C3 AI Workflows Configuration Guide
Set up workflows
The workflow authoring agent is automatically deployed as part of the Quick Start script. All Genai.Workflow.NodeTemplate instances seeded in the "default_toolkit" Genai.Workflow.NodeTemplateToolkit are available out-of-the-box.
You can view the available node templates directly from the workflows authoring UI by expanding the "Node Templates & Examples" panel.
Add new node templates
You can add custom node templates to the default toolkit, which applies to newly created workflows.
Agent node templates
To automatically generate node templates for each new agent deployment, run:
Genai.Workflow.Config.setConfigValue('createNodeTemplatesForAgentDeployments', true)When enabled, node templates for deployed agents are dynamically added to a workflow during workflow creation. These templates are not persisted to the default Genai.Workflow.NodeTemplateToolkit.
Author custom node templates
To create custom node templates, follow the step-by-step guide in: 02-Making-Custom-NodeTemplates.ipynb
Best practices:
- Avoid creating too many node templates. Large template sets can make the workflow authoring prompt overly large and reduce performance.
- If a node template outputs a native Python type, ensure it is correctly mapped in
Genai.Workflow.Config#nativeToResourceMapso it can be displayed in the UI.
Inputs
Workflows can be defined with either of the following input types:
- No inputs: for example, a workflow that begins with user input or an internet search.
- A single C3 Type input: for example, an alert-processing workflow that takes a single instance of a C3 Type entity such as
Alert.c3typas input.
C3 Type inputs
All types available through:
Genai.StructuredData.DataModelGraph.forName("default")can be used in workflows.
Test and schedule workflows
When testing a workflow from the UI that accepts a C3 Type input, the most recently created entity of that type is passed automatically.
When scheduling a workflow, it runs automatically for newly created entities within the last X minutes, where X is configurable in the UI.
Custom execution
You can execute a workflow that takes an entity as an input programmatically (for example, in an afterUpdate hook) using the following snippet:
input = workflow.getRequiredInputForAsyncAction(obj)
workflow.executeWorkflow(null, input)Example C3 Type input: file inputs
Workflows can be triggered automatically for new files.
To enable this behavior:
- Add the
Genai.SourceFiletype to the list of whitelisted types. - Create a new Genai.SourceCollection that points to the file URL.
- Configure a sync schedule for the source collection.
Debug broken workflows
If a workflow fails, its error message appears in the Workflows UI.
View full execution logs
You can access detailed execution logs, including inputs and outputs for every node, to help diagnose failures:
file = c3.Genai.Workflow.Observability.displayLogEntries(workflowExecution=workflow_execution, saveToLocal=False)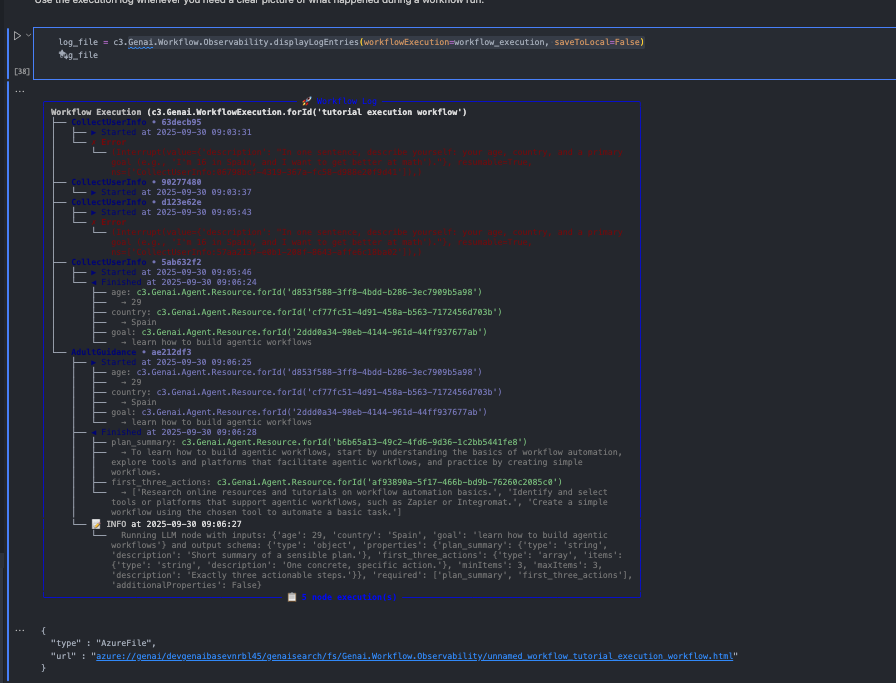
Additional configuration
Example queries and authoring patterns can be pre-seeded in Genai.Workflow.Config#examples. These examples appear under the "Node Templates & Examples" panel in the Workflows UI to guide end users.
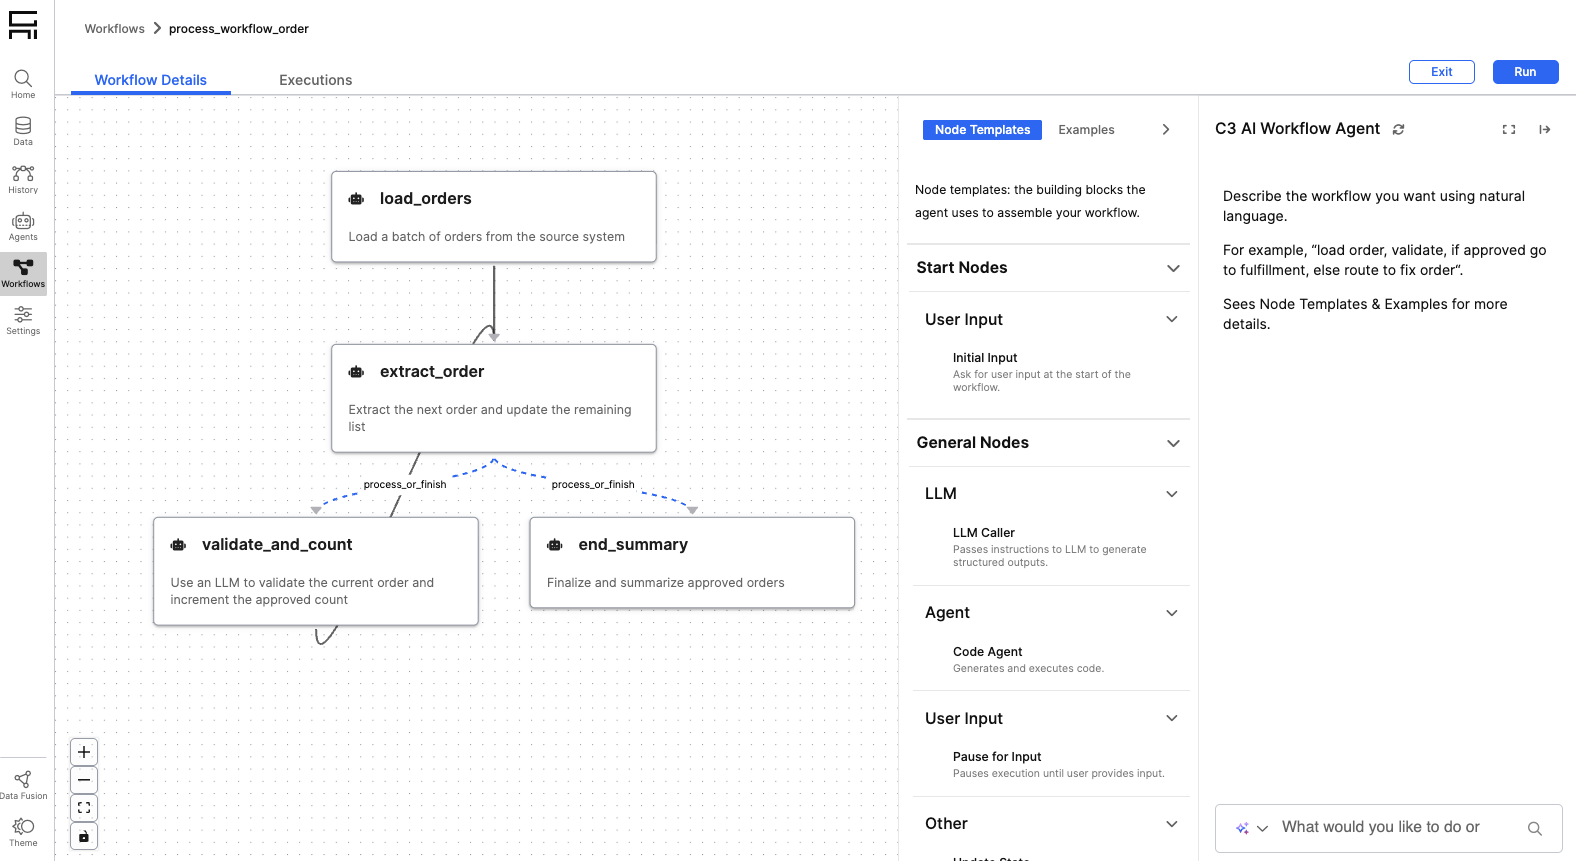
Workflow canvas interface reference
The workflow canvas provides a complete interface for building and managing workflows. This section documents the UI components and their functions.
Canvas layout
The workflow editing interface is divided into four main areas:
- Left side: Workflow canvas showing nodes and connections.
- Right side panels: Node Templates panel (when workflow is not published) and Node Configuration panel (when a node is selected).
- Right side chat: C3 AI Workflow Agent chat box for describing and modifying workflows in natural language (not shown when workflow is published).
- Bottom: Issues Footer Bar showing workflow validation status.
Node templates and examples panel
Located on the right side of the canvas (when the workflow is not published), this collapsible panel contains two tabs.
Node templates tab
Displays all available node templates organized by:
- Kind: Grouped sections like "Start Nodes" and "General Nodes".
- Category: Subcategories like "User Input", "Agent", "LLM", "Tool", and more.
Examples tab
Shows pre-built workflow examples configured in Genai.Workflow.Config#examples.
- Helpful for understanding common workflow patterns.
- Contains example workflows you can reference or use as templates.
C3 AI Workflow Agent chat box
Located on the far right side of the canvas, the Workflow Agent chat interface allows you to:
- Describe your workflow requirements in natural language.
- Modify existing workflows by conversing with the agent.
- Get suggestions and clarifications on workflow design.
Status:
- When workflow is in edit mode: Chat box is visible and active for workflow creation and modifications.
- When workflow is published: Chat box is hidden (published workflows cannot be modified through the agent).
Example interaction:
You: "Create a workflow that gets user email and sends a summary report"
Agent: "I'll create nodes for user input and email sending. Should the
summary be generated before sending?"Node configuration panel
When you select any node in the workflow canvas, the Node Configuration Panel opens on the right side with three tabs:
- Details tab: Read-only information including node name, description, template, category, icon, color, and node type.
- Variables tab: Shows input variables (name, type, description, configurable status) and output variables (name, type, description).
- Configuration tab: Editable parameters specific to the node template. Input types vary (text fields, dropdowns, JSON editors, checkboxes). Select Save to apply changes.
Issues footer bar
Located at the bottom of the workflow canvas, this bar shows workflow validation status:
- Issues display: Shows an exclamation triangle icon with a badge count (red when greater than 0). Select to view all issues found.
- Validate button: Manually triggers workflow validation through
checkReadiness()backend method. Returns{ isReady: true/false, issues: [list] }.
Node-level issue indicators
When issues exist, individual nodes show a red warning icon in the upper-right corner. Hover over the icon to see specific issues affecting that node.
Common issues include required parameters not filled, missing upstream input, type incompatibility with connected nodes, and invalid configuration values.
Work with node variables
Each workflow node has input and output variables that define data flow between nodes.
Understand variable types
Variables display:
- Name: Variable identifier (used in state mappings).
- Type: Data type (string, number, c3.TypeName, and more).
- Description: Purpose of this variable.
- Configurable: Whether this variable is configurable in the UI.
Add custom variables
For nodes with user-defined inputs or outputs:
- Select + Add Variable in the Variables tab.
- Enter:
- Variable name (snake_case).
- Type selector (string, number, object, and more).
- Description for clarity.
- Select Save.
The variable becomes available for edge connections to other nodes.
Common variable type issues
| Issue | Solution |
|---|---|
| Type mismatch error between nodes | Ensure source output type matches target input type. |
| Variable not appearing in edges | Verify variable is marked as "output" in source node. |
| Required variable missing | Add variable through "Add Variable" or node template. |
Parameter modification and validation
When you modify node parameters, the system validates immediately against node requirements, then re-checks the entire workflow for required fields, type compatibility, and circular dependencies. Red warning icons appear on affected nodes if issues are found. Saved parameters are applied when the node executes.
Hidden output toggle
Each node has an eye icon button that controls whether output appears on the execution results page. Select once to show output, select again to hide. Use this to hide intermediate processing outputs, sensitive data, or reduce storage.
Upload images to workflows
Workflows can accept image inputs that are uploaded during execution.
Image upload in workflow execution
To upload images during workflow execution:
- In the workflow execution panel, select the upload button next to the chat box.
- Choose images by selecting Select Files or dragging and dropping into the upload area.
- Select Upload to add images to the workflow context.
Images become available as inputs to downstream nodes.
Supported image types are PNG (.png), JPEG (.jpg, .jpeg), GIF (.gif), WebP (.webp), SVG (.svg)
Image nodes in workflows
After images are uploaded, you can create workflow nodes that read and process image content, extract information, transform images into structured outputs, or generate reports and summaries.