Configuring Structured Data Retrieval
Enabling structured data tools in C3 Generative AI lets you answer questions that rely on data from connected or integrated databases. Before users can query this data, an admin must configure which structured sources are available to the application. After setup, you can fine-tune several settings to improve retrieval accuracy and increase the chances of returning a useful answer.
This document covers configuration for CanvasAgent_default and CanvasAgent_deep_research. The project ids for these are default_canvas and deep_research and you can use these to initialize those agents. All other agents are instances of Dynamic Agent Canvas or Dynamic Agent Deep Research, so you can follow the same steps for any agent instance.
Prerequisites
Before you begin, ensure the following:
- You can access Jupyter Notebook and the Application C3 AI Console.
Open Jupyter Notebook
Open Jupyter Notebook from the C3 Generative AI Application card:
- Navigate to your application in C3 AI Studio.
- Select Jupyter Notebook.
- Set the
py-query_orchestrator_312runtime as the notebook kernel.
Fetching the data model
This tutorial assumes that you have uploaded structured data into your application.
The following example uses a database called SamplePublicFurnaceLocation, with a series of columns that specify the location of assets or furnaces. The data structure determines the data model.
| id | functionalLocation | country | city | latitude | longitude |
|---|---|---|---|---|---|
| CA-SF | CA-SF | US | SF. | 25.5050 | 45.8484 |
| FL-Houston | FL-Houston | US | Houston | 29.7601 | -95.0758 |
| FL-Hamburg | FL-Hamburg | Germany | Hamburg | 53.5488 | 9.9872 |
Setup structured retrieval
In a C3 Type, a whitelist is a defined set of allowed values for a field or method. When configuring the data model, be precise—if you omit a required Type, field, or metric, it won't be available to answer questions. If you include too many fields, the platform and language model may retrieve irrelevant information, reducing the quality of results. Structured retrieval can be accomplished using the following steps:
Set up the
white_listformat asjsonto match your data model:Pythonwhite_list = { "SamplePublicFurnaceLocation": { "fields": [ "id", "functionalLocation", "country", "city", "latitude", "longitude" ], } }As an optional step, use the
overrideDocumentationfield on your graph instance if you need to override the existing Type documentation.You must persist (
upsertormerge) the graph after updating this field for it to take effect. Create descriptions of the fields to improve retrieval performance of theoverrideDocumentationfield.Pythonoverride_doc_on_data_model_graph = { "SamplePublicFurnaceLocation": { "doc": ( "Furnaces work on a simple principle: instead of using electricity," "furnaces use heat to make electricity. " ), "fields": { "id": "The id of the furnace", "functionalLocation": "The region that the furnace is made in", "country": "The country furnace is made in. Use this field when the query asks about where the furnace is made in. DO NOT use this field if the question asks about the city.", "city": "The city furnace is made in. Use this field when the query asks about where the furnace is made in.", "latitude": "Use this field if the question asks about the city furnace is located in.", "longitude": "Use this field if the question asks about the city furnace is located in.", }, }, }Name your data model graph (for example,
furnaceDataModel) and set the Type of the Genai.StructuredData.DataModelGraph to that name. Refresh the graph with the whitelisted data model using the following code:Pythondata_model_graph_name = "furnaceDataModel" DATA_MODEL_GRAPH = c3.Genai.StructuredData.DataModelGraph.forName(data_model_graph_name) refreshGraph = True if not DATA_MODEL_GRAPH or refreshGraph: DATA_MODEL_GRAPH = ( c3.Genai.StructuredData.DataModelGraph( id=data_model_graph_name, name=data_model_graph_name, whitelistedDataModel=white_list, includeCollectionFields=True, overrideDocumentation=override_doc_on_data_model_graph, ) .upsert() .get() )Next, set up the dynamic agent use the refreshed data model. You must specify the
execute_retrieval_spec_tooltool for retrieving structured data. The following example also upserts afuzzy_match_string_values_toolthat adds the data model graph and specifies then_gram_sizeto four. Then_gram_sizefield instructs the LLM to match four characters from the query to the requested data model's field.Pythonexecute_retrieval_spec_tool = c3.Genai.Agent.Dynamic.Tool.make( { "id": "execute_retrieval_spec_new", "name": "execute_retrieval_spec_new", "pySrc": {"url": "meta://genAiBase/resource/tool/execute_retrieval_spec.py"}, "toolConfigurationParams": {"dataModelName": data_model_graph_name}, }, "descriptionForLlm":"a tool to retrieve structured data" ).upsert(returnInclude="this") fuzzy_match_string_values_tool = c3.Genai.Agent.Dynamic.Tool.make( { "id": "fuzzy_match_string_values_new", "name": "fuzzy_match_string_values_new", "pySrc": {"url": "meta://genAiBase/resource/tool/fuzzy_match_string_values.py"}, "toolConfigurationParams": { "fuzzyMatcherInitializationSpec": { "dataModelGraph": data_model_graph_name, "techniqueKwargs": {"n_gram_size": 4} }, "nValuesToRetrieve": 20, }, "descriptionForLlm":"a tool to fuzzy match queries" } ).upsert(returnInclude="this") fuzzy_match_string_values_tool.initialize()Add the new tools to your agent's toolkit and confirm it was done. You can start with checking for the new tools:
Pythonc3.Genai.Agent.Dynamic.Tool.fetch()Now, add those tools to the agent's toolkit and confirm it was done.
Pythontoolkit = c3.Genai.Agent.Dynamic.Toolkit( id="structured_retrieval_toolkit", name="structured_retrieval_toolkit", descriptionForUser="Toolkit for structured retrieval.", tools=[ execute_retrieval_spec_tool, fuzzy_match_string_values_tool ], ) toolkit = toolkit.upsert(returnInclude="this") c3.Genai.Agent.Dynamic.Toolkit.fetch(excludeMeta=True)The agent must now see the data model graph in its system prompt. You should add the
documentationfield which is part of the data model graph specified in Step 1.PythonNEW_SYSTEM_PROMPT = """ # C3 AI Agent You are an AI agent built by C3 AI, serving as the interface between users and their enterprise data and applications that can be accessed through tools. ## Tag Structure Wrap all responses in these tags: - `<thought> ... </thought>` - for internal reasoning, planning, or decision-making - `<execute> ... </execute>` - for executing Python code - `<solution> ... </solution>` - for delivering the final answer or asking the user for clarification ... ## Python Libraries Available You are allowed to use these libraries to address the user's query: - datetime - dateutil - time - numpy - pandas - matplotlib ## Toolkit {{toolkit}} ## Data Model Documentation {{documentation}} ## Additional Instructions {{instructions}} ## More Examples {{FEWSHOT_EXAMPLES}} """ DATA_MODEL_GRAPH_DOCS = DATA_MODEL_GRAPH.buildDataModelDocumentation( nExampleStringValues=3 ) SYSTEM_PROMPT = c3.Genai.Prompt.fromString(NEW_SYSTEM_PROMPT) SYSTEM_PROMPT = SYSTEM_PROMPT.withField("id", "structured_retrieval_agent_demo") SYSTEM_PROMPT.remove() SYSTEM_PROMPT = SYSTEM_PROMPT.upsert(returnInclude="this")After updating your system prompt:
- Initialize the agent and associate the toolkit with that agent
- Update the
chatManagerSpecwith the updated SYSTEM_PROMPT - Finally, terminate all engines running PyUtil processes.
Python# Create ChatManagerSpec with the Genai.Prompt object chat_manager_spec = c3.Genai.Agent.Dynamic.ChatManagerSpec(systemPrompt=SYSTEM_PROMPT) # Configure your agent # You can specify the name as "default_canvas" as well. agent = c3.Genai.Agent.Dynamic(name="deep_research") agent_config = agent.config() agent_config.setConfigValues({ "chatManagerSpec": chat_manager_spec})Check the data model to see that it was changed:
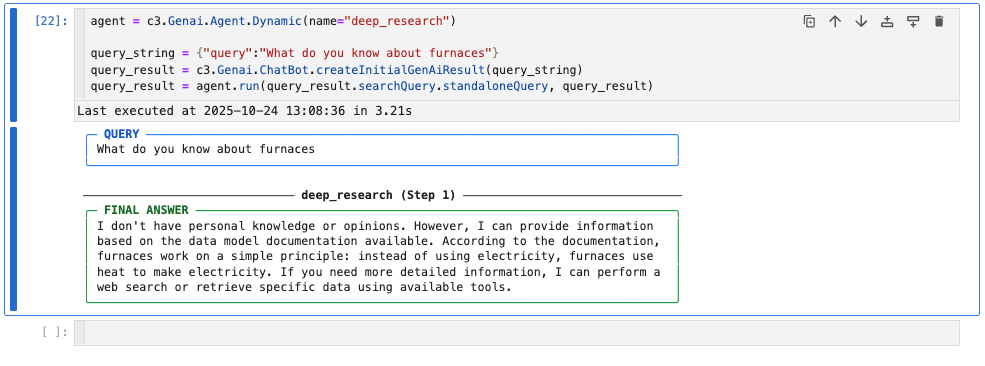
Pythonquery_string = {"query": "What do you know about furnaces"} query_result = c3.Genai.ChatBot.createInitialGenAiResult(query_string) query_result = agent.run(query_result.searchQuery.standaloneQuery, query_result)