Microsoft Fabric OneLake as an Azure File System
Microsoft Fabric OneLake provides an Azure‑compatible endpoint for accessing lakehouse storage. This endpoint allows you to interact with OneLake files using the same patterns and APIs as Azure Blob Storage or Azure Data Lake Storage (ADLS). When configured with C3 AI’s AzureFileSystem, OneLake can be mounted and accessed as a standard file system within the C3 AI Platform.
This guide explains how to connect a C3 AI application to Microsoft Fabric OneLake and use it like an Azure-compatible file system for reading/writing files, listing directories, and managing access.
Before You Begin
Ensure the following prerequisites are met:
- Access to a Microsoft Fabric Workspace and at least one Lakehouse.
- A C3 AI environment with permissions to configure FileSourceSystem.
- An Azure AD App Registration (Service Principal) if you plan to use client secret credentials.
Step 1: Create a Fabric Workspace and Lakehouse
Navigate to Microsoft Fabric and sign in with your Microsoft account.
If you do not already have a workspace to connect to, select the New workspace tile to create a new workspace. This opens the workspace creation dialog.
Choose a Fabric‑enabled workspace type:
- Fabric
- Fabric Trial
- Power BI Premium
Note Confirm workspace eligibility with your tenant administrator (if applicable). If you are not using a trial workspace, you may need administrator assistance to ensure the workspace is configured correctly and to evaluate any associated billing implications.
Navigate to the workspace where you want to store files and open the workspace.
Create a new Lakehouse if you do not have one. The Lakehouse stores files within your workspace.
Select + New item to create a new Lakehouse.
Provide a name for the Lakehouse. Enter a descriptive name that aligns with your project.
Select Create. The Lakehouse is added to your workspace and can now be used to store and manage files.
Step 2: Create a FileSourceSystem
In your application, you should create a FileSourceSystem for each Fabric Lakehouse you want to connect to.
Open your C3 AI application package and navigate to the directory where metadata definitions are stored.
Create a new FileSourceSystem metadata file similar to the following example:
In your package, go to: /metadata/FileSourceSystem/
Create a file such as: OneLakeFileSource.json
Define the FileSourceSystem configuration and add the following content to the file:
{
   "name": "OneLakeFileSource",
   "rootUrlOverride": "azure://<WORKSPACE_NAME>/<LAKEHOUSE_NAME>.Lakehouse/Files/"

}
Specify the workspace and Lakehouse identifiers. Replace <WORKSPACE_NAME> with the name of the workspace and <LAKEHOUSE_NAME> with the name of the Lakehouse.
You can also use GUIDs instead of names, which can particularly be helpful if the workspace or Lakehouse names contain special characters. You can find the workspace and Lakehouse GUIDs in the browser URL when viewing the Lakehouse (see below).
Example URL: https://app.fabric.microsoft.com/groups/<WORKSPACE_GUID>/lakehouses/<LAKEHOUSE_GUID>
In this case, if using GUIDs, your rootUrlOverride would be: "azure://<WORKSPACE_GUID>/<LAKEHOUSE_GUID>/Files/”
Note You should not include “.Lakehouse” in the URL when using GUIDs
- Create a FileSourceSystem specifically for the Lakehouse you want to connect. This avoids configuration conflicts.
Step 3: Choose an Authentication Method
You can authenticate to OneLake using one of the following methods:
Client Secret Credentials: Configure the following on AzureCredentials object for your source system:
- Client ID
- Client secret
- Tenant ID
Workload Identity (Azure clusters only): No client secret needed and this uses the Service Principal associated with your Azure Kubernetes Service (AKS) pod’s environment.
Note Use the same credentials or service principal for all Lakehouses within the same workspace, as they share the same underlying access requirements.
Client Secret Credentials
To use client secret credentials, you must have an application registration or service principal already created in Azure, and it must exist within the same Azure tenant as the Fabric Lakehouse you intend to access. If one does not exist, create a new application registration using the steps below.
Navigate to your Microsoft Azure Portal and sign in.
In Azure Portal → App registrations → New registration.
Fill in the name of the application and select Register.
Select the Overview tab on the left side of the panel.
Record the credentials of the application registration.
- Application (client) ID
- Directory (tenant) ID
On the left panel, navigate to Manage -> Certificates & secrets -> Client secrets
Create a client secret if you do not already have one.
Select + New client secret and fill in the description and expiration and select Add to create a new client secret.
Copy the secret value and store it in a secure location.
Navigate to Microsoft Fabric and select the workspace you created in Step 1: Create a Fabric Workspace and Lakehouse.
Note Do not navigate to the created Lakehouse. You want to give access to the entire workspace, not just the Lakehouse.
Select Manage access in the top right corner
Select Add people or groups and share the workspace with the name of your service principal/app registration.
Grant Viewer for read-only access, or use any other role to allow write permissions. See Workspace roles in Lakehouse for roles and permissions.
Set the credentials on the FileSourceSystem:
fss = c3.FileSourceSystem.forName("OneLakeFileSource")
# This name should match the previously created FileSourceSystem
# To use client secret credentials, set the client ID, tenant ID, and client secret recorded earlier.

client_id = "..."
tenant_id = "..."
client_secret = "..."

# Create and set the credentials.
# To access OneLake, you must set the endpoint to "blob.fabric.microsoft.com", and you must set storageCredentials.accountName to "onelake"

creds = {
    "type": "AzureCredentials",
    "endpoint": "blob.fabric.microsoft.com",
    "activeDirectoryId": tenant_id,
    "accessKey": client_id,
    "secretKey": client_secret,
    "storageCredentials": {
        "accountName": "onelake"
    }
}

fss.setCredentials(creds)
Workload Identity (Azure Clusters)
You can use Workload Identity authentication if you are running on an Azure cluster. This eliminates the need to manage client secret credentials. This method is supported when the service principal associated with your AKS pod’s environment variables is in the same Azure tenant as the Fabric workspace you need to access. You will need to identify the service principal to grant access to the workspace. If the service principal is not known, coordinate with your Operations team to obtain it or use Client Secret Credentials instead.
If you know the correct Service Principal to use, share the Fabric Workspace with the Service Principal and follow the instructions below.
Navigate to Microsoft Fabric and sign in.
Navigate to the Workspace you created in Step 1: Create a Fabric Workspace and Lakehouse.
Note Do not navigate to the created Lakehouse. You want to give access to the entire workspace, not just the Lakehouse.
Select Manage access in the top right corner,
Select Add people or groups and share the workspace with the name of your Service Principal
Grant the appropriate permissions according to Workspace roles in Lakehouse. For example, Viewer is for read-only access.
Set the credentials on the FileSourceSystem:
fss = c3.FileSourceSystem.forName("OneLakeFileSource")
# This name should match the previously created FileSourceSystem # To use workload identity, you do not need to set any credentials specific to your service principal.
# You simply need to set the endpoint and storage credentials name to the correct value to ensure that we access OneLake.
# Create and set the credentials.
# To access OneLake, you must set the endpoint to "blob.fabric.microsoft.com", and you must set storageCredentials.accountName to "onelake"
creds = {
"type": "AzureCredentials",
"endpoint": "blob.fabric.microsoft.com",
"storageCredentials": {
"accountName": "onelake"
}
}
fss.setCredentials(creds) Step 4: Mount a OneLake Path
Define a mount to constrain the connector to a specific directory. Create one mount per Lakehouse at a minimum. Mount to subfolders for finer control.
# In this case, you can set the mount to be the same as the rootUrlOverride.

workspace_name = "<WORKSPACE_NAME>"
lakehouse_name = "<LAKEHOUSE_NAME>"

# When setting the mount URL, if you want to access all files in the Lakehouse, you can remove the "myOneLakeRoot/" at the end, this is just an example of a restricted root directory to limit the scope of the connector's access
# The four parts that are necessary are the scheme ("azure://"), workspace name, Lakehouse name, and "Files" (this is the root of all files in your lakehouse, automatically created by Microsoft Fabric/OneLake)

mount_url = f"azure://{workspace_name}/{lakehouse_name}.Lakehouse/Files/myOneLakeRoot/"

# If you used GUIDs for your rootUrlOverride in the FileSourceSystem, you should do that here as well
# Get the Workspace and Lakehouse GUIDs from the URL in your browser address bar when viewing the Lakehouse
# For example, extract the IDs from a URL like this: "https://app.fabric.microsoft.com/groups/<WORKSPACE_GUID>/lakehouses/<LAKEHOUSE_GUID>"
# Uncomment if using GUIDs instead of names.
# We do not need the ".Lakehouse" in the URL when using GUIDs
# workspace_guid = "<WORKSPACE_GUID>"
# lakehouse_guid = "<LAKEHOUSE_GUID>"
# mount_url = f"azure://{workspace_guid}/{lakehouse_guid}/Files/myOneLakeRoot/"

c3.FileSystem.azure().setMount("oneLakeMount", mount_url) Step 5: Perform File Operations
Most operations that are supported by AzureFileSystem are available. The following example operations are covered in this guide:
- List Files
- Write to a New File
- Read File
- Write to New File in a Directory
- List Files on Non-Empty Root
- List Only on the Nested Directory only Shows One File
- List Again To Verify File is Deleted
List Files
Input
# List files on empty root:
c3.FileSystem.azure().listFiles(mount_url)
Output
{
  "type" : "ListFilesResult"
} Write to a New File
Input
# Write to new file:
f1 = c3.FileSystem.azure().makeFile(mount_url + "myTestFile1.txt")
f1.writeString("Test100")
Output
{
  "type" : "AzureFile",
  "url" : "azure://TestWorkspaceNT2/TestLakehouseNT2.Lakehouse/Files/myOneLakeRoot/myTestFile1.txt"
}
Read a File
Input
# Read a file
f1.readString()
Output
'Test100'
Write to A New File in a Directory
Input
# Write to new file in a directory
f2 = c3.FileSystem.azure().makeFile(mount_url + "myDir/myTestFile2.txt") f2.writeString("Test200") f2.readString()
Output
'Test200'
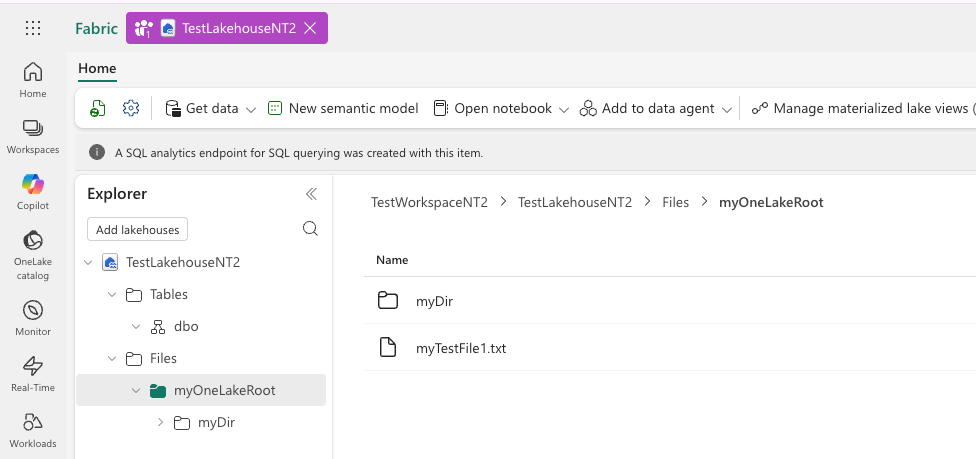 |
| File in the Lakehouse UI |
List Files on Non-Empty Root
Input
# List files on non empty root
c3.FileSystem.azure().listFiles(mount_url)
Output
{
  "type" : "ListFilesResult",
  "files" : [ {
    "contentLength" : 7,
    "eTag" : "0x8DE6B58FE6A2020",
    "lastModified" : "2026-02-13T23:38:30Z",
    "contentMD5" : "rldTlS99tLHVallC4IR2+Q==",
    "url" : "azure://TestWorkspaceNT2/TestLakehouseNT2.Lakehouse/Files/myOneLakeRoot/myDir/myTestFile2.txt"
  }, {
    "contentLength" : 7,
    "eTag" : "0x8DE6B58FD7464E8",
    "lastModified" : "2026-02-13T23:38:28Z",
    "contentMD5" : "8G5+mAGYETCGaaJNJno5XQ==",
    "url" : "azure://TestWorkspaceNT2/TestLakehouseNT2.Lakehouse/Files/myOneLakeRoot/myTestFile1.txt"
  } ]
} List Only On The Nested Directory Only Shows One File
Input
# Listing only on the nested directory only shows one file
c3.FileSystem.azure().listFiles(mount_url + "myDir/")
Output
{
  "type" : "ListFilesResult",
  "files" : [ {
    "contentLength" : 7,
    "eTag" : "0x8DE6B58FE6A2020",
    "lastModified" : "2026-02-13T23:38:30Z",
    "contentMD5" : "rldTlS99tLHVallC4IR2+Q==",
    "url" : "azure://TestWorkspaceNT2/TestLakehouseNT2.Lakehouse/Files/myOneLakeRoot/myDir/myTestFile2.txt"
  } ]
}List Again To Verify File is Deleted
Input
# List again. We see that the deleted file is no longer there
c3.FileSystem.azure().listFiles(mount_url)
Output
{
  "type" : "ListFilesResult",
  "files" : [ {
    "contentLength" : 7,
    "eTag" : "0x8DE6B58FE6A2020",
    "lastModified" : "2026-02-13T23:38:30Z",
    "contentMD5" : "rldTlS99tLHVallC4IR2+Q==",
    "url" : "azure://TestWorkspaceNT2/TestLakehouseNT2.Lakehouse/Files/myOneLakeRoot/myDir/myTestFile2.txt"
  } ]
}Accessing Raw Delta Lake Files in a Lakehouse (Advanced)
Recommended Usage It is recommended that applications should interact with the Lakehouse through the Files folder rather than directly accessing the raw Delta Lake storage. Direct access to the Tables directory should be reserved for advanced scenarios where the application explicitly manages Delta Lake file formats.
C3 AI applications can optionally access the underlying raw Delta Lake table files stored in a Lakehouse. This capability is intended for advanced use cases where direct interaction with the raw storage layer is required.
Mounting the Tables Directory
In addition to mounting the Files directory of a Lakehouse, you can also create a mount for the Tables directory. This allows applications to perform standard file system operations on the raw Delta Lake files. This is similar to the operations performed on the Files directory as described in Step 5.
Example:
tables_mount_url = f"azure://{workspace_name}/{lakehouse_name}.Lakehouse/Tables/"

c3.FileSystem.azure().setMount("OneLakeTablesMount", tables_mount_url)
After mounting, applications can interact with the directory using standard c3.FileSystem operations.
Important Considerations
The Tables directory contains the underlying storage representation of Delta Lake tables. These tables are composed of multiple files, including:
- Parquet data files
- Transaction log metadata (e.g., Delta Lake log files)
These files must be interpreted according to the Delta Lake specification because a single logical table may correspond to many data and metadata files.
For this reason:
- Accessing the Tables directory is not recommended for general usage.
- Applications should only access these files if they are specifically designed to correctly parse and manage Delta Lake table structures.