Azure Event Hubs Connector
The C3 Agentic AI Platform connector for Azure Event Hubs enables integration between C3 Agentic AI Platform applications and your Azure Event Hubs service.
When integrating with Azure Event Hubs in the context of data integration (consuming data to be persisted in a C3 AI Platform data store), it is recommended that you use the CloudMessageSourceSystem framework. The CloudMessageSourceSystem framework provides a codeless approach to consuming and ingesting messages from a variety of messaging systems including Azure Event Hubs, AWS Kinesis and Apache Kafka.
Prerequisites
Before using the Azure Event Hubs connector, ensure that you have access to an active Event Hubs namespace with one or more Hubs. See the Azure Event Hubs documentation for more information.
Register Azure Event Hubs credentials with the C3 Agentic AI Platform
Begin by defining the Event Hub cloud message broker name:
var ehResourceName = AzureEventHub.makeResourceName("EVENT_HUB_NAME", "EVENT_HUB_NAMESPACE", "RESOURCE_GROUP");Generate the configuration key from an AzureEventHub Type instance constructed using the broker name. Then, set the broker name as the configuration value:
var configKey = AzureEventHub.make({resourceName: ehResourceName}).configKey();
AzureEventHub.setConfigOrSecretValue(configKey, "resourceName", ehResourceName);
AzureEventHub.setConfigOrSecretValue(configKey, "external", true);Setting credentials using Service Principal
In this task, you configure authentication for your Azure resources using a service principal. This approach enhances security by allowing your application to authenticate without relying on user credentials.
Here's a step-by-step overview to guide you through the process:
Understand Service Principal authentication
A service principal is an identity created for use with applications, hosted services, and automated tools to access Azure resources. It uses a client ID and client secret for authentication.
Gather required information
Before you start, ensure you have the following details:
- Active Directory ID — Your Microsoft Entra ID Tenant ID
- Access Key — The Application (Client) ID for your registered application
- Secret Key — The client secret (application password) generated for your application
- Account ID — Your Azure subscription ID
- Region — The Azure region where your resources are located
Create the credentials object
Use the gathered information to create a credentials object in your code. Here’s a template to follow:
var credentials = {
  "type" : "AzureCredentials",
  "activeDirectoryId" : "< ACTIVE_DIRECTORY_ID >",
  "accessKey" : "< APPLICATION_ID >",
  "secretKey" : "< SECRET_ID >",
  "accountId" : "< SUBSCRIPTION_ID >",
  "region" : "< CLOUD_REGION >"
}Set credentials for your resource
Use the credentials object to authenticate your application with Azure resources. This typically involves calling a method like AzureEventHub.setCredentialsForResourceName, passing in the resource name and the credentials object.
Test your configuration
After setting up the credentials, run your application to ensure that it can successfully authenticate and interact with Azure resources. Monitor for any errors and adjust your configuration as needed.
Conclusion
By following these steps, you securely set up service principal authentication for your Azure resources, allowing your application to operate efficiently and safely.
Note on Azure Event Hub client creation
When the following three fields are provided, the code always attempt to use the service principal to create the Azure Event Hub client:
- activeDirectoryId
- secretKey
- accessKey
If you also intend to use a shared key while populating these fields, the code may still successfully create a client using the service principal. However, be aware that this client may have different roles compared to those assigned with the shared key.
Role assignment for Azure Event Hub access
After setting up credentials for users using a service principal in Azure, it is essential to assign the appropriate roles to ensure they can interact with Azure Event Hub effectively. Follow these steps:
Access the Azure Portal: Log in to the Azure Portal and navigate to your subscription.
Open Access Control (IAM): Select the subscription and go to the Access control (IAM) section.
Add Role Assignment:
a. Select + Add and choose Add role assignment.
b. Select the Azure Event Hub Owner role to grant full access.
Assign to Service Principal: Use the search option to find and select the service principal that requires access.
Verify Assignment: Confirm that the service principal appears in the Role assignments section, indicating successful permission setup.
This process ensures that users can send and receive messages through Azure Event Hub, facilitating seamless integration and functionality.
Steps to test sending and receiving messages in static console
After configuring authentication for Azure resources using a service principal, follow these steps to test sending and receiving messages in the static console:
Define Azure Event Hub resource
Specify the name of your Azure Event Hub resource. If you don't have one, create it as needed. This variable holds the name of your Azure Event Hub resource. Ensure it is correctly specified to match your setup.
eventHubResourceName = "<your_event_hub_resource_name>"Create a service principal credential
Create a service principal credential to authenticate and authorize access to Azure resources.
cred=AzureCredentials.make({
  activeDirectoryId: "<your_active_directory_id>",
  secretKey: "<your_client_secret>",
  description: "<description>",
  accountId: "<your_subscription_id>",
  accessKey: "<your_application_or_tenant_id>",
  region: "<your_region>",
})Set the credential
Assign the service principal credential to the CloudMessageSourceSystem to enable authenticated access to Azure resources. Use the setCredentials() method on the CloudMessageSourceSystem instance to assign the previously created service principal credential.
// create an instance of CloudMessageSourceSystem with the name "EventHub" using the make function
cmss=CloudMessageSourceSystem.make({
  "name": "EventHub"
})
//set the credentials
cmss.setCredentials(cred)Create a cloud message
Create a cloud message to be sent to the Azure Event Hub.
Use the CloudStreamMessage.make() method to create a new message with the specified parameters.
msg = CloudStreamMessage.make({
  id: "123",
})
By creating a cloud message with these parameters, you prepare a message that can be sent to the Azure Event Hub for processing.
Send the message
By using the DataIntegrator.sendObjs() method, you send the message to the Azure Event Hub, ensuring it is processed and delivered according to the specified parameters.
DataIntegrator.sendObjs({'type': 'AzureEventHub', 'resourceName': '<your_event_hur_resource_name>'}, [msg], {'batchSize': 100, 'contentType': "application/json"})Receive and verify the message on Azure portal
Receive and verify the messages sent to the Azure Event Hub, ensuring that the entire process from sending to receiving works correctly.
msgs=DataIntegrator.receiveMessages({'type': 'AzureEventHub', 'resourceName': '<your_event_hur_resource_name>'}, {'type': 'CloudStreamReceiveMessagesSpec', 'partition': "1", 'timeoutMillis': 1108, 'batchSize': 100})Setting credentials using accessKey
In this task, you configure authentication for accessing Azure Event Hubs using the access key method. This approach utilizes a general Azure credentials setup, which can encompass various authentication methods. Follow these steps to ensure a successful configuration:
Understand accessKey authentication
The access key method allows your application to authenticate with Azure resources using a key that grants access to the associated services.
Gather necessary information
Before proceeding, make sure you have the following details:
Active Directory ID — Your Microsoft Entra ID Tenant ID
Access Key — The key used for authentication, which may be a primary or secondary key
Secret Key — If applicable, this may refer to a client secret for additional security
Account ID — Your Azure subscription ID
Region — The Azure region where your resources are located
a. Shared Access Policy Name and Key: If using SAS, gather these details as well.
Create the credentials object
Use the information collected to create a credentials object in your code. Here's a template to follow:
var credentials = {
  "type": "AzureCredentials",
  "activeDirectoryId": "< ACTIVE_DIRECTORY_ID >", // Tenant ID
  "accessKey": "< ACCESS_KEY >", // Access key
  "secretKey": "< SECRET_ID >", // Optional client secret
  "accountId": "< SUBSCRIPTION_ID >", // Subscription ID
  "region": "< CLOUD_REGION >", // Azure region
  "sharedAccessPolicyName": "< SAS_POLICY_NAME >", // Required for SAS
  "sharedAccessPolicyKey": "< SAS_KEY >" // Required for SAS
}Set credentials for your resource
Use the credentials object to authenticate your application with Azure Event Hubs. This typically involves calling a method like AzureEventHub.setCredentialsForResourceName, passing in the resource name and the credentials object.
AzureEventHub.setCredentialsForResourceName(ehResourceName, credentials, ConfigOverride.APP);This is crucial for establishing a secure connection to an Azure Event Hub by applying the necessary credentials. It allows your application to authenticate and interact with the Event Hub, enabling you to manage and process events effectively.
Test your configuration
After setting up the credentials, run your application to ensure it can successfully authenticate and interact with Azure Event Hubs. Monitor for any errors and adjust your configuration as needed.
Conclusion
By following these steps, you securely set up authentication for Azure Event Hubs using the access key method. This approach allows your application to access resources efficiently while maintaining security.
Configuring an Azure Event Hub consumer
Configuring the C3 Agentic AI Platform to subscribe to an Azure Event Hub requires the following 3 steps:
- Configure the Types to model the messages consumed from the Event Hub.
- Configure
CloudMessageSourceSystemandCloudMessageSourceCollectionseed data. - Enable the
CloudMessageSourceCollectionto receive messages.
Additionally, the CloudInboundMessage Type can be configured to explicitly model an Event Hub consumer. CloudInboundMessage is a parametric Type requiring you to specify a Type that represents the messages consumed from the topic.
The following example defines and applies the configuration required by the C3 Agentic AI Platform to subscribe to the eh1 Event Hub available from Azure Event Hubs.
This example contains messages published to the eh1 hub with the following format:
{
  "Country": "USA",
  "City": "New York",
  "Date": "2023-05-11",
  "Temperature": 20,
  "Humidity": 60,
  "Wind Speed": 10,
  "Wind Direction": "NW",
  "Precipitation": 0,
  "Cloud Cover": 20,
  "Visibility": 10,
  "Pressure": 1013,
  "Dew Point": 10,
  "UV Index": 5,
  "Sunrise": "05:30",
  "Sunset": "20:15",
  "Moonrise": "22:00",
  "Moonset": "08:00",
  "Moon Phase": "Waning Gibbous",
  "Conditions": "Partly Cloudy",
  "Icon": "partly-cloudy-day"
}Configure the Types to model the messages consumed from the Event Hub
First, you must define your C3 AI Types to model the JSON format of the messages to be consumed from the Event Hub. This example has one Type, SourceWeatherDataMeasurement, to model according to the JSON message above.
/**
 * This type represents the raw data that will represent `WeatherDataMeasurement` information.
 */
type SourceWeatherDataMeasurement mixes Source  {

  Country: string

  City: string

  Date: datetime

  Temperature: int

  Humidity: int

  @ser(name="Wind Speed")
  WindSpeed: int

  @ser(name="Wind Direction")
  WindDirection: string

  Precipitation: int

  @ser(name="Cloud Cover")
  CloudCover: int

  Visibility: int

  Pressure: int

  @ser(name="Dew Point")
  DewPoint: int

  @ser(name="UV Index")
  UvIndex: int

  Sunrise: string

  Moonrise: string

  Moonset: string

  @ser(name="Moon Phase")
  MoonPhase: string

  Conditions: string

  Icon: string

}
Additional Types, transforms and Application Types may be required to fully capture the message models being consumed.
Configure the CloudMessageSourceSystem and CloudMessageSourceCollection Types to register the Event Hub
A CloudMessageSourceSystem is a means of organizing related CloudMessageSourceCollections.
A CloudMessageSourceSystem is created by specifying its name. For example, you can add the following EventHub.json to the \metadata\CloudMessageSourceSystem directory of your package:
{
    "name": "EventHub"
}
A CloudMessageSourceCollection represents a source collection that references a CloudMessageBroker and its related queue, topic, stream, etc.
The CloudMessageSourceCollection references a CloudMessageSourceSystem and contains information about how to process data received from that topic, as well as information required to connect to the topic.
For example, to model a CloudMessageSourceCollection called WeatherDataMeasurementSource, you can add the following WeatherDataMeasurementEventHub.json to the \metadata\CloudMessageSourceCollection directory of your package:
{
    "name": "WeatherDataMeasurementSource",
    "sourceSystem": {
        "type" : "CloudMessageSourceSystem",
        "name" : "EventHub"
    },
    "source": "SourceWeatherDataMeasurement",
    "external": true,
    "cloudMessageBrokerName": "eh1/c3-eventhub-testing/azv8qa-rsgp-c3-01",
    "cloudMessageBrokerType": "AzureEventHub",
    "batchSize": 10,
    "timeoutMillis": 5000
}
You can use the console to further configure CloudMessageSourceCollection using the SourceCollection.Config mixin. The following example specifies the content type, preferences for archiving records and the SourceCollectionProcessMode.
var src = CloudMessageSourceCollection.forName("WeatherDataMeasurementSource");
src.config()
.withContentTypeOverride("application/json")
.withDoNotChunk(true)
.withDoNotArchiveStatus(false)
.withDoNotArchiveSources(true)
.withDoNotArchiveFailedSources(false)
.withProcessMode("ON_ARRIVAL")
.setConfig()Enable the CloudMessageSourceCollection to receive messages
The following commands tell the platform to subscribe to the Event Hub and process messages as they arrive into the broker in real time:
src.register()
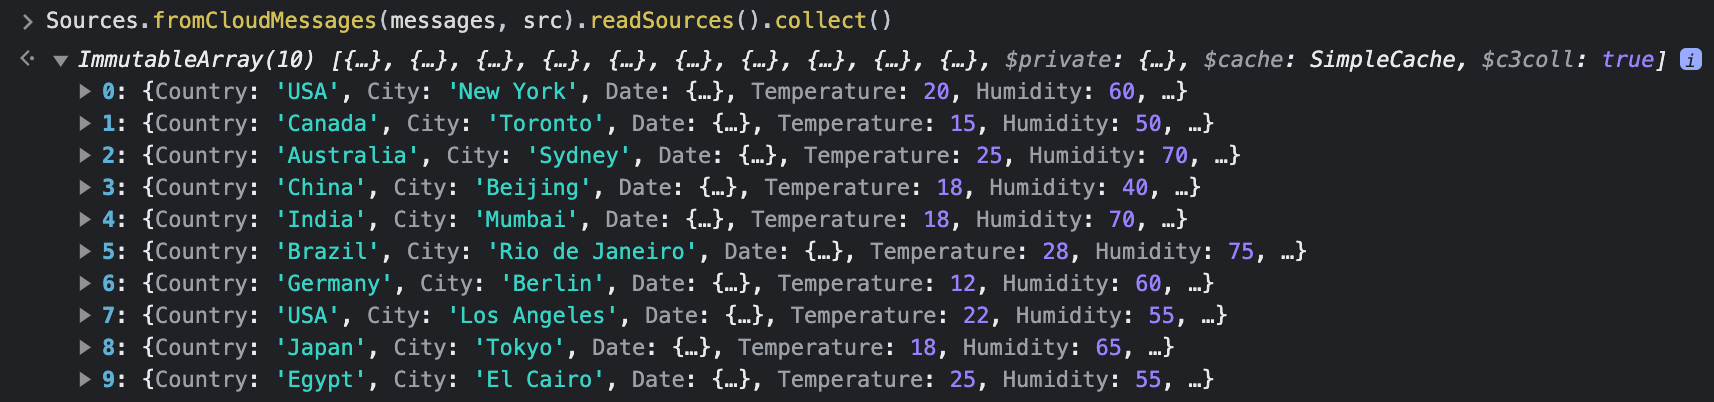
src.startOnArrivalMode()To verify that messages are being received, you can create an instance of the AzureEventHub Type using your resource name and call the receiveMessages() method. Be sure to include the Partition of the Event Hub that you want to read messages from. For more information, see the Partition section of the Features and terminology in Azure Event Hubs topic in the Azure Event Hubs documentation.
broker = AzureEventHub.fromResourceName(ehResourceName);
messages = broker.receiveMessages({partition: 0})
Messages are stored as a JavaScript ArrayBuffer, which can be read as objects by running the following command:
Sources.fromCloudMessages(messages, src).readSources().collect();This only works if sources are not archived. Otherwise, messages are consumed upon receipt and cannot be read.
Configure a CloudInboundMessage Type and link to Event Hub
To model an Event Hub consumer and configure downstream processing, you can create a CloudInboundMessage Type. Mixing in CloudInboundMessage indicates that the Type is an Event Hub consumer.
As messages are consumed from the eh1 topic, they are dispatched to the SourceOrdersInboundQueue.process() method for processing.
Configuring the C3 Agentic AI Platform to publish to an Event Hub requires the following 4 steps:
type SourceWeatherDataMeasurementInboundQueue mixes CloudInboundMessage<SourceWeatherDataMeasurement> {

  process: ~ js-server

}
Implement the process method in SourceWeatherDataMeasurementInboundQueue.js, which persists data to the WeatherDataMeasurement Type.
function process(messages) {

    var array = WeatherDataMeasurement.array();
    var meas;

    messages.forEach(function (msg) {

      meas = WeatherDataMeasurement.make({
        country: msg.Country,
        city: msg.City,
        date: msg.Date,
        temperature: msg.Temperature,
        humidity: msg.Humidity,
        windSpeed: msg.WindSpeed,
        windDirection: msg.WindDirection,
        precipitation: msg.Precipitation,
        cloudCover: msg.CloudCover,
        visibility: msg.Visibility,
        pressure: msg.Pressure,
        dewPoint: msg.DewPoint,
        uvIndex: msg.UvIndex,
        sunrise: msg.Sunrise,
        moonrise: msg.Moonrise,
        moonset: msg.Moonset,
        moonPhase: msg.MoonPhase,
        conditions: msg.Conditions,
        icon: msg.Icon
      });

      array.push(meas);

    })

    try {
      WeatherDataMeasurement.createBatch(array);
    } catch (e) {
      log.info(e.message);
    }
  }
Next, associate the SourceWeatherDataMeasurementInboundQueue Type with the eh1 Event Hub.
SourceWeatherDataMeasurementInboundQueue.setBrokerName(ehResourceName, "AzureEventHub");
SourceWeatherDataMeasurementInboundQueue.setBatchSize(10);
SourceWeatherDataMeasurementInboundQueue.setTimeoutMillis(5000);
CloudMessageDispatcherConfig.clearCache();
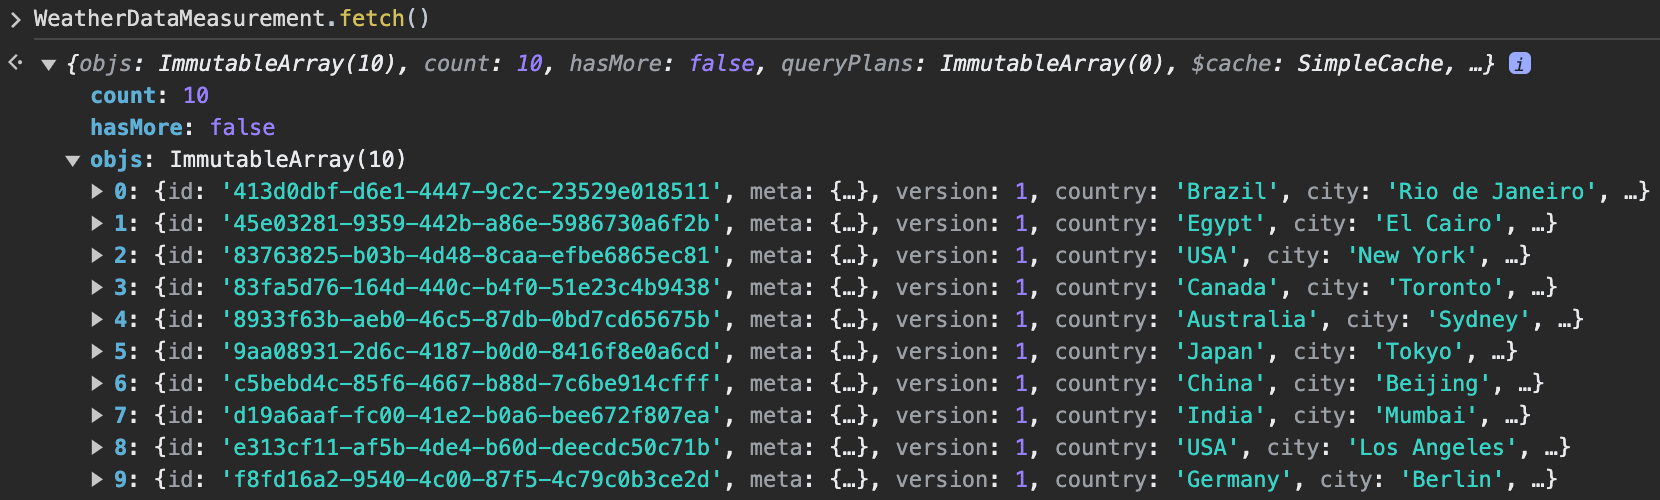
SourceWeatherDataMeasurementInboundQueue.register();You should now see data populate in the WeatherDataMeasurement Type.
Configure an Azure Event Hubs Producer
The steps to configure the C3 Agentic AI Platform to publish to an Event Hub are nearly identical to those for consuming messages from an Event Hub.
You can configure a C3 AI CloudOutboundMessage Type to explicitly model an Event Hub producer. Additionally, you can publish messages with the same structure as the ones consumed from the topic. This lets you reuse the SourceWeatherDataMeasurement Type in the CloudOutboundMessage parametric Type.
Configure a CloudOutboundMessage Type and link to Event Hub
Mixing in CloudOutboundMessage indicates that the Type is an Event Hub producer.
type SourceWeatherDataMeasurementOutboundQueue mixes CloudOutboundMessage<SourceWeatherDataMeasurement>Next, associate the SourceWeatherDataMeasurementOutboundQueue Type with the eh1 Event Hub.
SourceWeatherDataMeasurementOutboundQueue.setBrokerName("eh1/c3-eventhub-testing/azv8qa-rsgp-c3-01", "AzureEventHub");
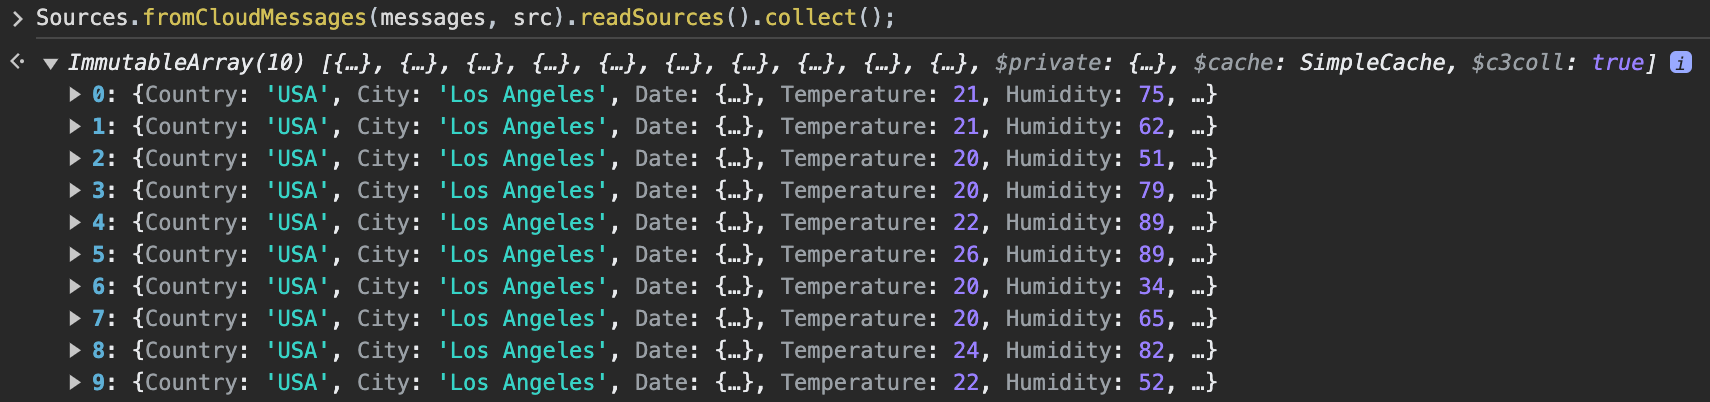
SourceWeatherDataMeasurementOutboundQueue.setBatchSize(10);Lastly, publish messages to the eh1 Event Hub by invoking the SourceWeatherDataMeasurementOutboundQueue.sendBatch() method. The following code generates sample data and publishes it to the eh1 Event Hub.
function createMeasurements(city, country, date) {
  var cAry = C3.ArrayBuilder.fromJson({type: 'ArrayBuilder<SourceWeatherDataMeasurement>'});
  var partition = 1;
  var meas;
  var t = DateTime.fromString(date);

  for (var i=0; i < 10; i++) {
    t = t.plusDays(1);

    meas = SourceWeatherDataMeasurement.make({
        Country: country,
        City: city,
        Date: t,
        Temperature: randomBetween(18, 28),
        Humidity: randomBetween(20, 90),
        WindSpeed: randomBetween(2, 20),
        WindDirection: "SW",
        Precipitation: randomBetween(0, 15),
        CloudCover: randomBetween(0, 10),
        Visibility: randomBetween(25, 50),
        Pressure: randomBetween(900, 1200),
        DewPoint: randomBetween(0, 40),
        UvIndex: randomBetween(0, 10),
        Sunrise: "05:25",
        Moonrise: "21:00",
        Moonset: "09:00",
        MoonPhase: "Waning Gibbous",
        Conditions: "Sunny",
        Icon: "clear-day"
      });

    cAry.push(meas);
  }

  SourceWeatherDataMeasurementOutboundQueue.sendBatch(cAry.build(), partition);
}

function randomBetween(min,max) {
    return Math.floor(Math.random()*(max-min+1)+min);
}

createMeasurements("Los Angeles", "USA", "2023-06-01");
You can verify that the messages were published to the Event Hub.