Manage Application State
The UI infrastructure uses actions, reducers, and epics to manage the application state. Application state allows for components to be interactive, talk to each other, and more. Managing the application state is similar to Redux state management. The goal of this section is to understand how the state is managed in C3 AI UI infrastructure.
Overview of Redux
Redux uses actions and reducers to modify a global state. A global state is like a centralized storage for data which holds the application state. An application state is essentially the data structure that holds data for your application. With Redux, you can manage your state (which is manipulating and updating the application state).
With state management, you can:
- Store: Hold the state of the application.
- Actions: Describe the state change. They do not change the state.
- Reducers: Implement functions that take an action and directly change the state.
For more on Redux architecture, see Concepts and Data Flow.
Trigger epic with component's action
Components often use and manipulate states with actions and reducers. They can come with a pre-defined set of actions and reducers or you can create custom actions and reducers. Those actions can be used to trigger an epic. Epics allow for customizations or managing the state like filtering a table with a filter panel or deleting an event through a modal.
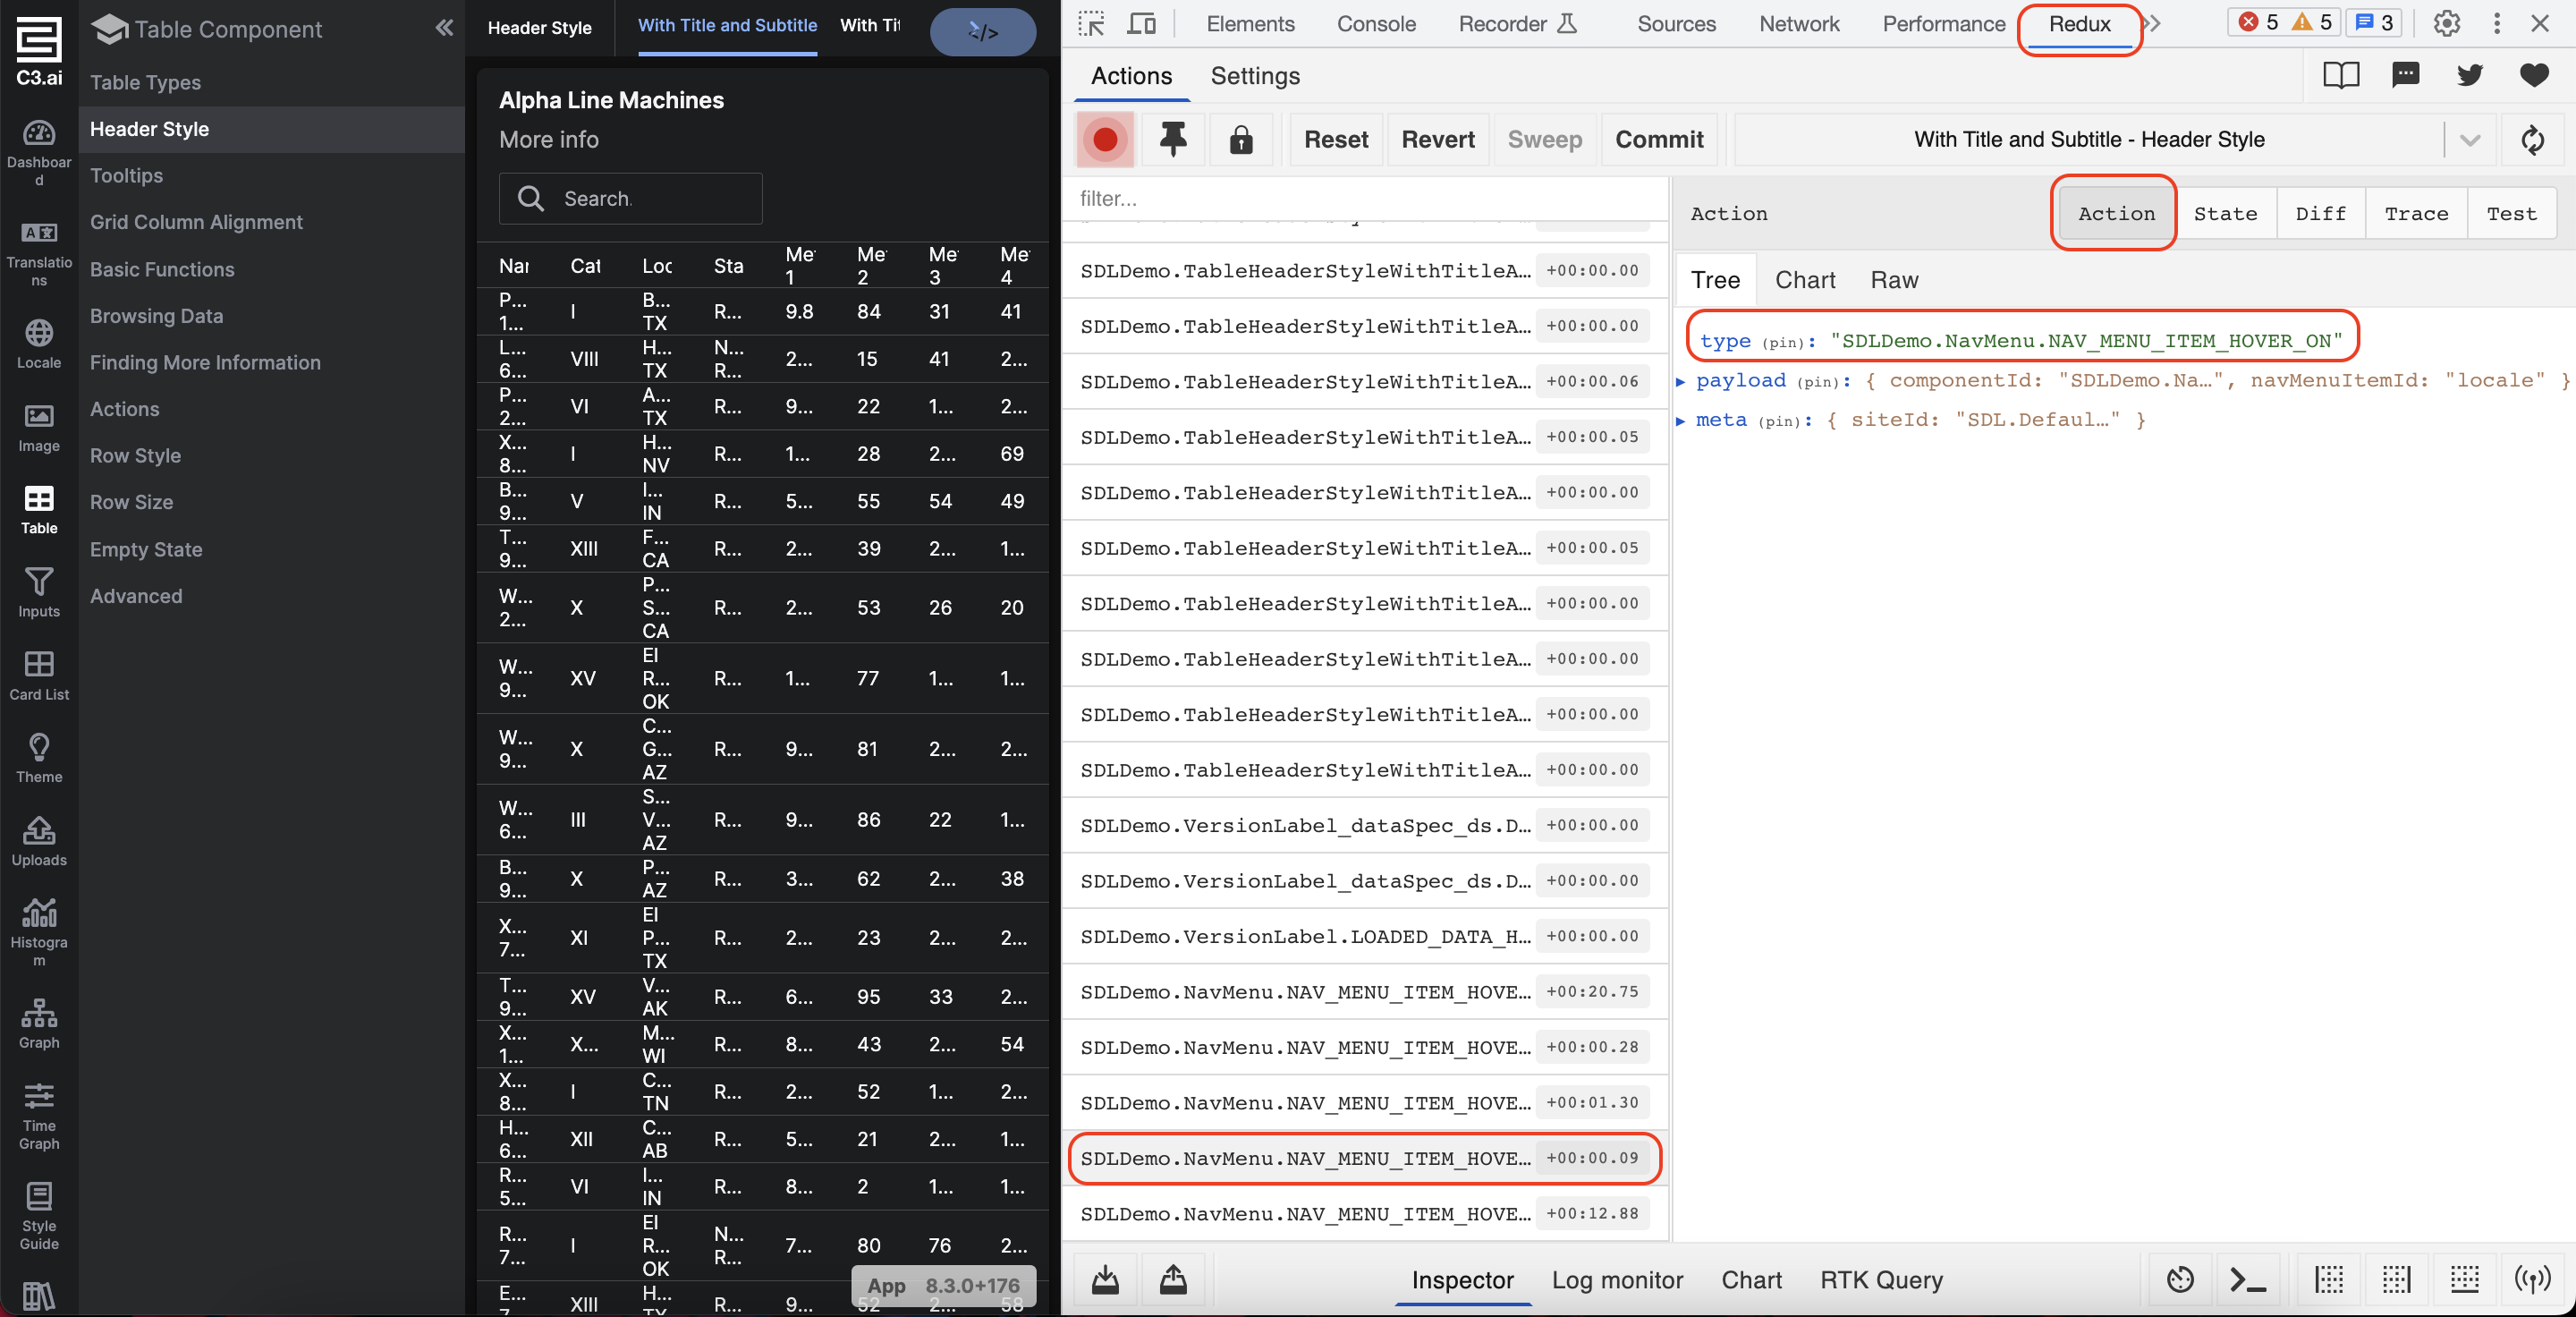
To see the pre-defined set of actions:
- Open the Redux developer tools and go to the Actions tab. This is where you can see the triggered actions. You can also select the action to see more information.
- Interact with the component to see the pre-defined actions.
In the following image:
- The user opens the Redux developer tools and the Actions tab is open.
- The user hovers over the options in the navigational menu and the action
NAV_MENU_ITEM_HOVER_ONis populated. - Select the action to see more information.
State, actions, and reducers
The UiSdlApplicationState is a Type that contains a collection of actions and reducers. To create your custom action and reducers, create your own UiSdlApplicationState Type and mixes with UiSdlApplicationState.
This is an example of how an action called PRIMARY_BUTTON_CLICK triggers an epic called DemoEpicDeleteAfterExample.
For more details on what is happening: The exampleUI.customHeaderModal is the ID (an IDof a component is the filename) of the component that has the action PRIMARY_BUTTON_CLICK. This triggers an epic called DemoEpicDeleteAfterExample. This epic is going to delete an object in the table component that has the ID exampleUI.MachineList. The exampleUI.UiSdlApplicationStateEUI is a custom application state for this specific application; custom application states are remixed with the UiSdlApplicationState Type. The MERGE in the payloadStrategy is saying to merge the two different application states. The other main option is OVERRIDE where the application state will be overridden.
    "effectTriggers": [
      {
        "trigger":"exampleUI.customHeaderModal.PRIMARY_BUTTON_CLICK",
        "effectType": "DemoEpicDeleteAfterExample",
        "payload": {
          "componentId": "exampleUI.UiSdlApplicationStateEUI",
          "tableToRefresh": "exampleUI.MachineList"
        },
        "payloadStrategy":"MERGE"
      }
]Actions and reducers
To create actions and reducers, you must create two files with the same name:
myApplicationStateCollections.c3typ: declare the actions and reducers.myApplicationStateCollections.ts: write the actions and reducers.
Inside myApplicationStateCollection.c3typ, you must declare the Application State as a Type and must mixes with UiSdlApplicationState.
It is best practice to declare the action before the reducer.
The following code block is the implementation for myApplicationStateCollection.c3typ.
@typeScript
type myApplicationStateCollections mixes UiSdlApplicationState {
  machineStatus: string = 'RUNNING' // field with default value
  /*
   * Listens for actions of type 'ROW_RECORD_STORE'
   */
  @uiSdlActionCreator(actionType='ROW_RECORD_STORE')
  @typeScript(env="client")
  storeRowRecordAction: function(id: string, obj1: json): UiSdlReduxAction

  @typeScript(env="client")
  @uiSdlReducer(actionType='ROW_RECORD_STORE')
  rowRecordStoreReducer: private inlinefunction(
    state: !UiSdlReduxState, action: UiSdlReduxAction
    ): UiSdlReduxState
}
The following code block is the implementation for myApplicationStateCollections.ts.
import { setConfigInApplicationState } from '@c3/ui/UiSdlApplicationState';

export function storeRowRecordAction(id, obj) {
  return {
    type: id + '.ROW_RECORD_STORE',
    payload: {
      applicationStateId: id,
      obj: obj
    }
  }
}

export function rowRecordStoreReducer(state, action) {
  const appStateId = action.payload.applicationStateId;
  return setConfigInApplicationState(
    appStateId, state, ['rowRecord'], action.payload
  );
}Access the application state
For the components to have access to application state, you must:
- Create the JSON file with the application state Type.
- Add the application state to the content JSON file.
Step 1 - Create the JSON file with the application state type
Under ui>c3>meta, create a file for the application state:
// exampleUI.UiSdlApplicationStateEUI.json
{
  "type":"myApplicationStateCollections"
}
The myApplicationStateCollections refers to the type you declared that holds all of the reducers and actions. The code block myApplicationStateCollections refers to the application state Type that is created in the previous example: myApplicationStateCollections.c3typ. Default values defined on the type are automatically included in your application state, or can be overridden in the json file.
Step 2 - Add the application state to the content JSON file
To allow components to have access to the application state, you must incorporate the field: applicationStateRef.
For example, the modal might want to read from the application state to grab specific data that is rendered when the page is loaded. For a modal file to have access to the application state, you incorporate the applicationStateRef in the exampleUI.HomeContent.json file.
"applicationStateRef": {
  "id":"exampleUI.UiSdlApplicationStateEUI.json"
}// exampleUI.HomeContent.json"
{
"type": "UiSdlConnected<UiSdlLayoutBase>",
"applicationStateRef": {
"id":"exampleUI.UiSdlApplicationStateEUI"
},
"component": {
"children": [
{
"id": "exampleUI.MachineList"
},
{
"id": "exampleUI.customHeaderModal"
}
]
}
}This file now has access to the application state.
Best Practices: The Application State is included in content JSON files instead of directly incorporating it into components.
Epics
Epics call and use actions and reducers to read and write to the state. Epics are written to perform function epic(action, state) => new state.
Organize epics within packageName/src/epics folder.
When creating a custom epic, create two files with the extensions c3typ and ts:
DemoEpicDeleteEvent.c3typ: Declare the custom epic.DemoEpicDeleteEvent.ts: Implement the custom epic function.
Naming Convention: Include "Epic" in the filename of all epic files. For example, DemoDeleteEvent is not a valid epic filename. However, DemoEpicDeleteEvent is a valid epic filename because it includes the word "Epic".
Previously, we mentioned that epics write and read into the state and grab data from the state by calling actions and reducers.
Epics use actions to store information in the application state.
For example:
//...
import { storeRowRecordAction } from '@c3/ui/myApplicationStateCollections'

// Overrides the epic method
export function epic(actionStream, _stateStream) {
  return actionStream.pipe(
    mergeMap(function (action) {
      ...
        return concat(
            ...
            of(storeRowRecordAction(...))
            );
      }
    )
  )
}
Epics can also grab information from the state; epics call getConfigFromApplicationState(applicationState, state, reducer).
To use getConfigFromApplicationState, import the function:
import {getConfigFromApplicationState} from '@c3/ui/UiSdlApplicationState';
@typeScript
type myApplicationStateCollections mixes UiSdlApplicationState {
/*
* Listens for actions of type 'ROW_RECORD_STORE'
* "myApplicationStateCollections.c3typ"
*/
 @typeScript(env="client")
 @uiSdlReducer(actionType='ROW_RECORD_STORE')
 rowRecordStoreReducer: private inline function(
   state: !UiSdlReduxState, action: UiSdlReduxAction
  ): UiSdlReduxState

 @uiSdlActionCreator(actionType='ROW_RECORD_STORE')
 @typeScript(env="client")
 storeRowRecordAction: function(id: string, obj1: json): UiSdlReduxAction
}// myApplicationStateCollections.ts
import { setConfigInApplicationState } from '@c3/ui/UiSdlApplicationState';
export function rowRecordStoreReducer(state, action) {
const appStateId = action.payload.applicationStateId;
return setConfigInApplicationState(appStateId, state, ['rowRecord'], action.payload);
}
export function storeRowRecordAction(id, obj) {
return {
type: id + '.ROW_RECORD_STORE',
payload: {
applicationStateId: id,
obj: obj
}
}
}Create a custom application state
The following example demonstrates how to create a custom application state that manipulates data and interacts with other components. In the example, the application state keeps track of the data for how many times a button was clicked and translated, or the modal also has access to the application state and showcases the total number of times the user selects the button. This example showcases how multiple components can read from the same application state.
When managing the application state, create two files with the extensions c3typ and ts:
ApplicationState<applicationName>.c3typ: Declare the reducers and actions.ApplicationState<ApplicationName>.ts: Implement the reducers and actions.
To create a custom application state that is accessible to other components:
Create a file,
src/ui/ApplicationStateDemo.c3typ. To interact with the application state and to track the button count, declare actions, reducers, and other fields.TypeScript@typeScript type ApplicationStateDemo mixes UiSdlApplicationState { /** * Map between the buttonId and the number of clicks made on a button */ buttonClickCount: private map<string, int> /** * Triggered when we want to increase the click count when clicking on a button */ @typeScript(env="client") @uiSdlActionCreator(actionType='CLICK_COUNT_INCREASE') increaseClickCountAction: private function(buttonComponentId: string, componentId: string): UiSdlReduxAction /** * Listens for actions of type `CLICK_COUNT_INCREASE`, and increases the click count for the * given button metadata ID * * @param state * Redux state * @param action * Redux action * @returns a new Redux state */ @typeScript(env="client") @uiSdlReducer(actionType='CLICK_COUNT_INCREASE') clickCountIncreaseEffect: private inline function(state: !UiSdlReduxState, action: UiSdlReduxAction): UiSdlReduxState }Create a file,
src/ui/UiSdlApplicationStateDemo.tsto implement the function that tracks how many times a user selects a button.TypeScriptimport { setConfigInApplicationState, getConfigFromApplicationState } from '@c3/ui/UiSdlApplicationState'; function increaseClickCountAction(buttonId, componentId) { return { type: componentId + '.' + 'CLICK_COUNT_INCREASE', payload: { buttonId: buttonId, componentId: componentId, }, }; } function getCount(componentId, state, statePath) { let count = getConfigFromApplicationState(componentId, state, statePath); if (typeof count === 'undefined') { count = 0; } return count; } function clickCountIncreaseEffect(state, action) { const buttonClickStatePath = ['buttonClickCount', action.payload.buttonId]; const uiStateId = action.payload.componentId; const buttonCount = getCount(uiStateId, state, buttonClickStatePath); return setConfigInApplicationState(uiStateId, state, buttonClickStatePath, buttonCount + 1); }Create
ui/c3/meta/MyApplication.ApplicationStateButton.jsonto show a button. The number of times a user selects this button shows up on a modal. The modal is created in the next sections.JSON{ "type" : "UiSdlConnected<UiSdlButton>", "component" : { "content" : "Select" } }Create
ui/c3/meta/MyApplication.ApplicationStateModal.jsonto display a modal component when the button is selected.JSON{ "type" : "UiSdlConnected<UiSdlModal>", "component" : { "size" : "TINY", "modalType" : { "type" : "UiSdlOneButtonModal", "primaryButtonLabel" : "OK" } } }Create
ui/c3/meta/MyApplication.ApplicationStateDemoComponent.jsonto compose all the files you created in the previous steps and reference the application state.- The
applicationStateReffield references the application state. - The
childrenarray under thecomponentfield references the button and modal components. - The
effectTriggersdefines what your actions and reducers are called.
JSON{ "type" : "UiSdlConnected<UiSdlContainer>", "component" : { "children" : [ { "id" : "MyApplication.ApplicationStateButton" }, { "id" : "MyApplication.ApplicationStateModal" } ] }, "effectTriggers" : [ { "trigger" : "MyApplication.ApplicationStateButton.BUTTON_CLICK", "actions" : [ { "type" : "MyApplication.ApplicationStateDemo.CLICK_COUNT_INCREASE", "payload" : { "buttonId" : "MyApplication.ApplicationStateButton" } } ] }, { "trigger" : "MyApplication.ApplicationStateDemo.CLICK_COUNT_INCREASE", "actions" : [ { "type" : "MyApplication.ApplicationStateModal.MODAL_CONTENT_UPDATE", "payload" : { "content" : { "dynamicValue" : "MyApplication.ApplicationStateModal.content", "vars" : { "numTimesClicked" : { "type" : "UiSdlApplicationStateValueParam", "id" : "MyApplication.ApplicationStateDemo", "path" : "buttonClickCount", "action" : "statePathValue.get('MyApplication.ApplicationStateButton')" } } } } }, { "type" : "MyApplication.ApplicationStateModal.MODAL_OPEN" } ] } ], "applicationStateRef" : { "type" : "UiSdlApplicationStateRef", "id" : "MyApplication.ApplicationStateDemo" } }- When you select the button, the
MyApplication.ApplicationStateButton.BUTTON_CLICKis called and triggers theMyApplication.ApplicationStateDemo.CLICK_COUNT_INCREASEaction. - The action calls the
CLICK_COUNT_INCREASEreducer which is defined asclickCountIncreaseEffectinsrc/ui/ApplicationStateDemo.c3typand updates the application state with a new total of times the users selects the button. - By triggering the
MyApplication.ApplicationStateDemo.CLICK_COUNT_INCREASEaction, theMyApplication.ApplicationStateModal.MODAL_CONTENT_UPDATEreducer triggers which opens a modal. - The total sum shown in the modal is the value of the
buttonClickCountfield which is stored within the application state.
- The
Additional resources
To find built-in actions, reducers, and epics, go to the documentation page In the Developer Portal or on the application console, run command: c3ShowType(<ComponentName>) and select on the Index tab.