File Explorer in C3 AI Studio
File Explorer provides a centralized interface for browsing and managing files within the storage mounts configured for an application. You can use File Explorer to navigate directories, inspect file metadata, upload files, create directories, select multiple files, and copy, move, delete, download, or preview files.
A mount represents a configured storage location that maps File Explorer to an external storage provider. Supported providers include Azure Blob Storage, Google Cloud Storage (GCS), Amazon S3, OneDrive, SharePoint, and Google Drive. Each mount acts as an entry point into a storage location that has been made available to the current application.
All mounts and file operations in File Explorer are application-scoped. File Explorer displays and operates only against the mounts configured for the currently selected application.
File Explorer provides direct access to mounted storage locations for operational file management. Unlike Data Fusion connectors and Source Collections, File Explorer does not configure or trigger ingestion pipelines, synchronization jobs, Source Collections, or transformation processing.
The File Explorer interface includes:
- A mounts view for accessing configured storage locations
- A directory tree for navigating folders
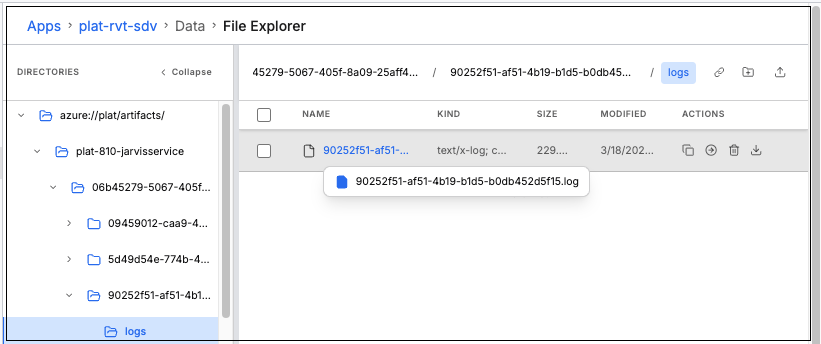
- A file list for browsing directory contents
- Toolbar actions for directory-level operations (create directory, upload files, copy path to clipboard)
- Per-row actions for managing individual files and directories, and bulk actions for operating on multiple selected items (copy, move, delete, download)
Available functionality is the same across all storage providers. Your application permissions and whether a mount is read-only can still affect which operations succeed:
- Your application permissions determine which mounts and operations are available to you.
- Write operations (create directory, upload, copy, move, delete) return an error on read-only mounts. The interface always shows these actions; it does not hide or disable them for read-only mounts.
Navigate to File Explorer
Complete the following steps to view the File Explorer for an application:
- In C3 AI Studio, navigate to the Apps page.
- Select an application.
- Click on Data and select File Explorer.
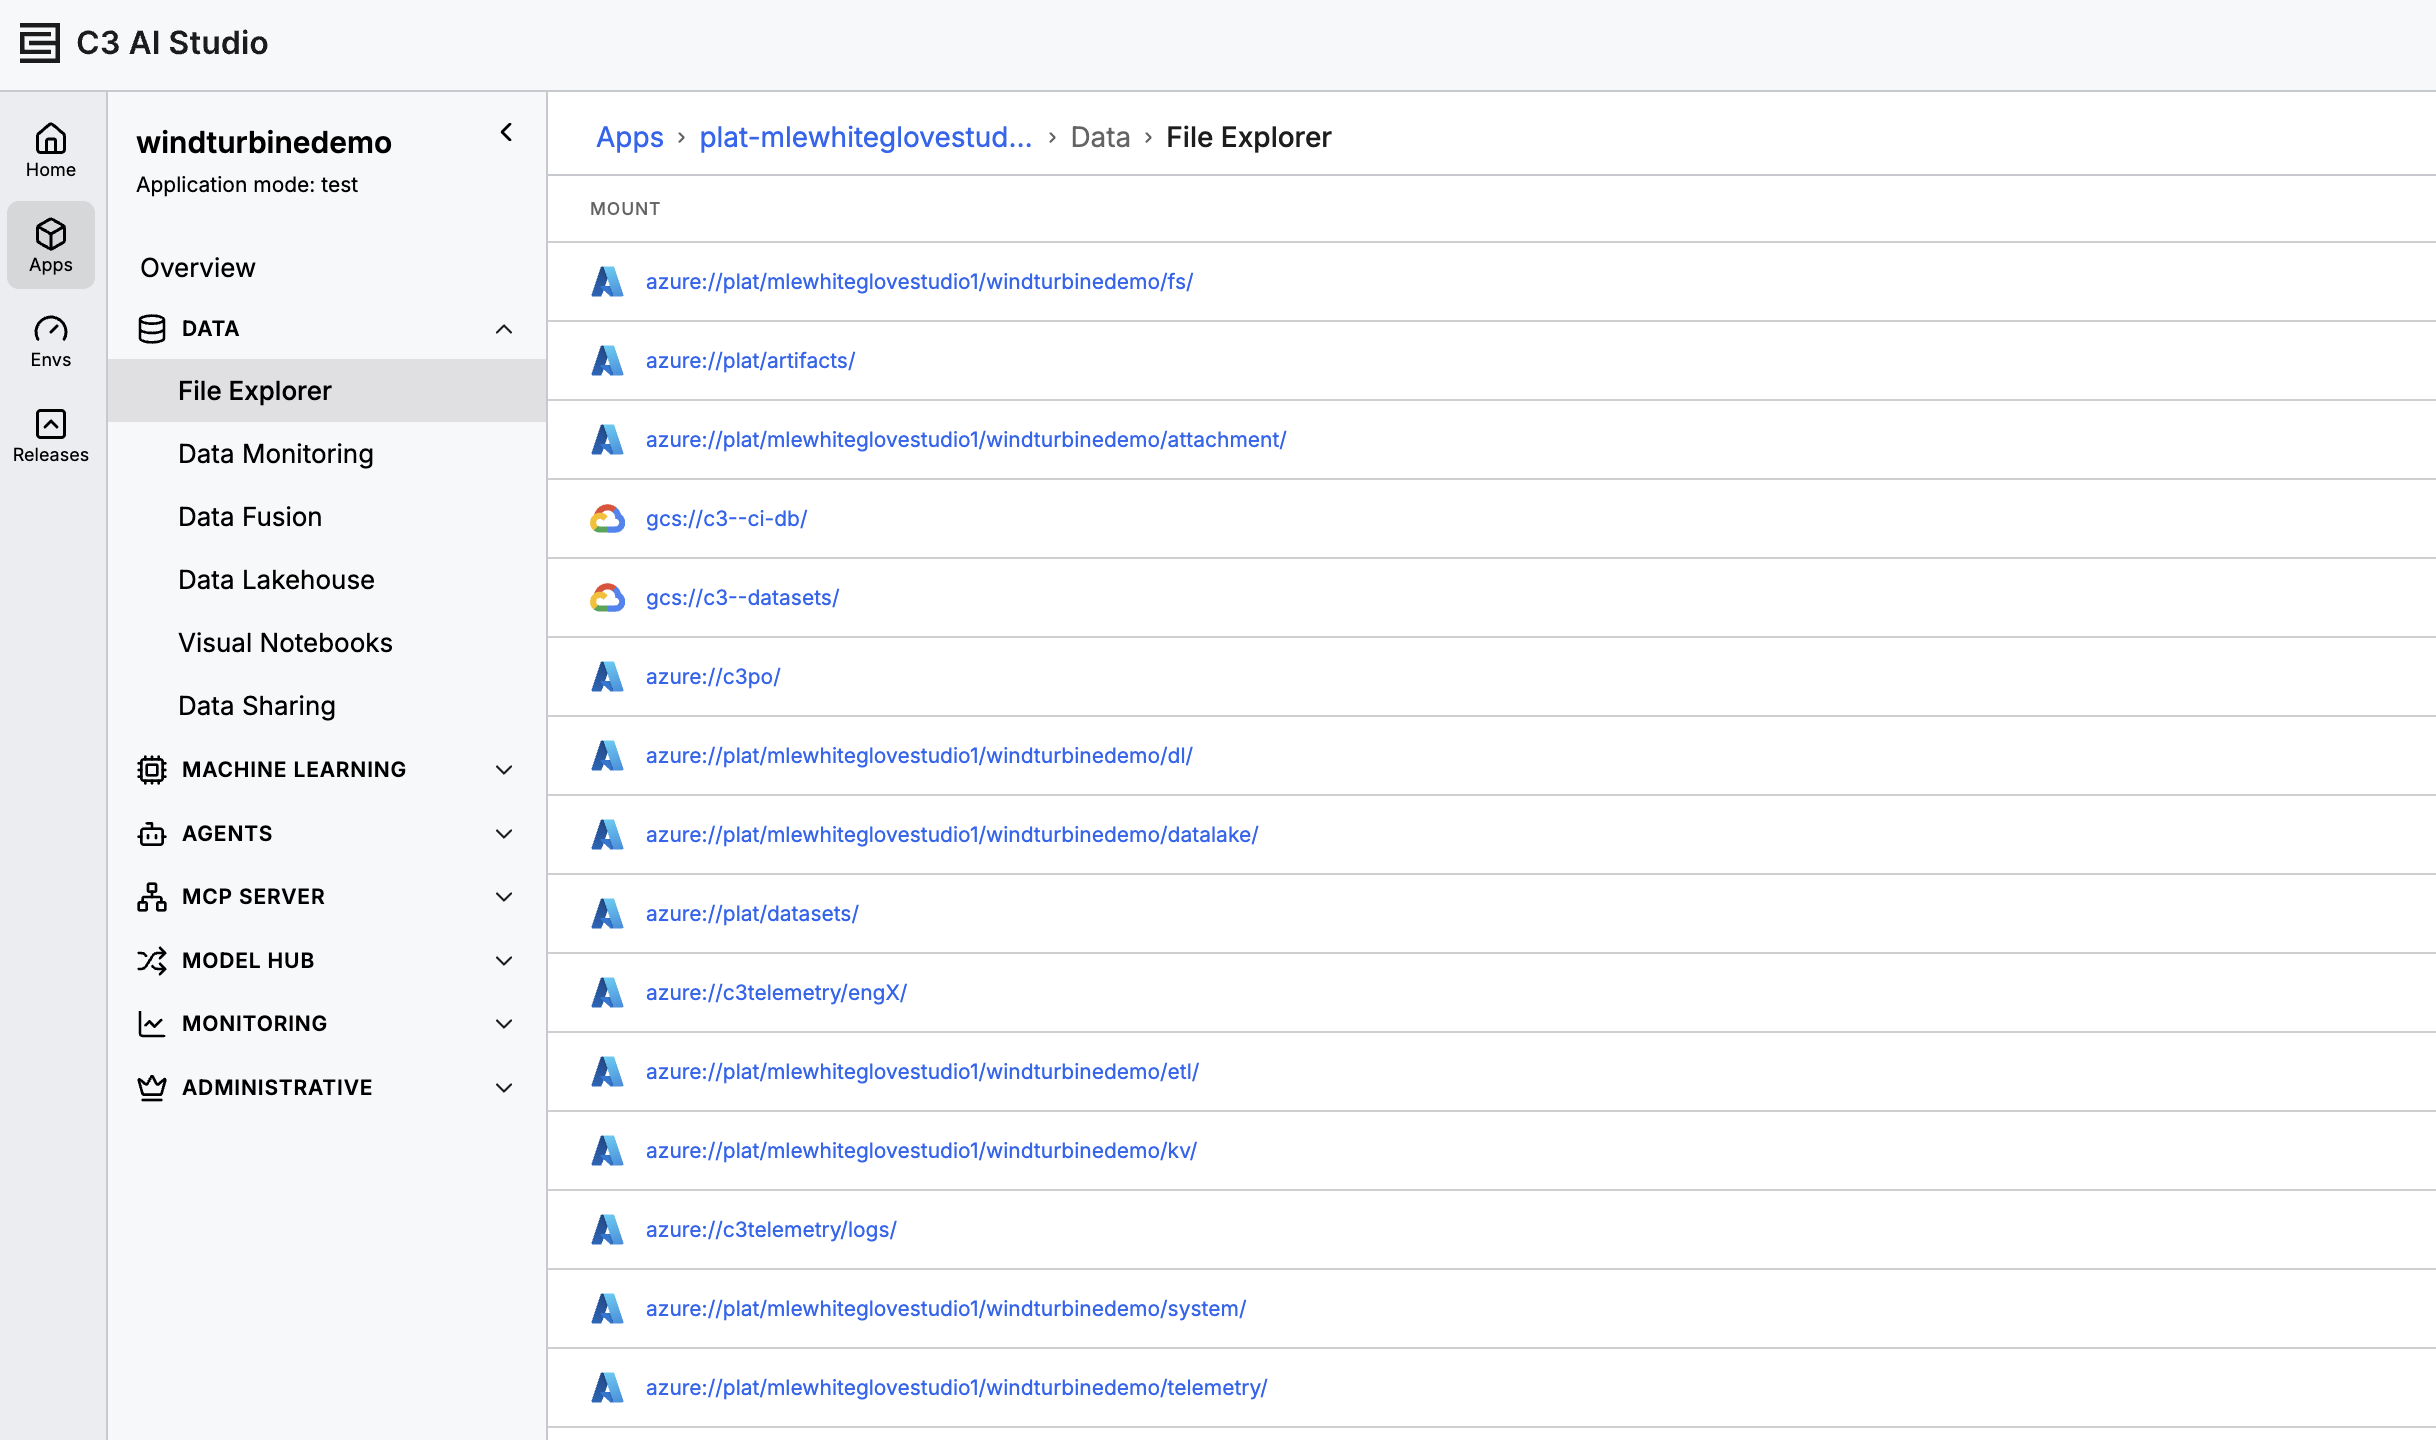
<img src="img/fe-navigate.png" alt="Navigate" height="400"/>The File Explorer landing page displays the storage mounts configured for the current application.
Browse mounts
The mounts view lists the storage mounts available to the application, showing the mount path and storage provider icon for each one (see the image in Navigate to File Explorer above). Select a mount to open and browse its contents.
Supported providers include Azure Blob Storage, Google Cloud Storage (GCS), Amazon S3, OneDrive, SharePoint, and Google Drive. OneDrive and SharePoint mounts currently show a generic folder icon instead of a provider-specific icon.
Browse files and directories
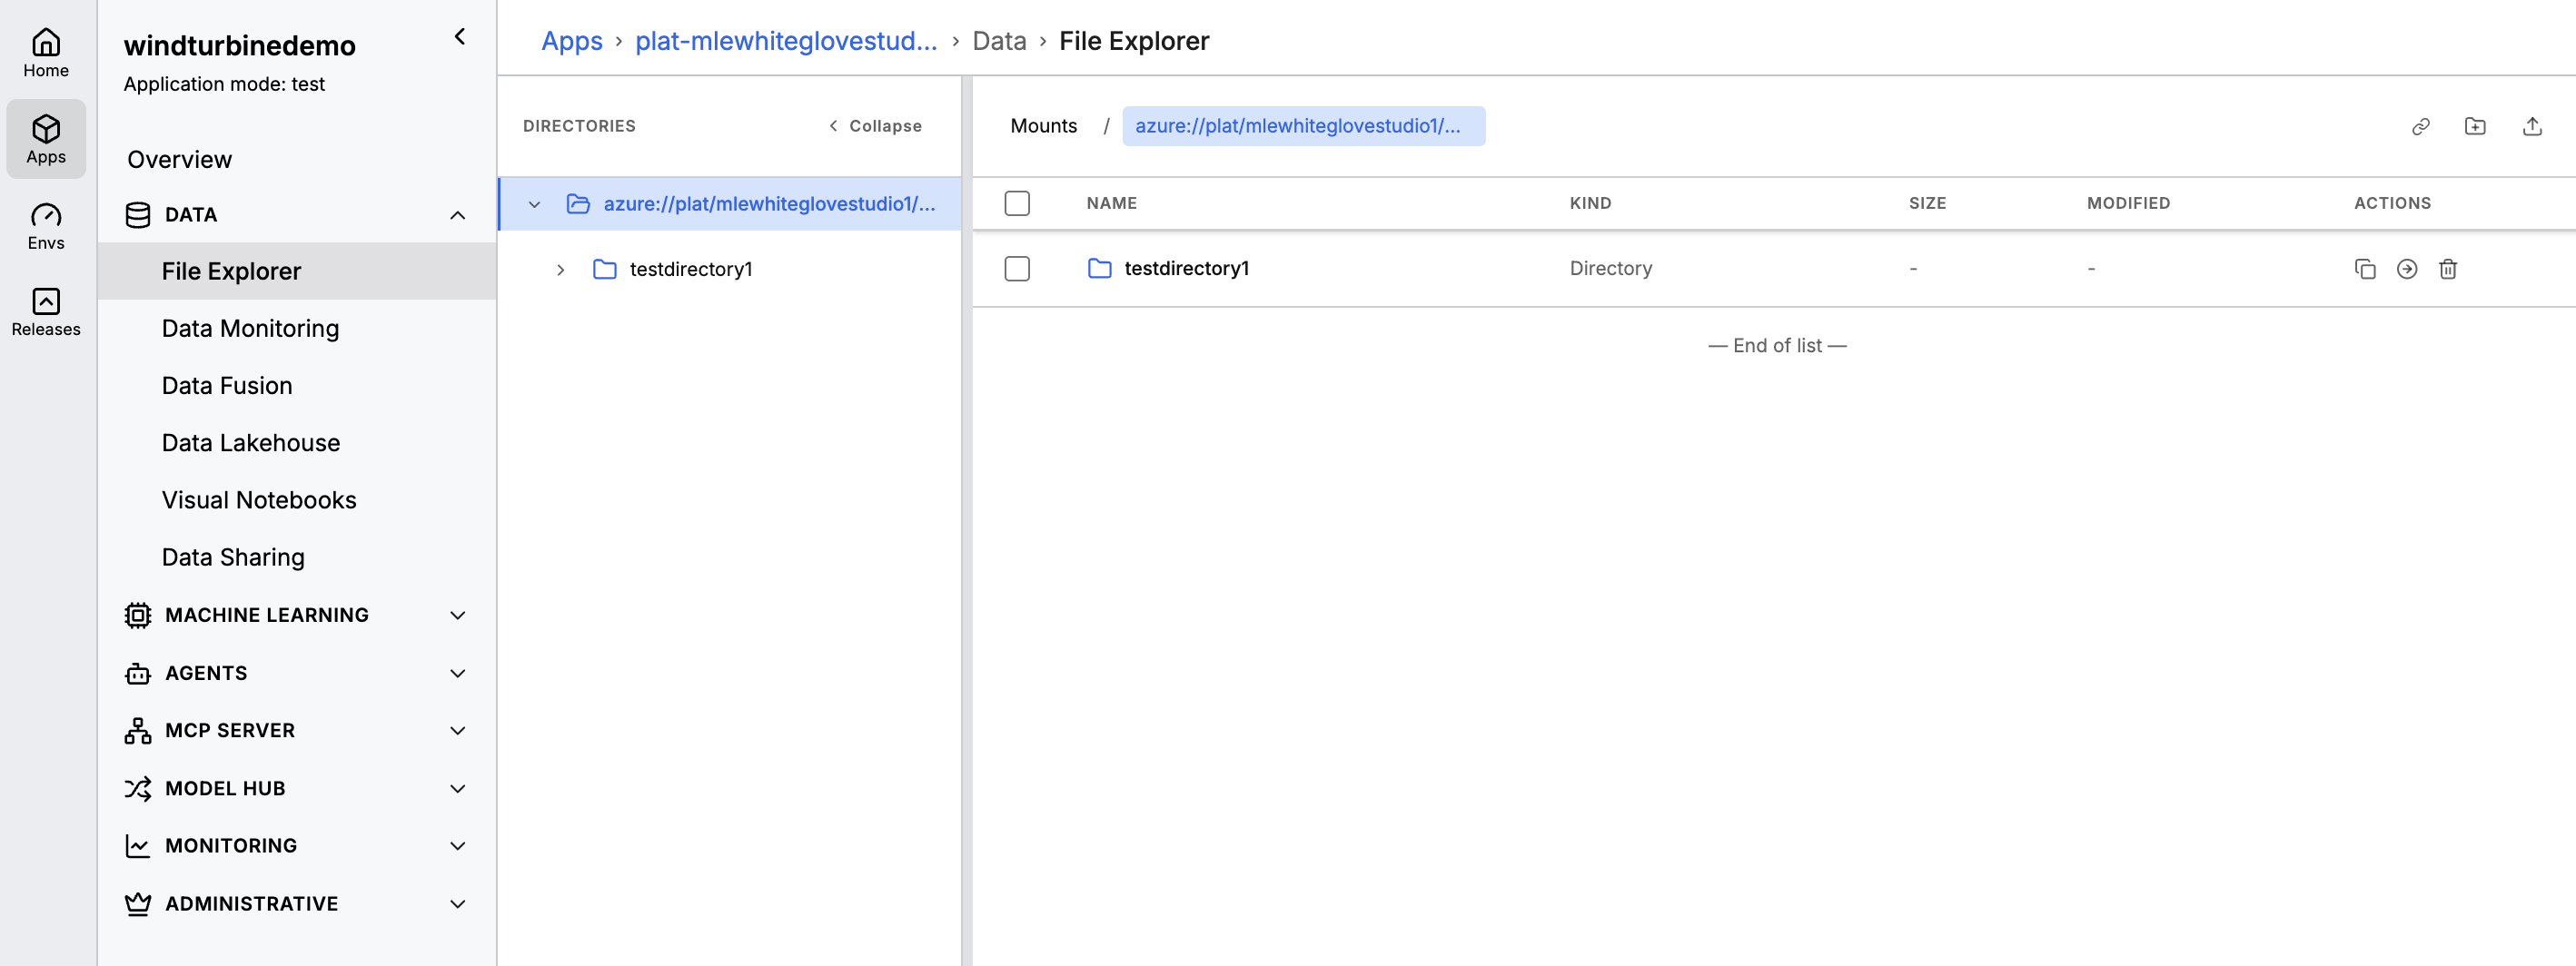
After opening a mount, File Explorer displays a split-pane layout for navigating directories and viewing files.
Directory pane
The DIRECTORIES pane displays the folder structure for the selected mount.
You can:
- Select a directory to navigate to it
- Expand directories to view nested folders
- Collapse the pane to increase workspace size
Selecting a directory updates the file list to display the contents of the selected location.
File list pane
The file list displays the contents of the currently selected directory.
The file list includes the following columns:
| Column | Description |
|---|---|
| Name | File or directory name |
| Kind | Directory for directories, or the file's content type for files (for example, application/json); - if the content type is unknown |
| Size | File size |
| Modified | Last modified timestamp |
| Actions | Available actions vary by object type |
Selecting files
You can select one or more items from the file list to perform bulk operations.
File Explorer supports:
- Selecting individual items using row checkboxes
- Selecting all currently loaded items using the header checkbox
- Selecting a range of items by holding Shift while selecting another item
The file list loads items in pages of 100 and loads additional pages automatically as you scroll. If a directory has more than 100 items, select the header checkbox, then scroll to the end of the list and select the header checkbox again to extend the selection to the newly loaded items.
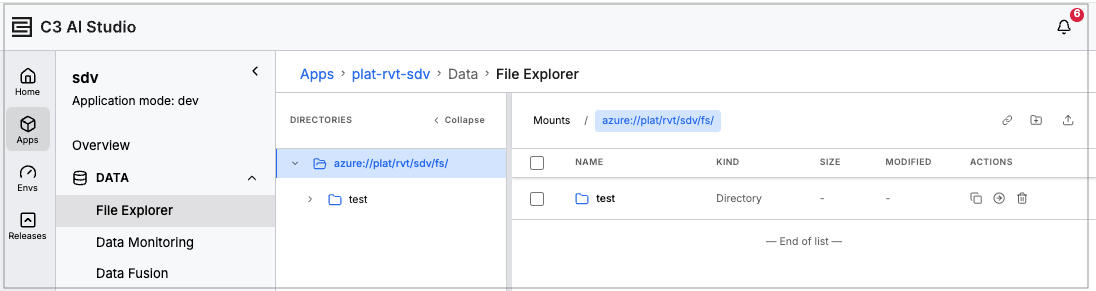
When one or more items are selected, a bulk action toolbar appears with the operations available for the selection. Selected items remain selected until you clear the selection, navigate to another directory or mount, or complete a bulk operation.
Breadcrumb and toolbar
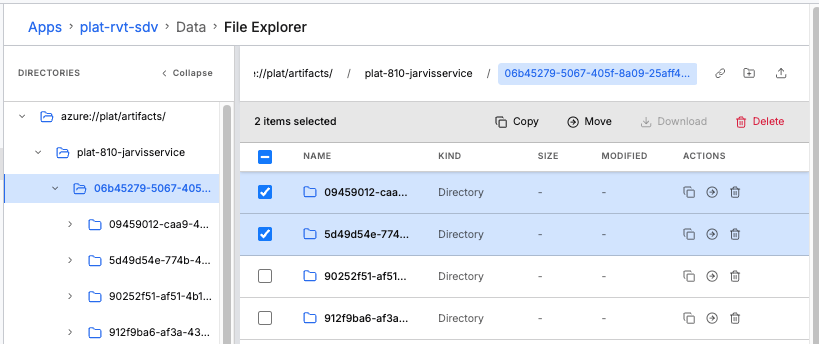
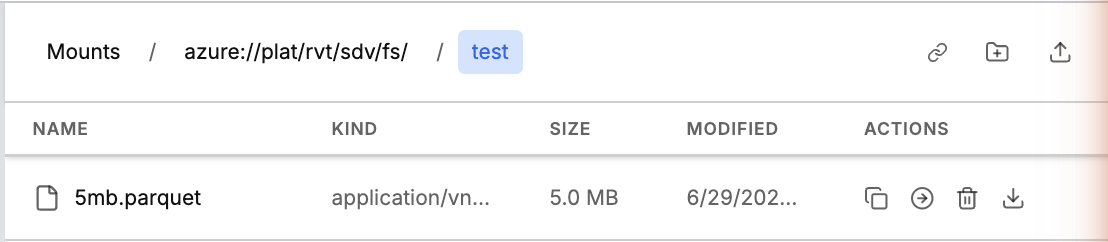
A single bar above the file list shows a breadcrumb trail for the current location within the selected mount, and provides directory-level actions:
- Select any breadcrumb segment to navigate directly to that level.
- Select Mounts to return to the mounts landing page.
- Copy the current path to clipboard.
- Create a directory.
- Upload files.
The directory-level actions are always shown, even on read-only mounts. Creating a directory or uploading a file on a read-only mount returns an error.
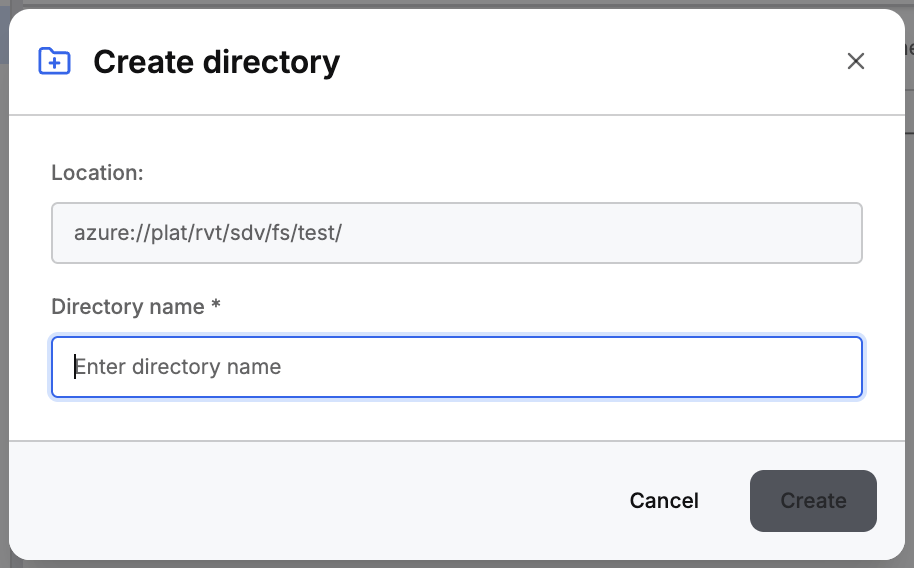
Create a directory
Create a directory to organize files within a mount before uploading, or to establish a folder structure for data that will be written to the storage location by a pipeline or application.
- Navigate to the target location.
- Select Create directory in the toolbar.
- In the dialog, confirm the Location field shows the intended path.
- Enter a directory name.
- Select Create.
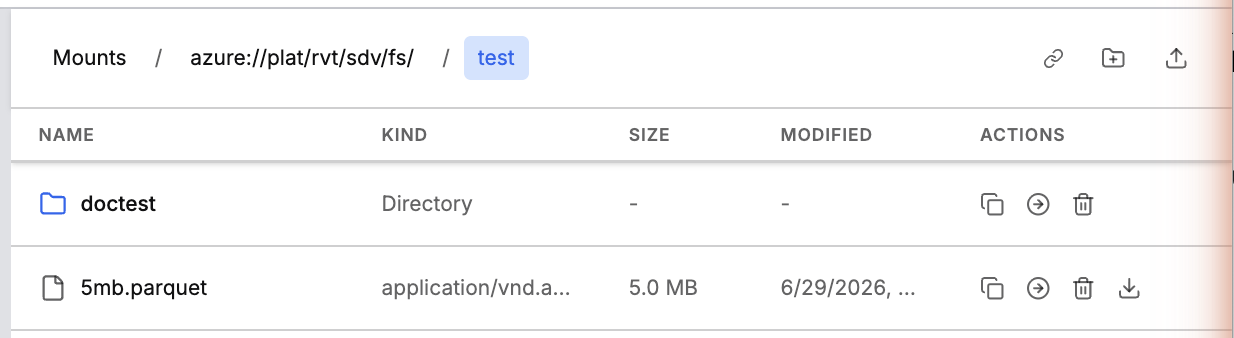
The new directory appears in the file list for the current location.
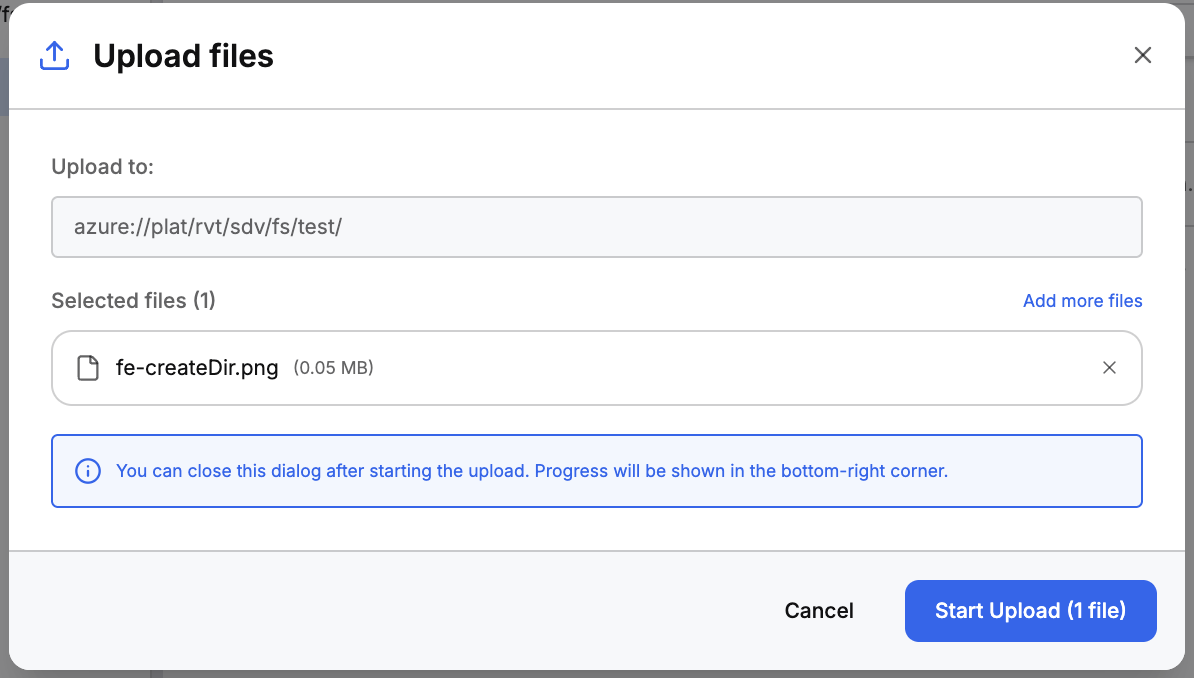
Upload files
Upload files to a mount when you need to make local data available to your application.
- Navigate to the target directory.
- Select Upload files in the toolbar.
- In the dialog, either select Click to select files to browse your local system, or drag and drop files into the upload area.
- Select Start Upload to begin. A progress indicator in the bottom-right corner shows the upload status.
Additional upload behavior:
- The uploaded files appear in the current directory after the upload completes.
- File Explorer does not enforce a platform-level file size limit for uploads. The effective limit depends on the storage provider. An upload that exceeds it fails with an error.
- Uploading to a read-only mount also fails with an error. The Upload files toolbar action is shown regardless of whether the mount is read-only.
- Large file operations (such as uploads, downloads, copies, and moves) may take longer depending on network conditions and storage provider performance.
File Explorer does not support uploading folders. Dropped folders are skipped and not uploaded.
Uploading a file with the same name as an existing file at the destination overwrites the existing file. File Explorer does not prompt for confirmation before overwriting.
Uploads stage through a cluster-managed data-load mount before moving to the destination. If the cluster doesn't have a data-load mount configured, uploads fail with the error data-load mount is not configured on this cluster.
Manage files and directories
The Actions column provides file-level and directory-level operations. You can perform actions on individual files using the Actions column or on multiple selected files and directories using the bulk action toolbar. Available bulk actions depend on whether files, directories, or both are selected.
Available actions can differ between files and directories.
File actions
File actions include:
- Preview (files only; select the file's row, not the Actions column)
- Copy
- Move
- Delete
- Download
Bulk actions
When multiple files or directories are selected, File Explorer displays a bulk action toolbar with the following actions for the selection:
- Copy
- Move
- Delete
- Download (enabled only when the selection includes at least one file)
Directory actions
Directory actions include:
- Copy
- Move
- Delete
Copy a file or directory
Copy a file or directory when you need to duplicate data to another location within a mount.
- Locate the file or directory. To copy multiple files or directories, select them using the row checkboxes before choosing Copy from the bulk action toolbar.
- Select the Copy action.
- Specify the destination location. For a single file or directory, you can also change the destination name; it defaults to
Copy of <name>when copying within the same directory. For bulk copy or move operations, the selected items are copied or moved to the same destination using their original names. - Confirm the operation.
You can select a different mount, including a mount backed by a different storage provider, as the destination for a copy operation. Whether the copy succeeds can depend on the source and destination providers; some cross-provider copies fail.
Copying a file to a destination that already has a file with the same name overwrites the existing file. File Explorer does not prompt for confirmation before overwriting.
Copying a directory only copies the files it contains; empty directories, including empty nested subdirectories, are not created at the destination. This applies even when the directory being copied also contains files elsewhere in its structure.
Move a file or directory
Move a file or directory when you need to reorganize content within a mount.
- Locate the file or directory. To move multiple files or directories, select them using the row checkboxes before choosing Move from the bulk action toolbar.
- Select the Move action.
- Specify the destination location.
- Confirm the operation.
For files, the object is removed from its original location and appears at the destination after the operation completes.
For directories, only the contained files move to the destination. The original directory remains at the source as an empty directory. As with copy, empty directories and empty nested subdirectories are not created at the destination, even when the directory being moved also contains files elsewhere in its structure.
You can select a different mount, including a mount backed by a different storage provider, as the destination for a move operation. As with copy, some cross-provider moves fail depending on the source and destination providers.
Moving a file to a destination that already has a file with the same name overwrites the existing file. File Explorer does not prompt for confirmation before overwriting.
Preview a file
Open a file to inspect its contents directly in C3 AI Studio without downloading it. This is useful for quickly reviewing outputs, checking file structure, or confirming data before further processing.
To preview a file:
- In the file list pane, locate the file you want to preview.
- Select the file's Name, Kind, Size, or Modified cell. Preview is not available from the row checkbox or the Actions column.
- The file opens in a preview panel within the Studio.
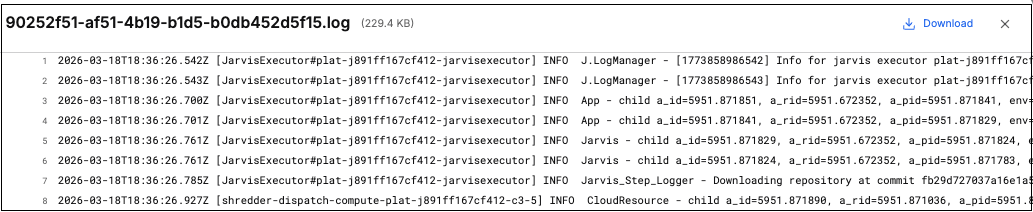
File Explorer previews a fixed set of file types:
- Images: JPG, JPEG, and PNG
- Source-code files: JS, TS, TSX, JSX, PY, JAVA, C, CPP, H, HPP, GO, RS, RB, PHP, SWIFT, KT, SCALA, and R
- Common text and markup: TXT, JSON, XML, HTML, CSS, CSV, MD, YML, YAML, LOG, SQL, and SH
For other file types, File Explorer shows Preview not available and offers a Download option instead.
Preview also has the following limits:
- Text and code files show only the first 10,000 characters. Longer files display a truncation notice.
- Images and PDFs larger than 10 MiB, or with an unknown file size, are not previewable.
Delete a file or directory
Delete a file or directory when data is no longer needed in the storage location.
- Locate the file or directory. To delete multiple files or directories, select them using the row checkboxes before choosing Delete from the bulk action toolbar.
- Select the Delete action.
- Confirm the deletion.
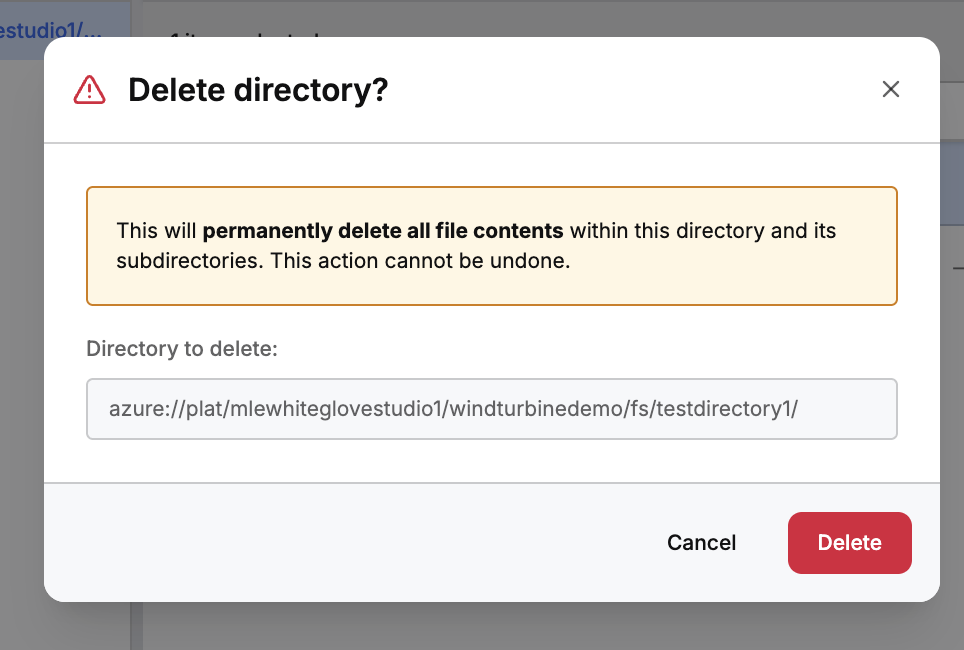
Deleting a directory recursively deletes its contents. Deleted files and directories are permanently removed from the selected storage location.
Download a file
Download a file when you need a local copy for review or offline use.
To download a single file:
- Locate the file in the file list.
- Select the Download action.
- The file is downloaded to your local system.
To download multiple files:
- Select the files using the row checkboxes.
- Select Download from the bulk action toolbar.
- The selected files are downloaded to your local system.
Bulk download applies only to files. If the selection includes directories, only the selected files are downloaded.