C3 AI Studio Credentials
The Credentials page in C3 AI Studio stores Open Authorization (OAuth) 2.0 settings that connectors reference by name. Use an outbound credential to connect to an external OAuth provider. Use an inbound credential to register an application as an OAuth provider for external clients.
Before you begin
You can open Credentials with one of these roles:
- Cluster Administrator
- Environment Administrator
- Application Administrator
- Developer
The page is available in server version 8.12 and later. For an application, the application must be running.
An application administrator or higher can view secret values. The same roles can edit a credential and delete it from the details page.
Navigate to Credentials
Complete the following steps to navigate to the Credentials page:
- In C3 AI Studio, select Envs or Apps.
- Select an environment or an application.
- Select Administrative, and then select Credentials.
<img src="img/credentials-1.png" alt="Credentials in the Administrative menu" height="400"/>
The Credentials page is available for an environment and for an application. Select Envs or Apps in step 1 to choose the scope.
Credentials list
Enter text in Search credentials by name to find a credential. You can also select Filter by type to limit the list by inbound or outbound credentials. Select Clear All to remove the filter.
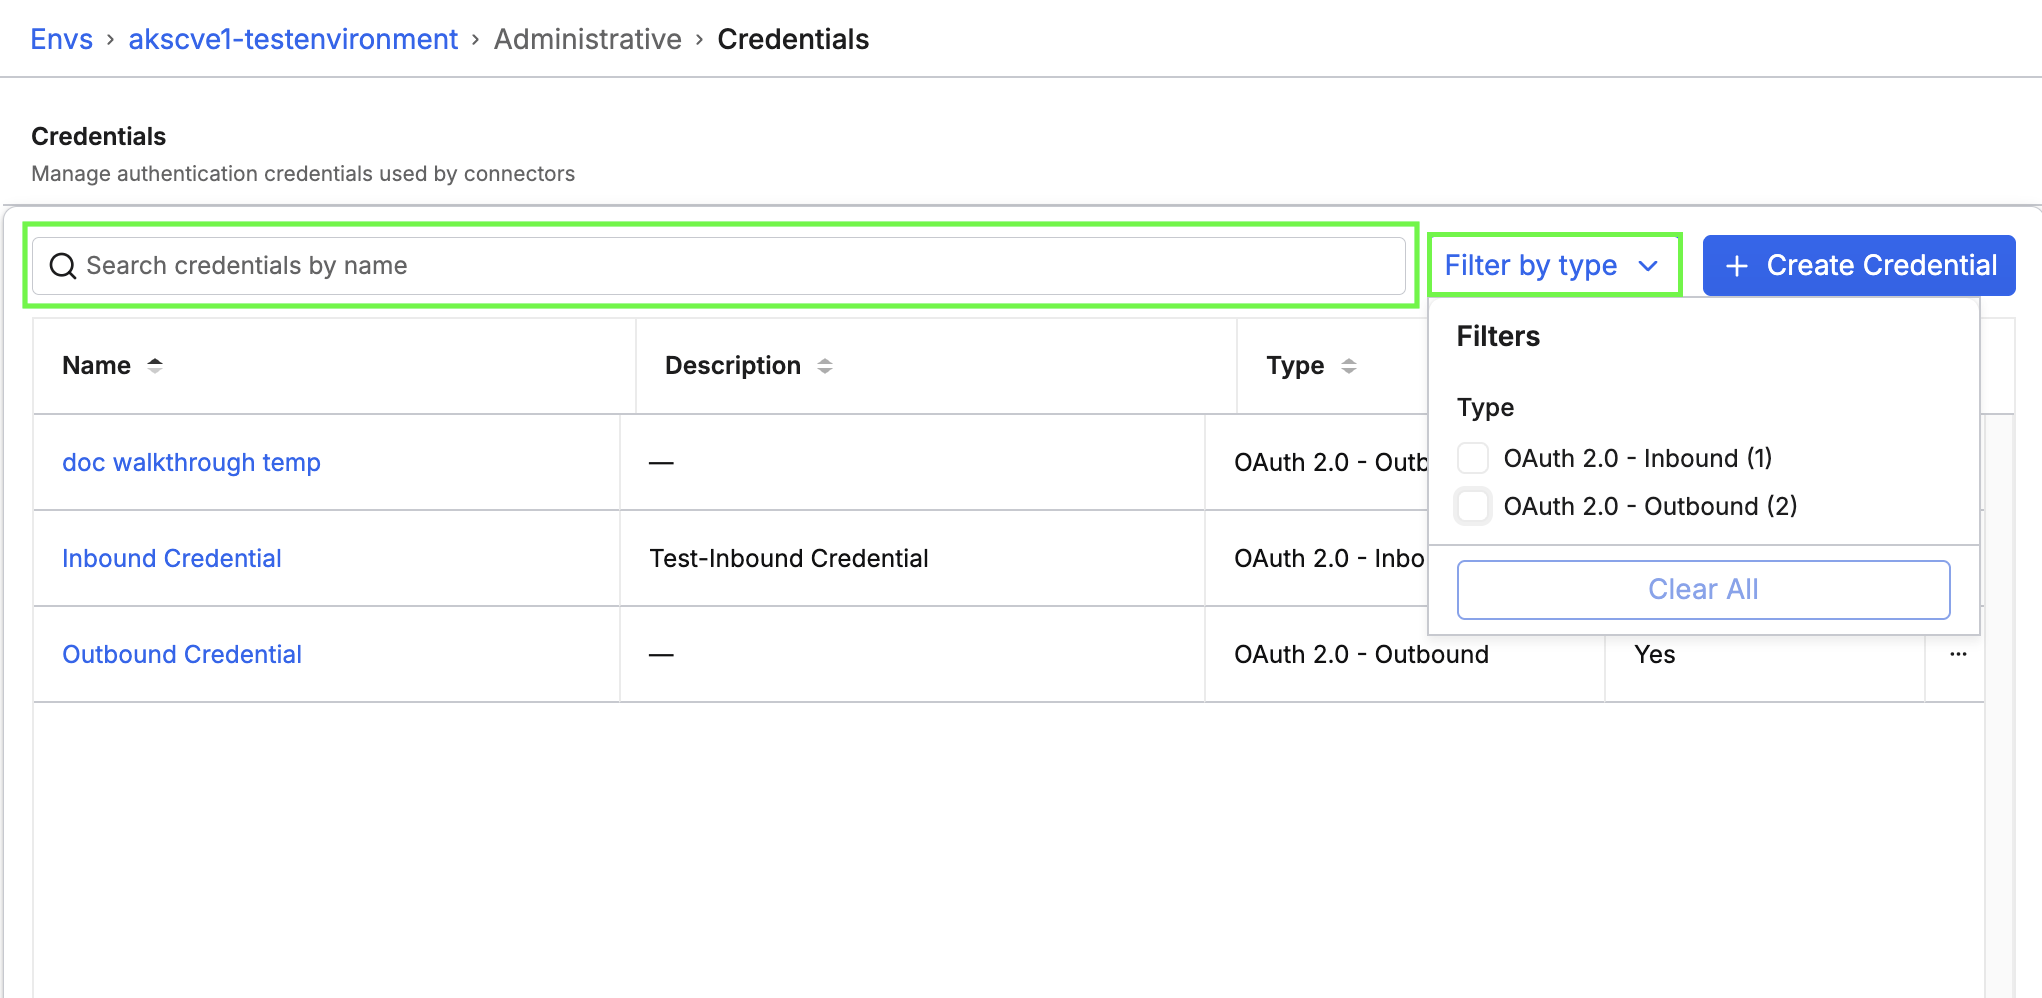 |
| Filter by Type or Search Credential by Name |
The list of credentials shows the following columns:
- Name: The name connectors use to reference the credential. Select the name to open the details page.
- Description: Optional notes. An empty description shows a dash.
- Type: Outbound or inbound credential type
- OAuth 2.0 - Outbound
- OAuth 2.0 - Inbound
- Shared: Shared column displays Yes or No.
- Yes for a shared credential, such as an outbound authorization server
- No for a per-user token.
When no credentials exist, the page shows No credentials.
Each row has an actions menu. Select the three dots at the end of a row. The actions that appear depend on the credential:
- View Details: Open the details page.
- Generate Token: Shown for an outbound authorization server and an inbound application.
- Edit: Shown for an outbound authorization server and an inbound application.
- Revoke: Shown when a revocation action is available.
- Enable or Disable: Shown for a per-user token.
- Delete: Shown when the credential can be deleted.
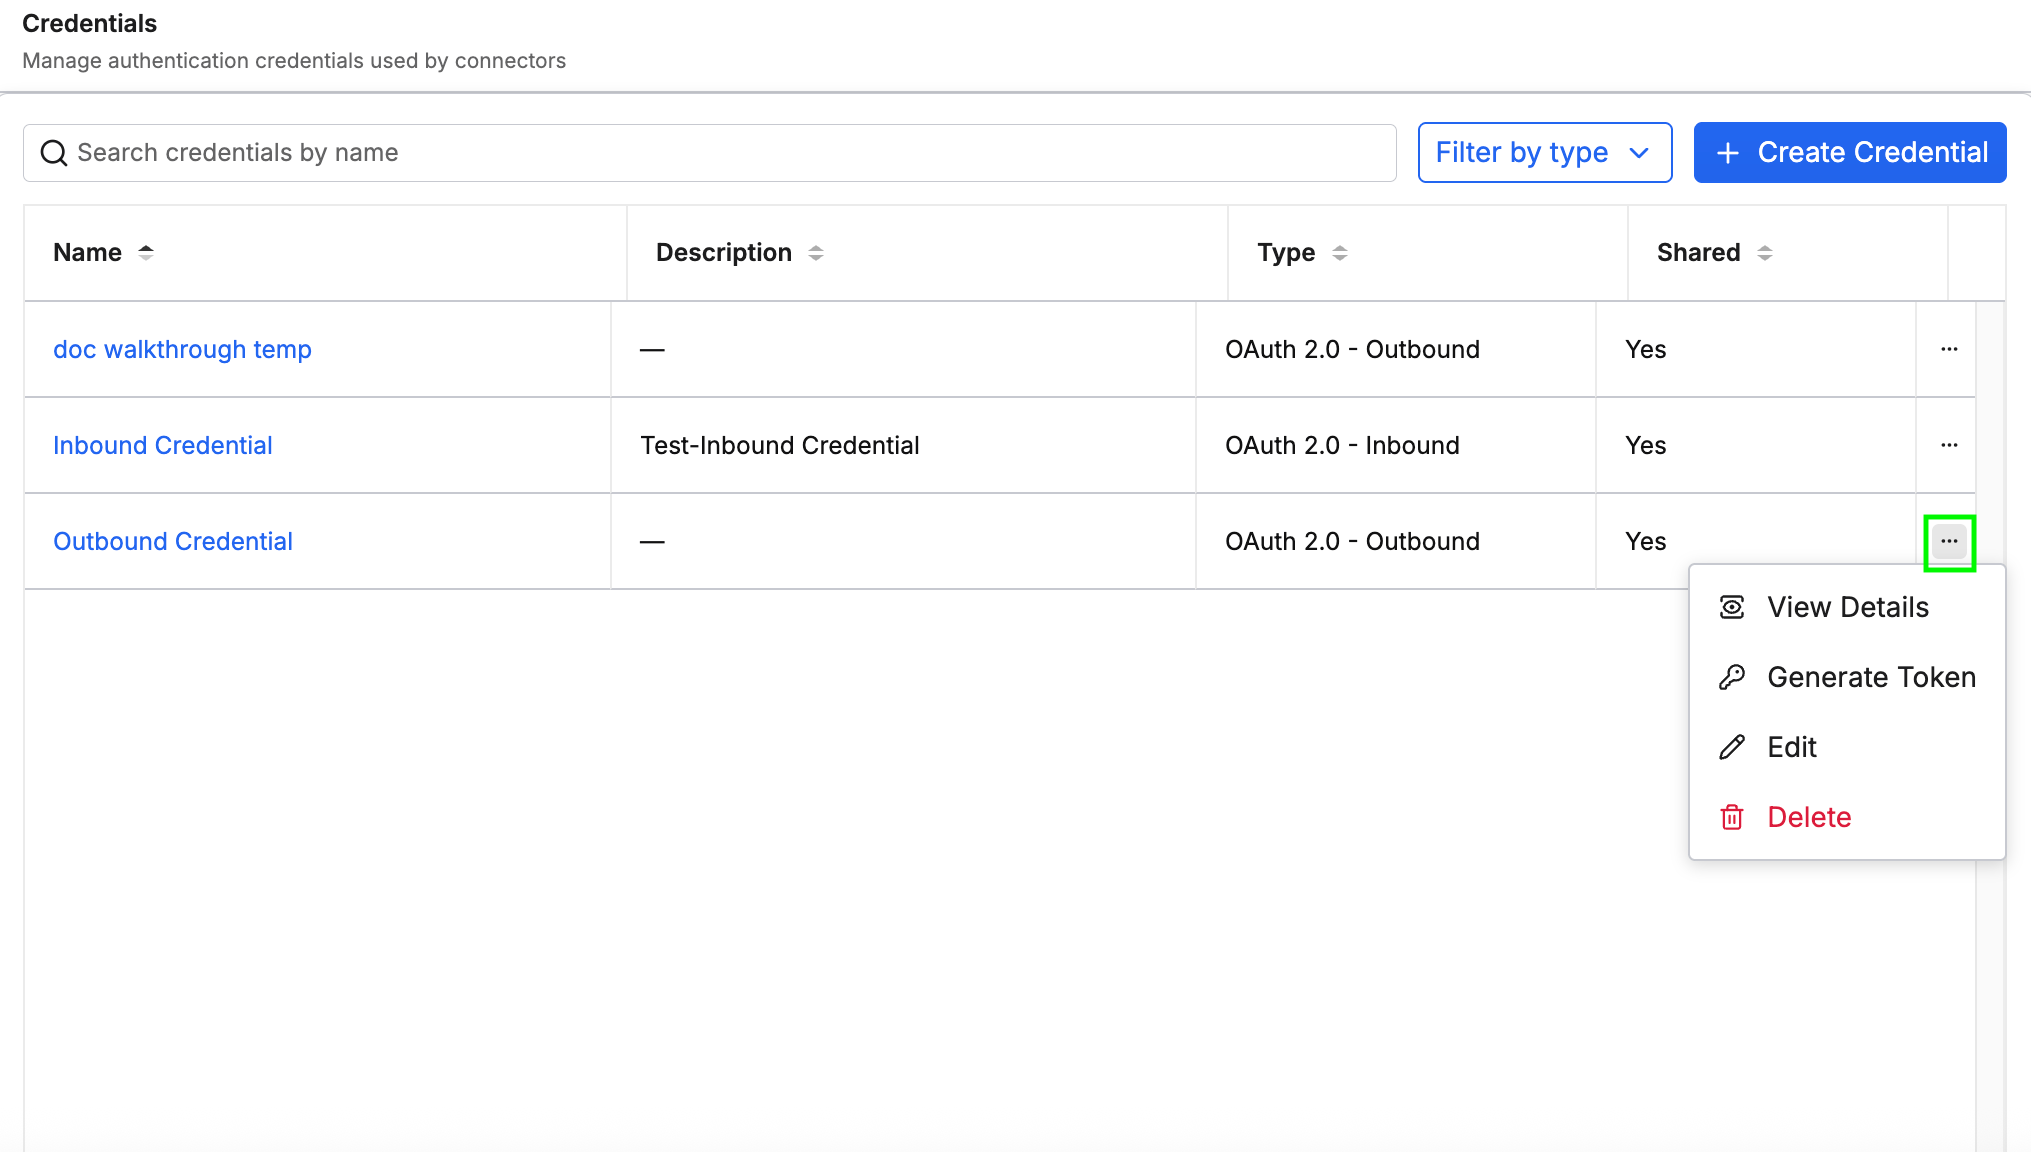 |
| More Actions |
Create an outbound credential
An outbound credential records the endpoints of an external OAuth provider. Connectors in the chosen sharing scope can reference it by name.
- On Credentials, select Create Credential.
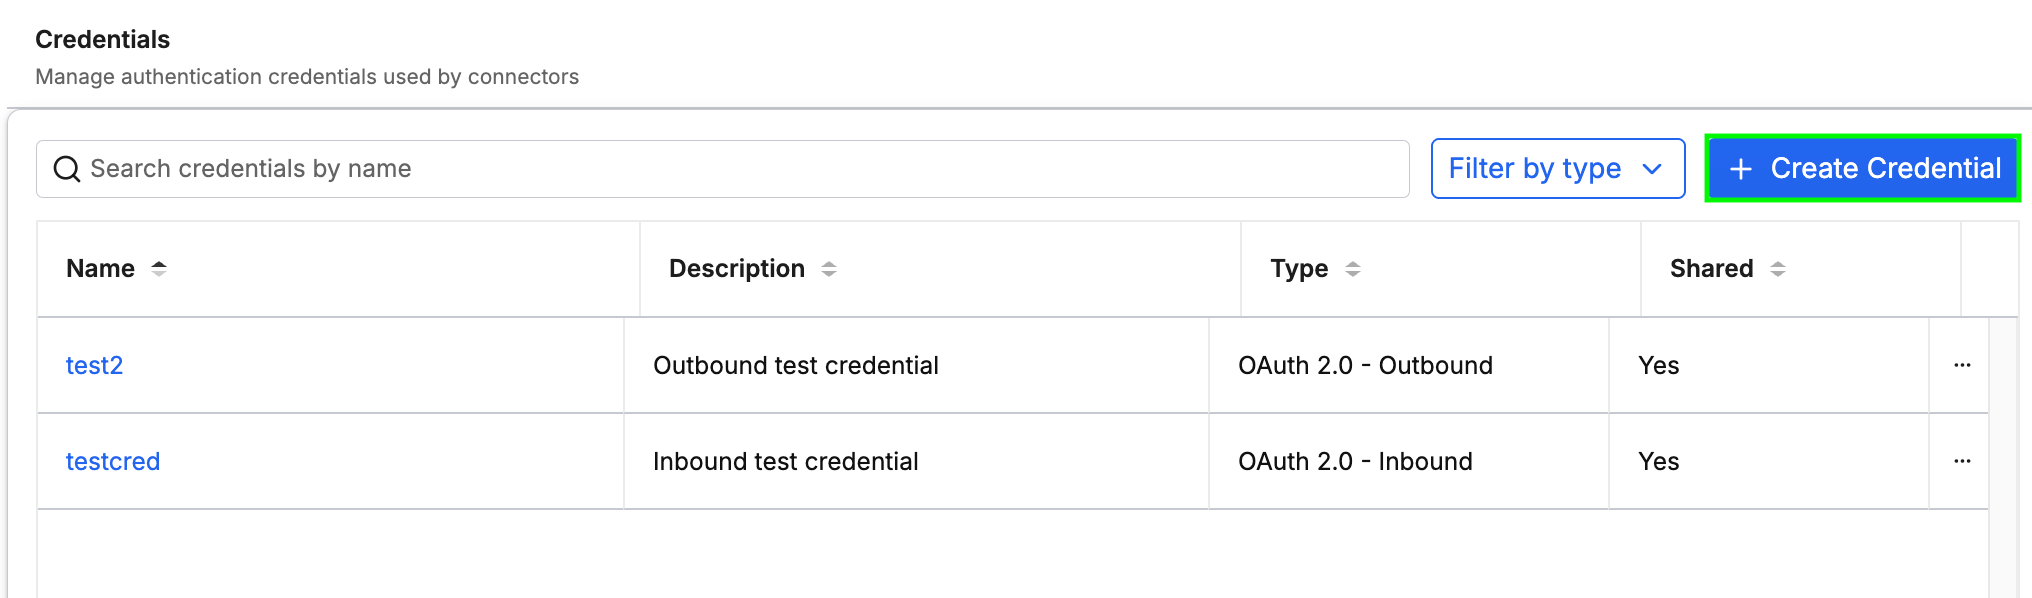 |
| Create Credential |
- Confirm that Credential Type is OAuth 2.0.
- In Credential name, enter a unique name.
The name must be 3 to 50 characters. Use letters, numbers, spaces, hyphens, and underscores. Include at least one letter or number.
- In Description, enter optional notes.
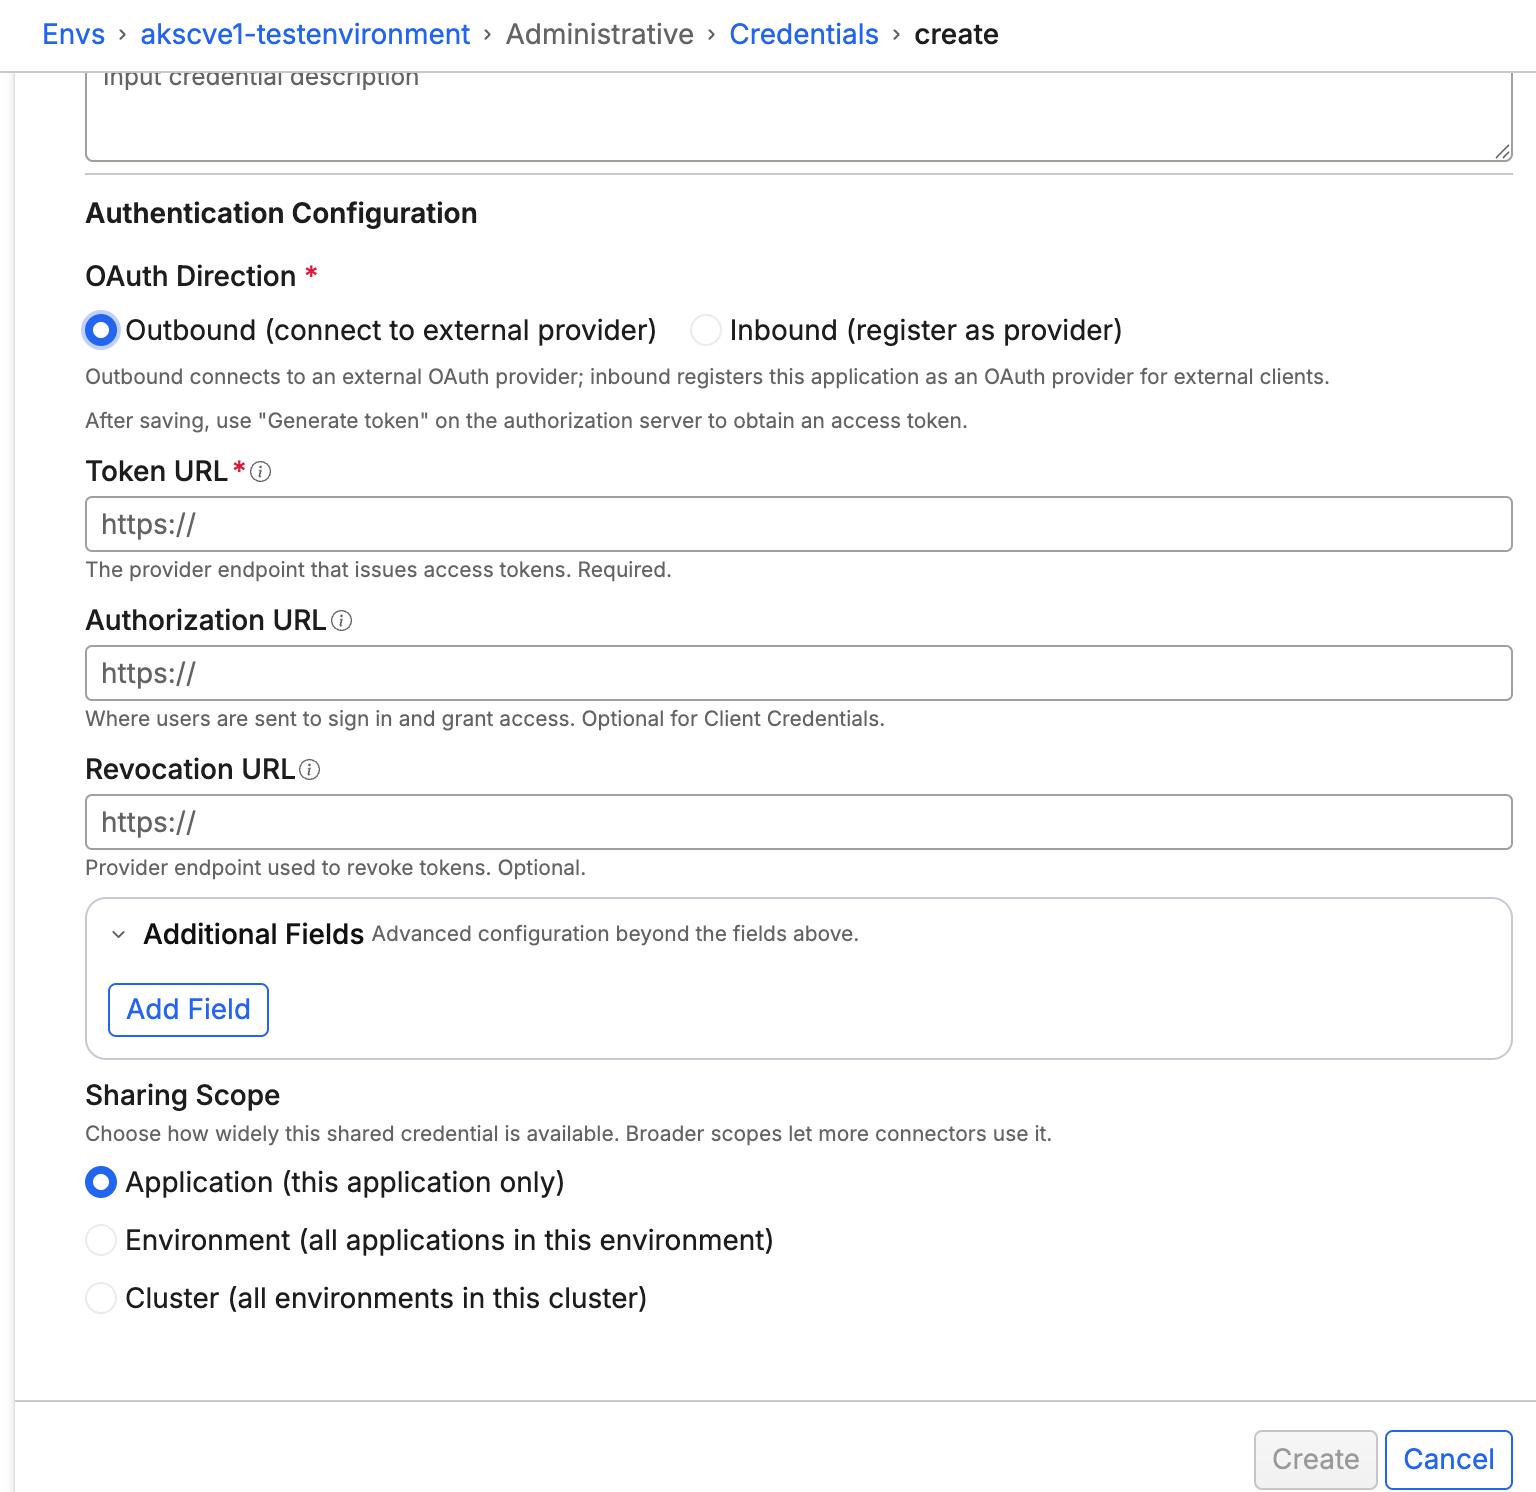
- Under OAuth Direction, select Outbound (connect to external provider).
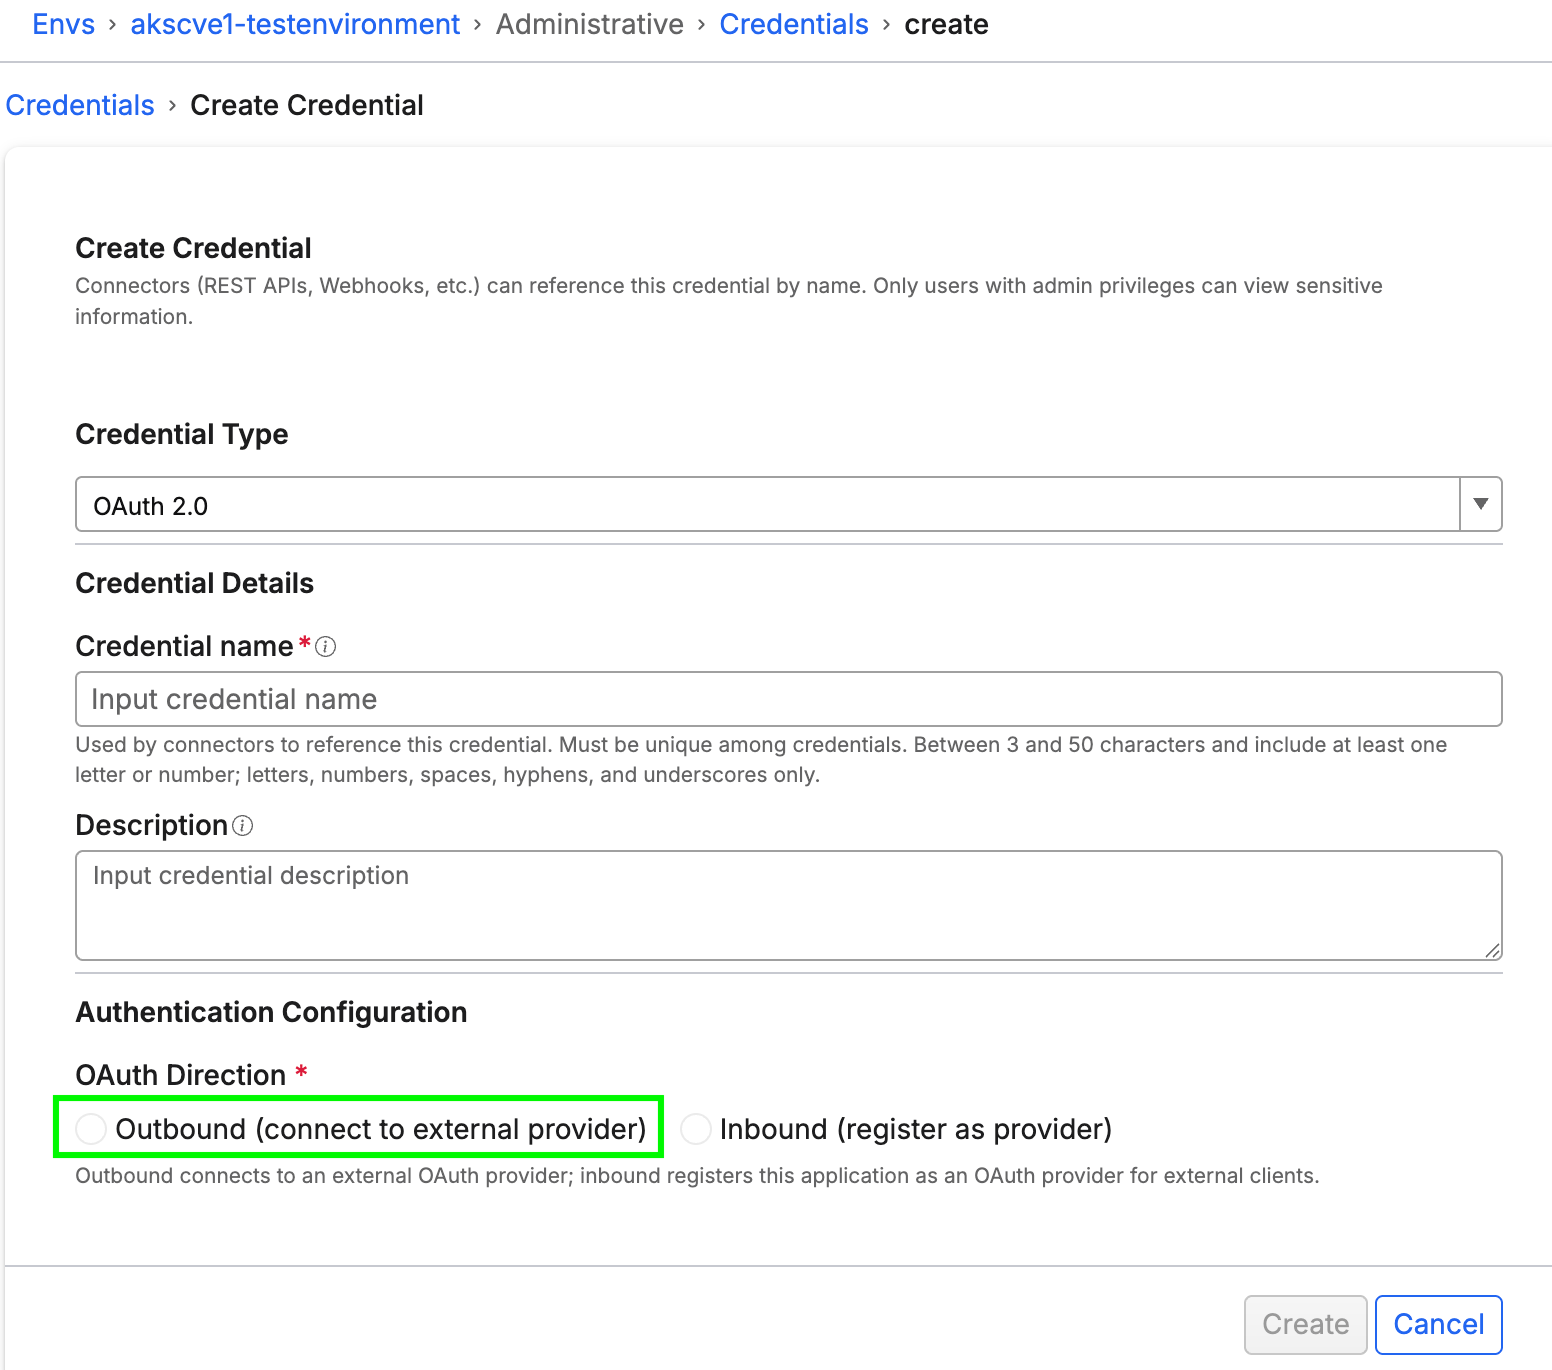 |
| Select Outbound authentication configuration |
- In Token URL, enter the provider token endpoint. The value must be an
httpsURL. - In Authorization URL, enter the provider authorization endpoint when users must sign in. Leave it blank for a client-credentials flow.
- In Revocation URL, enter the provider revocation endpoint when the provider supports token revocation.
- Under Sharing Scope, select who can use the credential. Sharing scope has three options:
- Application (this application only)
- Environment (all applications in this environment)
- Cluster (all environments in this cluster)
The default scope is Application (this application only). A broader scope lets more connectors use the credential.
- Select Create.
 |
| Fill in Token URL and Select Sharing Scope |
After you save, the credential appears in the list with type OAuth 2.0 - Outbound. Select Generate Token on that credential to request an access token.
Create an inbound credential
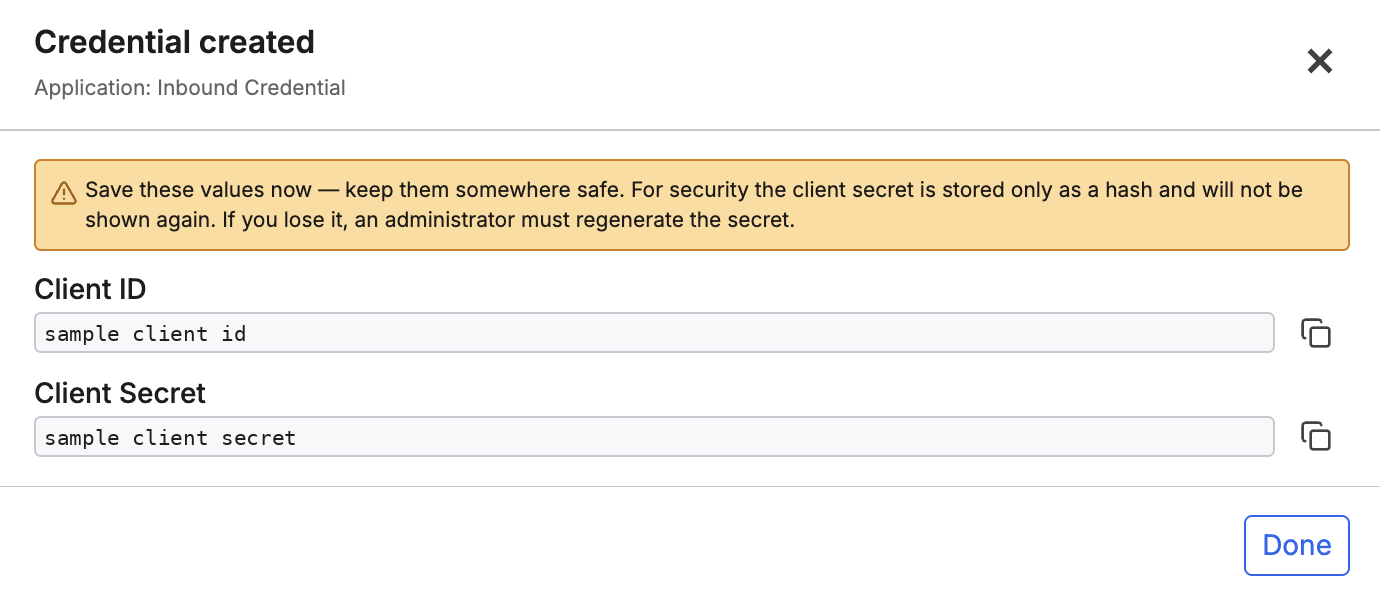
An inbound credential registers the application as an OAuth provider. C3 AI returns the client secret one time. Copy it before you close the dialog. An administrator can regenerate the secret later if it is lost.
- On Credentials, select Create Credential.
- Confirm that Credential Type is OAuth 2.0.
- In Credential name, enter a unique name. Use the same name rules as an outbound credential.
- In Description, enter optional notes.
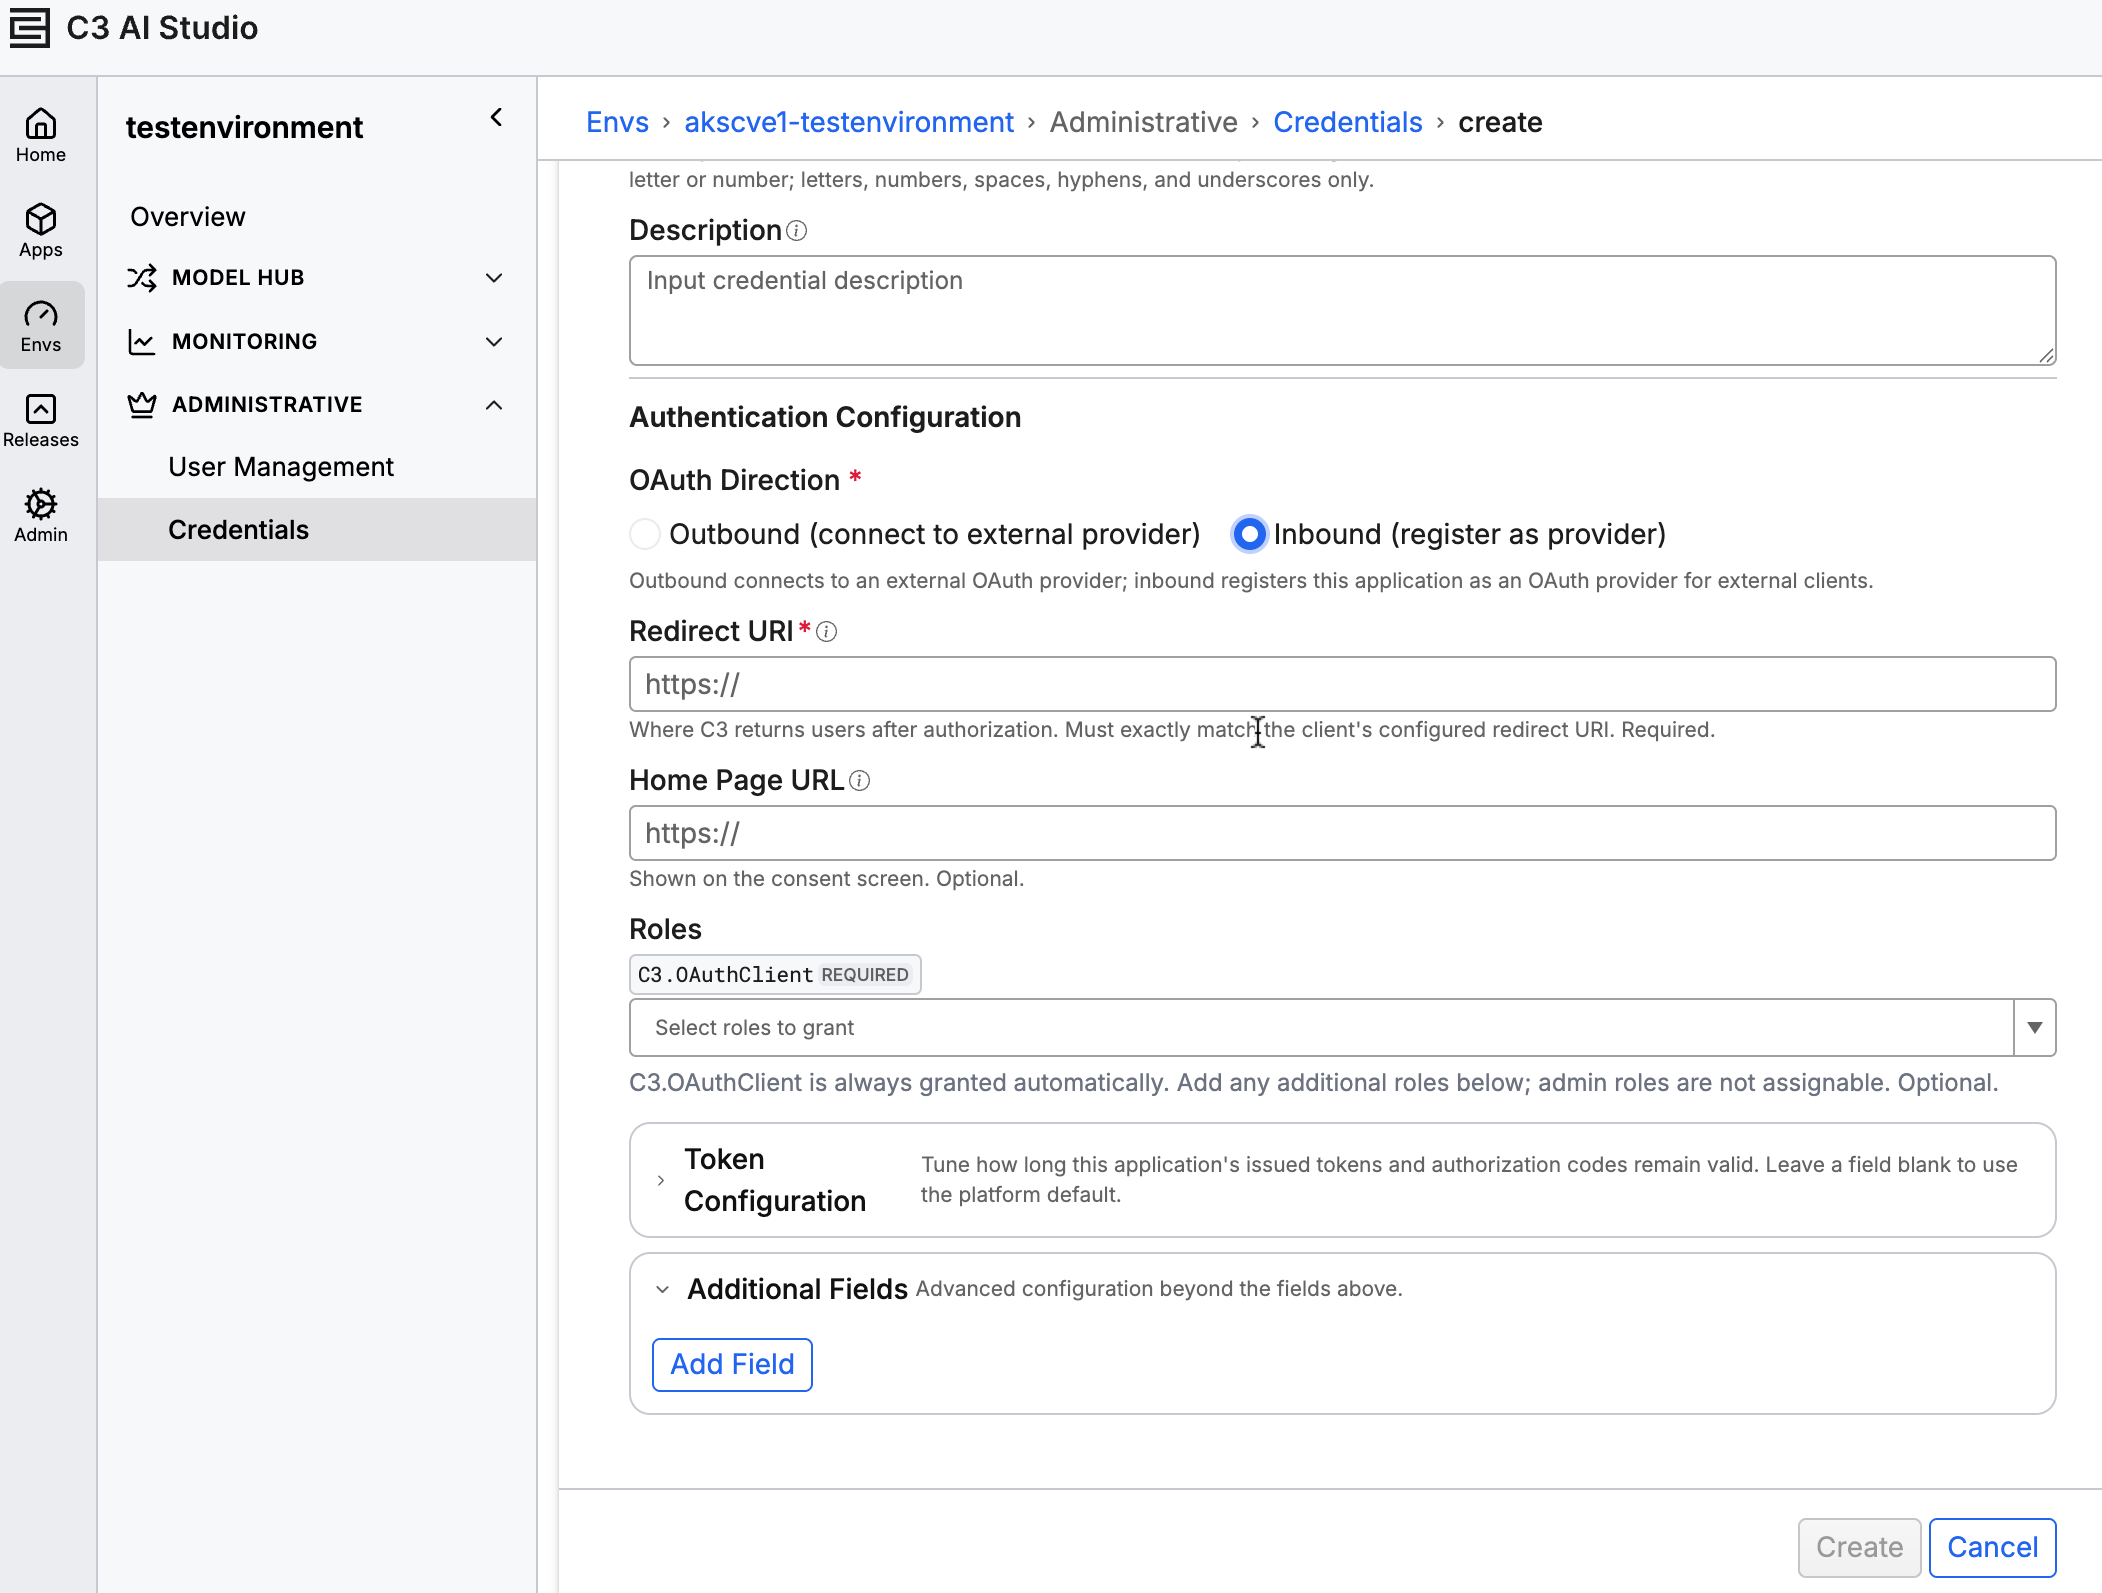
- Under OAuth Direction, select Inbound (register as provider).
 |
| Inbound Authentication Configuration |
- In Redirect URI, enter the
httpsURL where C3 AI sends the user after authorization. It must match the redirect URI on the client. - In Home Page URL, enter the optional
httpspage shown on the consent screen. - Under Roles, leave
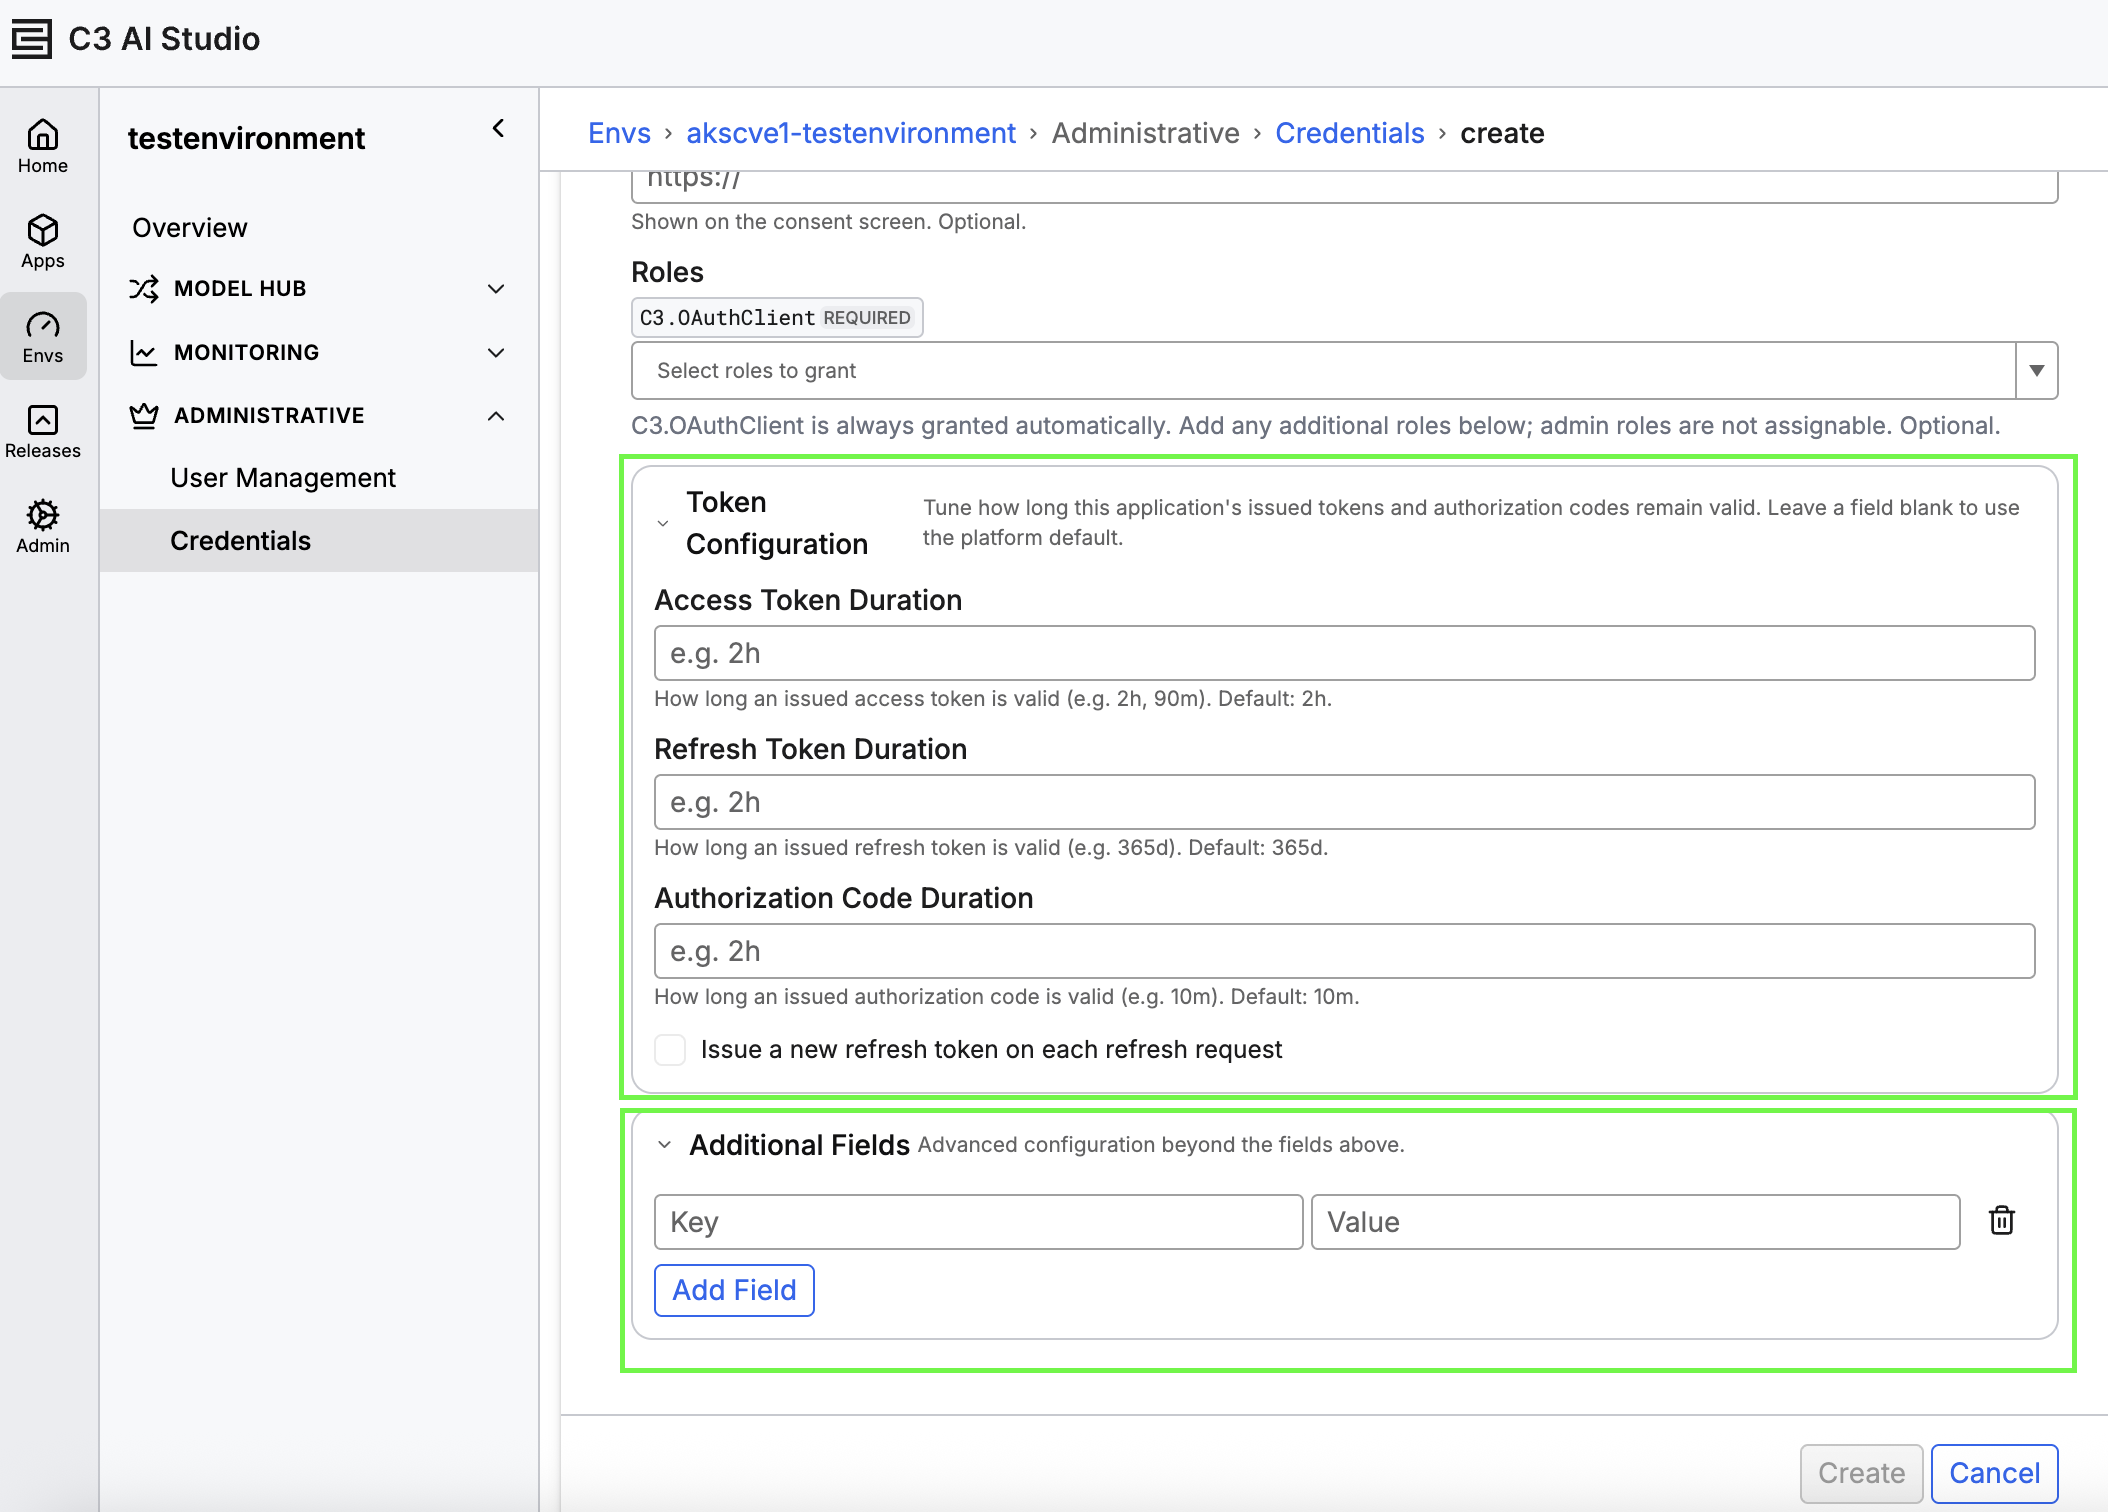
C3.OAuthClientin place. It is required, and C3 AI grants it automatically. Add other roles when the client needs them. Administrator roles stay out of this list. - Open Token Configuration when you need durations other than the defaults. Leave a field blank to keep the default.
 |
| Token configuration and Additional Fields |
Default token durations are:
- Access Token Duration:
2h - Refresh Token Duration:
365d - Authorization Code Duration:
10m
Select Issue a new refresh token on each refresh request when each refresh must return a new refresh token. The checkbox is cleared by default.
- Select Create.
- In Credential created, copy Client ID and Client Secret, and then select Done.
 |
| Client ID and Client Secret |
The new credential appears in the list with type OAuth 2.0 - Inbound.
Review credential details
Select a credential name, or select View Details in the row actions menu of a specific credential. The header shows the credential name, OAuth 2.0, and Outbound or Inbound.
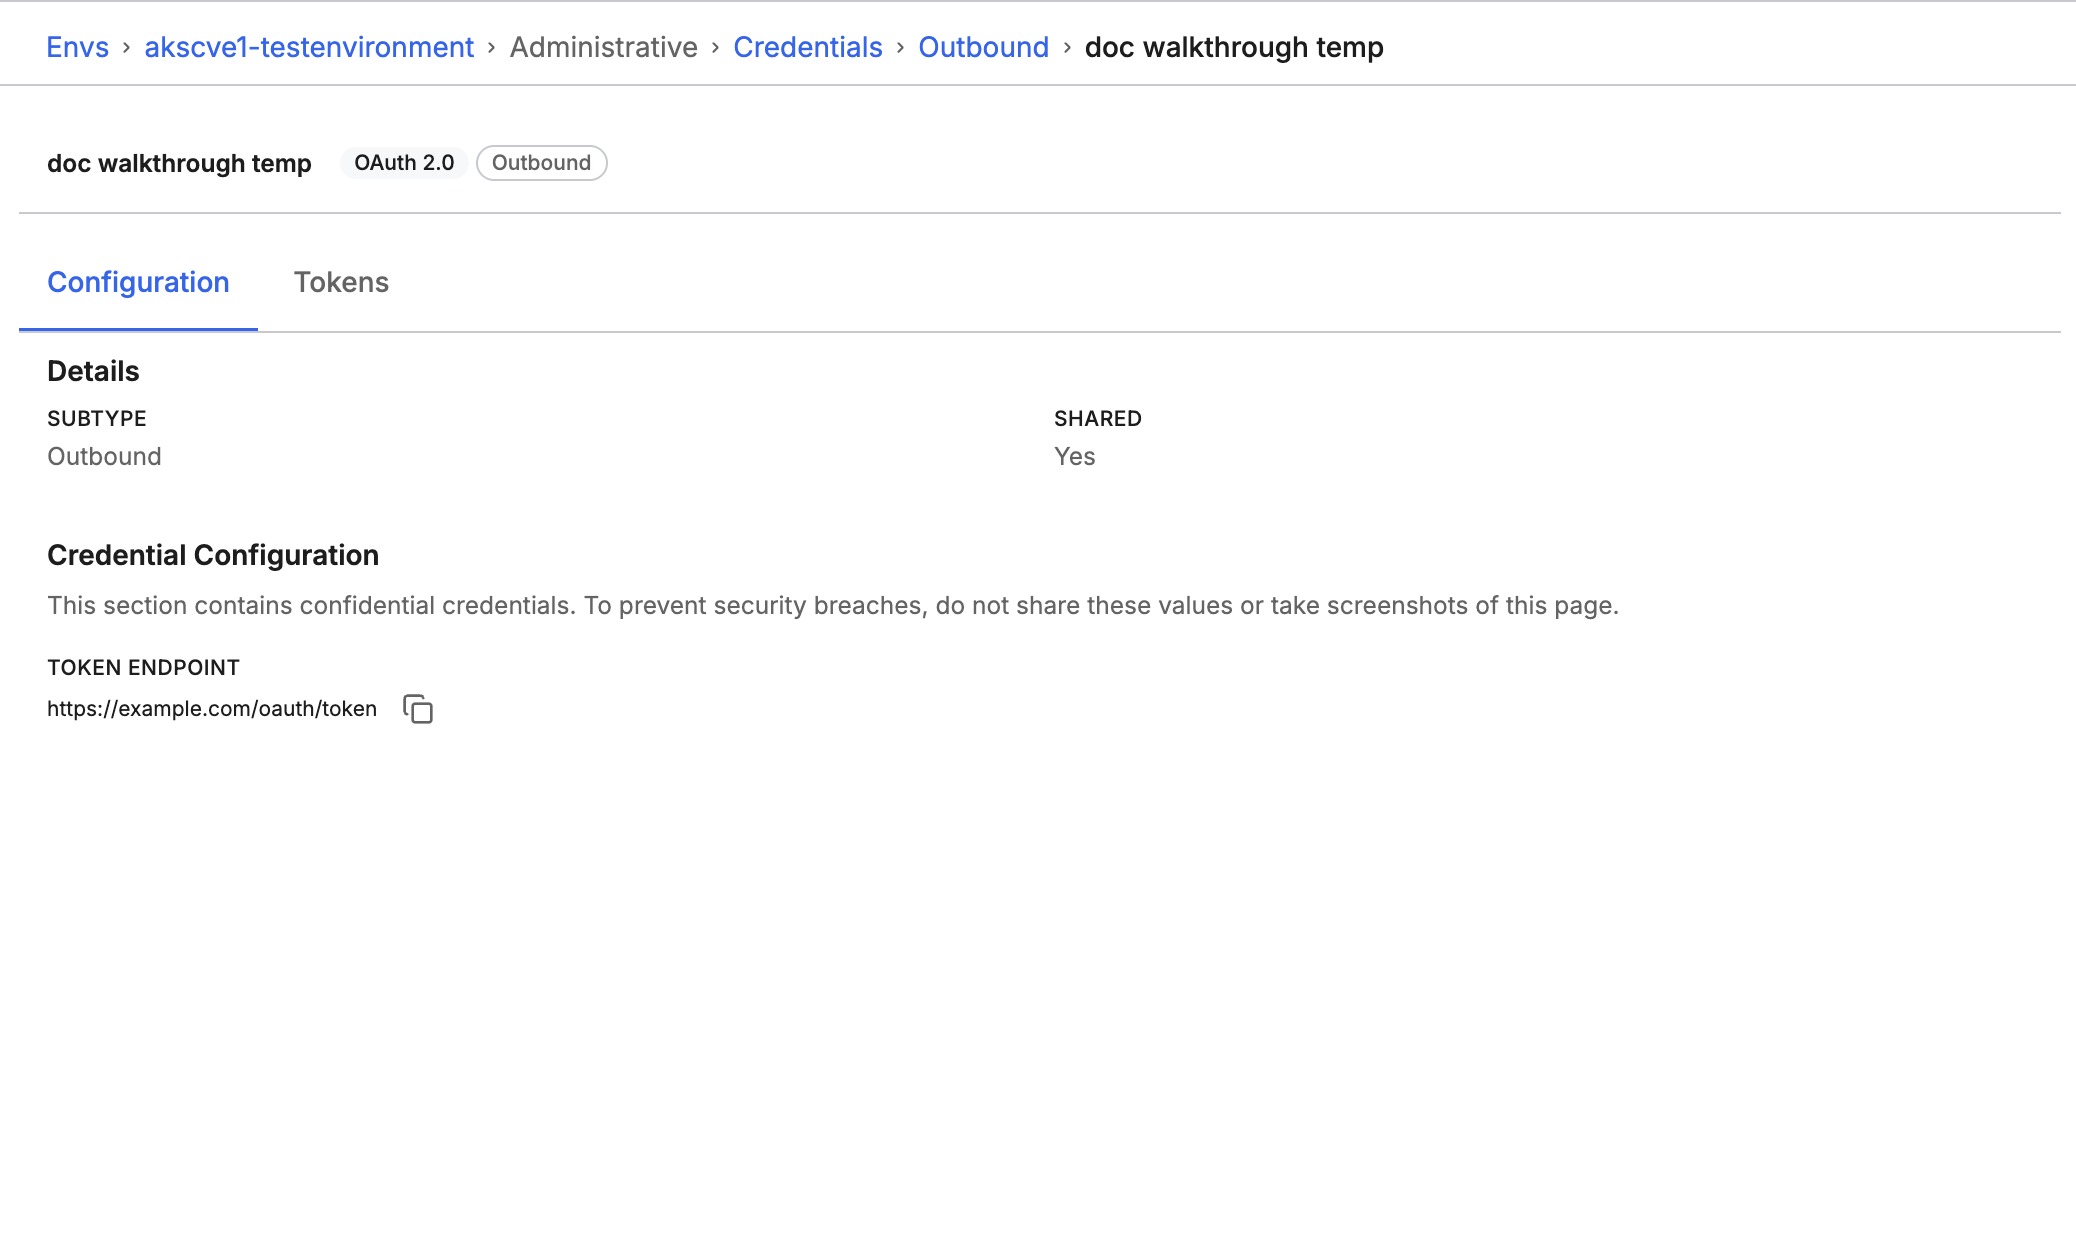 |
| Outbound Credential Details |
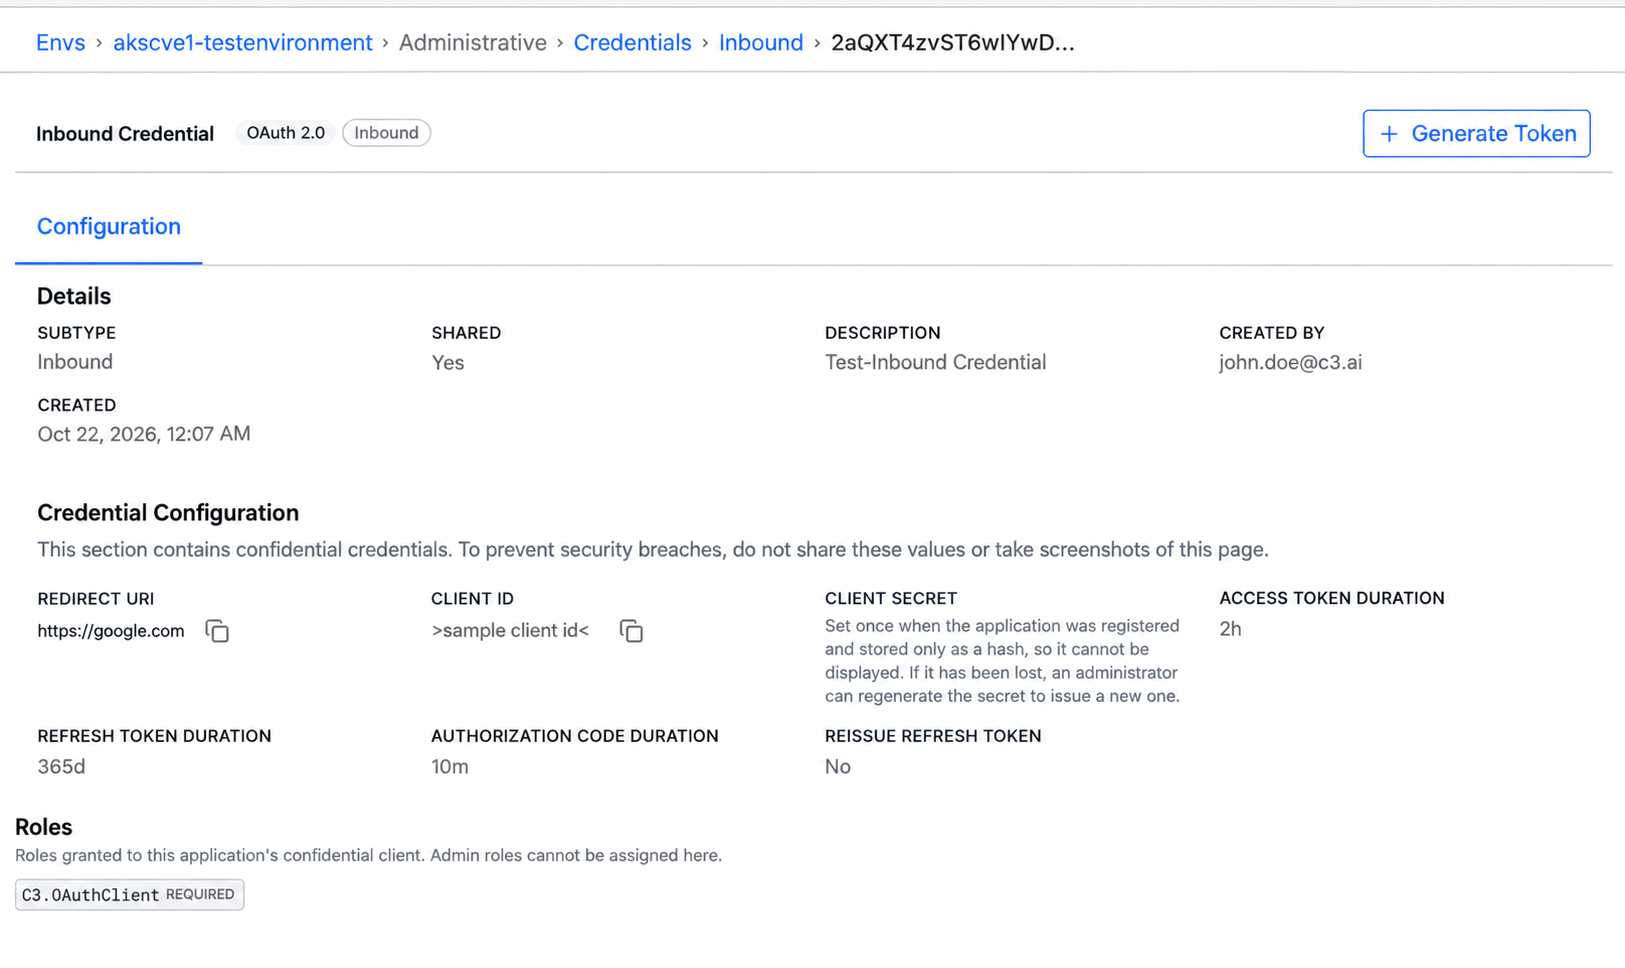 |
| Inbound Credential Details |
Details shows the subtype and whether the credential is shared. A description appears here when you entered one.
The Configuration tab lists the saved endpoints or inbound settings. Secret values stay hidden. An application administrator or higher can reveal a stored secret.
The page warns you not to share these values or capture them in a screenshot.
Select Edit Configuration to change an outbound endpoint or an inbound setting. On an inbound credential, you can change how long issued tokens and authorization codes stay valid. Leave a duration blank to keep the current value. Select Save changes to keep the update, or Discard changes to leave it unchanged. This action is available to an application administrator or higher, and only for an outbound authorization server or an inbound application.
For an inbound credential, the Client Secret appears only in the create dialog. Select Regenerate secret to issue a new secret. Copy the new value before you close the dialog. Clients that still use the previous secret stop working until you update them.
Roles lists the roles on an inbound confidential client. Change the selection, and then select Save Roles. C3.OAuthClient stays assigned.
Tokens
An outbound credential has a Tokens tab. Inbound credentials do not have the Tokens tab. The Tokens tab lists access tokens issued for that authorization server. Tokens you generate on this page are saved to your account.
When the tab is empty, it shows No tokens issued for this authorization server.
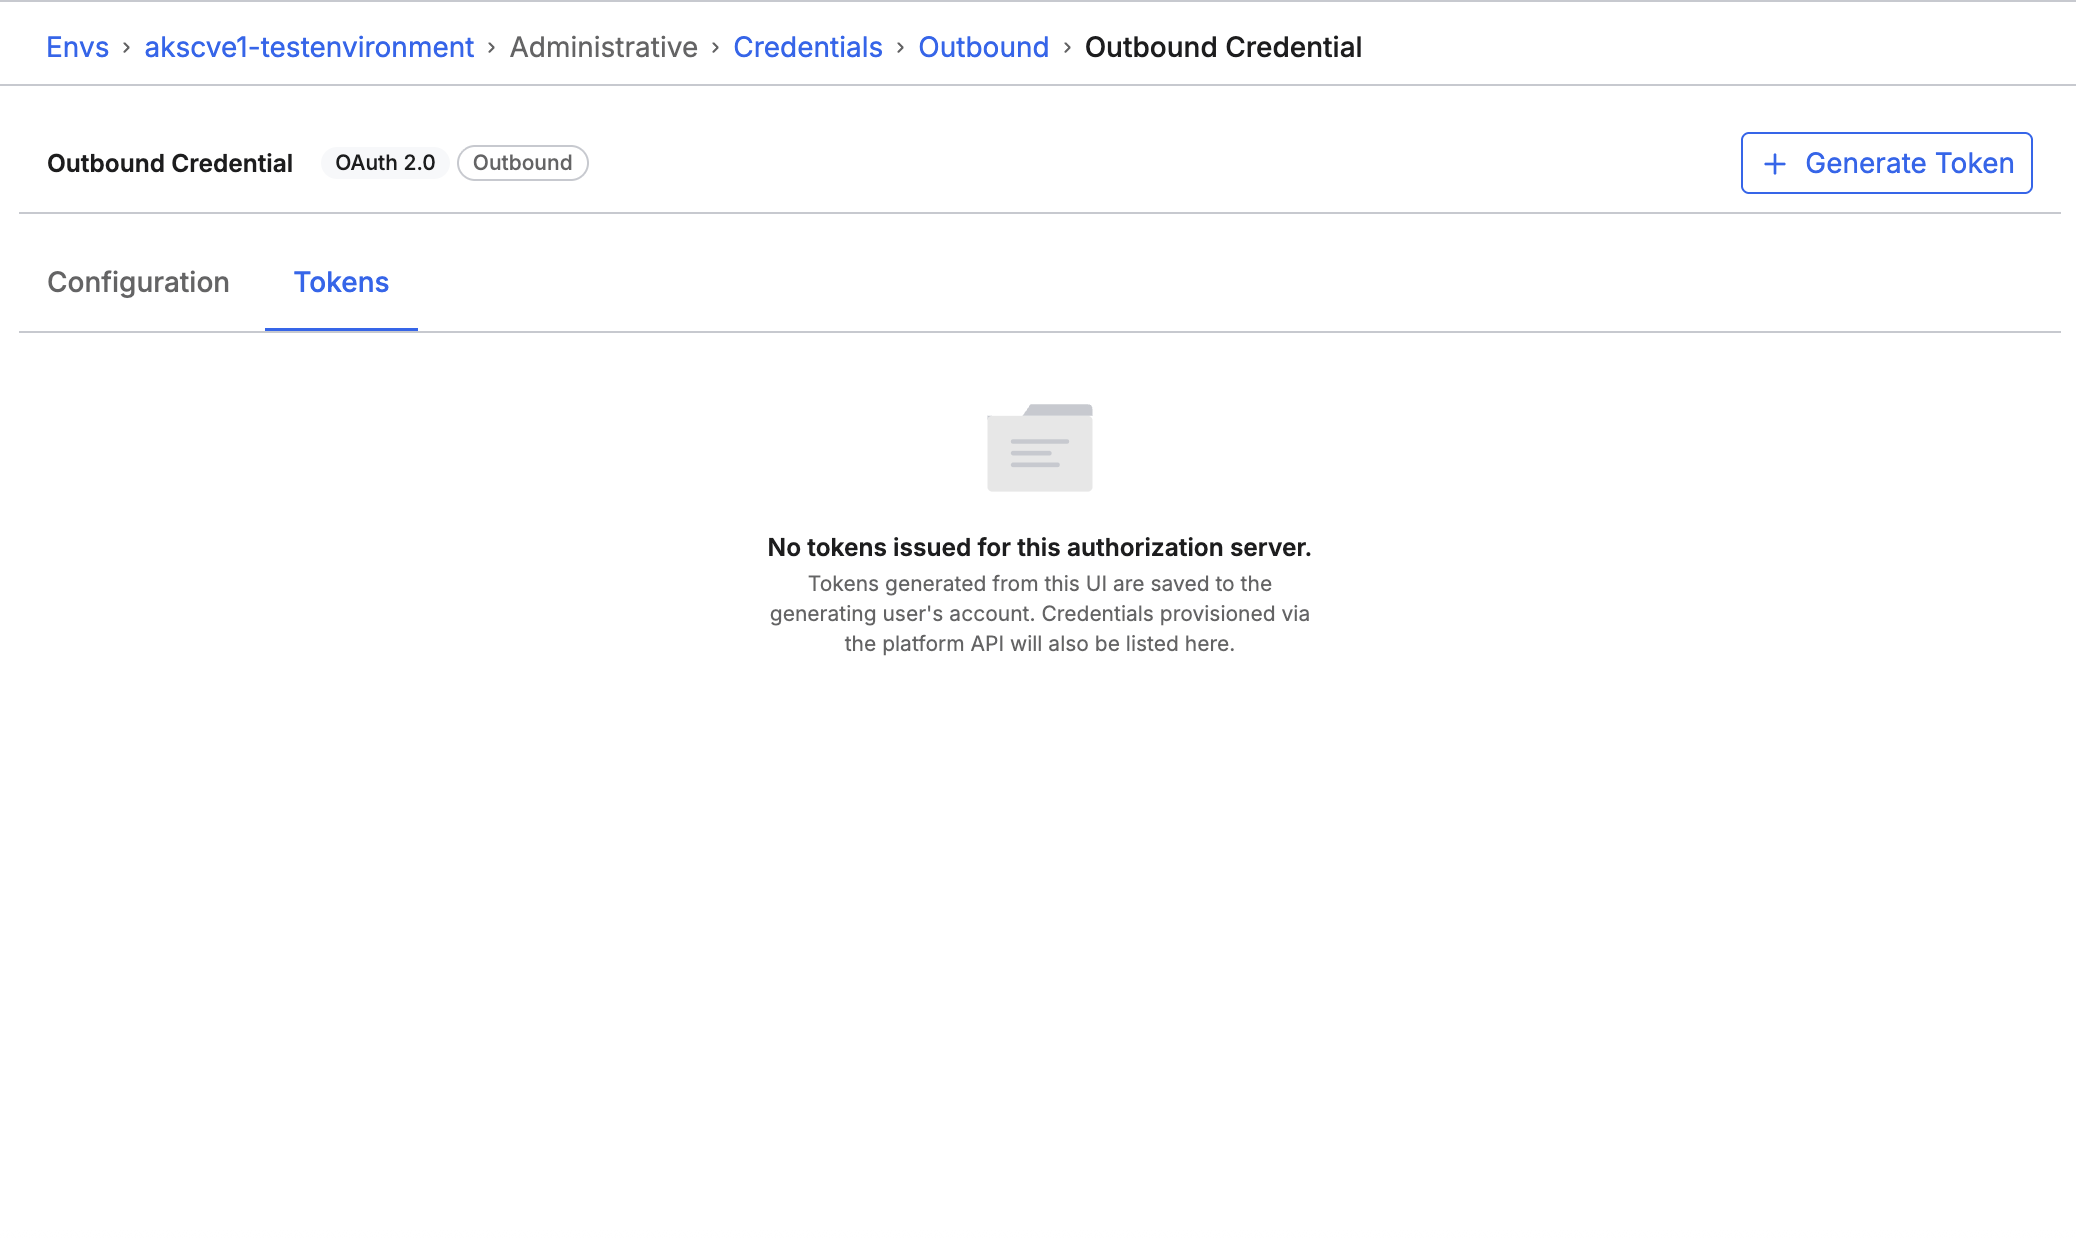 |
| Tokens |
Open a token to see its configuration. From that page you can:
- Refresh the token.
- Revoke the token: invalidates the token at the provider.
- Delete the stored token: removes the token from your account.
Generate a token
You can generate a token from the row actions menu or from the details page. On an outbound credential, Generate Token is on the Tokens tab. On an inbound credential, it is on the Configuration tab.
- Select Generate Token.
- Under Grant Type, select Client Credentials or Authorization Code (PKCE). PKCE is Proof Key for Code Exchange.
- In Credential name, enter a name for the issued token.
- In Client ID, enter the client identifier from the provider.
- In Client Secret, enter the client secret.
- In Scopes, enter an optional space-separated list of scopes.
- Select Generate.
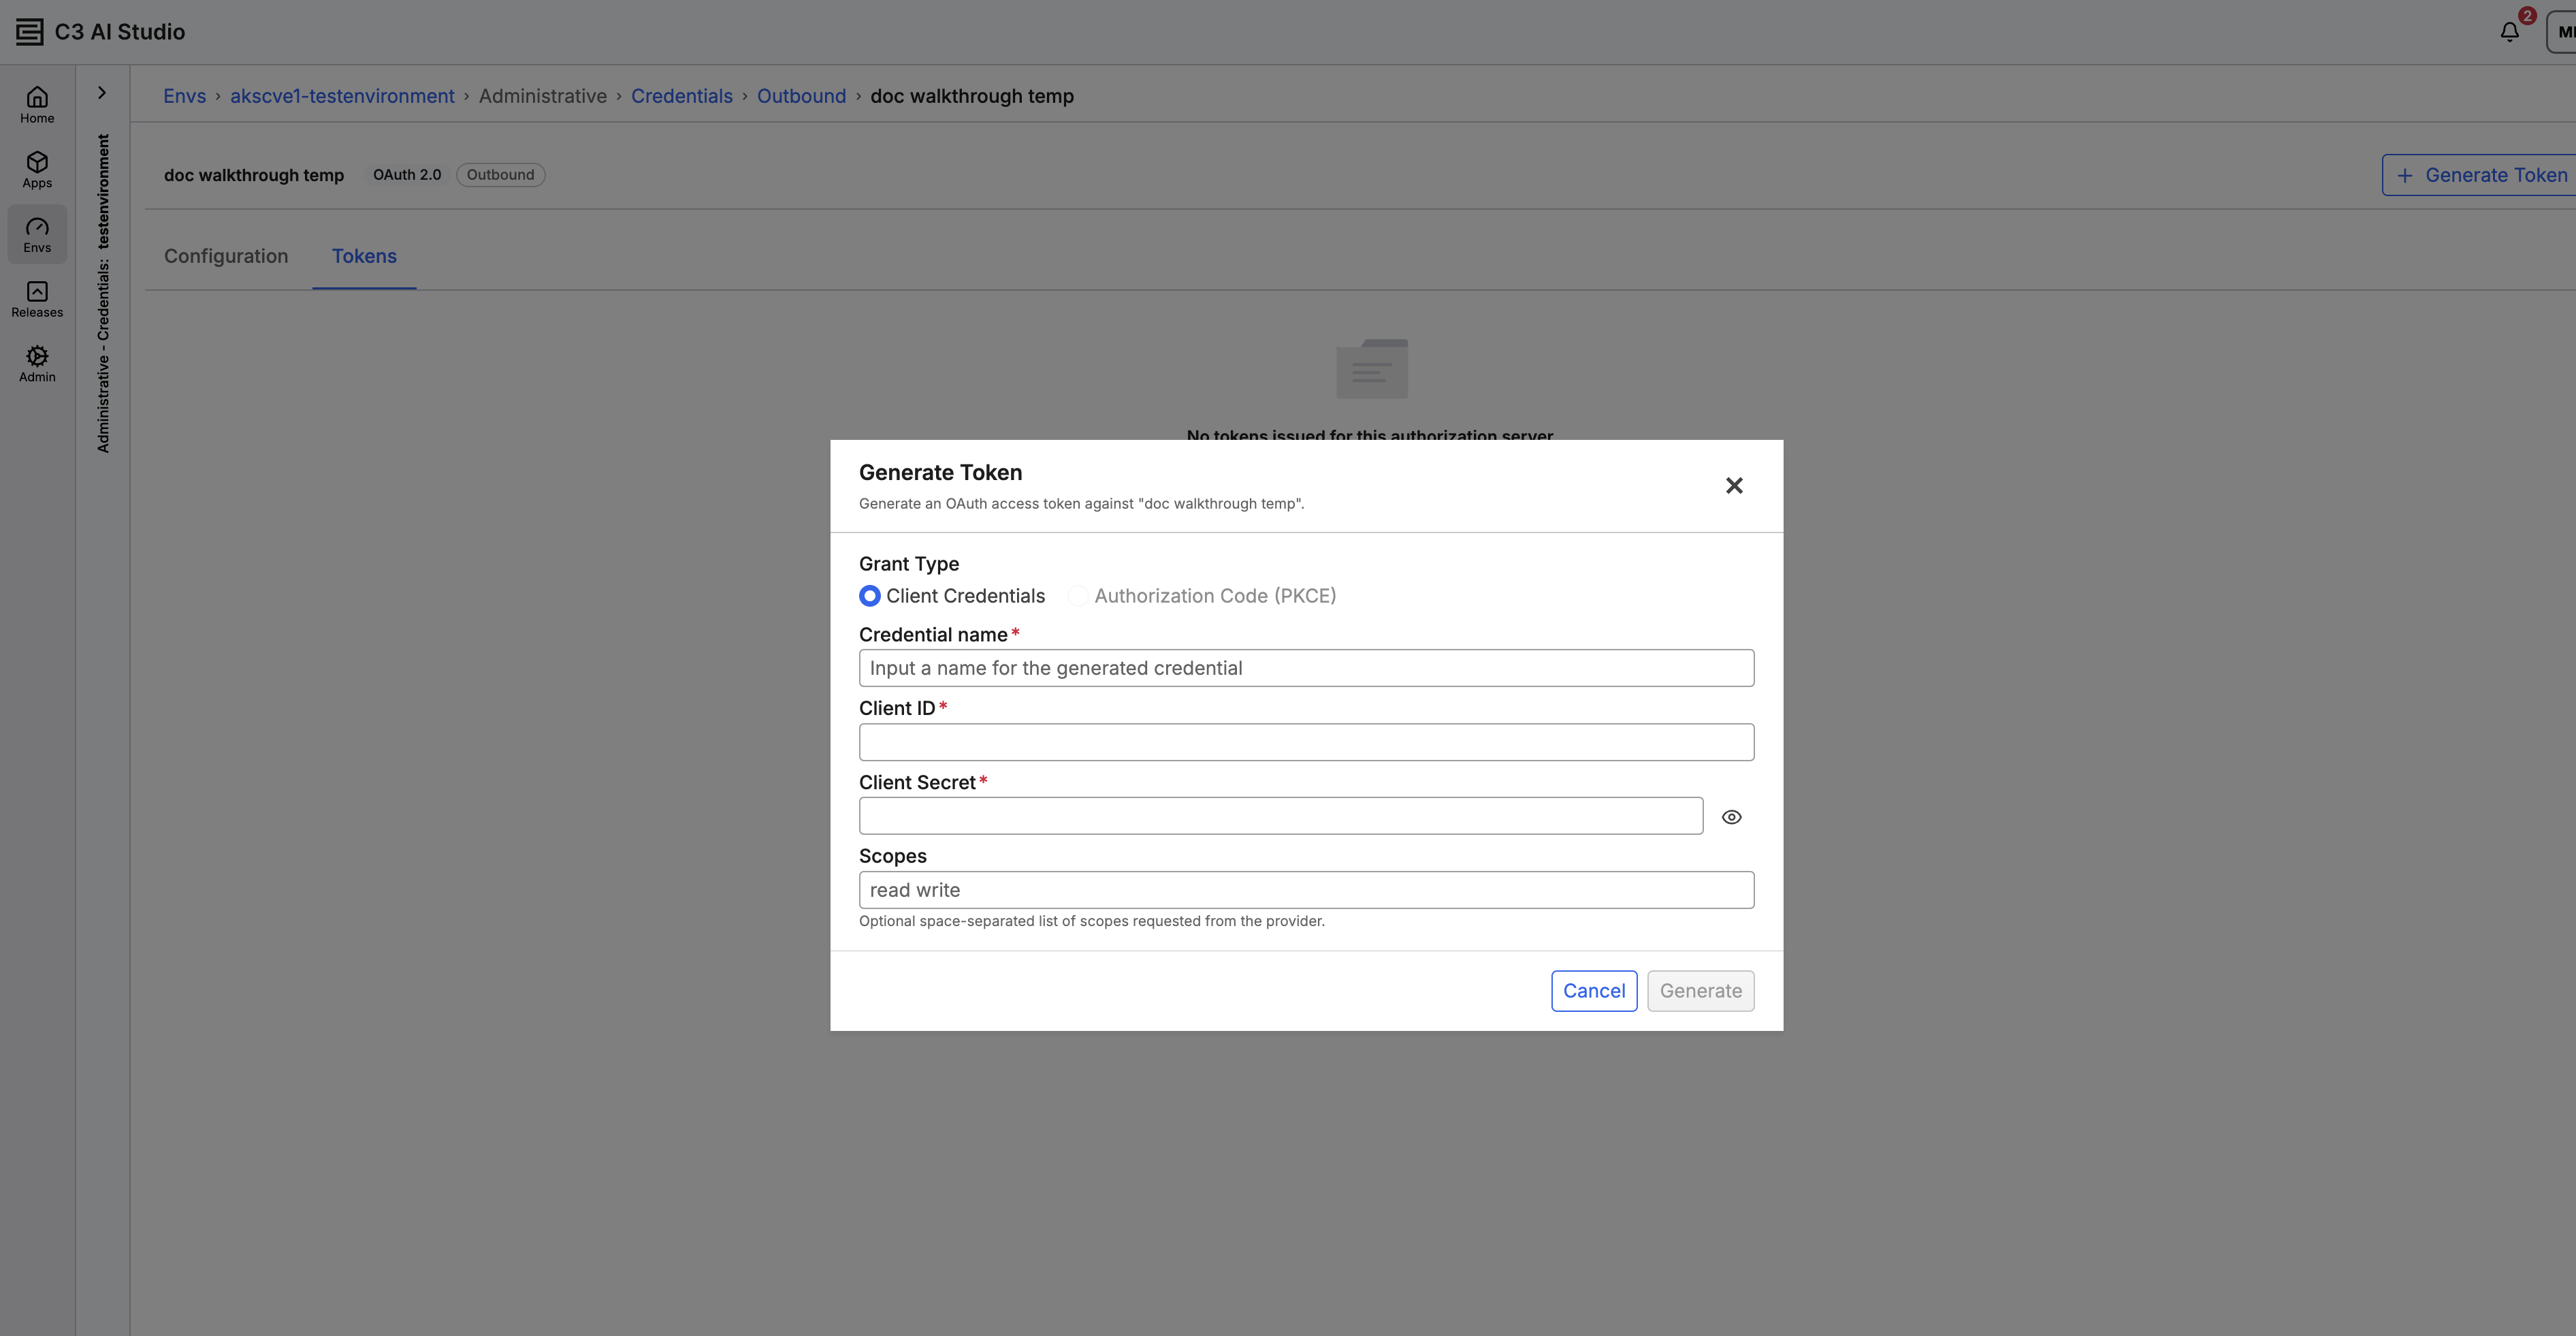 |
| Generate Token |
Authorization Code (PKCE) is available when the credential has an authorization endpoint. For that grant, enter the Redirect URI, select Open authorization page, and then paste the Authorization Code and Returned State.
For an outbound credential, the token is saved to your account. You can copy it in the dialog, or reveal it later on the token Configuration tab. For an inbound credential, the token is shown one time and is not saved. Copy it before you select Done.
Revoke a credential
Revoke is shown only when a revocation action is available.
- For an inbound credential, an administrator can revoke the shared client secret. Every user of that application must authorize again. You cannot revoke a single user.
- For an outbound credential, Revoke appears when a revocation URL is set and you have at least one token. It revokes your token at the provider and removes that token from your list. Other users are not affected.
- Select Revoke.
- Type the credential name to confirm.
- Select Revoke.
Delete a credential
Delete removes the credential. You cannot undo the delete.
- In the row actions menu, select Delete. On the details page, an administrator can select Delete on the Configuration tab.
- Type the credential name to confirm.
- Select Delete.
Deleting an inbound credential also removes its confidential-client user and its token durations.
The list shows Credential deleted.