Build and Run Data Validation Rules in Data Fusion
Data Fusion is in Beta. Please contact your C3 AI representative to enable this feature.
Validating your data ensures that the information flowing into your C3 AI application is accurate, complete, and reliable. Using the Data Validation tab in C3 AI Studio Data Fusion, you can define and run rules that automatically check your datasets for inconsistencies, missing values, or incorrect relationships between entities. This helps you detect and correct data quality issues early, maintain trustworthy analytics, and ensure that downstream models and workflows operate on clean, validated data.
Example Use Case
Suppose you created an entity from a CSV file containing patient information from a melanoma immunotherapy clinical trial, for example MelanomaImmunotherapyTrialData1.csv. This dataset includes fields such as Patient ID, Age, Treatment Type, Response Status, and Follow-up Duration. Use the following procedure to ensure the integrity of patient age data in clinical trial datasets.
Write a rule that checks whether the age field contains valid positive values.
Deploy and run the rule to identify invalid or missing records.
Review the validation summary and fix any data quality issues in the source file.
Seeded vs. Non-Seeded Data Validation Rules
All data validation rules in C3 are defined using the base type DataValidation.Rule, which can be extended to represent specific rule types such as Foreign Key or Lambda rules. Rather than supporting a single rule type, the platform provides a flexible rule model that can be extended as needed.
The distinction between seeded and non-seeded rules is based on how the rules are created and managed, not on differences in their structure or type:
Seeded rules are defined as part of the application model and include the
SeedDatamixin, which allows them to be packaged and deployed with the application. These rules are typically version-controlled and promoted through environments (Dev → Test → Prod).Non-seeded rules are created dynamically, often at runtime or through the UI or API, and are not included in the application seed data.
While the underlying rule model remains consistent, seeded rules may have restrictions on editing or deletion in Test and Production environments to ensure governance and consistency in validated data models.
Seeded Rules
You create seeded rules as part of your application’s seed data. You do not need to manually author JSON files, you typically create validation rules through the application or UI and then publish them using the publish workflow. As part of this process, Data Fusion exports the rules as JSON files and places them under the application’s seed/ directory, where they become part of the application package.
When you create or deploy the application, Data Fusion automatically seeds these rules in the target application. You typically use seeded rules when you want to reuse the same validation logic across multiple applications. For example, you might create rules in a development environment, publish them, and then deploy them to test and production as part of the application.
Use seeded rules when you want to:
- Initialize validation rules automatically when the application is created
- Reuse the same rules across environments
- Version and deploy validation logic with the application
Non-Seeded Rules
You create non-seeded rules directly in the target environment, primarily through C3 AI Studio. These rules exist only in that environment and are not included in the application’s seed data.
You typically use non-seeded rules for environment-specific validation or experimentation. Because these rules are not published or packaged with the application, they do not automatically appear in other environments.
Use non-seeded rules when you want to:
- Create validation rules specific to a single environment
- Experiment with validation logic without publishing it
- Avoid impacting other environments
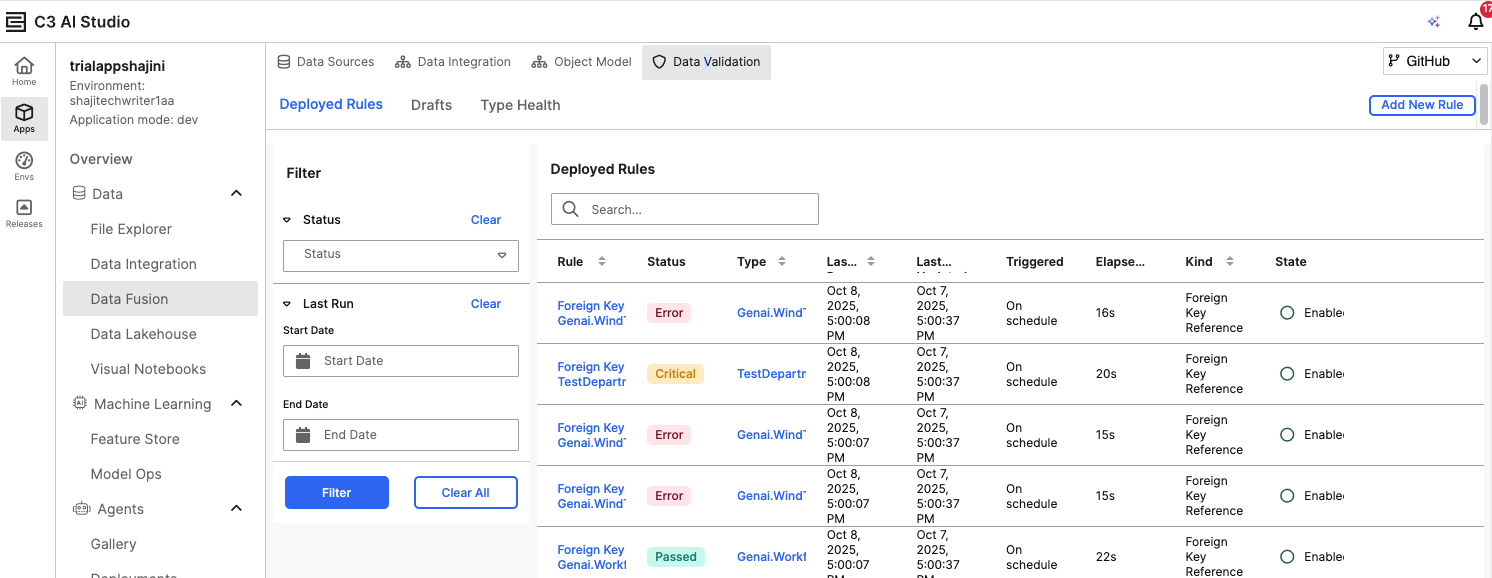
Overview of the Data Validation interface
The Data Validation interface in C3 AI Studio (Data Fusion) provides an end-to-end workflow for ensuring data integrity within your C3 AI application.
Using this interface, you can:
- Create and configure validation rules to enforce data quality standards.
- Run validations on your entities to detect inconsistencies or missing values.
- Monitor and review results directly within Studio through an integrated summary view.
You can define both prebuilt and custom validation rules, execute checks on your data, and analyze validation outcomes—all within the same Studio environment.
Open your application in C3 AI Studio.
From the left navigation panel, go to Data Fusion > Data Validation.
The Deployed Rules page displays all existing validation rules along with their status (for example, Passed, Error, or Critical).
- Use the Filter panel to view rules by Status or Last Run Date.
- The Deployed Rules table shows details such as Rule Name, Type, Trigger Schedule, Elapsed Time, and Rule State.
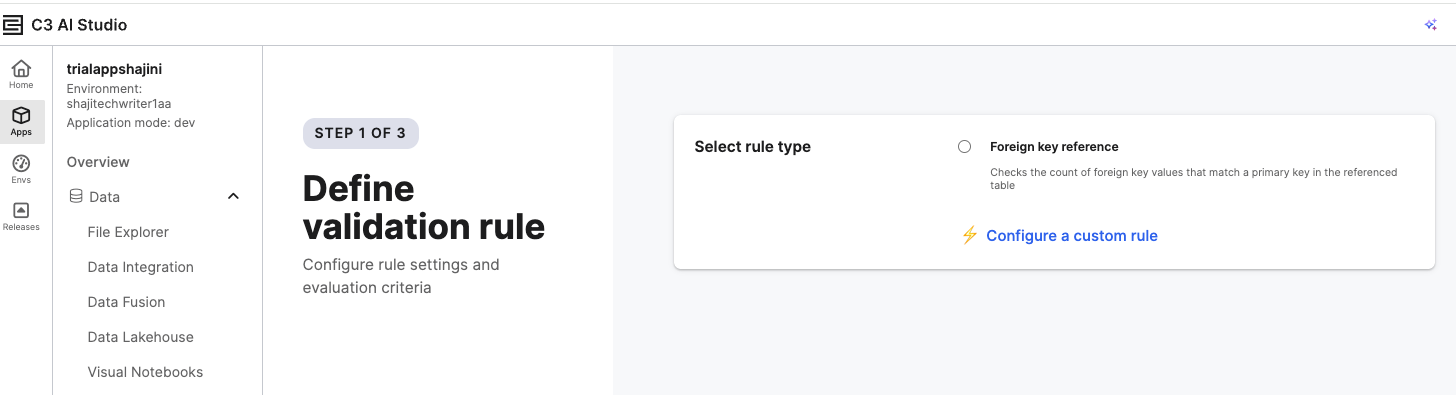
Create a New Validation Rule
Select Add New Rule on the top-right of the Deployed Rules page.
On the Define Validation Rule page, choose one of the following options:
- Foreign Key Reference — Checks that all foreign key values match a primary key in a referenced table.
- Configure a Custom/Lambda Rule — Create a rule using Python or JavaScript for specific data validation logic.
A Lambda rule in C3 AI Studio is a lightweight, custom validation rule that lets you define your own logic for checking data quality. Instead of relying only on predefined rule types (like foreign key checks), a Lambda rule allows you to write simple Python or JavaScript functions that evaluate each record in your dataset according to your business requirements.
For example, you can create a Lambda rule to verify that all “age” values are positive or that a “status” column contains only allowed categories. Lambda rules give you flexibility to express validation logic directly in code, run it against selected entities, and identify records that do not meet the defined criteria.
Define the Rule Logic
In this step, you define the validation logic that determines how your data will be checked. Use this interface to specify conditions, expressions, or transformations that form the basis of your custom data validation rule.
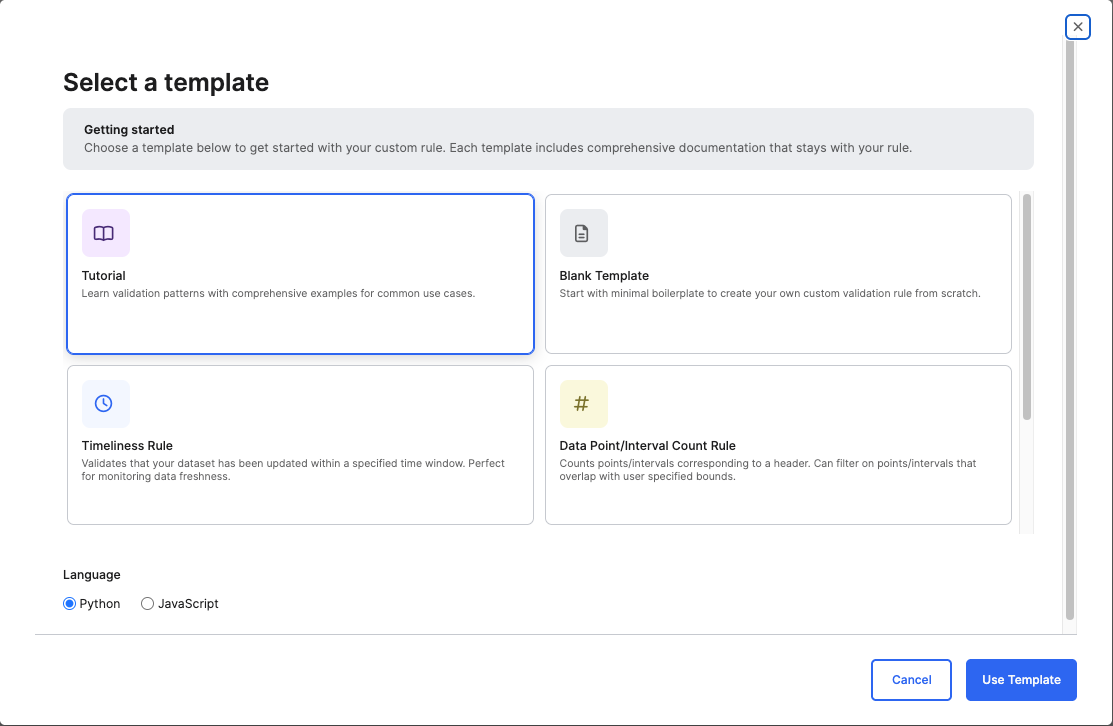
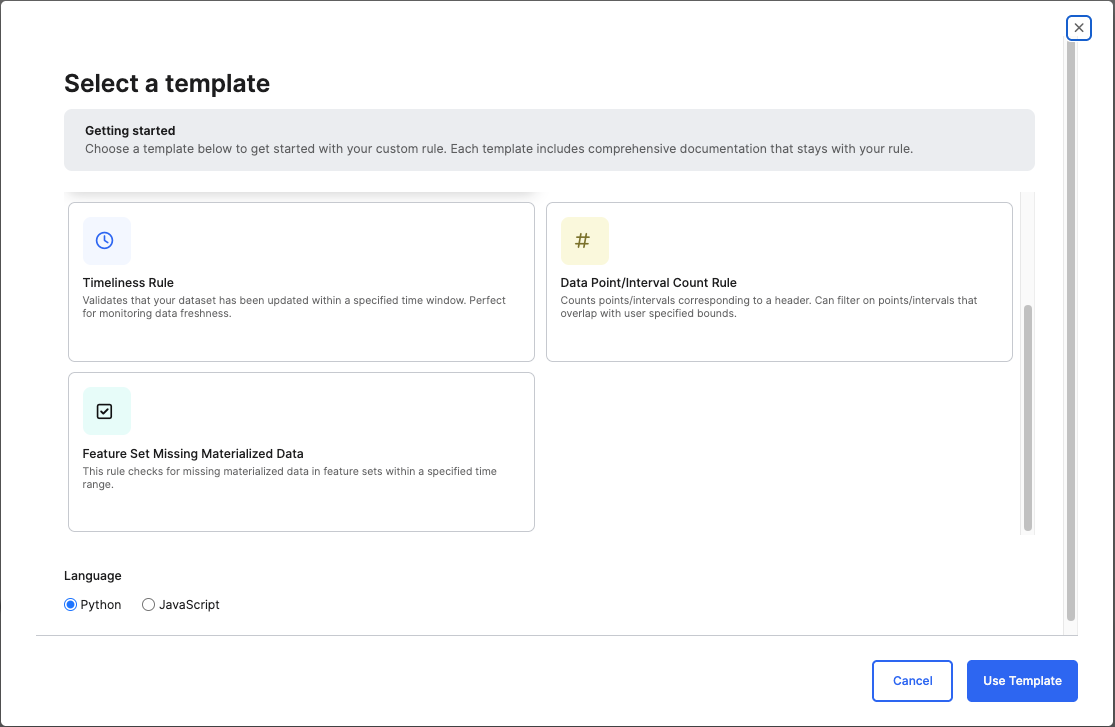
After you select Configure a Custom/Lambda Rule, the Select a Template dialog opens.
Use this interface to choose how you want to define your validation rule.Choose a Template
Blank Template — Start with a minimal boilerplate to create a custom validation rule from scratch.
Tutorial Template — The Tutorial template is an interactive, instructor-style workspace that teaches you to build scalable, production-grade Data Validation rules. It includes platform execution guidance, schema design rules, helper method documentation, troubleshooting tips, and full example implementations, all enriched with explanations directly in the code. When you select it, it opens a pre-populated rule file containing detailed inline explanations, example code, and best practices for writing validation logic using the platform’s MapReduce execution model. The Template includes:
- Quick-start guidance on choosing a target type, designing detail schemas, and authoring
mapandsummarizefunctions. - A Platform Primer explaining how rules run in parallel, how the
runobject behaves, and how final statuses are produced. - Instructions for designing details tables and schemas, including required fields and schema constraints.
- Reference material for runtime helpers such as:
run.debugrun.addDetailsrun.addError- A Troubleshooting & FAQ section covering common issues such as mixed column types, missing statuses, and debugging tips. This template is ideal for users who are new to custom validation or anyone who wants a structured, example-driven starting point for building robust validation rules.
- Quick-start guidance on choosing a target type, designing detail schemas, and authoring
Timeliness Rule — Use this predefined rule to verify that your dataset has been updated within a specified time window. This is ideal for monitoring data freshness and detecting ingestion delays. You can use this rule when you need a quick way to monitor data freshness without writing custom logic. This rule helps ensure that your dataset is updated within a specific time interval, which is particularly useful for detecting missing or delayed data updates.
Data Point / Interval Count Rule — Use this rule to verify that your dataset contains the expected number of data points or intervals within a specific time range or measurement window. You can narrow the scope by applying filters to check only the records that fall within a certain time or data boundary (for example, readings from a specific sensor or date range) or to count only those points or intervals that overlap with specified bounds. This helps detect missing, irregular, or incomplete data before it impacts analysis or model accuracy and is particularly useful when validating time-series or interval-based datasets or when you need to ensure that only a subset of data within user-defined start and end times is validated.
Feature Set Missing Materialized Data Rule — Use this rule to check for gaps or missing materialized data within one or more Feature Sets over a specified time range. It helps ensure that Feature Sets used for machine learning or analytics contain complete and up-to-date materialized data before training or inference, supports data readiness for feature pipelines and predictive modeling, and assists in troubleshooting data freshness or ingestion issues in materialized datasets.
Configuration options:
- To validate specific Feature Sets, add a filter condition in Advanced Config:
- Key:
filter - Value:
intersects(id, ['<feature_set_ID_1>', '<feature_set_ID_2>'])
- Key:
The result table lists the Feature Set ID, Subject ID, and Start/End Time Range for each gap in materialized data.
Select a Language
- Choose the language in which to write your rule logic:
- Python (default) — Recommended for most validation scenarios.
- JavaScript — Select if your existing workflows or data pipelines are implemented in JavaScript.
- Choose the language in which to write your rule logic:
Select Use Template to open the code editor and define your rule logic.
- The selected template automatically prepopulates the editor with base logic or examples to help you get started.
- Modify or extend the code as needed to align with your data validation goals.
This opens the code editor to modify the code.
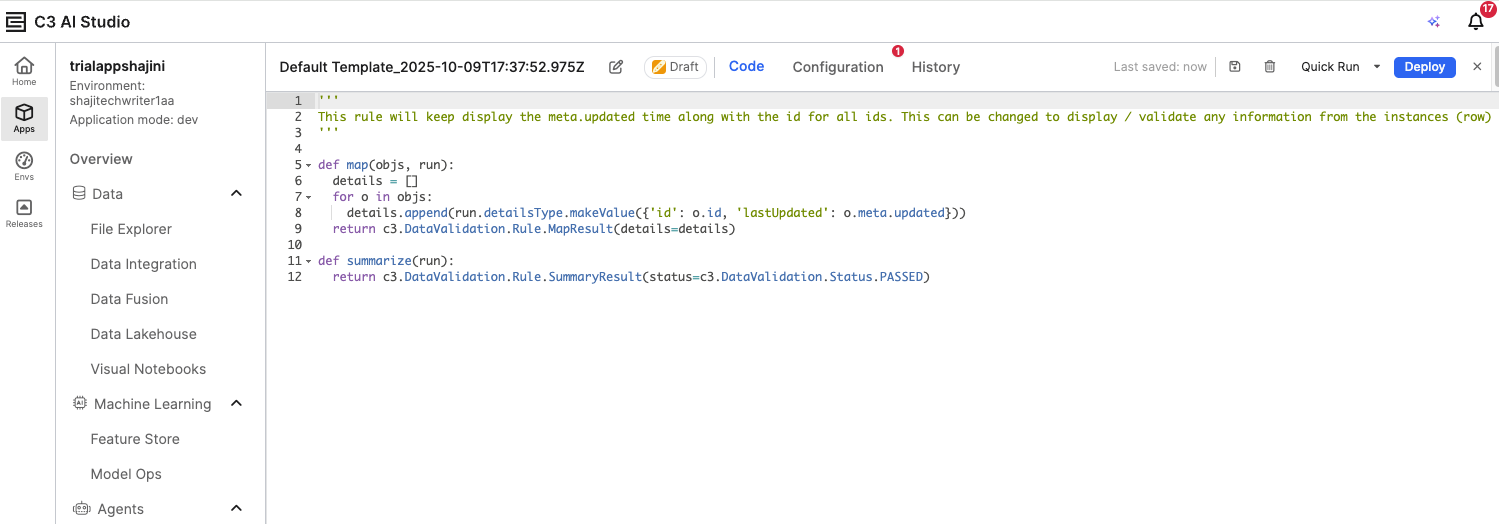
The code editor shows a preview of the rule functions:
The map function defines the logic to examine data records.
The summarize function determines whether the rule passes or fails based on results from map. In a Lambda rule, the map and summarize functions work together to perform and report data validation. The map() function runs first and checks each record in the selected entity against the defined validation condition, capturing details for any records that fail. The summarize() function then aggregates those results to determine the overall outcome of the rule—whether it passed or failed—and returns a summary message. Together, they allow you to apply detailed record-level checks while producing a clear, high-level validation result.
Configure the Rule
Configure the target entity, result table, and runtime settings for your validation rule, and optionally add advanced parameters if filters or conditions are required.
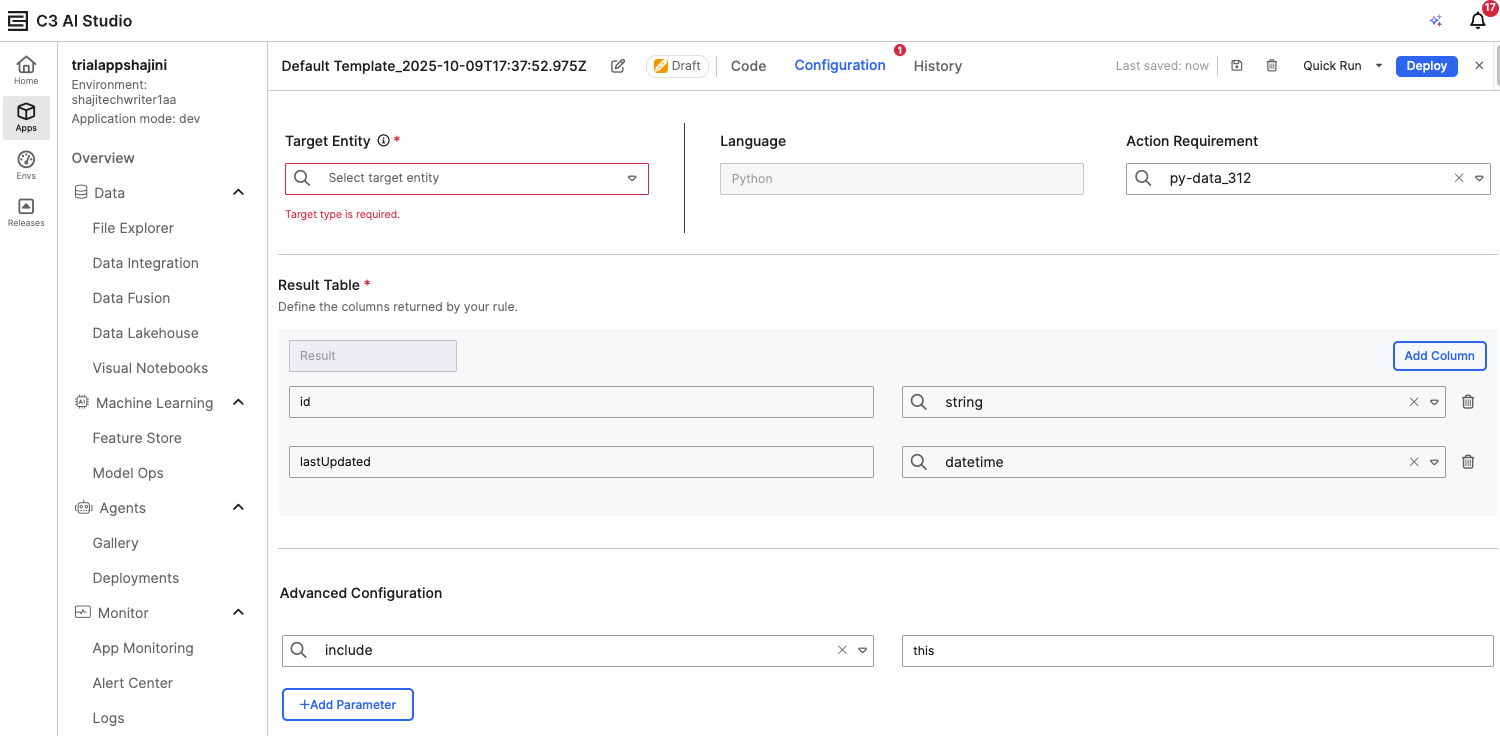
In the Configuration tab:
Under Target Entity, select the entity you want to validate (for example, the entity you created from a CSV file).
Under Result Table, define the columns that will be returned in the validation results (for example, id, lastUpdated, or any relevant field names).
Verify the Action Requirement is prefilled with the appropriate runtime. This ensures that your rule runs in an environment that includes the necessary Python or JavaScript libraries. The default runtime is preconfigured with commonly used dependencies, so in most cases, no changes are required.
Optionally, add parameters under Advanced Configuration if your rule needs to reference specific filters or conditions.
Deploy the Rule
Use the Deployment Configuration window to deploy your data validation rule after configuring and testing it. You can choose whether to replace an existing rule or deploy it as a new one.
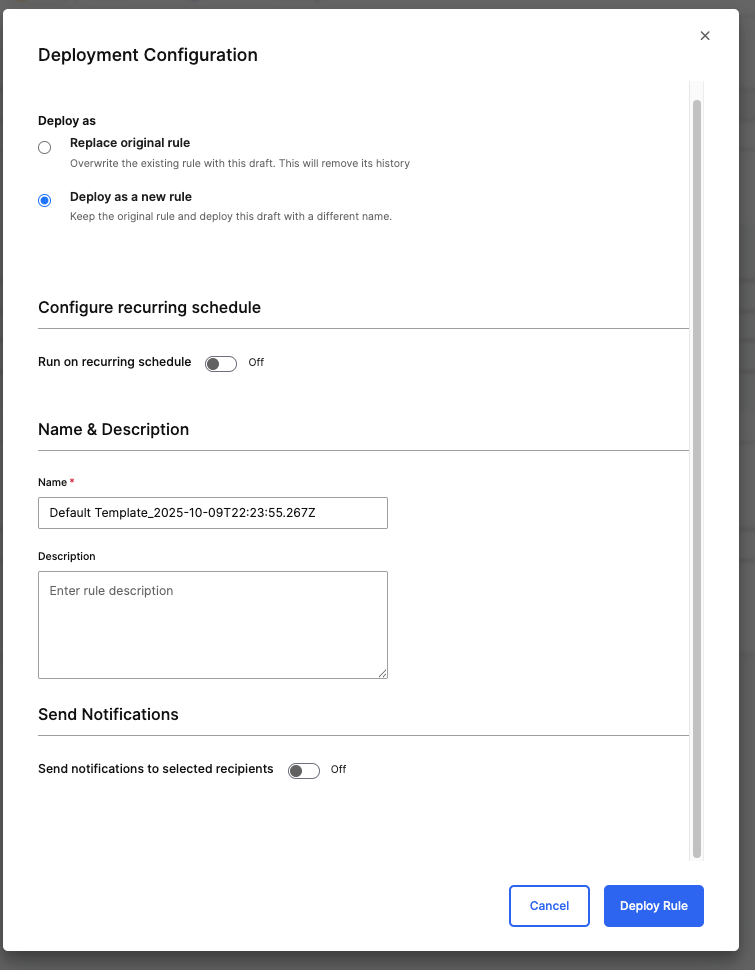
Click Deploy in the rule editor.
In the Deployment Configuration window, choose one of the following options:
Replace original rule – Overwrites the existing rule and removes its history.
Deploy as a new rule – Keeps the original rule and saves the current draft as a new version.
(Optional) Toggle Run on recurring schedule if you want the rule to execute automatically at regular intervals.
Enter a Name and an optional Description for the rule.
(Optional) Enable Send notifications to selected recipients to alert specific users when the rule runs.
Select Deploy Rule to finalize deployment.
This process makes the rule active and available under the Deployed Rules tab for monitoring and execution.
Run and Review the Rule
After defining and configuring your validation rule, you can deploy and run it to verify its behavior and review the results directly within the Data Fusion interface.
Once configured, select Deploy to make the rule available in your environment.
Use Quick Run to run the rule immediately and test the results.
Return to the Deployed Rules tab to view the run status and execution history.
The Status column indicates whether the rule passed or failed.
The Elapsed Time column helps track execution performance.
You can click on a specific rule to view detailed output, including any validation errors detected.
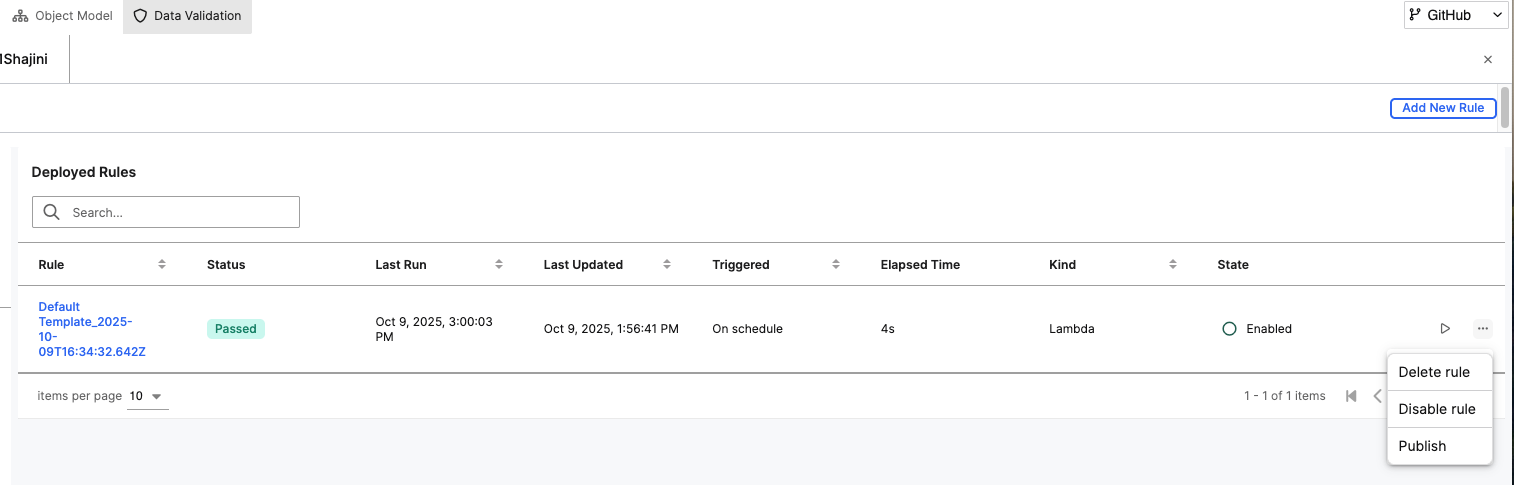
View Deployed Rules
After a data validation rule is deployed, it appears under the Deployed Rules tab in the Data Validation perspective. This interface allows you to monitor, manage, and maintain deployed rules.
The menu to the right of each rule provides management options:
Delete rule – Permanently removes the rule.
Disable rule – Temporarily deactivates the rule without deleting it.
Publish – Makes the rule available for shared use or inclusion in production workflows.
This view helps you quickly assess the health and status of their validation rules and take appropriate actions to maintain data quality in their environment.
View Rule Execution History and Results
After a validation rule is deployed and executed, you can monitor its performance and review detailed results in the History tab under the Data Validation perspective. This interface provides insights into how your rule ran on the selected entity and what data issues were detected. This view helps you verify whether their validation logic is functioning as expected, identify problematic data entries, and ensure the overall integrity of data loaded into their entity.
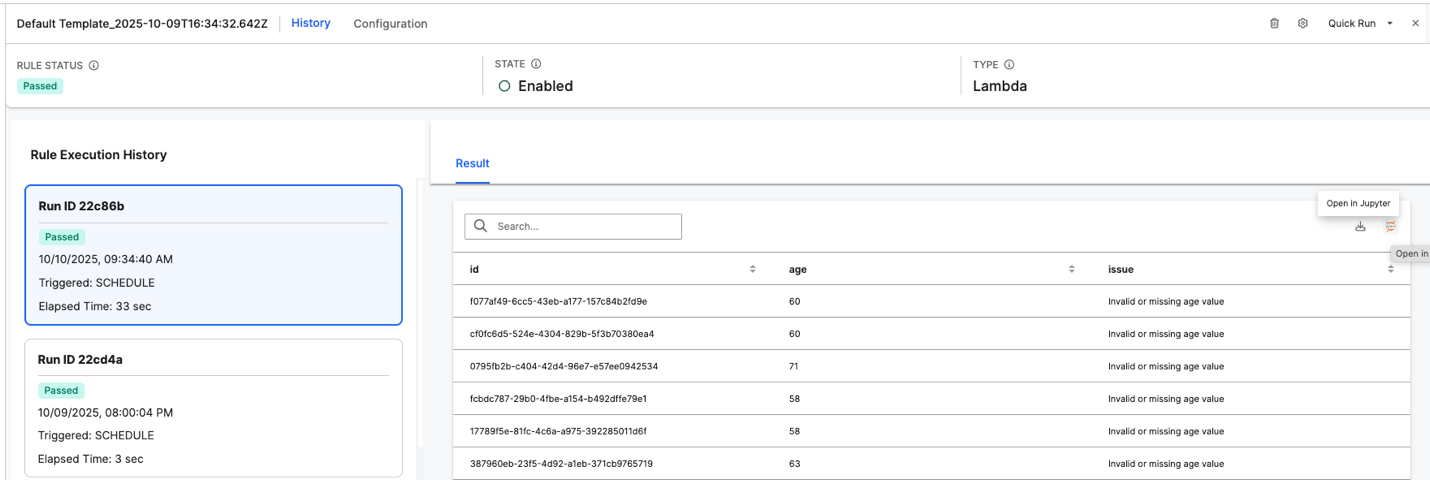
Interface Overview:
Rule Status – Displays the overall outcome of the most recent rule execution (for example, Passed, Error, or Critical).
State – Indicates whether the rule is Enabled or Disabled.
Type – Specifies the type of rule, such as Lambda, representing a rule implemented as a Python or JavaScript function.
Rule Execution History:
Lists all past executions of the selected rule, with details such as:
Run ID – A unique identifier for each execution instance.
Status – Displays whether the execution Passed or Failed.
Triggered – Shows how the rule was initiated (for example, SCHEDULE or Manual).
Elapsed Time – Indicates how long the execution took to complete.
Selecting a specific Run ID loads the corresponding results on the right pane.
Result Panel:
Displays the data validation results for each record processed by the rule.
Columns such as id, age, and issue show record identifiers, input values, and any detected data issues (for example, “Invalid or missing age value”).
You can search within the results or export them for further analysis.
Additional Actions:
- Use the Open in Jupyter option to view or analyze validation results interactively in a Jupyter notebook.
Export Validation Results to Jupyter
After running a data validation rule, you can export the results to Jupyter for deeper analysis. This allows you to work with your validation data using Python and Pandas within your Jupyter notebook environment. Exporting validation results to Jupyter helps you perform advanced data exploration, filtering, and visualization of data issues detected by the validation rule.
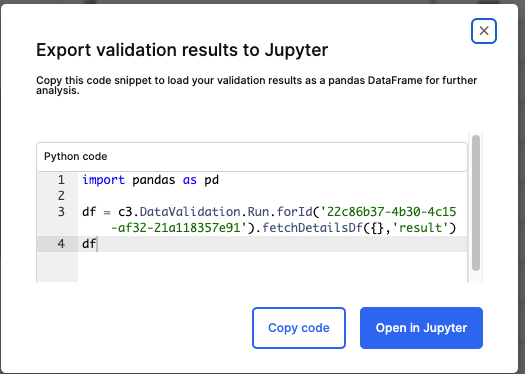
Interface Overview
The Export Validation Results to Jupyter dialog provides a pre-generated Python code snippet that retrieves your validation results as a Pandas DataFrame.
Steps to Use This Feature
Select Open in Jupyter from the rule results page.
In the dialog box, review the Python code snippet provided. It typically looks like this:
Pythonimport pandas as pd df = c3.DataValidation.Run.forId('<Run_ID>').fetchDetailsDf({}, 'result') dfRun_ID – Refers to the unique identifier of the validation run.
The code fetches all result details and converts them into a DataFrame for analysis.
Choose one of the following options:
Copy code – Copies the snippet so you can paste it manually into your Jupyter notebook.
Open in Jupyter – Automatically opens a Jupyter notebook session with the snippet preloaded.