Configure Unstructured Data Integration Pipeline
Data Fusion is in Beta. Please contact your C3 AI representative to enable this feature.
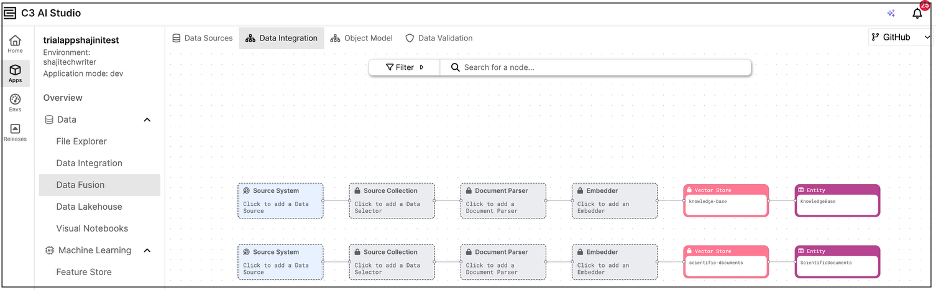
This topic describes how to configure an Unstructured Data Integration (UDI) pipeline in C3 AI Studio, from the Data Fusion interface of your application. Each step in the UDI pipeline is configured by selecting and connecting the corresponding components displayed on the canvas, as shown in the figure.
These components include the Source System (to connect to a file-based data source), Source Collection (to organize and manage the imported files), Document Processor (to extract and preprocess unstructured content), Embedder (to convert content into vector embeddings), Vector Store (to store and manage the embeddings), and Target Entity (to hold the processed data for downstream search and analysis).
Together, these components enable the ingestion of unstructured files, transformation into embeddings, and storage in a target entity for efficient semantic search and retrieval.
Multiple Unstructured Data Integration Pipelines
In the Unstructured Data Integration (UDI) canvas shown in the example here, each row represents an independent data pipeline linked to a specific Vector Store. Each pipeline is designed to process a different set of unstructured files, such as text documents, PDFs, or reports, based on your data ingestion and embedding requirements.
Because the Vector Store serves as the entry point for unstructured pipelines, a new row is automatically created for every Vector Store that exists or is added to your application.
Each pipeline runs independently, allowing you to tailor configurations such as the document processor, embedder, or vector store for each dataset.
When you run a pipeline, it executes a complete unstructured data ingestion flow, from document processing and embedding to vector storage, enabling you to manage multiple unstructured data workflows within a single application.
Configuration Steps
Add a source system
- Begin by selecting or configuring a data source connector, such as Amazon S3, Azure Blob, or SharePoint. This step defines the external location where your unstructured documents (PDFs) are stored.
- The Source System represents the entry point for accessing raw file data.
Add a source collection
- Under the configured Source System, add a Source Collection to specify which files to include.
- The Source Collection acts as the logical grouping of files that will feed into your unstructured data pipeline.
Add a document parser
The Document Parser defines how your unstructured files, such as PDF documents, are parsed during data ingestion. It is built as a combination of Processor Components, each responsible for handling a specific operation in the pipeline, such as parsing raw text, chunking large sections into smaller units, or formatting data structures before embedding.
These components may initially act as parsers but can later perform transformations on substructures of the original data, depending on the pipeline design.
If you plan to perform metadata extraction (for example, extracting author names, timestamps, or document categories), you must select a Document Parser that is configured to support it. Currently, the user interface does not indicate whether a parser is metadata-enabled, so you should verify this in the underlying C3 type configuration.
Note: The pre-seeded mew3 and mew3-low-cost processors support Metadata Extraction out of the box. Other processor components may not have this capability and will require additional configuration to enable metadata enrichment.
To enable metadata extraction, ensure your processor includes the component GenaiCore.StructuredProcessor, which provides the necessary functionality for structured data enrichment.
Add the Document Processor node to process and transform raw files into structured text chunks. This corresponds to the
GenaiCore.Unstructured.Processor, which orchestrates multiple processing components, such as:- Parser – Reads and extracts text content from each file.
- Chunker – Splits text into smaller, semantically meaningful sections.
- Formatter – Optionally normalizes or enriches text.
Each step can be defined as a
ProcessorComponent(for example,TestTxtParserComponent,TestSentenceChunkerComponent, etc.).
Configure metadata extraction (optional)
After selecting a Document Parser, you can configure optional metadata extraction to enrich your ingested documents with additional context such as author names, timestamps, or document categories.
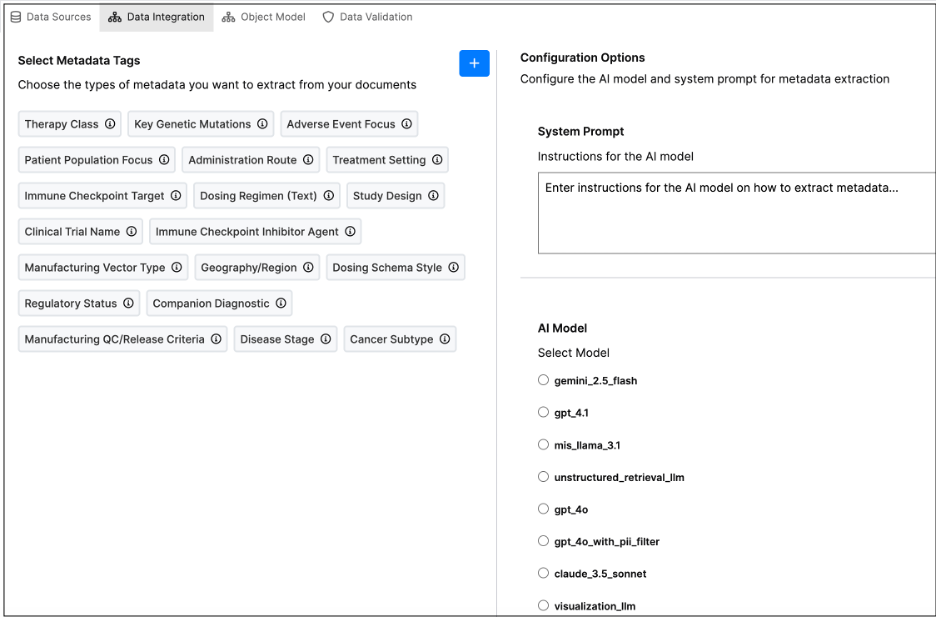
The Metadata Extraction panel allows you to select Metadata Tags and choose which metadata fields to extract from your documents. If no tags appear under Select Metadata Tags, it means none have been configured yet.
You can create new tags directly by clicking + Create a New Tag, which opens a dialog where you can define fields such as Author, DocumentType, or Department.
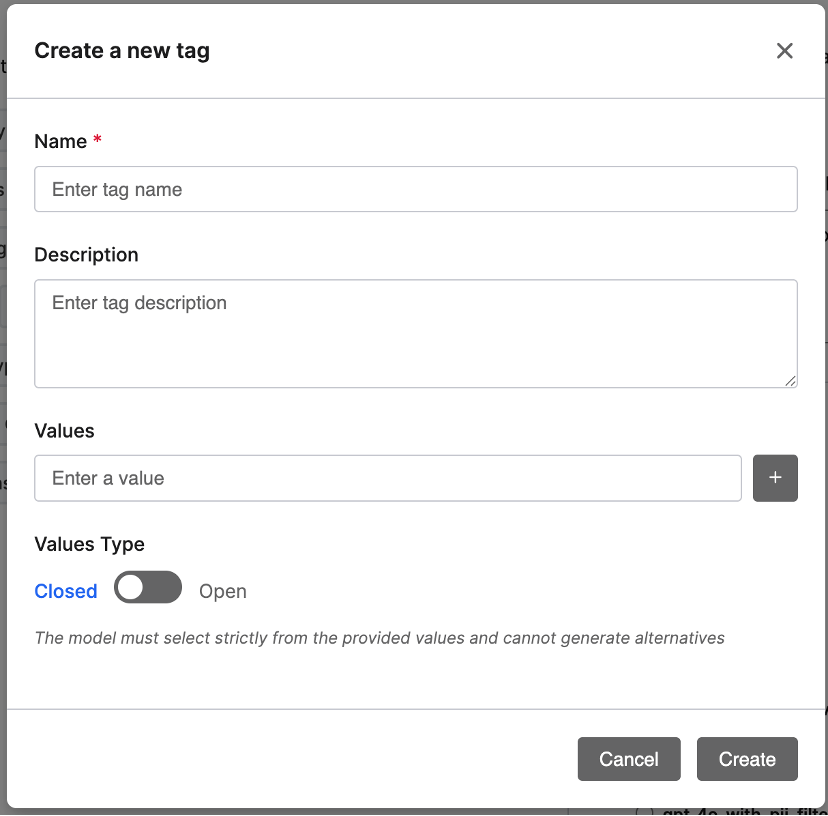
Each tag can include a description, a list of valid values, and a value type (Closed or Open). Closed tags restrict the model to predefined values, while Open tags allow it to generate new ones.
Note: If you do not see the option to create tags, contact your system administrator to check your permissions.
- Configuration Options
- System Prompt: Enter instructions for the AI model on how to extract metadata (for example: “Extract the author, publication date, and keywords from the document header.”).
- AI Model: Select the model you want to use for metadata extraction — either a custom model (e.g., mymodel) or the default model (mew3).
- Preview & Test – Click Preview Data to test metadata extraction with your current configuration and validate that the model extracts the desired fields.
- Complete Configuration – Once satisfied, click Complete to save your settings and return to the pipeline view.
Note: Metadata extracted through this step becomes part of the enriched document record stored in the Vector Store. These metadata fields are indexed alongside document embeddings, enabling more precise and context-aware semantic searches during retrieval.
- Configure the embedder
The Embedder node converts the parsed document text (and optionally extracted metadata) into vector embeddings — numerical representations used by the Vector Store for similarity search and retrieval.
When configuring the Embedder:
- Select an Embedder – Choose an available embedder from the list (for example,
default-llm-embedder). The embedder corresponds to theGenaiCore.Embedder.Enginetype and typically runs an embedding model such asmixedbread-ai/mxbai-embed-large-v1. - Verify Runtime Requirements – Ensure that the model runtime or Action Requirement includes the necessary Python libraries and model dependencies.
- Model Configuration – The selected embedder defines the model and parameters used to generate embeddings. You can customize this configuration in your package if needed (for example, to specify a different model runtime).
Once the embedder is selected, it connects automatically to the Vector Store node, completing the Unstructured Data Integration (UDI) pipeline flow.
- Configure integration schedule
After setting up the Embedder, define how frequently new unstructured files are checked and processed by selecting the integration schedule under the Source Collection instance.
In the Integration Schedule panel:
- Integration Schedule – Select how often the system should check the source directory for new files to integrate into the target entity.
- Available Options – Choose from time-based schedules such as Every day, Every hour, or Manual.
For example, selecting Every day ensures that the UDI job runs daily to process and embed new incoming documents automatically.
This scheduling step completes the Unstructured Data Integration (UDI) pipeline setup—from raw document ingestion to embedding generation and vector storage.
- Connect the vector store
Connect a Vector Store node to the output of the Embedder.
The Vector Store (for example, GenaiCore.VectorStore.Pg) is responsible for storing the generated vector embeddings and maintaining a link to the Target Entity where data will be persisted.
Each Vector Store must reference a Target Entity that defines where embedding vectors, metadata, and document content are stored.
Example:
Use a Vector Store such as knowledge-base to store embeddings for knowledge documents, or scientific-documents for research datasets.
- Select the target entity
Choose the Entity that will serve as the persistence layer for your embedded data.
This entity typically includes fields such as:
- content – The original document text or parsed content.
- embedding – The generated embedding vector.
- metadata – Extracted metadata fields or tags.
Example Entities:
KnowledgeBase– For general information or FAQ-style content.ScientificDocuments– For research papers and technical publications.
Once the Vector Store and Entity are connected, your pipeline is complete and ready to run for document ingestion, embedding, and storage.
How the Embedder Interacts with the Vector Store
Once the Embedder processes the document text, it generates vector embeddings—numerical arrays that capture the document’s semantic meaning.
These embeddings are then stored in the Vector Store, which serves as the retrieval layer for downstream use cases such as semantic search, document similarity, or question answering.
Each embedding record in the Vector Store is associated with:
- A document identifier or reference, linking back to the parsed file.
- Any metadata tags extracted earlier in the pipeline.
- The embedding vector generated by the selected embedder model.
This design allows users to efficiently query and search across large sets of unstructured documents using vector-based similarity instead of traditional keyword matching, improving both the accuracy and relevance of search results.