Quickstart: Build and Deploy an Alarm Clock
This quickstart builds one small application end to end: an alarm clock that stores alarms in a Type, styled with the shadcn/ui component library. You install the tools, connect the C3 AI VS Code extension to an environment, create a C3 package, build the React interface, preview it locally, and deploy it, first to a single-node environment to see it working with real data, then to a shared environment for a wider deployment. This quickstart takes one happy path; where a step makes a choice for you, it links to the guide page that covers the options behind it. For the model first, read Building a Front End on C3 with React and The C3 Front-End Architecture.
What you build
The alarm clock lists alarms, adds and deletes them, and toggles each on or off, storing them in an Alarm Type on the C3 backend. The interface uses shadcn/ui components for the buttons, cards, inputs, and switches.
Before you begin
Have a machine with at least 32 GB of memory running macOS, Windows, or Linux, and Google Chrome for viewing the running application. Have access to a running C3 environment, or permission to create one, because the backend runs there and the front end has no data of its own.
Set up
Get your machine and environment ready before you touch any application code. You install the tools, start a single-node environment to develop against, and connect the C3 AI extension to it. Set Up Your Environment covers this setup in depth, including component-library licensing and the choice between the VS Code extension and a coding-agent workflow.
Step 1: Install the tools
Install the three tools the quickstart uses. First install a current LTS release of Node, which includes npm, and confirm both are on your path:
node -v
npm -v
Both commands should print a version number. If either reports "command not found," install Node from the official installer and open a new terminal.
Next install Visual Studio Code, which you use as the editor and as the host for the C3 AI extension.
Finally install the C3 AI VS Code extension, which connects your machine to a C3 environment and deploys the package to a single-node environment. In VS Code, open the Extensions view, search for C3 AI, and install it. If an older C3 extension is already installed, uninstall it first, then close and reopen VS Code so the new extension loads cleanly.
End state: node -v and npm -v print versions, and the C3 AI extension appears in the VS Code Extensions view.
Step 2: Start a single-node environment
Confirm you have a running single-node environment (SNE) to develop against, because the C3 AI extension connects only to single-node environments. Sign in to C3 Studio at your cluster, and select the Envs tab. The tab lists your environments with a status column.
If a single-node environment already shows Running, note its name and use it. If none exists, select New Environment. In the Create New Environment wizard, select Single Node Environment and Next, enter a name in lowercase letters and numbers and select Next, then keep the preselected compute configuration and select Submit. The environment takes a few minutes to reach Running; wait for that status before continuing, because the extension cannot connect to an environment that is still starting.
End state: a single-node environment shows Running in the Studio Envs tab, and you know its name.
Step 3: Connect the extension to your environment
Connect the C3 AI extension to the running environment, which is the gate for everything that follows. First open a workspace for your work: in VS Code, select File > Open Folder and choose or create a folder, for example alarmclock-workspace. For a standalone package like this one, use an empty folder outside any other repository. If your package instead belongs in an existing repository or product ecosystem, open that repository and create the package within it, so it builds alongside the rest of the codebase.
The extension opens a Let's get started panel. Under Select Workspace, confirm it shows your folder. Under Connect to a C3 environment, paste the environment's development URL into the Environment URL field and select CONNECT.
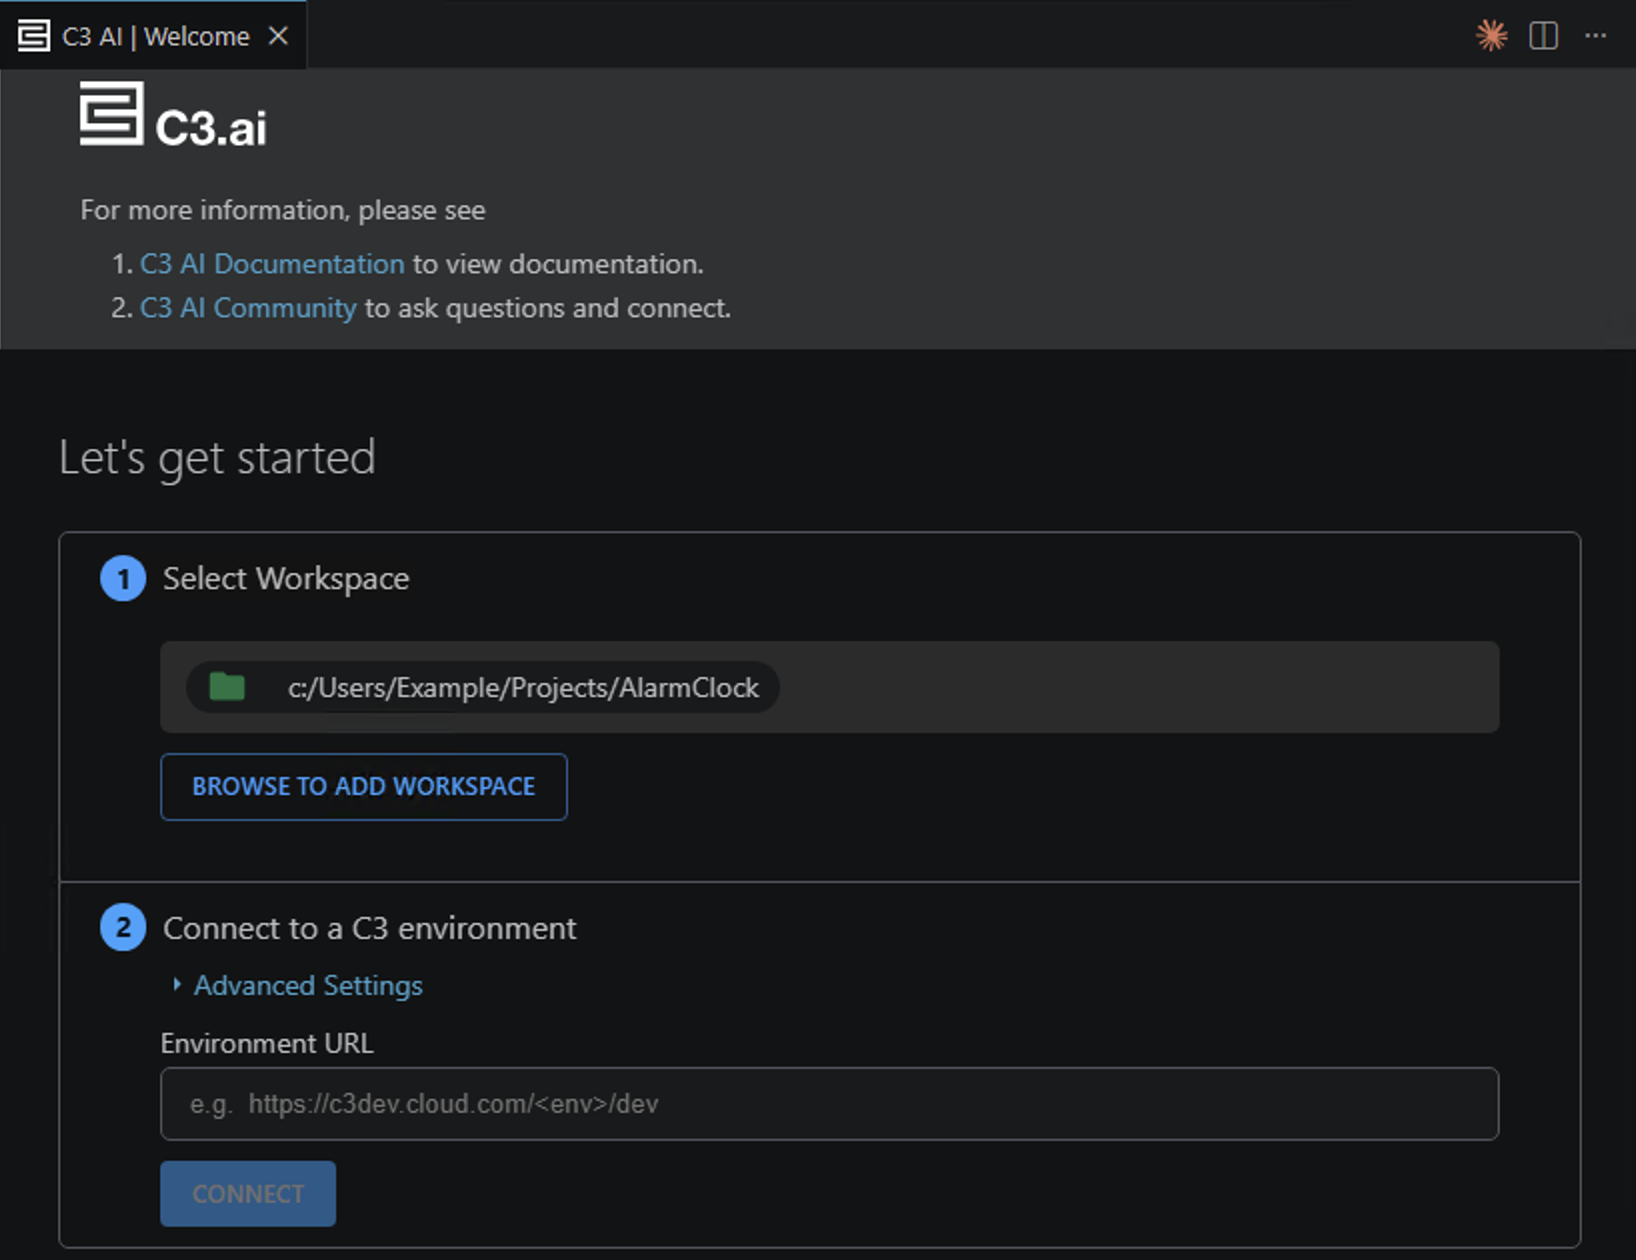
The development URL is not the address in your browser's bar when you are in Studio. Studio console addresses such as https://<cluster>/basetoolkit/studio/envs/... fail validation with "URL is malformed." Instead, select the VS Code icon in your Studio's environment details page and copy the development URL shown there. Paste that value, select CONNECT, and authenticate when the browser prompts you.
End state: the extension reports a successful connection to your environment, and you are authenticated.
Build the application
Create the package and write every file the alarm clock needs, from the data model through the styled interface. You write and compile code in these steps, and deploy in the next section.
Step 4: Create the package and scaffold the front end
Create the C3 package in your connected workspace, and scaffold its front end with Vite. This quickstart builds a plain Vite React application, so the package is a folder with a hand-written manifest and a React application under ui/.
Start with the package folder and its manifest. In your workspace, create a folder named alarmClock with a file alarmClock.c3pkg.json:
{
  "name": "alarmClock",
  "version": "1.0.0",
  "description": "Minimal alarm clock demo"
}
The extension's Create New UI Package command also creates a package, but it adds a uiComponentLibraryReact dependency and a configuration-based component layout. This quickstart builds a plain Vite front end and does not use uiComponentLibraryReact, so if you create your package with that command, remove the uiComponentLibraryReact dependency from alarmClock.c3pkg.json and follow the file layout shown here.
Add the serving config that tells the C3 Agentic AI Platform to serve the built front end as a single-page application at the application root. Create alarmClock/config/UiService.Config/DEFAULT.json:
{ "name": "DEFAULT", "spaMode": true }Scaffold the React application under ui/. From the alarmClock folder, run:
npm create vite@latest ui -- --template react-tsVite prompts you as it scaffolds. When it asks which features to add, select ESLint, then choose Install with npm and start now. Vite generates the React TypeScript application under ui/, installs its dependencies, and starts the dev server, which opens the default Vite page in your browser. Stop the server with Ctrl+C for now; you configure the application in the following steps. The --template react-ts option selects the React TypeScript starter. Start from the Template covers the scaffold and the full package layout, and how to start from a base application instead.
End state: the alarmClock package exists with its manifest, its serving config, and a scaffolded Vite React application under ui/ with its dependencies installed.
Every application file must live inside the package folder — the folder that contains alarmClock.c3pkg.json. If ui/, src/, seed/, or config/ are placed outside this folder, the C3 Agentic AI Platform does not find them and serves the default C3 Console instead of your application. Verify ui/ is inside alarmClock/, not beside it.
Step 5: Define the data model
Define the data model first, because the alarm clock stores each alarm on the C3 backend and the interface reads from it. A C3 package keeps its parts in fixed locations, and this step adds the two backend pieces, the Type and its seed data:
alarmClock/
  alarmClock.c3pkg.json     # package manifest (from Step 4)
  config/UiService.Config/  # single-page-application serving config (from Step 4)
  ui/                       # the Vite React application (from Step 4)
  src/entity/               # the data model, one .c3typ file per Type (this step)
  seed/                     # seed data, one folder per Type (this step)
Define the Alarm Type. Create src/entity/Alarm.c3typ:
@seed(userUpdatable=true, userRemovable=true)
entity type Alarm mixes SeedData<Alarm> {
  label: string
  time: string
  enabled: boolean
}
The entity type declaration gives Alarm persistence, so the backend can store, query, and serve alarm records. Each field becomes a column the front end reads and writes. Mixing in SeedData lets the package provision alarms from its seed/ folder when you deploy. The @seed annotation lets users change and remove those seeded alarms, which the alarm clock needs because its toggle and Delete controls write to them.
Seed a couple of alarms so the interface renders real rows once deployed. Create seed/Alarm/Alarm.json:
[
  { "id": "A1", "label": "Wake up", "time": "07:00", "enabled": true },
  { "id": "A2", "label": "Standup", "time": "09:30", "enabled": true }
]
The C3 Agentic AI Platform registers the Type and loads the seed data when you deploy the package, in the deploy steps. Once deployed, POST /api/8/Alarm/fetch, upsert, and remove all work with no further backend code, because a C3 entity type exposes them automatically.
End state: the Alarm Type and its seed data are defined in the package, ready to register on the environment when you deploy.
Step 6: Add Tailwind and the path alias
Add Tailwind CSS and the @/ path alias, because shadcn/ui requires both and its init does not add them for you. From the ui/ directory:
cd ui
npm install tailwindcss @tailwindcss/vite @types/node
Set the Vite configuration to load the Tailwind plugin and resolve the @/ alias, and set the C3 build output while you are here. Replace the contents of ui/vite.config.ts with:
import path from "path"
import { defineConfig } from "vite"
import react from "@vitejs/plugin-react"
import tailwindcss from "@tailwindcss/vite"

export default defineConfig({
  plugins: [react(), tailwindcss()],
  resolve: { alias: { "@": path.resolve(__dirname, "./src") } },
  base: "./",                                        // assets resolve under the app path prefix
  build: { outDir: "content", emptyOutDir: true },   // build into the served ui/content
})
Add the @/ alias to the TypeScript configuration so the compiler resolves the same imports. In both ui/tsconfig.json and ui/tsconfig.app.json, add a paths entry inside the existing compilerOptions block. Do not add baseUrl, because a recent TypeScript version deprecates it and the build fails with it present:
"compilerOptions": {
  "paths": { "@/*": ["./src/*"] }
}
Set your global stylesheet to import Tailwind. Replace the contents of src/index.css with:
@import "tailwindcss";End state: Tailwind is installed and the @/ alias resolves in both Vite and TypeScript.
Step 7: Add the shadcn/ui components
Add shadcn/ui to inherit styled components from a library rather than building them. From the ui/ directory, initialize shadcn:
npx shadcn@latest initThe init command prompts you twice. Select Base (Recommended) for the component library, and any preset for the theme — the quickstart overrides the colors in Step 10, so the preset choice does not matter. The command then writes a components.json, adds a Button component and a src/lib/utils.ts helper, and augments src/index.css with the theme variables. Add the remaining components the alarm clock uses:
npx shadcn@latest add card input switchEach add copies a component into src/components/ui, which you own and can restyle.
End state: the Button, Card, Input, and Switch components are available under @/components/ui. Confirm by listing the directory — you should see button.tsx, card.tsx, input.tsx, and switch.tsx. If any are missing, Step 9 fails with "Cannot find module" errors.
Step 8: Add the data client
Add the small client that every page uses to reach the backend. Create src/lib/c3.ts:
function apiPrefix(): string {
  const m = document.cookie.match(/(?:^|;\s*)c3AppUrlPrefix=([^;]+)/)
  if (m) return `${location.origin}/${decodeURIComponent(m[1]).replace(/^\/+|\/+$/g, '')}/`
  return (document.baseURI || location.href).replace(/#.*$/, '').replace(/[^/]*$/, '')
}
async function post<T>(type: string, action: string, args: unknown): Promise<T> {
  const res = await fetch(`${apiPrefix()}api/8/${type}/${action}`, {
    method: 'POST', credentials: 'same-origin',
    headers: { 'Content-Type': 'application/json', Accept: 'application/json' },
    body: JSON.stringify(args),
  })
  if (!res.ok) throw new Error(`${type}.${action} HTTP ${res.status}`)
  return res.json()
}
export const c3Read = <T,>(type: string, action: string, spec?: object): Promise<T> =>
  post<T>(type, action, spec === undefined ? [type] : [type, spec])
export const c3Write = <T,>(type: string, action: string, obj: object): Promise<T> =>
  post<T>(type, action, [obj])
export interface FetchResult<T> { type: string; objs: T[]; count: number; hasMore: boolean }
The apiPrefix function is what makes the same code work locally and when deployed: it resolves the API path relative to wherever the C3 Agentic AI Platform serves the application, so you never hardcode an environment address. Make API Requests covers the query language, the read and write body shapes, and how to handle failure statuses; Authenticate Requests covers the cookie posture behind credentials: 'same-origin' and the transports for other deployment topologies.
End state: c3Read and c3Write are importable from src/lib/c3.ts.
Step 9: Build the alarm clock page
Build the page that reads alarms, adds and deletes them, and toggles each. Create src/AlarmClock.tsx:
import { useEffect, useState } from 'react'
import { c3Read, c3Write, type FetchResult } from './lib/c3'
import { Button } from '@/components/ui/button'
import { Card } from '@/components/ui/card'
import { Input } from '@/components/ui/input'
import { Switch } from '@/components/ui/switch'

interface Alarm { id: string; label: string; time: string; enabled: boolean }

export default function AlarmClock() {
  const [alarms, setAlarms] = useState<Alarm[]>([])
  const [label, setLabel] = useState('')
  const [time, setTime] = useState('07:00')
  const [now, setNow] = useState(new Date())

  const load = () =>
    c3Read<FetchResult<Alarm>>('Alarm', 'fetch', { order: 'ascending(time)' }).then((r) => setAlarms(r.objs))

  useEffect(() => { load() }, [])
  useEffect(() => {
    const tick = setInterval(() => setNow(new Date()), 1000)
    return () => clearInterval(tick)
  }, [])

  const addAlarm = async () => {
    if (!label) return
    await c3Write('Alarm', 'upsert', { id: crypto.randomUUID(), label, time, enabled: true })
    setLabel('')
    load()
  }
  const toggle = (a: Alarm) => c3Write('Alarm', 'upsert', { id: a.id, enabled: !a.enabled }).then(load)
  const remove = (a: Alarm) => c3Write('Alarm', 'remove', { id: a.id }).then(load)

  return (
    <main className="mx-auto max-w-md space-y-4 p-6">
      <h1 className="text-2xl font-semibold">Alarm Clock</h1>
      <p className="tabular-nums text-muted-foreground">{now.toLocaleTimeString()}</p>
      <Card className="flex gap-2 p-4">
        <Input value={label} onChange={(e) => setLabel(e.target.value)} placeholder="Label" />
        <Input type="time" value={time} onChange={(e) => setTime(e.target.value)} className="w-32" />
        <Button onClick={addAlarm}>Add</Button>
      </Card>
      <ul className="space-y-2">
        {alarms.map((a) => (
          <li key={a.id}>
            <Card className="flex items-center justify-between p-4">
              <div>
                <div className="font-medium">{a.label}</div>
                <div className="tabular-nums text-muted-foreground">{a.time}</div>
              </div>
              <div className="flex items-center gap-3">
                <Switch checked={a.enabled} onCheckedChange={() => toggle(a)} />
                <Button variant="ghost" onClick={() => remove(a)}>Delete</Button>
              </div>
            </Card>
          </li>
        ))}
      </ul>
    </main>
  )
}
Render the page from the application entry. Replace the contents of src/main.tsx with:
import { StrictMode } from 'react'
import { createRoot } from 'react-dom/client'
import './index.css'
import AlarmClock from './AlarmClock'

createRoot(document.getElementById('root')!).render(
  <StrictMode>
    <AlarmClock />
  </StrictMode>,
)
Delete the template's starter src/App.tsx and src/App.css, so no unused files remain.
End state: the page reads alarms, adds and deletes them, and toggles each, and it compiles.
Step 10: Apply basic C3 styles
Give the shadcn components the C3 look by overriding the theme variables init wrote into src/index.css. Set the primary color to the C3 accent blue-60 #2266F0, the radius to a tight 4px, and the font to Inter:
:root {
  --primary: #2266F0;            /* C3 accent, blue-60 */
  --radius: 0.25rem;             /* the tight 4px C3 radius */
}
body { font-family: Inter, system-ui, sans-serif; }
Style with the C3 Design System covers the full design-token set, mapping the tokens into your component library's theme, and registering the chart theme, which is how a front end reads as a genuine C3 product rather than a few overridden variables.
End state: the buttons, cards, and switches render in the C3 accent, radius, and font.
Run, test, deploy
Take the finished package from your machine to a running application. You deploy it to a single-node environment to see it working with real data, add a test, build the bundle, and promote it to a shared environment. Previewing the interface locally is an optional part of the first step. The Local Dev Loop covers the local preview and the test-runner choice, Bundle and Serve covers the bundling mechanisms, and Deploy to an Environment covers the environment types and the single-node deploy that never serves the bundle.
Step 11: Deploy to your single-node environment
Run the alarm clock with a real backend by deploying it to the single-node environment you connected in Step 3. Before deploying, confirm the build succeeds and the output exists:
cd ui
npm run build
ls content/index.html
If the build fails or content/index.html does not exist, fix the errors before continuing. A deploy without a built bundle shows the default C3 Console instead of your application.
Start the application from the extension. Open Start Application, set Root package to alarmClock, leave Application name at its alarmclock default, and choose an Application mode: Development keeps the source code and metadata writeable with test data and test types available, which suits iteration, and Test makes them read-only. Select Submit.
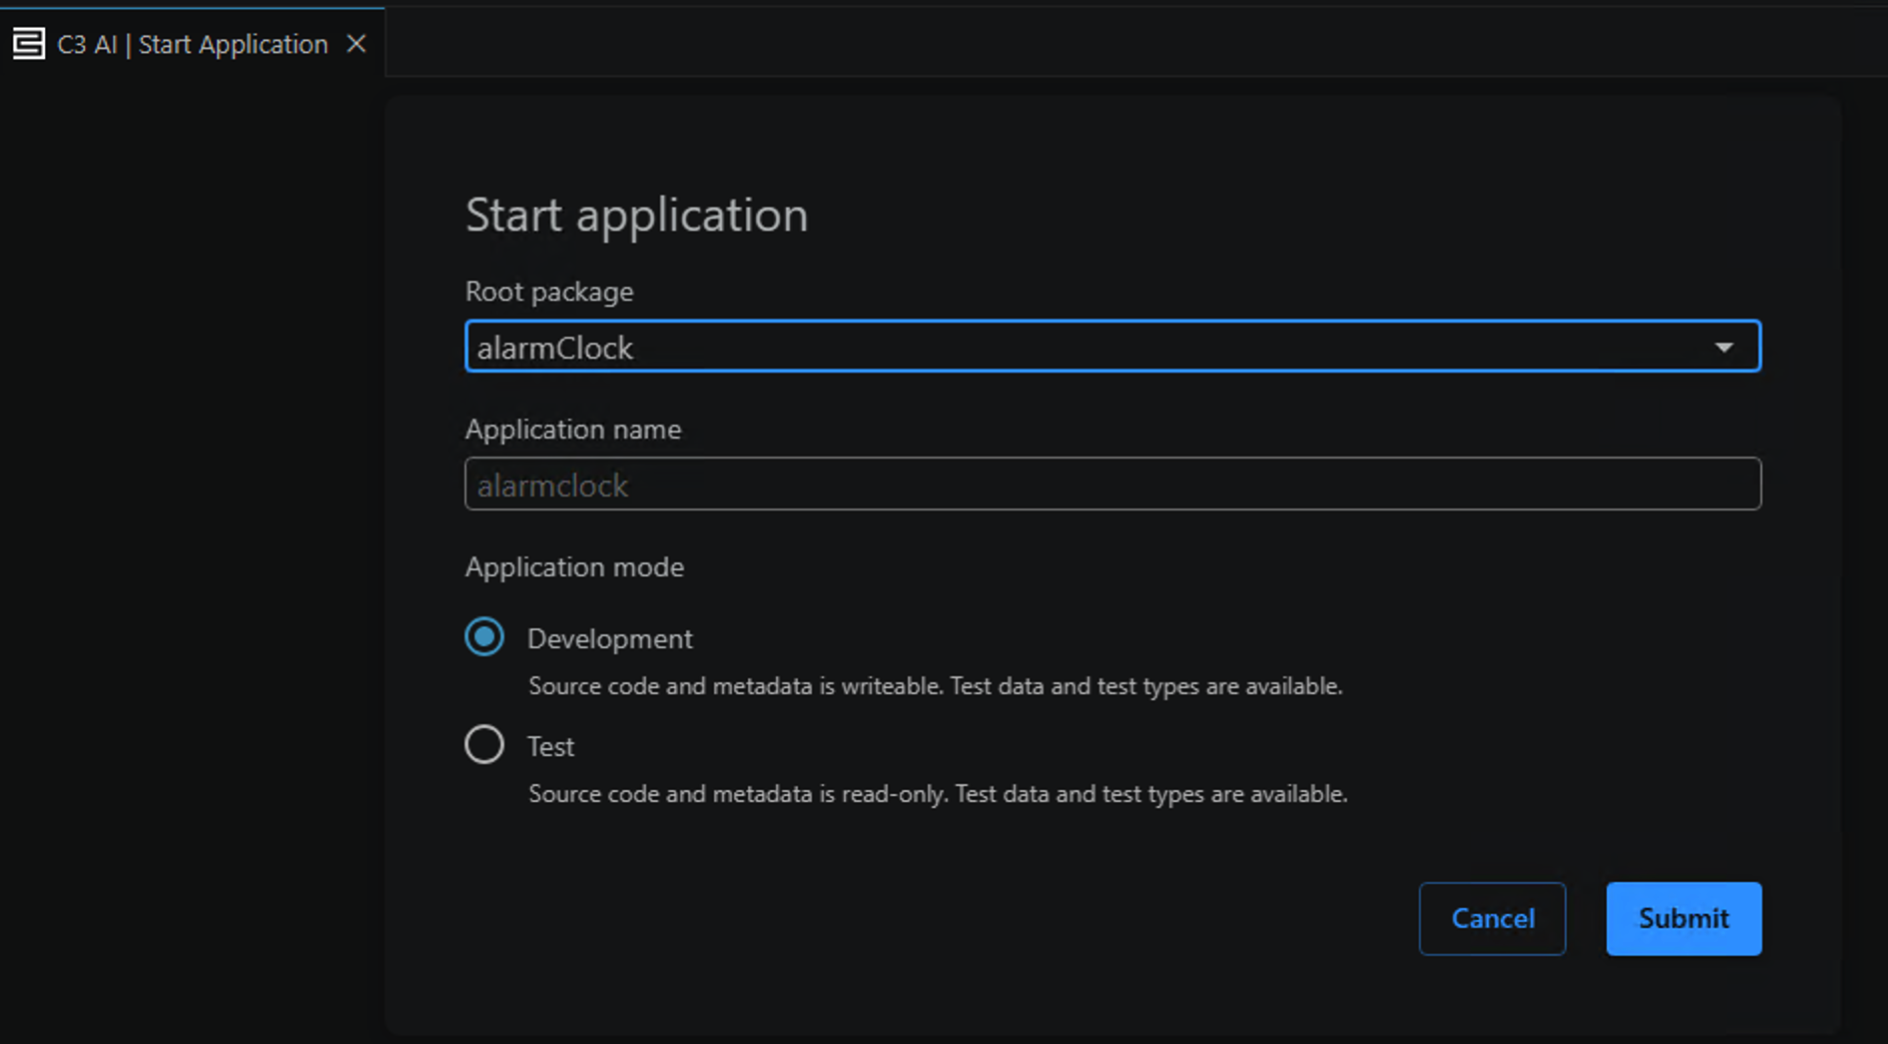
The extension provisions the package, registers the Alarm Type, loads the seed data, and starts the application. Wait for it to finish connecting and starting.
Then open the application from Studio. Sign in to Studio, open the Apps page, find the alarmClock application, and open its details. Select the Open application icon in the application header. The alarm clock loads at its application address, such as https://<cluster>/<env>/alarmclock/, and lists the seeded alarms Wake up and Standup, with the clock updating each second. Because the application is served on the environment's own origin, the browser sends the session cookie with every call and no token handling is needed.
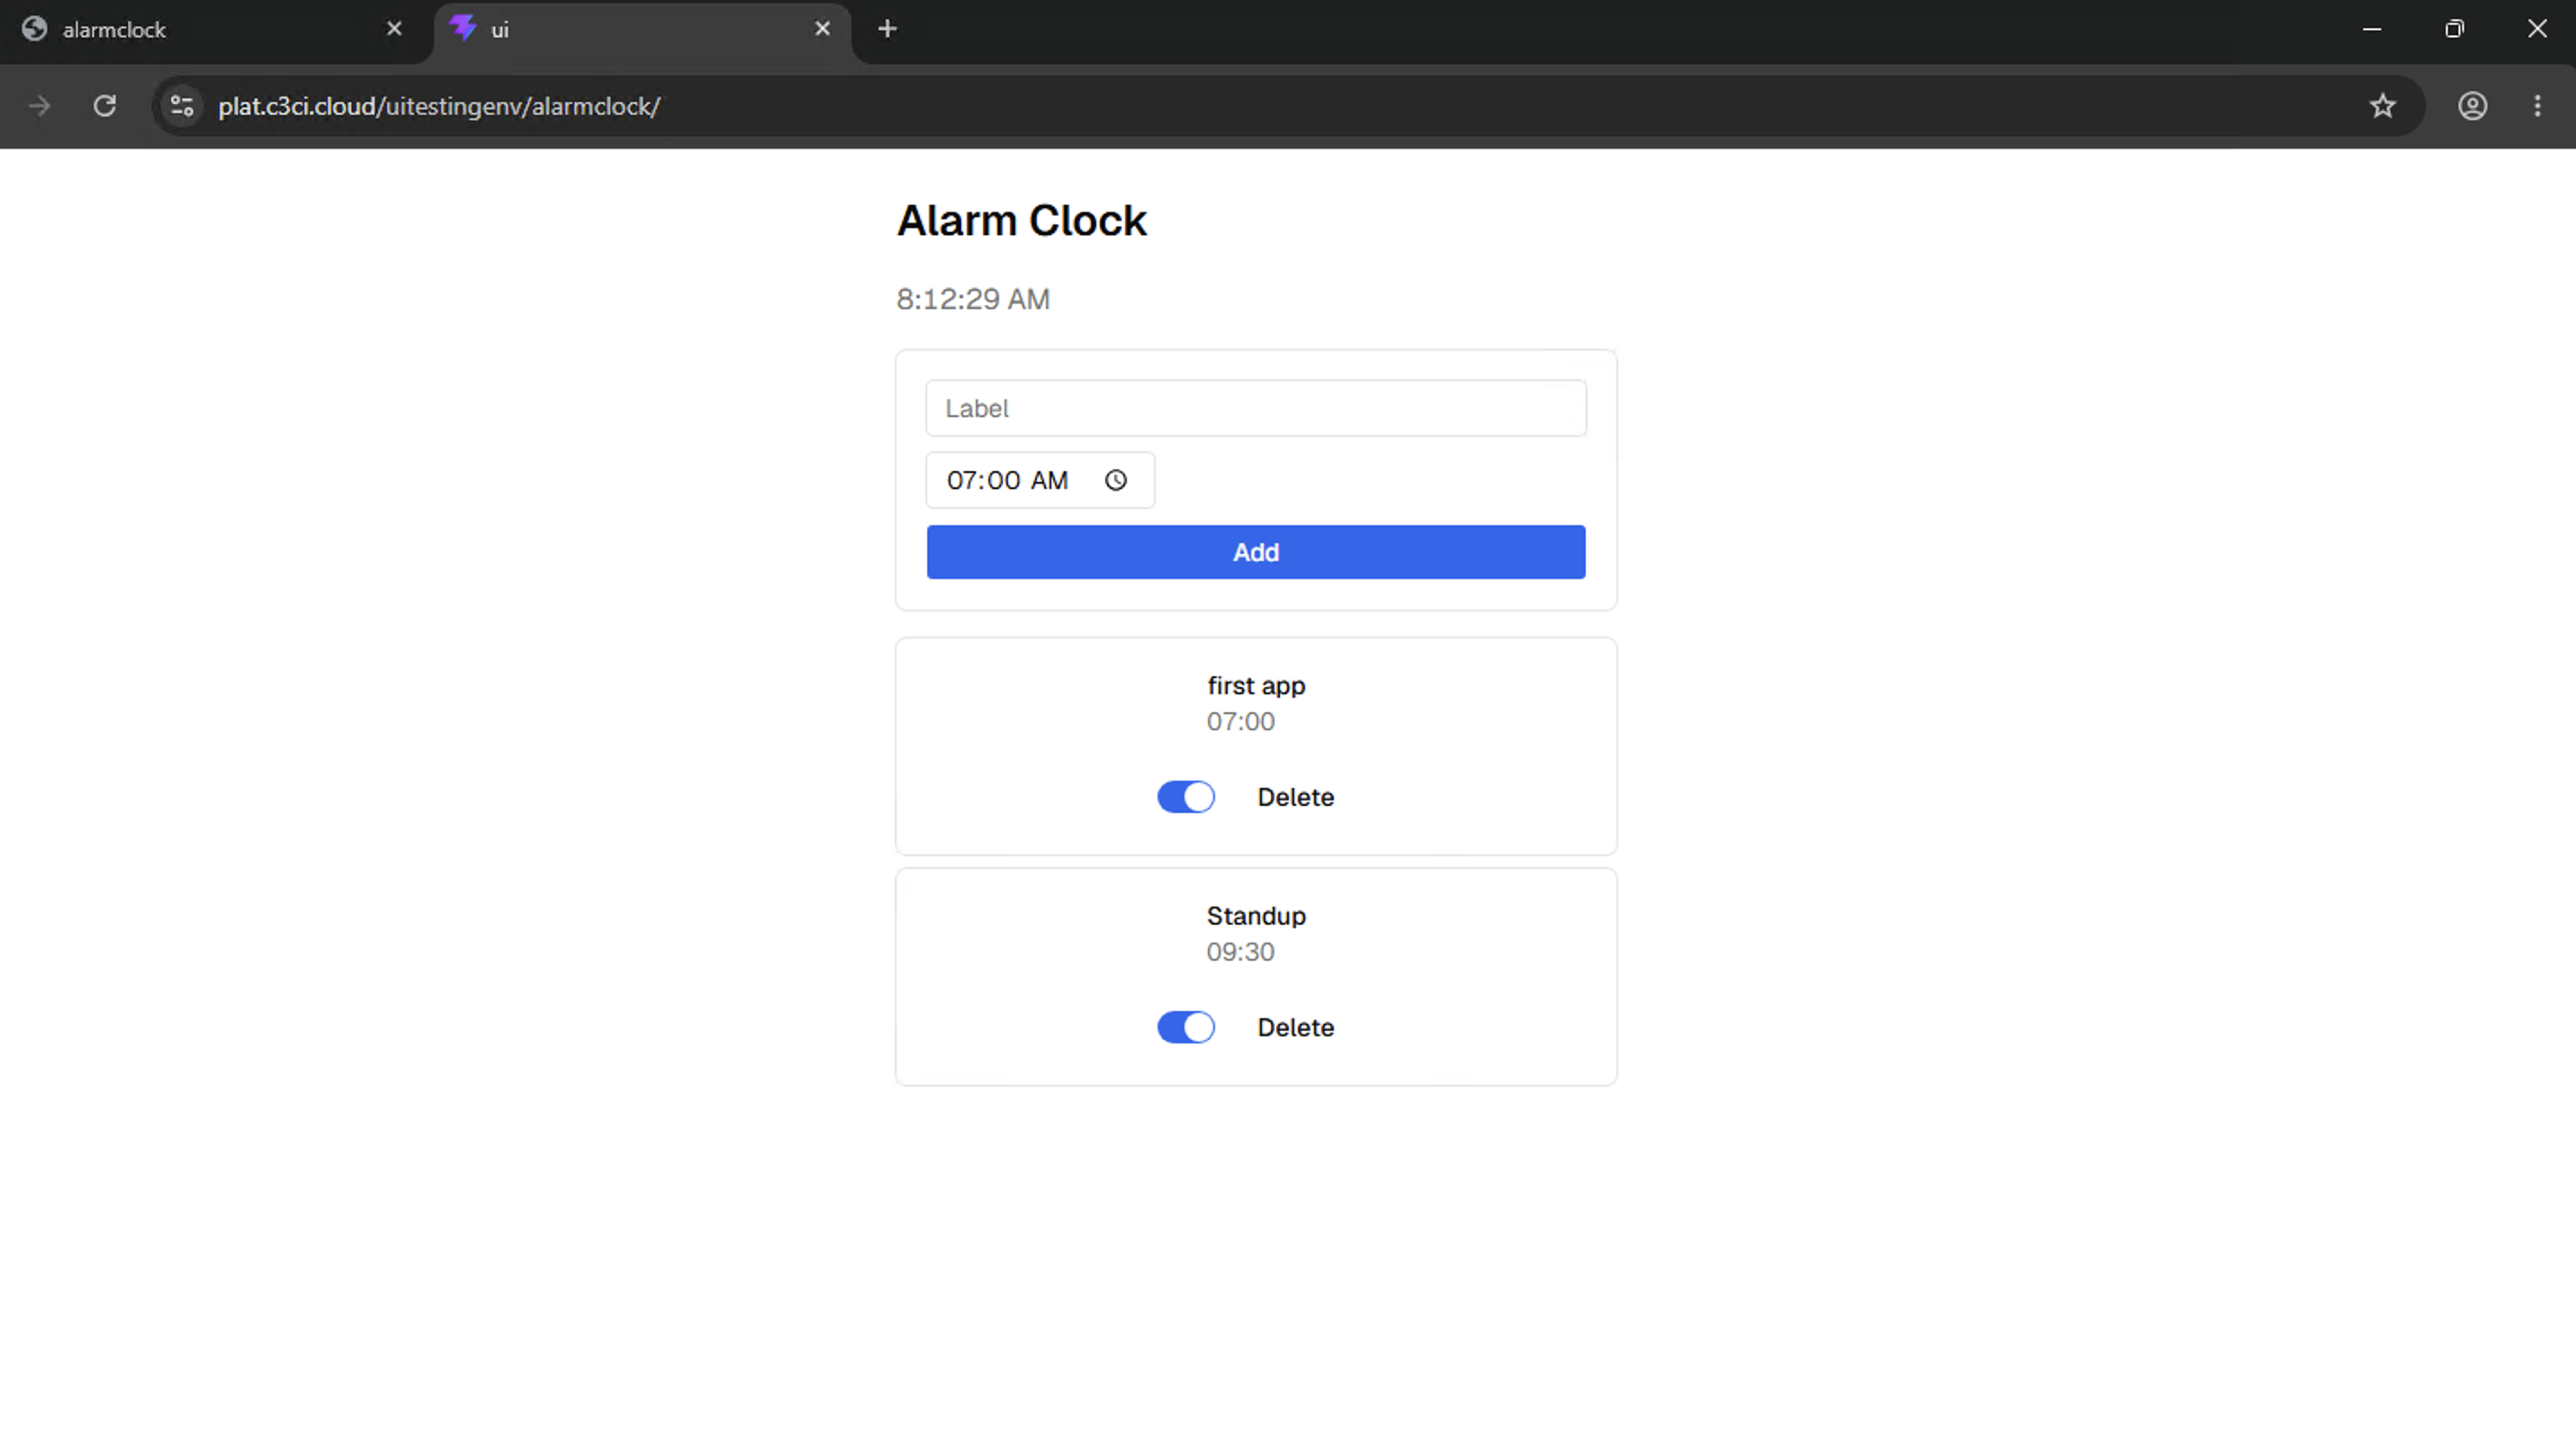
Adding an alarm, toggling one, and deleting one all persist to the backend, which you can confirm by reloading the page and seeing your change survive.
End state: the alarm clock runs on the single-node environment at its application address, listing and persisting real alarms.
Preview the interface locally (optional)
To iterate on layout and styling without deploying each time, preview the interface on your machine. This preview shows the interface only, with no backend. From the ui/ directory:
cd ui
npm run dev
The dev server prints a local address, such as http://localhost:5173. Open it, and the alarm clock renders with its clock, input row, and Add button, but the alarm list stays empty and the browser console shows api/8/Alarm/fetch returning 404. This is expected and confirms the interface works: the c3.ts client resolves each call relative to where the application is served, and on your machine that resolves to localhost, where no C3 backend answers api/8. The seeded alarms appear only when the application runs on an environment, as in the deploy step.
Step 12: Add a test
Add a test that renders the page against a mocked client, so a regression in the read-and-render path is caught. From the ui/ directory, install the test tools:
npm install -D vitest @testing-library/react @testing-library/jest-dom @testing-library/dom jsdomCreate the test setup file src/test-setup.ts:
import '@testing-library/jest-dom'Add the test configuration to vite.config.ts. Add the vitest type reference at the top of the file and the test property to defineConfig:
/// <reference types="vitest/config" /> test: { globals: true, environment: "jsdom", setupFiles: "./src/test-setup.ts" },Still in ui/, add a test script to package.json:
npm pkg set scripts.test="vitest run"Create the test src/AlarmClock.test.tsx:
import { render, screen } from '@testing-library/react'
import { describe, it, expect, vi } from 'vitest'
import AlarmClock from './AlarmClock'

vi.mock('./lib/c3', () => ({
  c3Read: () => Promise.resolve({ objs: [{ id: 'A1', label: 'Wake up', time: '07:00', enabled: true }] }),
  c3Write: () => Promise.resolve({}),
}))

describe('AlarmClock', () => {
  it('renders alarms from the backend', async () => {
    render(<AlarmClock />)
    expect(await screen.findByText('Wake up')).toBeInTheDocument()
  })
})
Run the test:
npm run testThe globals: true setting in the Vite configuration is what makes the global expect available for the jest-dom matchers; without it the run fails with "expect is not defined."
End state: the test passes, confirming the page renders alarms returned by the client.
Step 13: Bundle the front end
Build the static bundle that the C3 Agentic AI Platform serves. From the ui/ directory:
npm run buildThe base: "./" and outDir: "content" settings from Step 6 make the build write a relative-path bundle into ui/content, which the C3 Agentic AI Platform serves at the application root. The build ends with a summary and no errors.
End state: ui/content holds the built bundle, ready to serve.
Step 14: Deploy to a shared environment
Promote the application to a shared environment for a production deployment. Unlike the single-node deployment, which runs from the C3 AI extension, a shared-environment deployment goes through C3 Studio and Release Management: you create the environment, push your package to a GitHub repository, build a versioned artifact from it, and deploy that artifact. The extension is not involved, because it connects only to single-node environments.
Step 14a: Create a shared environment
Create the shared environment that hosts the deployment, or use an existing one. In Studio, select the Envs tab and select New Environment. In the Create New Environment wizard, select Shared Environment in the Environment Type step, then complete the remaining steps and submit. Wait for the environment to reach Running, because a stopped environment disables the deploy sources.
End state: a shared environment shows Running in the Studio Envs tab.
Step 14b: Push your package to a GitHub repository
Put your package in a GitHub repository, because Release Management builds the artifact from a repository branch rather than from your local files. Create a repository, commit the alarmClock package with its built ui/content from Step 13, and push the branch. Note the repository URL and the branch name, and have a repository authentication token ready, because the next step needs all three.
End state: the alarmClock package is on a branch in a GitHub repository.
Step 14c: Build a versioned artifact
Connect Release Management to your repository and build an artifact, so the deploy references an immutable version. In Studio, open Releases, select the Branches tab, and select New branch configuration. This configuration is where you connect Release Management to GitHub: set the source control to GitHub, the HTTPS repository URL to the repository from Step 14b, a Github repository authentication token, and a branch regular expression that matches your branch. Save the configuration, open the Build Queue tab, and start a build for the branch. When the build finishes, the artifact appears under the Artifacts tab.
Adding a branch configuration requires the Cluster Admin role. If you do not see the New branch configuration button, ask your cluster administrator to add the configuration for you. The repository must also be one that your cluster is configured to access — if the token returns HTTP 401, confirm with your administrator that the repository is reachable from your cluster.
End state: an alarmClock artifact exists in Release Management.
Step 14d: Create and deploy the application
Create the application from the artifact through the Studio deployment wizard, which has four phases: Select Package, Configure Deployment, Configure Compute, and Review. In Studio, select Create Application on the running shared environment to open the wizard.
In Select Package, confirm the Environment is your shared environment, set Source from to Built Artifacts, and set Package Name to alarmClock and Version to the version you built in Step 14c. The alarm clock has no dependencies to add. Select Next.
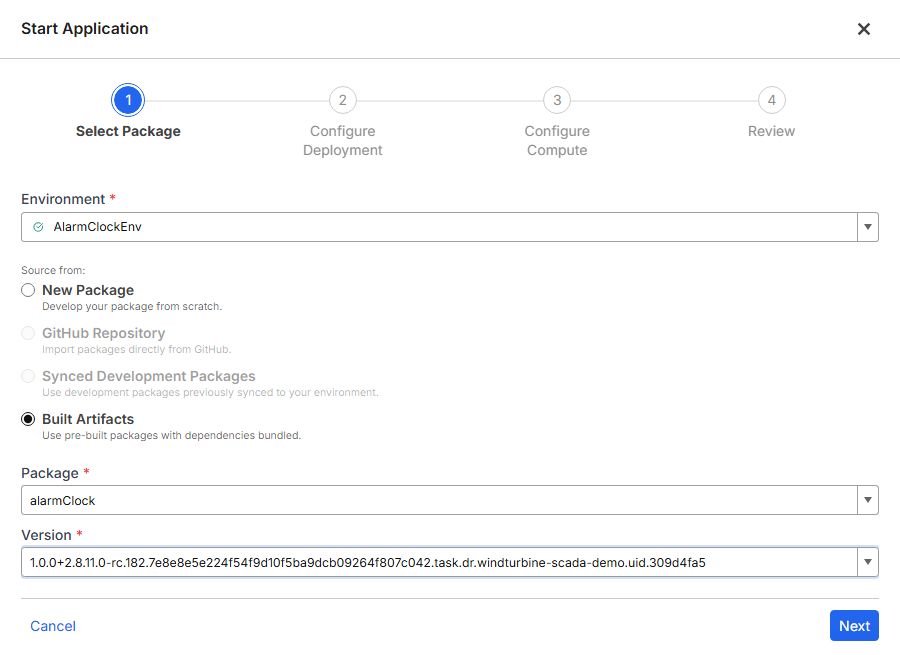
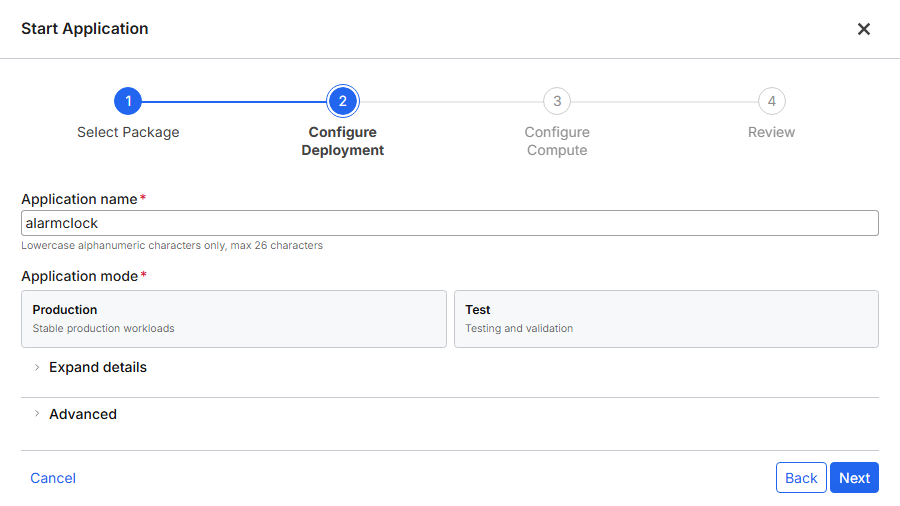
In Configure Deployment, enter an Application name using lowercase alphanumeric characters, at most 26 of them, such as alarmclock. Set Application mode to Production for a shared deployment, or Test for validation. Leave the Advanced Server version blank to use the environment default. Select Next.
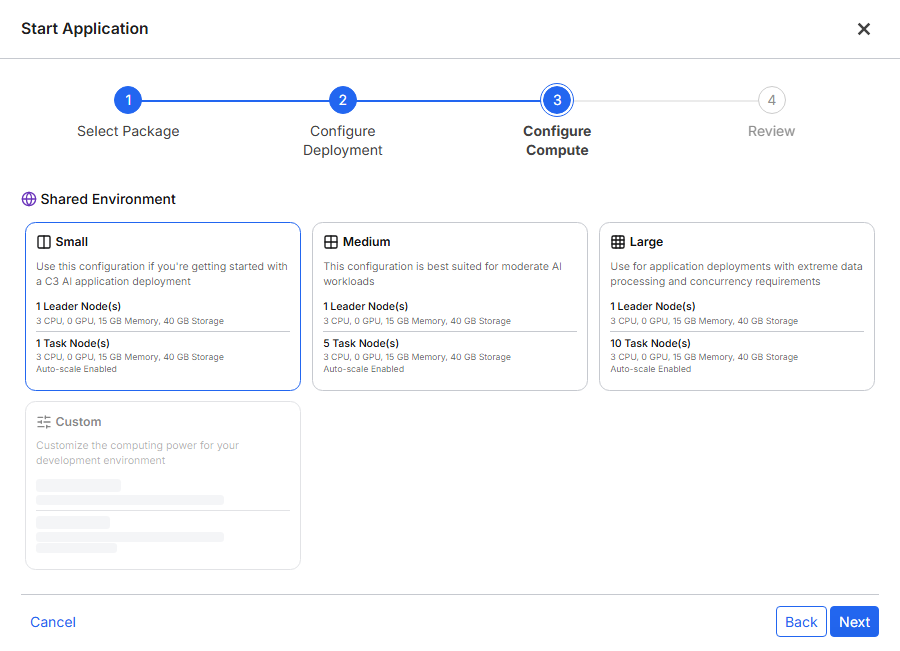
In Configure Compute, choose a node configuration. Small suits getting started, with one leader node, one task node, and auto-scale enabled, which is enough for the alarm clock. Medium and Large add task nodes for heavier workloads, and Custom sets the nodes yourself. Select Next.
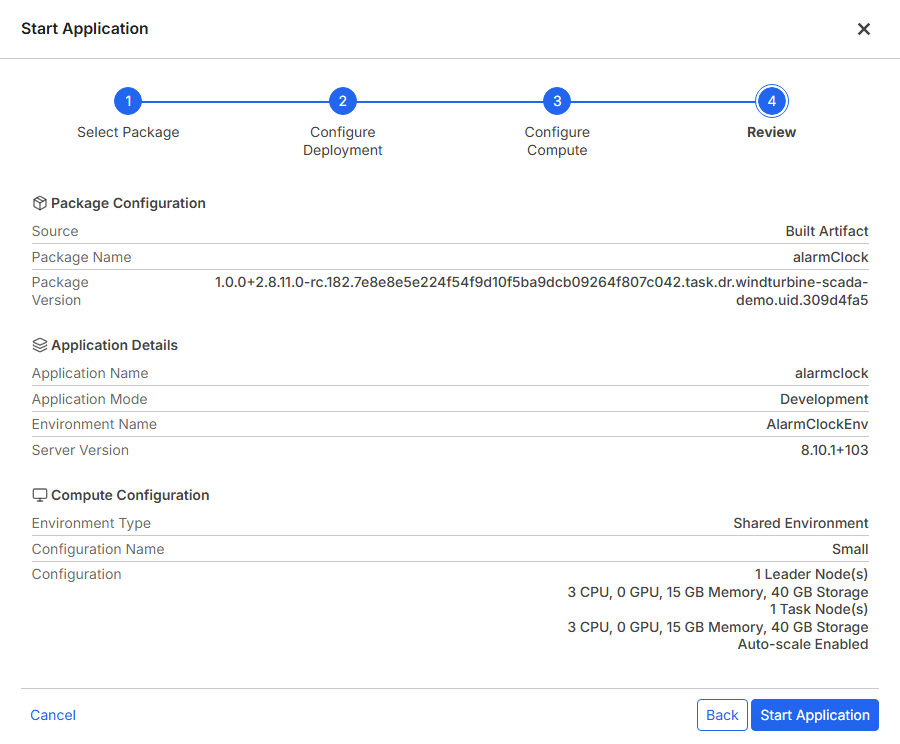
In Review, confirm the selections, which summarize the package, the application details, and the compute configuration, then start the application. The environment provisions the package, loads the seed data, and serves ui/content natively at the application address.
End state: the alarmClock application shows a Running status on the shared environment.
Built Artifacts is the source to use when GitHub Repository and Synced Development Packages are greyed out, which is common. The GitHub Repository source needs a GitHub integration configured for the environment, and Synced Development Packages needs a package first synced through the C3 AI extension. A stopped environment disables all four sources.
Step 14e: Verify the deployment
Confirm the deployed application reaches the backend. On the Studio Apps page, open the running alarmClock application and select the Open application icon in the application header. Open the browser developer tools console there and send a test request:
await fetch('api/8/Alarm/fetchCount', {
  method: 'POST',
  headers: { 'Content-Type': 'application/json' },
  body: JSON.stringify(['Alarm', {}]),
}).then((r) => r.json())
A number confirms the served application reaches the backend, authenticated by the session cookie with no authentication code. Then confirm the interface: the alarm clock loads at the application address and lists the seeded alarms.
End state: the alarm clock is live on the shared environment, listing the seeded alarms.
What you have now
You have built and deployed a complete C3 front end: an alarm clock that stores alarms in the Alarm Type, styled with shadcn/ui in the C3 look, tested, and running on an environment. Along the way you installed the tools, connected the C3 AI extension to an environment, created a package, defined a data model, added a component library, built the interface, previewed it locally, deployed it to a single-node environment to see real data, and promoted it to a shared environment.
Next steps
- The C3 Front-End Architecture explains what the C3 Agentic AI Platform handles and why.
- Make API Requests covers the query language and the write shapes in depth.
- Authenticate Requests covers the transports for a production deployment.
- Deploy to an Environment covers the deploy and its access requirements in depth.