Add a UI Page to Your Application
C3 AI Platform uses a metadata-driven approach to UI development. This allows you to focus on configuring page layouts, visualizations, and interactions between UI components, and frees you from having to write boiler plate code for fetching data, handling exceptions, and other tasks that consume development time.
In this example you'll see how to:
- Create a new application package by extending an existing package,
- Create a new route to define URLs for the application,
- Configure a UI component that fetches data and displays it in a tabular way,
- Switch the theme of your application.
Prerequisites and setup
Learn how to setup your machine so you have all the prerequisites in place for UI development.
Update your dependencies
Before adding UI pages to your application, make sure to update the <packageName>.c3pkg.json file of your application package with the following dependencies:
uiComponentLibraryReact: Include this dependency to create a front-end for your application.uiDemo: Include this dependency to configure a UI component that fetches and displays information about a list of machines. The entity and seed data for those machines is available in the uiDemo package.
Create a new page
In C3 AI Platform there are two main concepts:
- UI components: Define the look and feel of your application. UI components fetch data from the back-end and display it to users. UI components can be nested and composed to form a hierarchy of more complex components.
- Routes: Define the URLs of your application, and which component is displayed when a user accesses that URL.
To create a new page, you have to:
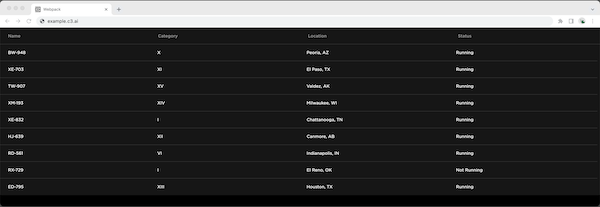
- Configure a UI component instance. In this example you'll configure a table component.
- Create a new route that maps a URL to that component instance.
Configure a UI component instance
To create a new component instance, add a new file in the {package}/ui/c3/meta directory:
examplePackage
├── examplePackage.c3pkg.json
└── ui
    └── c3
        └── meta
            └── examplePackage.MachineList.json
The name of the file needs to follow the convention {packageName}.{componentId}.json. Then, add the following configuration to the file:
{
  "type": "UiSdlConnected<UiSdlDataGrid>",
  "component":{
    "dataSpec": {
      "dataType": "SDLDemoMachine",
      "columnFields": [
        {
          "fieldName": "name",
          "label": "Name"
        },
        {
          "fieldName": "category",
          "label": "Category"
        }
      ]
    }
  }
}
Notice a few things in the configuration:
- The
typefield specifies which UI component to render. This example renders a grid (table) component. The component is connected to the client-side state management store. - The
dataspecfield specifies which backend type to use to populate the component with data. In this case theSDLDemoMachine, which has been pre-populated with seed data. - The
columnFieldsfield specifies the columns for the grid component by declaring which fields ofSDLDemoMachineto use to populate each grid column.
Learn more about UiSdlDataGrid.
Create a new route
You now have a component that can display information about a set of machines, but the component is not yet used anywhere, so end-users cannot see it yet. Let's fix that by creating a new route so users can navigate to a URL and see the UI component.
Routes are metadata, so make sure to create the {package}/metadata/UiSdlRoute directory if you haven't yet:
examplePackage
├── examplePackage.c3pkg.json
├── metadata
│   └── UiSdlRoute
│       └── UiSdlRoute.csv
└── ui/c3/meta
Add two new routes to the {package}/metadata/UiSdlRoute/UiSdlRoute.csv file:
targetModuleName,targetPageName,name,urlPath
examplePackage,MachineList,/,/
examplePackage,MachineList,/,/home
With these two routes and a deployed application, a user can access either https://{environment} or https://{environment}/home. See the examplePackage.MachineList component. Learn more about UiSdlRoute.
Note: When you are developing, you are making incremental changes. Go to https://localhost:{portNumber}/{urlPath} to access routes. The default port is 50081, but if that is in use, the system uses a different port. The C3 AI VSCE notification that pops up when bundling is completed or the logs in the output tab indicates which port you are using.
Bundle the UI
The last step is to transform the configurations you wrote into actual code a browser can run. This is known as bundling the UI of your application.
When bundling the UI, C3 AI Platform transforms your configurations into standard React code, and then uses standard technology, including Webpack, to transform React into static assets, including HTML, JS, and CSS.
In VS Code, right-click the package you created, and select 'Start UI Bundling'. Learn more.
Preview the application
Once bundling is done, you can preview your application. In your browser, navigate to https://localhost:{portNumber}/.
To manage your builds for your application, see Release Management documentation for more information.