Configure and Use C3 Central MCP Server
After connecting to the C3 Central MCP Server, you can configure instruction files, enable tools, use prompts, discover skills, and install extensions to create a personalized development workflow.
This setup allows your coding assistant to generate C3 AI code that aligns with your project standards and Type system conventions.
For setup instructions, see Connect to the C3 Central MCP Server.
Set up instruction files
Instruction files provide persistent context about your C3 AI project, such as naming conventions, Type patterns, and file structure. Your coding assistant uses these files to produce accurate and consistent code.
Install instruction files
Open a conversation with your coding assistant.
Enter the command:
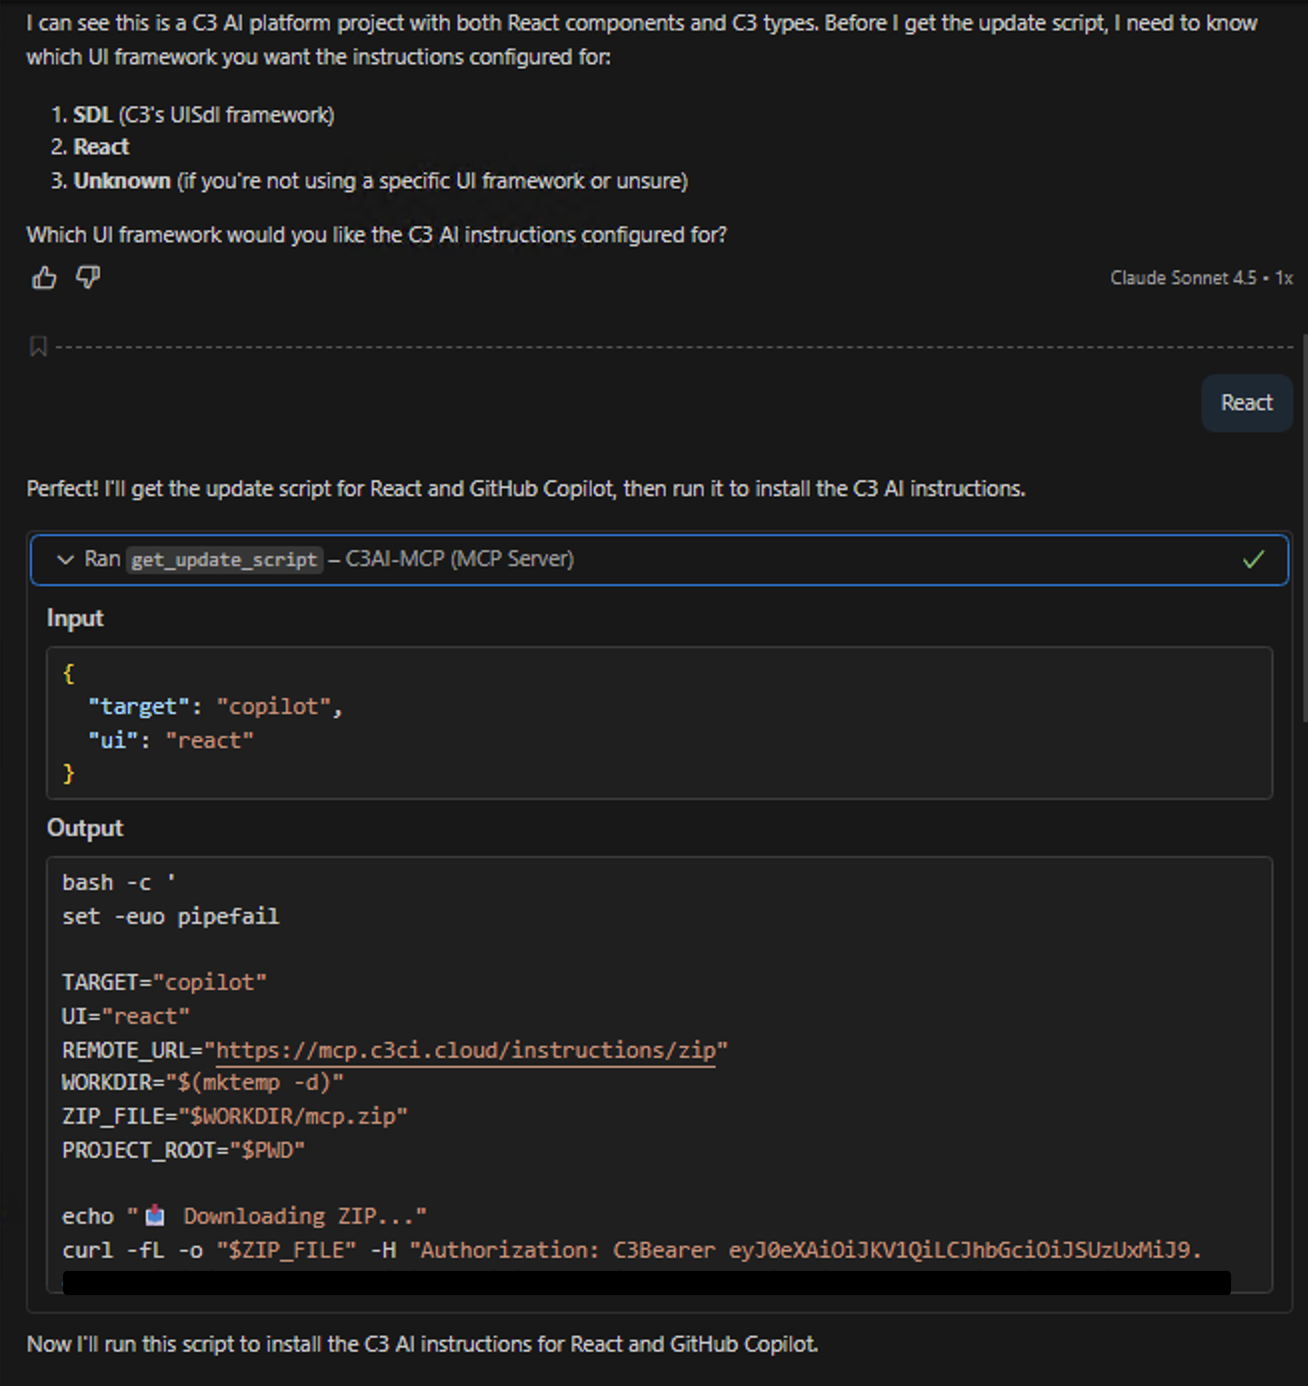
Update my instructions using C3 MCP.The assistant calls the
get_latest_instructionstool to fetch the latest C3 instructions and installs thec3-mcp-clicommand-line tool.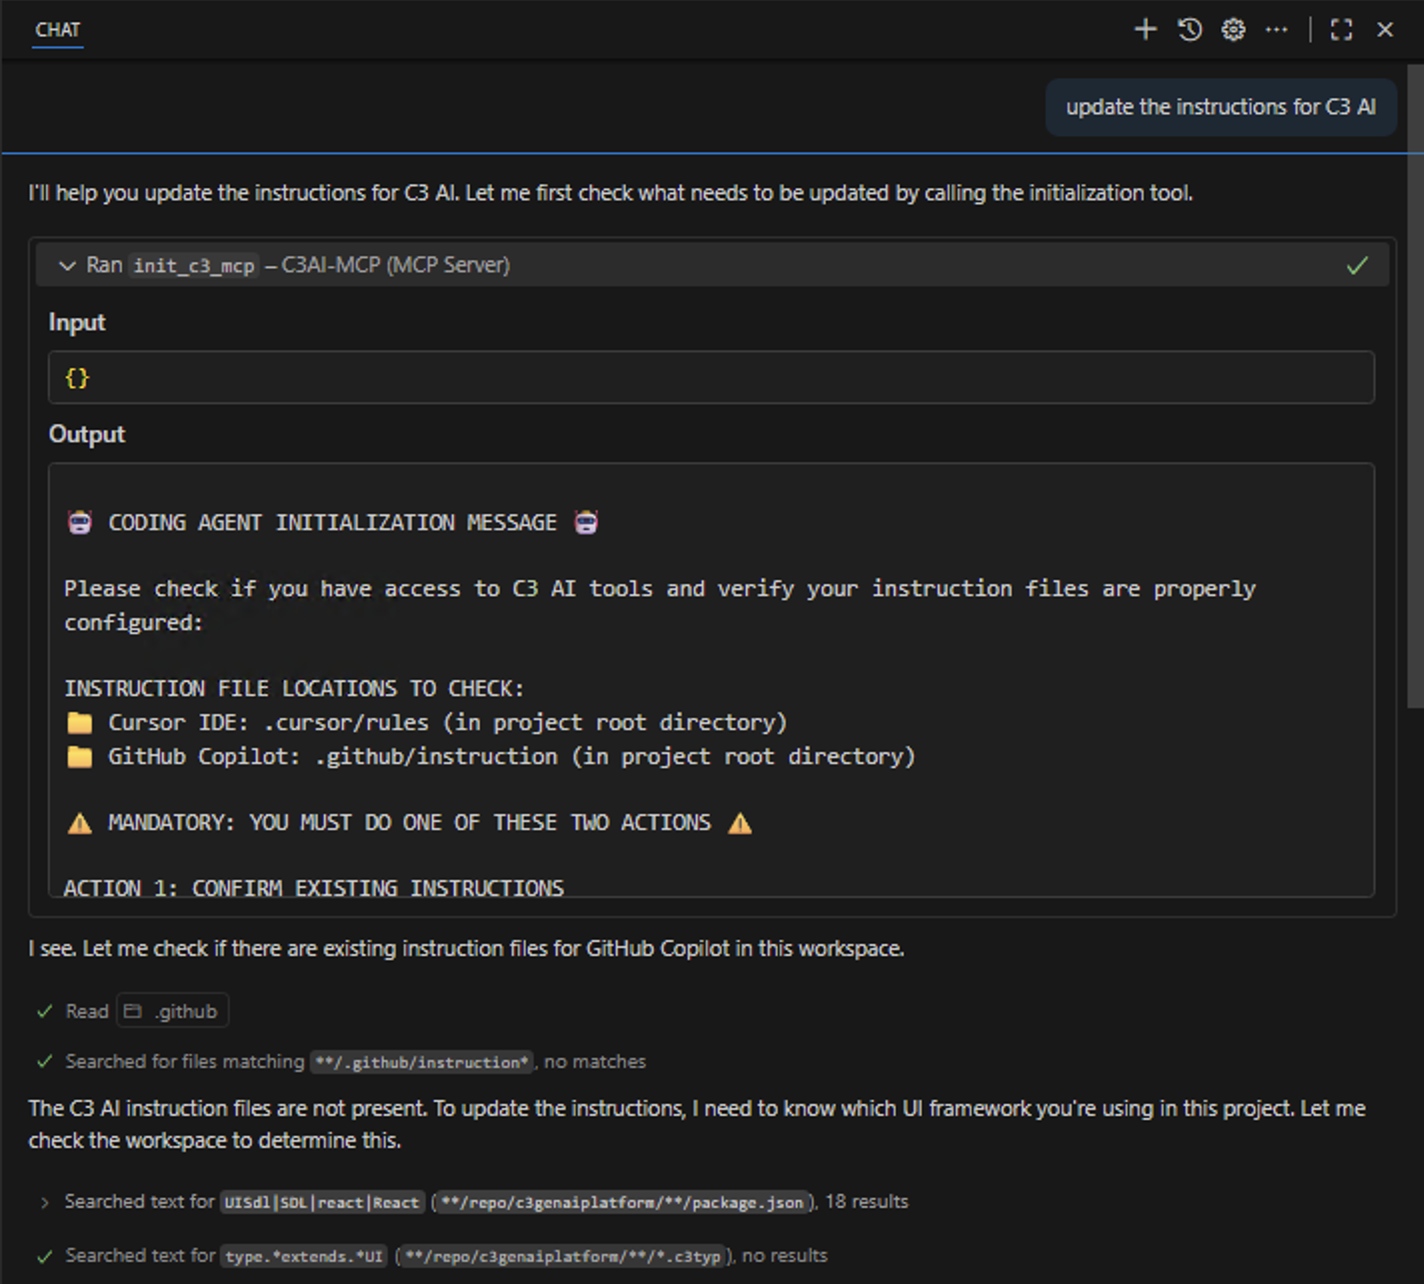
The assistant downloads and runs the setup script automatically.
Wait for the script to complete. The instruction files are stored in different locations depending on your editor:
- VS Code:
.github/instructions,.github/skillsfolders - Cursor:
.cursor/rules,.cursor/skillsfolders

- VS Code:
If the command does not run automatically, copy it from the chat and paste it into your terminal (Bash for Windows, standard terminal for Linux or macOS).
Tools
The MCP Server provides tools your coding assistant uses automatically when responding to your requests. You can enable or disable them depending on your workflow.
Available tools
The following table lists the core tools provided by the C3 Central MCP Server. Additional tools may be available depending on your server configuration.
| Tool | Description |
|---|---|
ask_c3_question | Answer general knowledge questions in the C3 AI domain. |
discover_skills | Discover and fetch all available skills with their names and descriptions. |
edit_c3_type | Edit an existing C3 Type based on a description of the changes. |
expand_c3_document | Fetch and return the expanded content of a specified C3 developer document. |
generate_c3_transform | Generate a JavaScript file for a C3 Transform given source and target Type files. |
generate_c3_types_from_data | Generate C3 Types for multiple data files with proper references between related types. |
generate_js_implementation | Generate a JavaScript implementation for a C3 Type based on a description. |
generate_new_c3_type_from_description | Generate the content for a new C3 Type based on a description. |
generate_python_implementation | Generate a Python implementation for a C3 Type based on a description. |
get_latest_instructions | Fetch the latest C3 AI coding instructions and install the c3-mcp-cli command-line tool for a specific IDE agent and UI framework. |
init_c3_mcp | Initialize C3 MCP for a new project or when C3 AI-specific instructions are not present. |
search_c3_documentation | Perform a semantic similarity search against C3 documentation. |
send_feedback_to_c3 | Send feedback about the AI behavior or tool outputs to C3. |
Example tool usage
| Action | Example user request | Tool used | Result |
|---|---|---|---|
| Search documentation | "Show me best practices for creating C3 Transforms." | search_c3_documentation | Returns relevant documentation and links. |
| Generate a new Type | "Create a C3 Type for a temperature and humidity sensor." | generate_new_c3_type_from_description | Generates and formats the new Type. |
| Modify an existing Type | "Add a field called location to the Sensor Type." | edit_c3_type | Updates the Type definition and displays a diff. |
| Create a Transform | "Generate a Transform from RawSensorData to Sensor Type." | generate_c3_transform | Creates the JavaScript file for the Transform. |
| Implement logic | "Write the implementation for the Sensor Type's validate method." | generate_js_implementation | Generates the JavaScript function template. |
| Generate Python code | "Write the Python implementation for the QueryEngine's run method." | generate_python_implementation | Generates the Python function implementation. |
Enable or disable tools
- In your coding assistant chat panel, select the tools icon.
- Navigate to MCP Server: C3AI-MCP and review the list of available tools.
- Enable or disable tools to match your workflow.
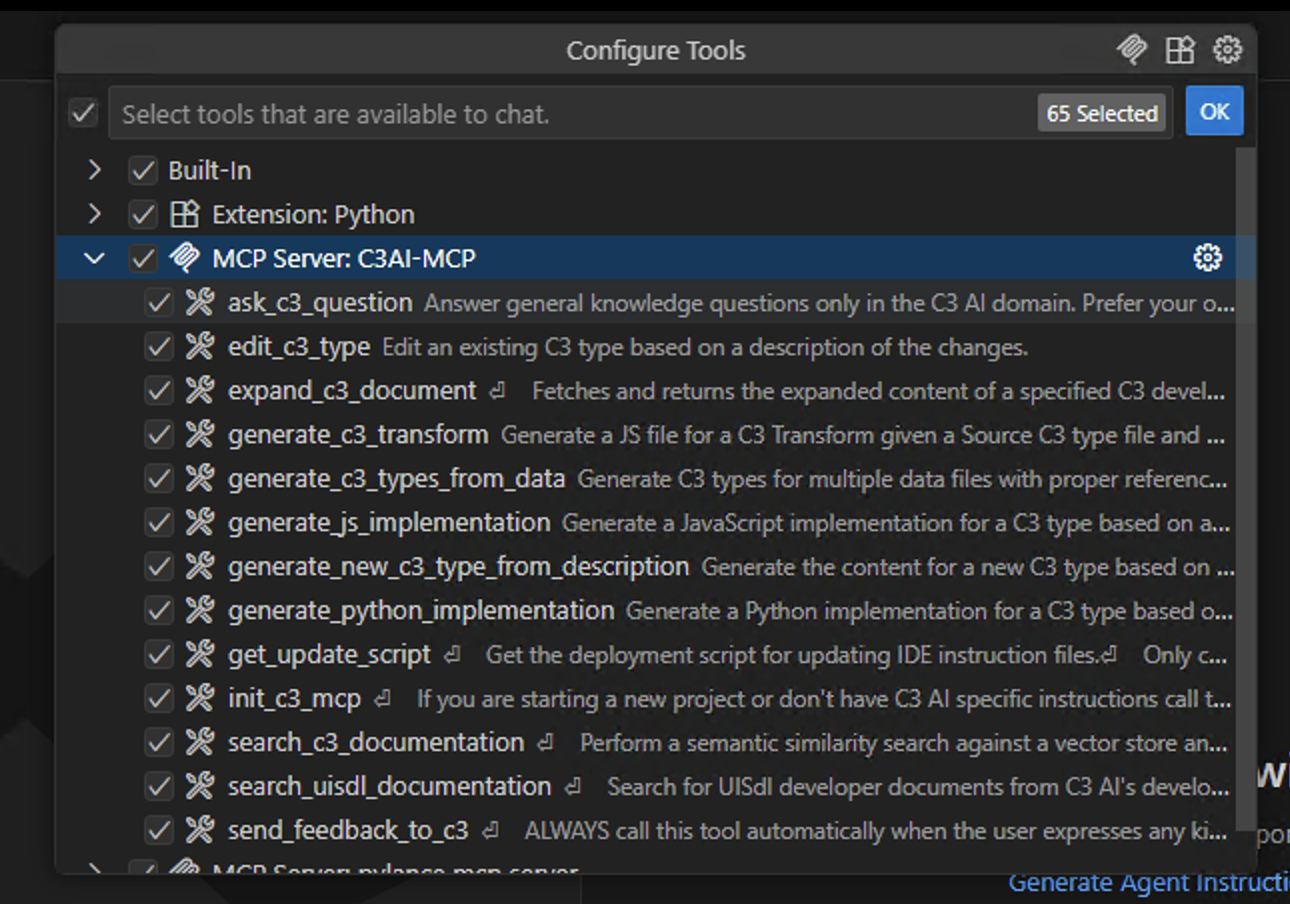
Only enabled tools are accessible during your sessions.
Test tools
You can test tools directly from the C3 Central MCP Server web portal at https://mcp.c3.ai.
Navigate to the Tools page in the web portal.
Select the play icon in the Actions column for the tool you want to test.
A dialog opens showing the tool description and its required arguments.
Enter test values for each argument and select Run Test.
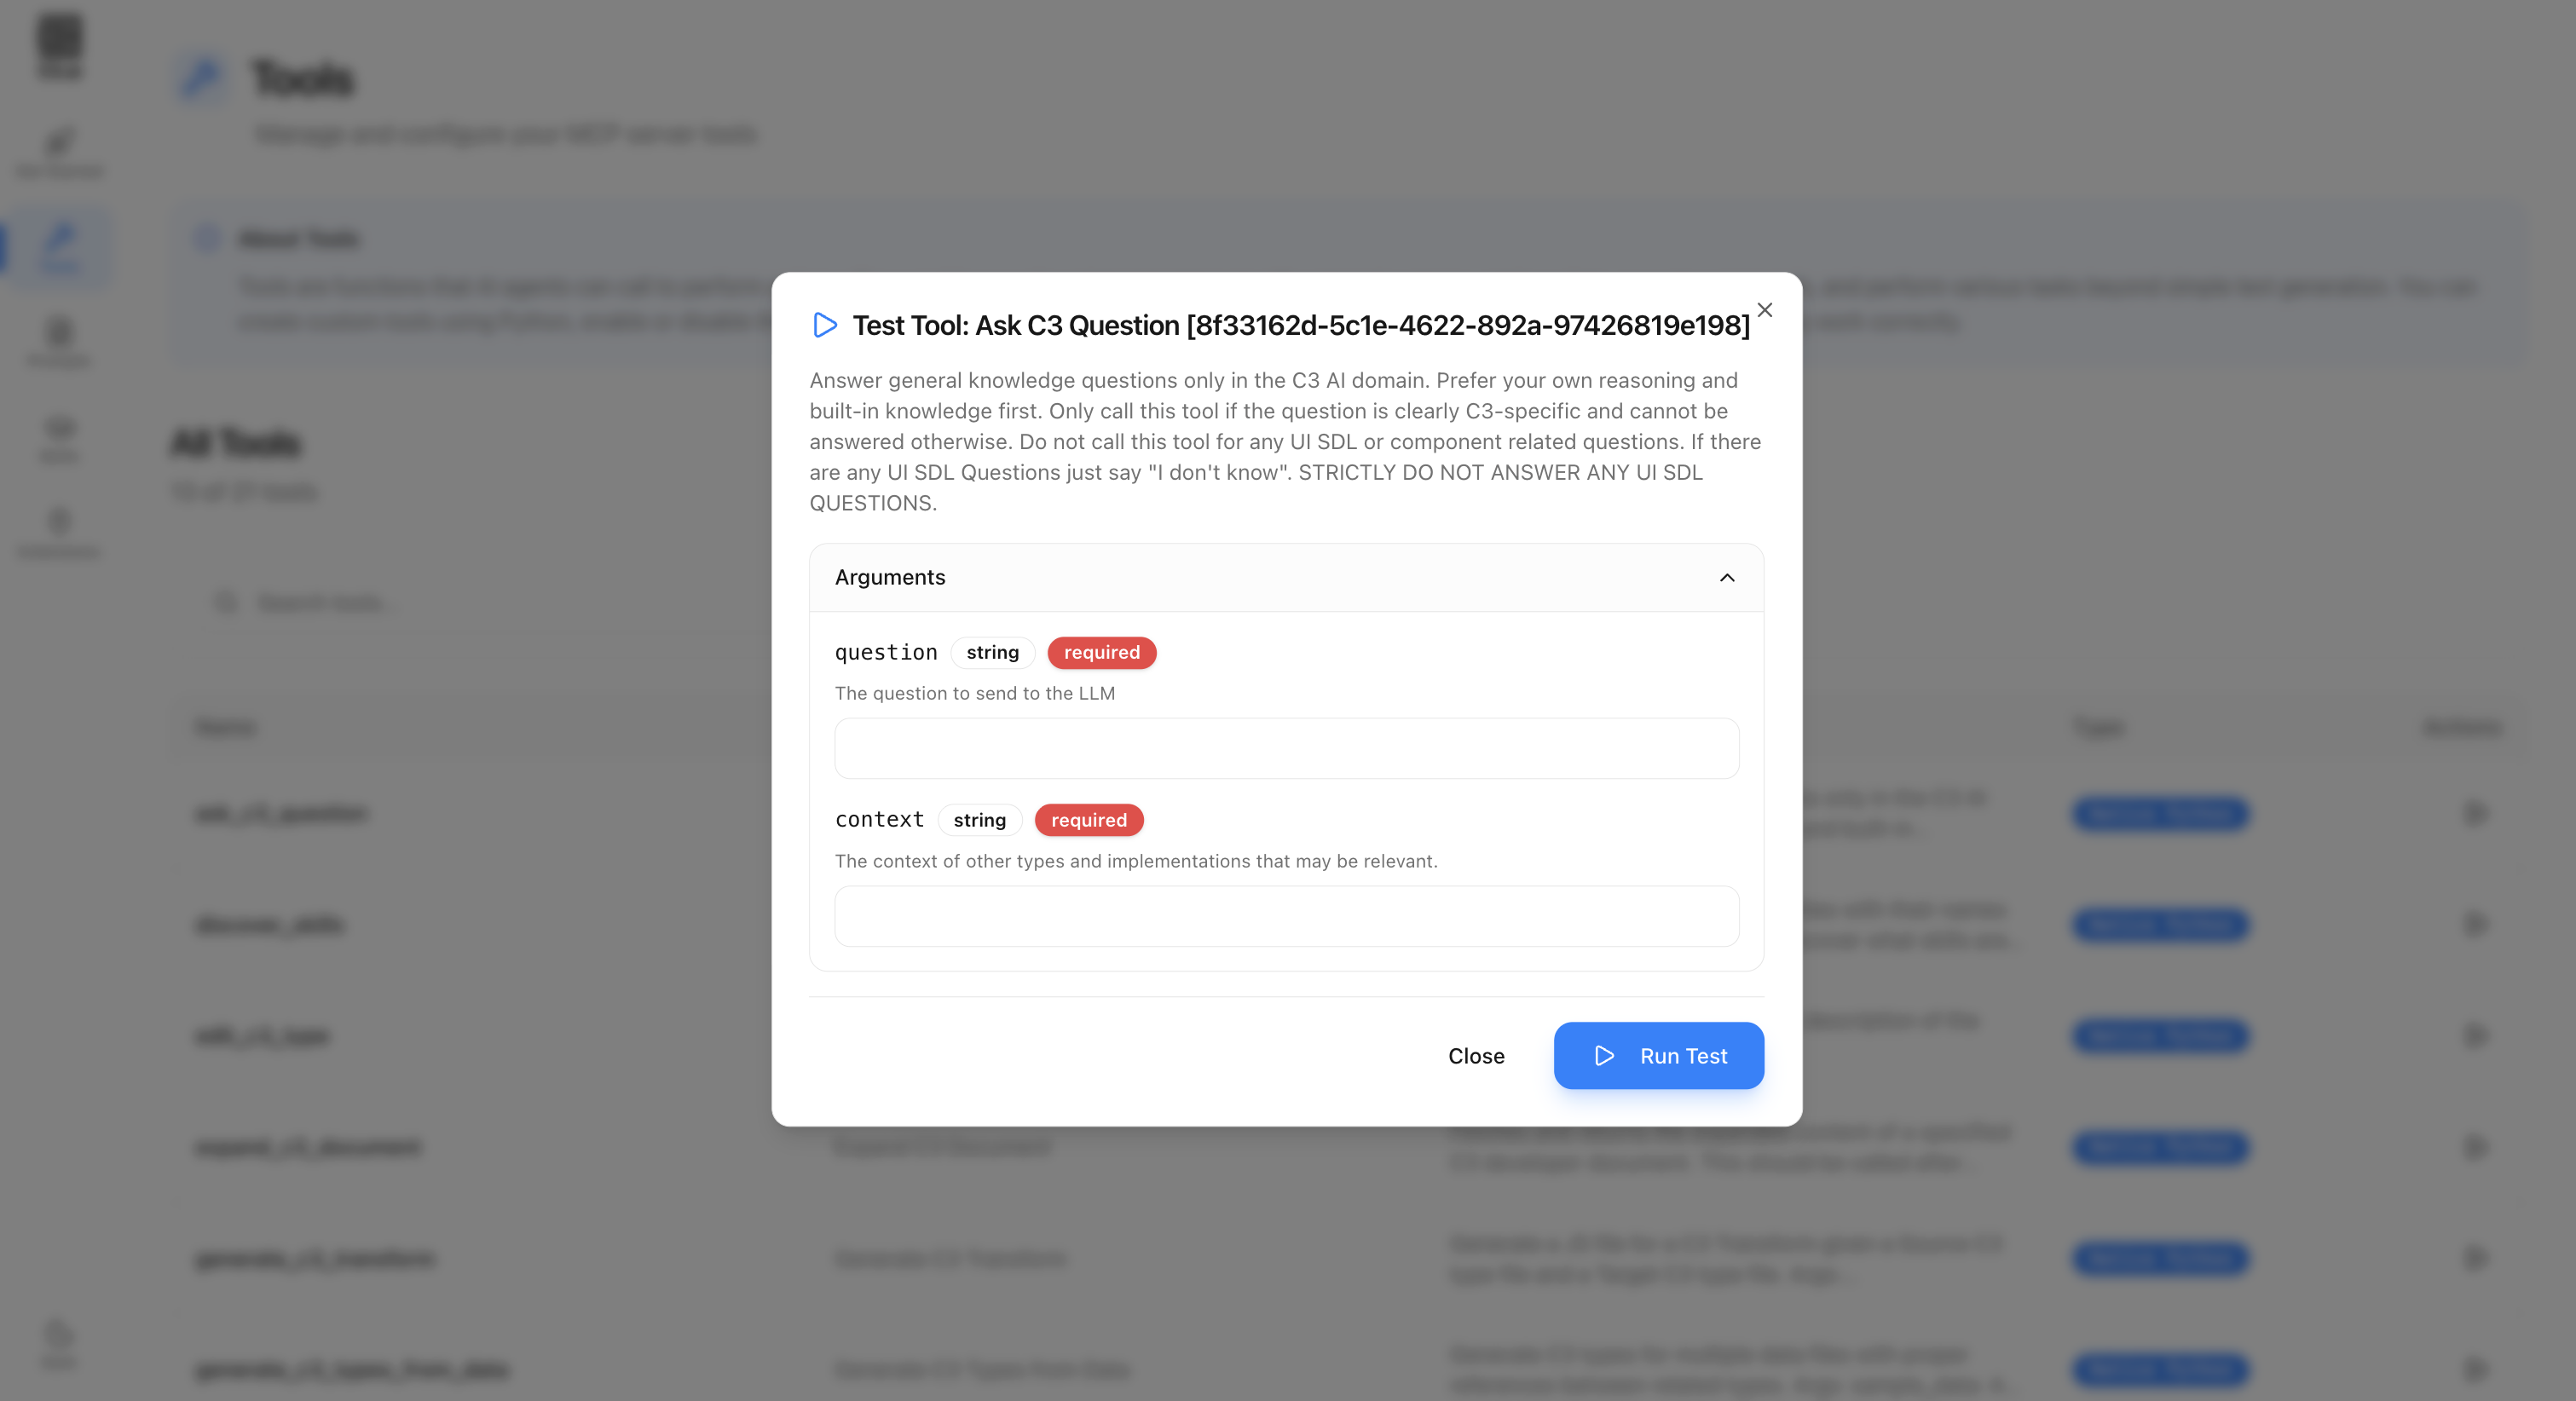
This helps you verify tool behavior before using it in your coding assistant.
Prompts
Prompts are predefined workflows that guide your coding assistant through common C3 AI development tasks. You can access them directly from your coding assistant's chat interface.
Use prompts in your editor
In your coding assistant's chat, type
/.Browse or search for a prompt.
Select it to insert it into your chat.
Follow the guidance that appears.
Type the name of a prompt after / (for example, /Create calculated fields in C3) to find it faster.
Available prompts
| Prompt | Description |
|---|---|
| Use annotations in C3 | Provides guidance for defining and using C3 annotations. |
| Design C3 data models and application architecture | Outlines data modeling patterns and application design principles. |
| Create calculated fields in C3 | Walks through creating calculated fields following C3 best practices. |
| Create CronJobs in C3 | Guides through creating CronJobs in the C3 system. |
| Write documentation for C3 AI Types | Generates structured .c3typ documentation templates. |
| Use the C3 file system | Explains how to manage and navigate files in C3 AI projects. |
| Write C3 unit tests using Jasmine | Creates Jasmine-based unit tests for C3 Types and logic. |
| Set up React applications with C3 AI React | Guides through React integration setup for C3 AI packages. |
| Write C3 unit tests using pytest | Generates pytest-based unit tests for backend logic. |
| Create roles and permissions | Provides steps for defining application roles, permissions, and access control. |
Each prompt launches a guided workflow. The assistant asks clarifying questions, then generates code or configuration aligned with C3 AI standards.
Common prompts
| Task | Example prompt |
|---|---|
| Create calculated fields | /Create calculated fields in C3 |
| Create CronJobs | /Create CronJobs in C3 |
| Set up React applications | /Set up React applications with C3 AI React |
| Write unit tests | /Write Jasmine unit tests for C3 Types |
| Create roles and permissions | /Create roles and permissions |
Each prompt launches a guided workflow. The assistant asks clarifying questions and generates C3-compliant code or configuration.
Skills
Skills are reusable capabilities that provide specialized knowledge and workflows to AI agents. The C3 Central MCP Server includes a library of skills that your coding assistant can discover and use automatically.
About skills
Skills extend your coding assistant with domain-specific expertise. Each skill contains tested instructions for a particular area of C3 development. You can use the discover_skills tool to list all available skills and their descriptions. Built-in skills are available automatically. To install additional or custom skills, use c3-mcp-cli add-skill <skill-name> (see Install a skill).
View available skills
You can browse all available skills in the C3 Central MCP Server web portal.
Go to https://mcp.c3.ai and navigate to the Skills page.
Search or filter skills by name, description, or status.
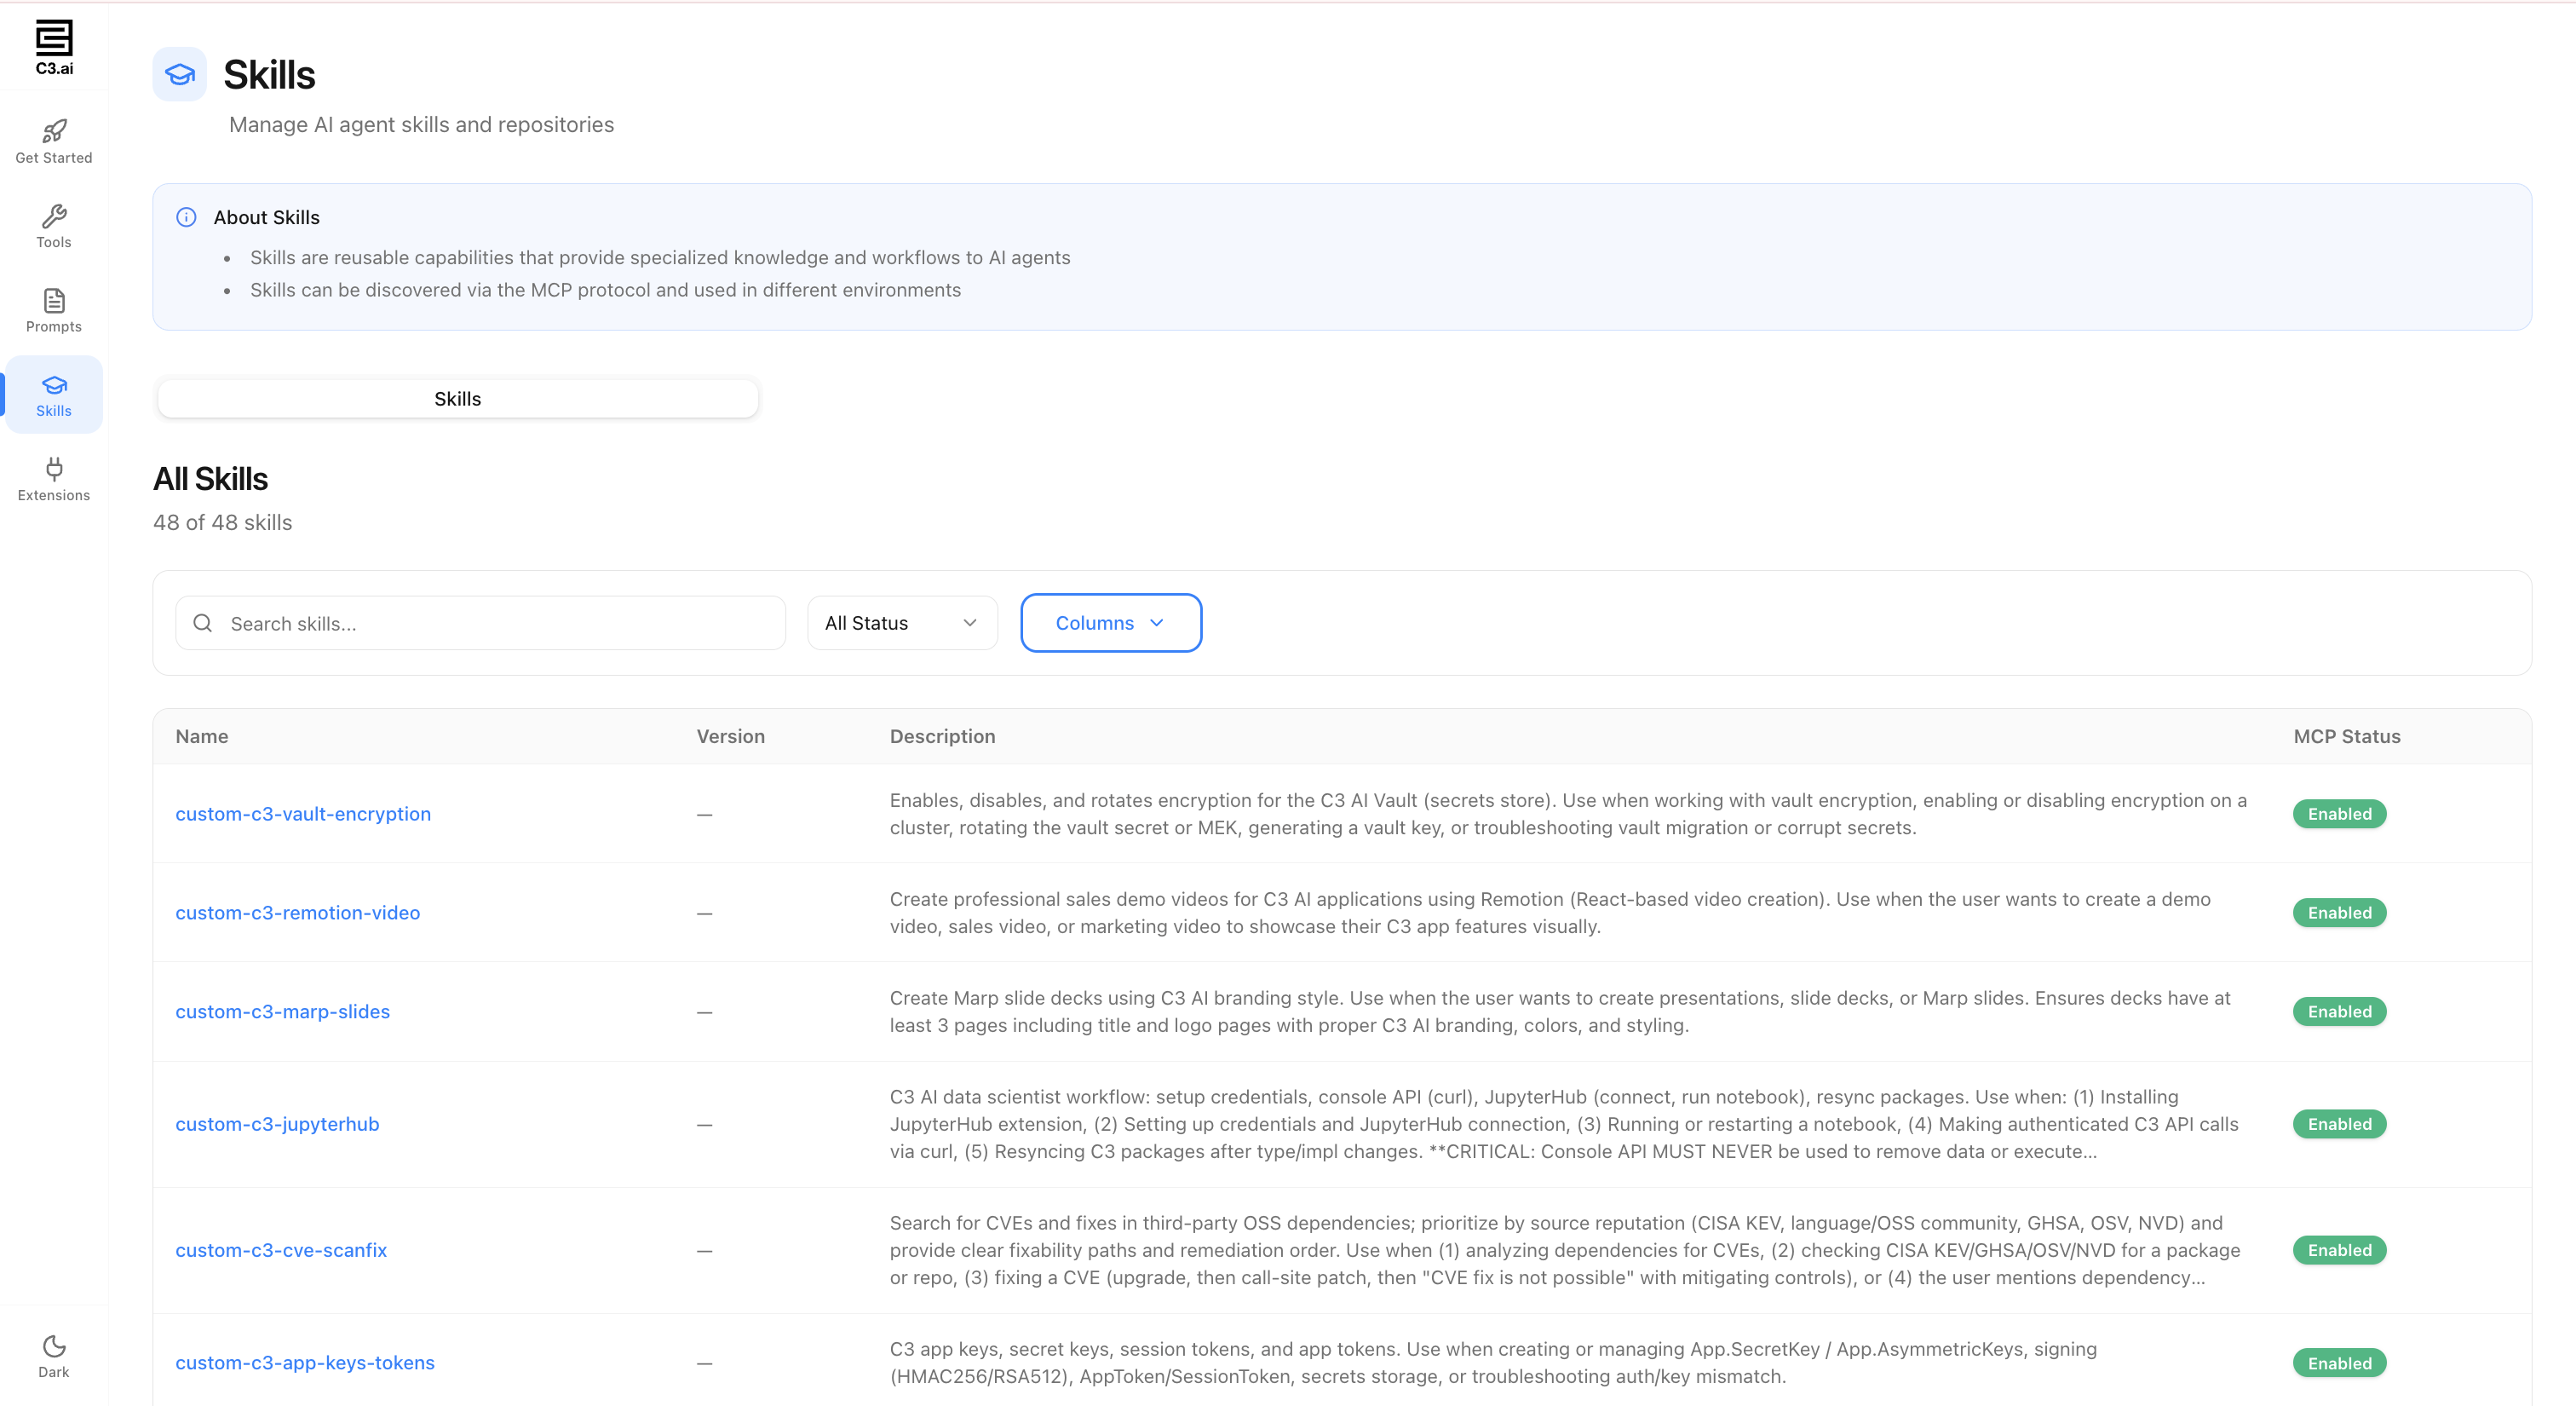
The following table shows some example skills:
| Skill | Description |
|---|---|
| c3-type-generation | Generate C3 Types using the C3 AI MCP tools. |
| c3-workflow | Build, troubleshoot, and decide when to use C3 Workflows (DAGs). |
| custom-c3-vault-encryption | Enable, disable, and rotate encryption for the C3 AI Vault (secrets store). |
| custom-c3-marp-slides | Create Marp slide decks using C3 AI branding style. |
| custom-c3-jupyterhub | C3 AI data scientist workflow: setup credentials, JupyterHub, and resync packages. |
| custom-c3-cve-scanfix | Search for CVEs and fixes in third-party OSS dependencies. |
| custom-c3-app-keys-tokens | Create and manage C3 app keys, secret keys, session tokens, and app tokens. |
| custom-c3-remotion-video | Create professional sales demo videos for C3 AI applications using Remotion. |
Skills are versioned and managed centrally. New skills are added regularly. Check the Skills page for the latest list.
Install a skill
You can install any available skill to your local workspace using the c3-mcp-cli command-line tool.
Find the skill you want on the Skills page at https://mcp.c3.ai.
Run the following command in your terminal:
Command Linec3-mcp-cli add-skill <skill-name>For example:
Command Linec3-mcp-cli add-skill custom-c3-cve-scanfixThe skill is downloaded to your personal skills folder (see Skill storage locations below).
Create custom skills
You can create your own skills to package domain-specific knowledge and workflows for your coding assistant. Each skill consists of a folder containing a SKILL.md file with YAML frontmatter and markdown instructions.
Skill file structure
A minimal custom skill requires a single SKILL.md file inside a named folder:
my-custom-skill/
└── SKILL.md
For more complex skills, you can include additional reference files:
my-custom-skill/
├── SKILL.md
├── reference.md
└── examples/SKILL.md format
The SKILL.md file uses YAML frontmatter followed by markdown content:
---
name: my-custom-skill
description: >
  Short description of what the skill does and when to use it.
  Include trigger phrases so the assistant knows when to apply this skill.
---

# My Custom Skill

## Overview

Detailed instructions, patterns, and examples for the assistant to follow.
The description field is important because your coding assistant uses it to determine when the skill applies to your request.
Skill storage locations
Where you store your skill folder depends on your editor and whether you want to share the skill with your team.
| Location | Editor | Scope |
|---|---|---|
.github/skills/ | VS Code (Copilot) | Personal |
.cursor/skills/ | Cursor | Personal |
.claude/skills/ | Claude Code | Personal |
.agents/skills/ | All editors | Shared with team |
Whether a folder is tracked in Git depends on your repository's .gitignore configuration, not on the folder name.
Personal skills are stored in editor-specific folders that are gitignored. Use these folders for experimental or role-specific skills that do not need team review.
Shared skills are stored in the .agents/skills/ folder and can be made available to all contributors on the repository.
Extensions
Extensions allow you to install additional MCP servers alongside the C3 MCP Server. Each extension connects your coding assistant to a third-party service, expanding its capabilities beyond C3 AI development.
Available extensions
You can browse and install extensions from the Extensions page in the C3 Central MCP Server web portal.
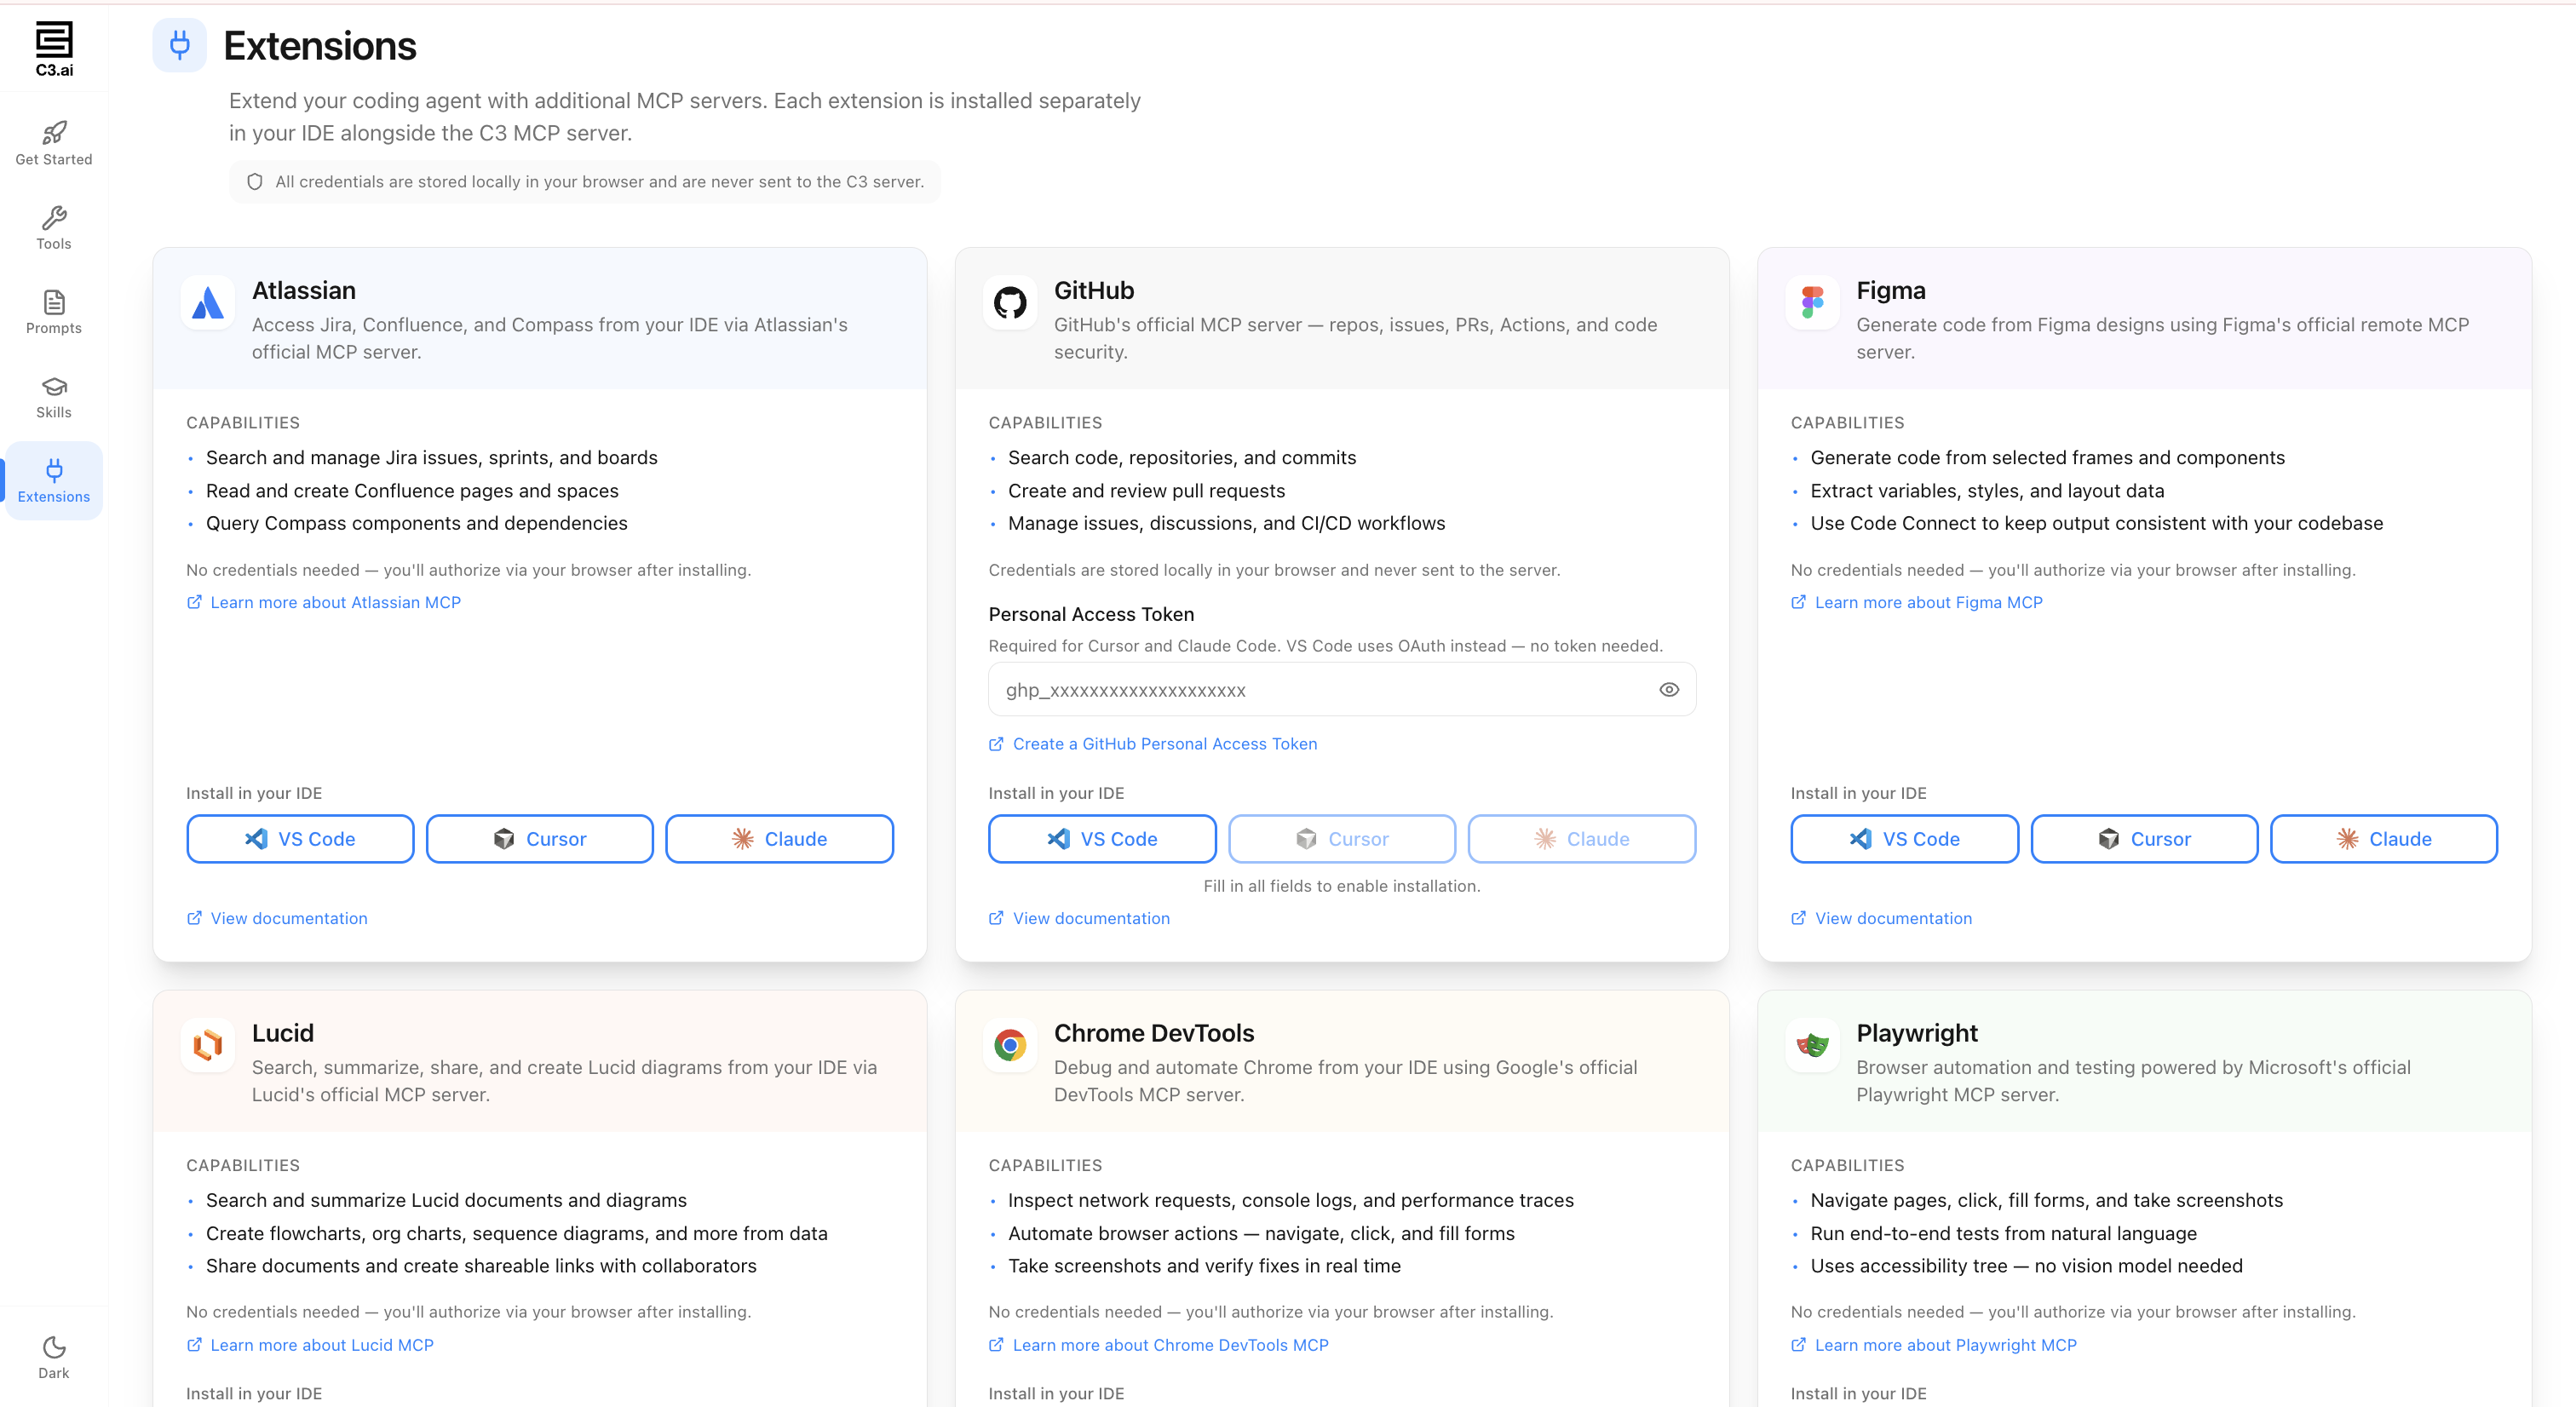
The following extensions are available:
| Extension | Description | Capabilities |
|---|---|---|
| Atlassian | Access Jira, Confluence, and Compass through Atlassian's official MCP server. | Search and manage Jira issues, sprints, and boards. Read and create Confluence pages and spaces. Query Compass components and dependencies. |
| GitHub | GitHub's official MCP server for repos, issues, PRs, Actions, and code security. | Search code, repositories, and commits. Create and review pull requests. Manage issues, discussions, and CI/CD workflows. |
| Figma | Generate code from Figma designs using Figma's official remote MCP server. | Generate code from selected frames and components. Extract variables, styles, and layout data. Use Code Connect to keep output consistent with your codebase. |
| Lucid | Search, summarize, share, and create Lucid diagrams from your IDE. | Create flowcharts, org charts, sequence diagrams, and more from data. Share documents and create shareable links with collaborators. |
| Chrome DevTools | Debug and automate Chrome from your IDE using Google's official DevTools MCP server. | Inspect network requests, console logs, and performance traces. Automate browser actions such as navigate, select, and fill forms. Take screenshots and verify fixes in real time. |
| Playwright | Browser automation and testing powered by Microsoft's official Playwright MCP server. | Navigate pages, select, fill forms, and take screenshots. Run end-to-end tests from natural language. Uses accessibility tree with no vision model needed. |
Install an extension
- Go to https://mcp.c3.ai and navigate to the Extensions page.
- Locate the extension you want to install.
- If the extension requires credentials (such as a GitHub Personal Access Token), enter them in the provided field.
- Select VS Code, Cursor, or Claude to install the extension in your editor.
All credentials are stored locally in your browser and are never sent to the C3 server.
Connect to a C3 AI application
You can connect the MCP Server to a Single Node Environment (SNE) to work with live Types and configurations from your C3 AI application.
Open the C3 AI VS Code Extension.
Connect to your SNE from the extension settings.
The MCP Server detects the connection automatically.
Your coding assistant can now:
- Access live Type definitions.
- Generate Types and Transforms consistent with your data model.
- Suggest code that matches your application's configuration.
If the assistant suggests incorrect fields or relationships, confirm that the SNE connection points to the correct environment.
Troubleshoot configuration issues
Instruction files not detected
Problem: Copilot does not reference instruction files after installation.
Solution:
Verify the
.githubfolder exists at your project root level.Check the folder structure:
Text.github/ ├── instructions/ │ └── copilot-instructions.md └── workflows/If instruction files are in a nested
.githubfolder, move them to the root-level.githubdirectory.Restart VS Code and check for the "Used 1 reference" indicator in Copilot Chat.
Multiple .github folders can cause confusion. Always use the top-level directory for MCP instruction files.
MCP server not responding
Problem: MCP tools appear in the prompt list but do not execute.
Solution:
- Open Command Palette (
Cmd+Shift+Pon macOS,Ctrl+Shift+Pon Windows/Linux). - Select MCP: Open User Configuration.
- Check the status indicator for each server entry.
- If status shows anything other than "Running", click Start to activate the server.
- Verify all server entries show "Running" status.
The MCP server does not start automatically. You must manually activate it after installation or when switching projects.
Code changes not applying automatically
Problem: Copilot suggests code but does not modify files directly.
Solution:
- Check the mode selector at the bottom of Copilot Chat.
- Click the dropdown (may show "Claude Sonnet 4" or another model).
- Select Agent from the options.
- Verify Agent mode is active by confirming:
- "Agent" appears in the mode selector
- Context indicators show active extensions
- The prompt shows "Add context (#), extensions (@), commands (/)"
Agent mode is required for automatic file modifications. Without it, you only receive code suggestions.
Tools not available after configuration
Problem: Enabled tools do not appear or respond in chat.
Solution:
- Verify the MCP server is running (see "MCP server not responding" above).
- Check that Agent mode is enabled (see "Code changes not applying automatically" above).
- Type "/" in Copilot Chat to view available prompts.
- If MCP prompts appear but tools don't work, restart VS Code and repeat verification.
After resolving issues, test with: "What tools do you have access to?" to confirm connectivity.