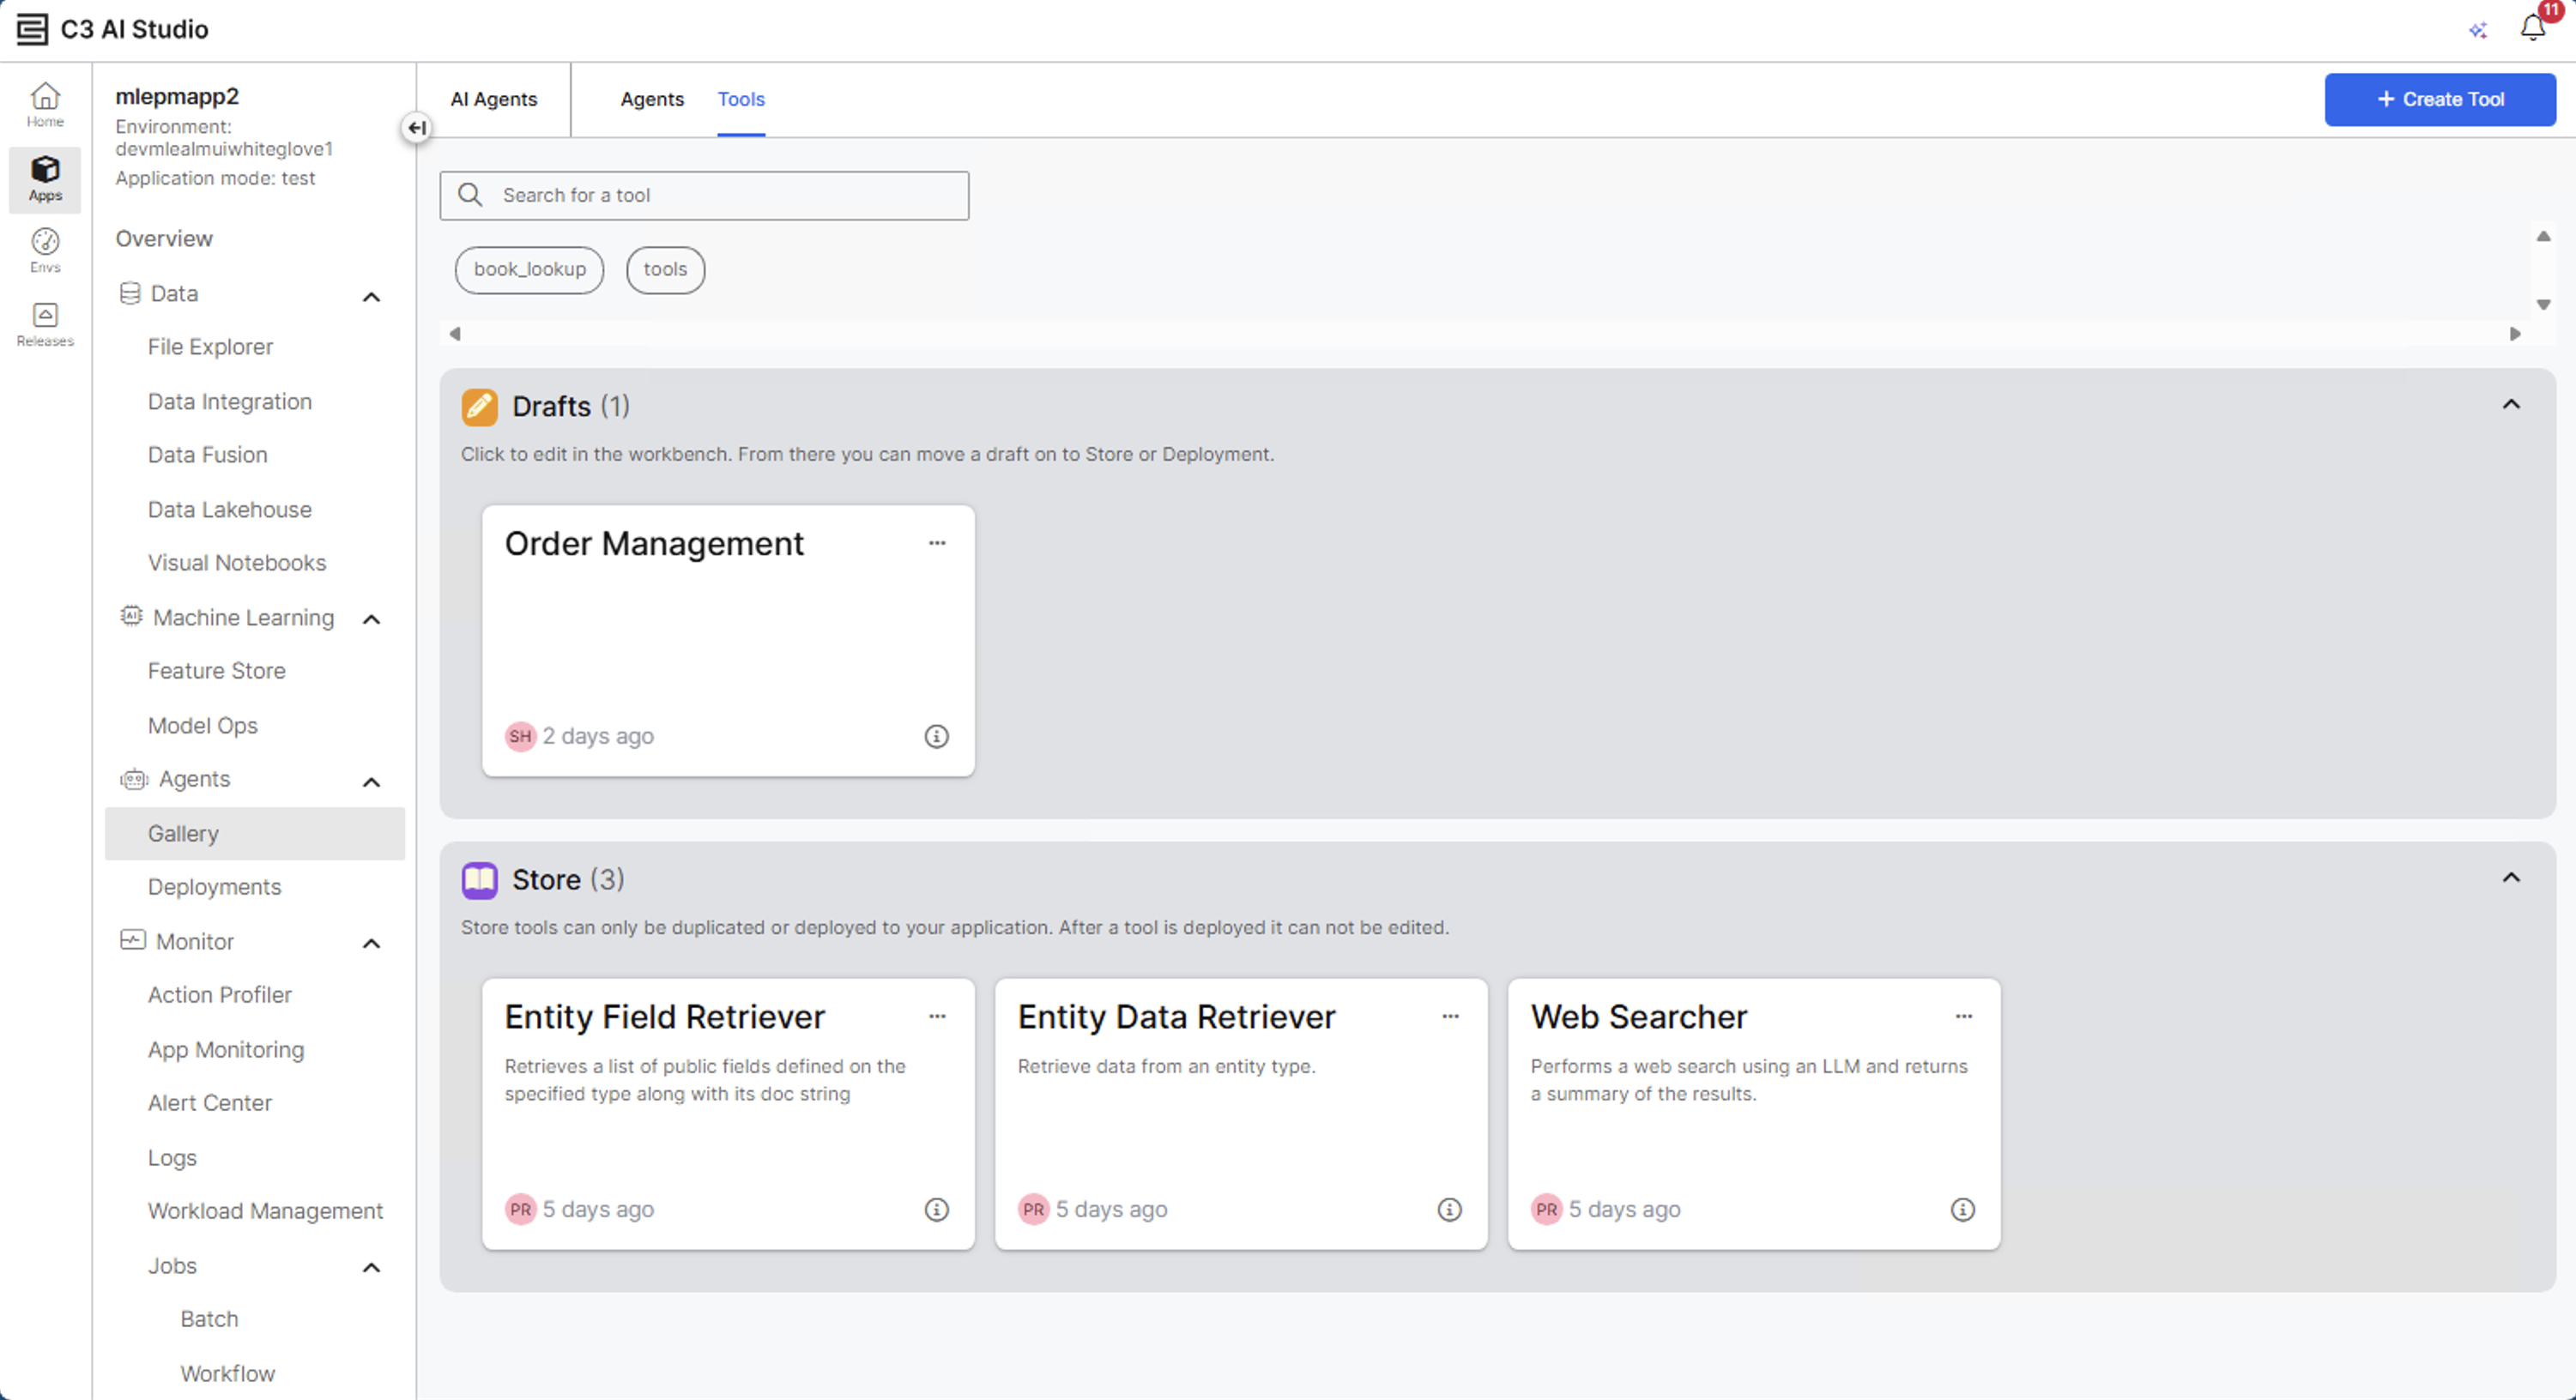
Create Python Tools from the UI
Open the tools gallery
- In Gallery, select Tools tab.
- The Tools gallery displays all available tools grouped by source:
- Drafts: Tools in progress that are not yet not ready to be added to an agent.
- Store: Finalized tools available for use in your agent.
- Select Create Tool to begin building a new tool.
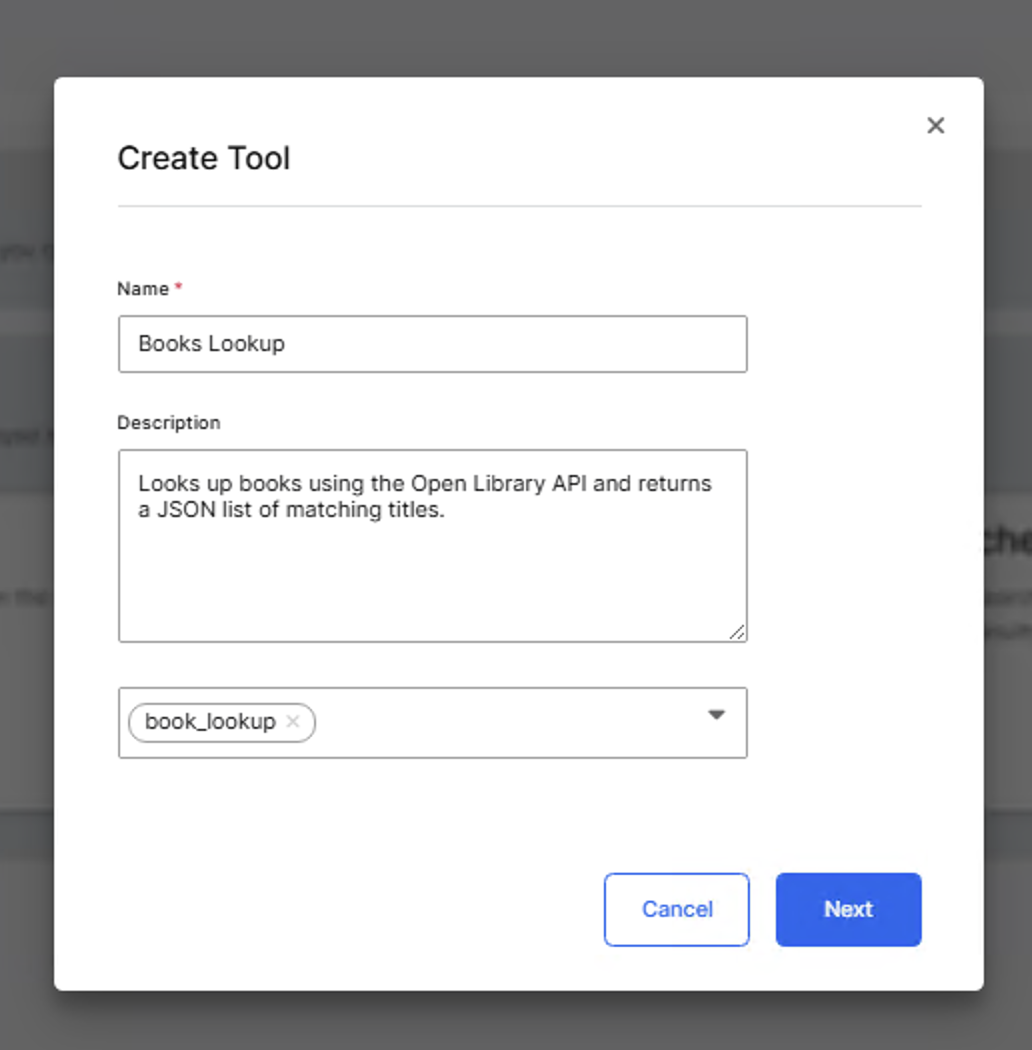
Create a new tool
Provide basic details
- Enter a Name for the tool. Example: Books Lookup
- Add a Description that helps other users in the agent and tool gallery understand what the tool does and when to use it. Example: Looks up books using the Open Library API and returns a JSON list of matching titles.
- (Optional) Add one or more Tags to organize or categorize your tool for later discovery. You can select from existing tags or create new ones in the modal. Example:
book_lookup. - Select Next to continue.
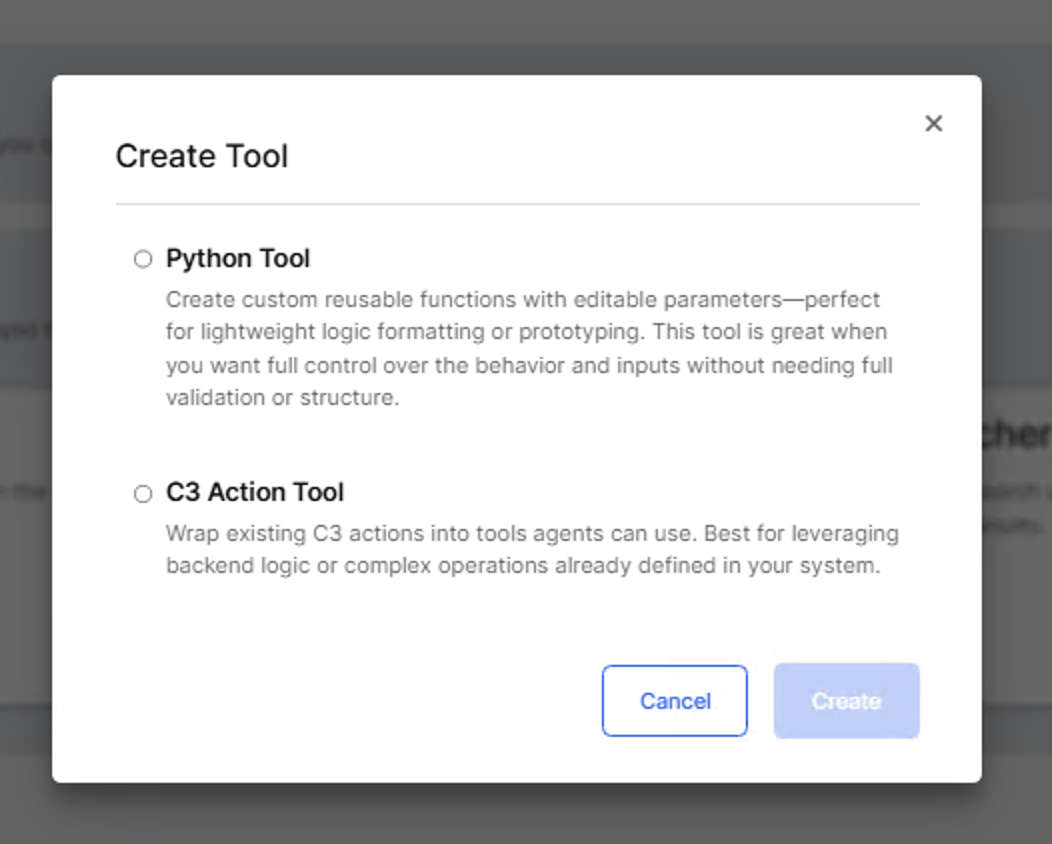
Select tool category
- The dialog displays two tool type options:
- Python Tool: Creates a reusable Python-based function with editable parameters. Use this option to define custom logic, prototypes, or lightweight integrations.
- C3 Action Tool: Wraps existing C3 Type methods into callable tools. Use this option to expose backend logic or C3 Actions to agents.
- Select Python Tool, and then select Create to generate the draft tool.
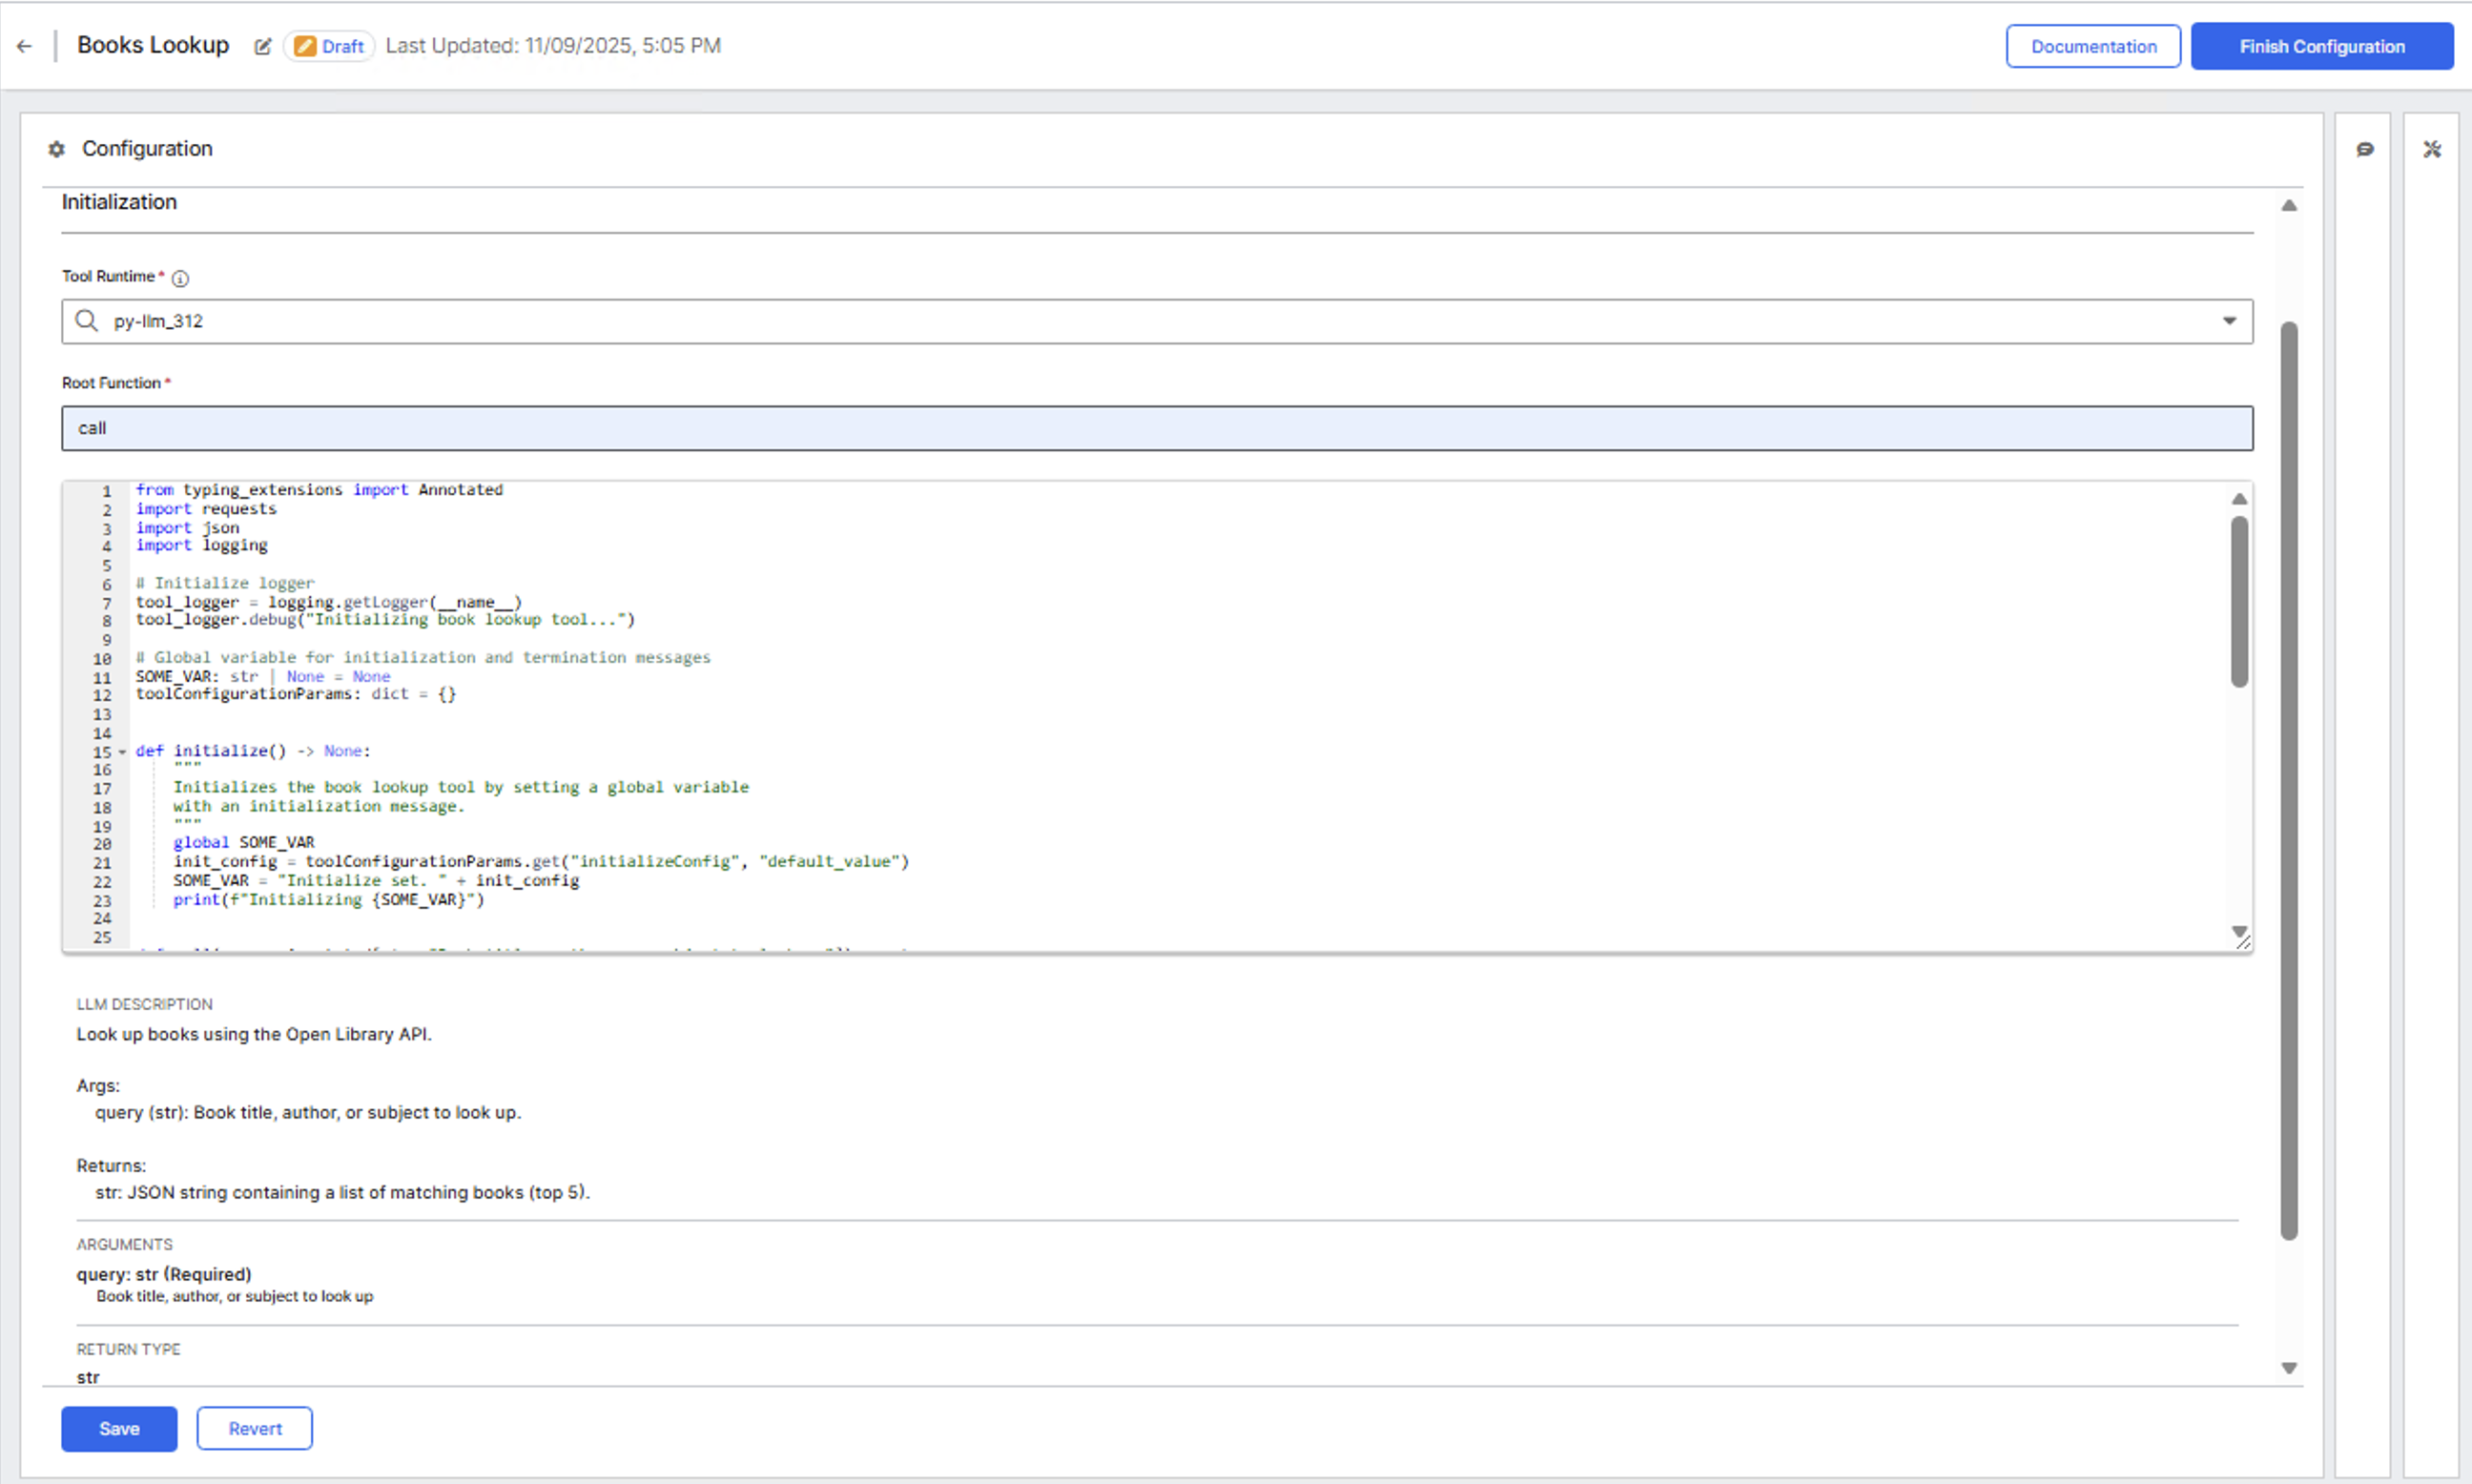
After you create the tool draft, the Tool Configuration page opens.
Configure and add tool logic
After you create the tool draft, the Tool Configuration page opens. This workspace includes three panels:
- Configuration (left): Define the tool's runtime, function entry point, and Python logic.
- Testing (center): Run standalone or agent-level tests.
- Trace (right): Review execution traces after testing.
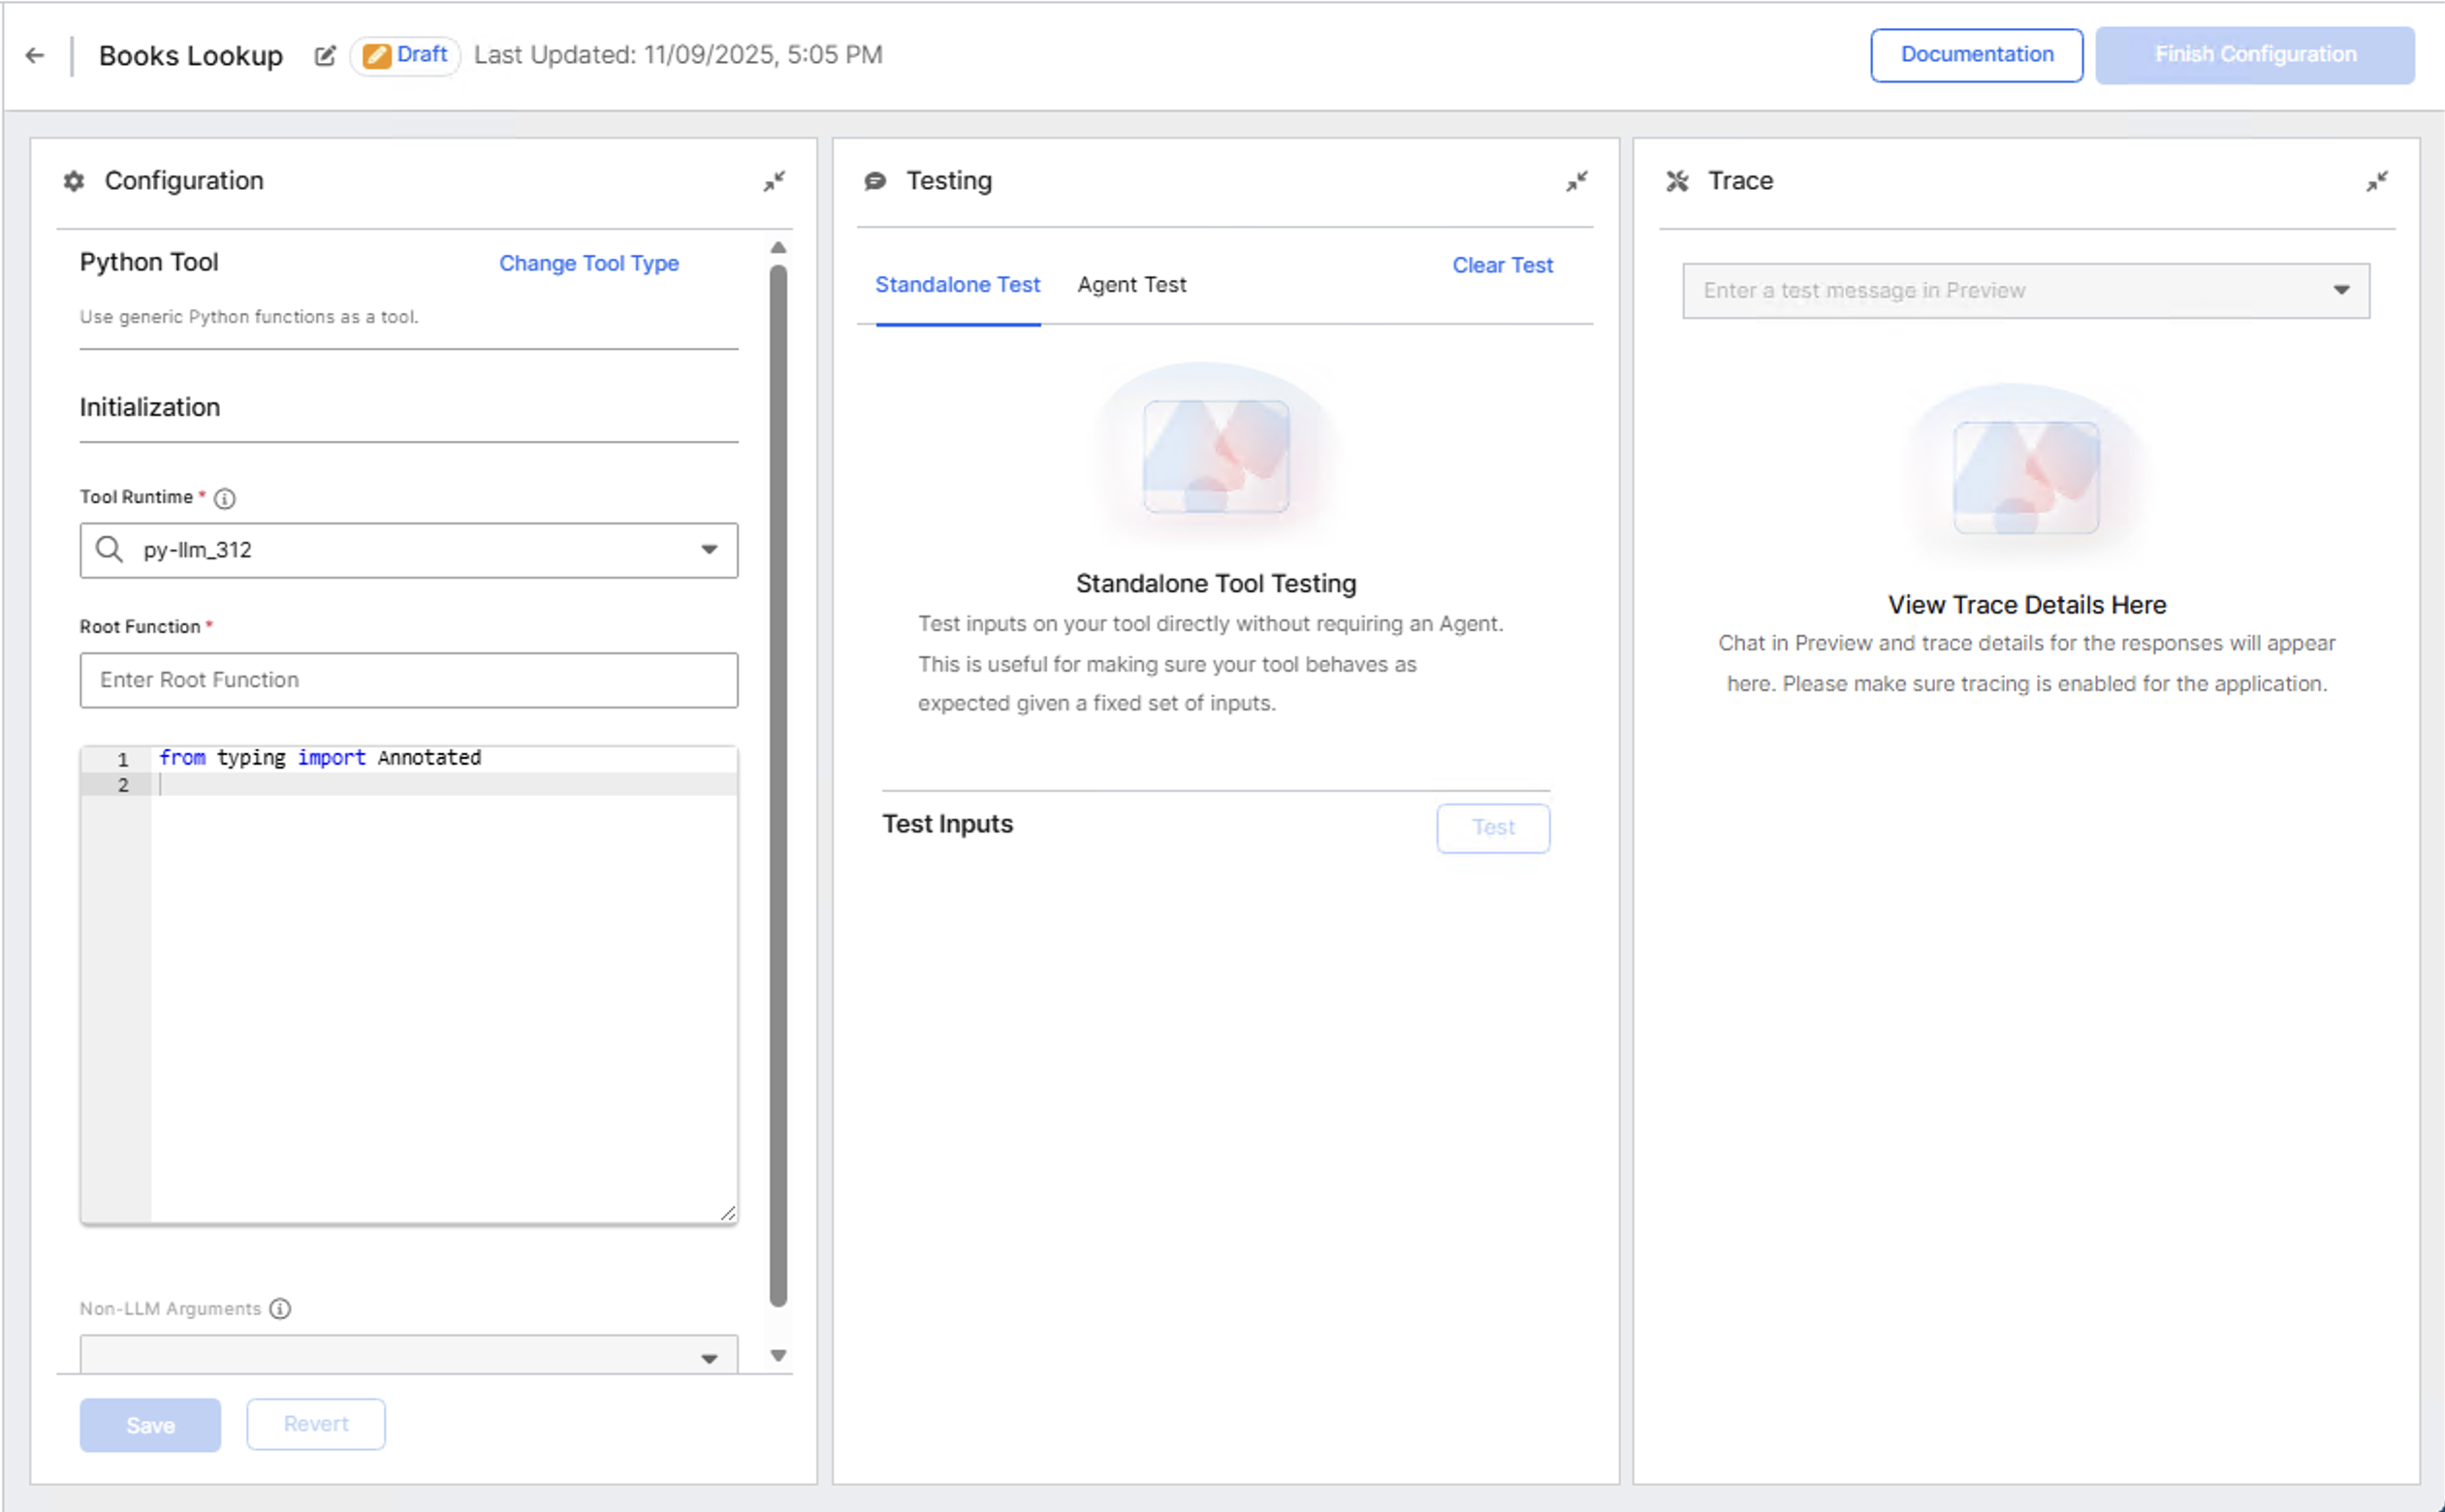
Set the runtime and root function
The Configuration panel specifies how your Python code executes.
Tool Runtime: Select the Python runtime environment. Example: py-llm_312
Root Function: Specify the main entry point for execution. This must match the callable method name in your Python code. This is the method the agent invokes when calling the tool. Example:
callin the code below.Paste your complete Python implementation into the Source Code Editor. Example code:
Pythonfrom typing import Annotated import requests import json import logging # Global variable for initialization and termination messages SOME_VAR: str | None = None toolConfigurationParams: dict = {} def initialize() -> None: """ Initializes the book lookup tool by setting a global variable with an initialization message. """ global SOME_VAR init_config = toolConfigurationParams.get("initializeConfig", "default_value") SOME_VAR = "Initialize set. " + init_config print(f"Initializing {SOME_VAR}") def call(query: Annotated[str, "Book title, author, or subject to look up"]) -> str: """ Look up books using the Open Library API. Args: query (str): Book title, author, or subject to look up. Returns: str: JSON string containing a list of matching books (top 5). """ url = f"https://openlibrary.org/search.json?q={query}" try: resp = requests.get(url, timeout=10) resp.raise_for_status() data = resp.json() books = data.get("docs", [])[:5] return json.dumps(books, indent=2) except requests.exceptions.RequestException as e: tool_logger.error(f"book_lookup_tool: Unable to fetch data: {e}") raise ValueError(f"Error fetching books: {e}") except ValueError: raise ValueError("Invalid JSON response received from server.")
When you paste your Python code into the Source Code Editor, the system automatically populates the following fields after validation:
- LLM Description: Extracted from the docstring of your main callable function. Example:
Look up books using the Open Library API - Arguments: Extracted from the function signature with type annotations.
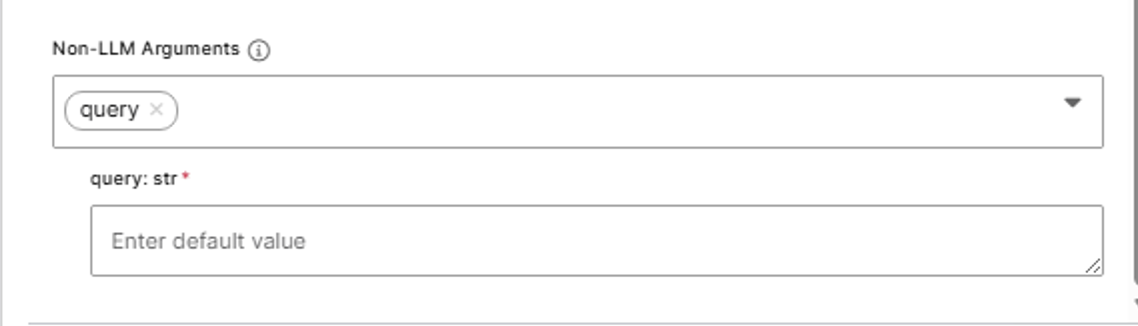
Hide tool arguments from LLMs
Non-LLM Arguments (also called injected arguments) are tool parameters that are provided by the system or the user but never by the LLM. The LLM does not see these arguments and cannot modify them.
Use Non-LLM Arguments for:
- API credentials that should not be visible to the LLM.
- File paths that restrict the LLM to specific directories.
- Database connections that require secure injection.
- Rate limits or configuration values that control tool behavior.
To add Non-LLM Arguments:
- In the Configuration panel, locate the Non-LLM Arguments section.
- Select the dropdown to add a new argument. An input field should appear below the dropdown.
- Enter a default value for the argument. This field is required if the argument is required for the tool to execute (derived from the function definition). This value can also be overridden on the agent workbench when adding the tool to an agent.
- This argument is injected automatically during tool execution.
Validate and test the tool
After successful validation, the editor confirms the tool's callable entry point and displays any initialization function detected. If any errors are present in the source code, an error box should appear in the UI with a list of the errors present. If no errors are present, the LLM description, input and return arguments should be rendered on the UI.
Always specify the correct Root Function name. This value determines which function executes when an agent calls your tool.
Run standalone tests
After validation, you can test the tool directly from the Testing panel. You can test tools in two ways:
- Standalone Test: Runs the tool independently without involving an agent.
- Agent Test: Runs the tool within an agent workflow to validate interaction and context handling.
- Select the Standalone Test tab.
- Enter a sample input for the query parameter. Example: Author name
Thomas Siebel - Select Test to execute the code.
- Review the output in the results pane. The response displays a JSON-formatted list of matching book titles.
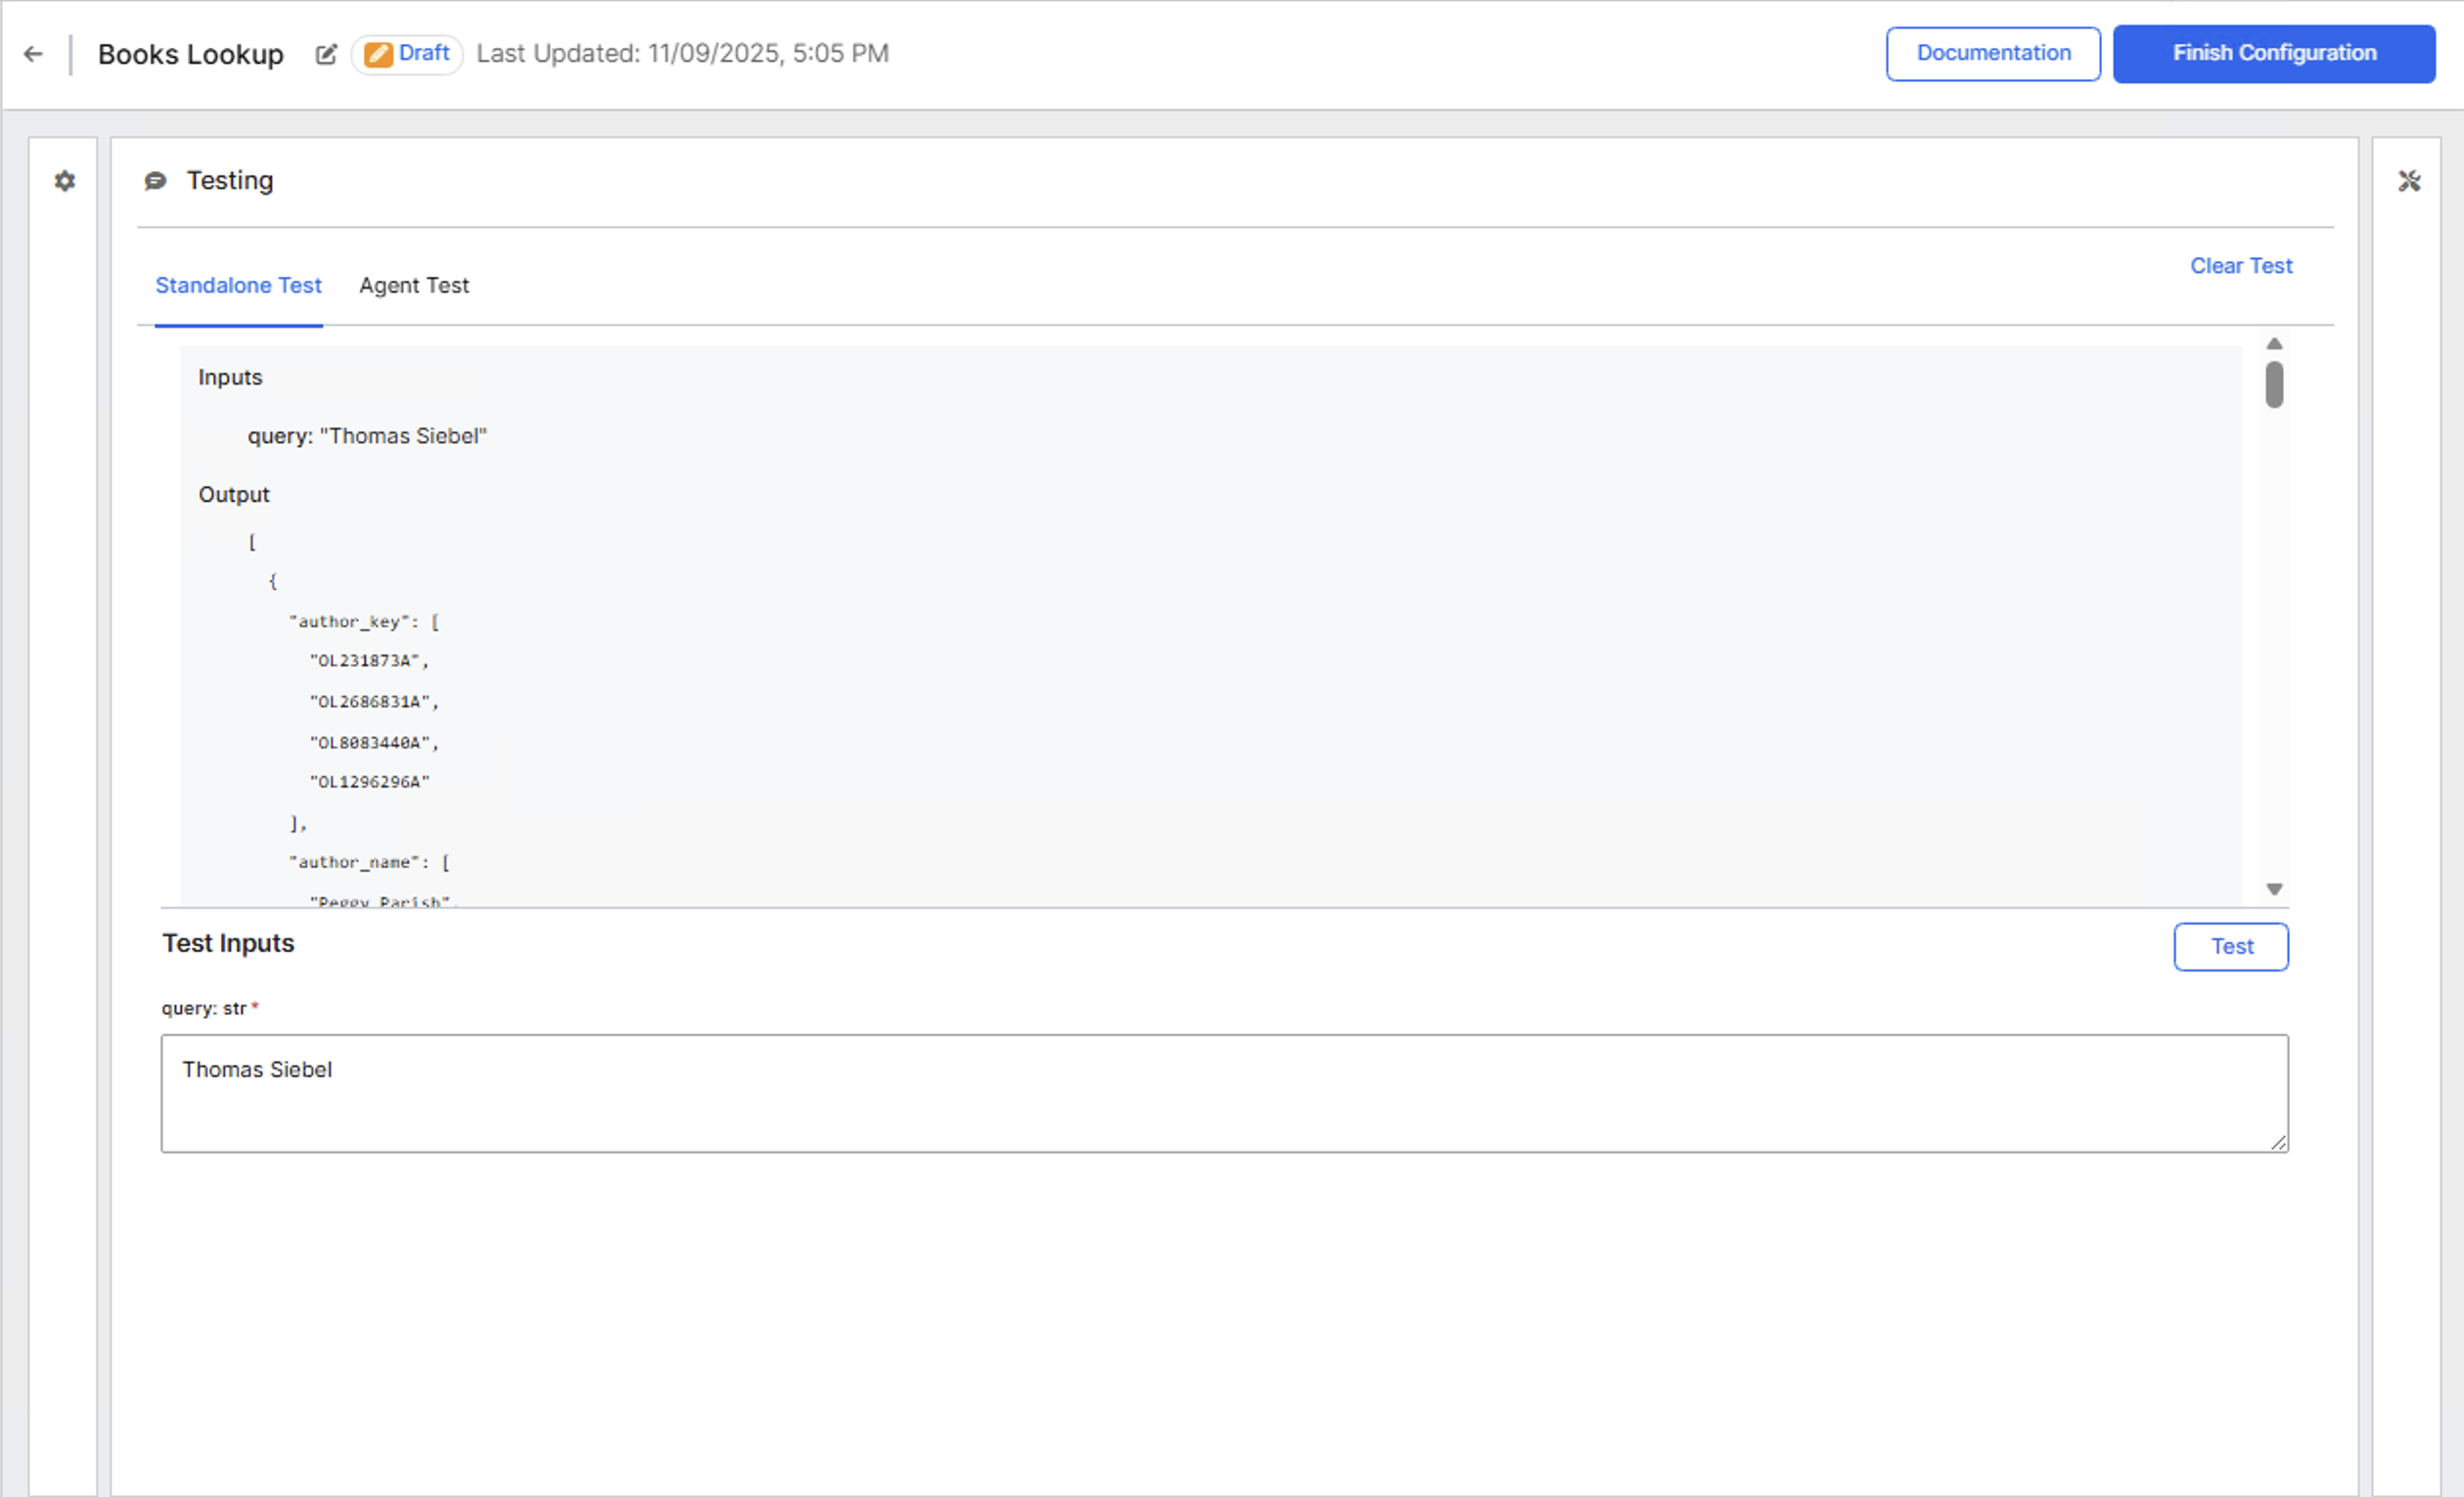
If errors occur, review the logs displayed in the output area to identify issues with syntax, imports, or API requests.
Test with an agent
After standalone testing, you can test how the tool performs when called by an agent.
- Select the Agent Test tab in the Testing panel.
- Select Select Agent to choose an existing agent from your environment.
- Enter a test message that would cause the agent to use your tool. Example:
Find books by Thomas Siebel. Use the available tools.. - Review the agent's response and the tool execution trace in the Trace panel.
This test confirms the tool integrates correctly with agent workflows and validates the LLM description and argument schema.
Store the tool
After successful validation and testing:
- Select Finish Configuration in the upper-right corner.
- Choose Move to Store to complete configuration. This makes it available for others to add to their agents as well.
Once the tool has been moved to the store, it appears under the Store section in the gallery.
Ensure your selected runtime includes the libraries required by your tool. Missing dependencies can cause import errors. If no existing runtime meets your requirements, you can create a new one in the Jupyter UI.
Verify in agents
After moving to store, verify the tool appears in agent configurations:
- Navigate to Agents > Gallery.
- Open an existing draft agent or create a new one.
- In the agent configuration, locate the Tools section.
- Select Add Tool. A modal window opens where you can search for and select the tool.
- Search for and select your tool. Example: Books Lookup
- Save the agent configuration.
- Test the tool by sending a message in the agent preview panel that triggers tool usage.
The agent can now call your tool during conversations.
Learn more about creating agents in Create Agents from Scratch