Promote and Version a Data Fusion Pipeline
You built and tuned a pipeline in Data Fusion. Now you want the same pipeline settings in your other environments, such as QA or production. The settings you tune on the canvas, such as chunk size or error handling, belong to the environment where you set them. To promote the settings to other environments, save them to the application package. The package holds the files that the C3 Agentic AI Platform deploys to every environment that runs the application.
On this page, you:
- Open the Save Pipeline Configurations dialog from the canvas settings.
- Compare the environment value of each setting with the value in the package.
- Choose the values to save to the package, then save them.
- Connect Data Fusion to a GitHub repository with an access token.
- Publish, pull, and review versions of the pipeline from the GitHub menu.
Prerequisites
Before you start, make sure you have:
- An application with a pipeline on the Data Fusion canvas, with at least one source collection.
- For a GitHub connection: a GitHub repository and a personal access token for it. For GitHub Enterprise, you also need the REST API URL of your GitHub Enterprise server. A classic token needs the
reposcope. A fine-grained token needs read and write access to Contents, Commit statuses, and Pull requests in the repository.
Open the Save Pipeline Configurations dialog
The canvas settings menu holds the commands that act on the whole application:
- In C3 AI Studio, open your application, then select Data > Data Fusion.
- On the Data Integration tab, select the settings button (gear icon) next to Add Data Source. The menu lists Disable Async Processing, Save pipeline configurations, and Rebuild Application Dependencies.
- Select Save pipeline configurations.
The Save Pipeline Configurations dialog opens.
Compare environment and package values
The dialog lists the configurations in two groups. Source Collection Configs has one card for each source collection in the application. Target Collections Configs has one card for each target entity Type, with its load settings such as updateMode and createOnly. When no target has saved load settings, the group reads "No configuration set or available". The steps on this page use a source collection card. Each card counts the fields set to sync, keep, and remove from the package.
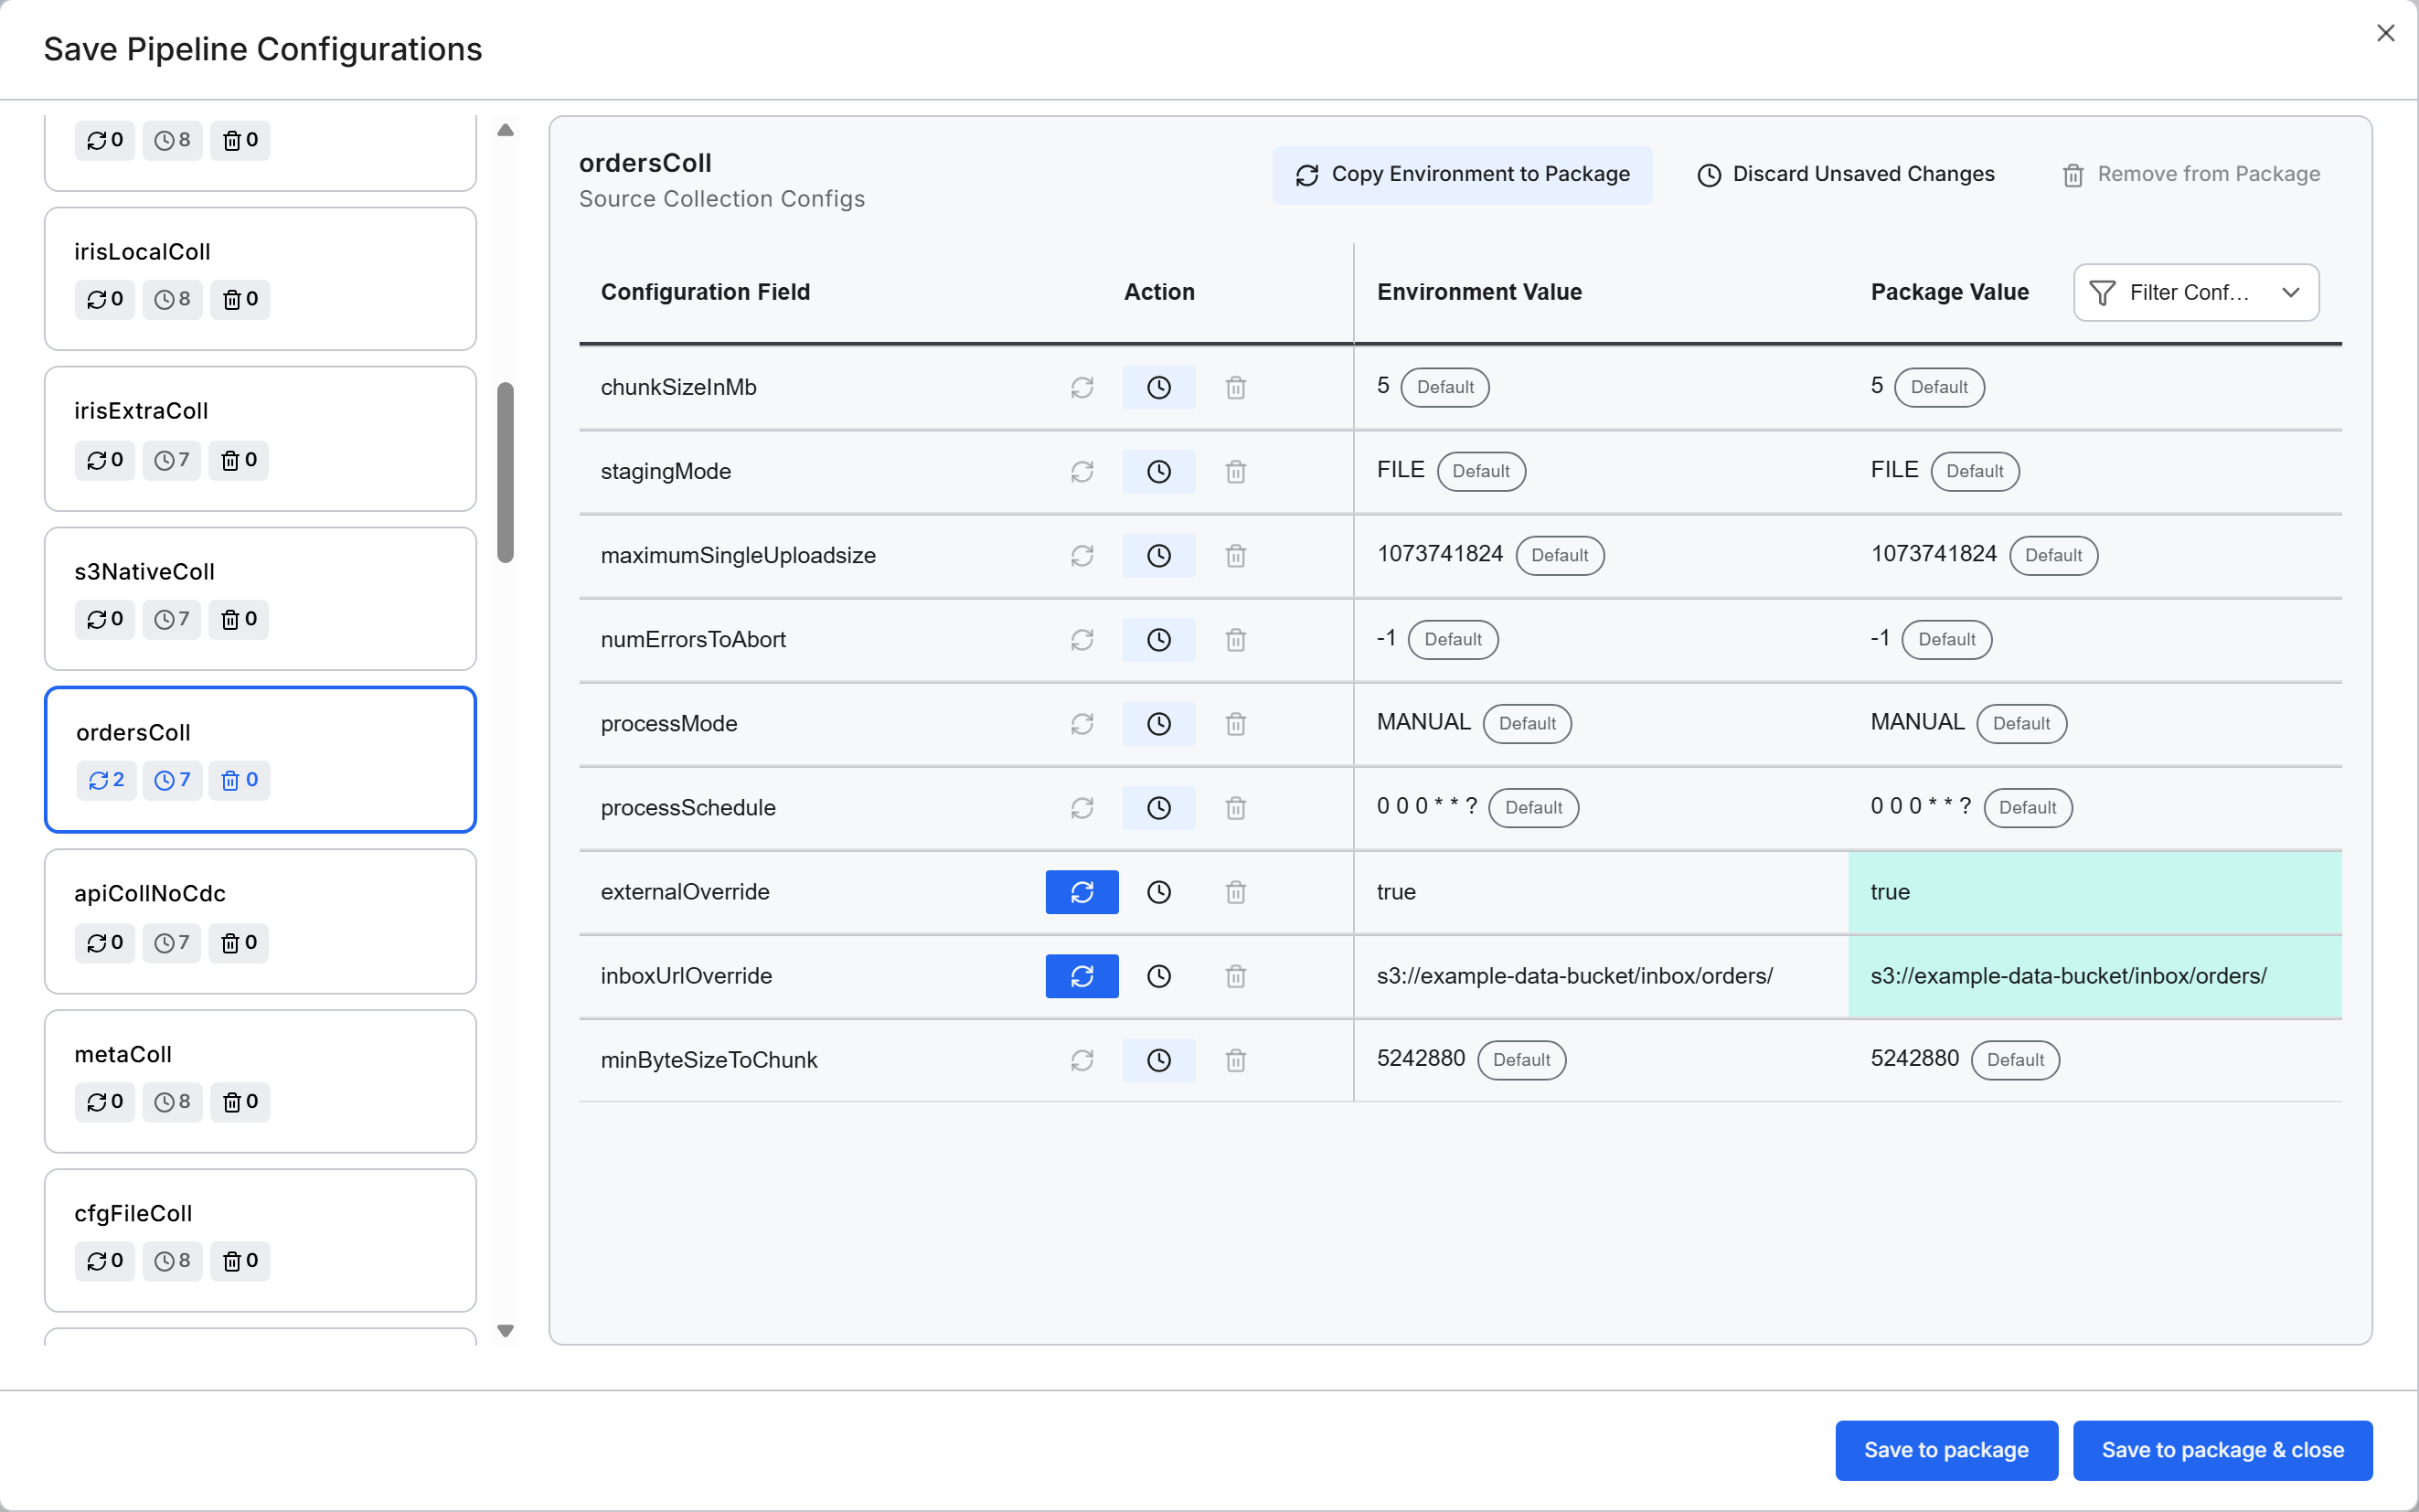
The screenshot of the field table shows an example application whose source collections include ordersColl, a collection of order records. Your dialog lists the source collections and target Types of your own application.
Select a card to open its field table, headed by the collection name. The table has four columns:
| Column | Shows |
|---|---|
| Configuration Field | The name of the setting, such as chunkSize, failOnExtraFields, or processMode. |
| Action | The action for this field when you save. |
| Environment Value | The value in the current environment. Default means the value equals the platform default. |
| Package Value | The value in the package. Not in Package marks a setting that the package does not hold. For a field set to sync, the column shows the value that saving writes. |
To filter the table, open the Filter Configuration Fields list (filter icon) in the Package Value column header. The list offers three choices:
- Show All lists every setting.
- Show Differences lists the settings whose environment and package values differ.
- Show Matches lists the settings whose environment and package values match.
Choose the values to save
To choose which values to promote, use the three icon buttons in the Action column of each row:
- Sync (sync icon): copy the environment value to the package. The button is available only when the two values differ.
- Keep (clock icon): leave the package value unchanged. Keep is the action for every field until you choose another.
- Remove (trash can icon): remove the value from the package. The button is available only when the package holds a value.
Choose an action for each field, or use the collection buttons Copy Environment to Package, Discard Unsaved Changes, and Remove from Package:
- Copy Environment to Package: sets sync on every field whose environment value differs from the package. The Package Value column shows the values that saving writes.
- Discard Unsaved Changes: returns every field of the collection to its saved state.
- Remove from Package: available when the package holds configuration for the collection.
Nothing changes in the package until you save.
Save the values to the package
When the actions are set, save them:
- Select Save to package to save and keep the dialog open, for example to continue with another collection.
- Select Save to package & close to save and close the dialog.
Both buttons stay unavailable until you set at least one action other than keep. The dialog close button closes the dialog without a confirmation prompt, so save or discard your actions first.
Saving writes only the collections you changed. Settings that equal the platform default are left out of the file. Secret values are never saved to the package.
Before you save a collection, choose Sync or Remove for every field whose environment and package values differ. A field left on Keep can take the environment value when another field of the same collection is saved.
The Package Value column shows the values in the package file for the collection. The path depends on the kind of collection:
- File, SQL, and API source collections:
config/SourceCollection.Config/<collection name>.json - Streaming source collections, such as Kafka:
config/CloudMessageSourceCollection.Config/<collection name>.json - Target entity Types:
config/DbTargetCollection.Config/<entity collection name>.json
For how the platform applies package values and environment values, see Configure a Source Collection.
Connect Data Fusion to GitHub
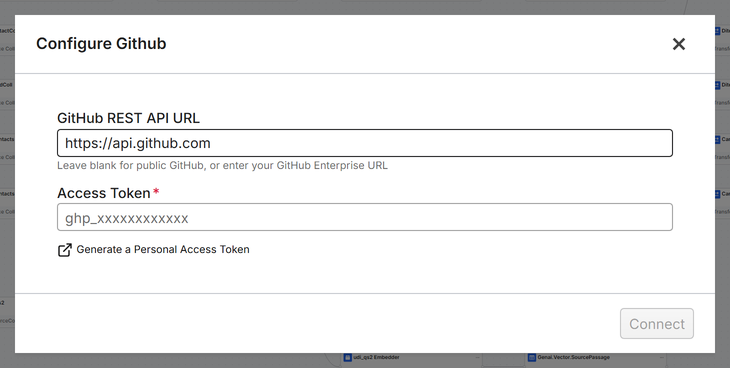
To version your pipeline in a GitHub repository, connect Data Fusion to GitHub. The Configure Github dialog has two steps: first it checks your personal access token, then you choose the repository and branch.
Data Fusion saves the repository, branch, and path for the whole environment, not for one application. Every application in the environment uses the same GitHub configuration, so agree on the branch with the other people who build in that environment.
Enter and check the token:
- On the Data Integration or Data Validation tab, select Configure GitHub. The Configure Github dialog opens.
- In GitHub REST API URL, keep
https://api.github.comfor GitHub, or enter the REST API URL of your GitHub Enterprise server. - In Access Token, paste your personal access token. To create a token, select Generate a Personal Access Token.
- Select Connect. The button is available once you enter a token. Data Fusion checks the token, and the dialog moves to the repository step.
Choose where Data Fusion stores your package:
- In Repository, choose the GitHub repository.
- In Branch, select an existing branch. To work on a new branch instead, select Create a new development branch. The Branch field becomes Base branch; choose the branch to start from, then enter the New branch name.
- (Optional) In Path, enter the folder in the repository that holds your packages.
- Select Confirm. The message "GitHub configured successfully" confirms the connection, and the Configure GitHub button becomes the GitHub menu.
Version the pipeline from the GitHub menu
Once GitHub is configured, the GitHub menu in the Data Fusion header holds the version control commands:
- Publish Changes: publishes the changes in your application package to GitHub. In the Publish Changes to GitHub dialog, you enter a Commit Message and review the Changed Files, then select Confirm. Confirm is available once you enter a commit message and at least one file has changed. The commit goes straight to the configured branch, with no pull request, so make sure the branch accepts direct commits.
- Pull Changes: brings the latest changes from the configured branch into your application.
- Discard Current Changes: removes all local changes that you have not published. The command is available only when you have unpublished changes. A confirmation dialog opens; select Discard. Your environment returns to the last published version, and you cannot undo this command.
- Show Version History: shows the version history of the package. Current Version heads the list, marked Not Published, followed by the commits on the configured branch. Each commit links to its page on GitHub. The list has no command to restore an earlier commit.
- Reconfigure GitHub: reopens the GitHub configuration, so you can change the repository or branch. Changing the branch rebases your current changes onto the new branch.
When publishing, pulling, or a GitHub configuration change finds conflicts, the Merge Conflicts Detected dialog opens. The dialog's choices depend on what found the conflicts:
- When you publish: Use local version overwrites the branch with your changes, and you lose the remote changes.
- When you pull or change the GitHub configuration: Use remote version overwrites your changes with the branch.
- In every case: Resolve manually in GitHub opens a pull request in GitHub at its conflicts view. Resolve the conflicts and merge the pull request there. Then return to the dialog and select Pull Changes, which resets your environment to the resolved branch.
In the target environment
Publishing carries the pipeline's source systems, source collections, Types, transforms, and saved configuration to the environments that deploy the branch. Publishing does not carry credentials, because Data Fusion never saves secret values to the package. After you deploy to another environment, enter the credentials there again in the connector's edit wizard or with setCredentials. In a production-mode application, you can replace the credentials of an existing connector, but you cannot change its other settings, change its connector, or add a connector: Add Data Source is not available there. Add connectors in a development or trial application, then promote them.
The CDC checkpoint of a SQL source collection stays in the environment that recorded it. The first run of that collection in the new environment therefore loads the whole table.