Validate Your Data Pipeline
A data integration pipeline loads records into your C3 Agentic AI Platform application. Data validation then checks that those records are accurate, complete, and consistent before models, agents, and analytics use them. You define rules on the Data Validation tab of Data Fusion, where you also build pipelines. A rule checks one entity Type for problems such as missing values, invalid values, broken references between entities, and stale data. You can run a rule on demand or on a recurring schedule, and every run records results that you can review and export.
To validate data:
- Choose a rule kind.
- Create a foreign key rule or a custom (Lambda) rule.
- Run and debug the rule.
- Deploy the rule with a schedule and notifications.
- Monitor the rule's runs and the health of each entity Type.
- Export results to Jupyter.
- Publish the rule to your application package.
How data validation fits after data integration
A typical Data Fusion workflow has three stages, each on its own tab of Data Fusion:
- Data Integration: load data from file, SQL, or streaming sources into entity Types.
- Object Model: review the resulting entity Types and the relationships between them.
- Data Validation: check the loaded records with rules.
A rule points at a target entity Type, the entity Type whose records it checks. Validation does not change your data. Validation reports the records that break a rule so that you can fix the source data, the pipeline, or the model.
Data validation checks records that are already loaded. To check incoming source data for missing, extra, or changed fields before a load, use source data validation. Use both: source data validation protects the pipeline from a changed source, and validation rules check the quality of the records that result. For source data validation, see Validate Source Data for Schema Drift.
Prerequisites
Before you create a rule, confirm the following:
- Your application runs C3 Agentic AI Platform version 8.9.0 or later. On earlier versions the Data Validation tab shows a message that data validation is not supported on this server version.
- Data Fusion appears under Data in C3 AI Studio. C3 AI Studio shows Data Fusion to application developers and administrators and to data quality analysts.
- Your user has a role that can create data validation rules and runs. To choose one, see Data Integration Roles and Permissions.
- At least one entity Type is loaded with data.
- The node pool that runs data validation has running nodes and free capacity. A node pool is a group of server nodes that run the same kind of work. Data validation runs on the application's default node pool unless the rule's
nodePoolsetting names another pool. When the pool has no capacity, a run waits in the queue until capacity is free.
Choose a rule kind
The Add New Rule menu creates two kinds of rule:
- Foreign key rule: checks that every reference field on the target entity Type points to an existing record in the referenced Type. A foreign key rule needs no code. By default the rule checks all reference fields, including ones added later, and you can limit it to selected fields.
- Custom (Lambda) rule: runs validation logic that you write in Python or JavaScript, such as range checks, allowed-value checks, data freshness, and cross-field consistency. The menu item is Custom Rule.
You build a custom rule as a draft, a working copy that you can run and edit, and then deploy it. A foreign key rule is deployed as soon as you save it. Only deployed rules run on a schedule, send notifications, and can be published.
Open the Data Validation tab
To see your rules and create new ones, open the Data Validation tab:
- Open your application in C3 AI Studio.
- In the navigation, select Data > Data Fusion.
- Select the Data Validation tab.
The tab has three sub-tabs, and the Add New Rule menu is available on each of them:
- Deployed Rules: lists deployed rules with the columns Rule, Status, Type, Last Run, Last Updated, Triggered, Elapsed Time, Kind, and State. Use the Filter panel to filter by Status, Last Run, Triggered, Kind, and State, and the search box to find a rule by name.
- Drafts: lists draft rules with the columns Rule, Type, Created By, and Last Updated.
- Type Health: lists each entity Type with its combined validation status and last run.
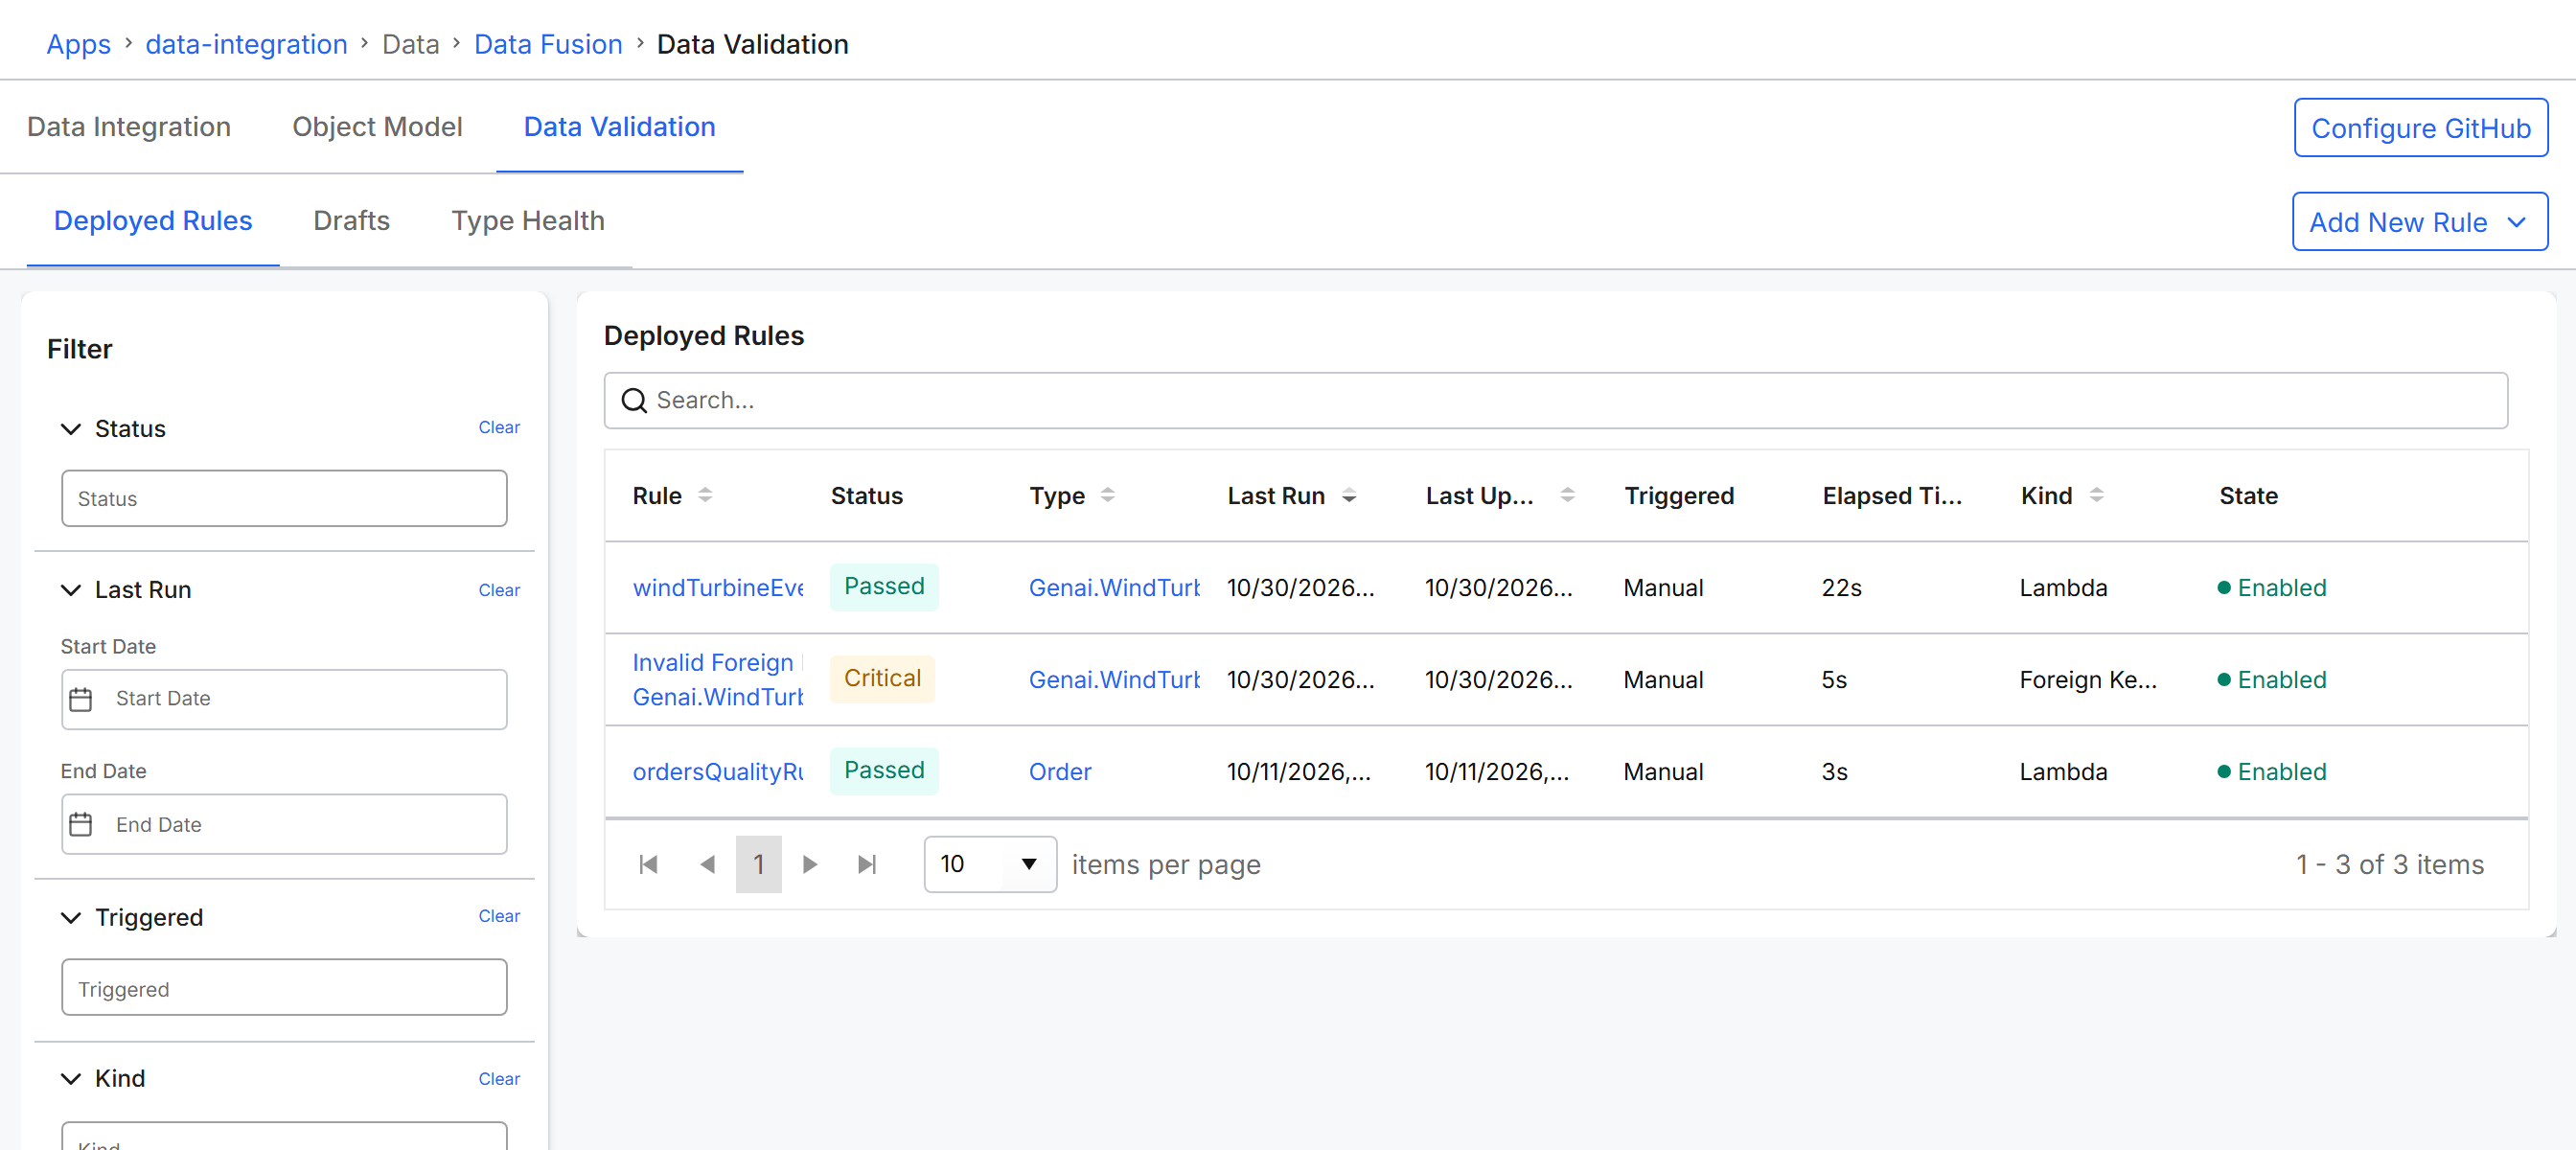
Create a foreign key rule
A foreign key rule checks referential integrity without code. The rule works on SQL-backed entity Types and on key-value entity Types that have a parent (Types that mix ParentPartitionable).
Select Add New Rule > Foreign Key Rule.
In the Create Foreign Key Validation Rule dialog, under Select target entity, select the entity Type to check.
The dialog lists the entity Type's reference fields under Existing foreign keys. If the entity Type has no reference fields, the dialog shows No foreign keys found and Save stays unavailable.
Choose which reference fields the rule checks with Validate selected foreign keys only:
- Off (the default): the rule checks all reference fields, including any added to the entity Type later.
- On: the rule checks only the fields you select. Turning the toggle on selects every field, so clear the checkbox of each field you do not want to check. Use Search foreign keys to find a field. Each field shows its name, value type, and description. Reference fields added to the entity Type later are not included automatically.
With the toggle on and no field selected, Save stays unavailable. The dialog shows "At least one foreign key must be selected when selective validation is enabled."
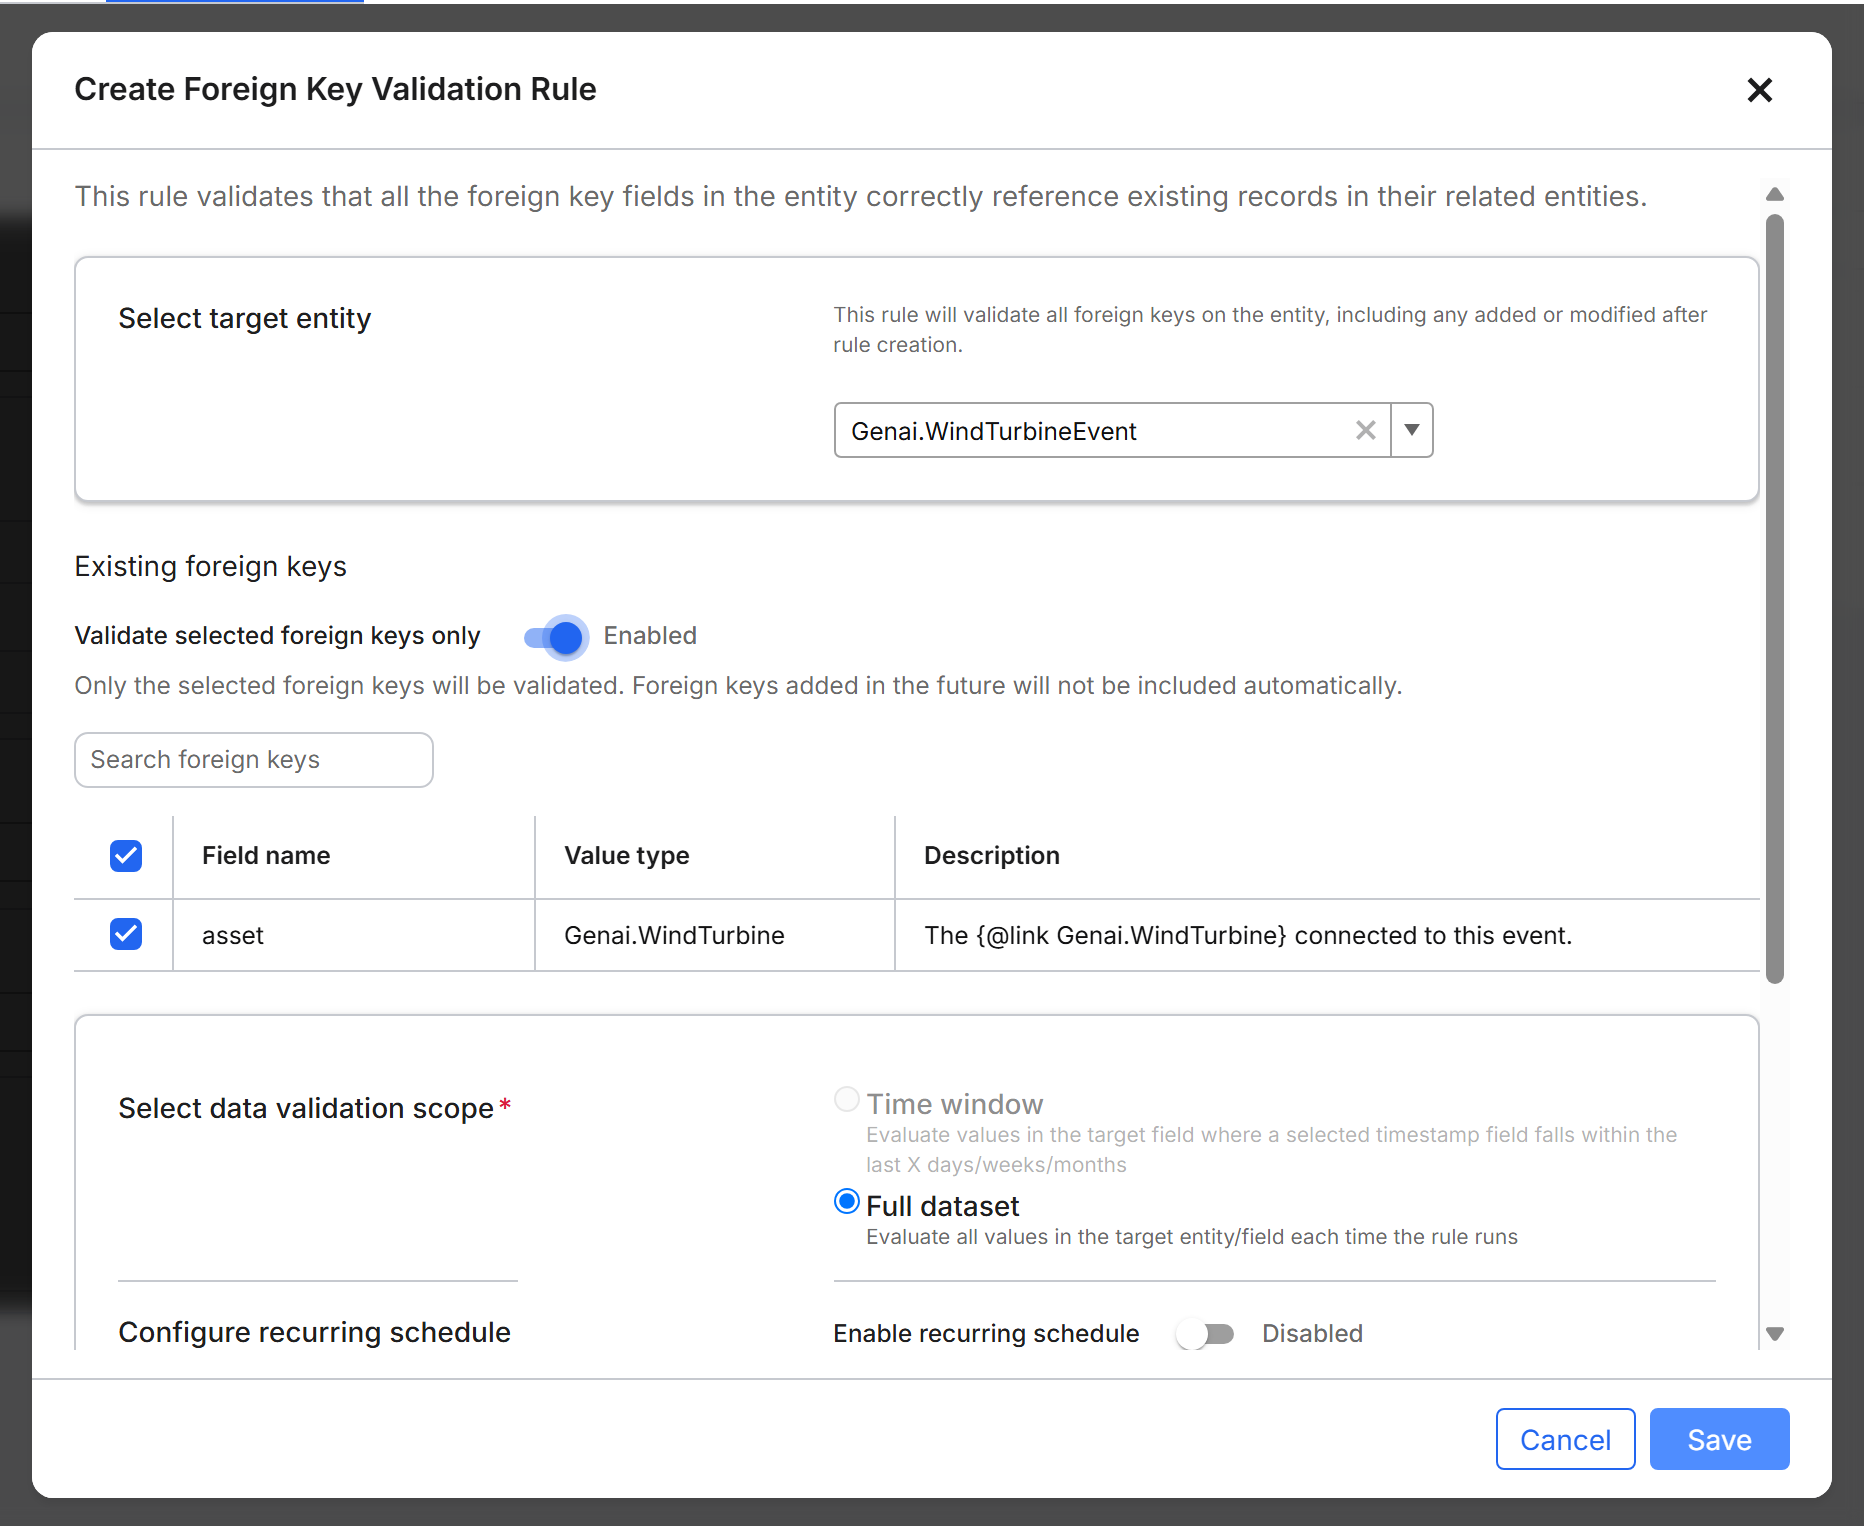
For an entity Type with reference fields, complete the remaining sections of the dialog:
- Select data validation scope (required): Full dataset. Time window is shown but not available.
- Configure recurring schedule: the Enable recurring schedule toggle is off by default. Turn the toggle on to set the schedule.
- Set Validation Rule Name (required): prefilled as
Invalid Foreign Keys in <Type>. The name must be unique. - Send Notifications: the Send notifications to selected recipients toggle is off by default. When you turn the toggle on, Save stays unavailable until you select a recipient.
- Advanced Settings (Default): prefilled with the run options that have defaults. Select +Add Parameter to add one.
Select Save.
C3 AI Studio confirms that the foreign key rule was created and opens the rule's detail page. The rule is deployed directly, with no draft. The rule's TYPE reads Foreign Key Reference. On the Deployed Rules sub-tab, the rule's Kind column reads Foreign Key Reference. To run the rule, select Quick Run, as described in Monitor and manage deployed rules.
If you turned on the schedule, check that the saved rule's configuration shows the schedule. If the configuration does not show the schedule, select Edit and set the schedule.
Each run reports the reference values that do not match an existing record. On the rule's History tab, the Failed Foreign Key Reference table has three columns:
- ForeignKeyField: the reference field whose value has no match.
- Value: the unmatched value.
- AffectedRows: the number of records that hold that value.
A run with no broken references shows Everything looks good! instead of the table.
A foreign key run ends with one of three statuses:
PASSED: no reference is broken.FAILED_CRITICAL: at least one reference is broken.ERROR: the run fails.
Running the rule fails with an error and records no run if the target entity Type has no reference fields to check. The same happens for a key-value Type without a parent.
The same failure occurs when Validate selected foreign keys only is on and a selected field is no longer a reference field on the entity Type. The error names the field and lists the valid reference fields. Edit the rule and clear that field, then run it again.
To create foreign key rules for every eligible entity Type at one time, call DataValidation.Rule.ForeignKey.ensureRules, as described in Programmatic usage.
Create a custom (Lambda) rule
A custom rule runs two functions that you write. The map function checks batches of target records in parallel and returns a detail row for each record that breaks the rule. The summarize function runs once after all batches finish, reads those details, and sets the status of the run.
- Select Add New Rule > Custom Rule.
- In the Select a template dialog, select the Language, then select a template, and then select Use Template. C3 AI Studio creates a draft and opens it in the Rule Builder, the editor for custom rules.
- In the Configuration pane, select the Target Entity and define the columns of the Result Table.
- In the Code pane, write the
mapandsummarizefunctions.
For each template, every configuration field, and code examples in both languages, see Create a Custom Lambda Validation Rule.
Run and debug a draft rule
Run a draft from the Rule Builder toolbar to test it before you deploy it. Select Quick Run to run the rule with its current configuration, or open More run options (the arrow next to Quick Run) for two more options:
- Debug Run: runs the rule and records the messages that your code writes with
run.debug(...). - Advanced Run: runs the rule with arguments that override its defaults for this run only, for example a smaller
limit, afilter, or abatchSize. Use Advanced Run to test on a small set of records first.
The panel under the editor shows these tabs:
- Code Issues: problems found in your code when the draft is saved. Code errors, a missing Target Entity, or invalid Result Table or Advanced Settings entries stop runs and deployment. The message Fix validation errors before proceeding. appears. Warnings do not stop a run.
- Runtime Errors: appears when a run ends with the status
ERROR, and lists the exceptions that your code raised. - Debug logs: the messages that your code wrote with
run.debug(...)during a debug run. - Result: the detail rows of the latest run, with one more tab for each additional result table that your code writes. Only the columns defined in the result table appear. Check the run status, for example Passed.
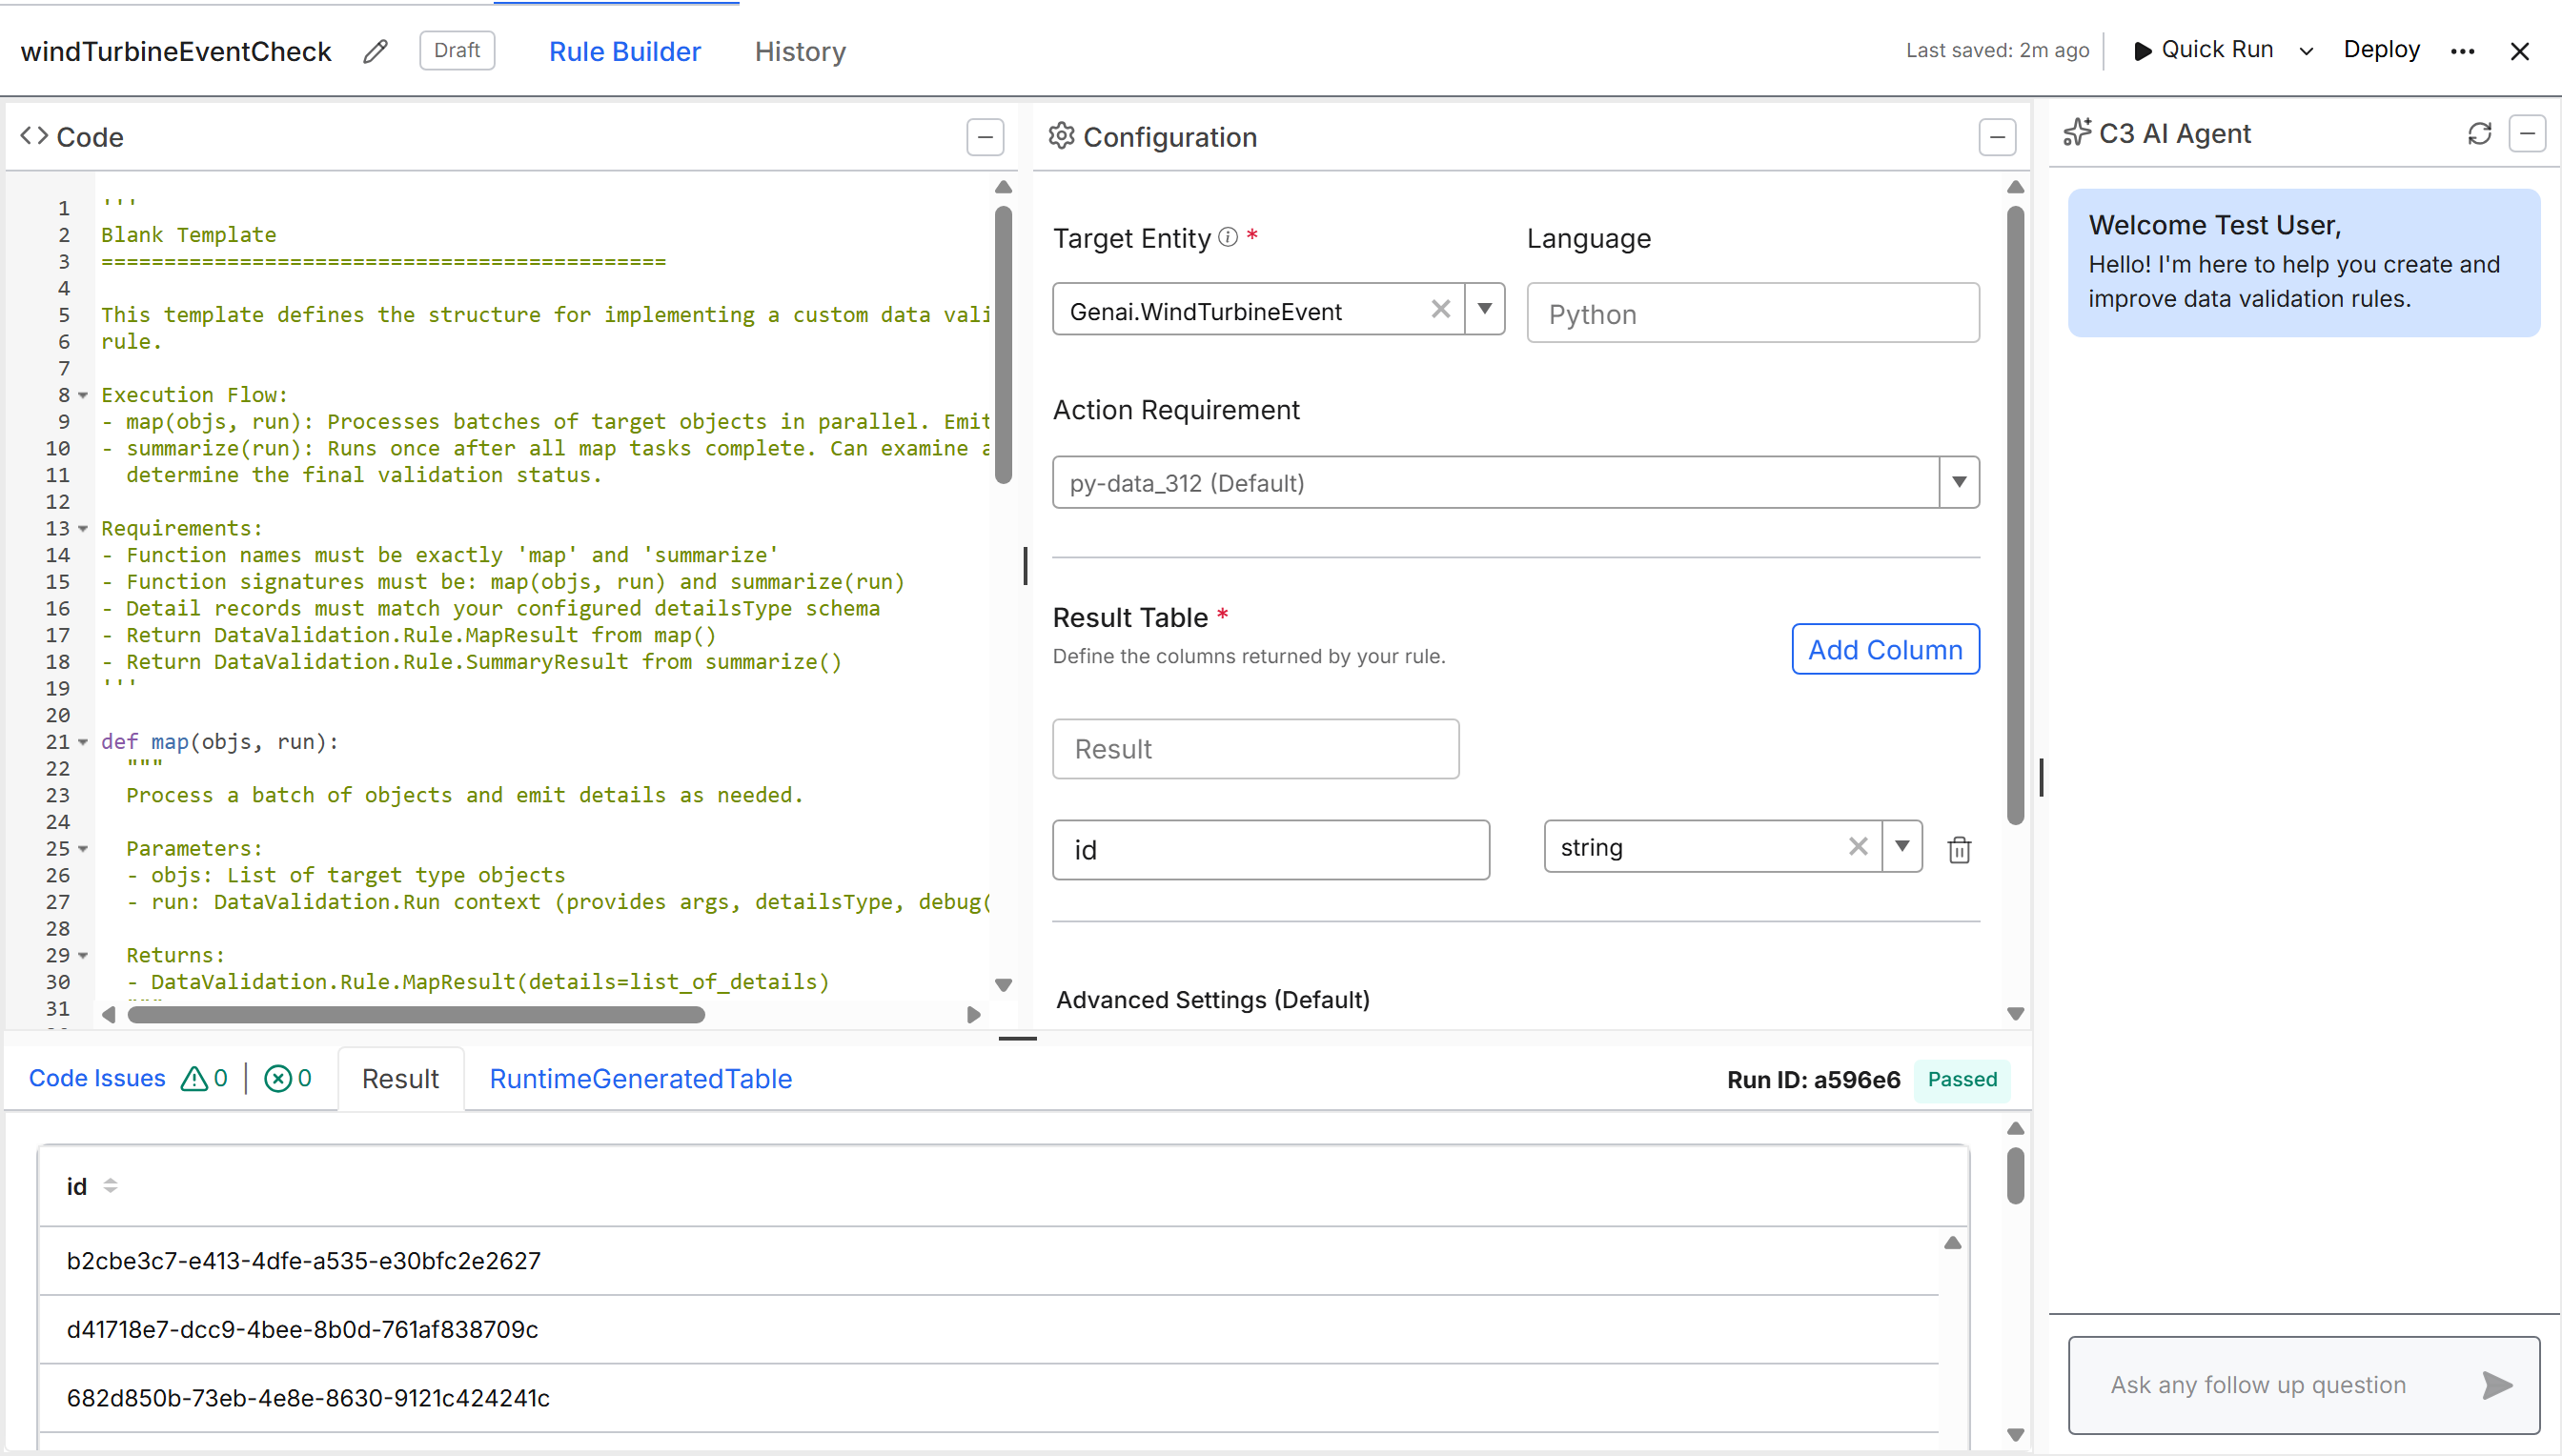
If you start from the Tutorial template (Python only), its summarize function also writes a summary row such as 0 total issues; 0 critical. to the result table.
Common problems:
| Symptom | Cause | What to do |
|---|---|---|
| The run does not start and Fix validation errors before proceeding. appears | The draft has errors: no Target Entity, a Result Table or Advanced Settings error, or code errors | Fix the errors on the Code Issues tab and in Configuration, then run again. |
The run ends with the status ERROR and the Runtime Errors tab appears | Your code raised an exception | Review the exception, add run.debug(...) messages, and use Debug Run. |
The progress bar stops at 95% and the run stays RUNNING | The bar is an estimate based on elapsed time, and it stops at 95% until the run ends. A run also waits while its node pool has no running nodes or free capacity | Check the capacity of the node pool, as described in Prerequisites. To end the run, select Stop run, the square button next to the progress bar. |
Deploy a rule
Deploy a tested draft to run it on a schedule, send notifications, and publish it.
In the Rule Builder toolbar, select Deploy.
In the Deployment Configuration dialog, under Deploy as, choose one option:
- Deploy as a new rule (the default): keeps any existing rule and deploys this draft under its own name.
- Replace existing rule: deploys this draft into an existing deployed custom rule. Select the rule under Select Rule To Be Replaced, then select Deploy Rule. The dialog shows no other settings for this option.
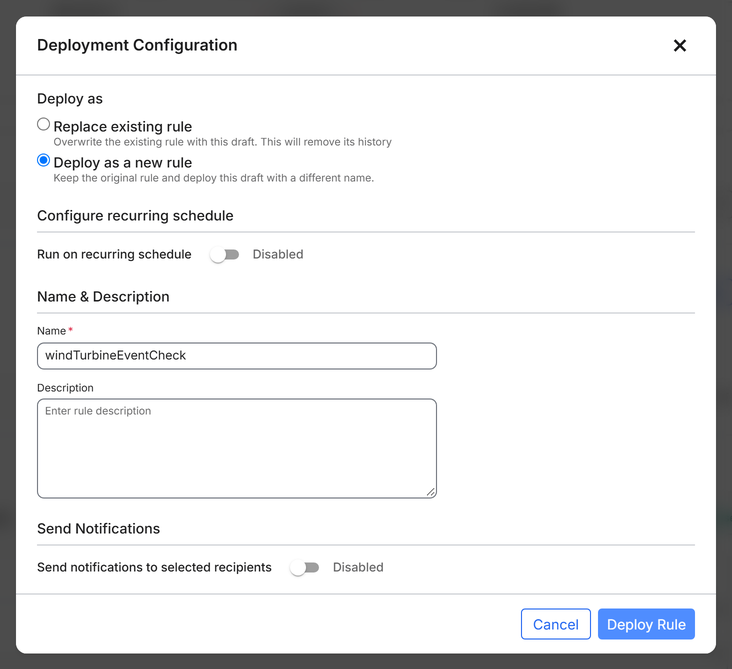
To run the rule on a schedule, turn on Run on recurring schedule under Configure recurring schedule, and set the schedule:
- Start Date: the date the schedule begins.
- Schedule: the frequency unit, Hour, Day, Week, or Month.
- Hour selection: Flexible hours, such as every hour, or Specific hours.
- Timezone: UTC or Local Timezone.
The Next 5 runs preview lists the next five run times. The schedule creates a
CronJob, the platform scheduler entry that starts the rule.Under Name & Description, check the Name, which starts as the draft's name and must be unique. Optionally, enter a Description.
To notify people about failed runs, turn on Send notifications to selected recipients under Send Notifications, and select at least one user or user group. Deploy Rule stays unavailable until you select a recipient.
Select Deploy Rule.
The deployed rule opens with RULE STATUS set to Awaiting Run and STATE set to Enabled.
Recipients get a notification when a run ends with the status ERROR or FAILED_CRITICAL, and another when a later run passes after such a failure. Runs that end with FAILED_MODERATE or ABORTED send no notification. FAILED_MODERATE means the run found a violation that the rule rates as moderate, and ABORTED means the run stopped before it completed. For every status, see Rule lifecycle and status reference.
Monitor and manage deployed rules
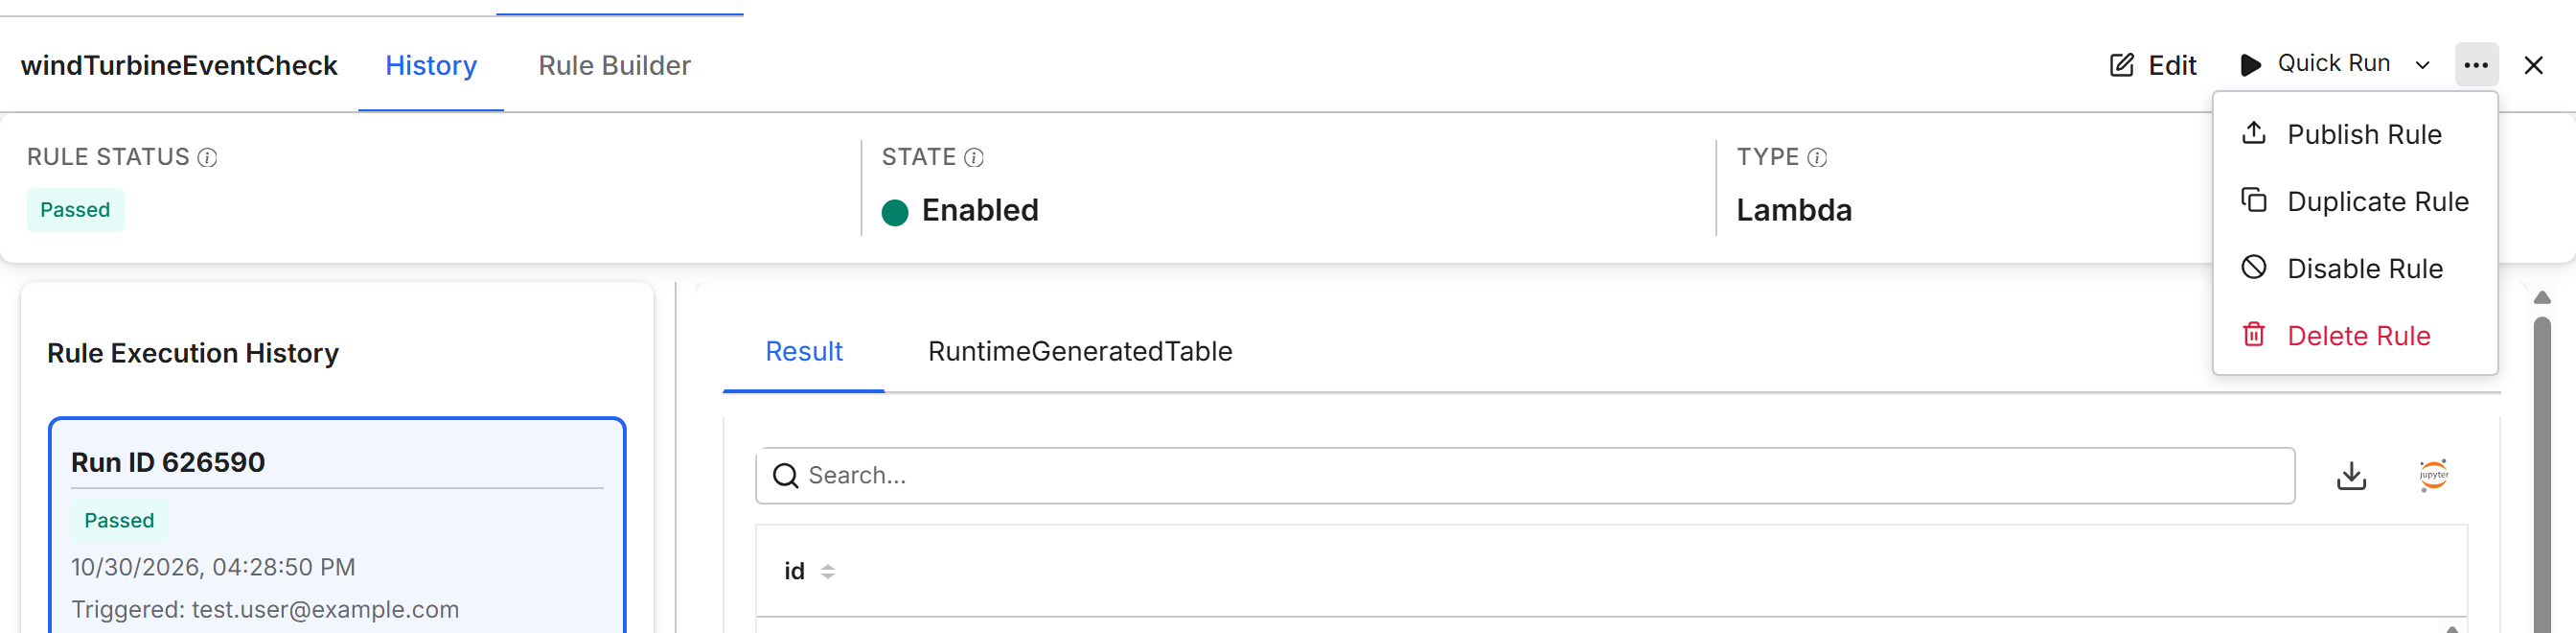
After you deploy a rule, use its detail page to run it and review its history. Use the overflow menu (the three-dot button) to publish, copy, disable, or delete the rule. Use the Type Health sub-tab to compare entity Types.
Review a deployed rule
To open a deployed rule, select it on the Deployed Rules sub-tab. The detail page shows:
- The RULE STATUS, STATE (Enabled or Disabled), and TYPE (Lambda for a custom rule, Foreign Key Reference for a foreign key rule) tiles.
- The History tab, which lists every run in Rule Execution History. Select a run to see its results.
- The Rule Builder tab, which shows the rule's configuration and, for a custom rule, its code.
- The toolbar, with Edit, Quick Run, More run options, and the overflow menu (the three-dot button).
A deployed rule offers Quick Run and Advanced Run. Debug Run is available only for drafts.
Publish, copy, disable, or delete a rule
The overflow menu of a deployed rule offers these actions:
- Publish Rule: writes the rule to your application package, as described in Publish a rule for version control.
- Duplicate Rule: creates a draft copy of the rule and opens it in the Rule Builder. Available for custom rules only.
- Disable Rule: stops scheduled and manual runs of the rule. Type Health no longer counts its earlier runs. Enter a reason in Disabled Reason, then select Save. While the rule is disabled, the menu shows Enable Rule, which turns the rule back on.
- Delete Rule: removes the rule after you confirm. The confirmation dialog states that the action cannot be undone.
Find entity Types whose data quality dropped
The Type Health sub-tab combines the status of all rules on each entity Type into one row. Each row shows the Type, its combined status, and its last run. Use Type Health to find the entity Types that need attention, then open their rules.
Export results to Jupyter
To analyze run results as a pandas DataFrame, open the deployed rule's History tab and select a run. Next to the download icon of the run's results, select the Jupyter icon (Open in Jupyter). The Export validation results to Jupyter dialog opens and shows a code snippet such as:
import pandas as pd
df = c3.DataValidation.Run.forId('<Run_ID>').fetchDetailsDf({}, 'result')
df
The second argument is the name of the result table; result is the default table. In the dialog, select Copy code to copy the snippet, or Open in Jupyter to open a notebook with the snippet already in it.
Publish a rule for version control
Publishing writes a deployed rule, and its CronJob if it has a schedule, to seed files in your application package. Seed files are package files that the platform loads into every environment where you deploy the package. You can commit the seed files to Git and promote the rule to other environments. Publishing does not run the rule. Only a deployed rule can be published.
- Open the deployed rule and, in the overflow menu, select Publish Rule.
- In the dialog, review the Package Name and the Package Path(s) of the files that publishing writes, for example
<package>/seed/DataValidation.Rule.Lambda/<rule ID>.json. A rule with a schedule also has<package>/seed/CronJob/DataValidation.Rule-CronJob-<rule ID>.json. The file names come from the rule ID, so publishing the rule again replaces the files from the earlier publish. - Write the files:
- In an application in development (
dev) or trial mode, select Publish. The platform writes the files into the package'sseed/folder. - In an application in any other mode, select Download Zip, and copy each file in the .zip to the path shown in the dialog.
- In an application in development (
- In your IDE, commit the rule's seed file together with its
CronJobseed file, so that the schedule still works after promotion.
A rule that the platform loads from package seed files is a seeded rule. In applications that are not in dev or trial mode, you cannot delete a seeded rule or change its name or description. A rule you create in an environment through C3 AI Studio or the API exists only in that environment until you publish it.
To save the configuration of a Data Fusion pipeline to your package and connect Data Fusion to GitHub, see Promote and Version a Data Fusion Pipeline.
Rule lifecycle and status reference
The Data Validation tab and the APIs report each rule's lifecycle state, each run's status, and each run's trigger.
Every rule has a name, an optional description, a target entity Type, the columns of its result table, and default arguments such as include and filter. A draft is a DataValidation.Rule.Draft, and a deployed rule is a DataValidation.Rule; both share the fields of DataValidation.RuleBase. A deployed rule also has a schedule, notification settings, and an enabled or disabled state.
Each execution of a rule creates a run, a DataValidation.Run. A run records its start and end time, its trigger, its arguments, its debug logs and errors, and its detail rows. The run's status is one of these DataValidation.Status values:
| Status | Meaning |
|---|---|
AWAITING_RUN | The rule has no runs yet. |
RUNNING | A run is in progress. |
PASSED | The run found no violation that the rule counts as a failure. |
FAILED_MODERATE | The run found a violation that the rule rates as moderate. The status badge reads Moderate. |
FAILED_CRITICAL | The run found a violation that the rule rates as critical. |
ERROR | The run failed with an exception. |
ABORTED | The run stopped before it completed. |
The rule sets the severity. A custom rule's summarize function decides whether a run is moderate or critical. A foreign key rule rates every broken reference as critical.
The Triggered column shows what started a run. The trigger is MANUAL when a user starts the run from C3 AI Studio or the API, and SCHEDULE when the rule's CronJob starts it.
Programmatic usage
The Types behind the Data Validation tab are available from the C3 AI Console, a notebook, or application code.
Run a deployed rule and read its results. run returns while the rule is still running, so wait until the run's status is no longer RUNNING before you read its details. A run waits in the queue while its node pool has no capacity, so the loop stops after 30 minutes. If the status is still RUNNING, check the node pool's capacity:
import time

# Fetch a deployed rule by name and run it (returns a DataValidation.Run)
rule = c3.DataValidation.Rule.fetch({'filter': 'name == "MyRule"'}).objs[0]
run = rule.run({'limit': 1000})           # overrides rule.args for this run only

# Wait for the run to finish, for up to 30 minutes
deadline = time.time() + 30 * 60
while c3.DataValidation.Run.forId(run.id).status == 'RUNNING' and time.time() < deadline:
    time.sleep(5)

# Read the details produced by the run
results = c3.DataValidation.Run.forId(run.id).fetchDetails({'limit': -1}).objs
Create foreign key rules for every eligible entity Type that does not have one. The first argument is the cron schedule for the new rules (daily at midnight here). The second, includeExternal, also covers External entity Types when set to True. An External entity Type mixes the External Type, and its data lives outside the databases that C3 AI manages. The call returns the number of rules it creates.
c3.DataValidation.Rule.ForeignKey.ensureRules('0 0 0 * * ?', False)Fetch rules, or count them, by their latest status:
c3.DataValidation.Rule.fetchByStatus(['FAILED_CRITICAL', 'FAILED_MODERATE'], {'limit': -1})
c3.DataValidation.Rule.fetchCountByStatus(['ERROR'], {})
Other members:
Rule.initRunandRule.finalizeRun: start and finish a run step by step.Run.abort: stops a run.Run.fetchDetailsStreamandRun.foldDetails: read large result sets as a stream.Run.fetchErrorsandRun.fetchDebugLogs: read a run's errors and debug messages.Rule.disableandRule.enable: disable or enable a rule.disabletakes a reason.
Best practices
To keep rules fast to run and their results useful, follow these practices:
- Test small, then scale: run a draft with Advanced Run and a
limitorfilterbefore you run it on the full data set. - Write useful details: include enough columns for people to find and fix each record. Useful columns are the record ID, the field, its current value, and a short description of the problem.
- Set severity on purpose: in a custom rule, return
FAILED_CRITICALfor problems that must stop downstream use andFAILED_MODERATEfor problems to review. - Keep
includesmall: in a custom rule, set theincludeargument to only the fields the rule reads. - Notify the right people: turn on notifications for the rules whose failures need action.
- Publish stable rules: publish a rule when it is stable, so that it is version-controlled and the same in every environment.