Enable Change Data Capture for a SQL Source via UI
Your pipeline reads a SQL table, such as a Snowflake table, into your C3 AI application. Without change data capture (CDC), each run reads the whole table again. With CDC, each run loads only the rows that are new or changed since the previous run, so runs stay short as the table grows.
CDC decides which rows are new through one or more order-by fields. An order-by field is a column whose value increases every time a row is added or updated, such as a last-updated timestamp. After each run, the pipeline saves a checkpoint: the highest order-by value it loaded. The next run loads only rows with a higher value.
You turn on CDC for one SQL source collection on the Data Integration tab of Data Fusion. A SQL source collection represents one SQL table and appears on the canvas as a SQL Source Collection node. To turn on CDC and use it:
- Open the properties of the SQL source collection and select Load Data.
- Choose the order-by fields.
- Choose manual or scheduled runs, and optionally stage records in files.
- Run the pipeline and check that the rows loaded.
CDC carries inserts and updates but not deletes, and some setting changes reset the checkpoint.
The screenshots on this page use a sample Snowflake table, read by a source collection named demoTableColl. Use your own table, collection, and Type names.
Prerequisites
Before you turn on CDC, make sure that:
- Your SQL source system, the connection to your database, and its pipeline are on the Data Fusion canvas. The pipeline has a SQL Source Collection node for the table, followed by the entity Type that mixes
Externaland lists the table's columns. Edit properties on the SQL Source Collection node stays unavailable until that Type exists. - The table has at least one column whose value increases every time a row is added or updated, such as a last-updated timestamp. CDC relies on that column to find new rows. Without such a column, CDC can miss new or changed rows, or load the same row twice.
- You have the roles to run and reset a SQL pipeline. See Data Integration Roles and Permissions.
To build this pipeline for Snowflake, see Connect with SQL Source System.
Turn on CDC for the SQL source collection
All CDC settings for a table are in the Edit Properties dialog of its SQL Source Collection node.
Select Load Data
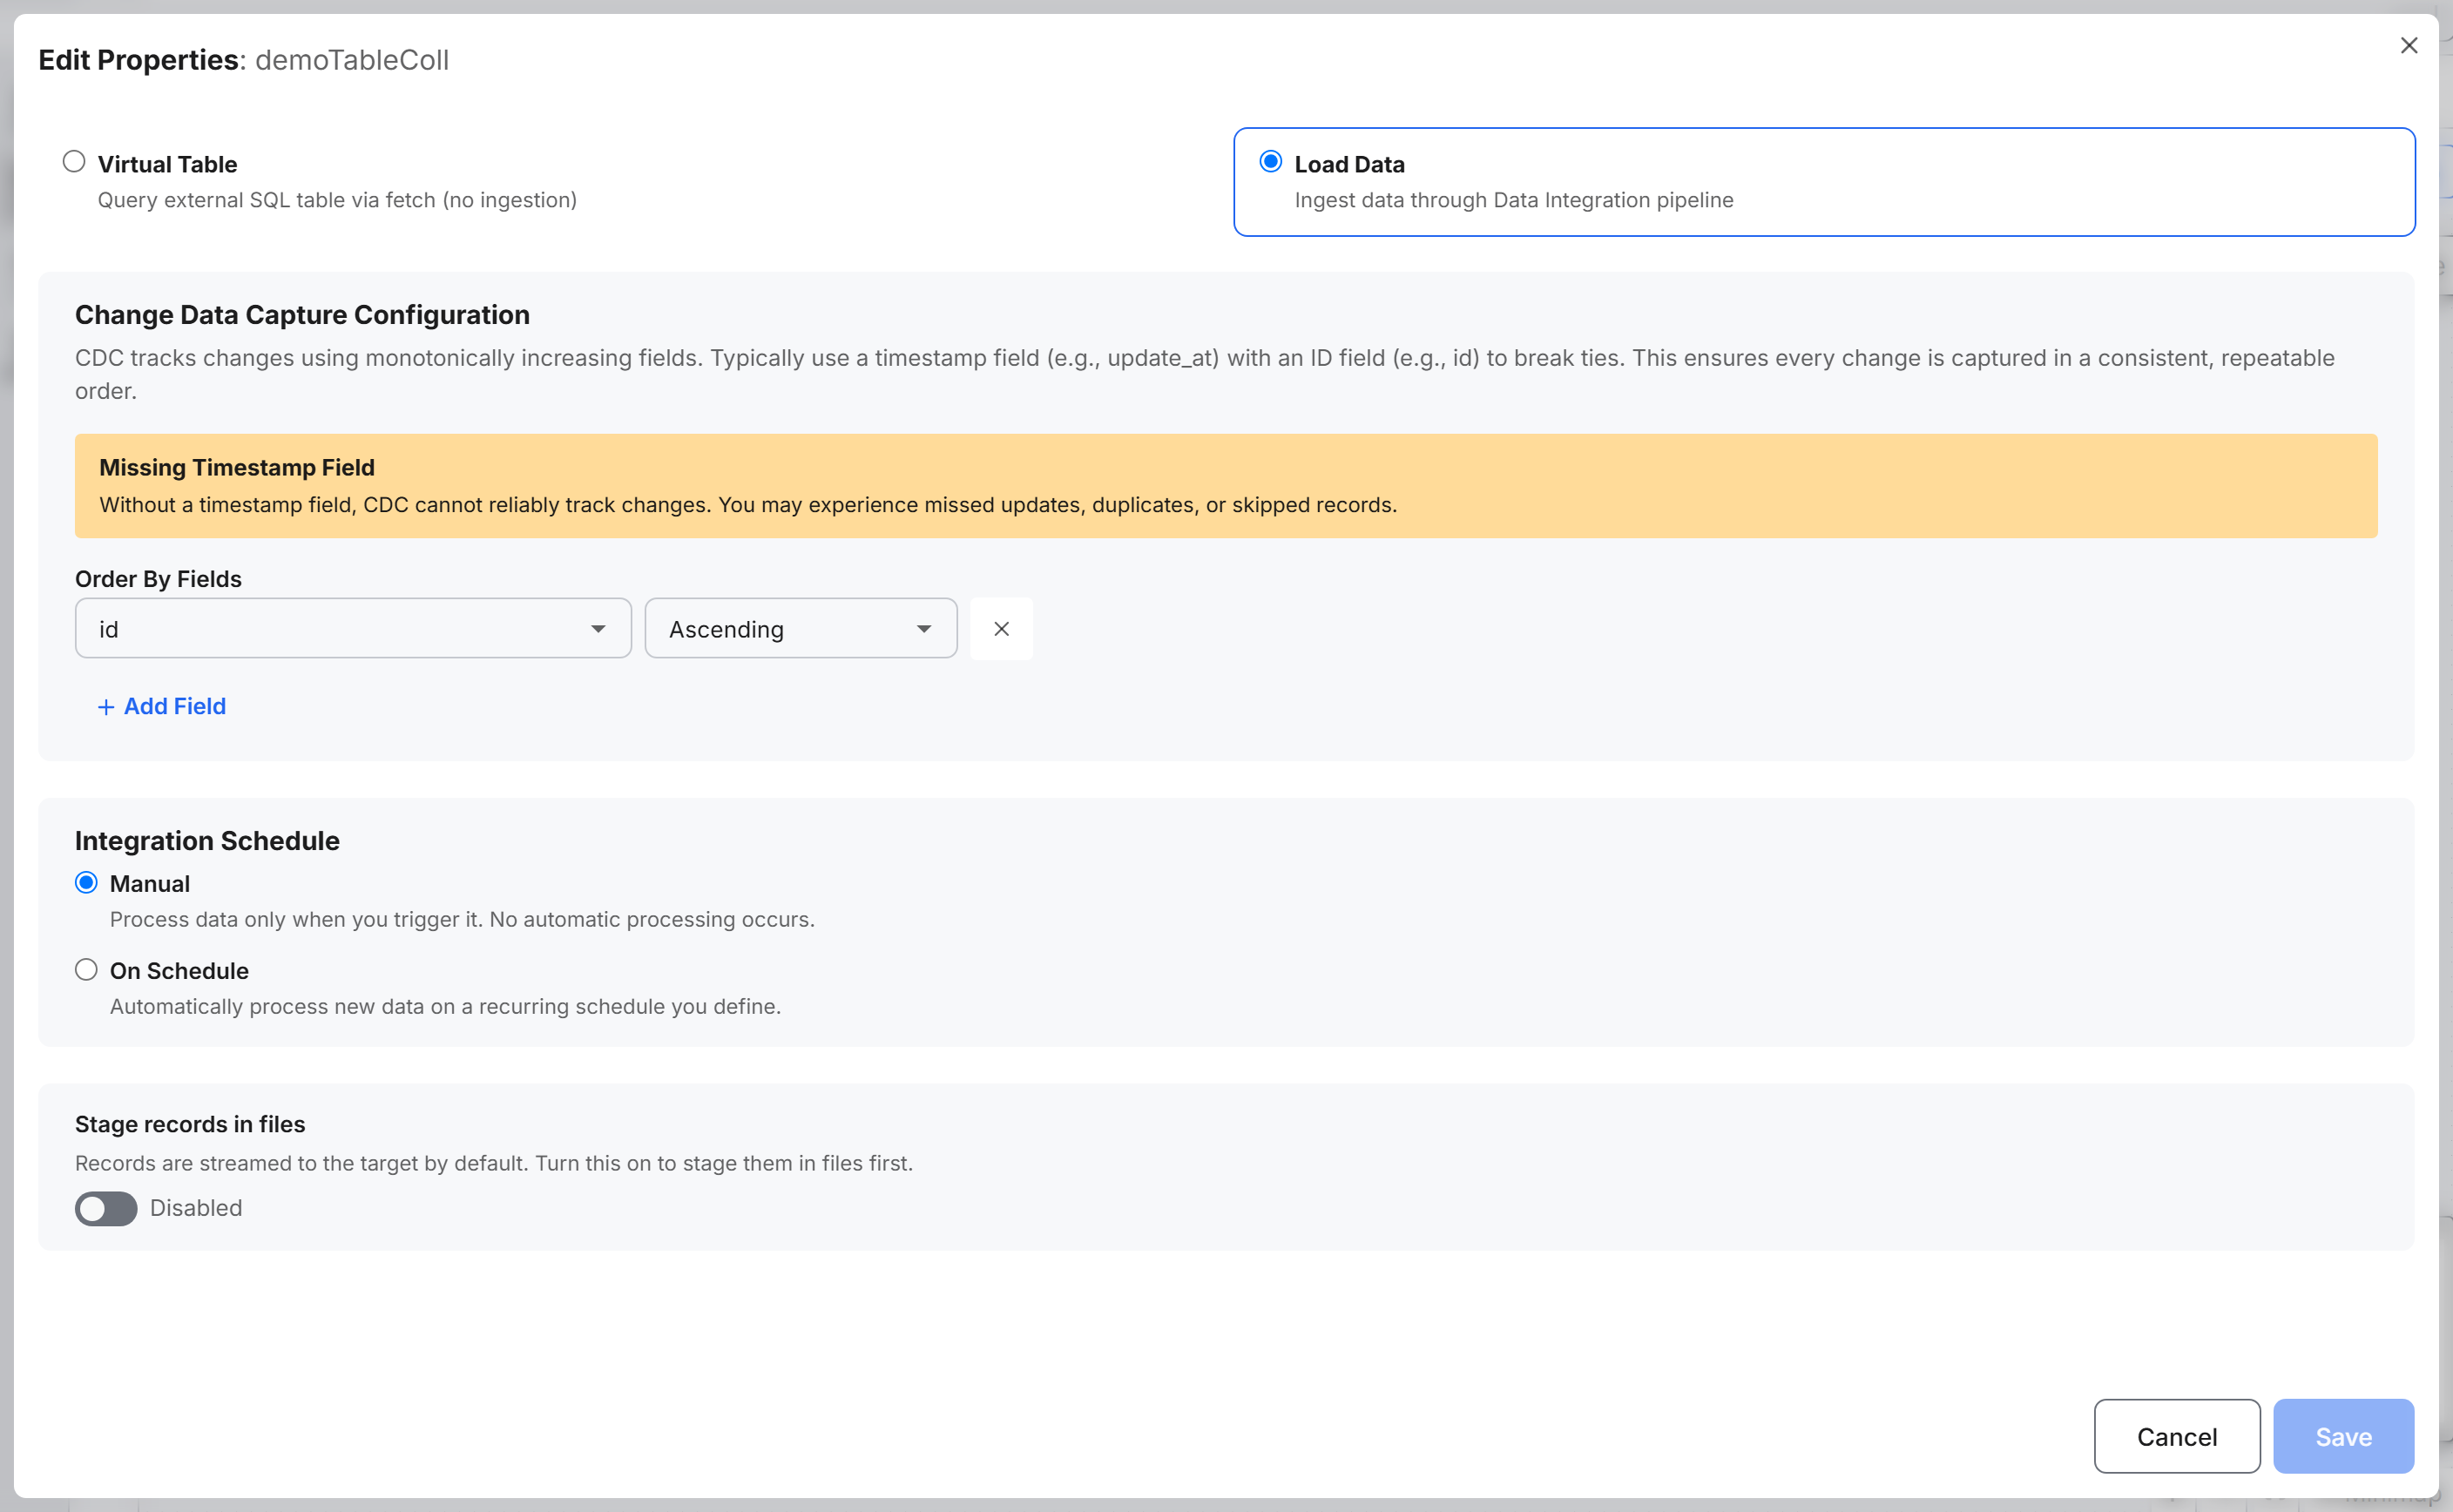
The dialog offers two modes. Virtual Table queries the SQL table where it is and loads nothing into your application, so it has no CDC settings. Load Data loads the rows into your target entity Type, the Type that stores the loaded rows in your application. Load Data is the mode that uses CDC.
- In C3 AI Studio, select Data > Data Fusion, then the Data Integration tab.
- On the SQL Source Collection node for your table, select the three-dot Open menu button, then select Edit properties. The Edit Properties dialog opens.
- Select Load Data. The Change Data Capture Configuration, Integration Schedule, and Stage records in files sections appear.
Choose the order-by fields
Under Change Data Capture Configuration, the Missing Timestamp Field warning shows until you select a timestamp, datetime, or date column as an order-by field. Set the order-by fields:
- Under Order By Fields, open the field list and select a column that increases with every new or changed row, such as a last-updated timestamp.
- Keep the direction at Ascending, the default. With Ascending, each run loads rows whose values are greater than the checkpoint. Descending loads rows whose values are lower than the checkpoint. Use Descending only when you want to reload older rows on purpose.
- (Optional) Select Add Field and select a second column, such as an ID. When two rows have the same timestamp, the second field puts them in a fixed order.
Run manually or on a schedule
Under Integration Schedule, choose when the pipeline loads changes:
- Manual: the pipeline runs only when you start it from the canvas.
- On Schedule: the pipeline runs on a recurring schedule. Set the Start Date, the Schedule (Daily by default), the Days of the week, and the Time of day. The pipeline runs at the Time of day in UTC. Next 5 runs lists the upcoming run dates.
Stage records in files (optional)
By default, the pipeline streams the captured rows straight to the target entity Type. Turn on Stage records in files to write the rows to intermediate files first and process them from there. Saving with the toggle on creates a staging file source system and collection named after the SQL collection.
Save the CDC settings
Select Save. The source collection now loads data with CDC on every run.
Run the pipeline
Start the first run from the SQL Source Collection node. The first run loads the whole table, because no checkpoint exists yet.
- On the SQL Source Collection node, select the Execute pipeline button (the play icon). The Execute Pipeline dialog opens. CDC ORDER shows your order-by field, and LAST UPDATED shows the current checkpoint, which is empty before the first run.
- Leave Reset Run State off for a normal incremental run. To reload the whole table instead, turn Reset Run State on.
- Select Execute.
Turning on Reset Run State clears the checkpoint, so the run reloads the whole table. Reset Run State also clears the processing queue and the run status records for the whole application. Turning on the toggle shows Keep existing data, Delete existing data, and the Affected targets that a delete would clear. Choose Keep existing data to keep the records already loaded, or Delete existing data to also remove the records in the listed targets. Either choice reloads the whole table.
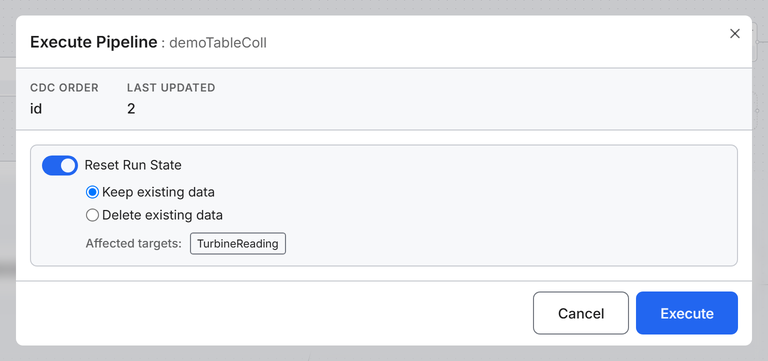
Reset Run State clears all queued work and all run status records in the application, not only this collection's. Delete existing data deletes all records in each listed target entity Type, including records that came from other sources.
Check that only new rows load
After the run, confirm what the run loaded:
- On the SQL Source Collection node, select the Open menu button, then select View run status. The run status view shows the queue activity and the Last Processed time. The run is done when the queues are empty and Last Processed shows the run time. The queue counts include work from other source collections in the application.
- On the Entity Type node, which represents your target entity Type, select the Open menu button, then select View Data. The first run shows every row of the table.
- After rows are added or updated in the source table, select Execute pipeline again. LAST UPDATED now shows the checkpoint from the first run, and the run loads only the new and updated rows.
To follow runs across all your source collections, see Monitor Your Data Pipeline.
Limits of CDC on SQL sources
These limits apply when you plan a CDC pipeline:
- Inserts and updates only: CDC loads rows whose order-by value increased. A row deleted from the source table produces no new value, so the pipeline does not remove its record from the target entity Type. To clear deleted rows, reload with Reset Run State and Delete existing data. Delete existing data deletes all records in the listed target Types, including records that other sources loaded.
- Virtual Table and the checkpoint: saving the collection in Virtual Table mode removes its order-by fields. If the collection never staged its records, the checkpoint stays, and switching back to Load Data with the same order-by field continues from it. If the collection staged its records, saving removes the checkpoint, and the next Load Data run loads the whole table.
- Changing the order-by field: on a collection that uses staging, saving a new order-by field removes the checkpoint, so the next run loads the whole table. On a collection without staging, the old checkpoint stays and the next run compares it with the new field, which can skip rows. After you change the field, reset the checkpoint with Reset Run State before the next run.