Connect C3 AI Application to Apache Kafka
The C3 Agentic AI Platform connector for Apache Kafka lets you work with the Apache Kafka messaging system. The connector links your C3 AI Applications to an Apache Kafka cluster.
To consume Kafka data and persist it in a C3 Agentic AI Platform data store, use the CloudMessageSourceSystem framework. The framework consumes and ingests messages without code from messaging systems such as Azure Event Hubs, AWS Kinesis, and Apache Kafka.
This page shows you how to register your Kafka credentials and configure a consumer that ingests messages from a topic. It also shows you how to configure a producer that publishes messages to a topic. If your Kafka cluster requires SSL, the last section shows you how to connect with PEM certificates.
Prerequisites
Before you use the Apache Kafka connector, make sure you have:
- Access to a running Apache Kafka cluster with ZooKeeper
- The host names and port numbers of the Kafka brokers serving the data
- The Kafka topics to be used
Register Apache Kafka credentials with the C3 Agentic AI Platform
Apache Kafka producers and consumers support Simple Authentication and Security Layer (SASL) authentication with the following security configuration:
- SASL_SSL PLAIN JAAS
Clients authenticate to the cluster with their own principal. Obtain or create these principals as needed.
The following example subscribes the C3 Agentic AI Platform to the Orders topic of a Kafka cluster provisioned on Confluent Cloud.
Define the Kafka topic name:
var topicName = "Orders";Generate the configuration key from an ApacheKafkaTopic instance that you construct with the topic name. Then set the topic name as the configuration value:
var configKey = ApacheKafkaTopic.make({resourceName: topicName}).configKey();
ApacheKafkaTopic.setConfigOrSecretValue(configKey, "resourceName", topicName);
ApacheKafkaTopic.setConfigOrSecretValue(configKey, "external", true);
Authenticate your client with the Apache Kafka cluster and set permissions on the Apache Kafka topic:
var creds = {
  "apiKey":"< API_KEY >",
  "apiSecret":"< API_SECRET >",
};
var endpoint = "< KAFKA_BROKER >:< PORT >";
var apacheCreds = ApacheCredentials.make({"endpoint": endpoint, "apacheApiKeyCredentials": creds});

ApacheKafkaTopic.setCredentialsForResourceName(topicName, apacheCreds, ConfigOverride.APP)
If your pipeline reads the topic through a CloudMessageSourceCollection, you can set the credentials on the source system instead, with CloudMessageSourceSystem.forName("<source system name>").setCredentials(apacheCreds). This sets them on each of the source system's deployed collections.
Configure an Apache Kafka consumer
To subscribe the C3 Agentic AI Platform to an Apache Kafka topic, complete these three steps:
- Configure the Types that model the messages consumed from the topic.
- Configure CloudMessageSourceSystem and CloudMessageSourceCollection Types to register the topic.
- Enable the
CloudMessageSourceCollectionto receive messages.
Instead of the codeless CloudMessageSourceCollection path above, you can configure a CloudInboundMessage Type. A CloudInboundMessage Type models an Apache Kafka consumer explicitly, with your own processing logic. CloudInboundMessage is a parametric Type, so you specify a Type that represents the messages consumed from the topic. In this example, that Type is SourceOrdersJSON.
CloudMessageSourceCollection and CloudInboundMessage are independent subscriber mechanisms, not sequential setup steps. If you register both on the same broker or topic, CloudMessageDispatcher.dispatchToAll sends each arriving message to both.
For this example, the messages published to the Orders topic have the following format:
{
  "ordertime": 1507163076488,
  "orderid": 46,
  "itemid": "Item_53",
  "orderunits": 8.553269159575795,
  "address": {
    "city": "City_41",
    "state": "State_83",
    "zipcode": 55197
  }
}Configure the Types to model the messages consumed from the topic
Define the Types that model the JSON format of the messages you consume from the topic. This example uses two Types, SourceOrdersJSON and SourceOrdersAddress, which model the JSON message above.
/**
 * This type represents the raw order data.
 */
type SourceOrdersJSON mixes Source {

  ordertime: int

  orderid: int

  itemid: string

  orderunits: double

  address: SourceOrdersAddress

}/**
* This type represents the address data for each order.
*/
type SourceOrdersAddress {
city: string
state: string
zipcode: int
}You may need additional Types, transforms, and application Types to capture the full models of the messages you consume.
Configure the CloudMessageSourceSystem and CloudMessageSourceCollection Types to register the topic
A CloudMessageSourceSystem organizes related CloudMessageSourceCollection instances.
You create a CloudMessageSourceSystem by specifying its name. For example, add the following Kafka.json file to the \metadata\CloudMessageSourceSystem directory of your package:
{
    "name": "Kafka"
}
A CloudMessageSourceCollection represents a source collection that references a CloudMessageBroker and its related queue, topic, or stream.
The CloudMessageSourceCollection references a CloudMessageSourceSystem and holds the information needed to process data received from the topic and to connect to the topic.
For example, to model a CloudMessageSourceCollection called OrderDataSource, add the following OrderDataKafka.json file to the \metadata\CloudMessageSourceCollection directory of your package:
{
    "name": "OrderDataSource",
    "sourceSystem": {
        "type" : "CloudMessageSourceSystem",
        "name" : "Kafka"
    },
    "source": "SourceOrdersJSON",
    "external": true,
    "cloudMessageBrokerName": "Orders",
    "cloudMessageBrokerType": "ApacheKafkaTopic",
    "batchSize": 10,
    "timeoutMillis": 5000
}
In the console, you can configure the CloudMessageSourceCollection further with the SourceCollection.Config mixin. The following code sets the content type, the preferences for archiving records, and the SourceCollectionProcessMode.
var config = CloudMessageSourceCollection.forName("OrderDataSource").config();
config.setConfigValue("contentTypeOverride", "application/json", ConfigOverride.APP);
config.setConfigValue("doNotChunk", true, ConfigOverride.APP);
config.setConfigValue("doNotArchiveStatus", false, ConfigOverride.APP);
config.setConfigValue("doNotArchiveSources", true, ConfigOverride.APP);
config.setConfigValue("doNotArchiveFailedSources", false, ConfigOverride.APP);
config.setConfigValue("processMode", "ON_ARRIVAL", ConfigOverride.APP);Enable the CloudMessageSourceCollection to receive messages
Run the following commands to subscribe the platform to the topic and process messages in real time as they arrive:
src.register()
src.startOnArrivalMode()
To verify that the platform receives messages, create an ApacheKafkaTopic instance from your topic name and call the receiveMessages() method. Include the partition that you want to read messages from.
broker = ApacheKafkaTopic.fromResourceName(topicName);
messages = broker.receiveMessages({partition: 0})
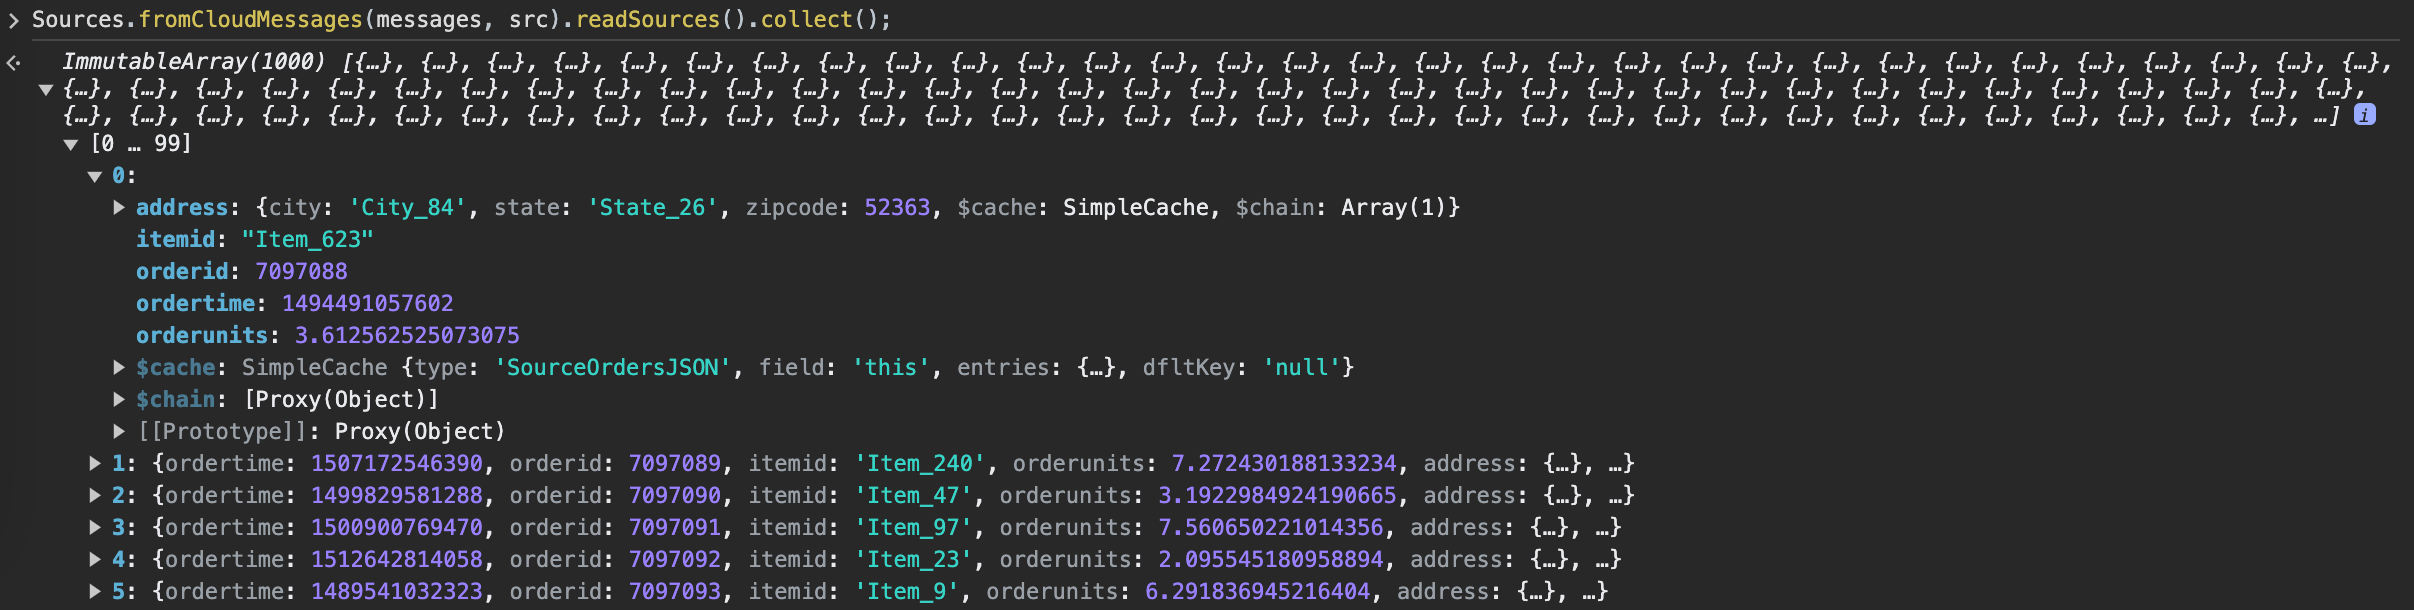
The platform stores messages as a JavaScript ArrayBuffer. Run the following command to read the messages as objects:
Sources.fromCloudMessages(messages, src).readSources().collect();This command works only when sources are not archived. With archiving on, the platform consumes messages on receipt, so you cannot read them.
Configure a CloudInboundMessage Type and link to Kafka topic
To model a Kafka consumer and configure downstream processing, create a CloudInboundMessage Type. When a Type mixes in CloudInboundMessage, the platform treats it as a Kafka consumer.
The platform dispatches each message consumed from the Orders topic to the SourceOrdersInboundQueue.process() method.
type SourceOrdersInboundQueue mixes CloudInboundMessage<SourceOrdersJSON> {

  process: ~ js-server

}
The process method writes each order to an OrdersData entity Type. Define it in your package, with one field for each value that process sets:
/**
 * This type stores the processed order data.
 */
entity type OrdersData {

  ordertime: int

  orderid: int

  itemid: string

  orderunits: double

  city: string

  state: string

  zipcode: int

}
Implement the process method in SourceOrdersInboundQueue.js, which persists data to the OrdersData Type. Message delivery is at-least-once, so process() must be idempotent. Use upsertBatch instead of createBatch, so that reprocessing the same message does not create duplicates. upsertBatch matches existing rows by id. Set id to a value derived from the message (here, orderid) instead of letting OrdersData.make() generate one. Otherwise, a replayed message gets a new id and creates a duplicate row.
Do not swallow write failures in process(). CloudStreamProcessor advances its checkpoint once process() returns. Let the exception propagate out of process() so that the platform redelivers the batch.
function process(messages) {

    var array = OrdersData.array();
    var meas;

    messages.forEach(function (msg) {

      meas = OrdersData.make({
        id: "Order_" + msg.orderid,
        ordertime: msg.ordertime,
        orderid: msg.orderid,
        itemid: msg.itemid,
        orderunits: msg.orderunits,
        city: msg.address.city,
        state: msg.address.state,
        zipcode: msg.address.zipcode
      });

      array.push(meas);

    })

    try {
      OrdersData.upsertBatch(array);
    } catch (e) {
      log.error(e.message);
      throw e;
    }
  }
Next, associate the SourceOrdersInboundQueue Type with the Orders Kafka topic.
SourceOrdersInboundQueue.setBrokerName(topicName, "ApacheKafkaTopic");
SourceOrdersInboundQueue.setBatchSize(10);
SourceOrdersInboundQueue.setTimeoutMillis(5000);

SourceOrdersInboundQueue.register();
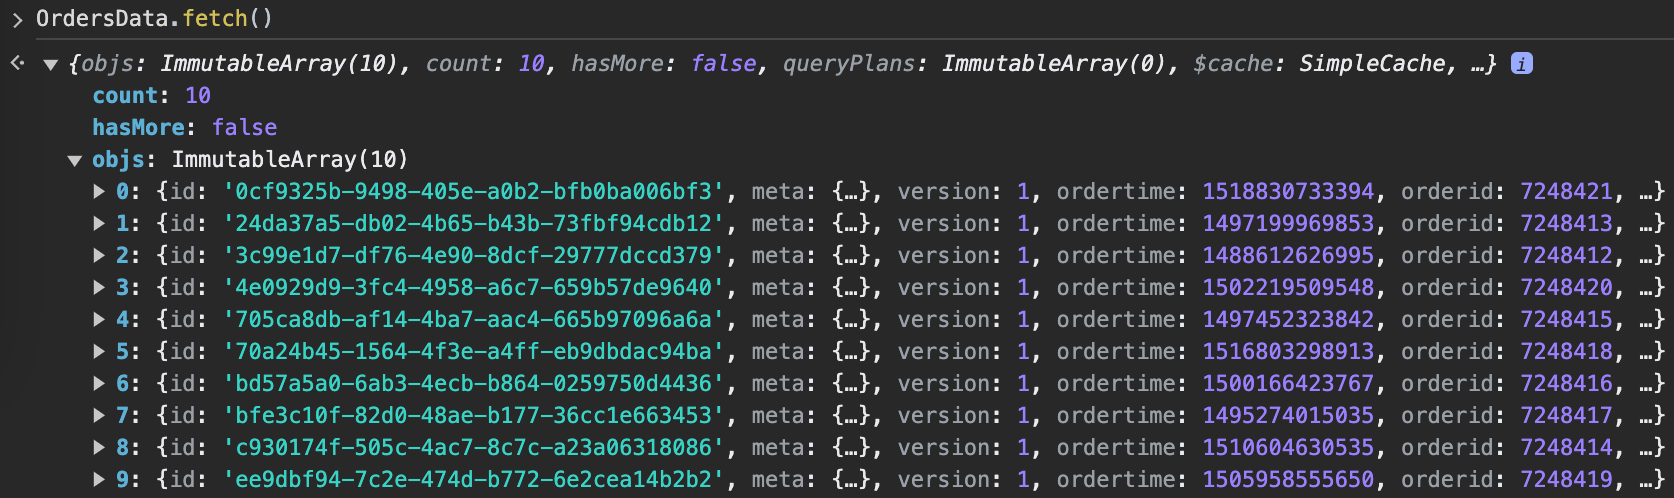
Data now populates the OrdersData Type.
Configure an Apache Kafka producer
Publishing to a Kafka topic takes nearly the same steps as consuming from one. This section reuses the topic registered above and configures a CloudOutboundMessage Type to model a Kafka producer explicitly. The published messages have the same structure as the consumed ones, so you reuse the SourceOrdersJSON Type in the CloudOutboundMessage parametric Type.
Configure a CloudOutboundMessage Type and link to Kafka topic
When a Type mixes in CloudOutboundMessage, the platform treats it as an Apache Kafka producer.
type SourceOrdersOutboundQueue mixes CloudOutboundMessage<SourceOrdersJSON>Next, associate the SourceOrdersOutboundQueue Type with the Orders Kafka topic.
SourceOrdersOutboundQueue.setBrokerName(topicName, "ApacheKafkaTopic");
SourceOrdersOutboundQueue.setBatchSize(10);
Publish messages to the Orders topic with the SourceOrdersOutboundQueue.sendBatch() method. The following code generates sample data and publishes it to the topic:
function createOrders(startTime, startOrderId) {
  var cAry = C3.ArrayBuilder.fromJson({type: 'ArrayBuilder<SourceOrdersJSON>'});
  var partition = 0;
  var order;
  var time = startTime;
  var orderId = startOrderId;

  for (var i=0; i<10; i++) {
    time += 3.6e6;
    orderId += 1;

    order = SourceOrdersJSON.make({
        ordertime: time,
        orderid: orderId,
        itemid: "Item_"+randomBetween(1, 100),
        orderunits: (1e-6)*randomBetween(1e6, 10e6),
        address: {
          city: "City_"+randomBetween(1, 100),
          state: "State_"+randomBetween(1, 50),
          zipcode: 94502
        }
    });

    cAry.push(order);
  }

  SourceOrdersOutboundQueue.sendBatch(cAry.build(), partition);
}

function randomBetween(min,max)
{
    return Math.floor(Math.random()*(max-min+1)+min);
}

createOrders(1518565054534, 93);
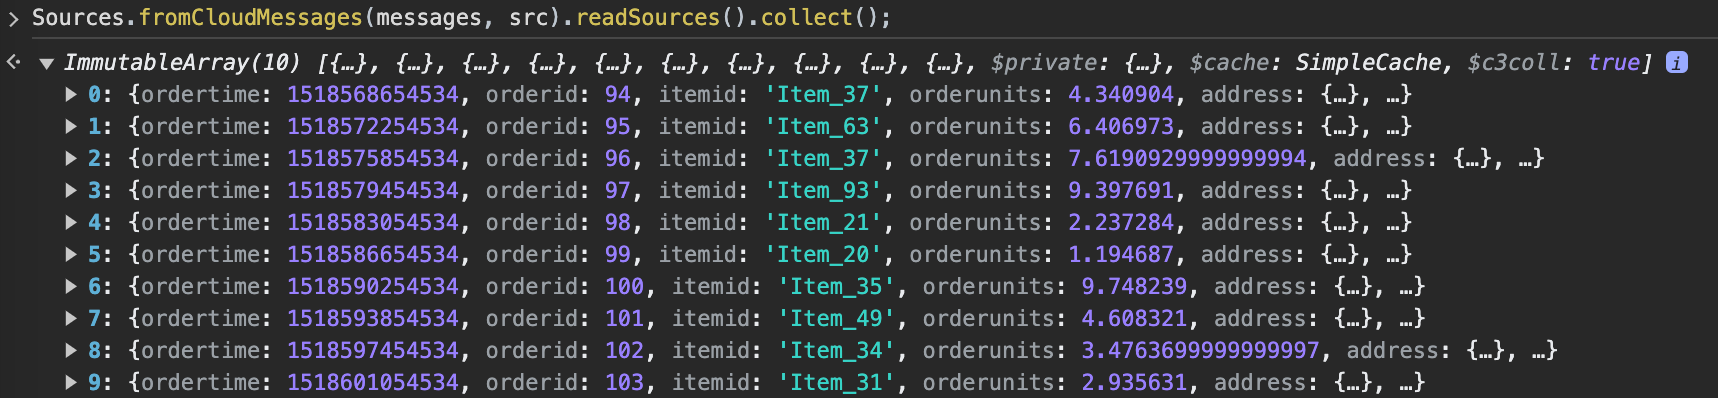
You can then verify that the messages reached the topic.
Configure an Apache Kafka connection with SSL enabled
To connect to your Kafka cluster over SSL, give the C3 AI server your certificates as PEM files. The server builds an in-memory keystore and truststore from them and manages their passwords.
The Kafka client does not accept keystore or truststore files (.jks) by location. Use PEM certificates and keys with TlsCertificate.createTls as shown below.
Step 1. Upload your certificate files
Get these files from your Kafka administrator or your cluster provider, in PEM format:
- The CA certificate that signed the broker certificates. You always need this file.
- The client certificate and its private key. You need these only when the brokers require client authentication (mutual TLS).
Upload the files to a file system that your application can read. See Upload Files.
Step 2. Create your credentials
Read the files and create an in-memory certificate with TlsCertificate.createTls, then add it to ApacheCredentials.
Choose sslMode to match how the brokers authenticate clients:
verify-ca: the client checks the broker certificate against your CA certificate. PasscaCertificatesonly.verify-full: mutual TLS. Also passclientCertificatesandprivateKey.
var fs = FileSystem.inst();
var folder = "< URL of the folder that holds your PEM files >";

var tls = TlsCertificate.createTls(TlsCertificate.KeyStoreSpec.make({
  "sslMode": "verify-full",
  "caCertificates": [fs.makeFile(folder + "< CA certificate file >").read()],
  // For mutual TLS only (sslMode "verify-full"):
  "clientCertificates": [fs.makeFile(folder + "< client certificate file >").read()],
  "privateKey": fs.makeFile(folder + "< client private key file >").read(),
  "privateKeyPassword": "< private key passphrase, if the key is encrypted >"
}));

var endpoint = "< KAFKA_BROKER >:< PORT >";
var credentials = ApacheCredentials.make({
  "endpoint": endpoint,
  "certificate": tls,
  // Optional: also verify that the broker host name matches its certificate.
  "properties": {"ssl.endpoint.identification.algorithm": "https"}
});
For verify-ca, remove the clientCertificates, privateKey, and privateKeyPassword lines and set "sslMode": "verify-ca". Always set sslMode.
To combine SSL with SASL authentication, also add apacheApiKeyCredentials to the same ApacheCredentials, as in "Register Apache Kafka credentials with the C3 Agentic AI Platform" on this page. The connection then uses SASL over SSL.
Step 3. Set the credentials
Create the corresponding CloudMessageSourceSystem and CloudMessageSourceCollection in the metadata folder of your package.
cmss=CloudMessageSourceSystem.make({
  "name": "ApacheKafkaTopic"
})

receiveBrokerName = "<your kafka topic name>"

cmsc=CloudMessageSourceCollection.make({
  "name": "<topic name>", // better to make the same as the name of the source type
  "timeoutMillis": 5000,
  "batchSize": 10,
  "cloudMessageBrokerType": "ApacheKafkaTopic",
  "cloudMessageBrokerName": receiveBrokerName,
  "description": "<description>",
  "external": true,
  "sourceSystem": {
    "type" : "CloudMessageSourceSystem",
    "name" : "ApacheKafkaTopic"
  }
})
After the package is deployed, set the credentials on the source system. This sets them on each of its collections:
cmss=CloudMessageSourceSystem.forName("ApacheKafkaTopic")

cmss.setCredentials(credentials)
To set credentials for one topic without a source system, call ApacheKafkaTopic.setCredentialsForResourceName(receiveBrokerName, credentials, ConfigOverride.APP) instead.
Step 4. Send and receive your messages
To send and receive messages with DataIntegrator instead of the producer and consumer Types, run the following code:
// create messages
msg=CloudStreamMessage.make({
  id: "123",
})
DataIntegrator.sendObjs({'type': 'ApacheKafkaTopic', 'resourceName': receiveBrokerName},[msg],{'batchSize': 100, 'contentType': "application/json"})

msgs=DataIntegrator.receiveMessages({'type': 'ApacheKafkaTopic', 'resourceName': receiveBrokerName}, {'type': 'CloudStreamReceiveMessagesSpec', 'partition': "1", 'timeoutMillis': 1108, 'batchSize': 100})