Upload Files
The C3 Agentic AI Platform provides file uploads through C3 AI Studio, the import API, or the file API which enables you to upload files to any connected file system.
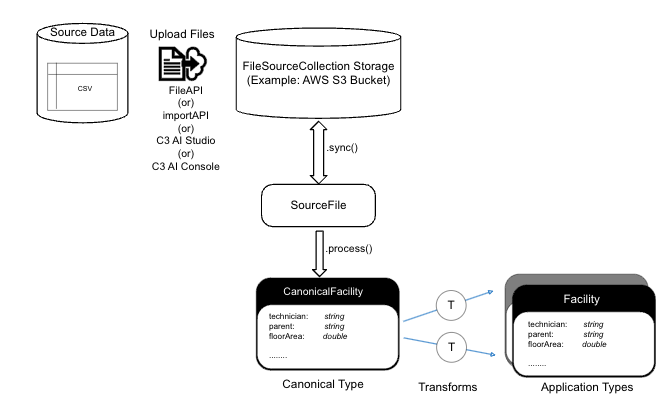
The following data upload flow diagram is a key tool for visualizing the process of integrating data from multiple sources into a unified view. It helps illustrate how data moves through various systems, highlights potential bottlenecks, and ensures consistency and accuracy.
Files are truncated when they exceed 2GB due to REST API limitations. You may need to split large files and upload smaller files individually.
Identify source data
Source data refers to the raw or original data that you want to upload or integrate into the system, which can be structured, semi-structured, or unstructured, and originates from external systems, databases, or devices. The process involves locating the raw data files that must be integrated, such as CSV, JSON, Parquet, or AVRO formats, and determining the source of the data, whether it's from an external database, a partner, or an IoT device.
Upload data to FileSourceCollection storage
FileSourceCollection storage is the file location where uploaded files are stored and managed before they are processed or transformed within the data integration pipeline. It serves as a centralized location for file storage, often cloud-based, ensuring files are accessible for synchronization and further steps in the workflow. The FileSourceCollection storage is often a cloud bucket or blob store (such as AWS S3, Azure Blob Store, or GCS Bucket).
Use any of the following methods to upload data to the FileSourceCollection storage.
- FileAPI – Use the C3 AI
fileAPI to upload the source data files into a specific file collection within the platform. This only stores the file in the FileSourceCollection Storage, requiring manual intervention to run .sync() and .process() later. - importAPI – Use the
importAPI option to upload the file and to automatically trigger both the synchronization (.sync()) and processing (.process()) of the file to trigger data ingestion and import into the Application type(s). - Data Integration Menu in C3 AI Studio – Alternatively, you can use the Bulk Load Data feature to load files through the Data Integration menu in C3 AI Studio. To find this option, select the application card from AI Studio home page. This opens the application details screen. On the application details page, select the Data Integration tab on the left.
- C3 AI Console – In the C3 AI Console, select Tools on the top left, then select Load File, which presents you with a model to upload files.
- Cloud Native Tools – Use other cloud tooling to upload files to the underlying bucket or blob store.
The File API and C3 AI Console are typically used for uploading files to test the DI pipeline or to store the files without immediate processing. These operations require additional steps to transform the data.
Synchronize the data as a SourceFile
A SourceFile is a Type in the C3 Agentic AI Platform which is the record of an underlying file on the file system. This record enables metadata to be tracked on the file size, upload date, file location, and also enables lineage to any downstream processing. This step is essential for making the files available for processing and transformation in the data integration workflow. Without it, the stored files would remain disconnected from the internal system's data model, making further processing impossible.
After the data is uploaded to the FileSourceCollection storage, there are two methods to synchronize the file. The first option is to go to C3 AI Studio, navigate to the Application Details page > Data Integration, and select the Bulk Load Data button to sync the files on the next screen.
The second option is to use the SourceFile.syncAll() API to synchronize the uploaded data in C3 Agentic AI Platform as shown in this example.
// Get the inboxUrl for the FileSourceCollection
var fileUrl = FileSourceCollection.forName('<FSC_NAME>').inboxUrl();
SourceFile.syncAll(fileUrl, {process: false});
The second parameter in syncAll() is a DataIntegSpec, which can be used to control synchronization options, such as whether to process the file immediately or delay the processing.
Note that syncing the file to create a SourceFile record is entirely separate from processing the data. This design allows users to sync all files at a given FileSourceCollection storage location while only processing a subset of files if desired.
Process data into a structured Canonical Type
A Canonical Type defines a standardized format to represent source data in a consistent, unified way within the system. It serves as an intermediate between raw data and the application data model, allowing data from various sources to be processed and integrated. By converting raw source data into Canonical Types, the system ensures data consistency and facilitates easier integration into application-specific types later in the workflow.
To perform initial data processing, utilize SourceFile.process(), SourceFile.processBatch(), or SourceFile.processAll() APIs as shown in the following example.
Example:
// .process() for one SourceFile
var sourceFileId = '<ID of SourceFile in C3 AI>';
SourceFile.forId(sourceFileId).process();

// .processBatch() for a group of SourceFiles
var sourceFiles = SourceFile.fetch({filter: "<some_filter_statement>"}).objs;
SourceFile.processBatch(sourceFiles);

// .processAll() for processing all SourceFiles according to a filter
var spec = DataIntegSpec.make({filter: "<some_filter_statement>"});
SourceFile.processAll(spec);
The raw data in the SourceFile is processed, validated, and transformed into a structured Canonical Type before being immediately processed by the downstream data pipeline. This processing step ensures that the data is standardized, cleansed, and prepared for further use or transformation within the system, making it a crucial part of the data integration workflow.
Example from the diagram:
In the diagram, the Canonical Type is represented by the example CanonicalFacility. This includes attributes like:
- technician — string (a field representing a technician's name)
- parent — string (a field referring to a parent facility or entity)
- floorArea — double (representing the floor area as a numerical value)
This canonical representation standardizes the data, regardless of how it was originally provided (for example, from different source files or databases).
Transform data
The transformation process involves converting raw source data into a canonical format by applying business rules, data cleaning, or reformatting. This canonical data is then mapped into application-specific formats to meet the needs of different systems. After initiating the processing of data from the previous step, there is no need to manually start the transformation step. It happens as one process.
The two transform arrows in the diagram represent the conversion of canonical data, such as CanonicalFacility, into multiple application types. These arrows signify that the standardized data can be adapted in parallel for various use cases. For example, one arrow may map CanonicalFacility to a detailed facility structure, while the other might map it to a summary type for reporting or analytics purposes.
Example from the diagram:
In the diagram, the CanonicalFacility has attributes like technician, parent, and floorArea, and these fields might be transformed into different application types:
- First Transform arrow – Maps CanonicalFacility into an Application Type used by the operational system for managing facility operations.
- Second Transform arrow – Maps CanonicalFacility into another Application Type used for reporting or analytics, focusing on key performance indicators (KPIs) like total floor area or technician details.
Upload files in C3 AI Studio
You can upload .csv files to an application in C3 AI Studio using the steps below. This enables you to integrate data in an easy way.
To upload files, first navigate to your application in C3 AI Studio.
- Navigate to your application. You can find your application within the Applications icon on the left.
- Select your application.
- Expand the left tab to reveal the AI Studio tabs.
- Select the Data Fusion tab.
Data Fusion is in Beta. Please contact your C3 AI representative to enable this feature. You are now ready to upload files through C3 AI Studio.
For more information on using Data Fusion, see File Upload Configuration Example.
Bulk load data
You can choose to upload files one at a time or upload multiple files at once. Use the Bulk Load Data option to choose which files to upload, and specify which SourceCollection.
- On the Data Integration page, select Bulk Load Data.
- Select the Upload Files button.
- Select Browse to choose the file or files you want to upload. Alternatively, select the files in another window, then drag them into your browser.
- Choose the correct
SourceCollectionfor the file.
You should now be able to see the file on your list. You can preview the file to confirm if the file was correctly uploaded.
If your files aren't showing, try selecting the Sync all files button.
Upload local files with the File API
The C3 Agentic AI Platform provides a file API that allows you to upload a local file to any connected file system. The Curl Type provides helpful utility functions to prepare a cURL request. You can run a cURL request from your local machine to call C3 Agentic AI Platform REST APIs.
To prepare a cURL request that uploads a local file to a remote file system, run the following:
// Example of file location on the default file system
var contentLocation = FileSystem.mounts().get('/') + 'path/to/file.csv';
var contentType = "text/csv"; // e.g. "text/csv"
var contentEncoding = "UTF-8"; // usually "UTF-8"
var localFilePath = "path/to/local/file.csv"; // e.g. "/Users/someuser/Documents/my_file.csv"
var authKind = AuthenticationKind.C3;

Curl.file({
  contentLocation: contentLocation,
  contentType: contentType,
  contentEncoding: contentEncoding,
  localFilePath: localFilePath,
  dataBinary: true,
  authenticationKind: authKind,
  authenticationToken: User.myUser().sessionToken().signedToken
});
An example response is provided below.
curl \
-H "Authorization: c3auth <token_value>" \
"Content-Type: <local_file_type>" \
-H "Content-Encoding: <local_file_content_type>" \
-X PUT @"<local_file_path>" \
<destination_file_path> \
--ssl -v
To send the file to the remote file system, open a new Terminal session and run the copied cURL command.
A 200 status indicates that the local file has been successfully uploaded to the remote file system. You can validate that the file has been added to the remote file system using FileSystem.listFiles(contentLocation).
FileSystem.listFiles() lists files in the default file system. If your files have been uploaded to a different file system, such as S3 or Azure Blob, then you need to instantiate the proper file system using FileSystem.s3().listFiles() or FileSystem.azure().listFiles().
The following file formats are supported for uploading:
CSV
JSON
XML
Parquet
Avro
Error status codes
If you do not receive a 200 status from the cURL request, the error status code can help you debug the issue:
302- Redirect to the IdP, probably because the authorization header wasn’t set correctly or is invalid.400- Bad request, generally because the destination path on the remote file system was not accessible.404- Requested endpoint was not found, most likely because of a typo on the path to the file API after the host URL (should be /<env>/<app>/file).415- Unsupported media type, which means that the local file did not have a supported file format.500- Internal server error, which means that the server is unavailable to process the request.
If no HTTP response is received, the host address was not valid.
Move files between remote file systems
The FileSystem methods make it easy to migrate data from one connected file system to another. This is possible because of the Type system abstraction layer that simplifies multi-cloud portability.
The following example copies the contents of the default file system mount for the Azure file system to an S3 bucket that has been connected to the C3 Agentic AI Platform:
var destinationPath = "<destination_file_system_path>";

var sourcePath = FileSystem.azure().mountUrl() + "jupyter/";
FileSystem.azure().copyFiles(sourcePath, destinationPath);Example workflow for loading data
The following details an end-to-end workflow for loading data to an environment, which includes verification steps to make sure the files loaded to the correct location and are synchronized with the server.
These steps assume the FileSourceCollection was previously configured for the file source system. For more information, see Declare Pipelines for File Sources.
If you load historical data, make sure to disable async processing before performing data loads by running InvalidationConfig.inst().withUpsertAsyncProcessingDisabled(true).setConfig().
To load data in an environment, do the following:
Set the URL to which the incoming file will be directed by modifying the
inboxUrlOverrideconfiguration in the following example code snippet and running it in the environment C3 AI console (env/c3).JavaScriptFileSourceCollection.forName("<sourceName>").config().setConfigValue("inboxUrlOverride","<folder-path>/<sourceName>");Use cURL to retrieve the files from a specified source and transfer them to your environment using either the File Type or Import Type. The cURL command allows you to send files from your local system (for example, if you want to test the data pipeline locally on your single node environment) and brings them into the designated environment.
File - Uploads the file to the path specified. This is the recommended approach for uploading files onto the C3 AI File System. See the following example code snippet.
Command Linecurl -vv -L -H "Content-Type: text/csv" -H "Authorization: c3auth <auth_token>"\ -X PUT --data-binary @<filename>.csv <cluster-name>/<env_name>/\ <app-name>/file/<folder-path>/<source_type>/<filename>.csvImport - Loads and processes the file for the canonical specified. This can be used to load adhoc data or to test data loads. See the following example code snippet.
Command Linecurl -vv -L -H "Content-Type: text/csv" -H "Authorization: c3auth <auth_token>"\ -X PUT --data-binary @<filename>.csv <cluster-name>/<env_name>/<app-name>/\ import/8/<CanonicalName>/<filename>.csv
Verify the files are accurately copied to the intended location in the environment by running the following example code snippet.
JavaScriptvar url=FileSourceCollection.forName("<source_name>").inboxUrl() c3Grid(FileSystem.listFiles(url).files)Ensure the metadata associated with the files is synchronized and updated with the server. This synchronization process aligns the file metadata from the mount point with the server. See the following example code snippet.
This is a critical step to ensure the C3 Agentic AI Platform identifies the file that was copied to the inbox URL and the mount point before beginning the ingestion pipeline.
JavaScriptSourceFile.syncAll(FileSourceCollection.forName("<source_name>").inboxUrl());