Create and Configure the C3 AI Model Inference Service
A C3 AI cluster with application(s) requiring the usage of large language models (LLMs), vision language models (VLMs), embedding models, or other large models may require a Model Inference Service to host and serve those models.
The C3 AI Model Inference Service (MIS) is a C3 Agentic AI Platform Microservice for low latency serving of machine learning (ML) models, including LLMs. With C3 AI MIS, you can host any MlAtomicPipe from the C3 AI Model Registry for a "warm" deployment and manage routing of all inference requests.
This topic addresses how to create a C3 AI MIS instance in C3 AI Studio, set up a pipe registration application in association with that instance (depending on Architecture 1 or 2), and how to connect client applications to the C3 AI MIS. See C3 AI MIS overview and architecture for more details on architecture.
As such, the workflow for creating and configuring the C3 AI MIS included in this topic are as follows:
- Create and start the C3 AI MIS application
- Start supporting microservices and applications based on architecture and testing needs
- Connect the client application(s) to the model inference service
Create the C3 AI MIS overview
Create a multi-node environment (MNE) called inference (name may vary if required) and start the C3 AI MIS application by completing the steps in the subsequent sections below, which consists of the following major actions:
- Create a MNE in C3 AI Studio
- Create the C3 AI Model Inference Service application
- Start the C3 AI Model Inference Service
Create MNE in C3 AI Studio
To create the MNE, do the following:
In C3 AI Studio, click the Create environment button from the Home page.
In the "Create new environment" window, type name of the MNE (for example
inference) in the Name field.In the "Server version" field, enter the desired server version.
NOTE: By default, the same server version as C3 AI Studio is used for the MNE if no server version is entered in this field. This is the recommended option unless there is a specifically desired and supported GA server version.
Select the "Shared Environment" radio button, then click Create.
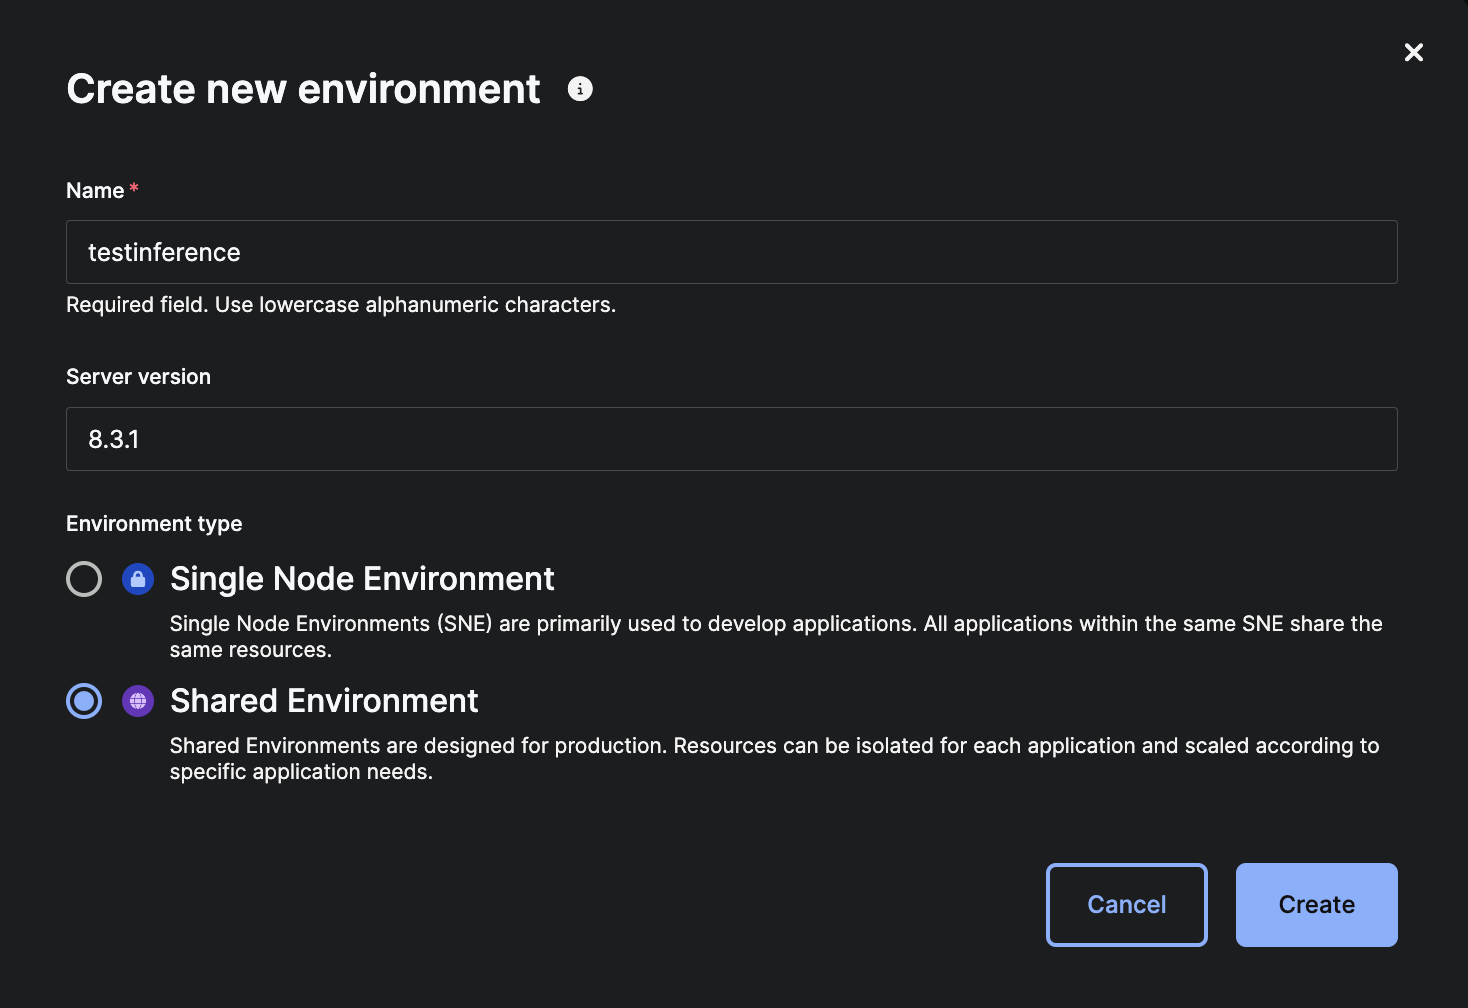 C3 AI Studio - Create Shared Environment for C3 AI MIS
A banner at top of the C3 AI Studio instance indicates the environment is starting.
NOTE: If you receive an error message in the banner, such as "Failed to start new environment... User has reached maximum concurrent non-single-node environment of 0," C3 AI Studio might be configured to limit creation of MNEs for Studio Users. Contact your C3 AI CoE or Studio Admin to obtain higher permissions.
Access the new environment by selecting the environment name in the Current environment drop-down list in the C3 AI Studio Home page; or, select it in the Environments tab to open the Environment Details page.
Once the status changes from "Starting..." to "Running," you'll be able to create an application for the C3 AI MIS.
Create the C3 AI MIS application
To create an application for the C3 AI MIS, do the following:
From the C3 AI Studio Home page, select the MNE created in the steps above in the Current Environment drop-down list.
Select the ellipses (...) next to View Details and select Open console.
This opens the C3 AI static console of the C3 AI Environment Management application (env/c3) in the C3 Agentic AI Platform.
In the Google Chrome tools bar, select View, Developer, then Developer Tools. Select the Console tab.
This opens the C3 AI console of the C3 AI Environment Management application (env/c3), allowing you to interact with your environment while in the C3 Agentic AI Platform.
Create the C3 AI Model Inference Service for you environment by using the following example code snippet:
JavaScriptvar rootPkg = "modelInferenceService" var appName = "service" C3.env().startApp({rootPkg: rootPkg, name: appName})This creates an application in your environment named
servicethat functions as the C3 AI MIS specific to your environment.Configure applications in the environment to use the C3 AI MIS:
NOTE: If this command recommended be executed from the C3 AI Environment Management application (env/c3) in the C3 AI Platform to take an effect for the all application of the environment.
JavaScriptvar appName = "service" ModelInference.setServiceAppId(App.forName(appName).id)Enable metric collection for the C3 AI MIS application (Optional):
JavaScriptvar appName = "service" App.Monitoring.Config.enable(App.forName(appName).id)NOTE: If this command fails with an error, such as "User '...' is not authorized to access App.Monitoring.Config#inst ..." Please contact your C3 AI CoE or Studio Admin for assistance in configuring metric collection.
Start supporting microservices and applications based on architecture or testing needs
This section provides instructions for create and start additional supporting applications that you might need based on the architectural design for your use case or for testing purposes.
If your use case is specific to Architecture 1, in which the C3 AI MIS and pipe registration application are separate applications in the environment, you also need a pipe registration application. Follow the instructions below to "Create a pipe registration application." See Overview of C3 AI MIS Administration for additional details regarding architectural design.
For testing purposes, you might want to create both a C3 AI Model Registry Service application and a test client application. In this case, follow the instructions below for "Starting a C3 AI Model Registry Service application" and "Creating and starting a test client application."
Create a pipe registration application
In the configuration illustrated by Architecture 1, a separate pipe registration application is required.
To create a pipe registration application, do the following:
From the C3 AI Studio Home page, select your environment from the Current environment drop-down menu.
Select the ellipses (...) next to View Details and select Open console.
This opens the C3 AI static console of the C3 AI Environment Management application (env/c3) in the C3 Agentic AI Platform.
In the Google Chrome tools bar, select View, Developer, then Developer Tools. Select the Console tab.
This opens the C3 AI console of the C3 AI Environment Management application (env/c3), allowing you to interact with your environment while in the C3 Agentic AI Platform.
Create the pipe registration application for your environment by running the following example code snippet:
JavaScriptvar rootPkg = "modelInferencePipes" var appName = "pipesapp" C3.env().startApp({rootPkg: rootPkg, name: appName})This creates an application in your environment named
pipesappthat functions as a pipe registration application.
Create a C3 AI Model Registry Service application (Optional)
Since the C3 AI Model Registry Service is generally part of a cluster-level deployment of C3 AI Studio, it is not required to set up a separate instance of the C3 AI Model Registry Service. In some instances, such as testing, you can create a separate C3 AI Model Registry Service application.
See also Set up C3 AI Model Registry Service on the C3 Agentic AI Platform.
Create the C3 AI Model Registry application
To create an application for the C3 AI Model Registry Service in your environment, do the following:
From the C3 AI Studio Home page, select your environment from the Current environment drop-down menu.
Select the ellipses (...) next to View Details and select Open console.
This opens the C3 AI static console of the C3 AI Environment Management application (env/c3) in the C3 Agentic AI Platform.
In the Google Chrome tools bar, select View, Developer, then Developer Tools. Select the Console tab.
This opens the C3 AI console of the C3 AI Environment Management application (env/c3), allowing you to interact with your environment while in the C3 Agentic AI Platform.
Create the C3 AI Model Registry Service for you environment by using the following example code snippet:
JavaScriptvar rootPkg = "modelRegistryService" var appName = "registryservice" C3.env().startApp({rootPkg: rootPkg, name: appName})This creates an application in your environment named
registryservicethat functions as the C3 AI Model Registry Service.Configure the environment to use environment local C3 AI Model Registry Service:
NOTE: If this command should be executed from the C3 AI Environment Management application (env/c3) in the C3 AI Platform to take an effect for the all application of the environment.
JavaScriptvar appName = "registryservice" ModelRegistry.setServiceAppId(App.forName(appName).id)
Create a test client application (Optional)
To set up an application to act as the client for the Model Inference service for testing, you need to start a client application.
From the C3 AI Studio Home page, select your environment from the Current environment drop-down menu.
Select the ellipses (...) next to View Details and select Open console.
This opens the C3 AI static console of the C3 AI Environment Management application (env/c3) in the C3 Agentic AI Platform.
In the Google Chrome tools bar, select View, Developer, then Developer Tools. Select the Console tab.
This opens the C3 AI console of the C3 AI Environment Management application (env/c3), allowing you to interact with your environment while in the C3 Agentic AI Platform.
Create the test client application for you environment by using the following example code snippet:
JavaScriptvar rootPkg = "modelInference" var appName = "testclient" C3.env().startApp({rootPkg: rootPkg, name: appName})This creates an application in your environment named
testclientthat can function as the test client application.
Connect the client(s) to the C3 AI MIS
Default configuration allowing all clients within the environment connecting to the C3 AI MIS. To configure the client application outside the environment, additional configuration is required.
Configure client(s) from a different environment within the cluster
Access to the C3 AI MIS can be configured on different override levels depending on needs. The hierarchy is the following, in order from finest to coarsest control:
- Application
- Environment
- Cluster
To apply configuration enter an application, C3 AI Environment Management application (env/c3) or C3 AI Cluster Management application (c3/c3), depending on how widely configuration should be applied.
For example if a configuration is applied on a C3 AI Environment Management application (env/c3), all applications of this environment will use the provided C3 AI MIS.
The following snippet can be used to apply such configuration:
var serviceAppId = '<cluster>-inference-service'
ModelInference.setServiceAppId(serviceAppId)
Where serviceAppId is an ID of the application in which the C3 AI MIS is running. It can be obtained by calling C3.app().id from the static console of the C3 AI MIS application.
Configure client(s) from a different cluster
Similar to connecting clients within a cluster, C3 AI MIS can be configured for a given cluster or environment, or it can be set per application.
Ensuring connectivity between clusters
As a first step it's important to ensure that the cluster(s) where the client applications are located have network connectivity to the cluster where the C3 AI MIS application is running.
Please contact your C3 AI CoE or Studio Admin to ensure this step is completed.
Configure clients
To apply a configuration, enter a normal application, the C3 AI Environment Management application (env/c3), or the C3 AI Cluster Management application (c3/c3), depending on how widely the configuration should be applied.
Use the following snippet for applying configuration on the client cluster:
var serviceAppId = '<INSERT SERVICE APP ID>'
var serviceAppUrl = '<INSERT SERVICE APP URL>'
ModelInference.setServiceAppId(serviceAppId, serviceAppUrl)
Where serviceAppId is an ID of the application in which the C3 AI MIS is running. It can be obtained by calling C3.app().id from the static console of the C3 AI MIS application.
For example:
var serviceAppId = 'genai-inference-service'
var serviceAppUrl = 'https://genai.c3ci.cloud/inference/service'
ModelInference.setServiceAppId(serviceAppId, serviceAppUrl)
This configuration ensures that client applications have information about the C3 AI MIS location.
It's required to collect ID of the application, and it's public key so C3 AI MIS will authorize requires from clients. The following snippet can be used to obtain application ID and the public key.
NOTE: Executed this snippet from same app where ModelInference.setServiceAppId(serviceAppId, serviceAppUrl) was called.
Extracting an app's id:
C3.app().idReading an application's public key:
C3.app().publicKeyContentAuthorizing clients
Cross-cluster clients have to be authorized from the application in which the C3 AI MIS is running.
Inject the application ID and the public key collected on the previous step and execute the following snippet:
NOTE: Be careful with line endings (\n) in the public key. They need to be preserved.
var key = "-----BEGIN PUBLIC KEY-----\nMIT...QAB\n-----END PUBLIC KEY-----"
var clientClusterId = '<INSERT CLIENT APP ID>'
ModelInferenceService.allowAccess(clientClusterId, key)Validating configuration
The following code snippet can be used for testing configuration for the client application:
ModelInference.listRoutes()This should display routes existing in the Model Inference Service. Each entry is an available route corresponding to a model.
Overriding cluster or environment configurations
Each application can rely on the default configuration supplied by the environment or cluster, or can override (See C3 Ai Configuration Framework for more details) the configuration to use something different.
If the C3 AI MIS was configured for a cluster, any application or environment can create its own default, using ModelInference.setServiceAppId.
Configuring clients to use multiple C3 AI MIS instances at once
Each application can be configured to use one or more C3 AI MIS instances.
To access the default C3 AI MIS, actions can be called directly on the ModelInference type. For example:
ModelInference.listRoutes()
ModelInference.completion('<route>', ['<prompt>'], {'param': 'params'})
Which is an equivalent of calling commands on the default instance of the ModelInference type:
ModelInference.inst().listRoutes()
ModelInference.inst().completion('<route>', ['<prompt>'], {'param': 'params'})
Use the following code snippet as an example of configuring and using another C3 AI MIS:
ModelInference.forName('secondary').setServiceAppId(serviceAppId, serviceAppUrl)
ModelInference.forName('secondary').listRoutes()
ModelInference.forName('secondary').completion('<route>', ['<prompt>'], {'param': 'params'})
It can be used with conjunction with the default C3 AI MIS for example:
ModelInference.completion('<route>', ['<prompt>'], {'param': 'params'})  // Hits default C3 AI MIS
ModelInference.inst().completion('<route>', ['<prompt>'], {'param': 'params'})  // Hits default C3 AI MIS
ModelInference.forName('secondary').completion('<route>', ['<prompt>'], {'param': 'params'})  // Hits secondary C3 AI MIS