Configure Agents
Use this guide to configure an agent in the by defining its objectives, prompts, model selection, memory, and tools so it performs tasks consistently and responds as intended.
Prerequisites
Before configuring an agent, ensure the following:
- You have created an agent in the Agent Gallery. If you have not yet created an agent, see Create Agents.
- You have the required role or permissions to edit agent configuration. Learn more about the roles in Agent Lifecycle Management Roles and Permissions
Configure an agent through the Agent Workbench
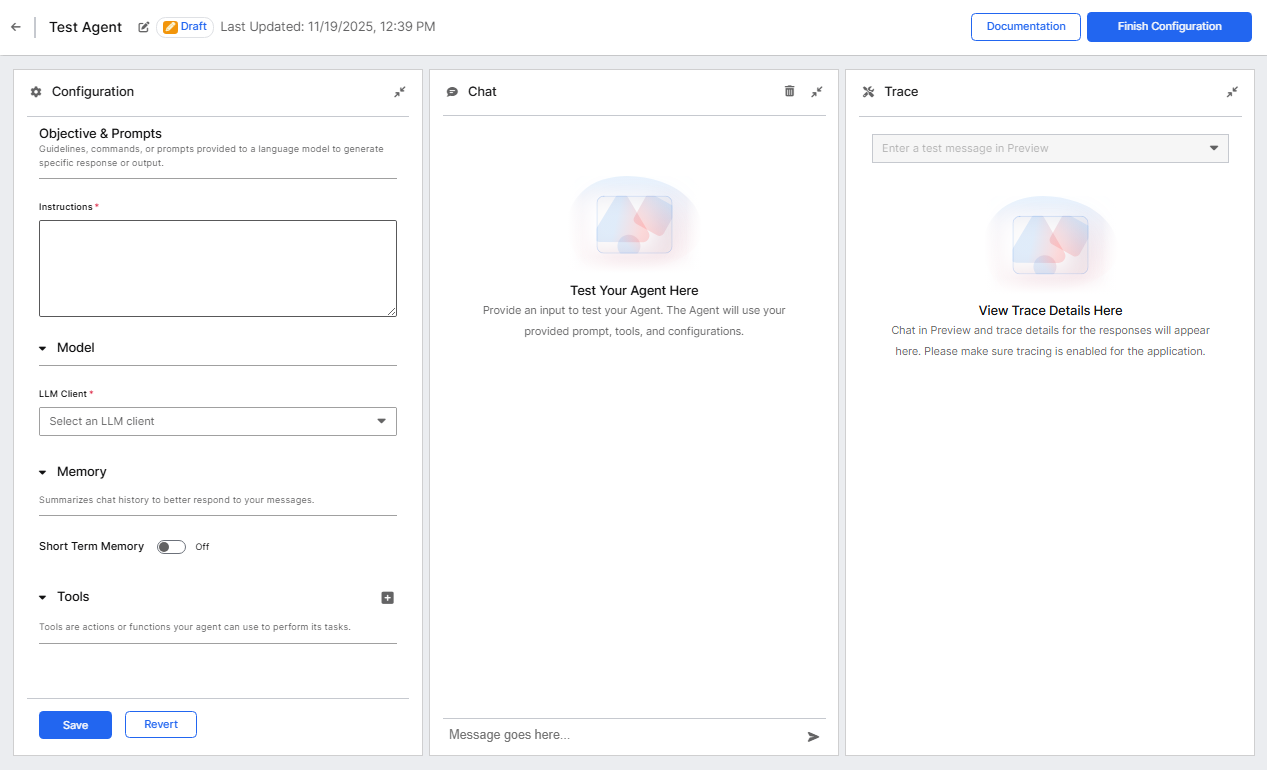
The Agent Workbench displays as a split-screen interface with three panels:
- Configuration (left): Controls for objectives, prompts, model selection, memory, and tools.
- Chat (center): Live chat interface to test agent responses.
- Trace (right): Execution traces for debugging and monitoring.
All panels are collapsible. The Trace panel is collapsed by default.
For details on the Agent Workbench, see Agent Workbench.
Follow these steps to configure an agent:
Define your agent's purpose in the Objective and Prompts section. Write clear, specific instructions that explain what your agent should do and how it should go about doing them. If you are adding tools for your agent to use you should also instruct the agent on when to use which tools, and how it should use them. The clearer and more descriptive you are, the more likely your agent is to perform its required tasks as intended.
Example:
TextYou are a helpful customer support agent. When customers ask questions about our products, provide clear, friendly answers. If you don't know something, politely say so and suggest they contact a human agent for more help.Select the LLM Client in the Model section. Available models include:
- Claude 4.5 Sonnet
- Gemini 2.5 Pro
- GPT 5
Available models vary by application and environment. For information on configuring LLM clients, see Configure LLM Clients.
Set up conversation memory using the Short Term Memory toggle. For most applications, enable this feature to provide a better user experience.
Add tools to extend your agent's capabilities. Select the plus icon (+) in the Tools section to browse available options.
To create new tools, see:
Add Documentation
Agent documentation helps other users understand your agent's purpose and capabilities.
- Select the Documentation button in the upper right area of the workbench.
- Select the pencil icon to enter edit mode.
- Describe what your agent does, what tools it uses, and any limitations.
- Provide example interactions to demonstrate expected behavior.
Select Save regularly throughout the configuration process to preserve your work.
Once your agent is configured and tested, it is ready to be deployed. Continue with Deploy Agents to make your agent available for use.