Embed Chat
Embed chat places the Agentix chat inside another C3 application, the host application, so users reach an agent without leaving the application they work in. An operations team, for example, can interact with their agent without leaving their Inventory Optimization application.
The host application must run on the same cluster as C3 AI Agentix, meaning the same C3 Agentic AI Platform deployment and host name. The embedded chat then signs in with each user's existing C3 AI session, so the host application needs no proxy, token, or second sign-in.
Setting up embedded chat divides the work between two groups:
- The C3 AI Agentix administrator: prepares the cluster for the host application to sync with the Agentix application. Then gives the host application's team the chat library from the Embed chat sections of the Admin page.
- The host application's team: adds the chat to their application's code, often with an AI coding assistant, selects the Agent they want to use in the chat and sets it via the Agents UUID (provided by the Admin), then deploys the application and verifies the chat session in their application.
After the chat runs, you can route each chat page in the host application to a different agent without a code change. When part of the setup is missing, the chat displays a message that names the cause.
What users see in the host application
A user who opens the chat page in the host application sees the following:
The full chat appears inside the host application. By default it shows the list of earlier chats on the left, the message box with model and effort controls, and the workspace panel.
The embedded chat differs from the C3 AI Agentix chat page in three ways:
- One agent per chat page: every new chat uses the agent that the host application's team chose. The control for switching agents is hidden unless the team turns it on.
- No application connections: the control for connecting other applications to a chat is hidden.
- No C3 AI Agentix navigation: the chat shows no links to other C3 AI Agentix pages.
Set up embedded chat
Complete these steps in order. The first three are for the Agentix Admin, and the last two belong to the host application's team:
- Prepare the cluster so the chat can find C3 AI Agentix and users can open it.
- Choose the agent the chat uses and give its ID to the team.
- Hand the team the chat bundle they'll use to install the chat page into their app. Send the starter kit when the team wants a complete example, or point it to the npm registry when it manages the library as a package.
- The team adds the chat to the application. See Add the chat to the host application.
- The team deploys the application to the cluster and starts a new chat. See Deploy and verify the chat.
Open the Embed chat pages
The Embed chat pages on the Admin page hold the setup details and the downloads for steps 1 to 3:
- Open Admin from the left navigation.
- Select the Platform tab.
- Select Embed chat, then select one of its three pages.
Each page covers one part of the setup:
- Overview: the cluster setup and what users experience after the chat runs.
- Download: the starter kit and a prompt for a coding assistant.
- npm registry: the install command for the published chat library and a prompt for a coding assistant.
Prepare the cluster
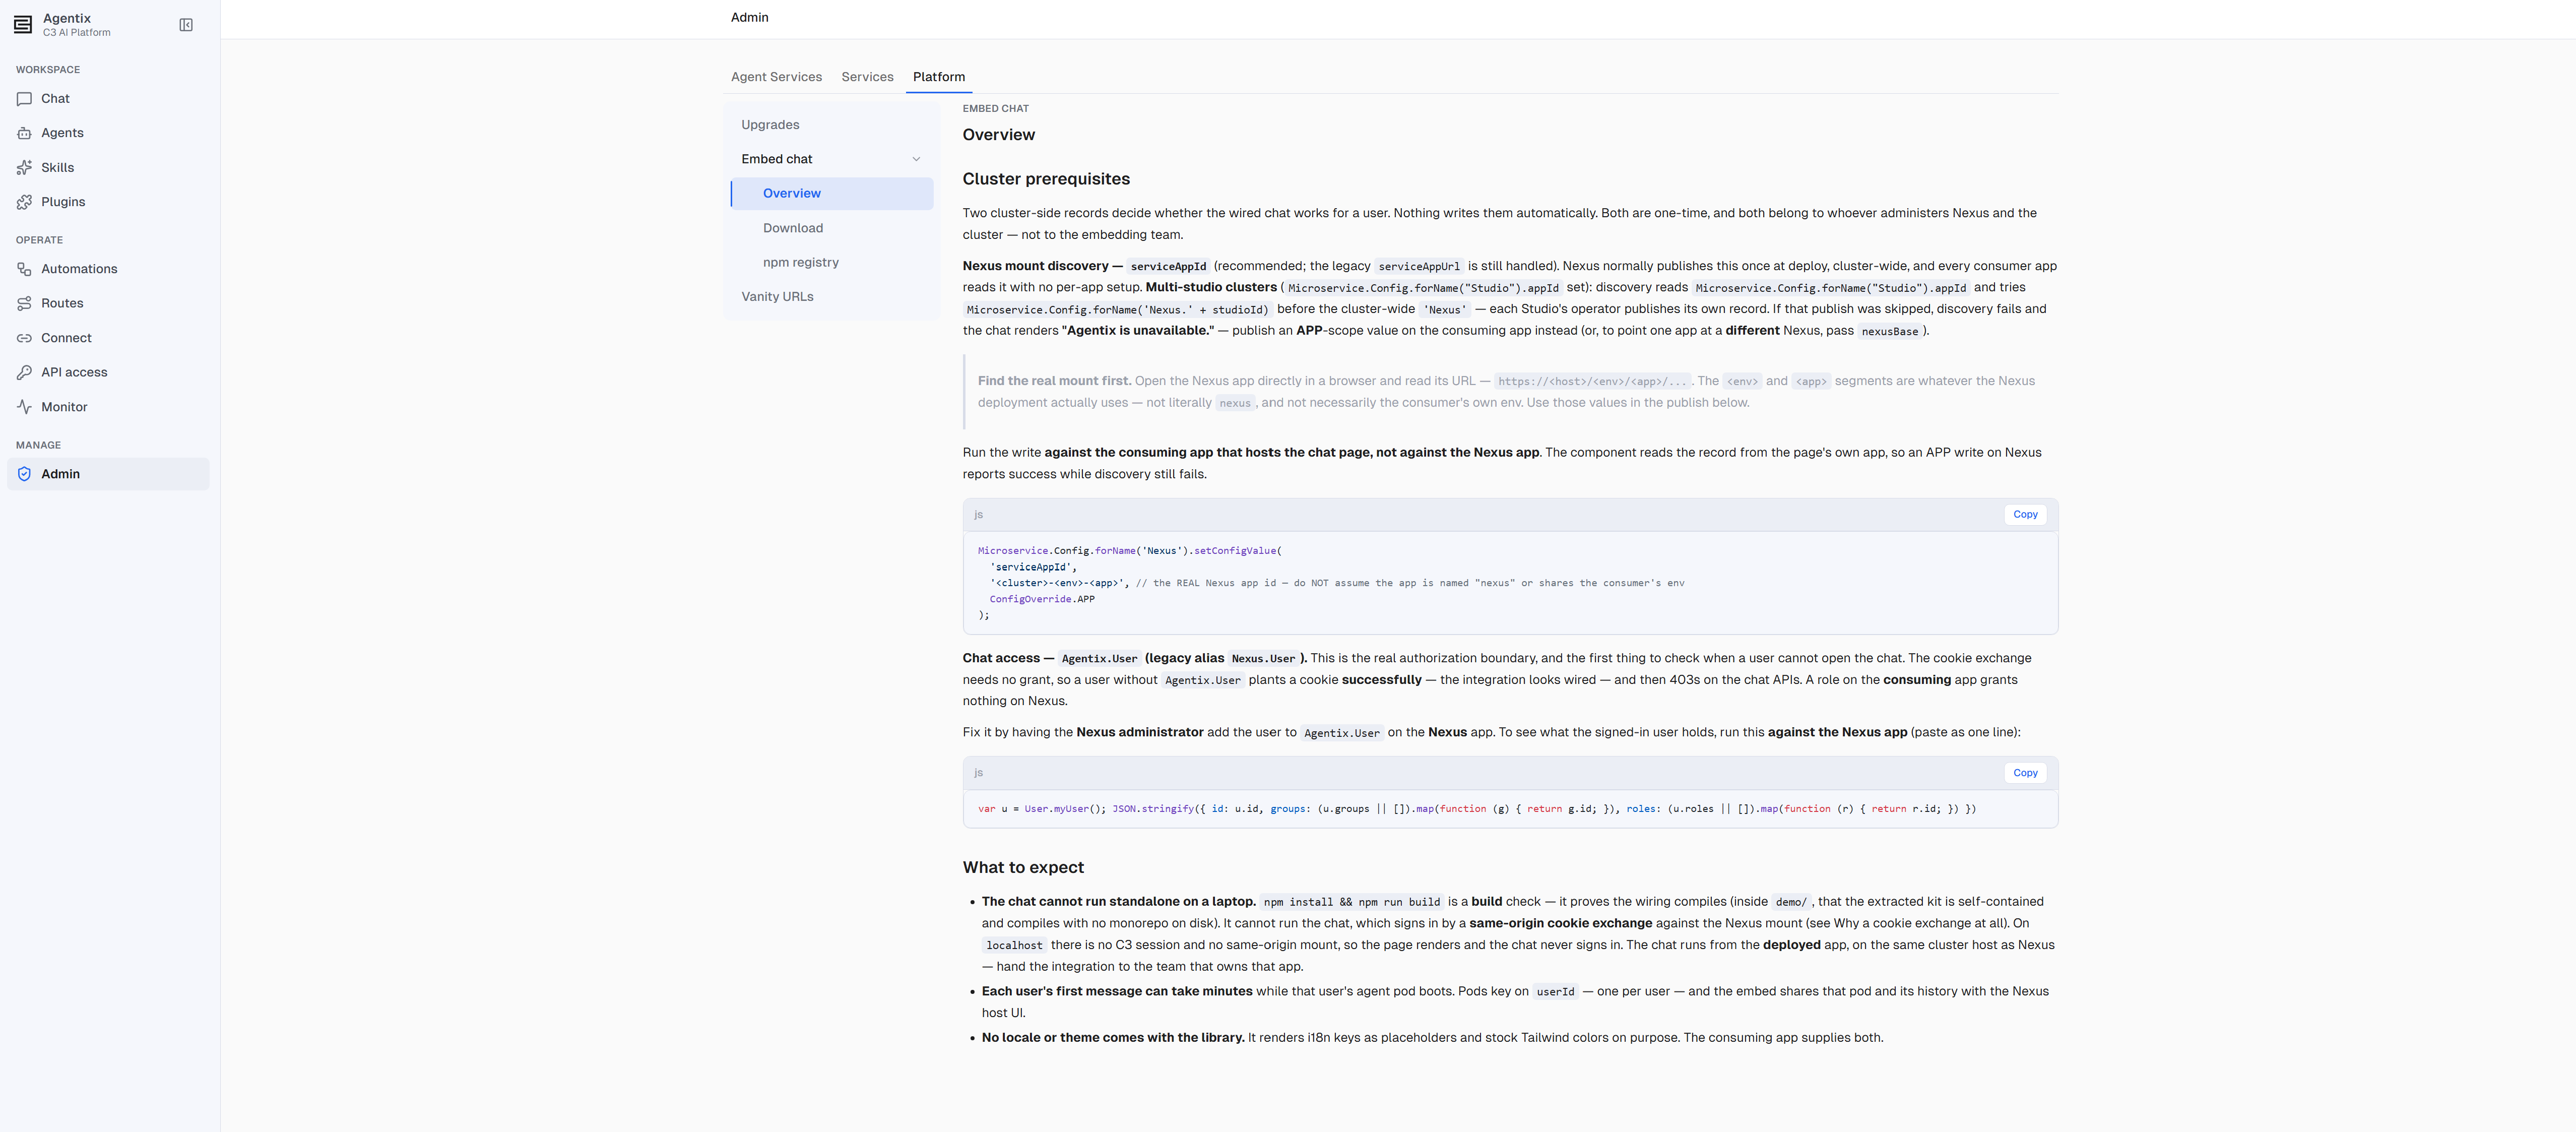
The Overview page lists the two settings that decide whether the embedded chat works for a user. Both are one-time settings. The first requires a Cluster Administrator or an administrator of the host application. The second requires an administrator who assigns roles on the C3 AI Agentix application.
Point the host application to C3 AI Agentix
The embedded chat finds C3 AI Agentix through the serviceAppId configuration value, which holds the application ID of your C3 AI Agentix application. Deploying C3 AI Agentix leaves this value unset. Until someone publishes it, every embedded chat on the cluster displays "Agentix is unavailable."
Publishing the value requires C3 Agentic AI Platform permissions beyond the Agentix.* roles. Choose the option that matches who can run it:
- For the whole cluster (recommended): a Cluster Administrator publishes the value one time, and every host application on the cluster reads it.
- For one host application: an administrator of the host application sets the value for that application only. Repeat it for each host application.
If you hold only Agentix.* roles, send the cluster command to your Cluster Administrator. Or send the host application command to the team that owns that application.
Publish the C3 AI Agentix application ID for the whole cluster
A Cluster Administrator runs these steps:
Open the C3 AI Console of the C3 AI Agentix application.
Run the following command.
App.inst().idreturns the application ID of C3 AI Agentix, in the form<cluster>-<env>-<app>, so the command always publishes the correct ID.JavaScriptMicroservice.Config.forName('Nexus').setConfigValue('serviceAppId', App.inst().id, ConfigOverride.CLUSTER);Confirm the published value. The following command returns the same ID as
App.inst().id:JavaScriptMicroservice.Config.forName('Nexus').getConfigValue('serviceAppId');
Without Cluster Administrator permissions, the command fails with the error "not authorized to set config at override level of CLUSTER."
Set the C3 AI Agentix application ID for one host application
An administrator of the host application runs these steps:
Get the application ID of C3 AI Agentix. Anyone who can open the C3 AI Console of the C3 AI Agentix application can run
App.inst().idthere and share the result. As mentioned above, running this command returns the application ID of C3 AI Agentix, in the form<cluster>-<env>-<app>. So you'll use the return value of this command in the command below.Open the C3 AI Console of the host application, the application that displays the chat.
Run the following command, with the application ID of C3 AI Agentix:
JavaScriptMicroservice.Config.forName('Nexus').setConfigValue('serviceAppId', '<cluster>-<env>-<app>', ConfigOverride.APP);
Run this command in the host application and not in C3 AI Agentix. The embedded chat reads the value from the application that displays it. An application-level value set in C3 AI Agentix reports success and has no effect on the chat.
Publish the C3 AI Agentix application ID for each C3 AI Studio
On a cluster with more than one C3 AI Studio, the embedded chat checks a record named for its own Studio first. It then checks the record for the whole cluster. A Cluster Administrator publishes a Studio record by running the following commands in the C3 AI Console of that Studio's C3 AI Agentix application:
var studioId = Microservice.Config.forName('Studio').appId;
Microservice.Config.forName('Nexus.' + studioId).setConfigValue('serviceAppId', App.inst().id, ConfigOverride.CLUSTER);Grant users access to the chat
Every user of the embedded chat needs the Agentix.User role on the C3 AI Agentix application. Roles on the host application apply only to the host application and grant no access to C3 AI Agentix.
Make sure the Agentix administrator grants every chat user Agentix.User on the C3 AI Agentix application. To assign the role, see Roles and Permissions.
Choose the agent the chat uses
The embedded chat starts every new chat with one agent, which the host application's team names by its agent ID. The C3 AI Agentix administrator fetches the agent ID chosen by the team and gives it to them. The team then adds that agent ID during their embed chat setup. The agent ID is one of the following:
- C3 Agent: the built-in, general-purpose agent. Its ID is
C3Agent. - An agent you created: open Agents from the left navigation and select the agent. The agent's ID is the part of the page URL after
#.
To create an agent for the chat first, see Create and Configure an Agent.
Choose how the team gets the chat library
The host application's team gets the chat library in one of two ways, and each way has its own page under Embed chat:
- Starter kit: one file with the library, a working example application, and instructions for a coding assistant. Choose it when the team wants a complete example to follow, or when its build machines have no access to the npm registry.
- npm registry: the library as the package
@c3/agentix-client-ui. Choose it when the host application ships on its own schedule and the team wants library updates to arrive with its other package updates.
The cluster setup on the Overview page applies to both.
Download the starter kit
The Download page packages everything the host application's team needs into a single file, agentix-chat-embed.tgz. To hand the kit to that team:
- On the Download page, select Download starter kit. The download uses your current session, so no second sign-in appears.
- Send the file to the team that owns the host application, with the agent ID from Choose the agent the chat uses.
- Under Prompt for your coding agent, select Copy and send the prompt with the file.
The prompt directs a coding assistant to follow the kit's instructions, add the chat at the /chat route, and leave the application's routing and theme unchanged.
Install from the npm registry
The npm registry page serves teams that add the chat library to the host application as the package @c3/agentix-client-ui. The top of the page shows the install command for the library version that matches your deployment, with a Copy button next to it. When your deployment has no recorded version, the command installs the @dev tag, which always points to the newest published build.
The rest of the page gives the team the details it needs to install the package:
- Registry: the address of the private npm registry that hosts the package. Each person or build machine that installs the package needs read access to the registry.
- Install: the commands that connect a project to the registry and install the package.
- Tags: the three tags that follow new releases,
latestfor released builds,nextfor release candidates, anddevfor the newest development build. - Requirements: the libraries the host application must already use, and the route that displays the chat.
Under Prompt for your coding agent, select Copy to send the team a prompt written for this install path, with the agent ID.
Add the chat to the host application
The host application's team, or a coding assistant working in the team's code, completes the following steps. The prompt from the Embed chat page directs a coding assistant through the same steps:
- Add the library: with the starter kit, run
scripts/install_embed.sh, which adds the library to the application and creates a chat page and the language setup. With the npm registry, install@c3/agentix-client-ui. - Configure the build: the library ships as TypeScript source, so the application's own build compiles it. The build must use one shared copy of React for the application and the chat, as the example application in the starter kit shows.
- Include the chat's styles: the application's Tailwind CSS version 4 entry file imports
@c3/agentix-client-ui/tailwind-sources.css. - Mount the chat: add one route for the chat, with the agent ID from Choose the agent the chat uses.
- Match dark mode: when the host application switches between light and dark mode, it sets
data-themeon the page's root element to match.
Deploy and verify the chat
The chat runs only from the host application after it deploys to the cluster. A build on a developer's own computer confirms that the code compiles. The chat stays signed out there, because that computer has no C3 AI session on the cluster's host.
After the team deploys the host application, verify the chat:
- Sign in to the host application as a user who holds
Agentix.Userand no administrator role. - Open the chat page.
- Send a message and confirm that the reply appears as it streams in. Allow a few minutes for the first message.
- With the starter kit, run
scripts/verify_embed.shagainst the application's code to confirm the library, styles, and build settings.
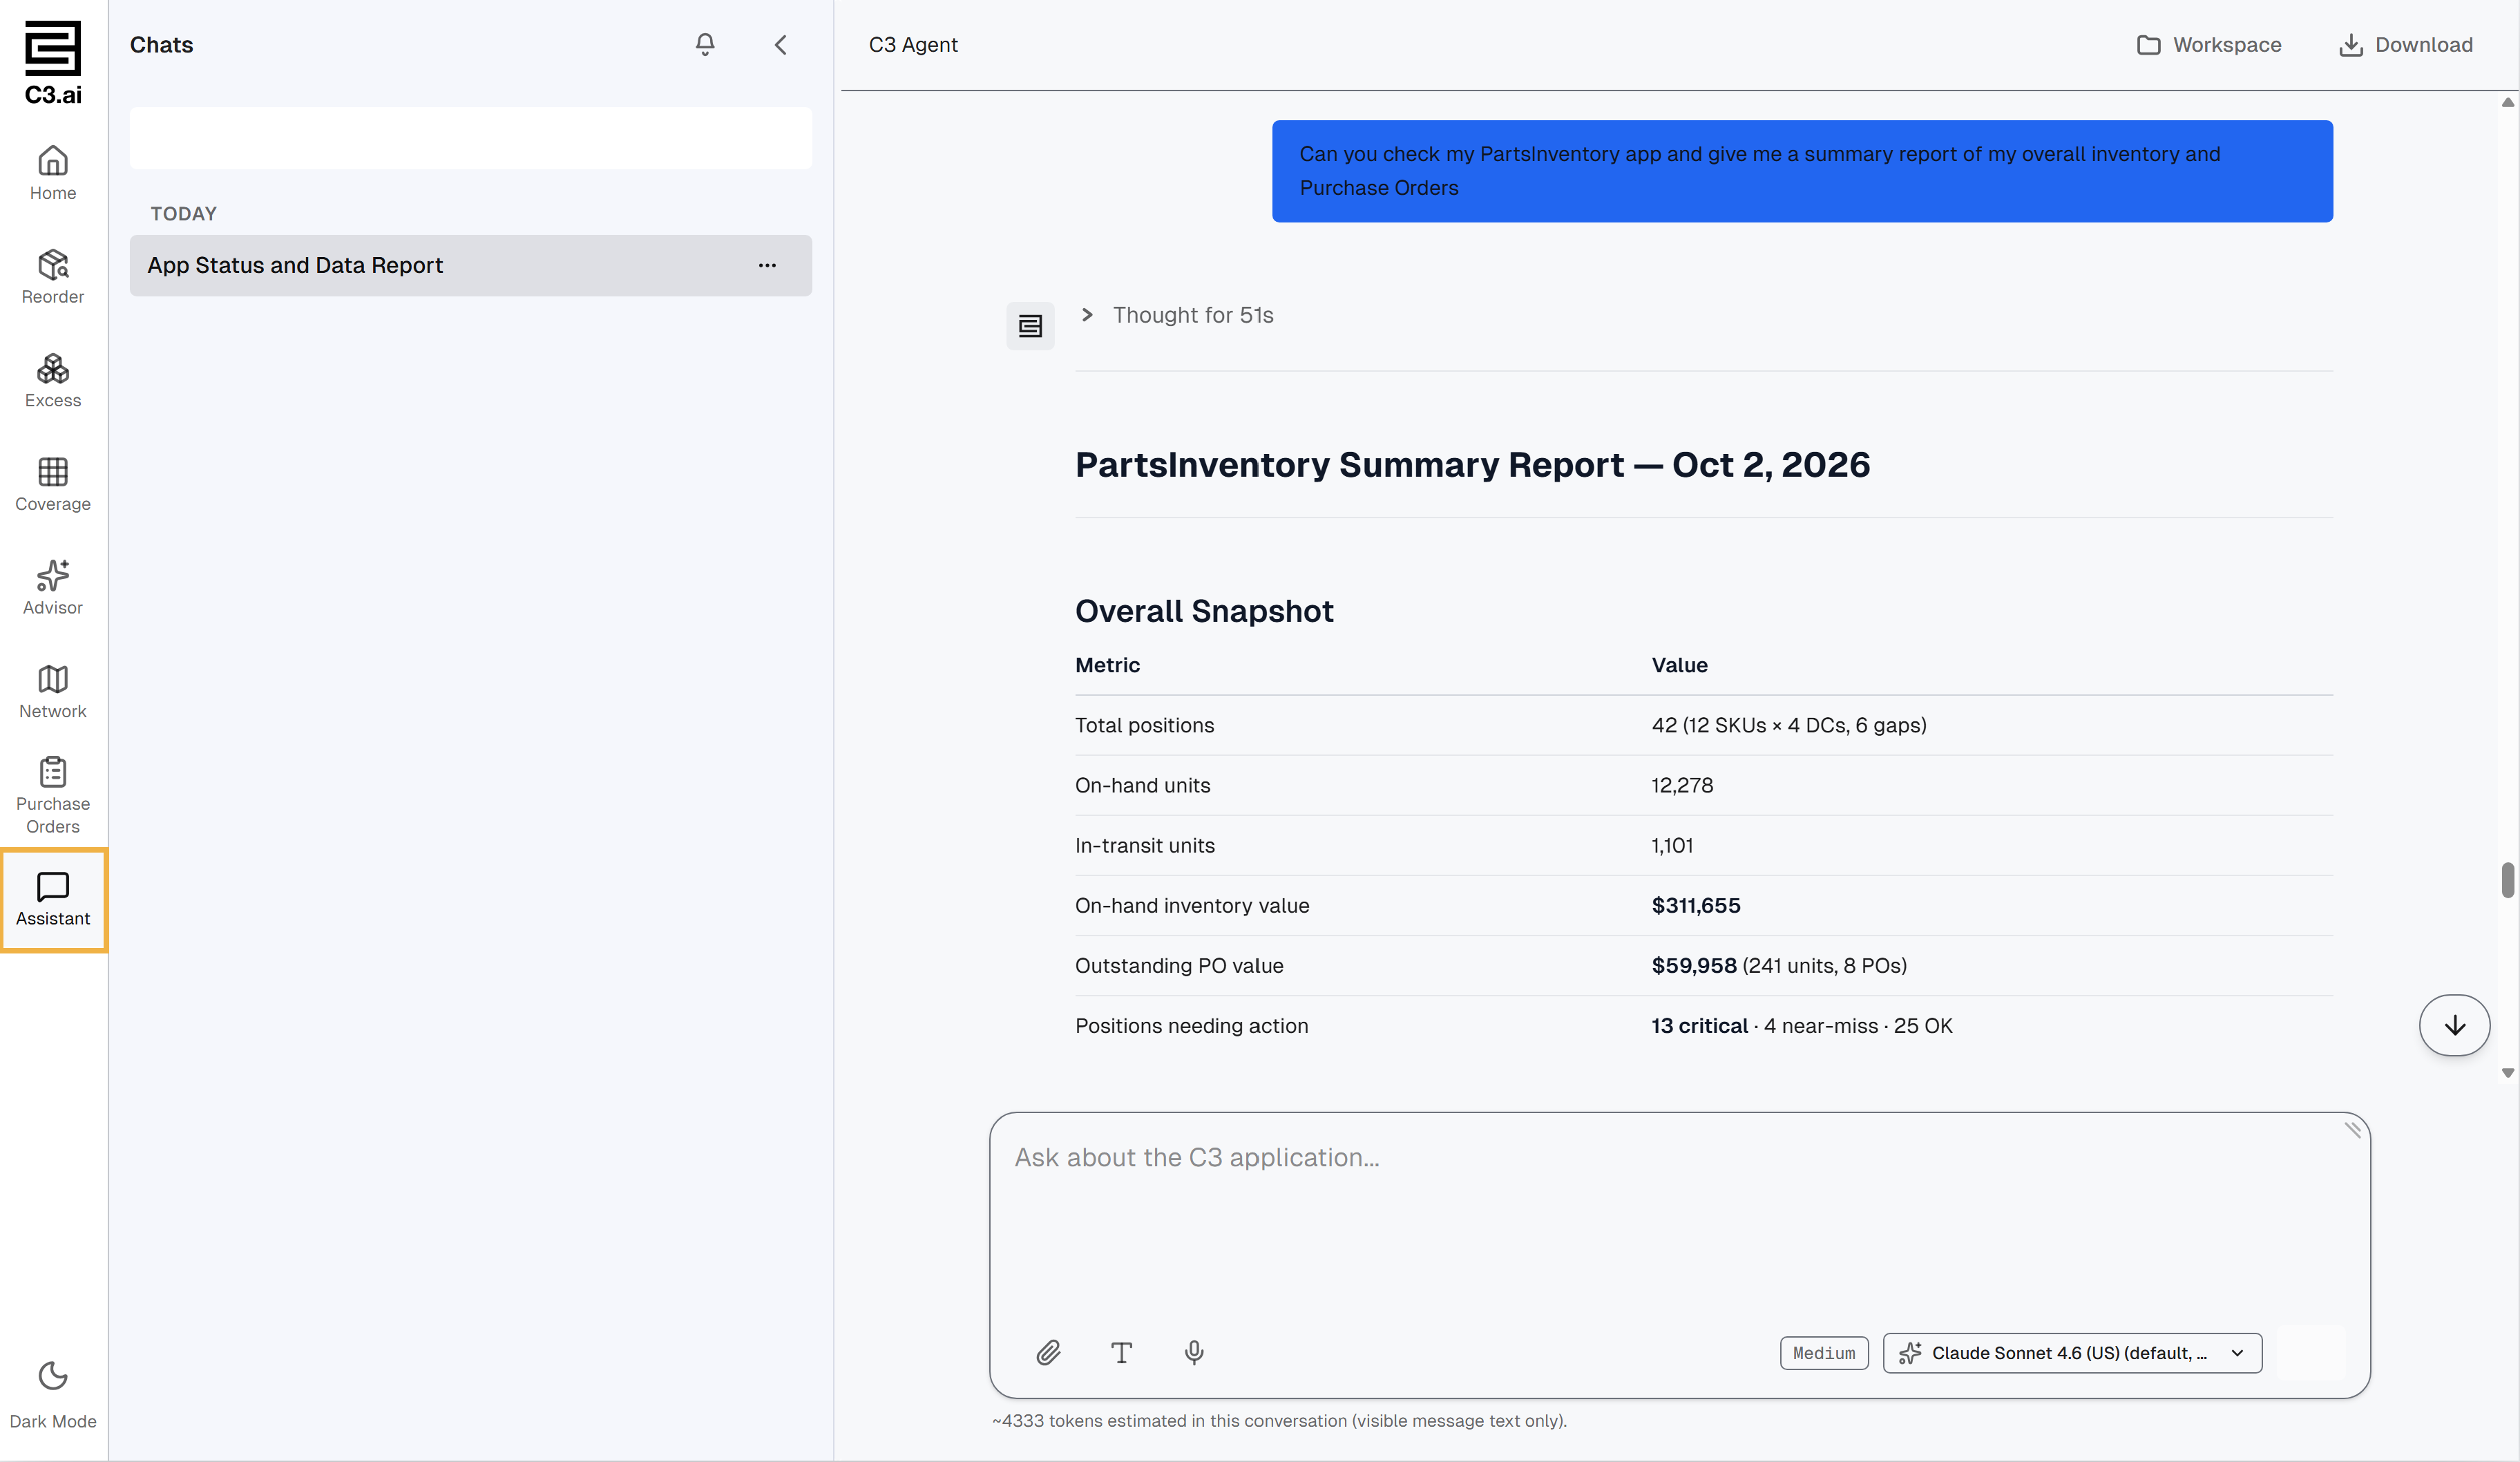
The example below shows an original C3 AI Application that tracks inventory. After the chat is successfully embedded into the host application, the user can now load the Agentix chat page in their app and start a conversation with the Agent they chose in the earlier step. In this case, its the default C3 Agent.
Route chat pages to agents
A host application can hold several chat pages, such as one for support and one for sales, and each page can use a different agent. Routing lets you choose and change that agent from C3 AI Agentix, without a change to the host application's code.
A route connects a host application and a chat page to an agent. The host application's team names each chat page with the routeKey setting, for example routeKey="support", and creates the route from the host application. The route then appears on the Routes page of C3 AI Agentix. To change the agent for a chat page:
- Open Routes from the left navigation. Each row shows the Application, the Endpoint, which is the chat page's route key, and the Agent.
- Select a different agent in the Agent column of the row.
A changed route applies to chats that start after the change. Conversations already in progress keep their agent. When no route matches a chat page, the chat uses the agent ID from the agentDefId setting.
Permissions
Embedded chat involves the following roles, from the C3 AI Agentix roles and the C3 Agentic AI Platform:
| Action | Role required |
|---|---|
| Open the Embed chat pages and download the starter kit | Agentix.AppAdmin, or a platform administrator |
| Publish the C3 AI Agentix application ID for the whole cluster | Cluster Administrator |
| Set the C3 AI Agentix application ID for one host application | An administrator of the host application |
| Change the agent for a route on the Routes page | Agentix.AgentAdmin or higher (Agentix.AppAdmin, or a platform administrator) |
| Use an embedded chat | Agentix.User on the C3 AI Agentix application |
For the full role ladder, see Roles and Permissions. For the developer side of embedding an agent, see Embed an Agent.