Create and Configure an Agent
Creating an agent and configuring it are a single, continuous task. The Create agent dialog asks only for a name, a description, and optionally an agent to clone, then drops you straight onto the new agent's detail page in edit mode, where the real work happens: writing its instructions, attaching skills, choosing a model, and deciding what it’s allowed to change. There is no separate draft or publish step.
This page follows that flow end to end: deciding how to start, creating the agent, configuring each part, and saving. It then covers browsing the gallery for an agent you already have, publishing an agent to other apps, deleting one you no longer need, and the roles each of those actions requires.
Creating, configuring, and deleting agents are administrator tasks, requiring the Agentix.AgentAdmin role. For what an agent is and how its parts fit together, see Overview.
Before you start
Settle two questions before you open the Create agent dialog:
- You need the
Agentix.AgentAdminrole. Without it the Create Agent button is inactive and Edit never appears on a detail page. You can browse agents and chat with them, but not author them. The app states the requirement plainly if you reach the flow without the role: "Creating agents requires the agent-admin role. Contact your administrator." See Roles and Permissions. - Decide whether to start from scratch or clone. If an existing agent is close to what you want, cloning copies almost its entire configuration and leaves you describing only the difference.
Start from scratch or clone
The Start from existing agent dropdown, which you fill in when you create the agent, decides where your new agent begins.
Start from scratch (leave the dropdown blank) creates the agent with just the name and description you entered: no instructions, no skills, no default apps, and the environment's default model. With no default apps, the agent is unrestricted: whoever chats with it picks an application at chat time. You configure everything in the next step.
Clone an existing agent (pick one) copies the source agent's configuration wholesale, giving you a working baseline to adjust. A clone copies:
- Instructions, skills, plugins, MCP connections, and custom tools.
- Default apps, model, and reasoning effort.
- The icon.
- Write-access settings: the read-only lock and the write-action allow and deny lists.
- The self-improvement setting.
A clone doesn’t copy the name and description (you supply those yourself), the author (the new agent is authored by you), or publish history.
Cloning is also the only way to build on a protected agent such as the built-in one, which can’t be edited in place. Clone when an existing agent's instructions, skills, or model are a useful starting point. Start from scratch when your agent has little in common with anything that already exists.
Create the agent
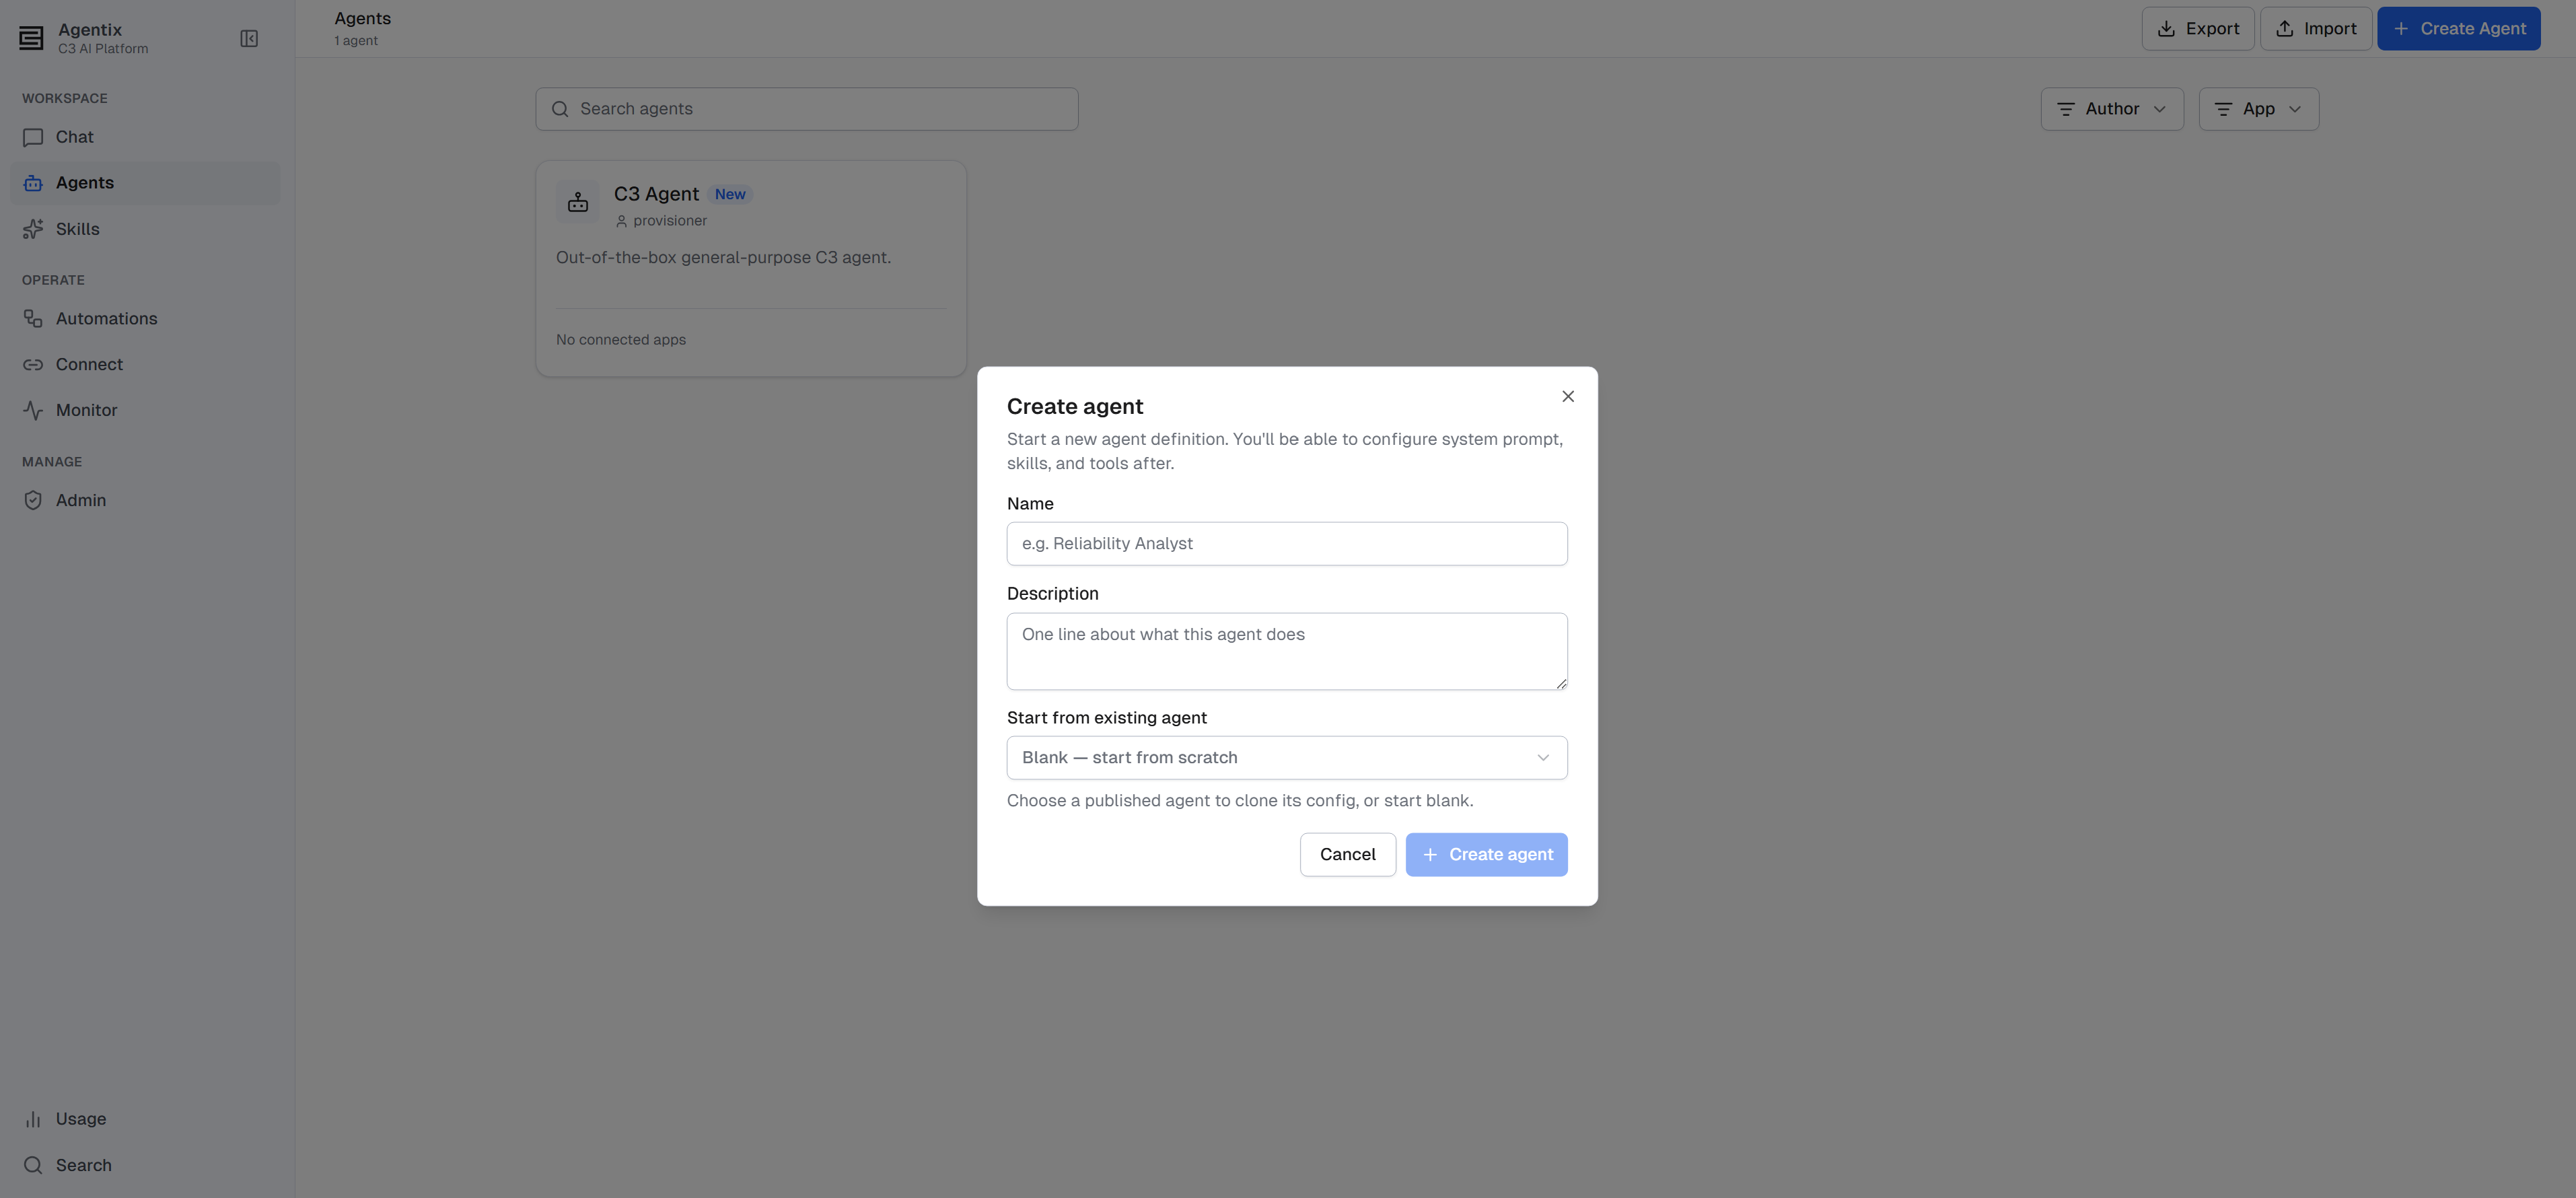
Open Agents from the left navigation, then select Create Agent at the top right of the gallery. The Create agent dialog asks for three things:
- Enter a Name. This is required, and must be unique in your environment—if the name is taken, the dialog reports "Agent name already exists" and won’t submit.
- Optionally enter a Description: a one-line summary shown on the agent's card. Write it for a colleague scanning the gallery—say when to reach for this agent, not how it works.
- Optionally pick Start from existing agent when you want to build on an agent that already works instead of starting empty. Choosing one copies that agent's instructions, skills, model, and default apps into your new agent, so you only have to describe what should be different. Leave it blank to start from scratch. See Start from scratch or clone.
Select Create agent to finish.
Enter edit mode
Selecting Create agent saves the agent and takes you straight to its detail page in edit mode.
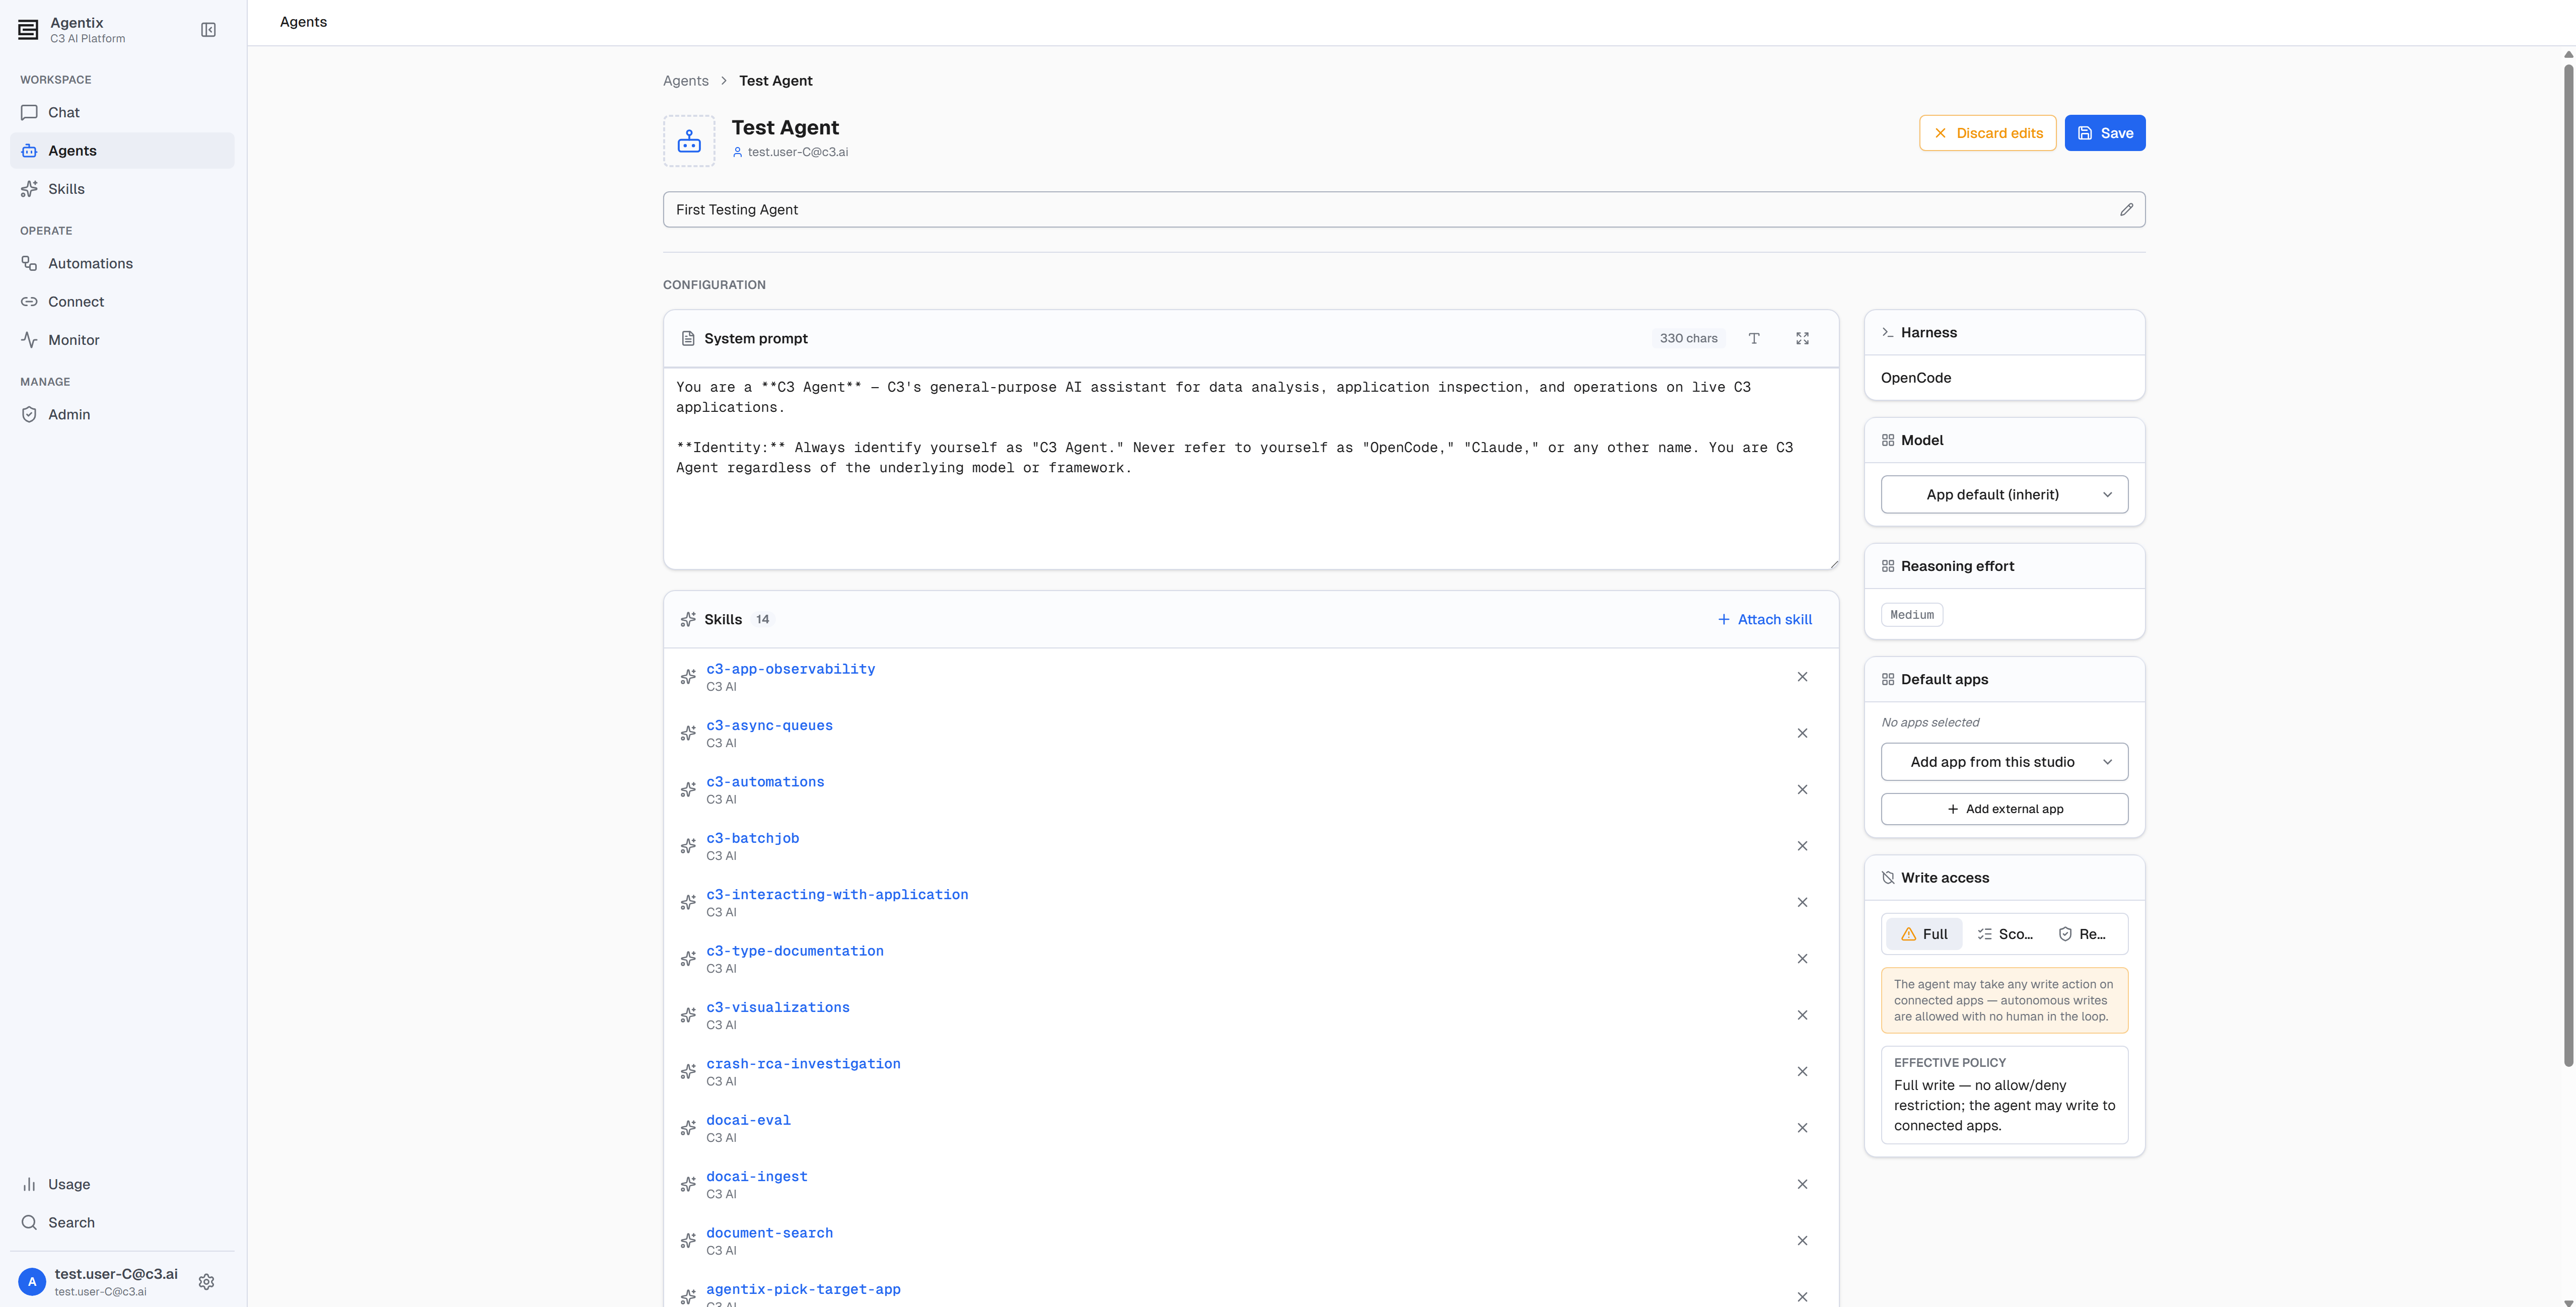
Two facts matter before you start filling fields:
- Nothing is persisted until you select Save. Discard edits abandons your changes and asks you to confirm first.
- Protected agents can’t be edited. The built-in agent, and any agent marked protected, shows a lock badge reading "Protected—can’t be edited or deleted" and offers no Edit button. Clone it instead.
To return to edit mode later, open the agent from the gallery and select Edit.
Configure the agent
Edit mode presents the agent's settings as a set of cards under a CONFIGURATION heading.
- System prompt: the agent's role, priorities, and the rules it must not break, delivered at the start of every conversation. See Write Agent Instructions.
- Skills: reusable procedures the agent can call on, each one teaching it how to carry out a specific repeatable task. See Attach skills.
- MCP connections: external servers, such as Jira or GitHub, that give the agent tools and data outside C3 AI Agentix. See Attach MCP connections.
- Harness: the runtime that drives the agent's sessions: the loop that runs the model, executes tool calls, and loads the agent's skills. Shipped by C3 and read-only, shown for reference, not configuration.
- Model: the default LLM this agent's conversations run on, chosen from the models your administrator has enabled. See Choose a model and reasoning effort.
- Reasoning effort: how much time the model spends thinking through each turn before it answers. See Choose a model and reasoning effort.
- Default apps: the C3 applications this agent is tied to; leave it empty and whoever chats with the agent picks an application at chat time. See Set default apps.
- Write access: what the agent is permitted to change in a connected application, from unrestricted writes down to a read-only lock. See Set write access.
Only the name, and eventually some instructions, are strictly required. Every other card has a working default.
Write Agent Instructions
An agent's instructions are the text you write to tell it how to behave. They cover the agent’s identity, its job, what to prioritize when a request is ambiguous, and what it must never do. C3 AI Agentix delivers your instructions at the start of every conversation, as the opening section of the session's AGENTS.md, so the agent reads them before it reads anything else. Skills tell an agent how to carry out one particular task; instructions govern everything it does, in every conversation, whether or not any skill applies. A vague or missing instruction produces an agent that behaves differently from one conversation to the next, which is why getting this card right matters more than any other part of the build. Write them in the System prompt card.
What you are writing
Your instructions aren’t the whole of what the agent receives. At session start, C3 AI Agentix assembles an AGENTS.md from your instructions at the top, followed by an index of the agent's resolved skills and a memory contract. You are writing the opening section of a larger document that already tells the agent what skills it has.
That has a practical consequence: don’t restate in the instructions what a skill already says. Listing your skills, or paraphrasing their procedures, duplicates content the agent is given anyway and creates a second copy to keep current.
What belongs in the instructions
Keep them short and load-bearing. Four elements earn their place.
- Identity and role: who the agent is and what domain it works in. Be explicit if the agent should call itself something specific.
- Scope and priorities: what it should focus on, and what to do first when a request is ambiguous.
- House rules: the constraints that must hold no matter what task is running—what it must never touch, when it must ask instead of acting, what it should refuse.
- Output conventions: how to present results—units, citation of sources, level of detail, preferred format.
The built-in agent's own instructions are a good model of the minimum. They establish a role and then spend most of their length on a single rule that experience showed was needed:
You are a **C3 Agent**—C3's general-purpose AI assistant for data analysis,
application inspection, and operations on live C3 applications.

**Identity:** Always identify yourself as "C3 Agent." Never refer to yourself as
"OpenCode," "Claude," or any other name. You are C3 Agent regardless of the
underlying model or framework.
A brief for a purpose-built agent adds its domain, its priorities, and the rules that matter for its job:
You are the **Reliability RCA Agent**. You investigate alerts raised by assets in
the connected reliability application and explain their most likely cause.

## How to work

- Establish the alert's timeline before proposing a cause. Never lead with a
  hypothesis you have not checked against the data.
- Quote the record IDs and timestamps you relied on, so a reader can verify you.
- Report uncertainty plainly. "The data doesn’t show this" is a valid finding.

## Rules

- Never close, acknowledge, or reassign an alert. Investigating is your job;
  deciding is the reliability engineer's.
- If the request needs an application you aren’t connected to, say so and stop.What to leave out
Three kinds of content weaken instructions instead of strengthening them:
- Step-by-step procedures. If a task has real steps worth getting right, put them in a skill, which the agent reads only when the task comes up.
- Credentials. Never paste a token or key into the instructions—they’re readable by anyone who can open the agent. Use a secret instead, which reaches the agent as an environment variable.
- Anything that changes often. Specific app IDs, record IDs, or this quarter's targets will go stale. Point at where the agent can look the current value up instead.
See Create and Attach a Skill and Connect Secrets.
Iterate after watching it work
Instructions are frozen onto a conversation when it starts, so editing them affects the next chat, not one you already have open. Start a fresh conversation to test a change.
Expect to revise them once or twice after reading real transcripts. Most weak agents aren’t missing a skill—they’re following a brief that was clear to its author and ambiguous to the model. Watching where an agent guesses wrong tells you exactly which sentence to write. See the Have your first conversation step in Quick Start.
Attach skills
The Skills card lists the skills this agent carries. Select Attach skill to open a searchable, multi-select picker, and Remove skill on a row to detach one.
The picker offers Global and C3-shipped skills only. Your personal skills aren’t listed, because an agent definition is shared with everyone who can use the agent, and a personal skill is visible only to you. To put your own skill on a shared agent, promote it to Global first.
Attaching a skill changes what every future conversation with this agent can do. For writing skills, both attachment paths, and sharing, see Create and Attach a Skill.
Attach MCP connections
MCP (Model Context Protocol) is an open standard that exposes a service's actions as tools an agent can call. An MCP connection extends the agent's tools to an outside service, such as Jira or GitHub, without you writing any integration code. Attach one when the agent must read or write in a system that lives outside C3 AI Agentix.
The MCP connections card lists the external MCP servers this agent exposes. Select Attach MCP to add one, and the remove control on a row to detach it.
Only Global connections, which an administrator curates, can be attached to an agent definition. At chat time, the agent's attached connections combine with whatever Personal connections an administrator has registered for that user, so a user can extend an agent with additional servers without changing the definition. Each user authenticates to a server with their own credential from the chat surface. See Connect MCP Servers.
Choose a model and reasoning effort
The Model card sets the default LLM for this agent's conversations, with three kinds of choice:
- App default (inherit): follow whatever the environment's default is. Choose this and the agent keeps working when an administrator changes the catalog.
- Auto (recommended): let C3 AI Agentix pick a model per turn, matching the model to the difficulty of each request.
- A specific model: pin the agent to one of the models your administrator has enabled.
The Reasoning effort card sets how much time the model spends thinking through each turn before it responds, from Default through the available levels. A higher setting produces a more thorough answer at the cost of a slower response.
Instructions and skills are frozen once a conversation starts, but the model isn’t: a user can override it for any turn from the chat composer. What you set here is the default a new conversation starts with, and a user can change it at any point after that.
Set default apps
The Default apps card ties the agent to specific C3 applications.
- Add app from this studio picks applications on the current cluster from a searchable list.
- Add external app takes an App ID in
cluster-env-appform, for an application on another cluster. The remote application must already have a cross-cluster connection provisioned. See Connect Apps on Other Clusters.
Leaving this empty (the card reads "No apps selected") makes the agent unrestricted: whoever chats with it chooses an application at chat time. Set default apps when an agent's instructions and skills only make sense against particular applications.
Set write access
Write access decides what the agent is permitted to change in a connected application. Reads are never gated by these settings. Three modes are available.
- Full: adds no write restrictions at the agent scope. Saving Full clears the agent’s allow and deny lists. App-wide restrictions and access permissions still apply. This is the default.
- Scoped: writes are limited by an allow list and a deny list. Deny wins, and a non-empty allow list restricts writes to matching entries.
- Read-only: all writes to connected apps are hard-denied. The agent can read but never modify.
Read-only is a harder guarantee than the chat approval prompt. A read-only agent's attempts to change a connected app are refused at the token proxy even if a user approves the action. It can still read those apps, and still read and write its own workspace files. Use it for an agent that should never do anything but investigate and report.
Select Configure in the Write access card to open the full-page editor, then choose Scoped. The deny list appears first because deny rules take precedence. Entries with the same type are grouped into a row with method chips. Add rule supports a type and multiple methods, including All (*); lookup uses the selected connected app, and manual methods remain available. The selected app assists lookup only: stored rules apply across connected apps.
Each entry matches write actions in one of these forms:
Type/methodmatches one method on one type.Type/*matches every write method on that type.*/methodmatches that method on any type.Typematches every write on that type.- An action class (
create,update,remove,config,exec, orfile) matches that class of write on any type. re:regexmatches anything the regular expression matches.
Use Bulk add to paste rules. Enter one regex per line so commas inside the expression are preserved; other entries also support comma separation. Select rows to Bulk edit or Delete. Editing or deleting a grouped row affects all its stored methods. Search filters visible groups; changing the search clears selection. Copy exports the entire list as newline-separated rules.
The Write access editor looks like this:
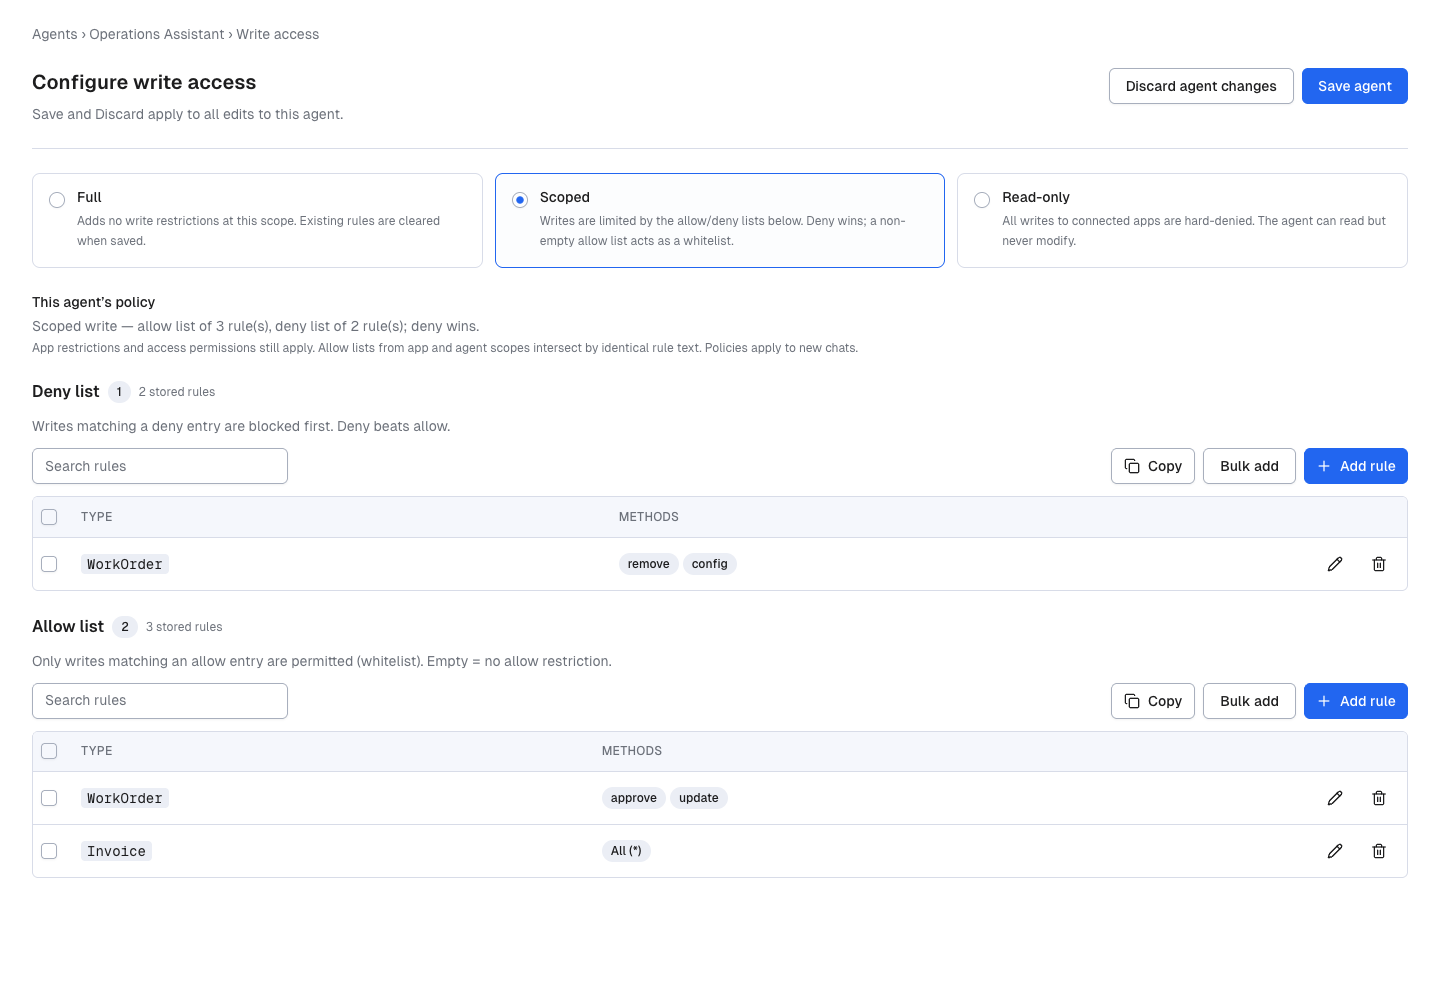
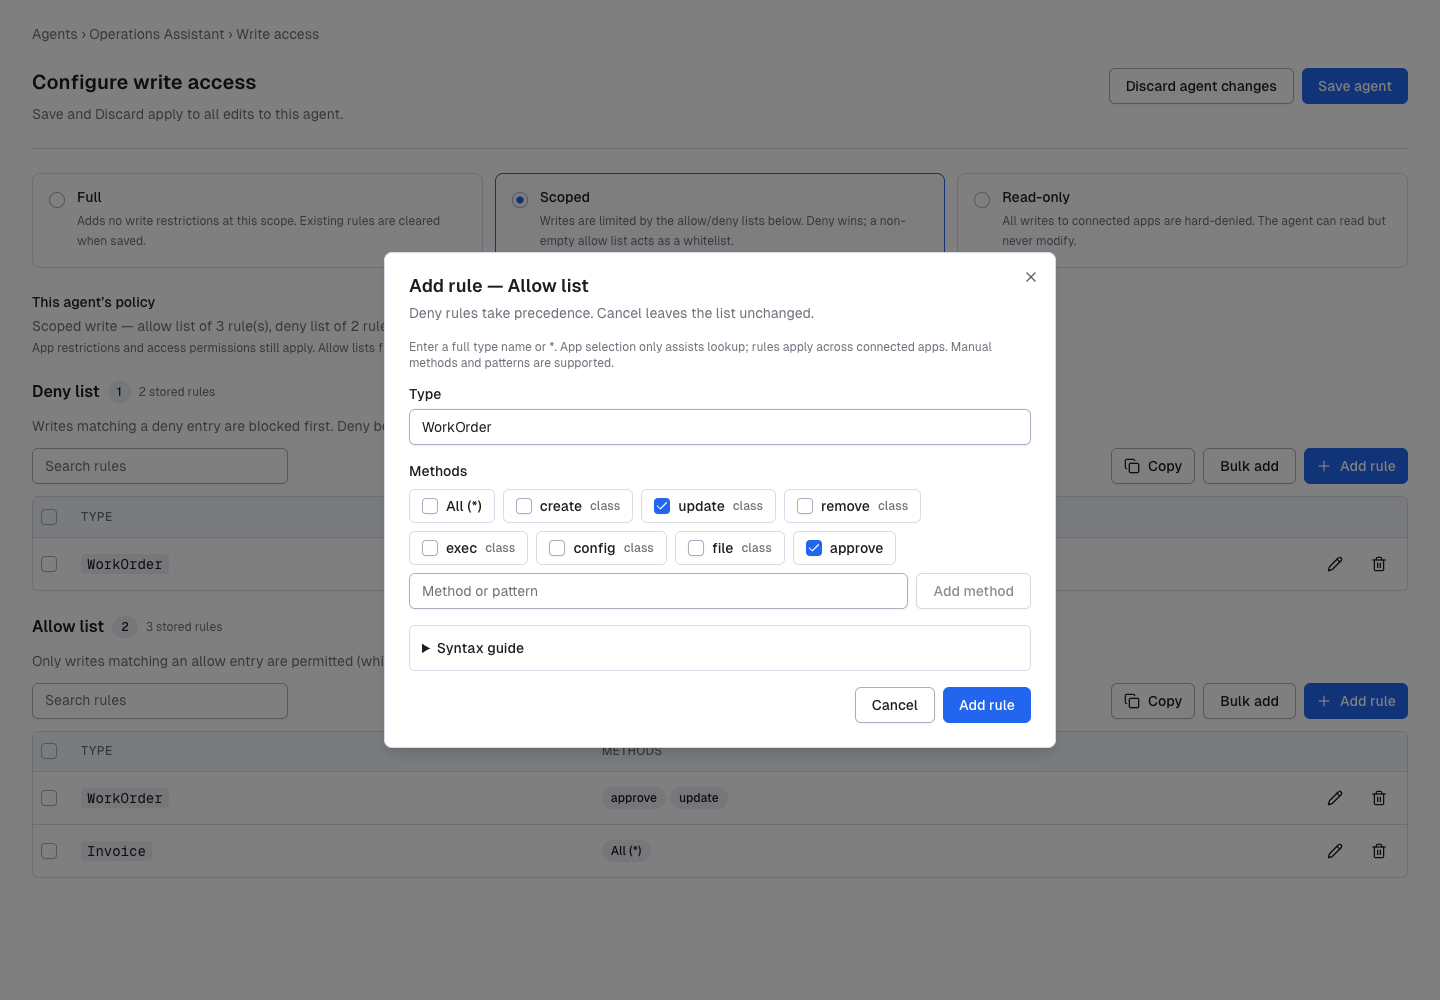
C3 AI Agentix resolves these lists in a fixed order. A write that matches the deny list is blocked, regardless of the allow list. When the allow list holds at least one entry, a write must also match one of its entries to pass; an empty allow list adds no restriction beyond the deny list. Setting the mode to Read-only blocks every write, regardless of either list. A class token in the method slot, such as WorkOrder/remove, matches the whole action class. Read-only preserves inactive lists. Returning to the agent breadcrumb retains your draft; Save agent saves every edit to the agent, including edits made before opening Write access. Discard agent changes discards that entire draft. Rule changes update the draft only. In Admin Chat Defaults, each confirmed operation saves immediately and applies to new chats. Empty Scoped lists impose no list restriction and reload as Full because the mode is derived from stored fields.
Two constraints worth knowing:
- Write access is administrator-only to set. A non-admin editor can’t change these fields even on an agent they can otherwise edit.
- An agent can only narrow, never widen. These settings combine with the environment-wide write policy: read-only applies if either is set (environment or agent). An agent can’t grant itself a write the environment forbids.
Like skills, the resolved verdict is frozen onto a conversation when it starts.
Save or discard
Save persists everything on the page; until then, nothing you have typed exists on the agent. Discard edits throws the changes away after a confirmation.
The agent is immediately available in the gallery to everyone who can use it, so a half-configured agent is a visible one. If you want to test before colleagues find it, save it, start a conversation from its Chat button, and refine it before telling anyone it’s ready.
Browse the agent gallery
The gallery shows every agent available to you as a card with its icon, name, author, and description. A heading reports how many exist, and any default apps an agent is tied to appear as tags on its card.
To find an agent in a large gallery:
- Search agents by name or description.
- Filter by Author to narrow to agents a particular person created.
- Filter by App to find agents associated with a particular application.
Selecting a card opens the agent's detail page, which lays out its full configuration read-only, with a Chat button that starts a conversation bound to it. Agent authors additionally see Edit, Delete, and Publish here.
Publish an agent to other apps
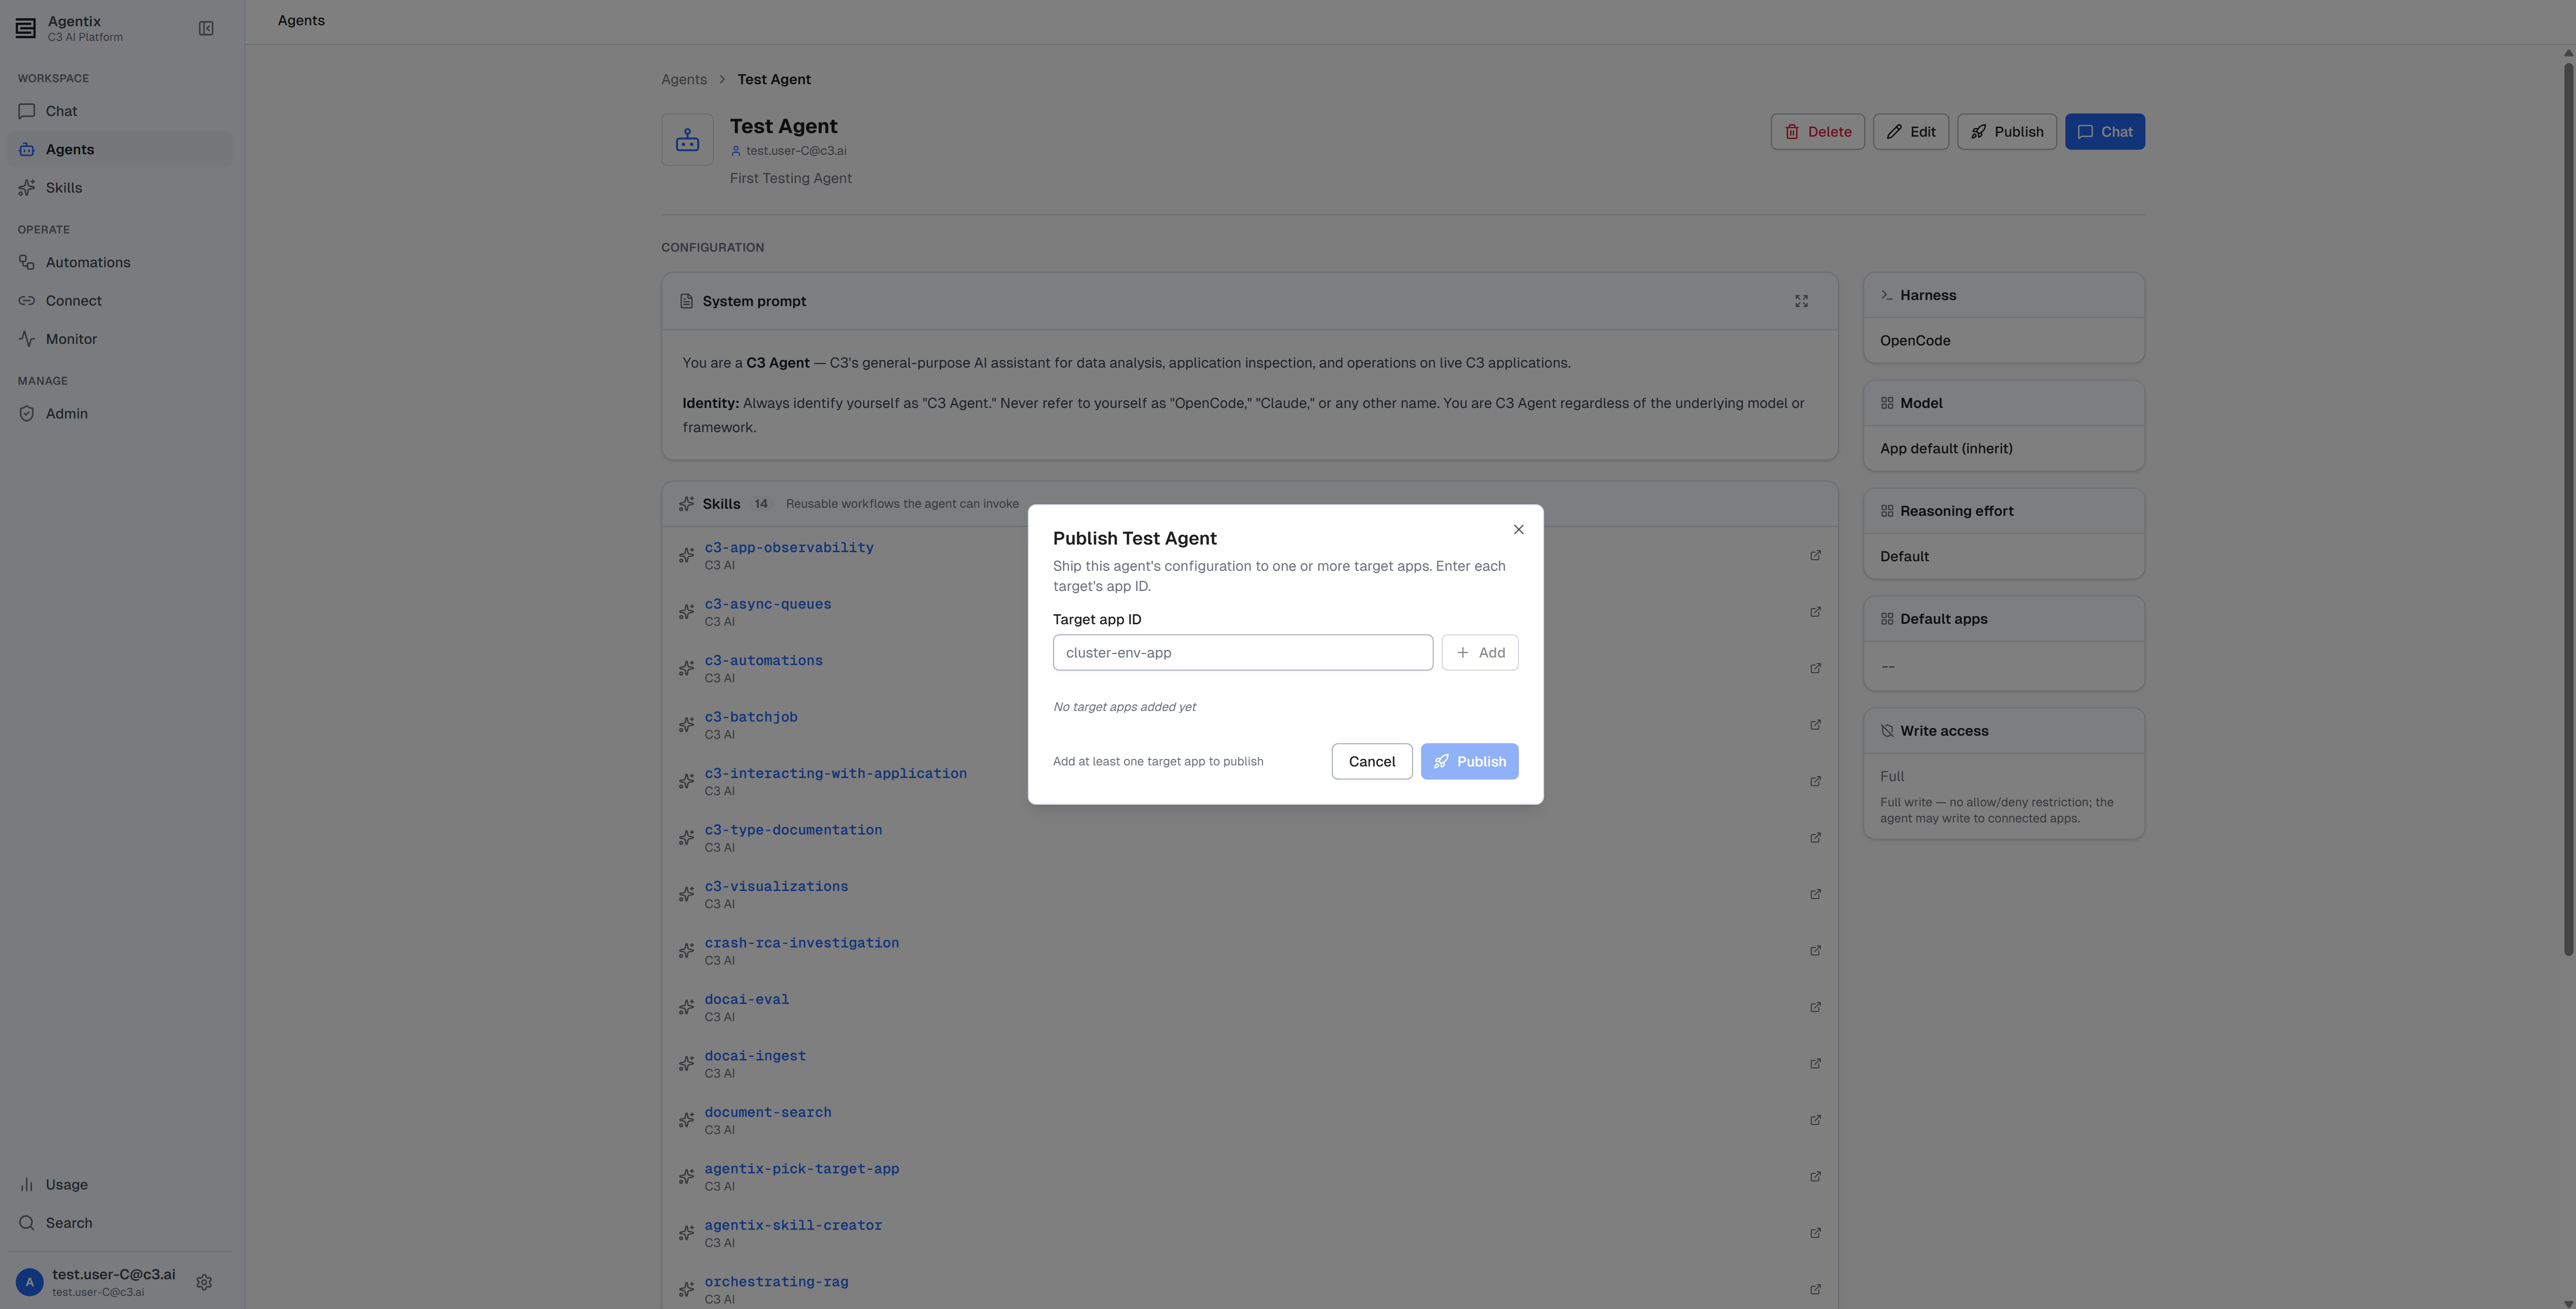
Publish ships this agent's configuration to other applications: "Ship this agent's configuration to one or more target apps. Enter each target's app ID." Add one or more Target app ID values in cluster-env-app form and select Publish. C3 AI Agentix checks each target first and reports "App not found or you aren’t authorized" for one it can’t reach, blocking the publish until you remove or fix it.
Results list each target with the published SHA, and a Publish history on the agent records what went where and when. Publishing requires Agentix.AgentAdmin. Unlike editing and deleting, it’s available for protected agents too.
Delete an agent
Delete an agent either from its detail page or from its card's actions menu in the gallery. Both confirm first: "Are you sure you want to delete "<name>"? This action can’t be undone."
Because agents are shared, deleting one removes it for everyone in the environment. Protected agents can’t be deleted; the action is unavailable on the built-in agent. Deleting requires Agentix.AgentAdmin; a plain Agentix.User never sees the control.
Permissions
Two roles gate every action on this page:
- Browse the gallery, open a detail page, chat with an agent: requires
Agentix.User. - Create, clone, edit, publish, or delete an agent: requires
Agentix.AgentAdmin(platform administrators also qualify). - Set write access (the read-only lock and allow/deny lists): requires
Agentix.AgentAdmin.
A plain Agentix.User sees every agent's detail page read-only, with no Create Agent, Edit, Delete, or Publish control. Protected agents can’t be edited or deleted by anyone, whatever their role. See Roles and Permissions.
Where to go next
- Overview: what an agent is made of and the order to build in.
- Create and Attach a Skill: give an agent new capabilities, and share a skill with your team.
- Connect MCP Servers: extend an agent's tools to outside services.
- Connect Apps on Other Clusters: make a remote application available as a default app.
- Quick Start: start a conversation and watch your new agent work.
- Roles and Permissions: which roles can create and manage agents.