Create and Attach a Skill
A skill teaches an agent one repeatable task. It gives the agent the domain knowledge and the step-by-step procedure. Together they tell it when the task applies and how to combine its tools to finish it. Write a skill when the built-in skills don't cover a task your team repeats.
A skill is just a folder of files — a SKILL.md and any helpers — that you package and upload through the C3 AI Agentix UI. After you upload it, it appears in the Skills catalogue, ready to attach. This page walks the whole path: write the skill, package it, upload it, and attach it to an agent. It then covers sharing the skill with your team, and the validation errors you might hit and how to fix them. There are two ways to author a skill: write the files yourself, or ask the agent to write one in chat. There are also two ways to attach one: from the agent's detail page, or inline from the catalogue.
Create a skill from chat
You don't have to write the files by hand. The built-in C3 Agent ships with a skill, agentix-skill-creator, that authors skills for you. In a chat, ask the agent to "create a skill that …". It drafts the SKILL.md and any helper scripts, shows them to you for review, and saves the skill on your behalf after you approve.
Skills created this way are always Personal (private to you). Promoting one to Global is an administrator action done in the Skills UI, not from chat. As with an uploaded skill, the new skill is available the next time you start a chat, not mid-conversation.
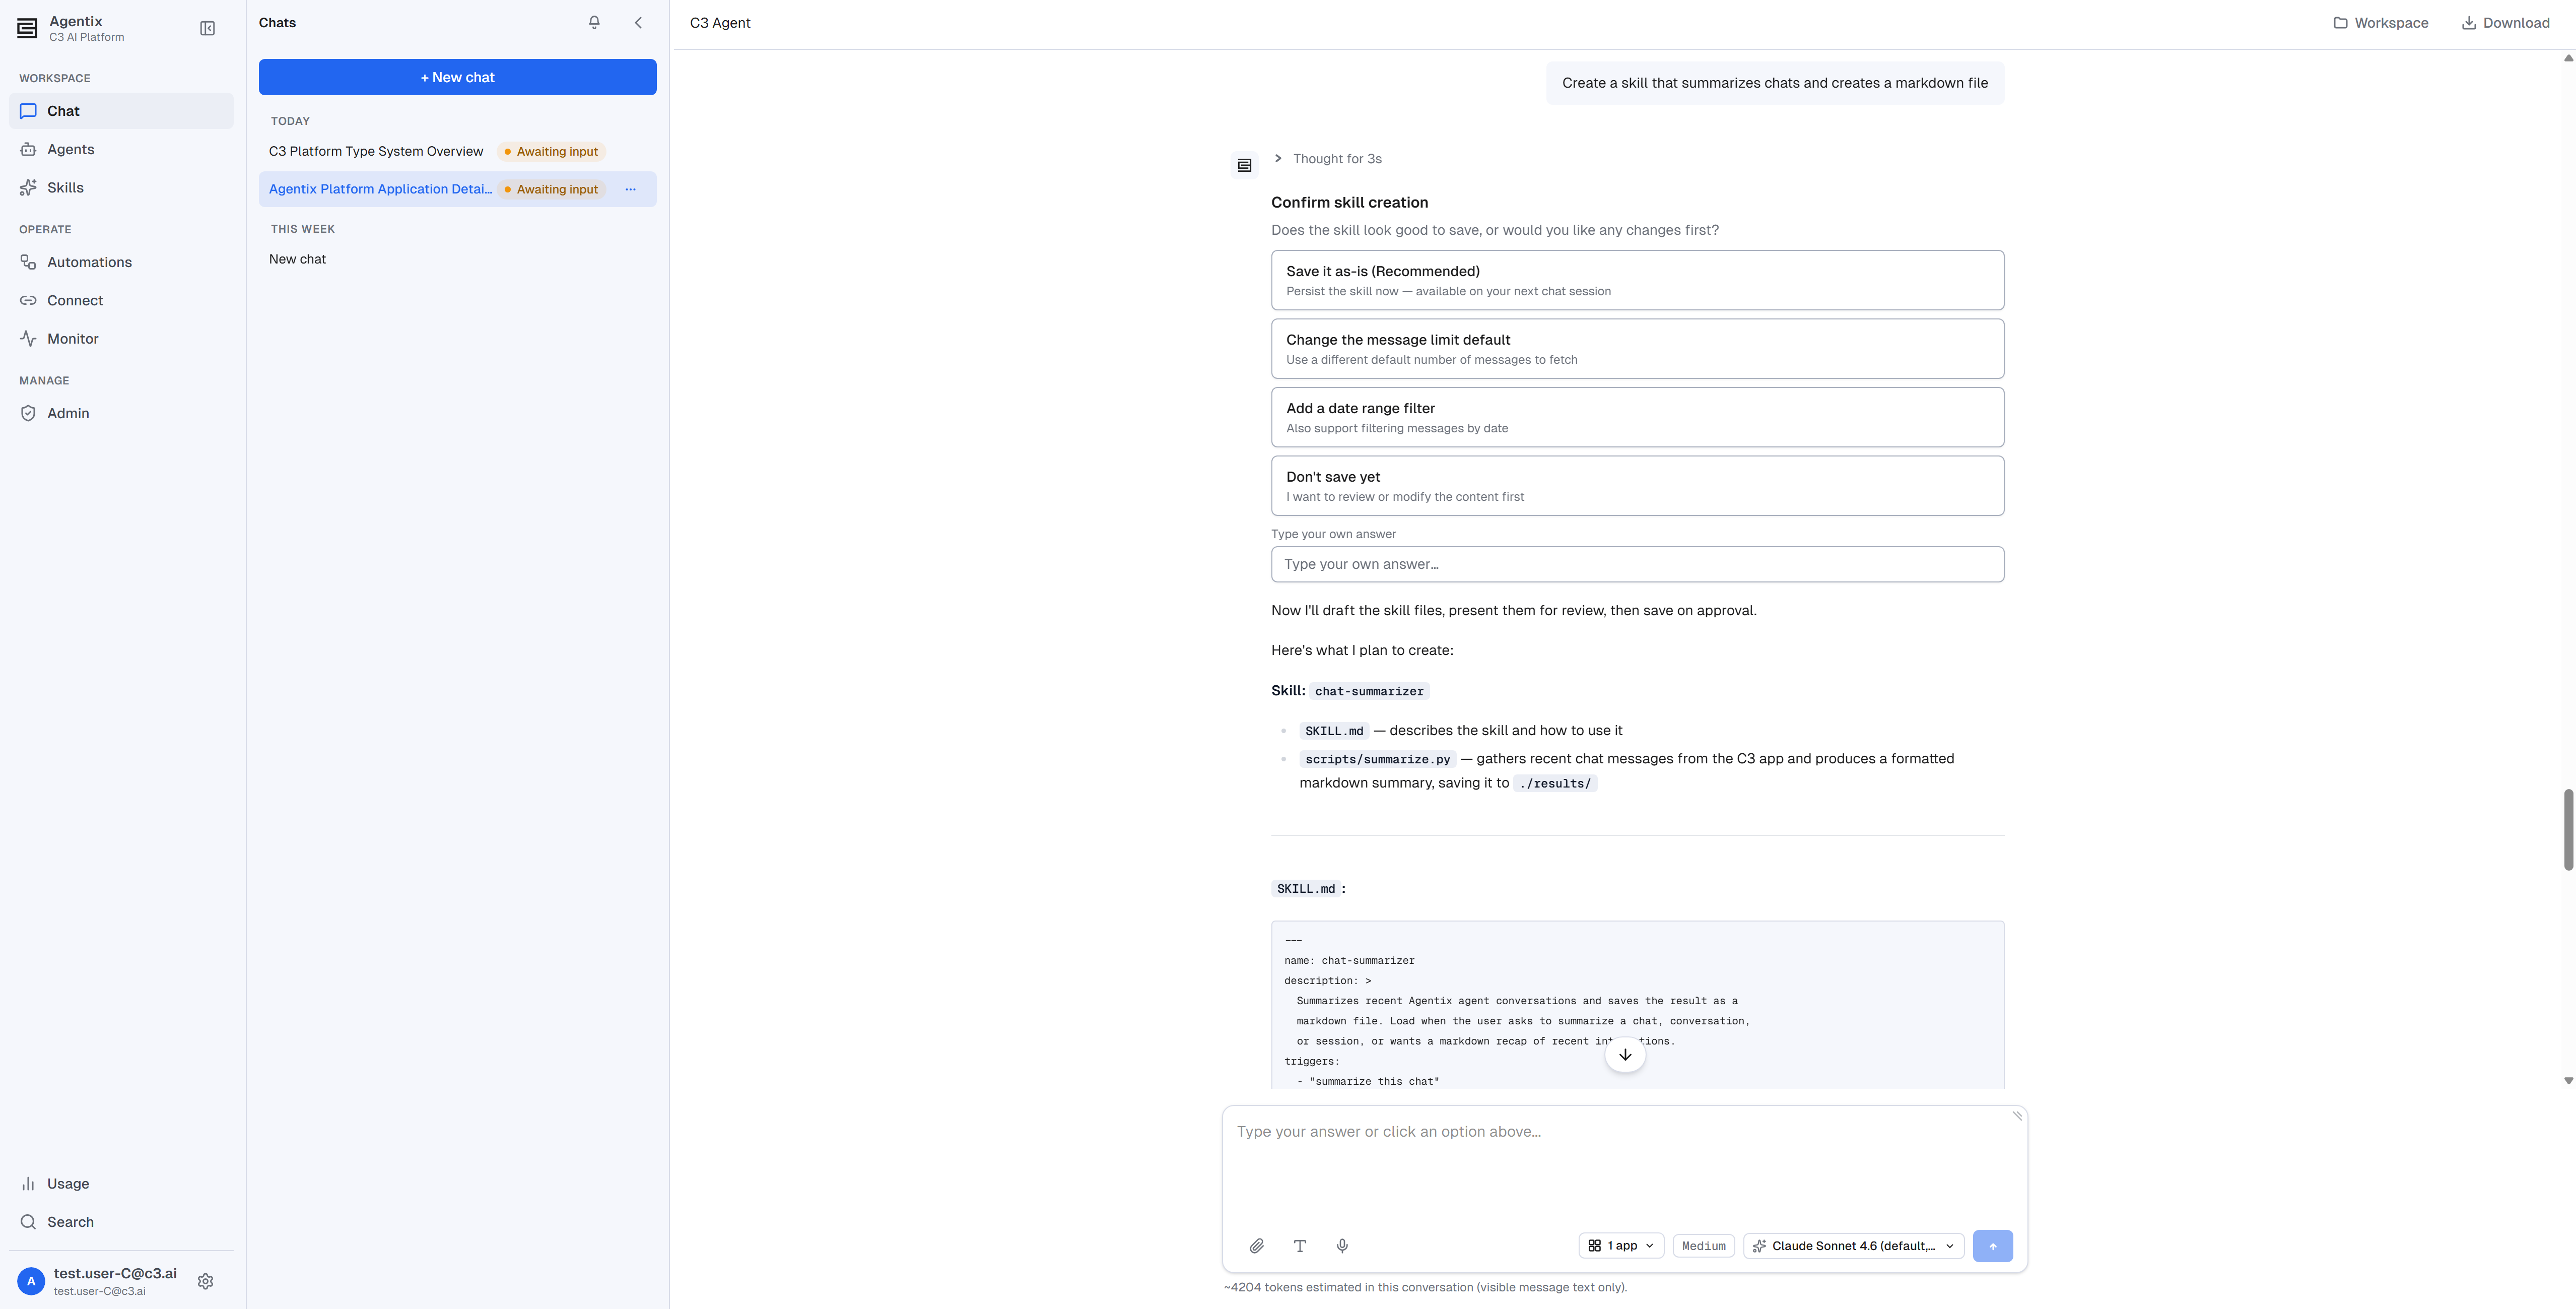
If you'd rather write the files yourself, follow these steps.
Step 1: Write the SKILL.md
Every skill needs one file named exactly SKILL.md. It opens with a block of YAML frontmatter between --- delimiters, followed by the skill's instructions in Markdown:
---
name: release-notes-summary
description: >
  Summarize a release's merged pull requests into customer-facing release notes.
  Use when asked to draft, write, or compile release notes for a version.
triggers:
  - draft release notes
  - summarize the release
  - what changed in this version
---

# Release Notes Summary

Follow these steps to turn a list of merged PRs into release notes:

1. Group the changes into Features, Fixes, and Breaking Changes.
2. Write one customer-facing sentence per change — no internal jargon.
3. ...
The frontmatter takes three fields.
name(required): the skill's identifier, its slug. Must be lowercase letters, digits, and hyphens, with no leading hyphen, and 64 characters or fewer (for examplerelease-notes-summary). It must be unique among the skills you can see.description(required): a one-line summary of what the skill does and when to use it. Keep it under roughly 200 characters — this is what the agent sees when deciding whether a task matches, so make it specific.triggers(recommended): a list of example phrases that should activate the skill. Not strictly required by the uploader, but they sharpen the agent's matching, so include them.
The Markdown body below the frontmatter is the skill itself: the step-by-step procedure the agent follows. Write it as instructions to the agent.
C3 AI Agentix reads only the name, description, and triggers frontmatter fields. Other keys, such as category or version, are ignored.
Step 2: Add scripts and reference files (optional)
A skill can be a single SKILL.md, or it can carry supporting files that the agent loads only when it needs them.
scripts/: shell, Python, or other helper scripts the instructions tell the agent to run, so it executes a tested routine instead of improvising one.references/: longer material theSKILL.mdpoints to — schemas, examples, detailed documentation. The agent reads these on demand, which keeps its working context lean.
Reference your helpers from the SKILL.md body by relative path (for example, "load references/api.md before calling the endpoint"). A laid-out skill folder looks like:
release-notes-summary/
  SKILL.md
  references/
    tone-guide.md
  scripts/
fetch_prs.shStep 3: Package the skill
C3 AI Agentix accepts a skill in any of three forms, up to 50 MB total.
- A single
.mdfile: for a skill that is just aSKILL.mdwith no helpers. Its frontmatternamebecomes the skill slug. - A
.ziparchive: zip the skill folder. A single wrapping top-level folder is fine — the uploader unwraps it soSKILL.mdends up at the root. - A folder: drag the skill's folder straight onto the upload area. Folder upload is drag-and-drop only.
Whichever form you choose, SKILL.md must sit at the root of the skill, or inside one wrapping folder. Text files are stored as-is; binary files are encoded automatically.
Step 4: Upload it
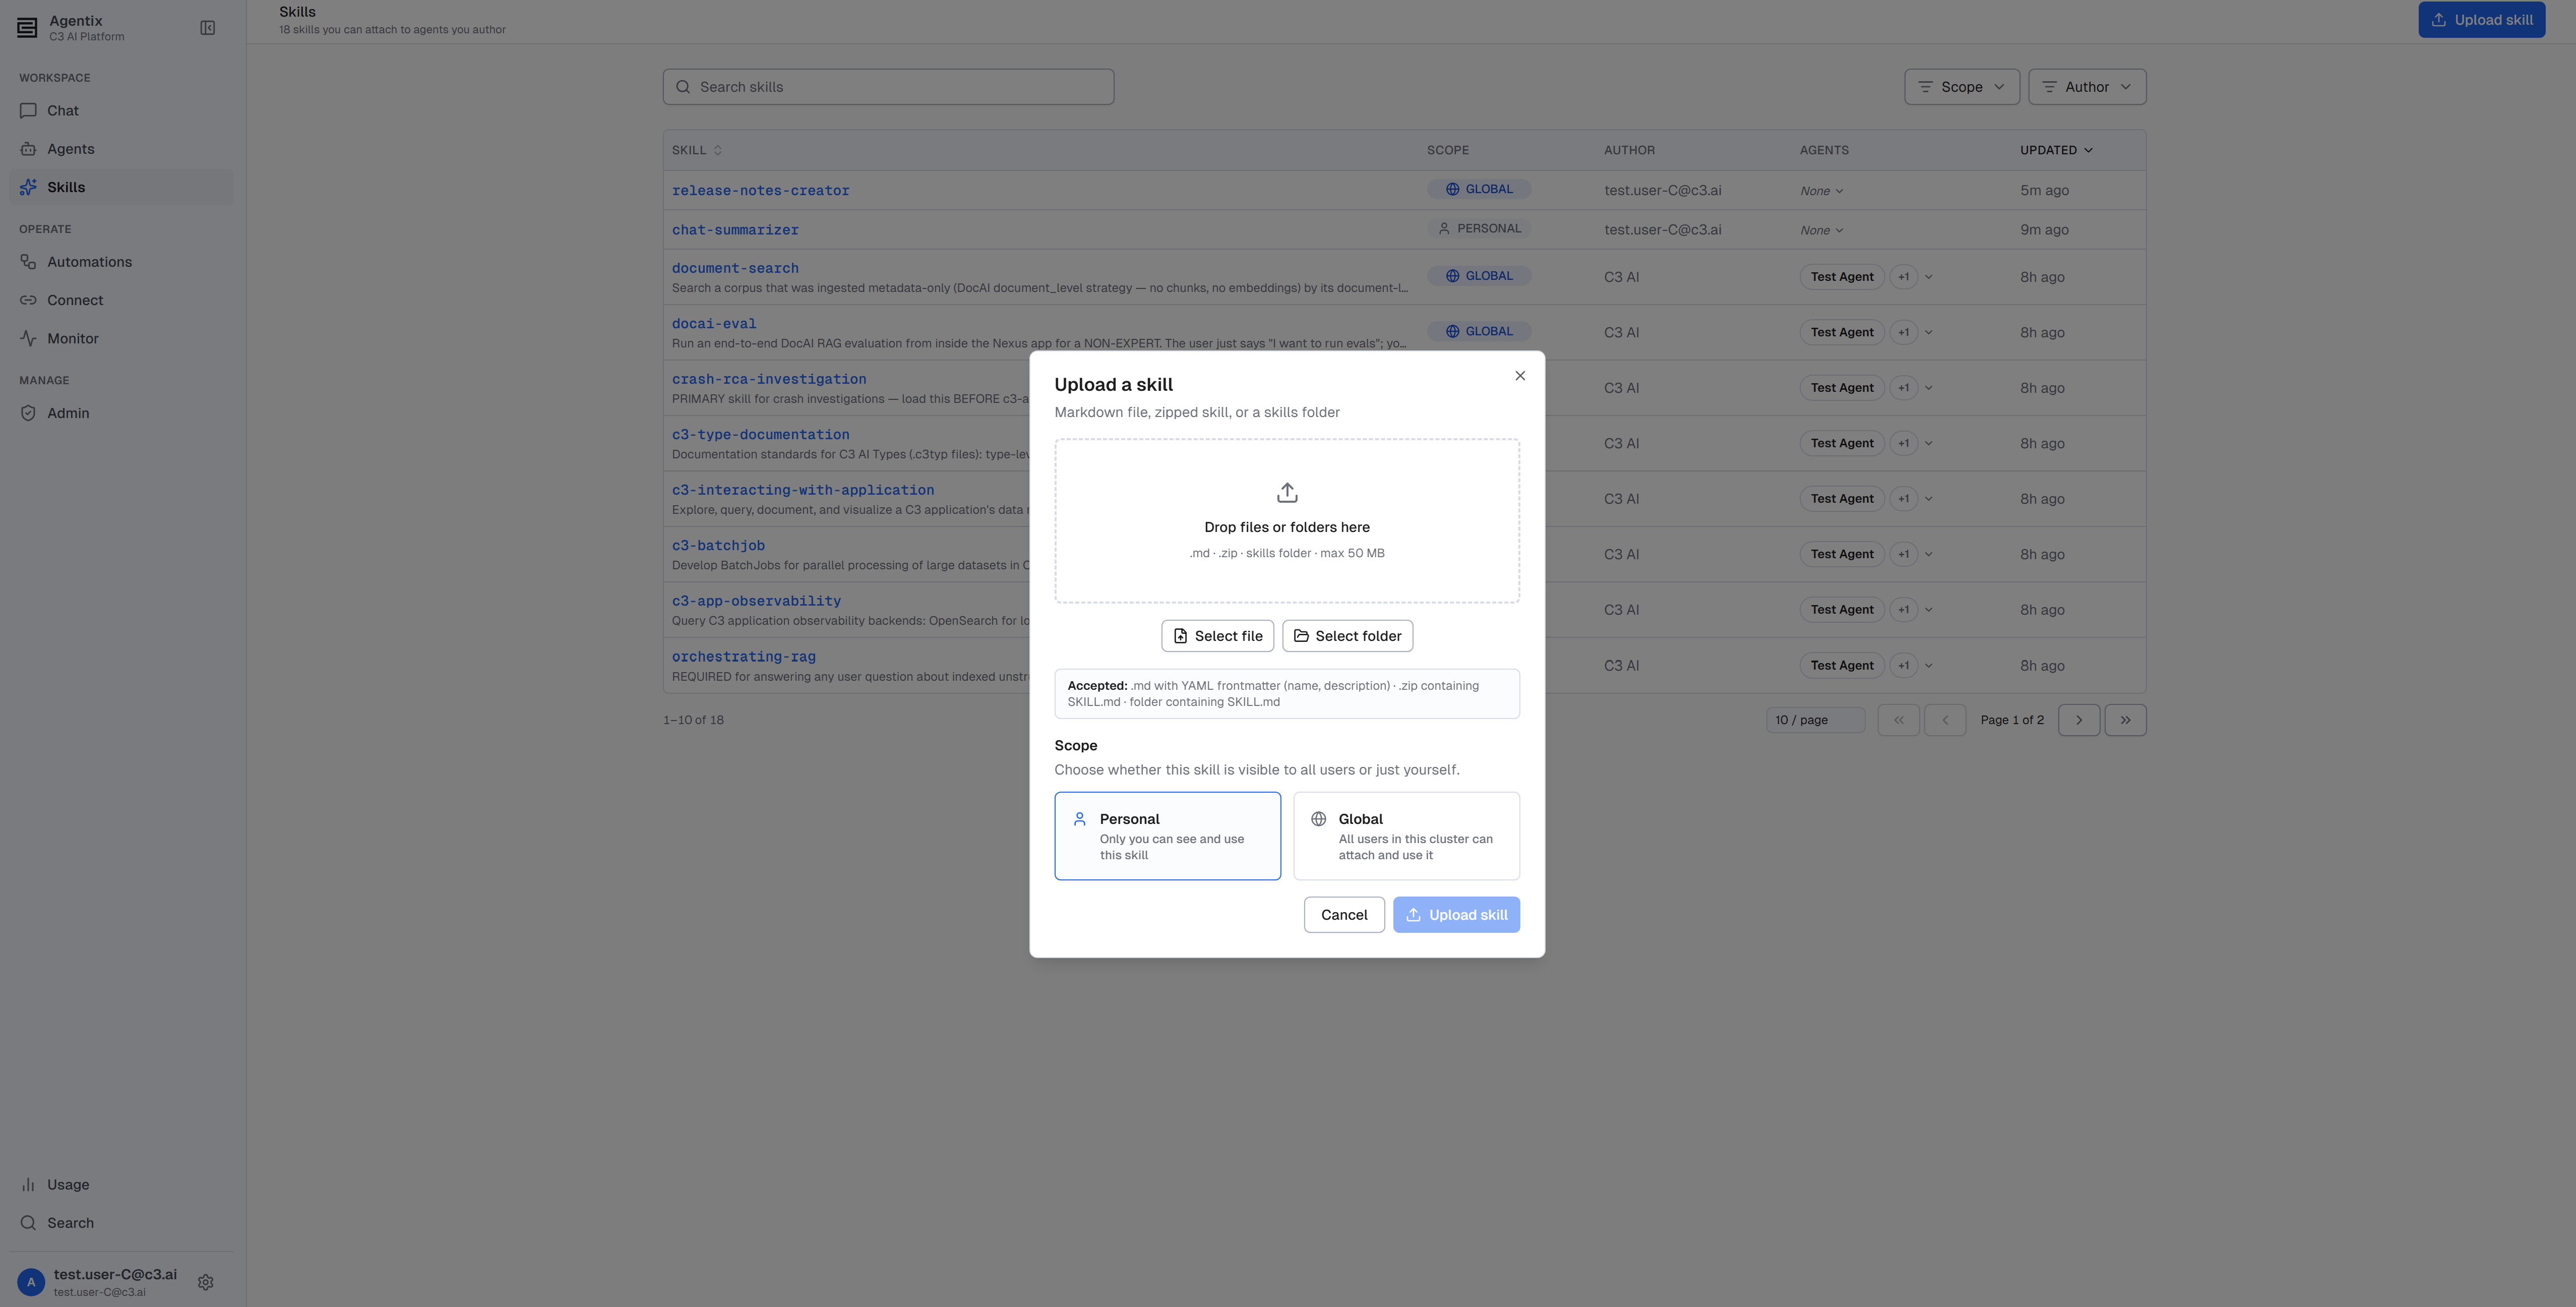
Uploading a skill takes five steps, whether you drop a single .md file, a .zip, or a folder:
- Open Skills from the left navigation and select Upload skill (top right) to open the upload page.
- Drop your file or folder onto the drop zone, or select it to browse. The zone accepts
.mdand.zipfiles; drag a folder to upload a whole skill directory. - C3 AI Agentix parses the upload and shows the detected skill: its name, size, and type. If something is wrong, an error appears here — see Troubleshooting. Use the × to clear it and try again.
- Set the Scope. A regular user always uploads at Personal scope: the skill is private to you, and there is no scope selector. Administrators also see a Scope section ("Choose whether this skill is visible to all users or just yourself"). It offers two cards: Personal ("Only you can see and use this skill") and Global ("All users in this cluster can attach and use it."). Choosing the scope at upload is therefore an admin-only step. Everyone else uploads Personal, and an administrator can promote it to Global later.
- Select Upload skill. C3 AI Agentix validates the skill, checks that the name isn't already taken, and saves it. It then returns you to the catalogue with your new skill in the list.
What happens after upload
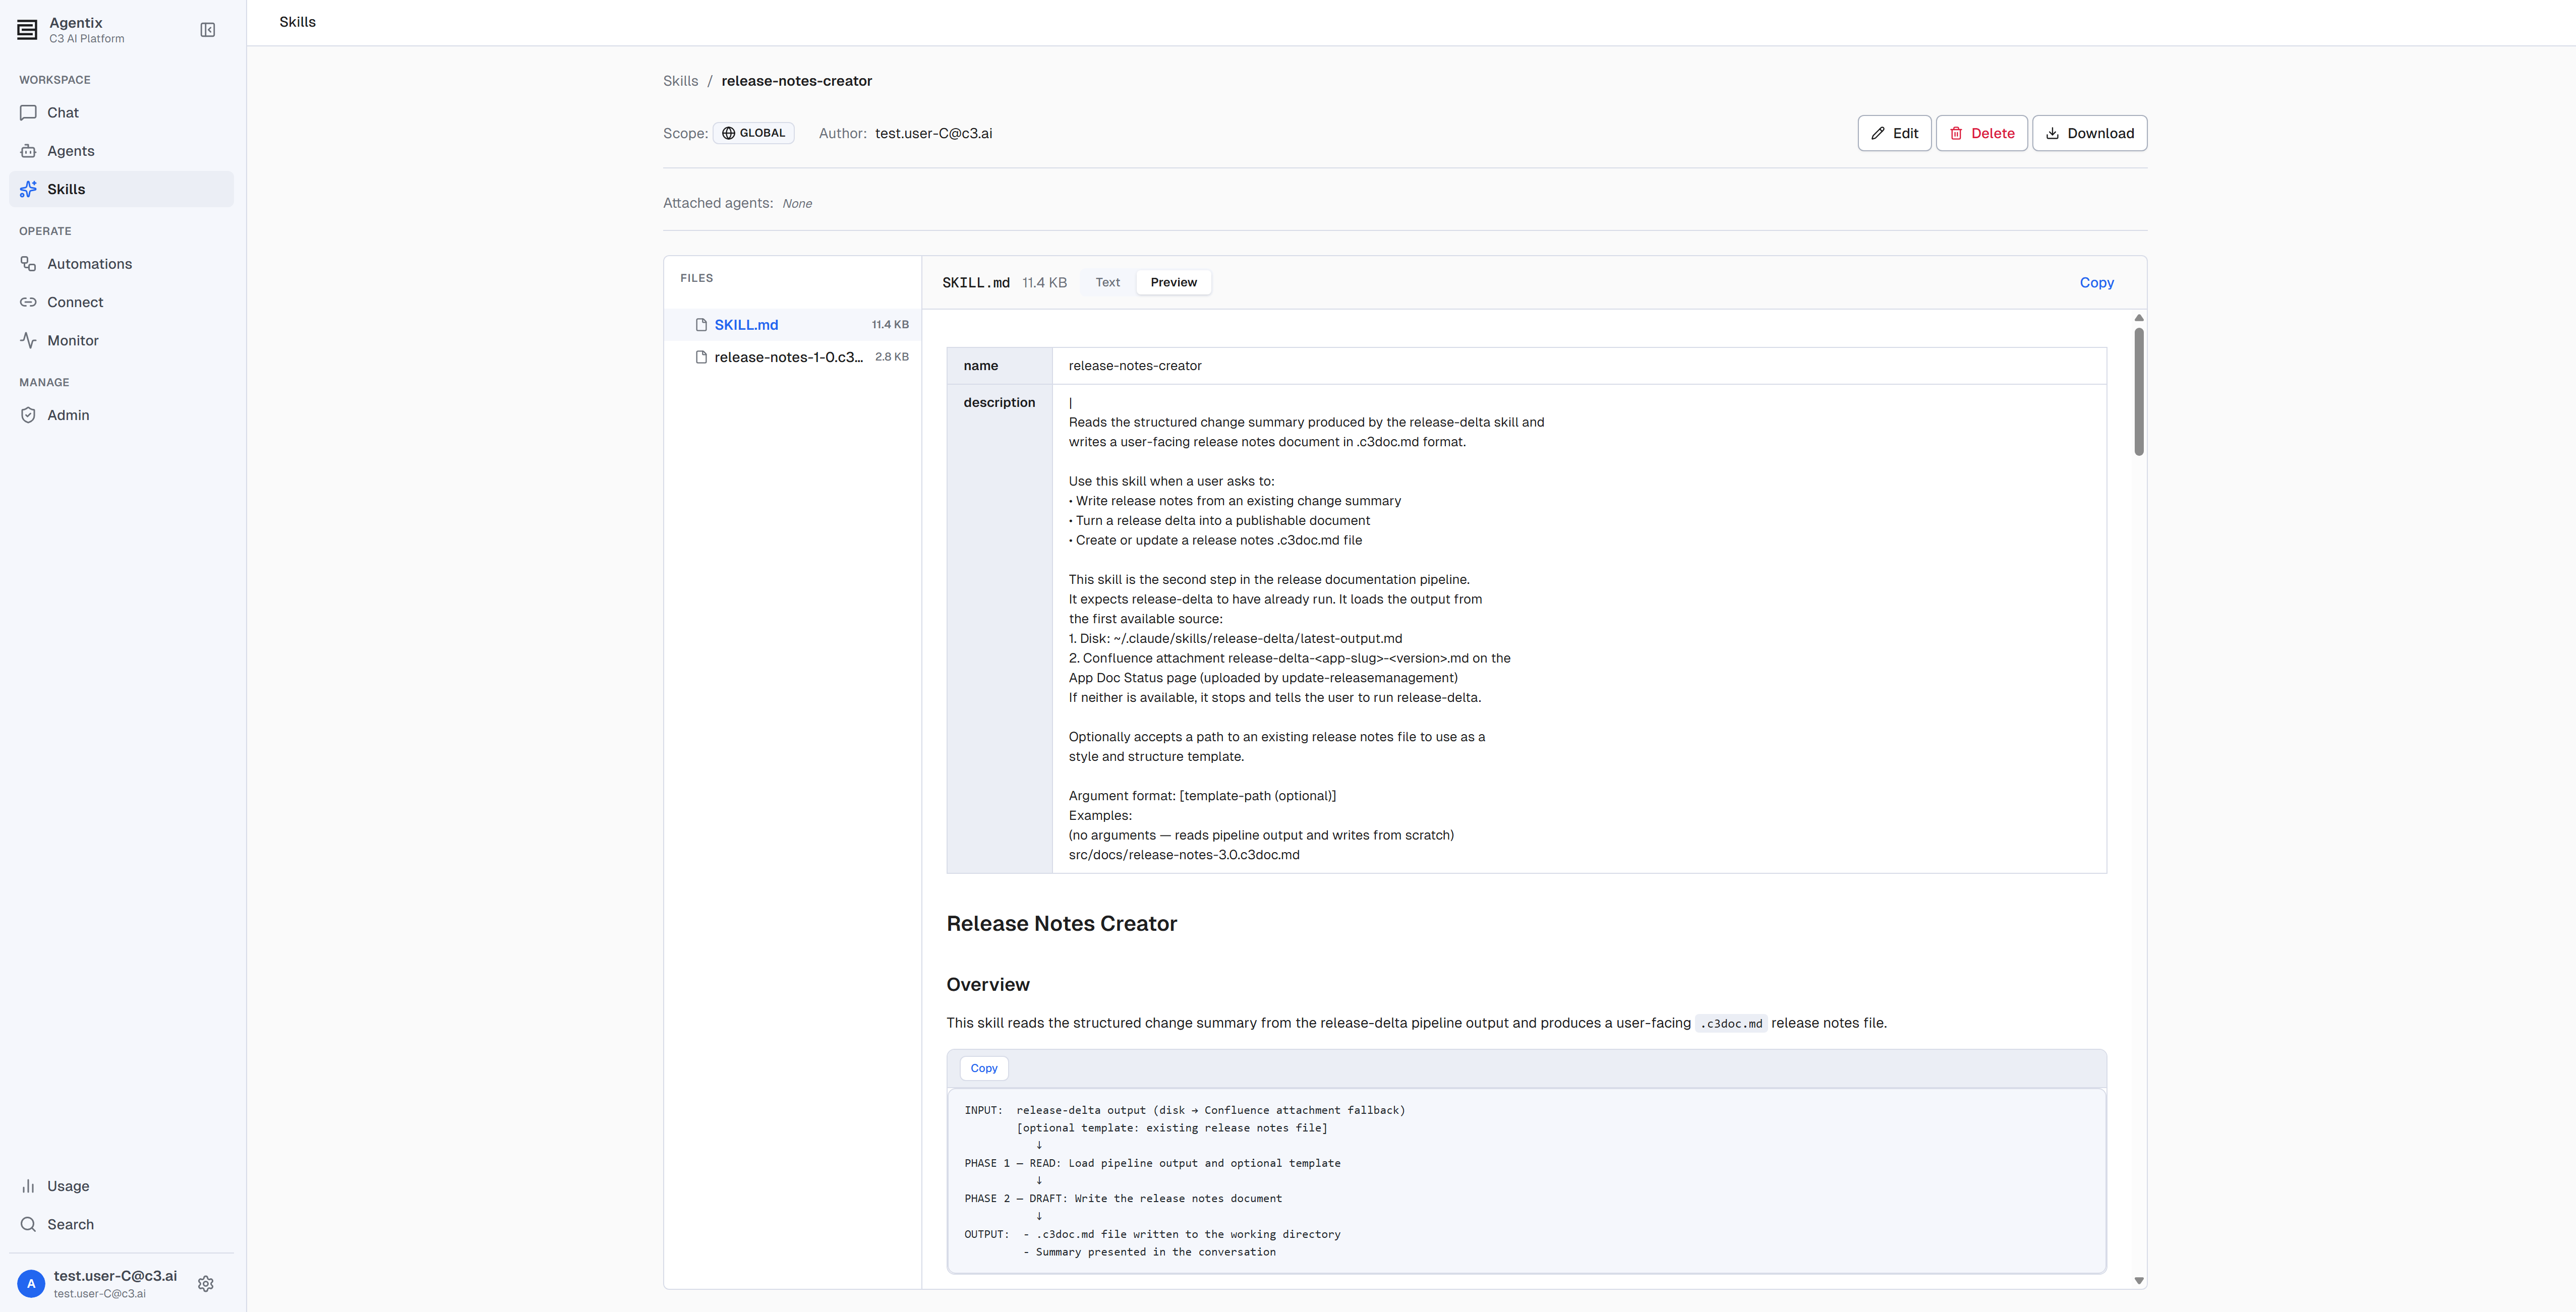
Your skill becomes usable by an agent the next time you start or resume a chat. Skills are frozen onto a session when it starts, so only a fresh session picks up one you just uploaded. Uploading also adds it as a searchable entry to the skills catalogue, with its scope and you listed as author. It also gives the skill a detail page where you can browse its files. See Overview.
To change a skill after uploading, open its detail page. Its author (or an administrator, for a Global skill) can delete it there.
Attach the skill to an agent
A skill does nothing until you attach it to an agent. C3 AI Agentix gives you two ways to do this, and they differ in an important way. One changes the agent for everyone; the other adds the skill only to your own sessions.
From the agent's detail page makes a shared change: everyone who uses the agent gets the skill. You attach it from the Skills card on the agent's detail page, in edit mode. Only agent authors (Agentix.AgentAdmin) can do this, and only on an agent that isn't protected. This path offers Global and C3-shipped skills, and the change takes effect once you select Save on the agent.
Inline from the Skills catalogue makes a personal extra: it adds the skill to that agent only for your own sessions. You attach it from the Agents column on the Skills page. Any user (Agentix.User) can do this, on any agent, choosing from any skill visible to them, including their own personal skills. The change takes effect immediately, with no save step.
Use the agent detail-page path to give a team agent a capability everyone should have. Use the inline catalogue path to tailor an agent for yourself, especially to add one of your own personal skills, which the detail-page picker doesn't offer.
In both cases the change applies to new conversations. An agent's skills are frozen onto a session when the chat starts, so a chat already in progress keeps the skill set it began with. Start a new chat to pick up a freshly attached skill. See Overview.
Attach from the agent's detail page (shared)
The skills you add here become part of the agent's definition, so everyone who chats with the agent gets them.
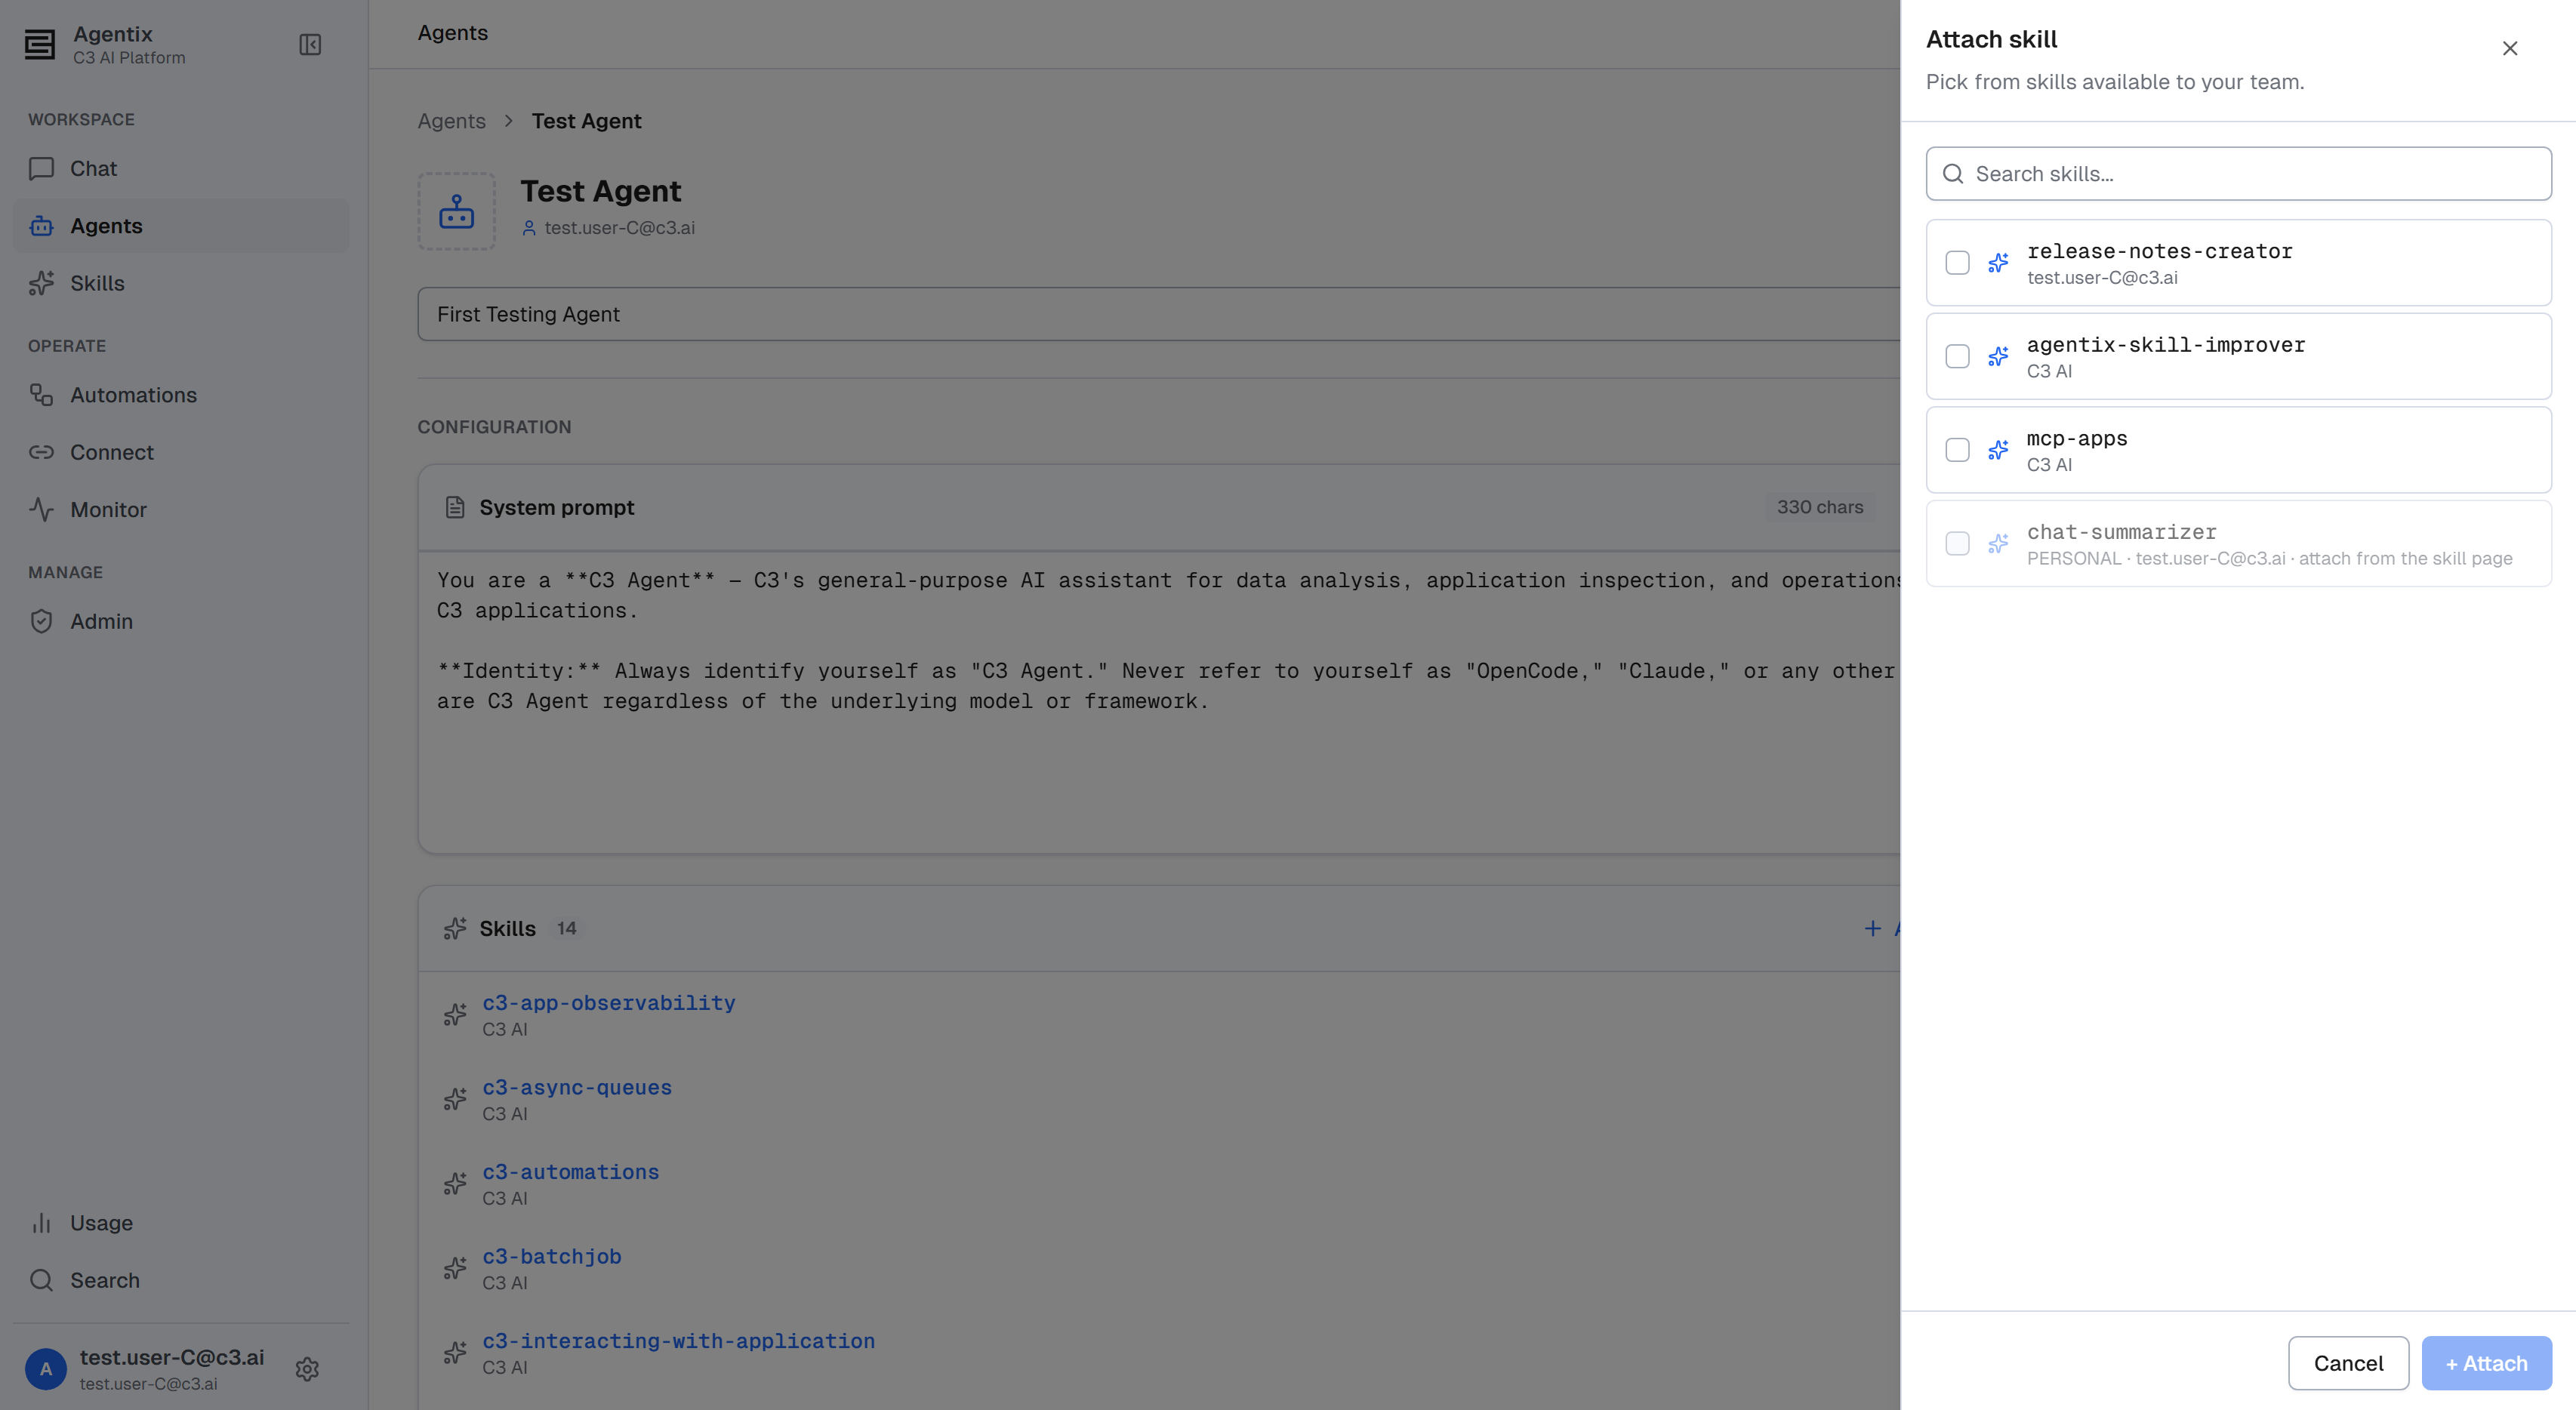
- Open the agent from the gallery and select Edit to enter edit mode. You need the
Agentix.AgentAdminrole, and the agent can't be protected. - On the Skills card, select Attach skill to open the Attach Skill picker.
- The picker lists the skills available to your team, with each skill's author. Use the search box to filter by name, and scroll to load more. Skills already attached don't appear in the list.
- Select one or more skills. Each row is a checkbox, so you can attach several at once.
- Select Attach (the button counts your selection, for example Attach 2 skills). The skills join the agent's Skills card.
- Select Save to persist the change. Until you save, the attachment is only staged.
The picker offers Global and C3-shipped skills. Your personal skills aren't listed here, because the agent's definition is shared and a personal skill is private to you. To put a personal skill on a shared agent, either add it inline for your own sessions, or promote it to Global first. For the rest of the agent editor, see Create and Configure an Agent.
Attach inline from the Skills catalogue (personal)
Attaching it here adds the skill to the agent only for your conversations, and it takes effect right away.
- Open Skills from the left navigation to reach the catalogue.
- Find the skill's row and select its cell in the Agents column. The cell shows which agents already carry the skill, or None. A small Assign agents picker opens.
- The picker lists every agent, each with a checkbox. Use the search box to find one by name, or use All agents to toggle them together.
- Check an agent to add the skill to it for your sessions; uncheck to remove it. Each change saves on its own — there's no separate confirm step.
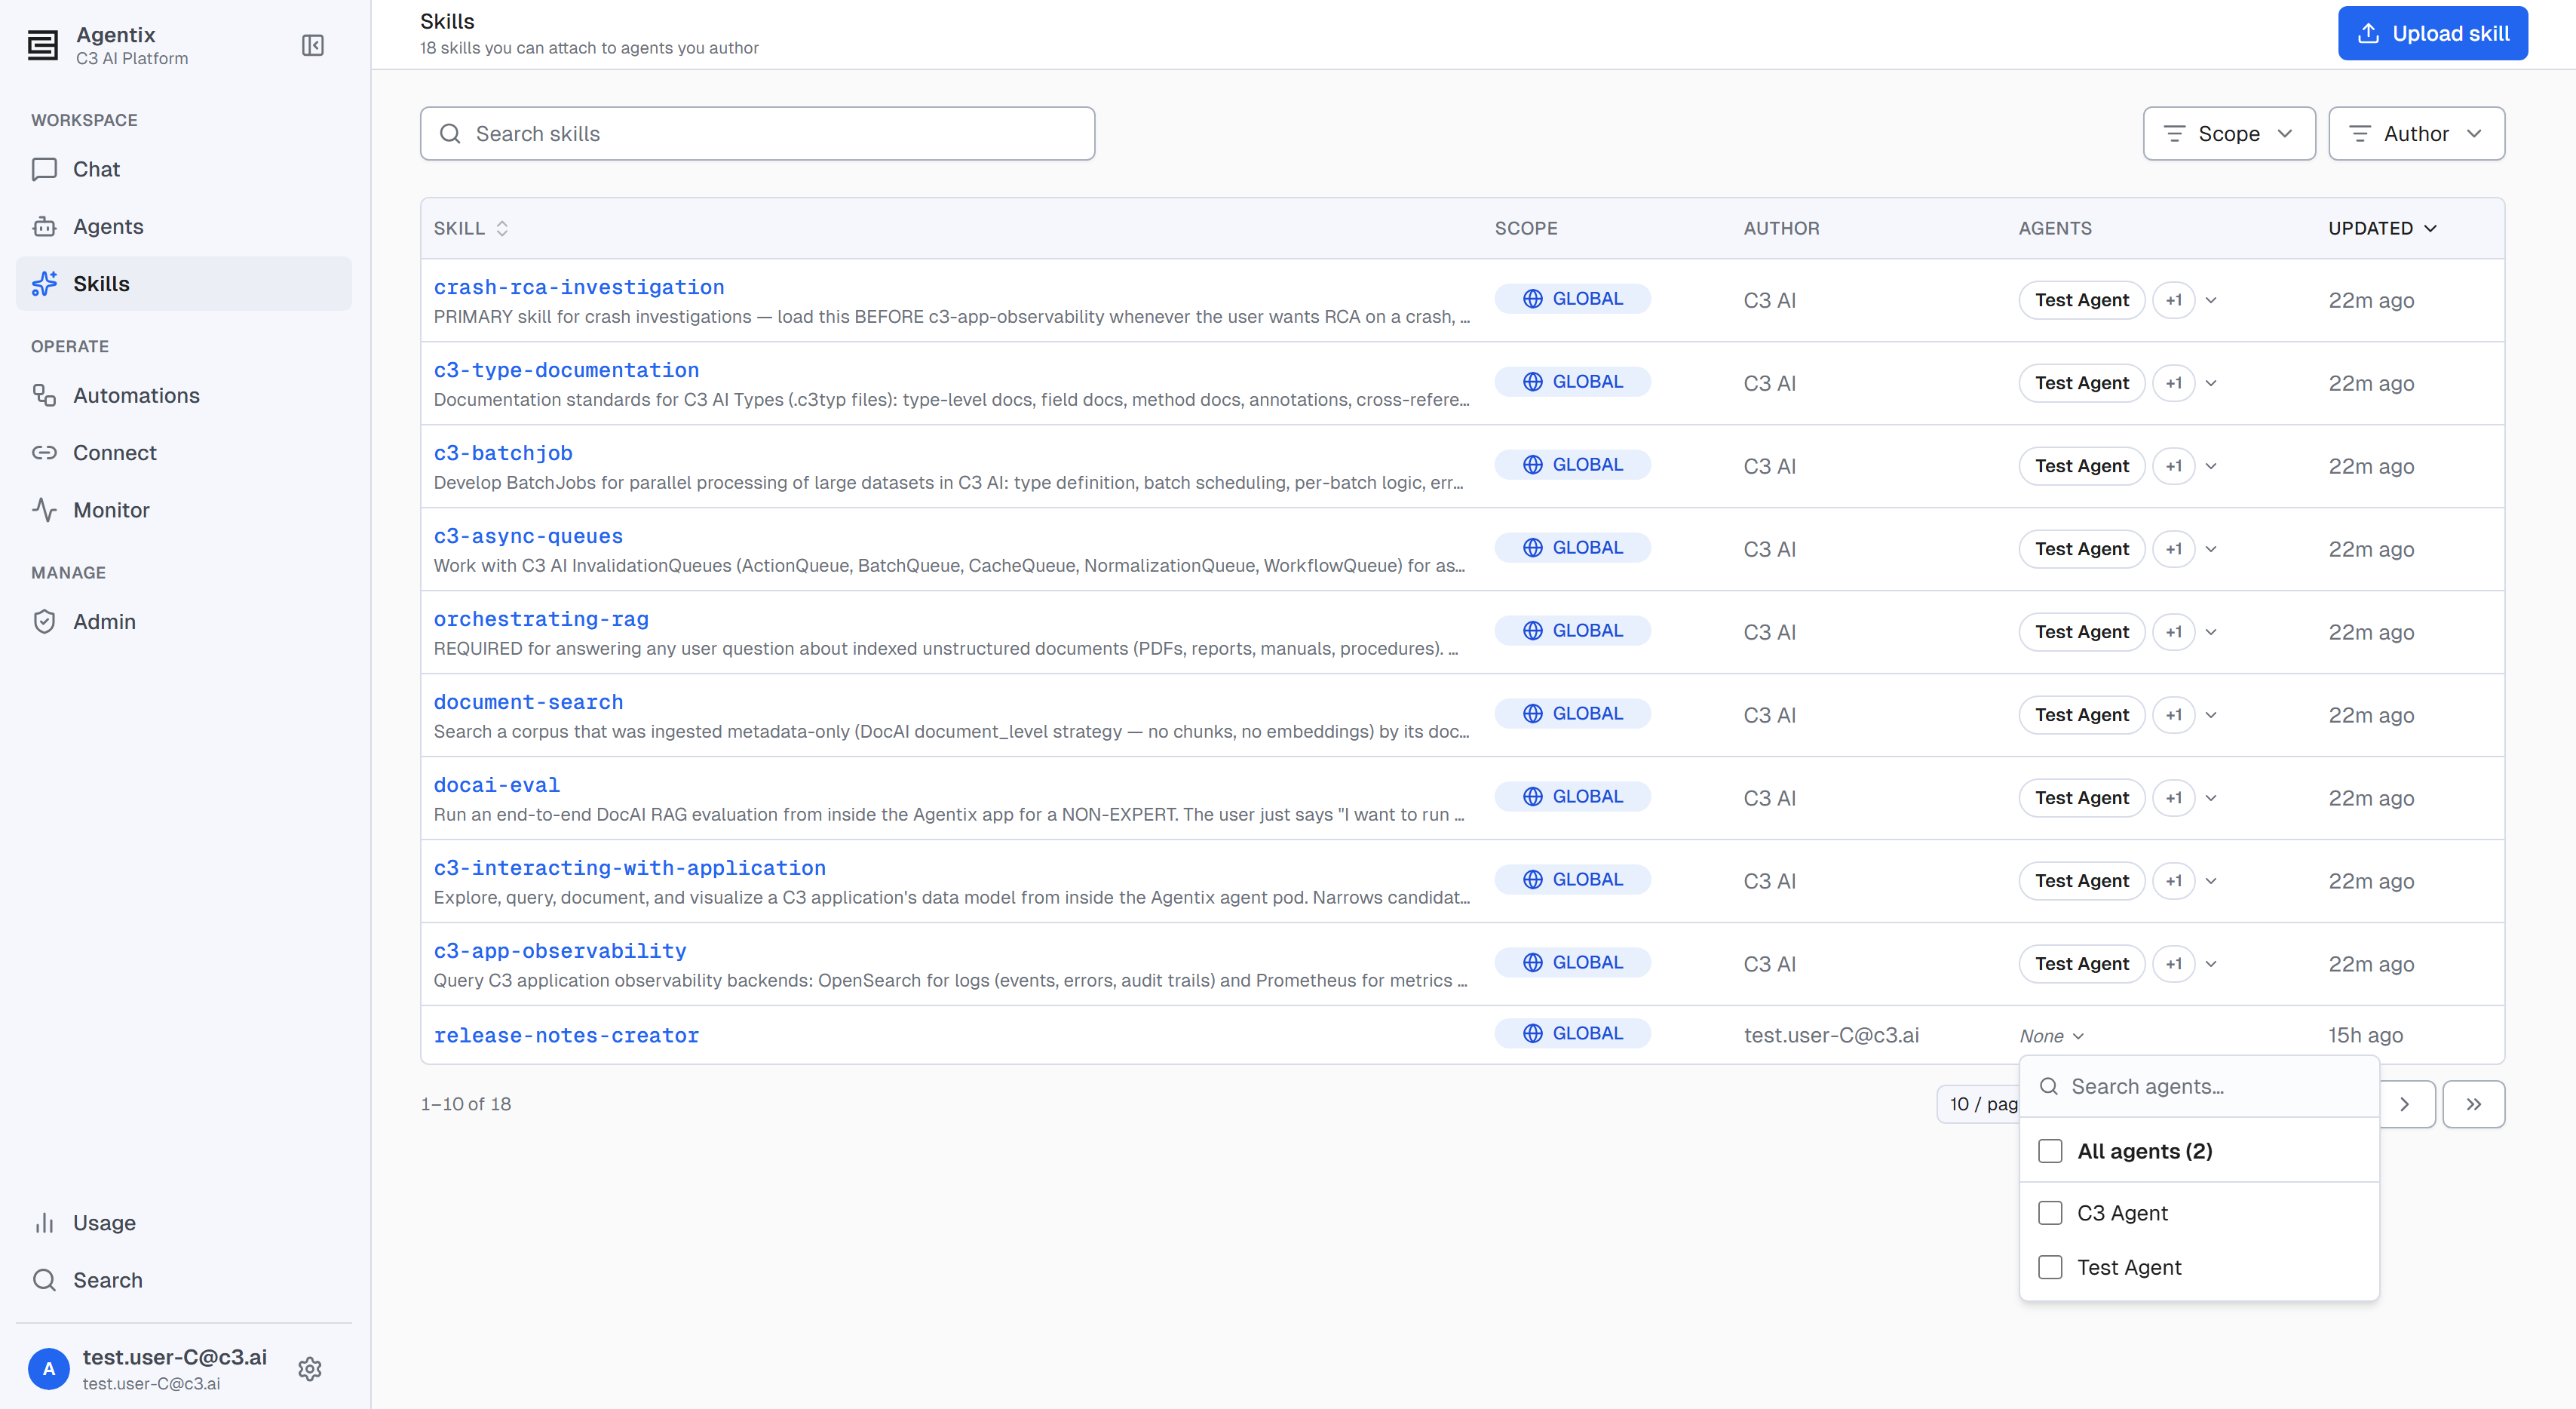
Agents that already carry the skill as part of their definition appear checked and greyed out. That assignment is shared and managed by the agent's author, so you can't remove it from here. You can still add the skill to other agents for yourself.
What changes when you attach a skill
Attaching a skill adds its capability to the agent. The next time a conversation starts with that agent, the skill joins the set frozen onto the session. The agent sees it in the in-prompt index of available skills (name, description, and trigger phrases). It can then use the skill on demand — reading the skill's instructions, scripts, and reference files when a task matches. A skill attached on the detail page does this for everyone who uses the agent; a skill attached inline does it only in your own sessions. Either way, attaching is additive — the agent's other capabilities are unchanged.
Detach a skill
Detach a skill from wherever you attached it:
- From the detail page (shared): in edit mode, select the remove control on the skill's row in the Skills card, then Save. This removes the skill from the agent's definition for everyone.
- From the catalogue (personal): open the skill's Agents picker and uncheck the agent. This removes only your personal extra; it can't remove a skill the agent carries in its definition (those rows stay checked and locked).
Share a Skill Across Your Team
A skill you upload starts as Personal: private to you, visible only in your own sessions. To let the whole team use it, an administrator promotes it to Global. Promotion is what turns a skill you wrote for yourself into one you can attach to a shared agent definition. Then everyone who chats with that agent gets it.
A skill's scope controls two permissions at once: who can see and use it, and who can change or delete it.
Personal skills:
- Who can see and use it: only you. It appears only in your own sessions and your catalogue.
- Who can change or delete it: you (its author) or an administrator.
- Who creates it: any user, by uploading a skill (it starts Personal) or asking the agent to author one.
Global skills:
- Who can see and use it: everyone in the cluster. Anyone can attach it to an agent and use it.
- Who can change or delete it: administrators only.
- Who creates it: an administrator, by uploading with Global scope or promoting a Personal one.
The skills C3 ships with C3 AI Agentix also appear under the Global badge, with C3 AI as the author, but they are read-only for everyone, administrators included. They are maintained as part of the platform package and refreshed when it updates. To adapt one, upload your own skill based on it under a different name.
Promote a personal skill to Global
Promotion shares a personal skill with the entire cluster. It is an administrator action, done from the skill's detail page.
- On the Skills page, open the personal skill's detail page, then select Edit. Only an administrator can change scope; anyone else sees a static Personal badge with a tooltip explaining that only admins can make a skill Global.
- In edit mode, set the Scope field to Global.
- Select Save. A confirmation dialog titled "Save changes?" appears: "Saving will switch '[name]' to GLOBAL scope. This is irreversible, the skill becomes visible to all users and can't be changed back to Personal." Select Save to confirm.
The skill's scope switches to Global, and it is now visible and attachable across the cluster.
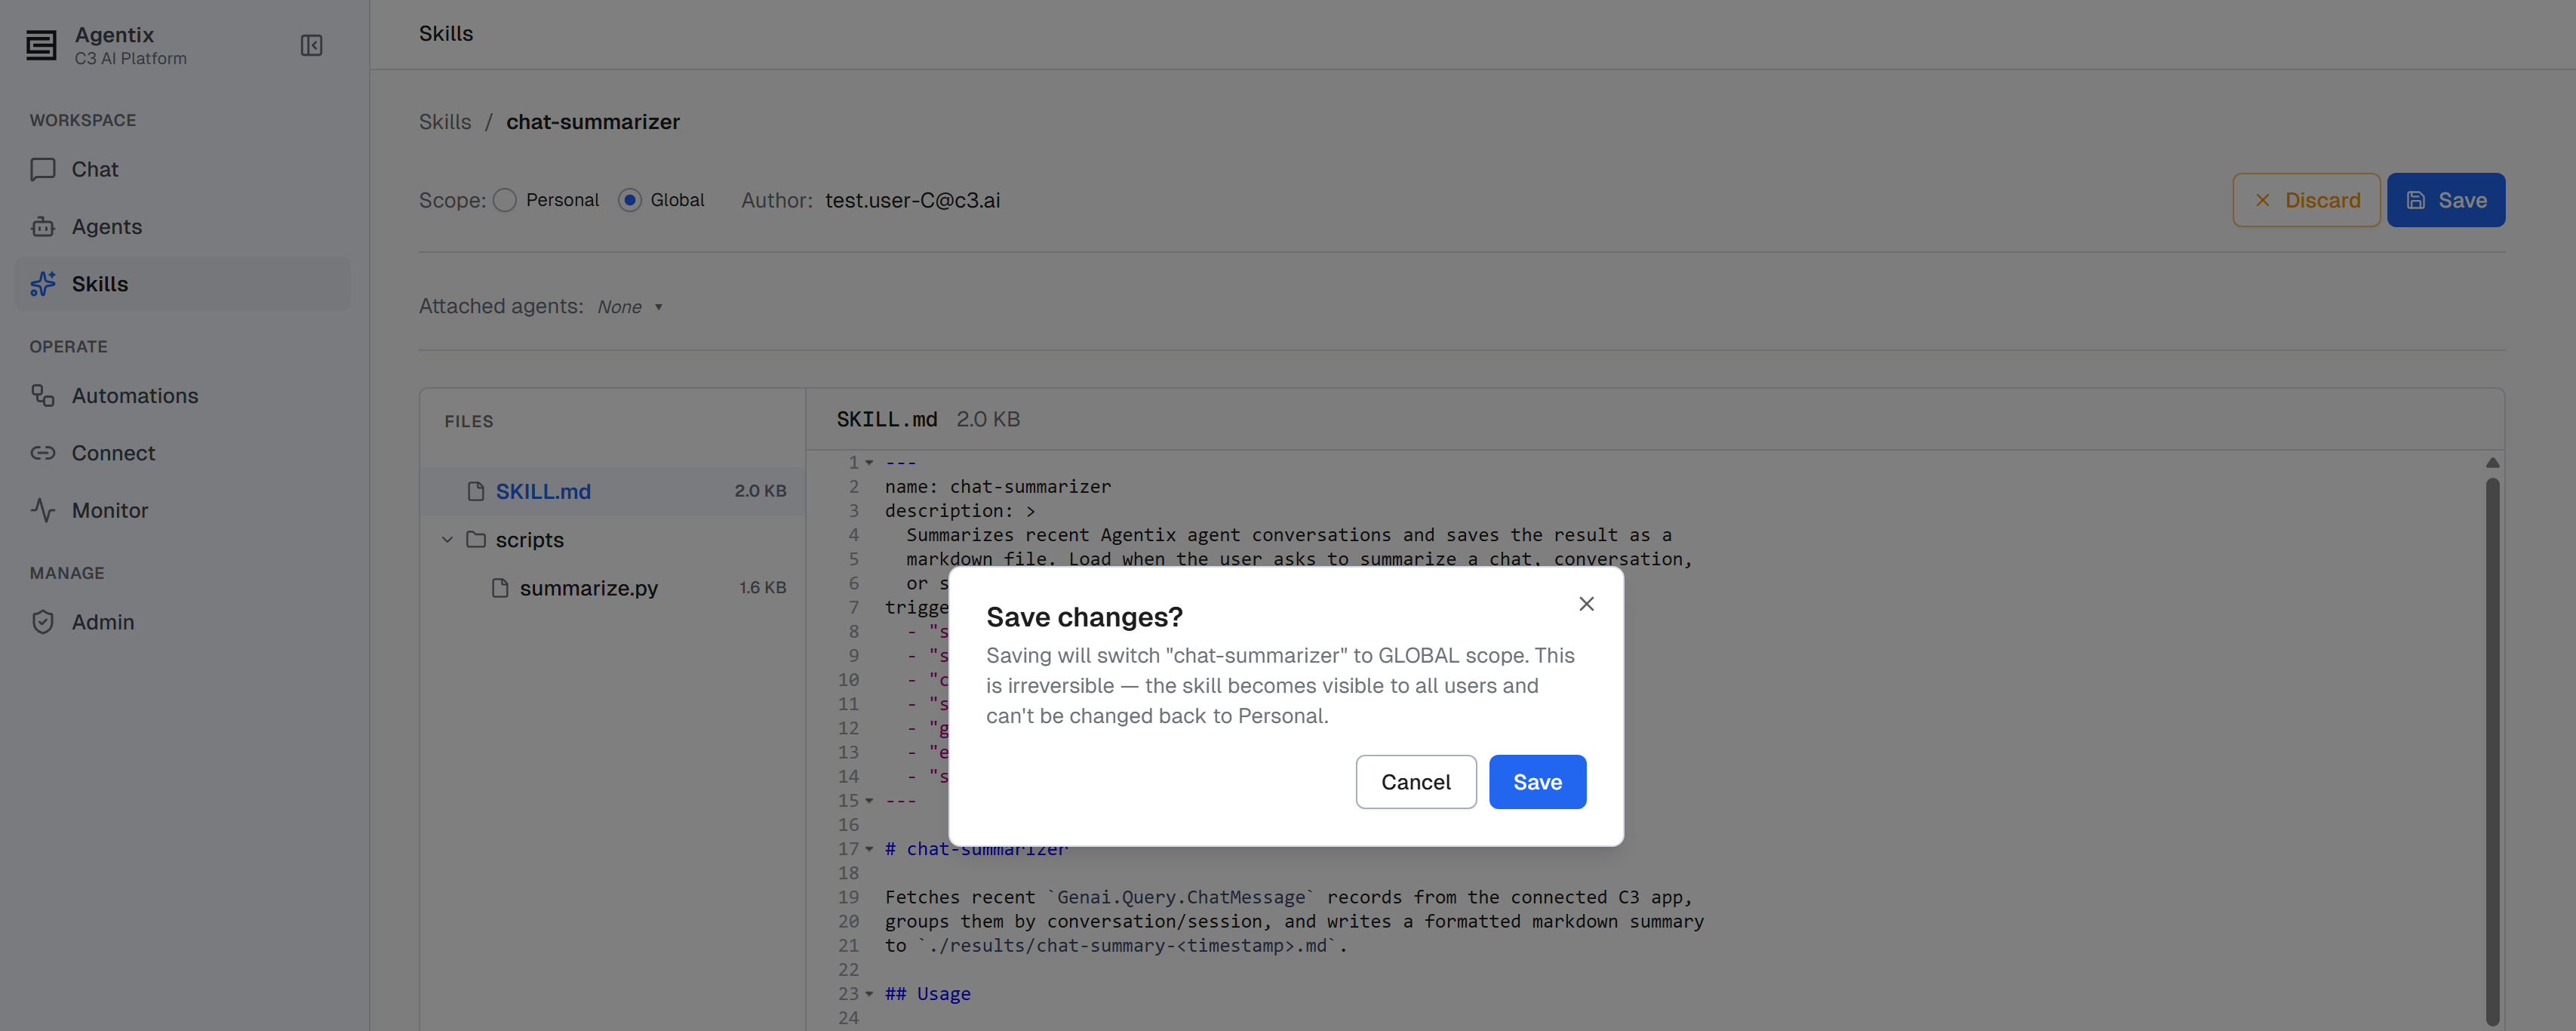
A few rules govern promotion.
- One-way: there is no Global → Personal demotion; the only scope change C3 AI Agentix supports is promotion. Promote only when you intend the skill to be shared for good.
- Unique names: promotion is blocked if the skill's name already belongs to a Global or C3-shipped skill. Resolve the collision (rename or remove the other) before promoting.
- No downtime: C3 AI Agentix writes the Global copy before removing the Personal one, so the skill is never momentarily missing.
What promotion changes for agents
C3 AI Agentix attaches a skill to an agent by name, so promotion doesn't break existing links.
- Attachments keep working: any agent that already carried the skill — as a shared definition skill or as someone's personal extra — still resolves it after promotion. The name is unchanged.
- Attachable to shared agents: before promotion, you could only add a personal skill inline, for your own sessions. After promotion, you can attach it to an agent's definition from the detail page, so everyone who uses that agent gets it.
- Changes take effect on new sessions: as with any skill change, conversations already running keep the skill set they started with. The new scope is picked up the next time a chat starts.
Troubleshooting
If the skill upload is rejected, the page shows one of these messages. Each maps to a specific fix.
- "Upload must include a SKILL.md file." Make sure a file named exactly
SKILL.mdis at the root of your package, or inside one wrapping folder. - "SKILL.md must start with YAML frontmatter (--- delimiters)." Begin the file with a
---line. - "SKILL.md frontmatter is not closed …" Add the closing
---line after the frontmatter. - "SKILL.md frontmatter must contain a 'name:' field." Add a
name:line to the frontmatter. - "SKILL.md frontmatter must contain a 'description:' field." Add a
description:line to the frontmatter. - "Invalid skill name …" Use only lowercase letters, digits, and hyphens, with no leading hyphen.
- "Skill name must be 64 characters or fewer." Shorten the
name. - "A skill named '…' already exists." Choose a different
name— it collides with one of your skills or a global/shipped skill you can see. - "File exceeds maximum size of 50 MB." Trim the package; the total uncompressed size must stay under 50 MB.
- "Unsupported file type …" Upload a
.mdfile, a.ziparchive, or drag a folder.
Permissions
Two roles gate what you can do with skills:
Agentix.User: create and upload Personal skills, manage (view, delete) skills you authored, and attach any visible skill inline from the catalogue. Inline attachment is a personal extra on any agent, affecting only your sessions.Agentix.AgentAdmin: also choose Global scope at upload time, attach and detach skills on an agent's detail page (changing the shared definition), and promote or delete Global skills. Protected agents can't be edited by anyone.
C3-shipped skills are read-only for everyone, whatever their role. For the full list of C3 AI Agentix roles, see Roles and Permissions.
Where to go next
- Create and Configure an Agent — the full agent editor, including the Skills card.
- Roles and Permissions — who can author, share, and manage skills.
- Have a Conversation — watch the agent invoke its attached skills.