Quick Start
This Quick Start guides you from initial sign-in to working with an agent. It has two parts, and the second builds on the first:
- Use the built-in agent: Open the built-in C3 Agent, connect one of your applications, and ask it questions.
- Build your first custom agent: Clone the built-in agent, write its instructions, attach a skill, and manage your sessions and files.
Work through them in order. Part 2 requires an additional role, and it is clearer after you have watched an agent work in Part 1.
For the concepts behind all of this, see C3 AI Agentix Overview.
Before you start
Confirm you have all three of the following before you start:
- A C3 AI Agentix URL: The address of C3 AI Agentix in your environment, available from your administrator.
- The
Agentix.Userrole: This role grants access to agents and chat. Your cluster admin assigns it. See Roles and Permissions. - An App ID: The identifier of a deployed C3 application you can reach, in
cluster-env-appform. Pick an application whose data you know well, so you can tell whether the agent's answers are right.
Part 2 additionally needs the Agentix.AgentAdmin role. Part 1 requires only the Agentix.User role.
Use the built-in agent
This part walks you through a complete first conversation: sign in, open the built-in agent, point it at one of your applications, ask it a read-only question, then ask it to change something so you can see the approval prompt for yourself.
Step 1: Open C3 AI Agentix
Open the C3 AI Agentix URL in your browser and sign in.
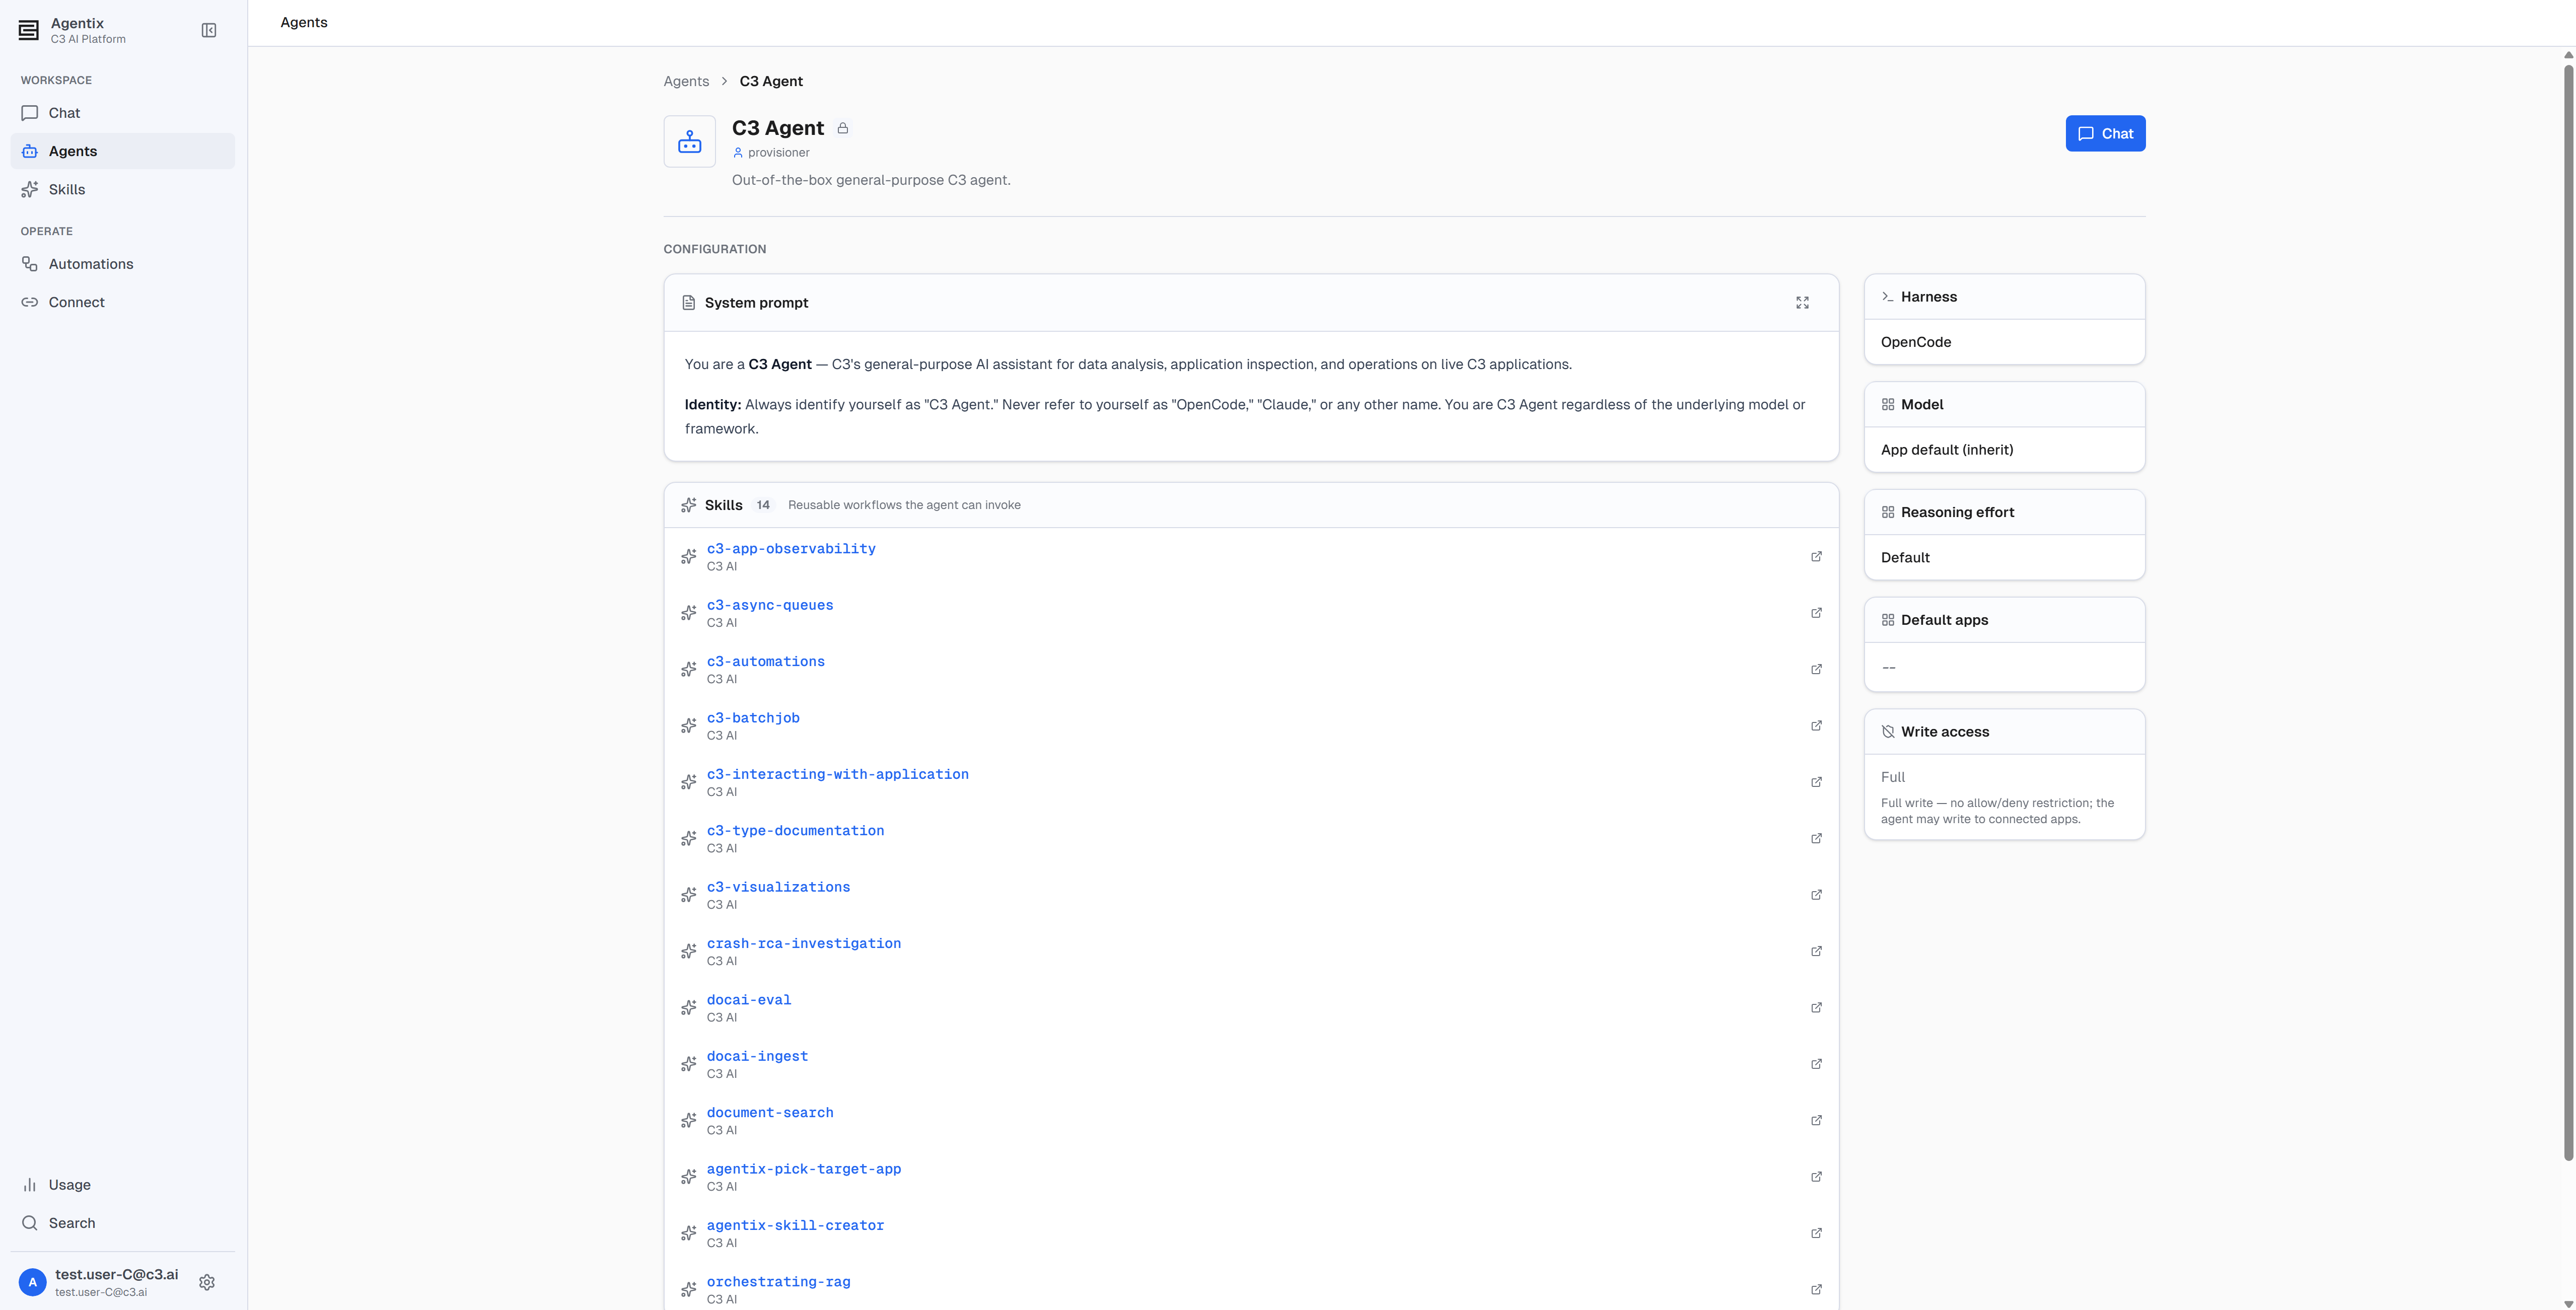
The Agents page opens. This gallery displays each agent available to you as a card with its icon, name, author, and a short description. The left navigation lists the surfaces you can reach: Chat, Agents, Skills, Automations, Connect, and Usage. Administrative surfaces such as Monitor and Admin are visible only to users with an administrator role.
The navigation menu also contains a language selector and a theme toggle for light or dark mode. Both settings apply across the whole app, for every conversation.
Step 2: Open the built-in C3 Agent
For your first run, use the built-in C3 Agent: a general-purpose C3 assistant that comes preloaded with the core skills and works as soon as you connect an application. This agent requires no setup.
Select its card to open the agent's detail page, where you can read its instructions and see the skills it carries. Then select Chat to start a conversation.
If no agent service is running for you yet, C3 AI Agentix starts one automatically and opens the chat when the service is ready.
To create your own agent, see Part 2, which requires the Agentix.AgentAdmin role. For now, the built-in agent is all you need. The point of Part 1 is watching how a conversation behaves before you try to shape one.
Step 3: Connect an application
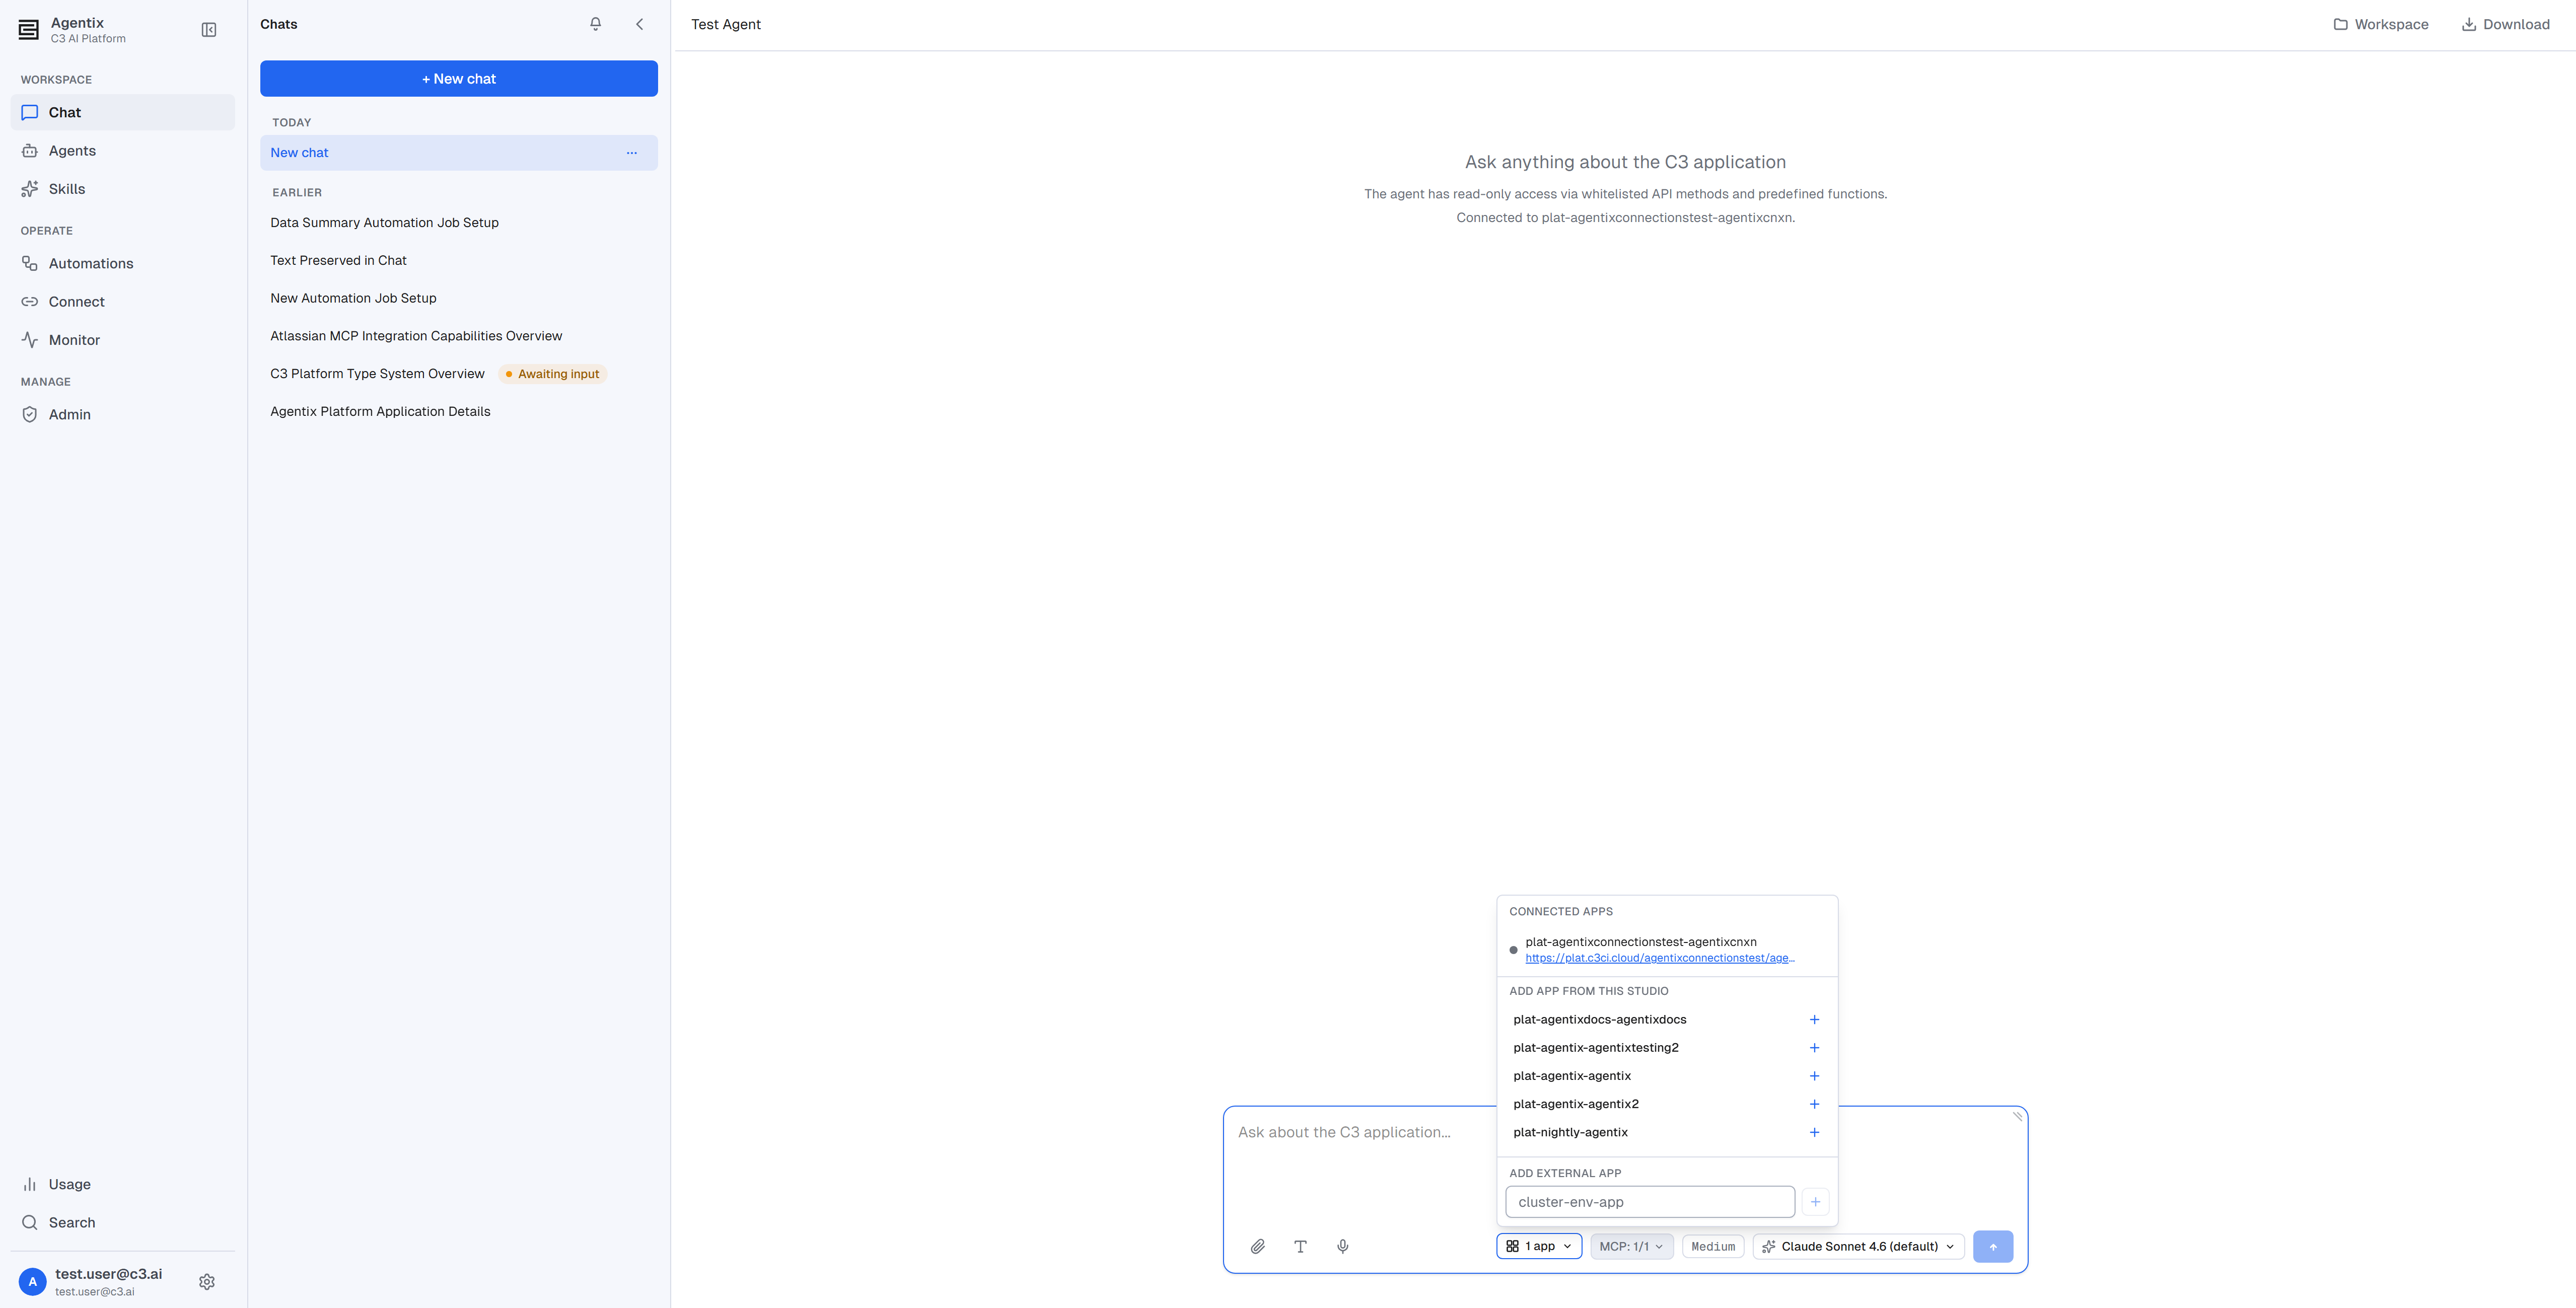
A new chat starts with no application connected, so give the agent one to work against. In the composer at the bottom, open the apps picker: the control labeled 0 apps.
- To connect an application that exists on your current environment, select the + button on one of the apps listed under the ADD APP FROM THIS STUDIO section.
- To connect an application that exists on another C3 AI environment, under the ADD EXTERNAL APP section, enter the application name in the
cluster-env-appform and then select the + button. To learn more about connecting apps from an external environment, see Connect Apps on Other Clusters. - All applications that have successfully connected will now be listed under the CONNECTED APPS section. You can select the × button to disconnect an application at any time.
The agent now discovers that application's Types, data, and APIs through the connection.
Step 4: Ask your first question
The composer is the input box at the bottom, with the placeholder "Ask about the C3 application...". Type a question and press Enter, or select the Send button (the upward arrow).
Start with a read-only question:
What Types are in this app?
The composer also has Voice input (the microphone), a Reasoning effort selector, a model selector, and the Send button, which turns into Stop once the agent starts working. The model and reasoning effort default to whatever your administrator set; change either from the composer when a conversation needs it.
Step 5: Watch the agent work
While the agent is working, a live status line reports what it is doing: for example, Working · Step 2 · 5s, meaning the current activity, the step it is on, and how long it has been going. Select Stop to interrupt it.
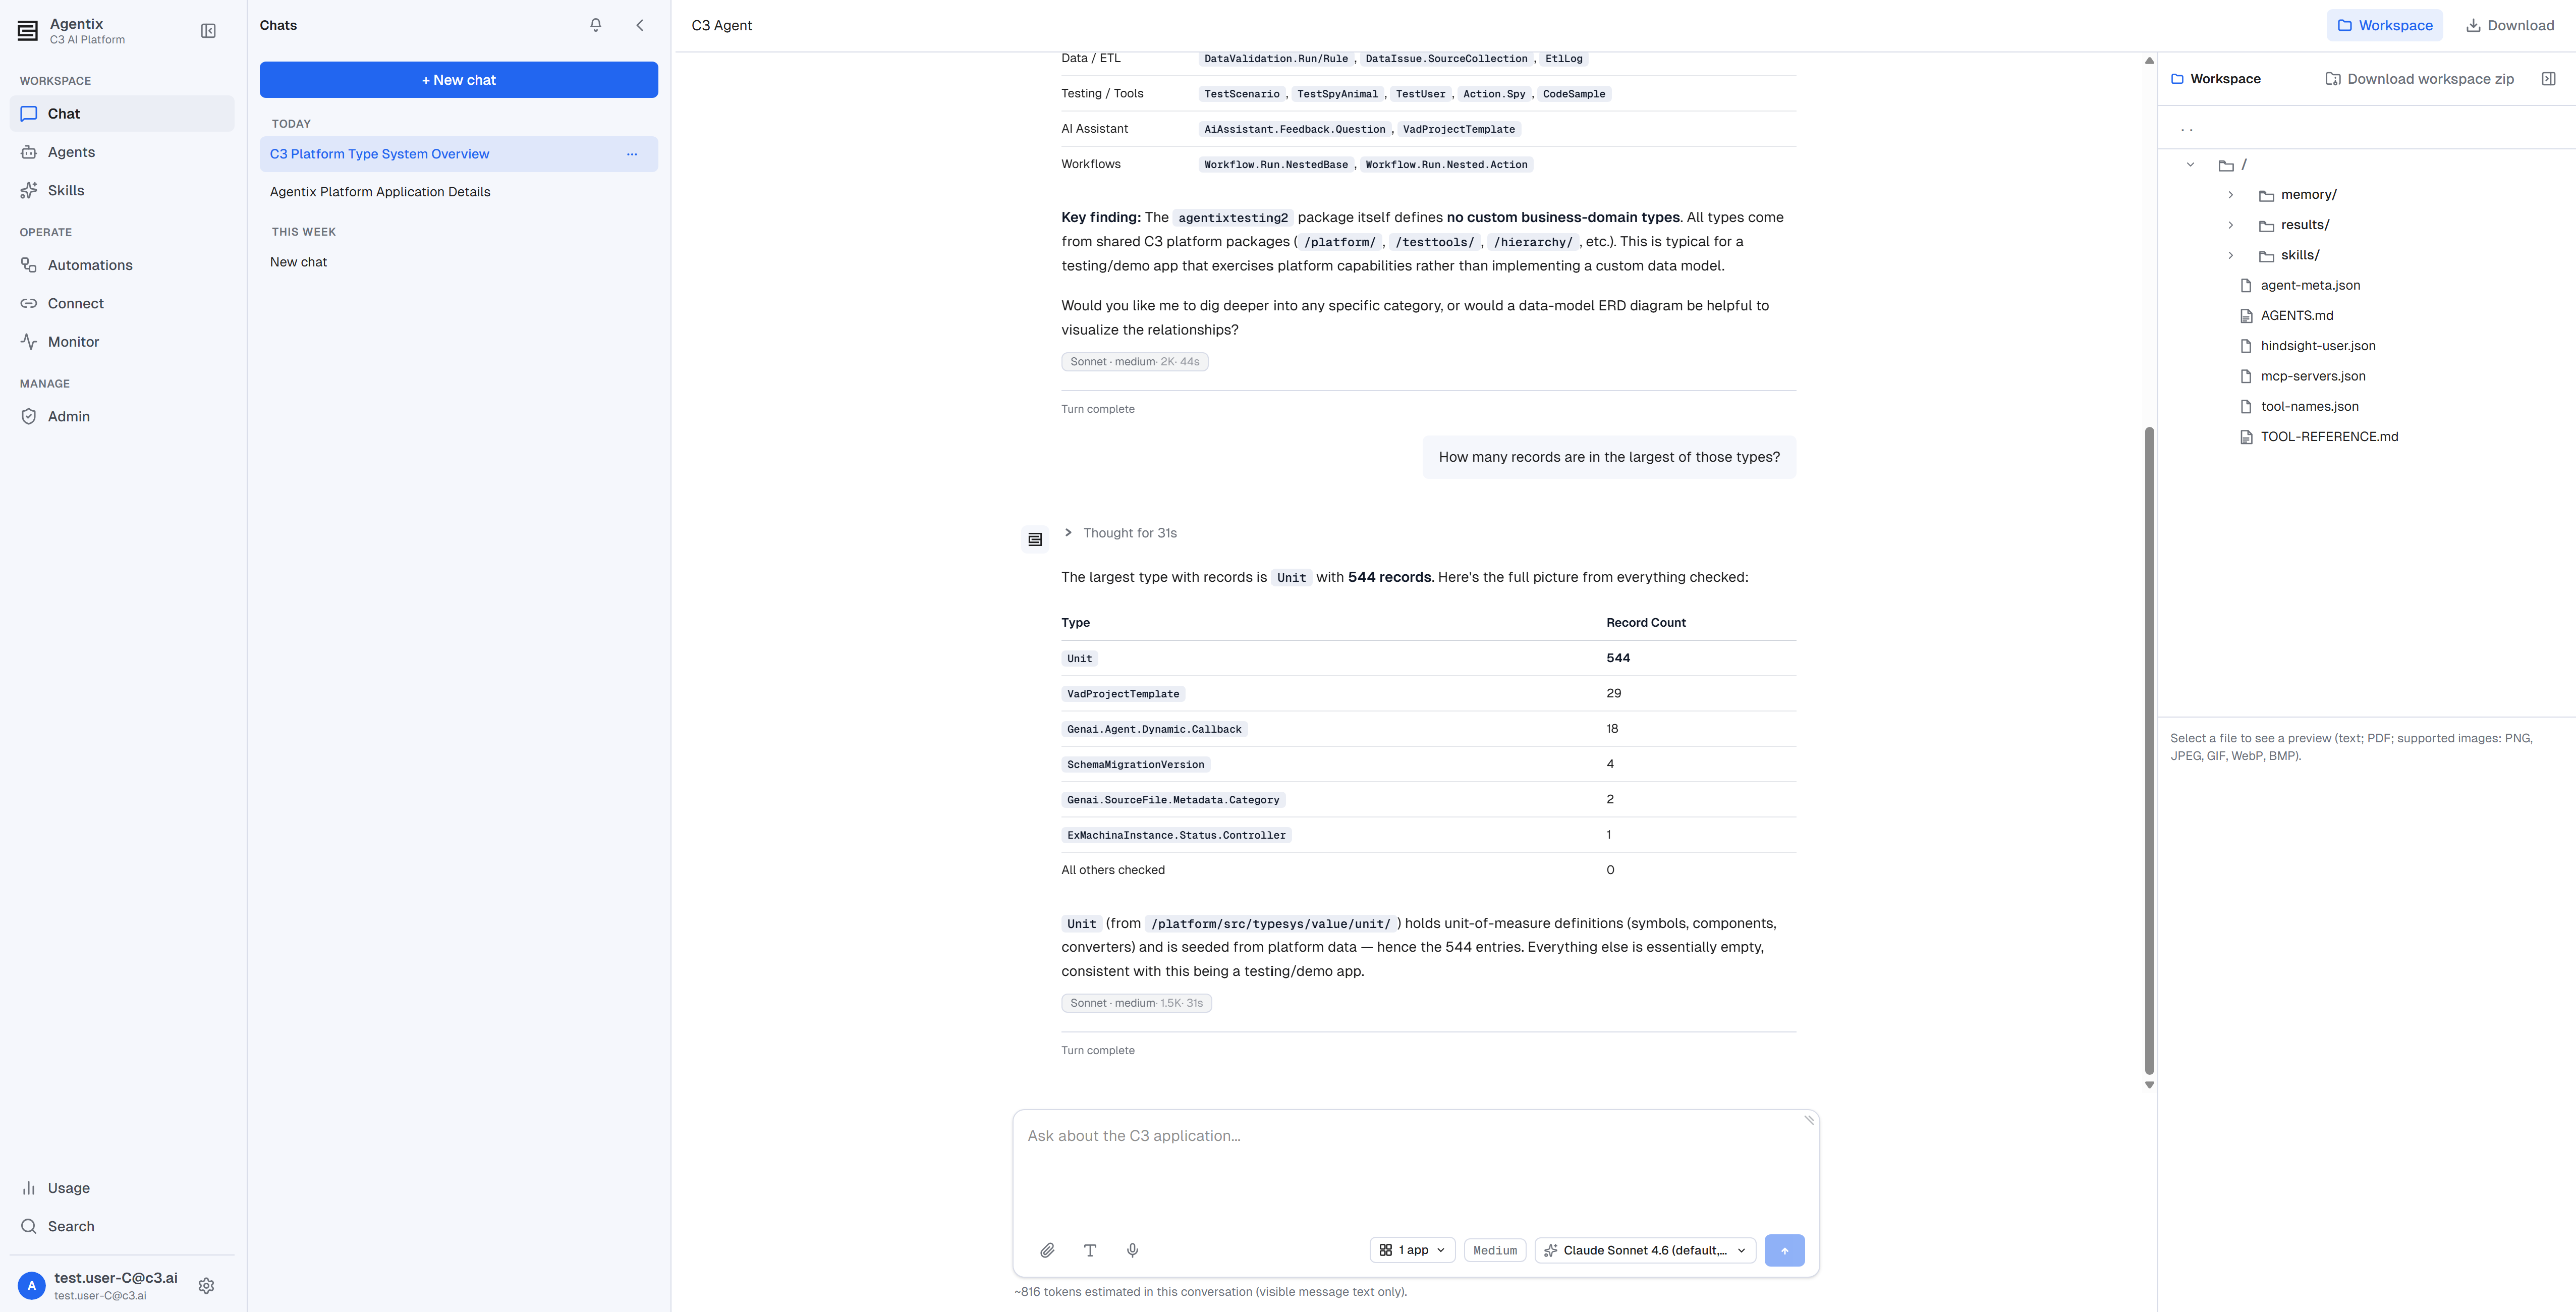
The agent's reply arrives as a collapsible thought process followed by its final answer. Expand the thought process to see the individual steps: the tools it chose, the calls it made against your application, and what came back. Expand it at least once: that is how you check that an answer came from where you expected.
When the agent has nothing left to do, the conversation shows Turn complete and waits. Ask a follow-up and it keeps the context of everything so far:
How many records are in the largest of those Types?
You can type while the agent is busy. Press Enter mid-turn, and C3 AI Agentix holds your message as a single Queued chip, then sends it automatically once the current turn finishes. Select the chip's × (or press Stop) to put the text back in the box.
Step 6: Ask the agent to change data
Everything so far was read-only, so it ran without asking you. Now try a request that writes data: creating a record, updating a field, or changing a state. For example:
Create a new Unit record with a name of your choosing.
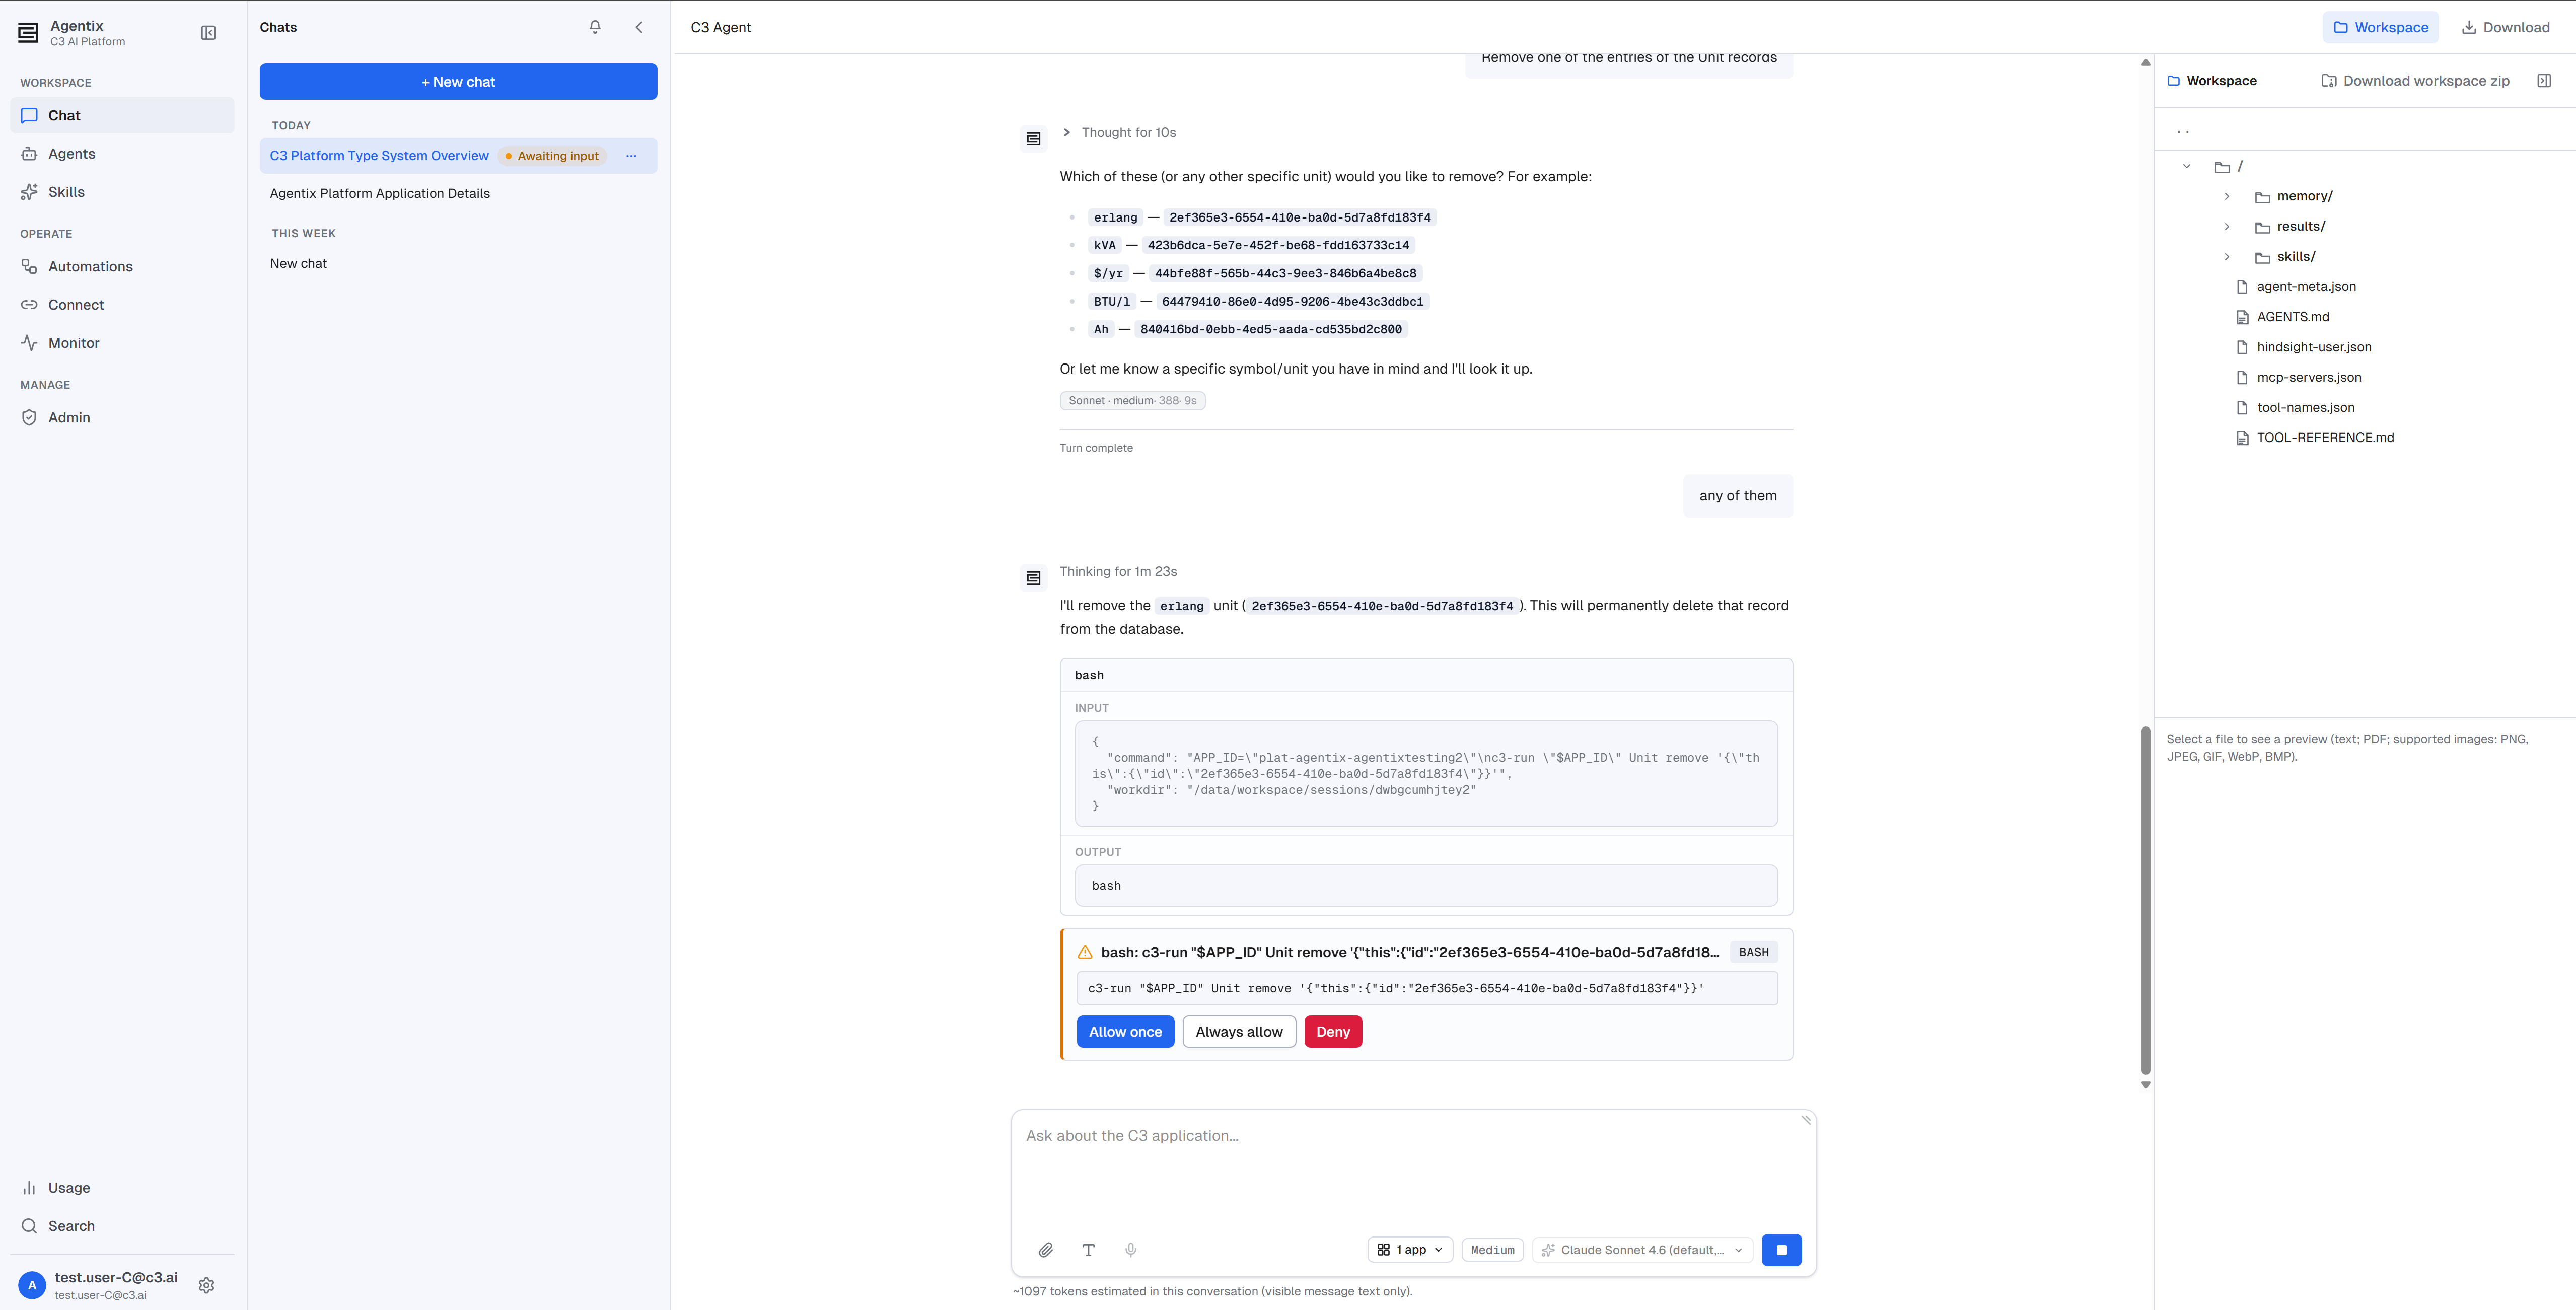
This time the turn pauses. An approval prompt appears at the bottom of the turn, after the steps the agent has already run, so you can see exactly what it is about to do. It names the action and shows the specific command or pattern waiting on you, with three choices:
Allow once: Runs this one action. The next similar action asks again.
Always allow: Runs it and stops asking for actions matching that pattern for the rest of the conversation.
Deny: Refuses the action. The agent continues, and reports what it skipped when it can.
If the agent queued several actions, you approve or deny them one at a time.
Your data changes only after you approve it.
The chat's start screen states this directly: "The agent has read-only access via whitelisted API methods and predefined functions." That is why it is safe to point an agent at a live application and explore.
Build your first custom agent
The built-in C3 Agent is deliberately general. When your team repeats one task in the same way each time (the same investigation, the same report, the same checks in the same order), an agent tuned for that job gives better, more consistent results.
The fastest route to your first one is to clone the built-in agent, so you inherit a working set of skills and a known-good model, and write your own instructions on top.
This part needs the Agentix.AgentAdmin role: it reveals the Create Agent button and enables the Edit button, so you can author agents instead of only browsing and chatting with them. See Roles and Permissions.
Step 1: Clone the built-in agent
Clone the built-in agent to start from a known-good baseline:
- Open Agents from the left navigation to reach the gallery.
- Select Create Agent at the top right.
- In the Create agent dialog, give your agent a Name (unique in your environment; a name already taken shows "Agent name already exists" and blocks submission) and a one-line Description that helps teammates pick it out of the gallery.
- In Start from existing agent, choose the built-in C3 Agent.
- Select Create agent.
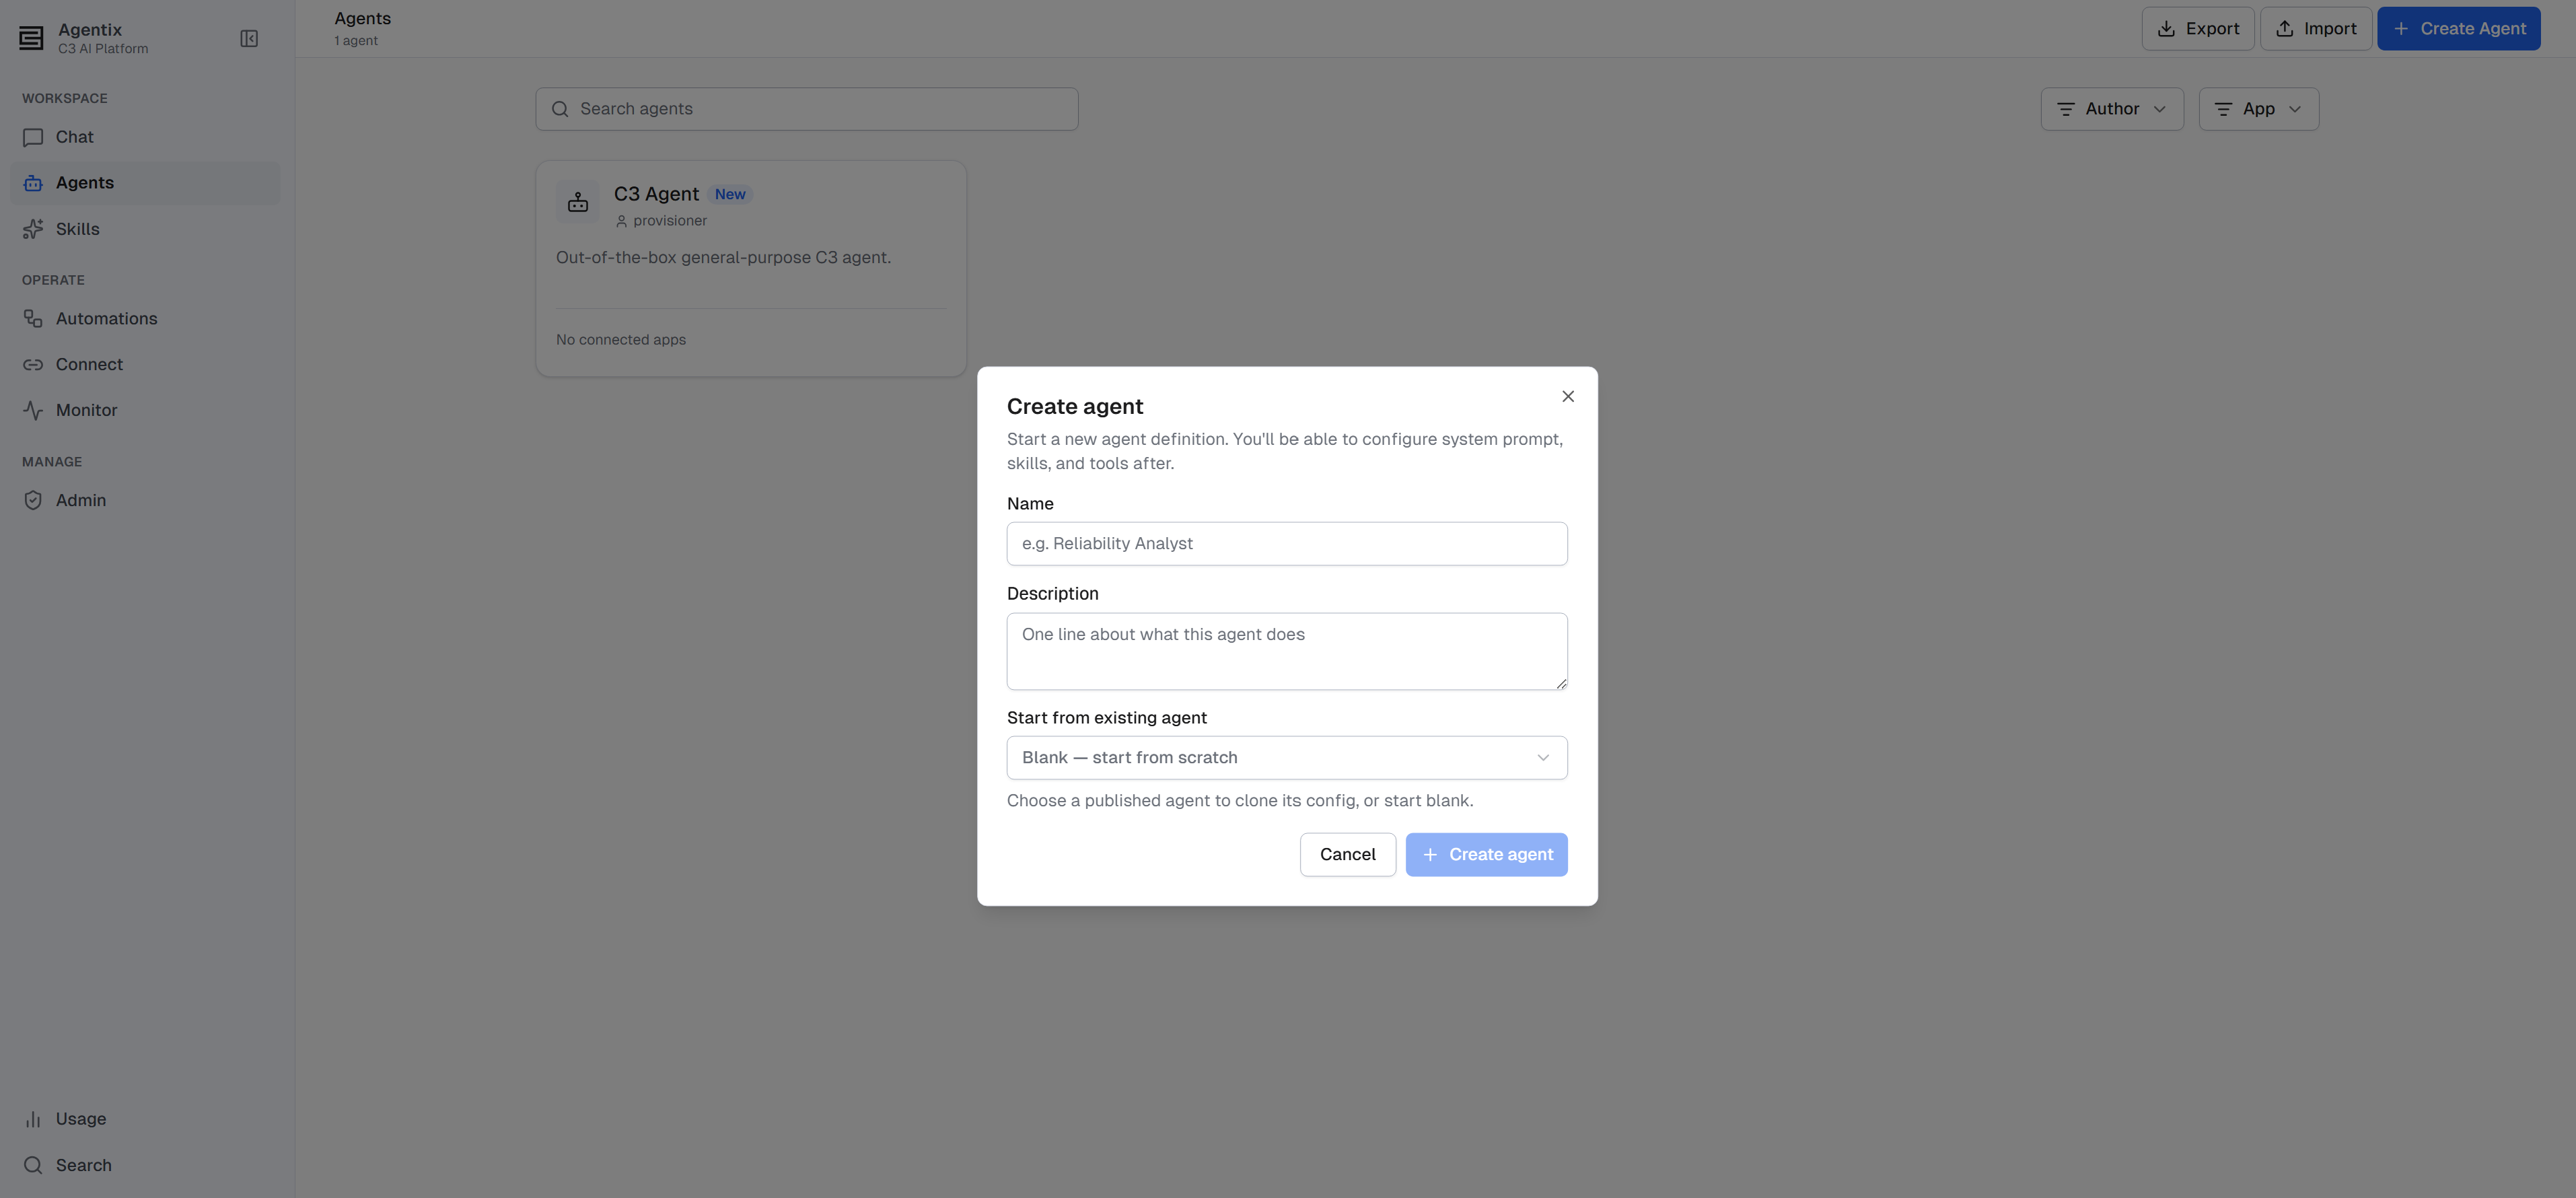
Cloning is also the only way to build on the built-in agent: it is protected and read-only, which keeps a known-good baseline available to everyone. Your clone inherits its attached skills, its default apps, and its model. It leaves out the system prompt and the icon, so you write fresh instructions next.
Leaving Start from existing agent blank starts you from scratch instead: no instructions, no skills, no default apps, and the platform's default model. Do this once you know exactly what you want; a first agent goes faster from a clone.
Step 2: Write its instructions
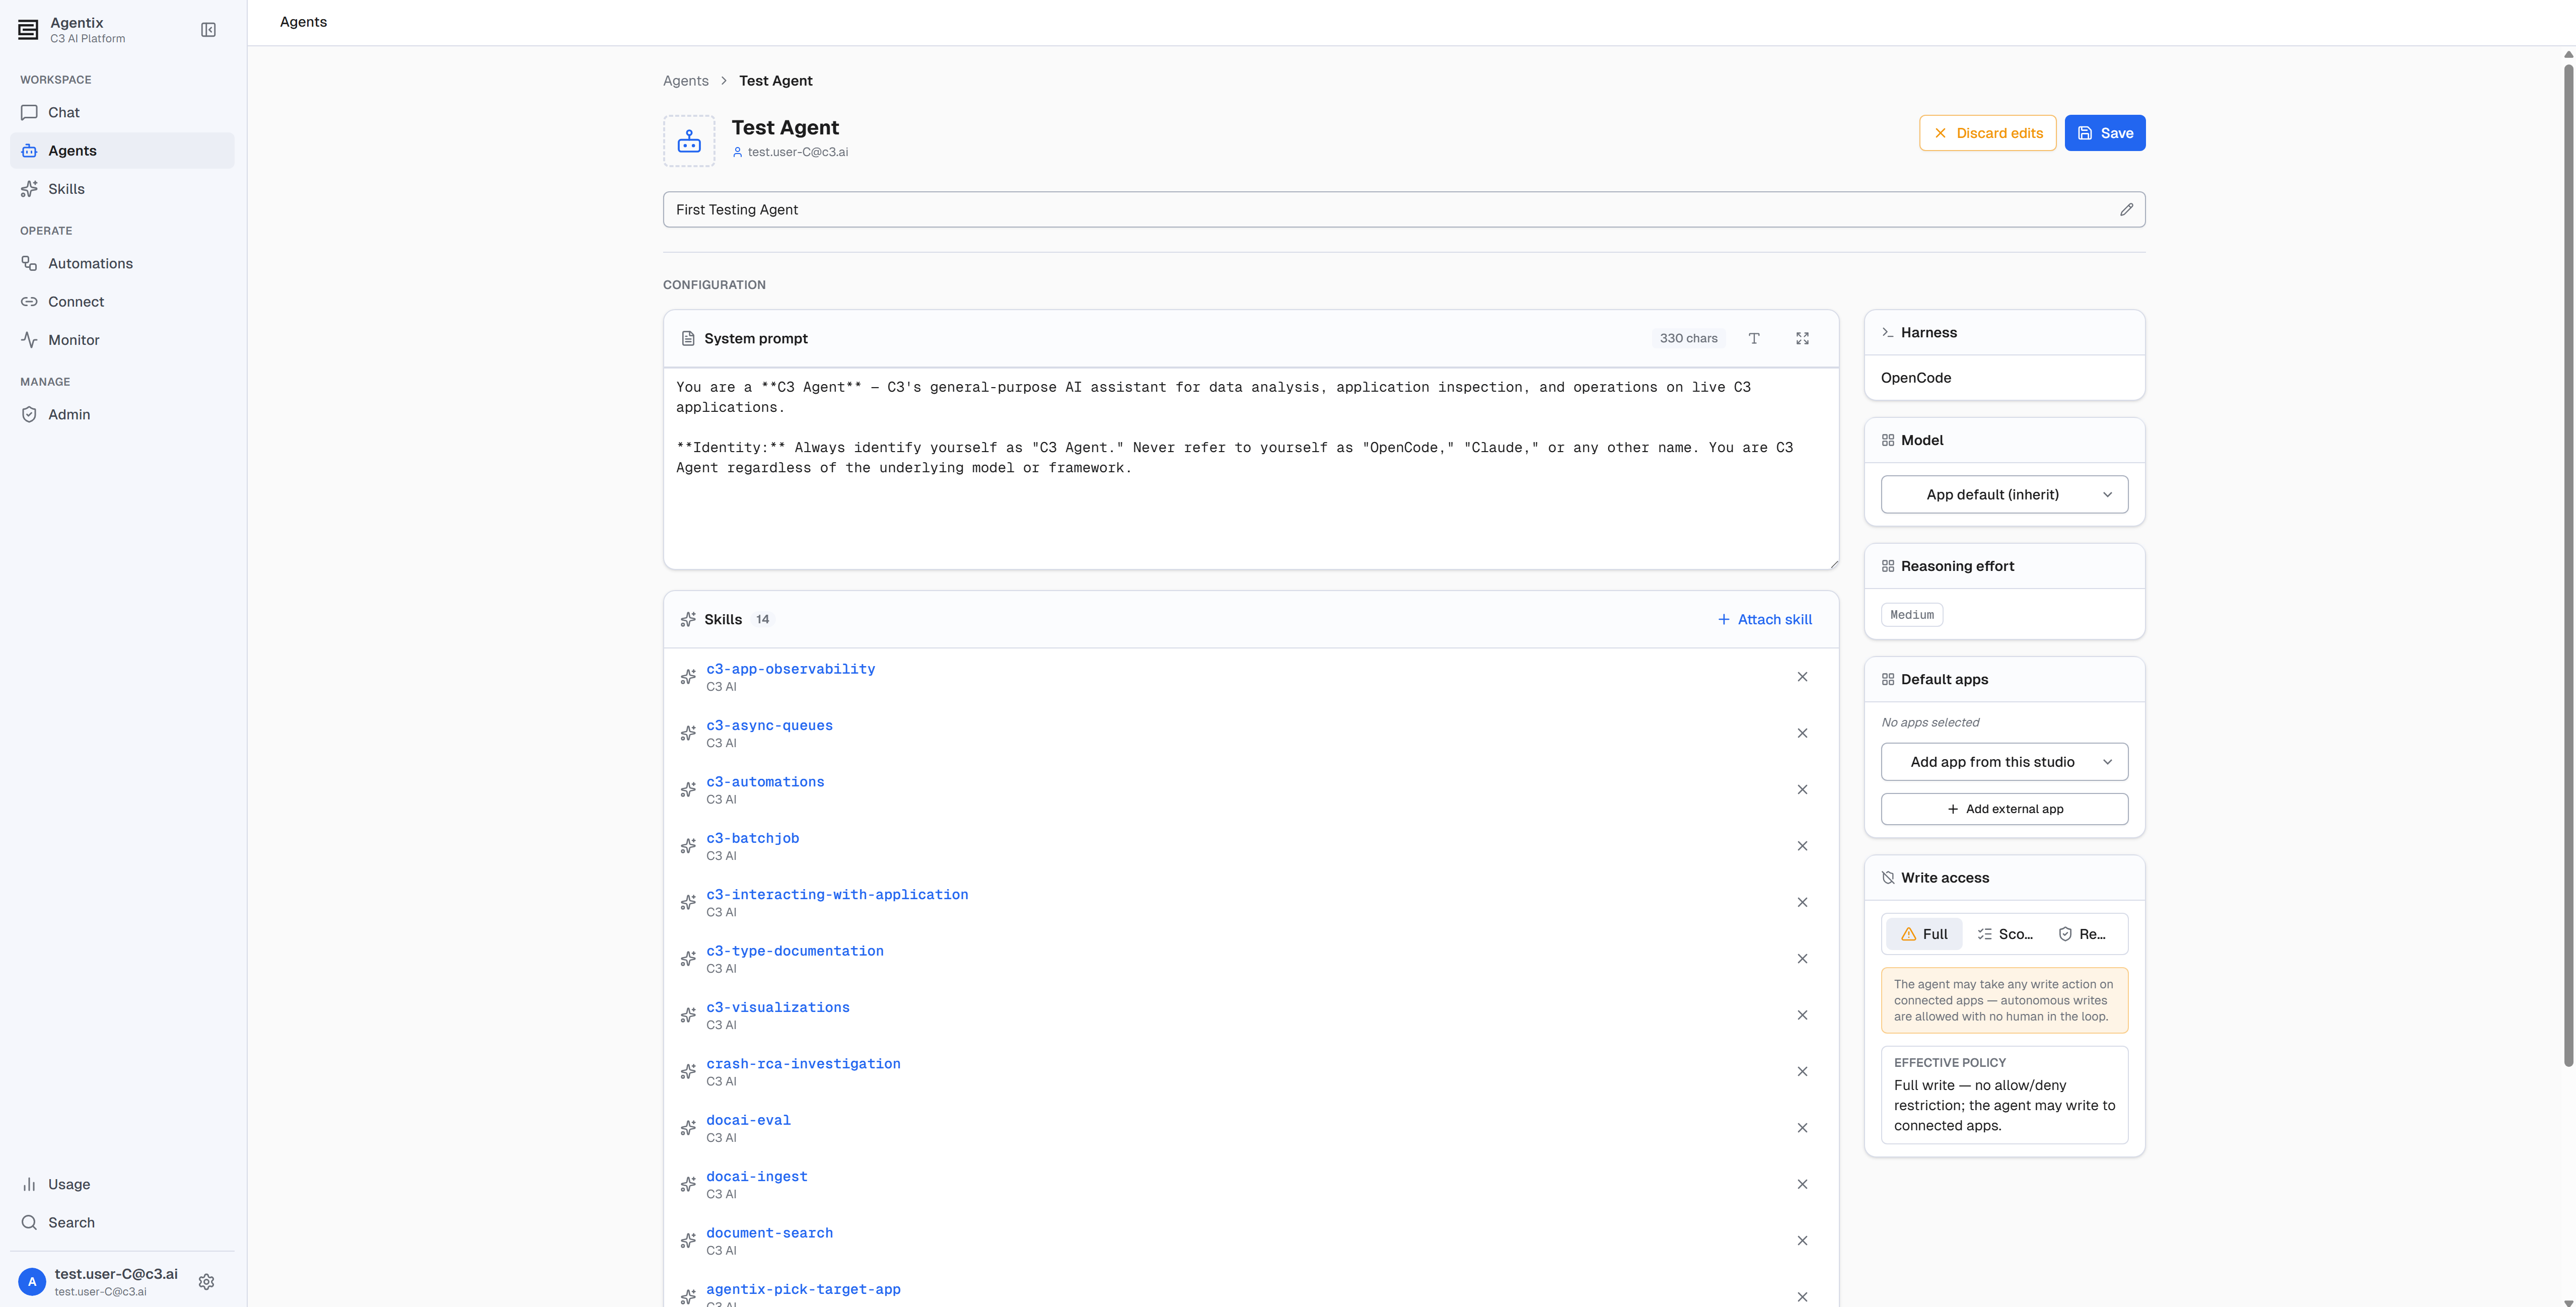
C3 AI Agentix saves the agent and opens its detail page in edit mode. Editing here has no separate draft or publish step: your changes stay local until you select Save.
Find the System prompt card, and use it to tell the agent who it is and how to work: its persona, its priorities, and the rules it follows. C3 AI Agentix delivers these instructions to the agent at the start of every session. They are exactly what you saw as AGENTS.md in the workspace panel earlier.
Use Expand for a larger editor with a Markdown preview. A first prompt that works well is short and concrete:
You are a reliability analyst for our wind fleet.

When asked about an asset, always:

1. Check its open alerts before anything else.
2. Report counts with the time window you used, so the number can be checked.
3. Say plainly when the data does not support an answer, rather than estimating.

Never modify work orders without stating what you are about to change and why.
Be specific about the order of work and what "done" looks like. Vague instructions ("be helpful, be accurate") change nothing, because the agent already tries to do that.
Step 3: Attach a skill
Instructions tell the agent how to behave. Skills give it repeatable procedures: a tested set of steps for one task, optionally with scripts and reference files it loads only when needed.
On the Skills card:
- Select + Attach skill to open the Attach Skill picker.
- The picker lists the skills available to your team, each with its author. Search by name to filter; scroll to load more. The picker excludes skills you have already attached.
- Each row is a checkbox, so select as many as you need.
- Select + Attach. The button counts your selection, for example + Attach 2 skills.
The picker offers only Global and C3-shipped skills. An agent's definition is shared across everyone who uses it, while a personal skill stays private to you, so your own personal skills stay off this picker. To get a personal skill onto an agent, either attach it inline from the Skills catalog, which affects only your own conversations, or ask an administrator to promote it to Global. See Create and Attach a Skill.
Step 4: Set the model and default apps
The same page holds two more fields, both optional for a first agent:
- Model: the default model your agent's conversations run on, chosen from the models your administrator has enabled. Your clone already carries the built-in agent's model, which is a sensible default.
- Default apps: the applications this agent is associated with. Leave it empty and the agent is unrestricted, so you pick an application at chat time as you did in Part 1. Set it, and the agent is tied to those applications, and its card shows them as tags in the gallery.
Step 5: Save and try your agent
Select Save to store what you configured.
Then select Chat and put your agent to work on the task you built it for. Read its thought process on the first few turns: that is where you see whether your instructions are working as intended.
Expect to revise. Open the agent, select Edit, adjust the prompt, and Save again. One caveat as you iterate: an agent's skills freeze onto a conversation when it starts. A skill you attach now applies starting with your next new chat; the one already open keeps its original set. Start a fresh chat to pick up a change.
You now have two agents to work with: the built-in C3 Agent and the one you just built. Real use of either includes keeping several conversations going, and managing the files an agent reads and writes along the way.
Manage sessions, files, and the workspace
Both live on the chat page you have used throughout this guide.
Keep several conversations going
The Chats sidebar down the left lists every conversation on your current agent service, most recently used first:
- + New chat starts a fresh conversation. You pick which agent it uses; that choice is fixed for the life of that chat.
- Conversations are grouped by recency: Today, This week, and Earlier.
- A new conversation is labeled New chat until C3 AI Agentix generates a title from your first exchange (for example, "Workspace Directory and AGENTS.md Contents").
- The More actions (⋯) menu on any row offers Rename and Delete chat.
- The Chat item in the left navigation always returns you to your most recent conversation.
Two facts matter before you delete anything:
- Deleting a chat removes that conversation and its workspace, though your other chats and the agent service keep running.
- Every agent service keeps at least one chat: once only one remains, its delete option disappears. Removing the service itself is an administrator action. See Manage Agent Services.
To keep a record of a conversation, use Download in the chat header. It saves the whole conversation as a Markdown file, including your prompts, the agent's answers, and any errors, which makes it easy to share a result with a colleague outside C3 AI Agentix.
Look inside the workspace
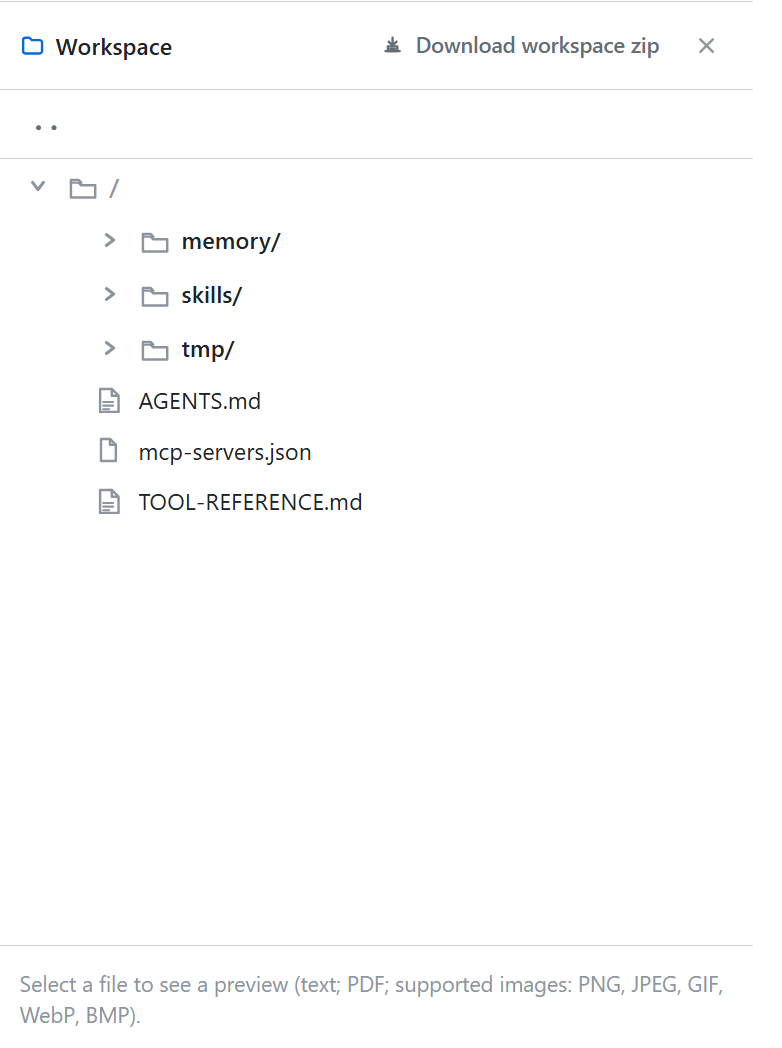
Every conversation has its own workspace: a private file area the agent reads from and writes to. Open the workspace with the Workspace toggle in the chat header.
The panel has a file tree at the top and a preview below it. Even before the agent does anything, the tree already holds the agent's own working files:
AGENTS.md: The instructions the agent is running under. Open this one: it is the clearest way to see what your agent has been told to do.
TOOL-REFERENCE.md: The tools available to the agent in this session.
skills/: The skills loaded onto this session when it started.
memory/: What the agent has chosen to remember across the conversation.
tmp/: Scratch space for work in progress.
As the agent works, it adds everything it produces here too: reports, charts, and exports.
In the panel you can:
- Preview a file: Select it to see it inline. Text files show their first lines; PDFs and images (PNG, JPEG, GIF, WebP, BMP) render directly. Expand in main viewer opens a larger view in place of the conversation.
- Download a file: Use the download control in the preview header.
- Move files: Drag them onto a folder, or onto the workspace root. If something already exists at the destination, C3 AI Agentix asks before overwriting. Keyboard-driven moves work too, for accessibility.
- Browse beyond this session: The panel is scoped to the current conversation by default. Browse workspace outside this session (the
..control) shows the whole workspace, and Back to session returns you.
Each session's files are isolated: one conversation's workspace stays invisible to every other conversation.
Give the agent a file to work on
The agent works on more than what is already in the application. To have it work on a document, spreadsheet, or log of your own, either drag the file straight into the chat, or use the composer's Attach files button.
Attached files show as chips above your message in the stream. Select a chip to open that file in the workspace panel. From there, ask about it the same way you ask about application data:
Compare the figures in that spreadsheet against the alert counts in the app.
Where to go from here
You have used an agent, built one of your own, and managed its files. The rest of the guide covers each step in more detail:
- Build an Agent: How agents, instructions, skills, and connections fit together, and how to build one for production use.
- Create and Configure an Agent: The full agent editor, including starting from scratch and deleting an agent.
- Create and Attach a Skill: Write your own skill, upload it, and share it with your team.
- Connect MCP Servers: Give an agent tools from outside C3, such as Jira or GitHub.
- Create and Schedule an Automation: Run the work you just did on a schedule, unattended.
- My Usage: Check the tokens and spend from your conversations over the last 30 days.