Data Lakehouse in C3 AI Studio
Data lakehouses store large amounts of raw data at a low cost. You can store a large volume of tabular data with the C3 AI Data Lakehouse and explore it using C3 Data Spark or the C3 Data Lake Tables API.
You can see your Data Lakehouse tables in C3 AI Studio. You can also add, filter, and edit metadata for tables in C3 AI Studio. For code-driven workflows, see Query Data Lakehouse Tables and Transform Data Lakehouse Data with Spark.
Page sections
The Data Lakehouse page is split into four tabs:
- Tables: A list of Data Lakehouse tables created in your application, and controls for creating more.
- Catalogs: A list of catalogs registered in your application.
- SQL Editor: An interface for querying tables in your Data Lakehouse.
- Editor History: A user-scoped audit trail of every SQL Editor run.
Access the Data Lakehouse page
To see tables in your Data Lakehouse:
- Select your application from the C3 AI Studio homepage or application list.
- Select Data Lakehouse in the Data section of the side navigation.
To switch tabs, select Tables, Catalogs, SQL Editor, or Editor History at the top of the page.
Tables tab
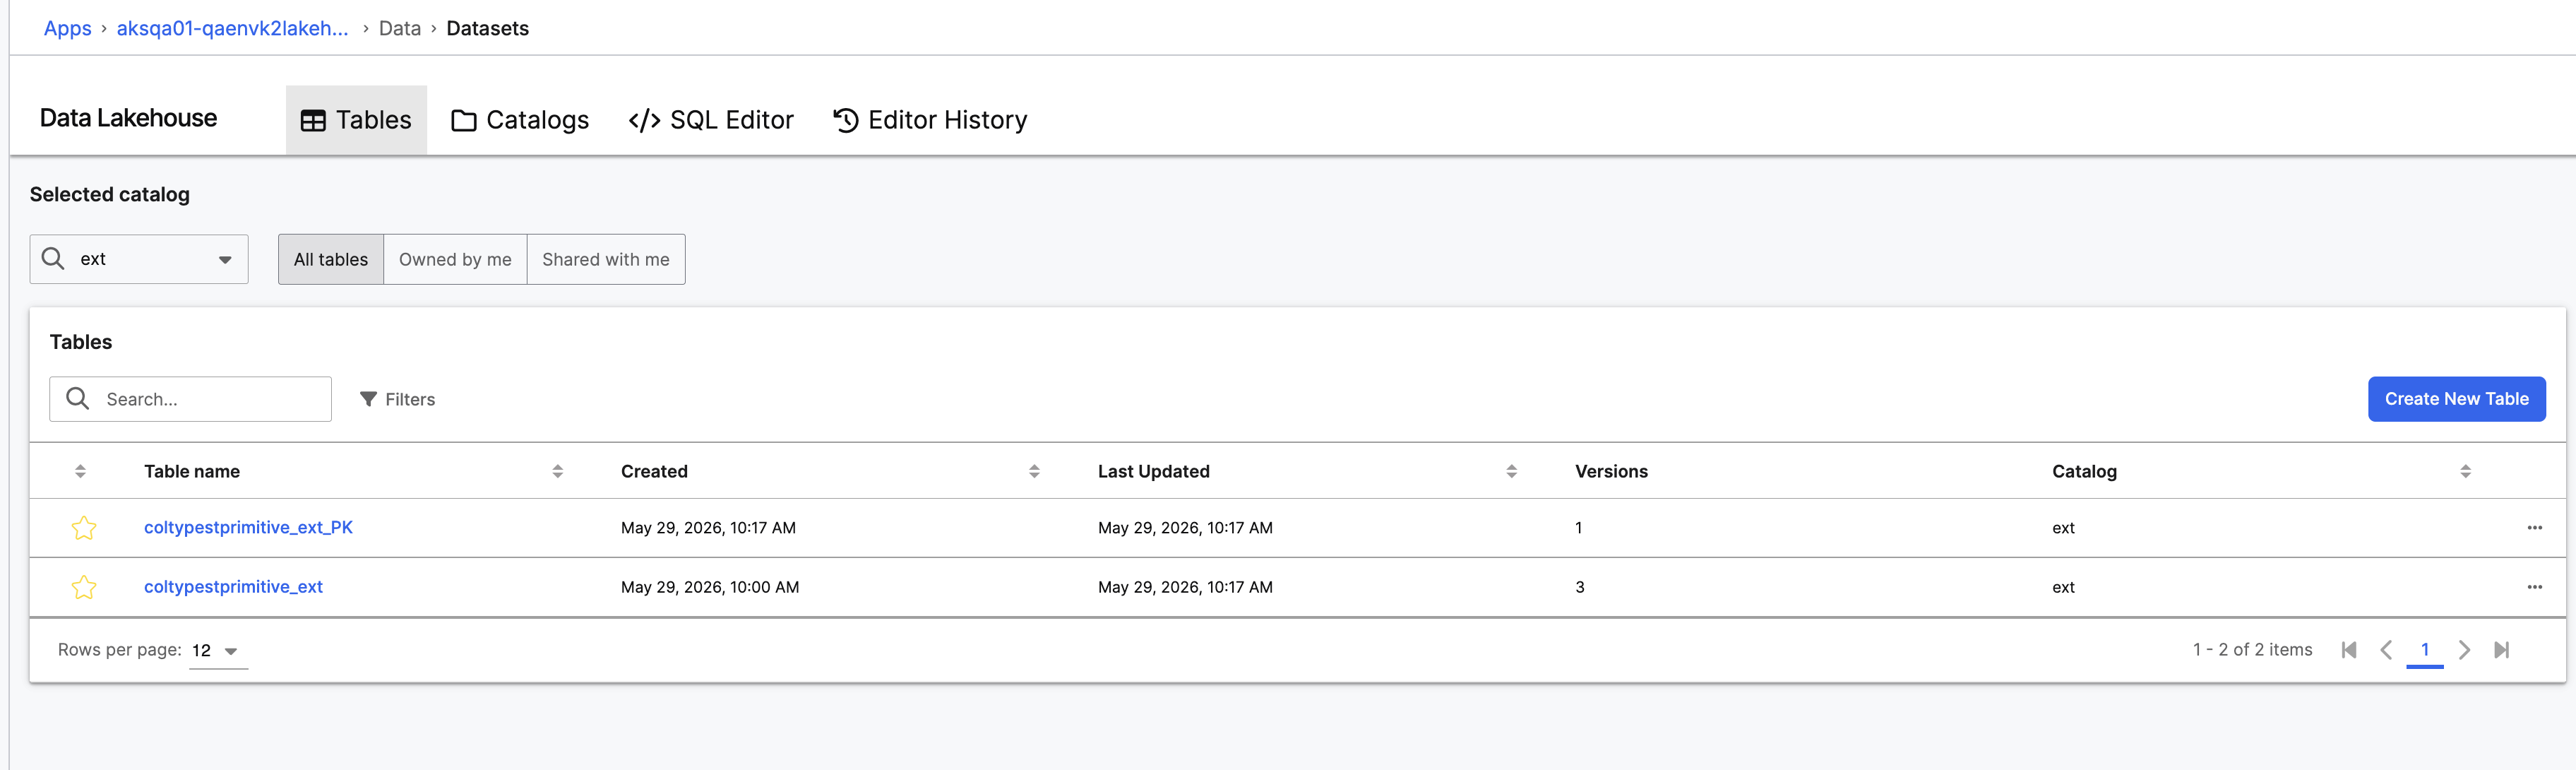
The Tables tab shows the tables in the selected catalog. Three segmented buttons control the scope:
- All tables: Every table the current user can read.
- Owned by me: Tables the current user created.
- Shared with me: Tables another application has shared with this one.
A Create New Table button sits at the top right of the grid; it is available on all three scopes. (Older builds render the button label in lowercase as "Create new table".)
Filters are available above the grid: a search box narrows the grid by table name, and a Filters button opens a drawer with Created (from / to) and Last Updated (from / to) date pickers. Some older builds render those date pickers inline above the grid instead of behind the Filters button.
If the All tables view shows no records but you know tables exist in the selected catalog, use the Select Table... combobox in the View Reference Table panel on the SQL Editor tab. The editor reaches the catalog directly through Spark and lists tables the grid does not currently show.
Catalogs tab
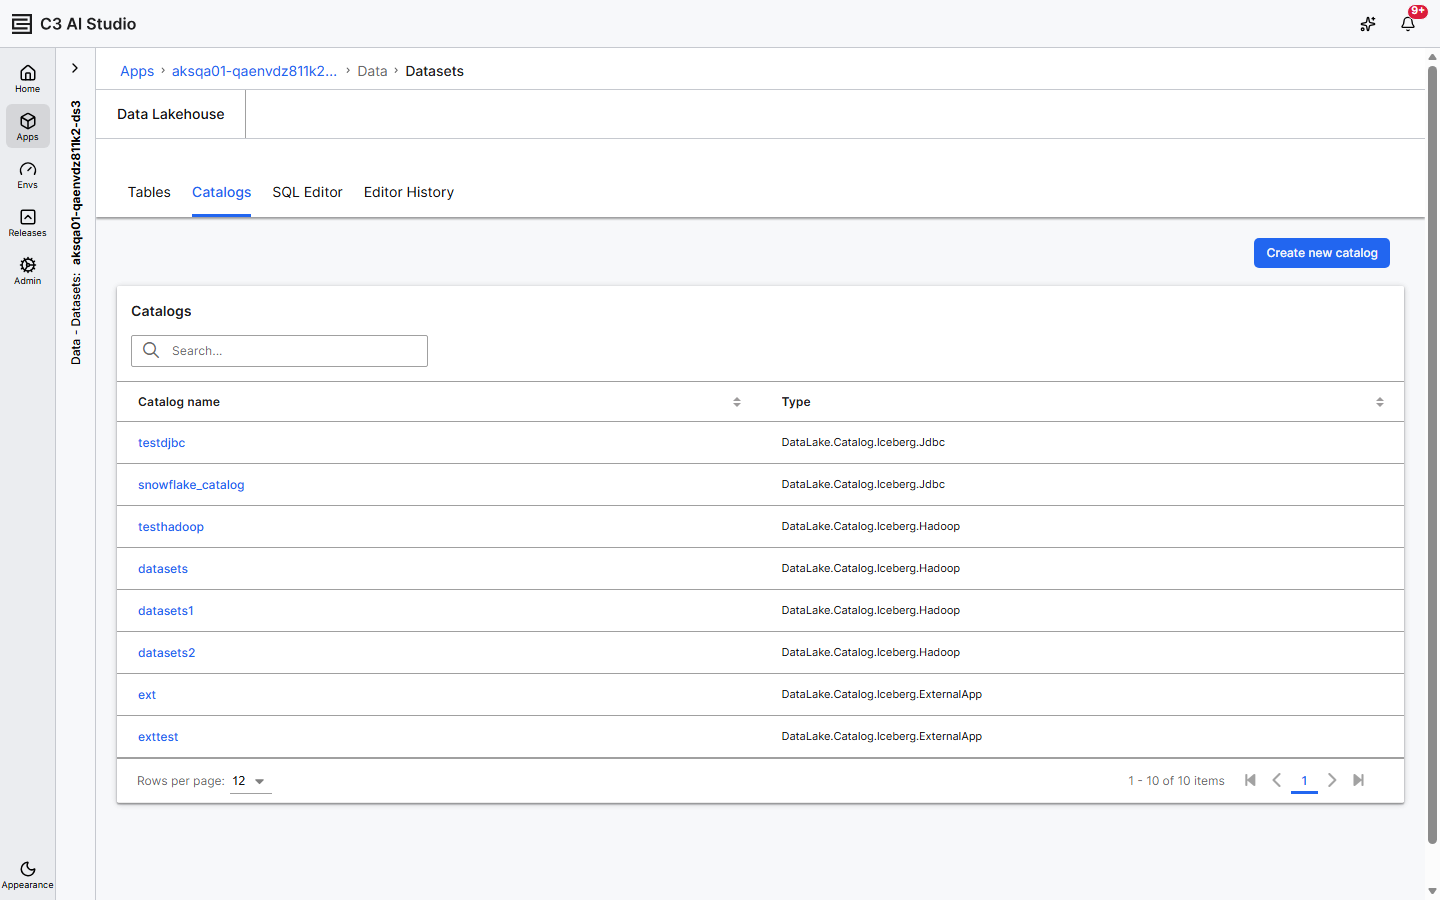
The Catalogs tab lists every catalog registered in your application. The grid shows two columns:
- Catalog name: The catalog's registered name.
- Type: The catalog kind —
DataLake.Catalog.Iceberg.Hadoop,DataLake.Catalog.Iceberg.Jdbc,DataLake.Catalog.Snowflake, orDataLake.Catalog.Iceberg.ExternalApp.
A Create new catalog button at the top right opens the catalog-creation form. For more detail on each catalog kind and the code paths to register one, see Register a Data Lakehouse Catalog.
SQL Editor tab
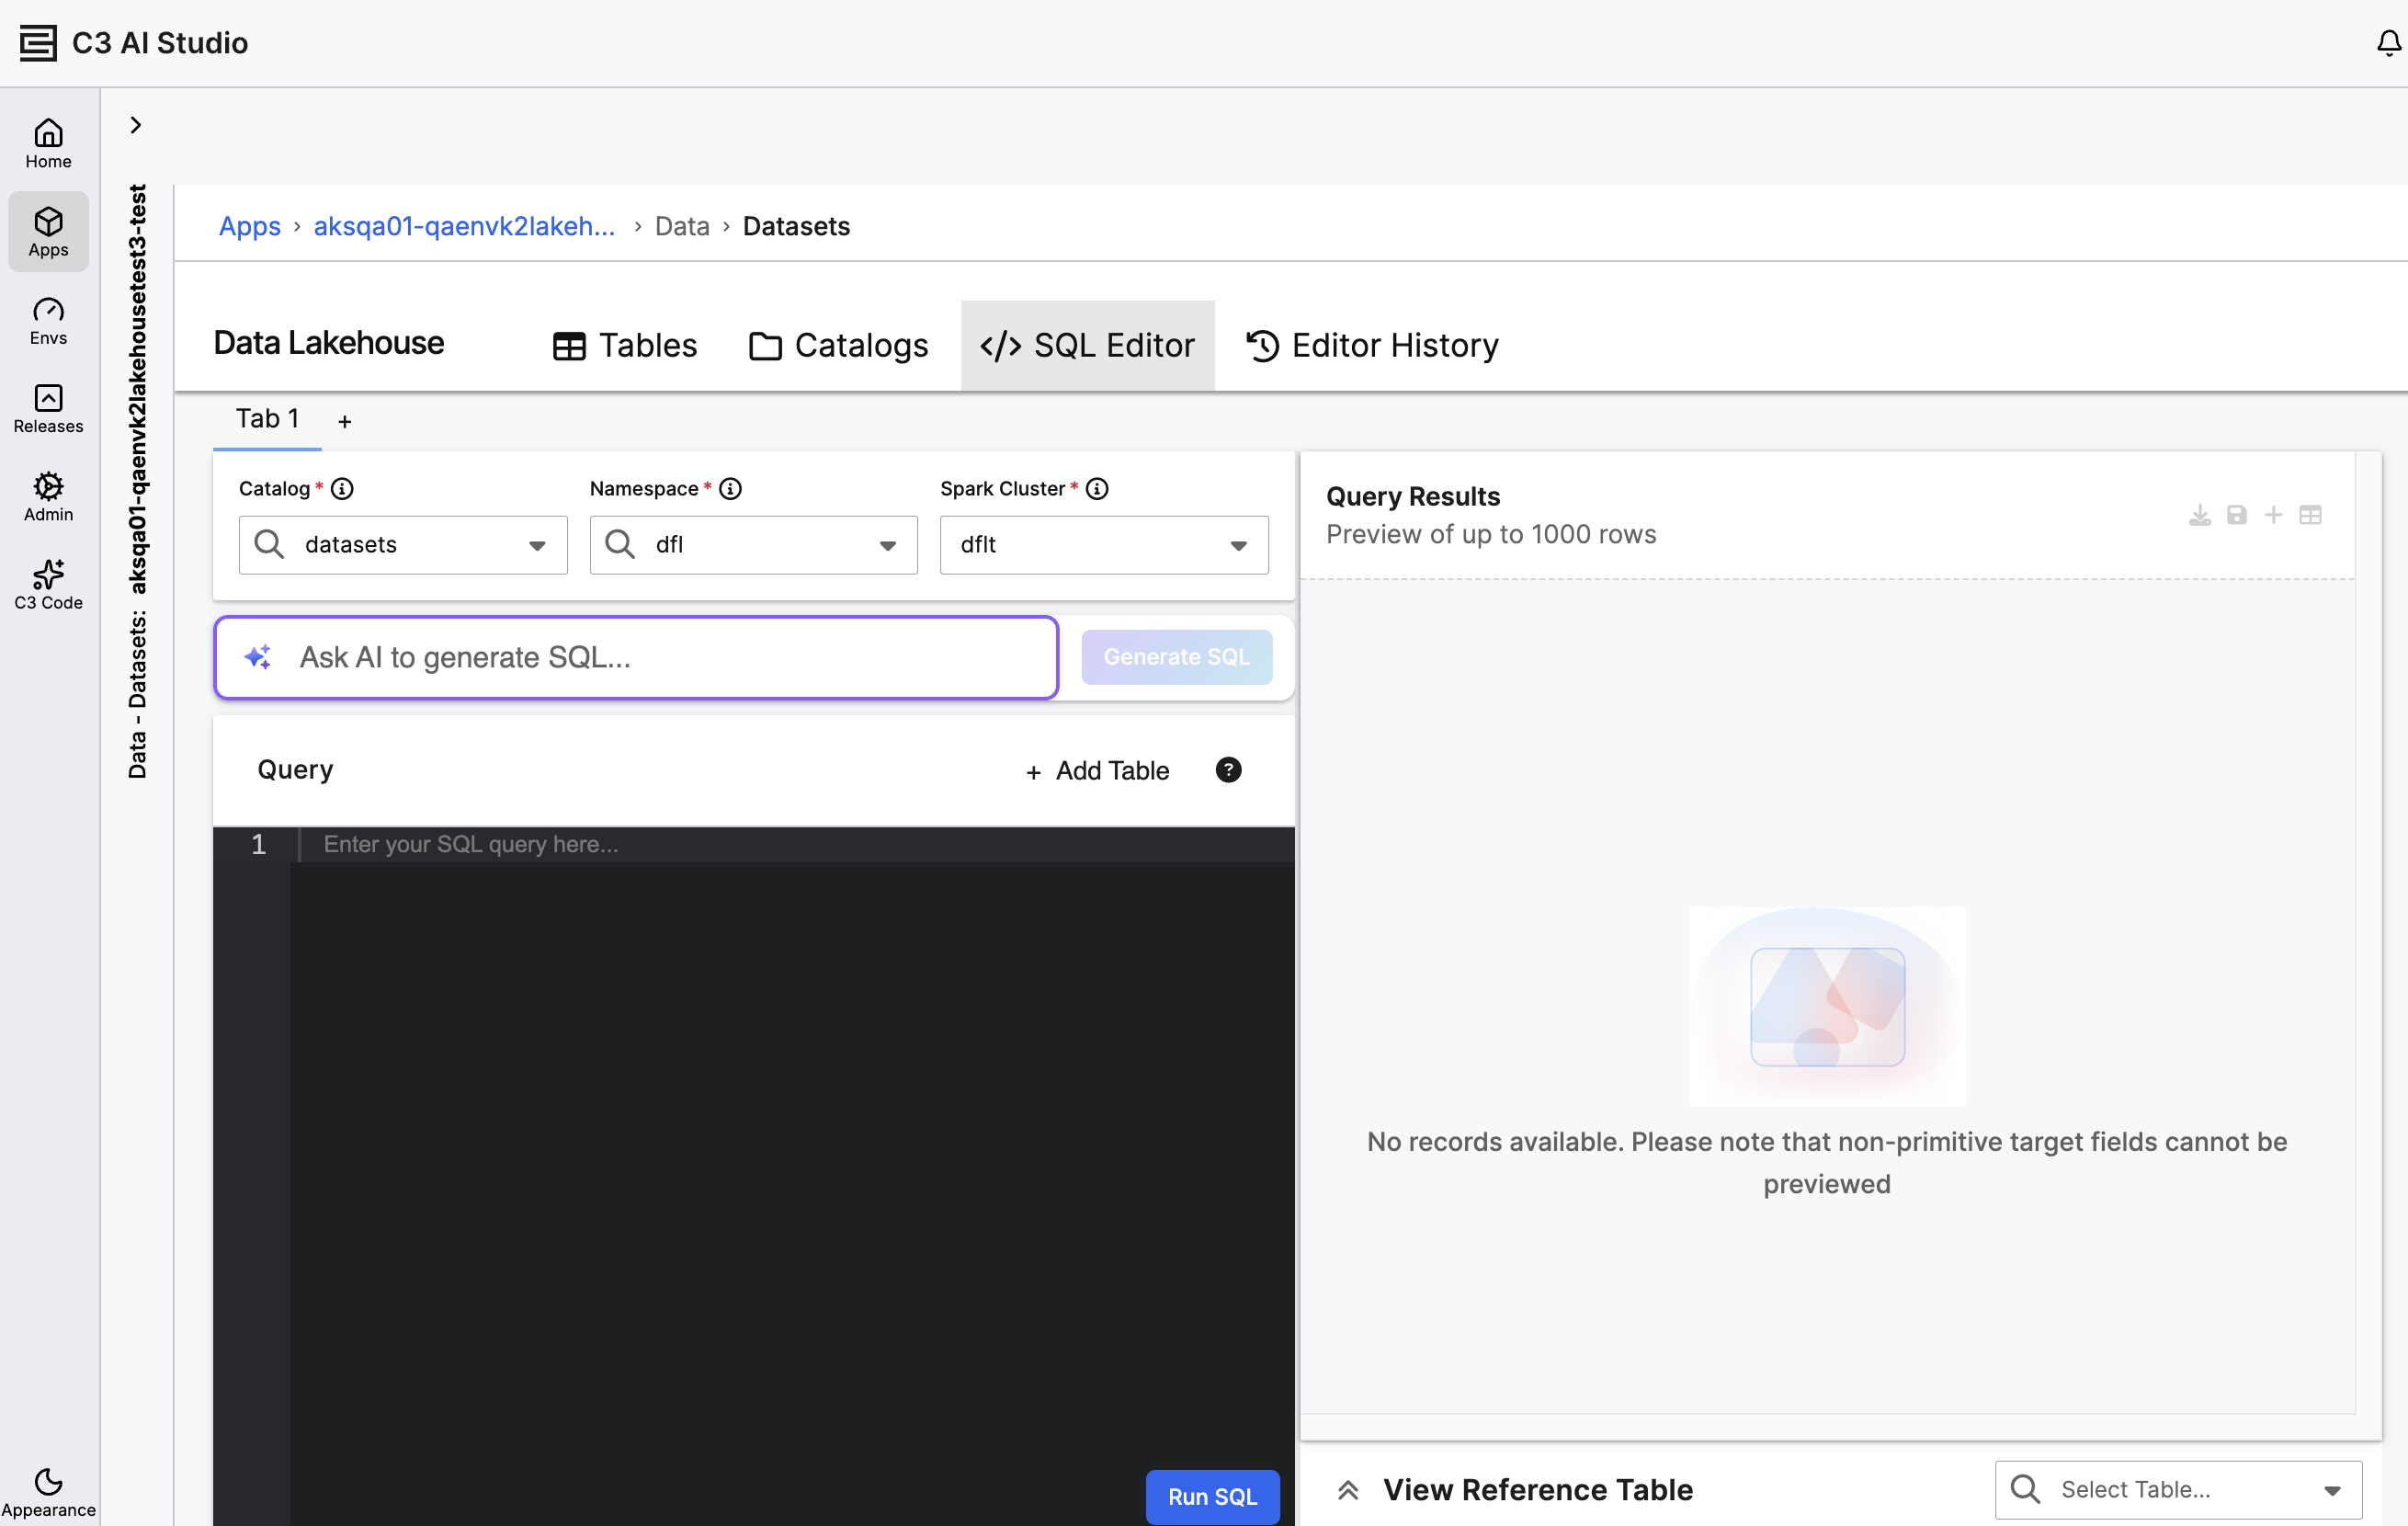
The SQL Editor is an interface for exploring data in an application's Data Lakehouse. The tab contains the following sections for exploring your selected catalog's data:
The editor supports multiple query tabs. Select the + button above the filter panel (aria-label Add tab) to open a new tab and work on a second query without losing the first.
Filter panel
The filter panel contains dropdown menus for selecting a target table or group of tables:
- Catalog: A catalog is a collection of tables (analogous but not identical to a database).
- The C3 Agentic AI Platform provides a default catalog (datasets) that contains all your tables.
- The dropdown menu allows you to select a catalog and narrow results to a subset of the tables in your Data Lakehouse.
- Namespace: A custom namespace associated with the catalog. Use this to narrow your table selection.
- Spark Cluster: The cluster that runs your query. The default cluster is
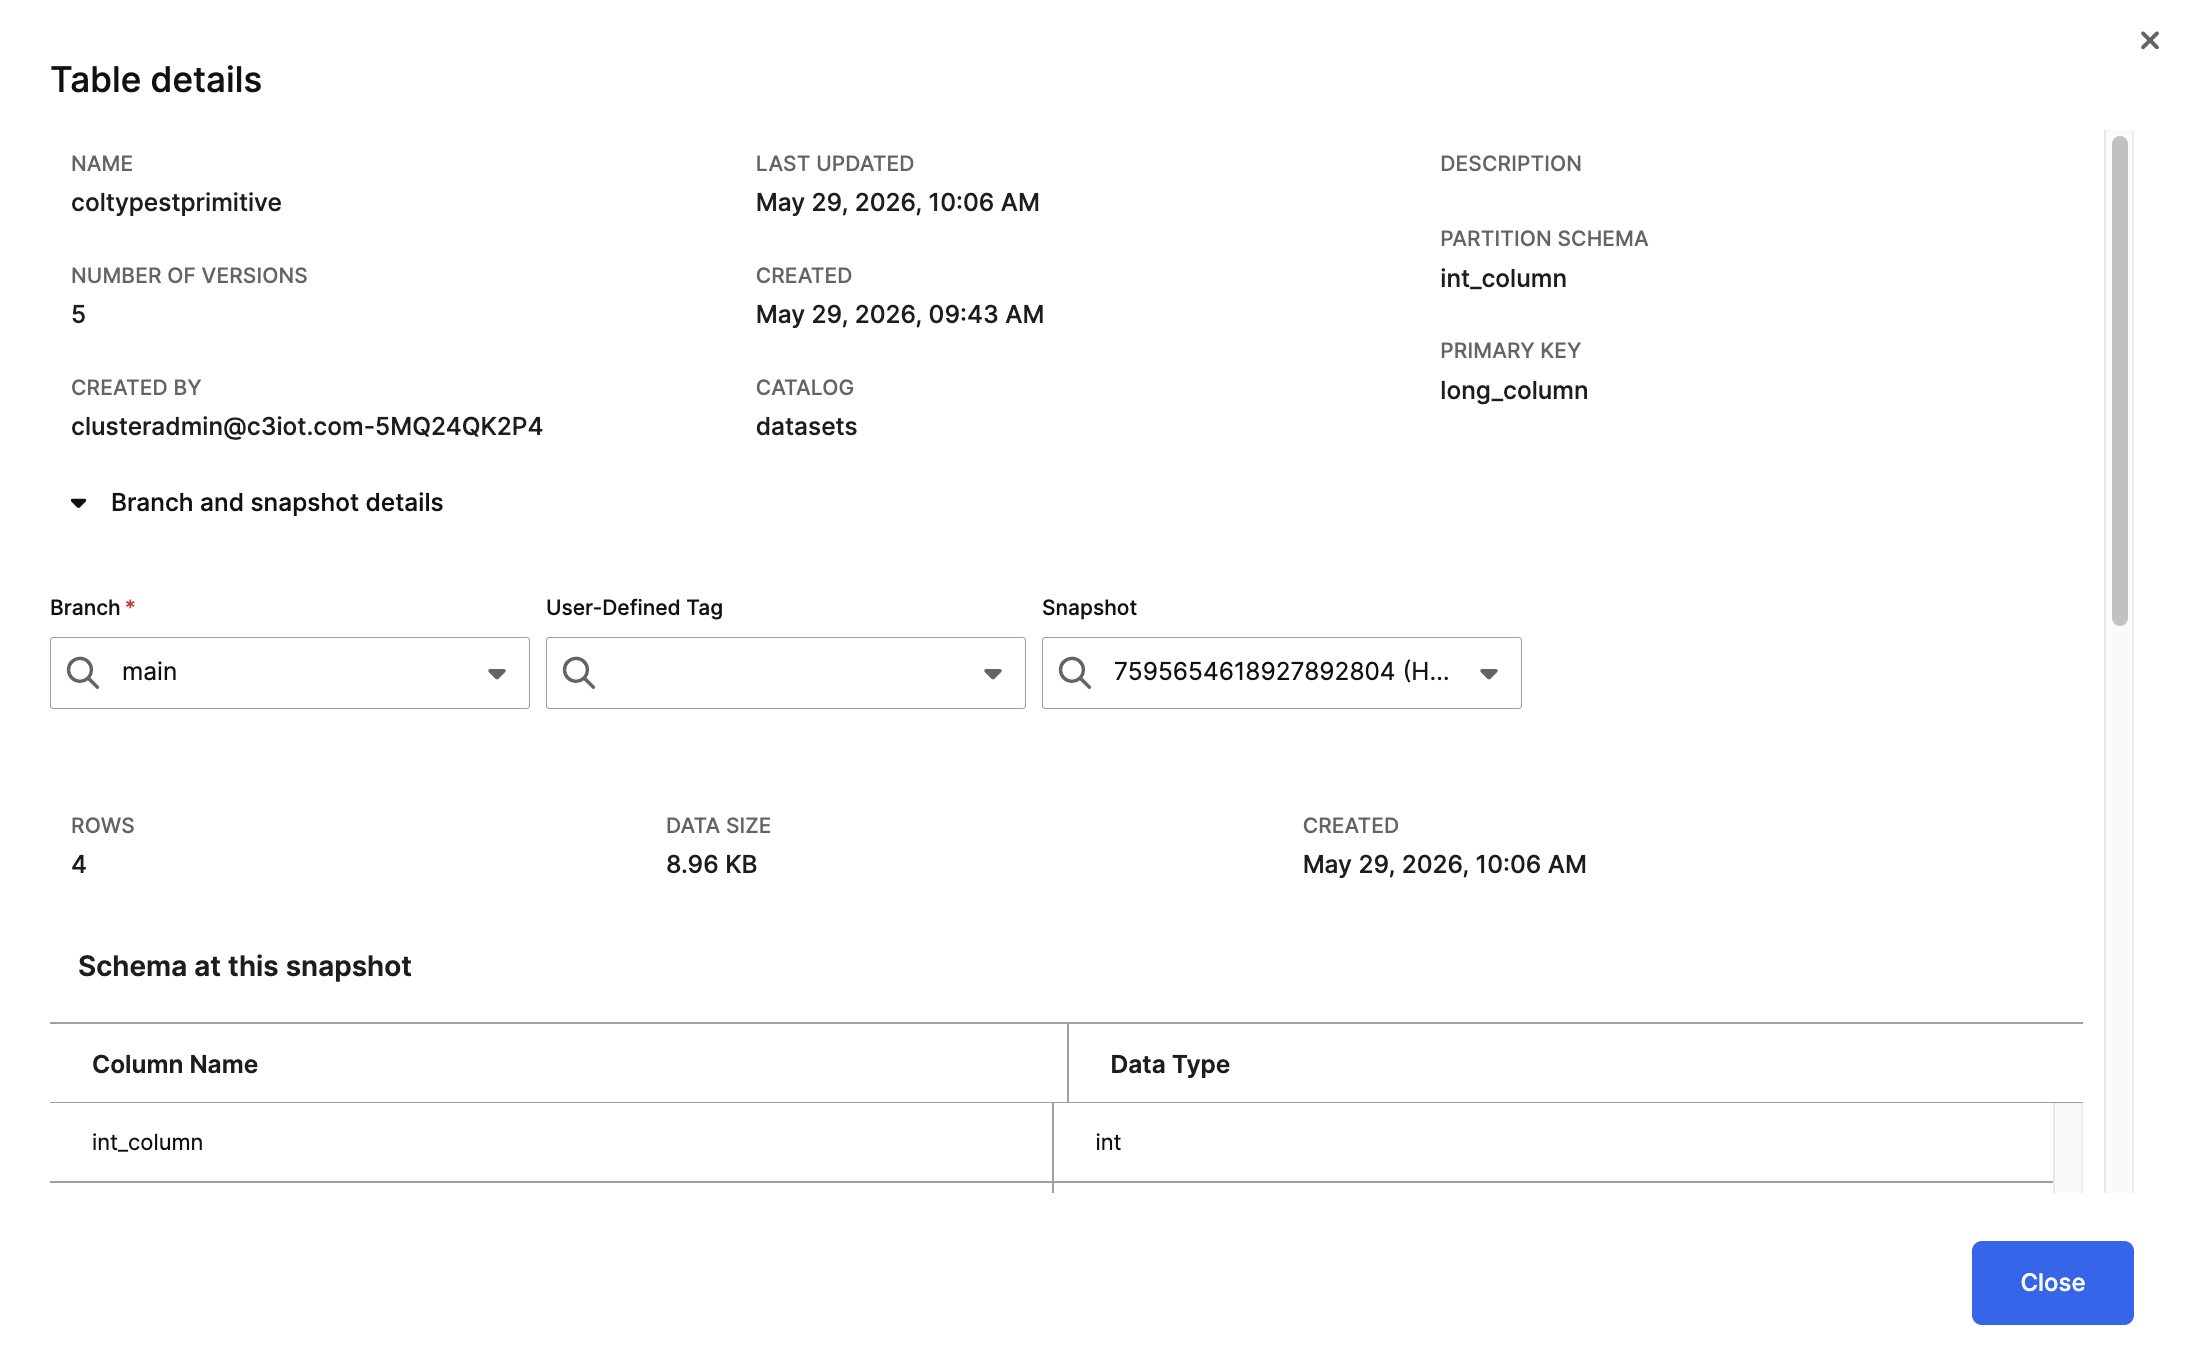
dflt. - View Reference Table: A table reference panel scoped to your Catalog and Namespace selections. Open the Select Table... combobox to pick a table, then select View Reference Table to open the Table details modal that includes:
- Table name, partition schema, primary key, catalog name, created and last-updated timestamps.
- The current branch and snapshot id.
- The schema (column name and data type) at the current snapshot.
- A preview of the first 20 rows of data.
AI Generate SQL
The Ask AI to generate SQL field above the query editor lets you describe a query in natural language. Select Generate SQL to insert the generated query into the editor. You can edit the generated query before running it.
Query builder
The Query builder section is used to create SQL queries for tables in the selected catalog. It consists of:
- Query editor: A text interface where you can edit an AI-generated query, or write your own. The query editor has an autocomplete feature, which suggests table names or SQL syntax.
- + Add Table: Inserts the table selected in the View Reference Table panel into the editor.
- Common SQL command help: Opens a quick-reference for the most-used SQL patterns.
- Run SQL: Submits the query.
When you submit a query and the selected Spark cluster is hibernated, the editor displays the banner Starting Spark cluster, query response will be available shortly. The query queues until the cluster reaches the Running state. Cold start can take several minutes; subsequent queries against a warm cluster return in seconds.
SQL query results
The SQL Query Results panel shows the result of the most recent query run in the editor. The exact output (rows and columns) depends on the nature of the query. The panel header is a row of icon buttons (download, save, plus, table) that let you:
- Download the results as a CSV.
- Save the results to the C3 File system.
- Save the results as a new table in the application's Data Lakehouse. The new table can subsequently be used in further data exploration.
- Switch between a table view and a chart view.
Editor History tab
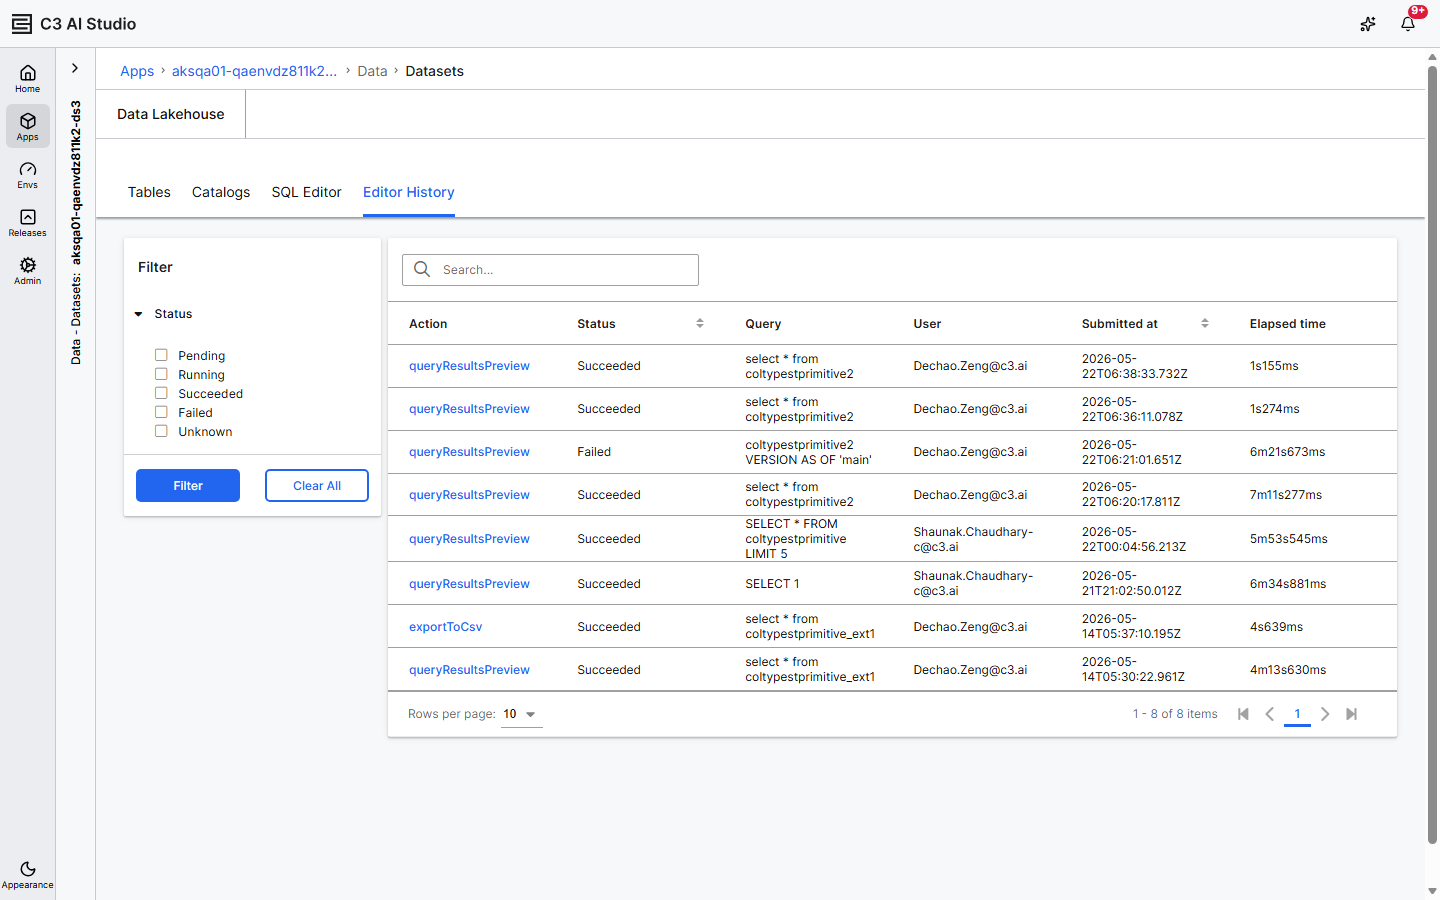
The Editor History tab is a per-user audit trail of every SQL Editor run. Use it to find a past query, inspect its status, or open its results.
The tab contains a Status filter (Pending, Running, Succeeded, Failed, Unknown), a search box, and a grid with the following columns:
- Action: The action button for the run.
queryResultsPreviewopens the result in a modal.exportToCsvdownloads the result as a CSV file. - Status: The current status.
- Query: The query text.
- User: The user who submitted the query.
- Submitted at: The submission time.
- Elapsed time: The total time the query took, including any cluster cold-start delay.
For the underlying execution telemetry, including filters by cluster and origin, see the Spark Executions page documented in Monitor and Maintain the Data Lakehouse.
Workflows
Create a new table
Upload data in C3 AI Studio to populate a new table. Your uploaded files must be in CSV format.
- On the Tables tab, select Create New Table. (Older builds render the button label in lowercase as "Create new table".)
- Select Browse, and choose an appropriate CSV file. You can verify your information after the upload completes.
- Files: Upload multiple files to populate your new table. Check that all your files are uploaded correctly.
- Schema: Verify your schemas are populated correctly.
- Target preview: Check that your data is accurate.
- File settings: Files are scanned automatically, but you can specify different delimiters if your target preview looks incorrect.
- Select Next after you have verified your file upload. Enter a Table name and Description for your new table.
- Select Upload to start processing your new table.
For richer table-creation options — primary keys, sort orders, complex partition expressions — see Create and Load Data Lakehouse Tables.
Filter Data Lakehouse tables
You can filter tables relevant to your use case. Possible filters include:
- Table name
- Owner
- Creation date
- Last updated date
You can add as many filters as necessary.
- On the Data Lakehouse page, select Add filter.
- From the dropdown menu, choose your filter field.
- Select an appropriate operator and enter a value.
- For the date operator, > means in the future, and < means in the past.
- Select Apply to add the filter.
Query a table with the SQL Editor
- Navigate to the SQL Editor tab.
- Select a source Catalog from the menu. If you have not created any custom catalogs, you can leave this option unchanged.
- Select a target Namespace. If you have not created any custom namespaces, you can leave this option unchanged.
- Select a Spark Cluster. The default cluster is
dflt. - Optionally, pick a table from the Select Table... combobox and select View Reference Table to inspect its schema and sample data before you write the query.
- Create a query. You have two options:
Enter a natural-language query into the Ask AI to generate SQL field, and select Generate SQL. For example:
TextWrite a small query to describe the Manufacturers table.Write a SQL query directly in the editor.
- Select Run SQL.
Your query results appear in the SQL Query Results panel. The same run also appears on the Editor History tab and on the Spark Executions page.