Create a Document Processing Pipeline in Data Fusion
Build a Doc AI document processing pipeline on the Data Fusion canvas, from a Source Collection to the stored results. You set up the collection, a Strategy that decides how Doc AI parses, chunks, embeds, and tags content, and a target Entity Type. You then start processing and track each document's status until Doc AI persists its results in your application.
Configure a Source System to connect Data Fusion to the location that contains your documents. For instructions, see Create an Unstructured Source Collection.
Configure a Source Collection
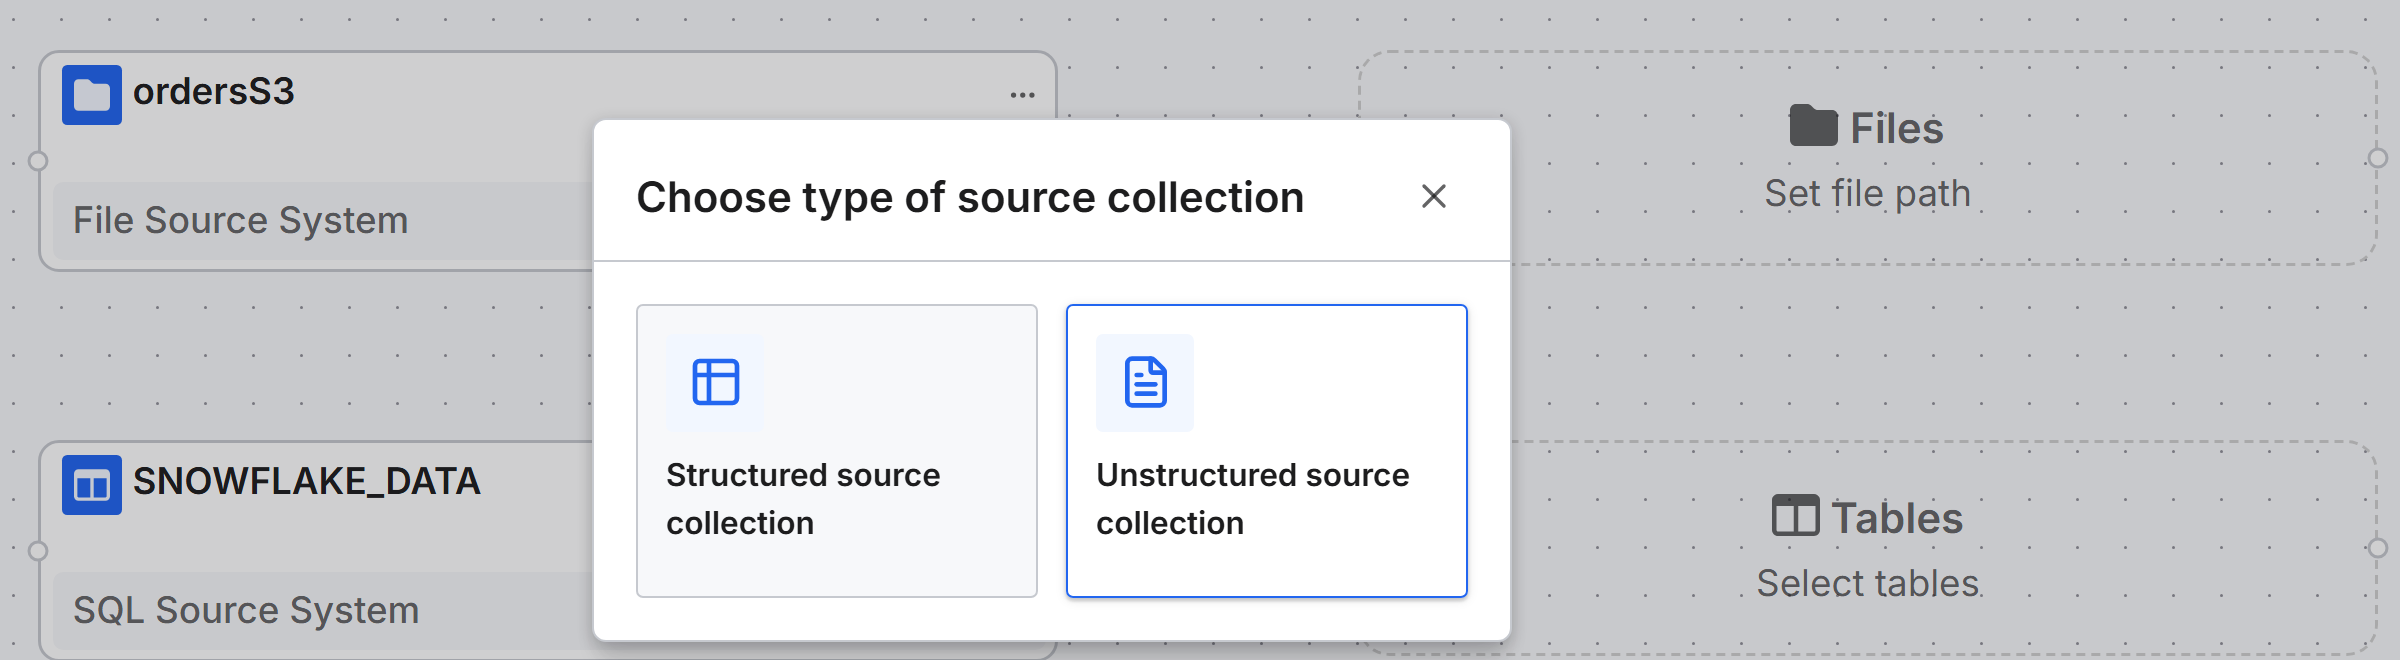
Configure a Source Collection to identify the documents that you want to process. When you create the Source Collection, choose the Unstructured source collection type, and under Processing Engine, select Doc AI. If the Doc AI service is not deployed for your environment, Doc AI is unavailable and the pipeline cannot run. For the general Source Collection setup procedure, see Create an Unstructured Source Collection.
Every application includes a pre-configured sample Source Collection named Default collection, which uses the Doc AI workflow. Applications running in dev or test mode also include Default collection (dev), a separate sample collection that uses the existing unstructured data integration (UDI) workflow. Use either to explore the canvas, or configure your own Source Collection as described in this section.

Configure a Strategy
To configure a Strategy:
- On the canvas, open the Strategy to display the Configure Strategy dialog.
- Specify a Name.
- Under Ingestion Strategy, select one of the following:
- Passage-level extraction
- Document-level extraction
For each option and how to choose between them, see the "Ingestion Strategies" section in Unstructured Document Processing using Doc AI in Data Fusion.
- Configure Strategy Steps and Tagging and Extraction.
Configure Strategy Steps
Use the Strategy Steps tab to configure how Doc AI processes document content. The available steps depend on the selected Ingestion Strategy. The steps shown here are for Passage-level extraction.
For Passage-level extraction, configure the following steps as needed:
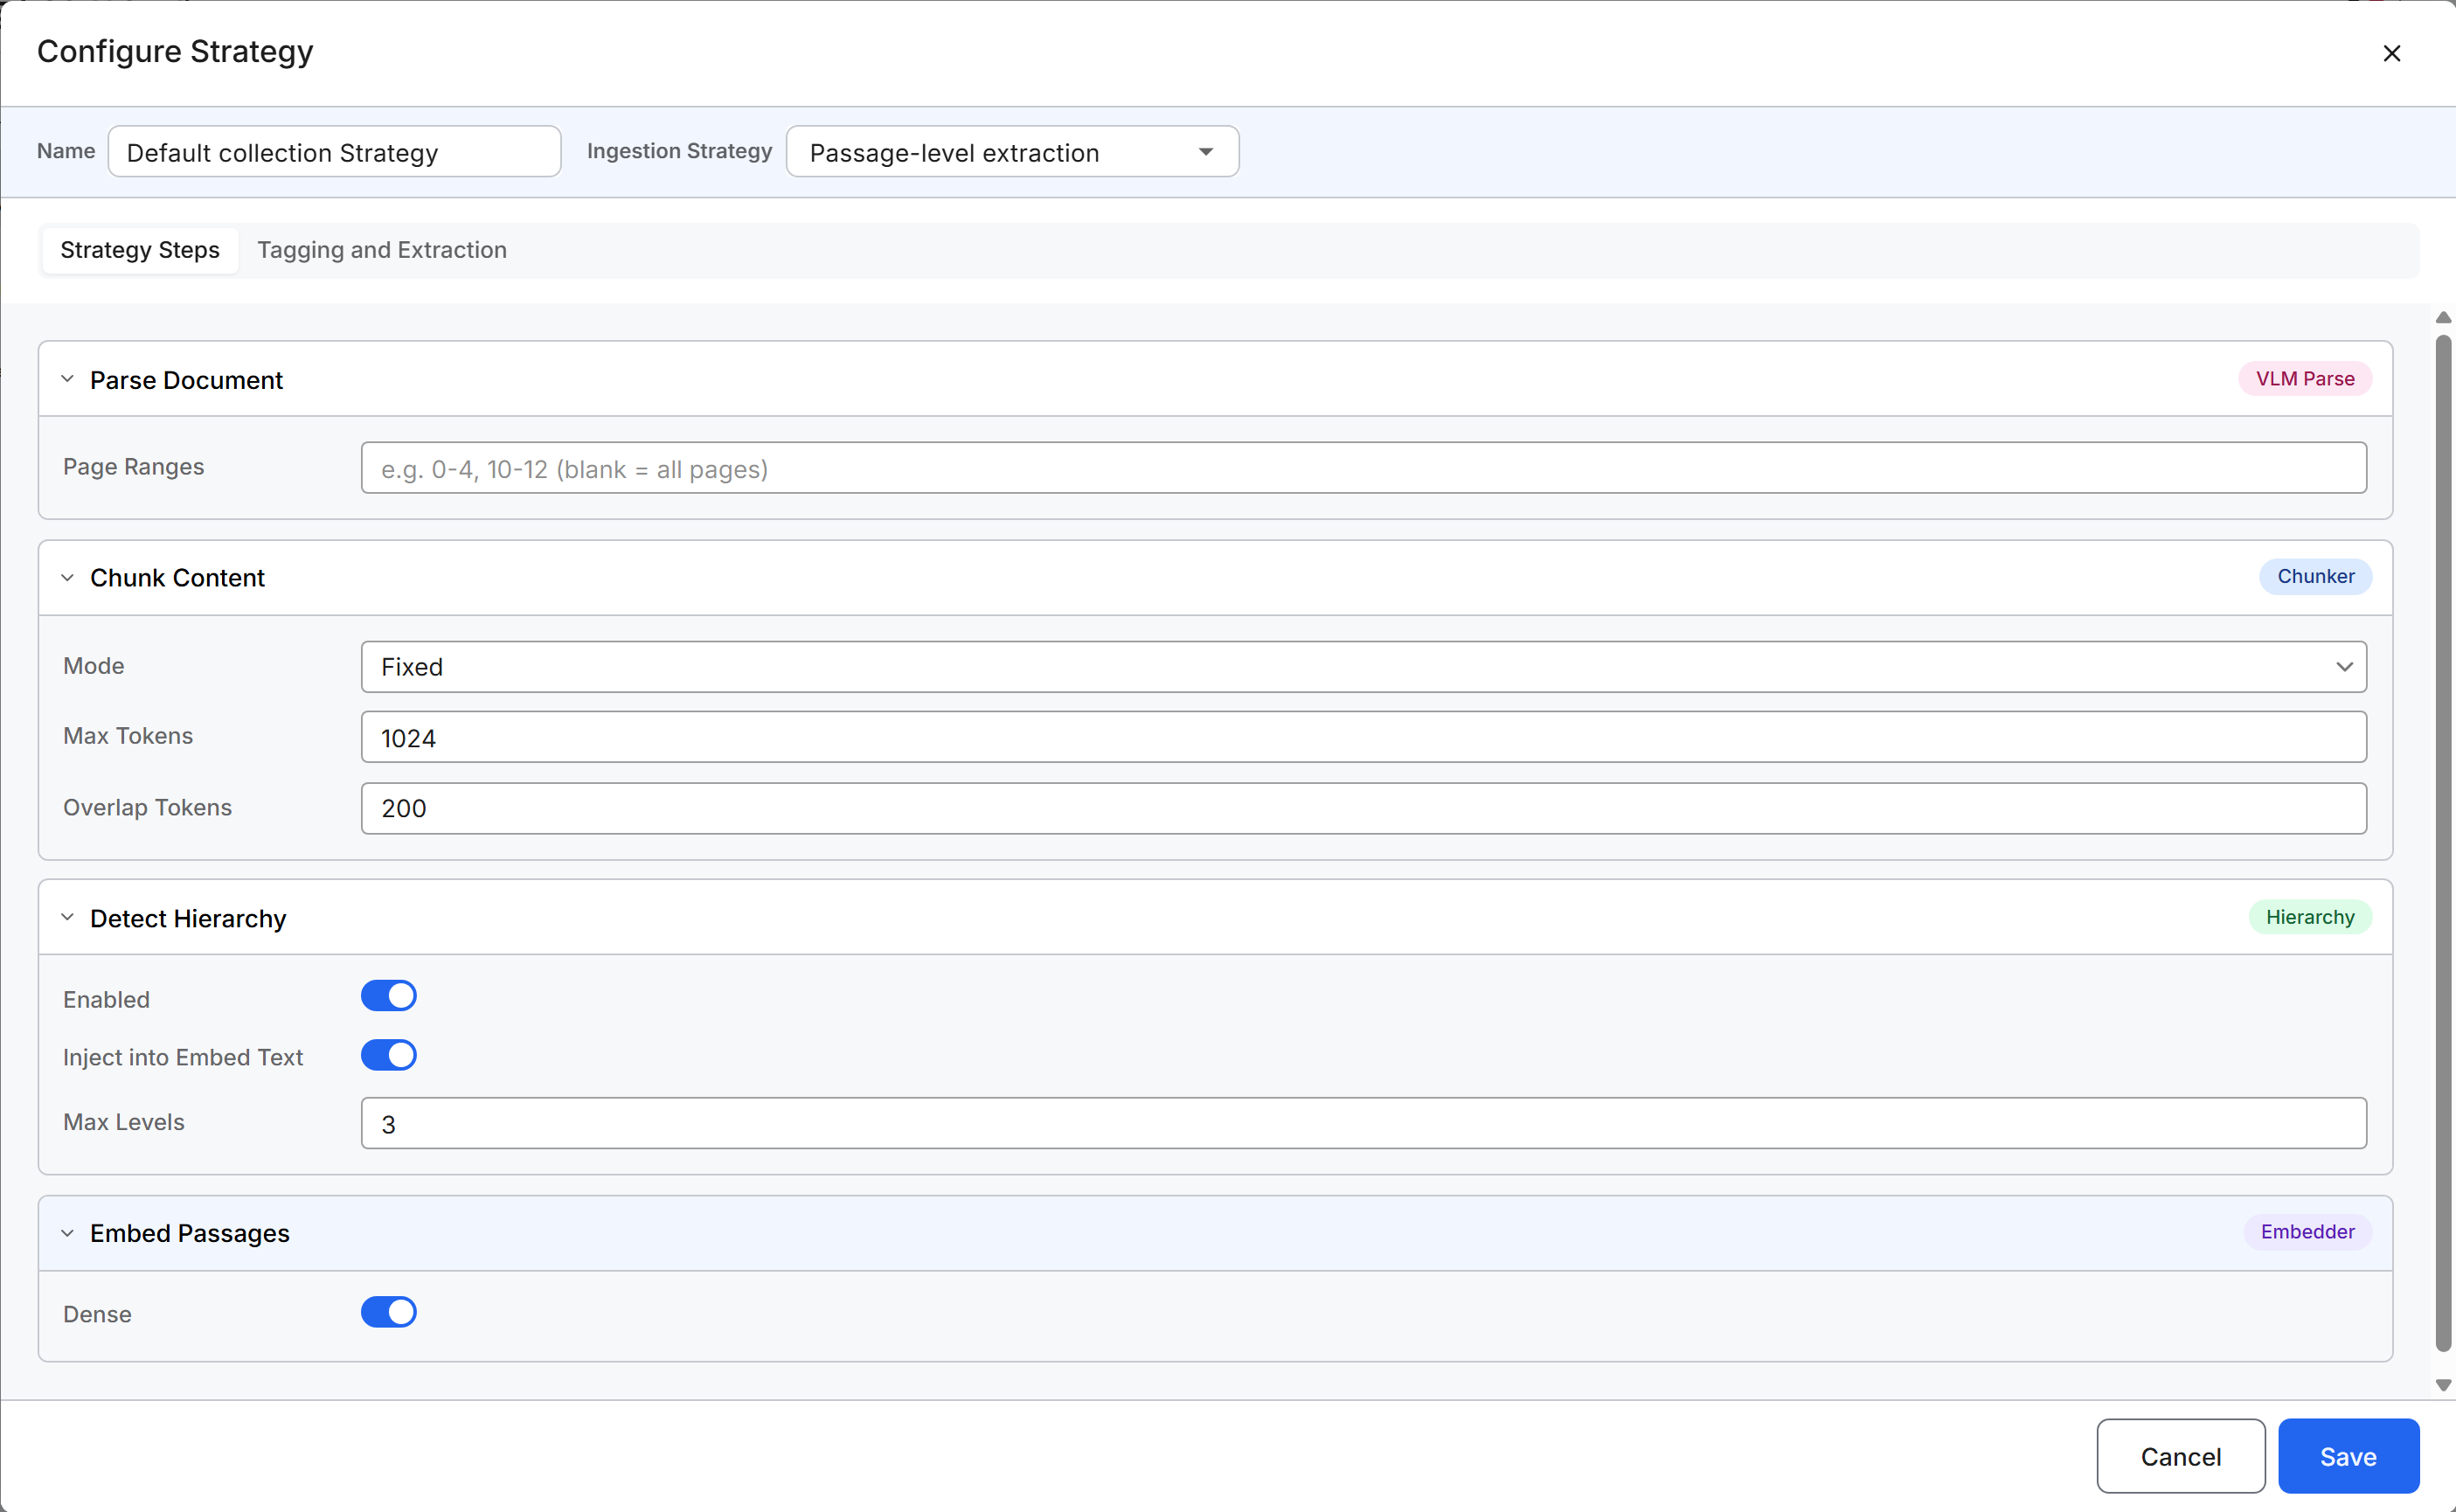
- Expand Parse Document.
- Under Page Ranges, specify the pages to process. Leave the field blank to process all pages. To process specific pages or ranges, enter them in the format shown in the field, for example,
0-4, 10-12. Page numbers are 0-indexed, so0refers to the first page. - Expand Chunk Content and configure the following:
- Mode: Select the chunking mode.
- Max Tokens: Specify the maximum number of tokens for each chunk.
- Overlap Tokens: Specify the number of tokens to overlap between consecutive chunks.
- Expand Detect Hierarchy and configure the following:
- Enabled: Enable hierarchy detection.
- Inject into Embed Text: Enable this option to include detected hierarchy information in the text used to generate embeddings.
- Max Levels: Specify the maximum number of hierarchy levels to include in the text used to generate embeddings. Doc AI always detects the full hierarchy and preserves it with the passage metadata. Max Levels only limits how many levels Doc AI adds to the embed text.
- Expand Embed Passages.
- Enable Dense to generate embeddings for the resulting passages.
- Configure Tagging and Extraction as needed. See Configure Tagging and Extraction.
- Select Save.
Configure Tagging and Extraction
Use the Tagging and Extraction tab to configure the metadata tags and business entities that Doc AI extracts from your documents.
The extraction scopes available depend on the selected Ingestion Strategy:
- With Passage-level extraction, you can configure extraction at the passage level, document level, or both.
- With Document-level extraction, you can configure extraction at the document level only.
You can configure tags, entities, or both for an available extraction scope.
For document-level extraction, use Page Ranges to specify the pages from which to extract information. Leave the field blank to use all pages, or specify individual page ranges in the format shown in the field, for example, 0-4, 10-12. Page numbers are 0-indexed, so 0 refers to the first page.
Configure tags
Configure tags to extract metadata from documents or passages at the selected extraction scope.
- In the Tagging and Extraction tab, locate Tags to Extract under the extraction scope that you want to configure.
- Select + Add Tag.
- Enter a Tag Name.
- Select the Type for the tag.
- If you select string enum, enter the allowed values under Enum Values, separated by commas.
- Repeat these steps to configure additional tags.

Tag extraction is optional. If you do not configure any tags for an extraction scope, Doc AI skips tag extraction for that scope.
Configure entities
Under Entities to Extract, define the business entities that Doc AI extracts at the selected extraction scope.
You can create an entity definition or import an existing C3 Type.
Create an entity
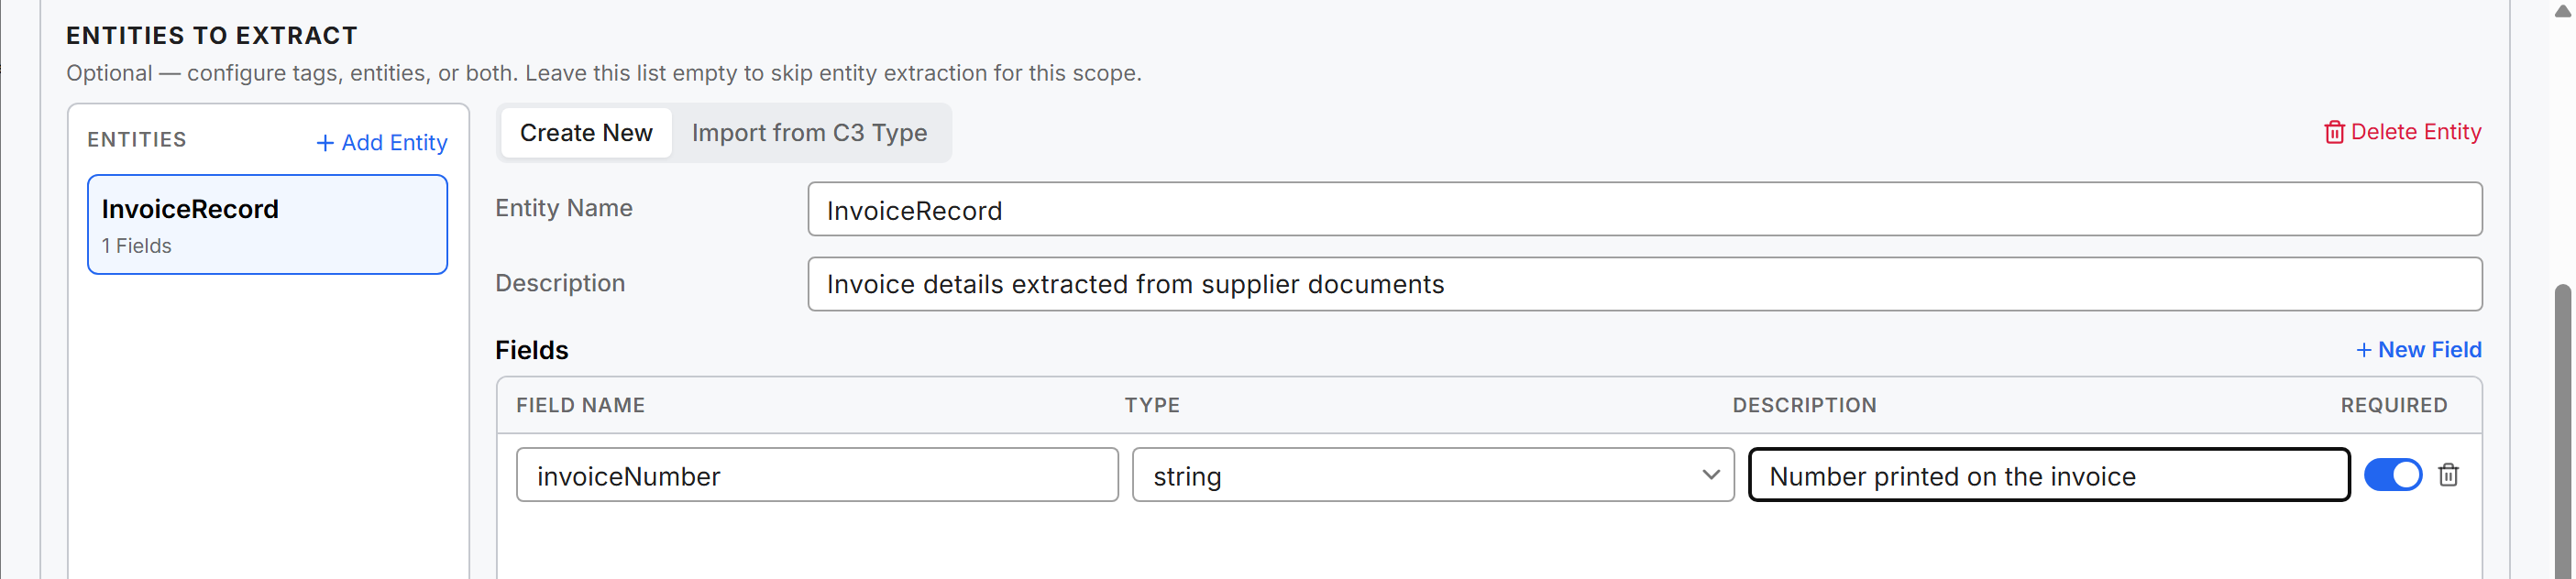
- Under Entities to Extract, select + Add Entity.
- Select Create New.
- Enter an Entity Name.
- Select + New Field to define the fields to extract.
- Configure the entity fields as described in Configure entity fields.
- Repeat these steps to configure additional entities as needed.
The entity name must not conflict with the name of an existing C3 Type.
Import an existing C3 Type
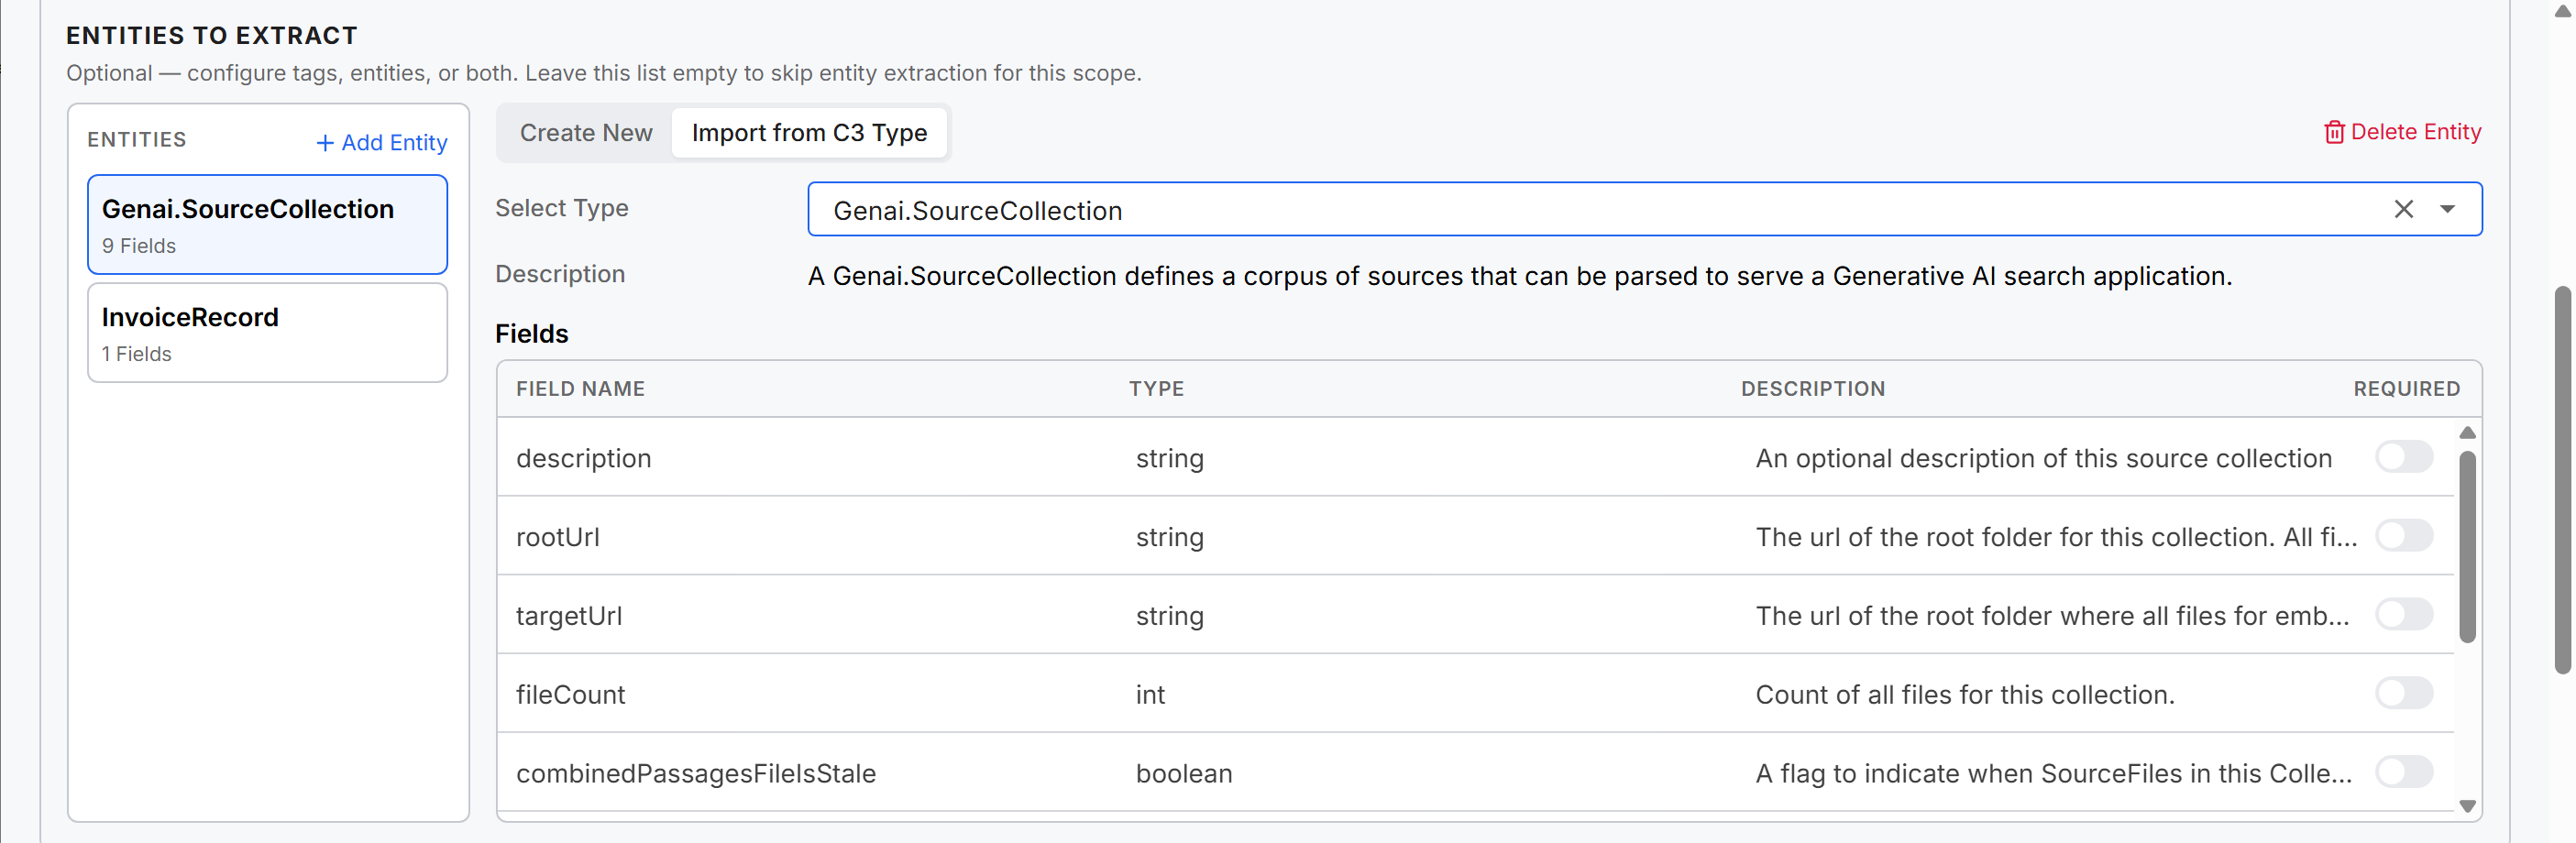
Import a C3 Type when you want to use an existing application type as the entity definition.
Under Entities to Extract, select + Add Entity.
Select Import from C3 Type.
In Select Type, search for and select the C3 Type to import.
Review the fields added from the selected C3 Type.
Configure entity fields
For an entity that you create, configure the fields that Doc AI extracts.
For each field, configure:
- Field Name: Enter the name of the field.
- Type: Select the data type for the field.
- Description: Describe the information to extract. Provide clear guidance about the expected value.
- Required: Specify whether the extracted entity must include the field.
Select + New Field to add another field. Use the delete action to remove a field that you do not want to extract.
After you finish configuring Strategy Steps and Tagging and Extraction, select Save to save the Strategy.
Configure the Target Entity
When you configure entity extraction in a Strategy, the pipeline includes an Entity Type node for the extracted entity. The Entity Type defines where the extracted entity records are persisted in the application.
To configure the target entity:
- On the canvas, select the Entity Type node associated with the extracted entity.
- In Define Target Entity, confirm or select the Entity Type where the extracted records are stored. The panel opens in Schema view; to edit the schema directly, switch to Code.
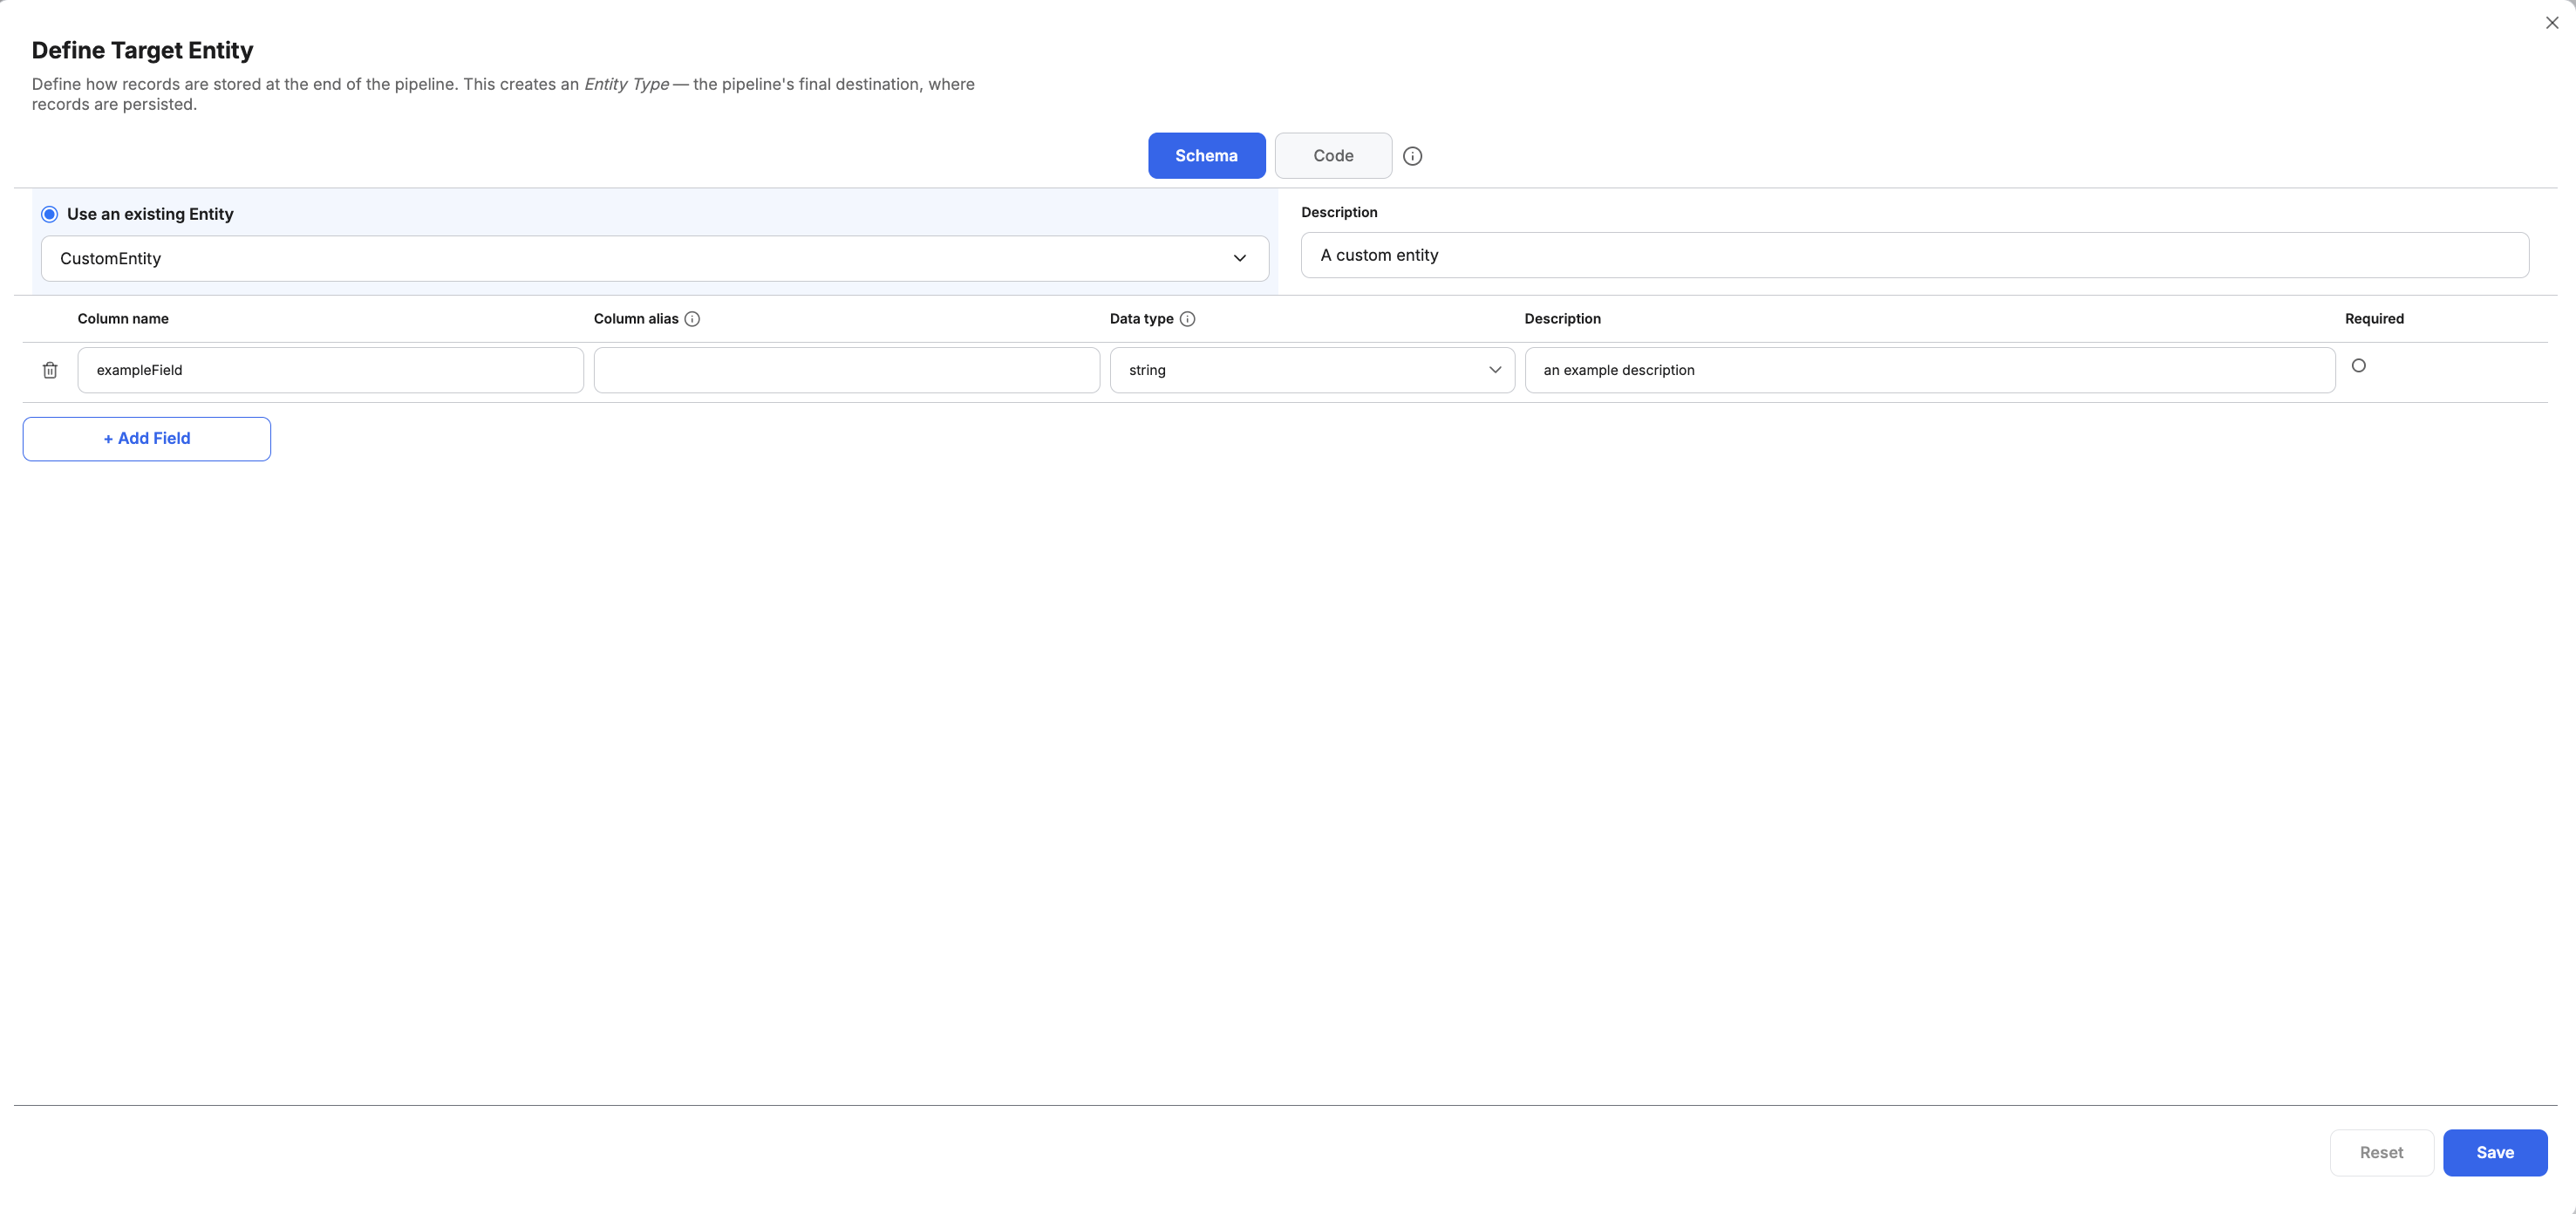
- Review the schema, including the Column name, Data type, Description, and Required settings.
- Modify the schema as needed. You can specify a Column alias, add fields, or remove fields.
- Optionally, enter a description for the target entity.
- Select Save.
The target entity schema reflects the fields configured for the extracted entity.
Start document processing
After you configure the Strategy for a Source Collection, start processing the documents in that collection. Make sure the documents you want to process have already been added to the collection. See Configure a Source Collection.
On the canvas, select the Execute button on the Source Collection node.
In the Configure Runtime Parameters dialog, select the All files tab to process every eligible document. To process only some documents, select the Select files tab and select the checkbox next to each document you want to process.
Select Execute.
Doc AI processes the selected documents using the configuration saved in the Strategy.
To track the status of each document, see Monitor document processing.
Monitor document processing
After you start processing, Doc AI processes each document in the Source Collection individually.
To check the status of a document, open the Configure Runtime Parameters dialog and review the Status column. To view only the documents in one state, use the Processing Status filter. The Processing Status filter offers All and one option for each status in the following table.
Each document can have one of the following statuses:
| Status | Description |
|---|---|
| Unprocessed | The document hasn't been submitted to Doc AI for processing. |
| Processing | Doc AI is currently processing the document. |
| Processed | Doc AI finished processing the document and persisted the results. |
| Needs Re-processing | The document was previously processed, but its source file changed since. |
| Failed | Processing failed for the document. |