Configure Unstructured Data Integration Pipeline
You have documents, such as PDFs, that you want an application or an agent to search by meaning. An Unstructured Data Integration (UDI) pipeline in C3 AI Data Fusion reads those files and splits them into passages. The pipeline then stores each passage in a form that search can match. This Quickstart builds a pipeline on the built-in Canonical source system, so it works without cloud credentials.
Quickstart: index your first document
The Quickstart takes six steps and indexes one document.
Prerequisites
Before you start, you need:
- Access to C3 AI Studio with a role that shows Data Fusion. To choose one, see Data Integration Roles and Permissions. To check, open C3 AI Studio and confirm that Data > Data Fusion opens.
- A PDF of a few pages to index: a short document keeps the first run fast.
For the full list, see Prerequisites for Unstructured Data Integration.
Step 1: Open the Data Fusion canvas
The Data Fusion canvas is the workspace where each source system and each pipeline step appears as a node. To open the canvas:
- In C3 AI Studio, select Data > Data Fusion.
The canvas opens and shows your source systems, including Canonical, and any pipelines that already exist.
Step 2: Create an unstructured source collection
A source collection is the folder of files that a pipeline reads. The built-in Canonical source system stores files inside the application, so you upload your document directly. Create the collection:
On the canvas, find the
Canonicalnode, labeled File Source System.Open the
Canonicalnode's menu (the three-dot button) and select Add Source Collection. The Choose type of source collection dialog opens. If a Files / Set file path node is attached toCanonical, you can select that node instead. The canvas shows the Files / Set file path node only for a source system that has no source collections yet.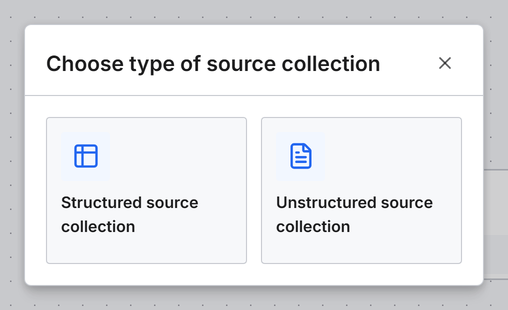
Select Unstructured source collection. The Set Source File Path dialog opens.
Keep Create new File Source Collection selected and enter a name for the collection in the box under it, for example
support_docs.Select Create directory, enter a Directory name, and select Create. Then open the new folder. To use an existing folder instead, open it. The collection processes every file under the path shown in the dialog, including nested folders. If you upload to the
Canonicalroot, the collection includes every file already stored inCanonical.Select Upload files. In the Upload files dialog, select your PDF or drag it into the dialog, and then select Start Upload. The file appears in the file list.
Select Save. If the Upload complete panel covers Save, select Clear on that panel first.
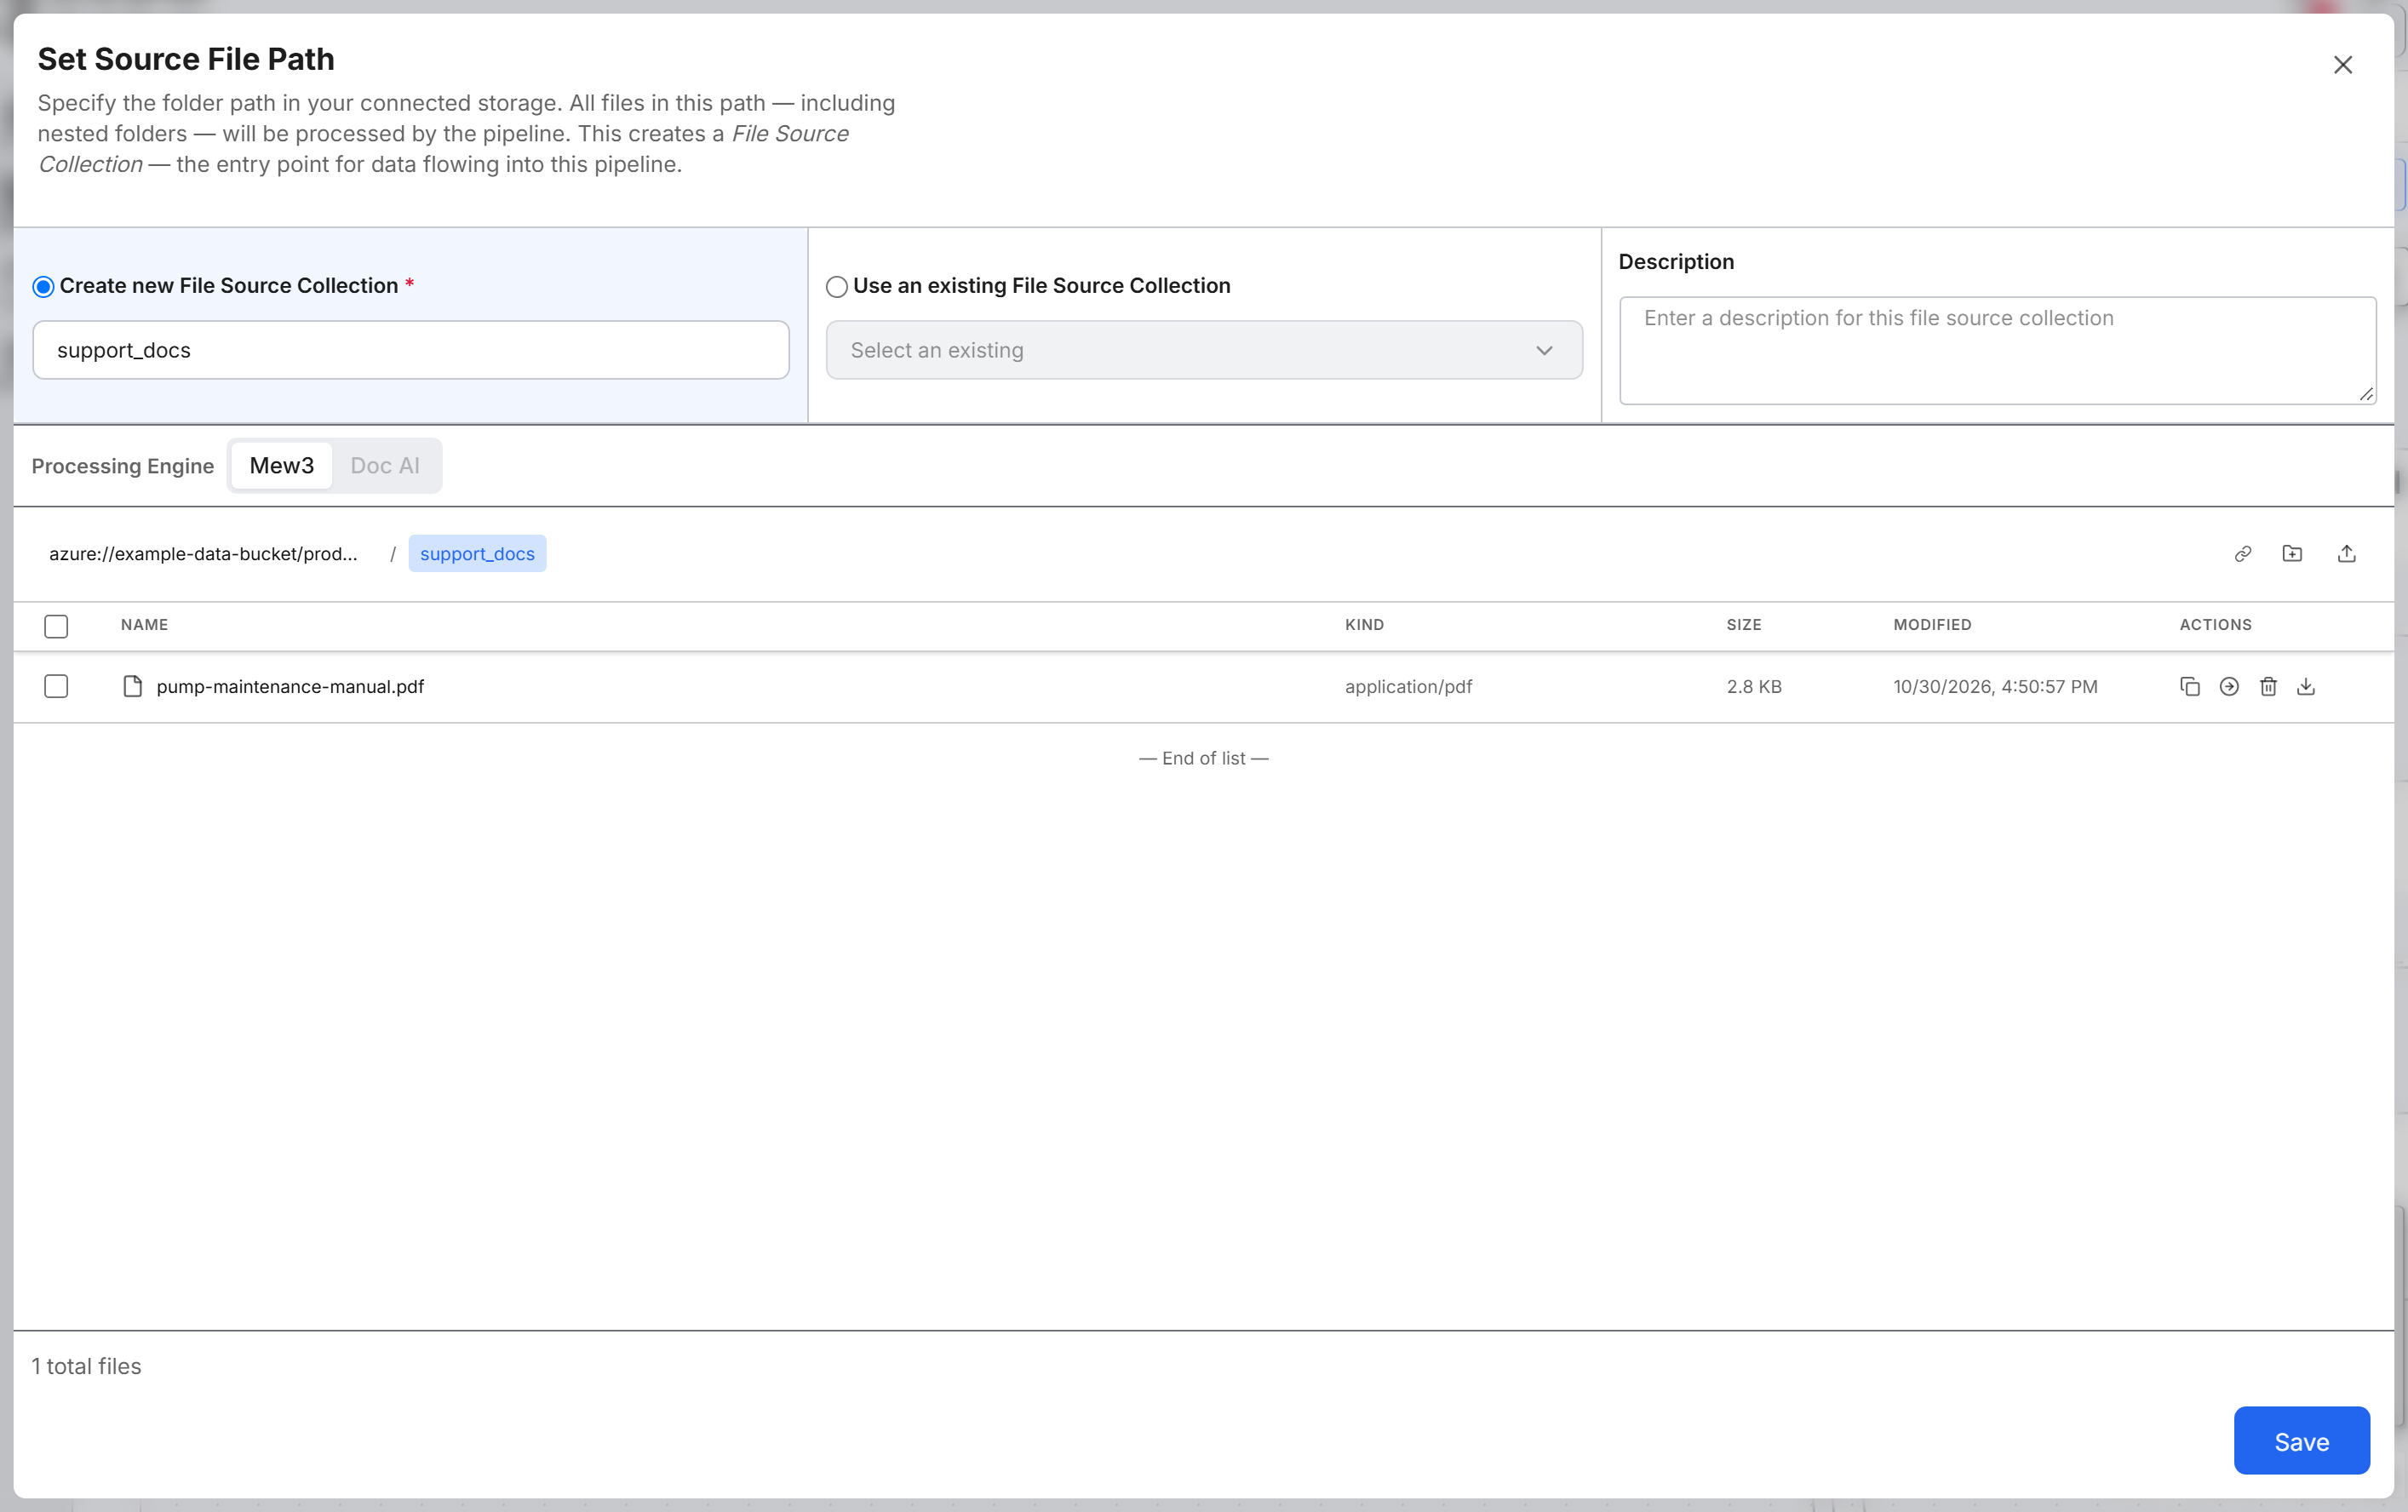
You don't need to select the file's checkbox: the collection covers the whole folder. Row checkboxes select files for actions such as Copy, Move, Download, and Delete.
The canvas adds two nodes: your source collection, labeled GenaiSourceCollection, and a Chunker placeholder labeled Add chunker. A placeholder is a node for a pipeline step that you have not configured yet.
Step 3: Configure the Chunker
The Chunker parses each file and splits its content into chunks, which are short passages of text that search can match. Add the Chunker:
- Select the Chunker placeholder. The Configure Chunker panel opens with a prefilled Name.
- Choose a parsing preset. The default preset is Pure VLM.
- Pure VLM: Parses each page end to end with a vision language model (VLM).
- Balanced: Choose it for documents that mix text, images, and tables.
- Text focused: Choose it for documents that are mostly text.
- Table focused: Choose it when tables carry the information you need.
- Select Save.
The canvas adds three placeholders: Entity Extractor, Metadata Tagger, and Embedder. The Entity Extractor and Metadata Tagger are optional, and this Quickstart skips them.
The Configure Chunker panel also sets the LLM model that the Chunker uses, the content to extract, and the chunk size. LLM stands for large language model. For every field and its default, see Configure the Chunker.
Step 4: Configure the Embedder
The Embedder turns each chunk into an embedding, a list of numbers that represents the meaning of the passage. Search uses embeddings to find passages with a similar meaning. The Embedder writes the embeddings to a vector store, which holds each passage with its embedding so that search can find it. Add the Embedder:
- Select the Embedder placeholder. The Configure Embedder dialog opens with a prefilled Name.
- Choose an Embedding Model. The list shows the embedding models configured in your environment, and the default depends on that configuration. Pick the model you plan to keep: changing the embedding model later means re-embedding every indexed document.
- Check the Retriever ID. The Retriever ID names the vector store that this pipeline writes to, and search tools use it to find the passages. Pipelines with the same Retriever ID share one store, and search returns passages from all of them. The field is prefilled with an existing ID, such as
default-pg. Keep the prefilled ID to add your passages to that store, or enter your own ID, for examplesupport_docs_retriever, to keep this pipeline's passages separate. - Select Save.
The canvas adds the passage node, labeled Genai.Vector.SourcePassage, after the Embedder. The passage node stands for the passages that the Embedder writes to the vector store. The pipeline is ready to run.
To include metadata tags in the embeddings, and for more on Retriever IDs, see Configure the Embedder.
Step 5: Run the pipeline
Running the pipeline processes the files that you select. Start the run:
On the source collection node, select the Execute pipeline (play) button. The Configure Runtime Parameters dialog opens.
Select Sync Source Collection. Syncing reads the collection's folder and lists the files in it. Your PDF appears in the list.
Choose which files to process. All files processes every file in the collection. To process one file, select Select files and select your PDF's checkbox in the file list.
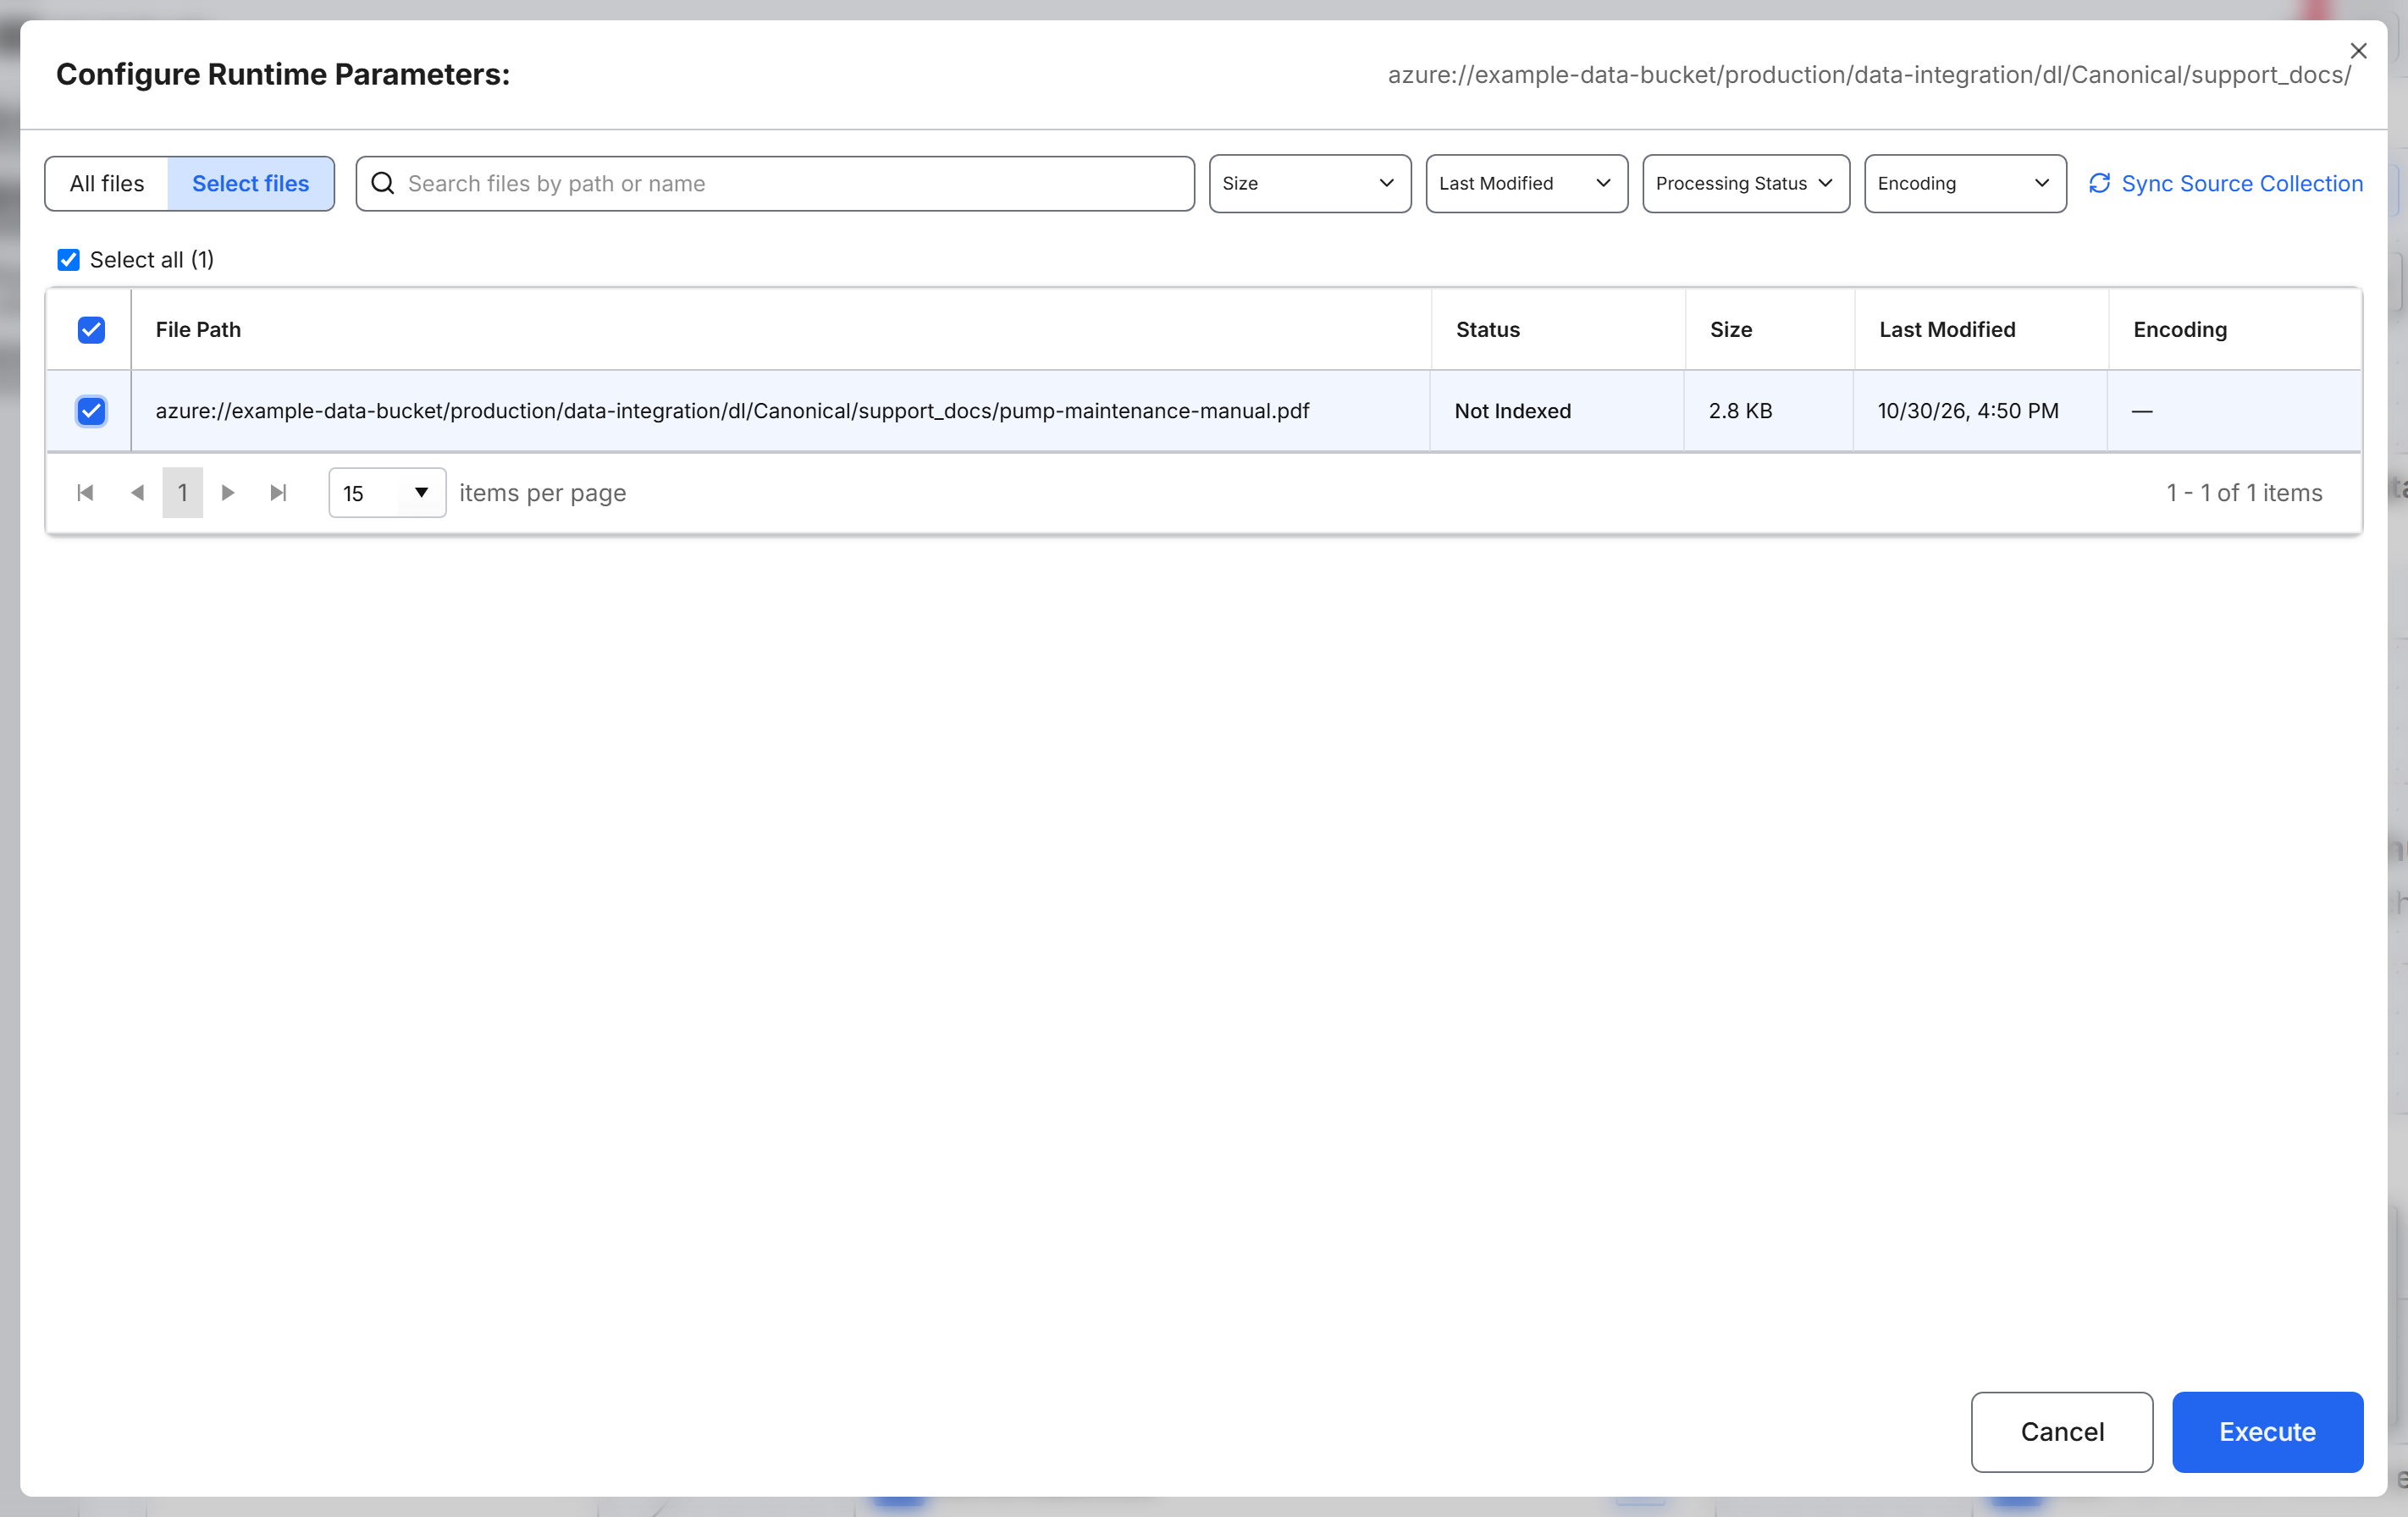
Select Execute.
The dialog closes, and a Pipeline execution started message appears. The run continues in the background.
Step 6: Check the result
The View Run Status dialog shows how many files are at each pipeline stage. Check that your document is indexed:
- Open the source collection node's menu (the three-dot button), and then select View run status.
- Under File Processing Status, check the Files by pipeline stage tiles. While the run is in progress, a Chunking card shows the chunking job.
- Select Refresh to update the counts. The dialog does not update by itself.
- When the INDEXED tile shows
1, your document is indexed and ready for search.
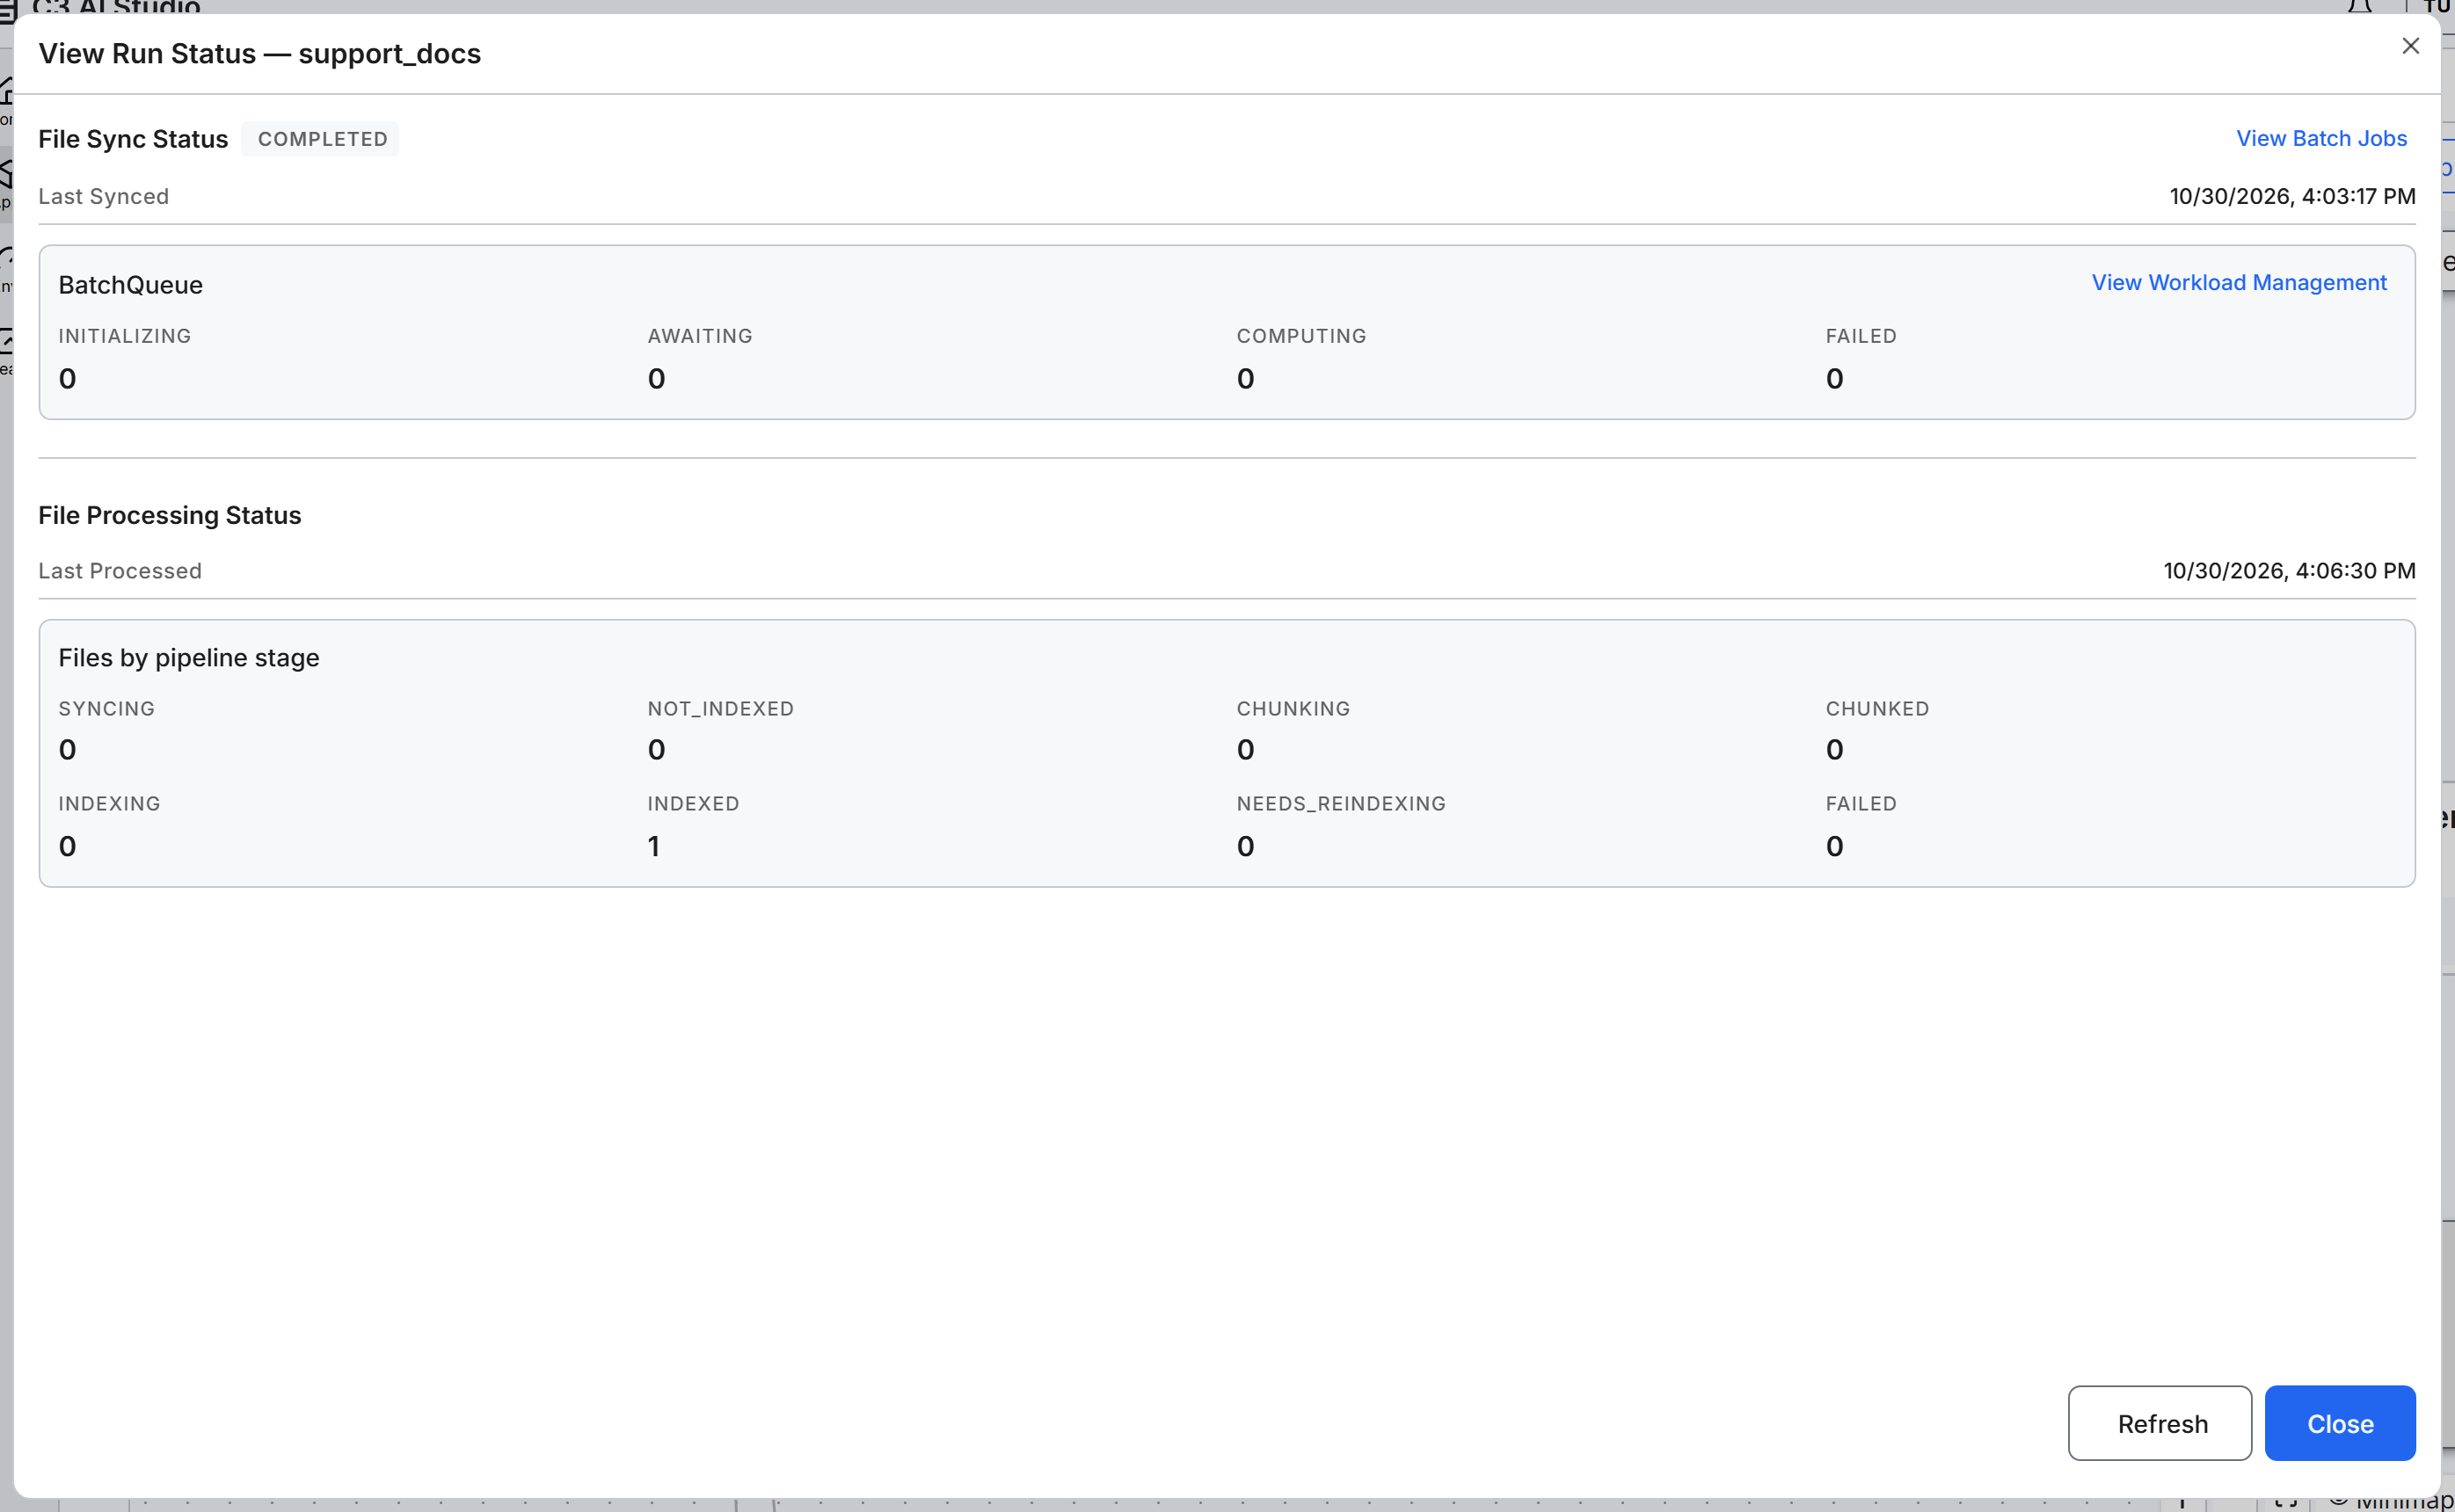
To see the file sync job, select View Batch Jobs. For every status and for troubleshooting, see Monitor Pipeline Execution.
Next steps
You now have a working pipeline. Adapt the pipeline to your own data and needs:
- Use your own storage: Read files from an external source, such as Amazon S3. See Create an Unstructured Source Collection.
- Add metadata tags or extract entities: The Metadata Tagger runs after the Chunker and before the Embedder. The Entity Extractor runs as a separate branch from the Chunker. See Configure Metadata Tagging and Configure Entity Extraction.
- Store extracted entities: Choose where entity records land. See Configure the Load Destination.
- Tune parsing and embeddings: See Configure the Chunker and Configure the Embedder.
- Index new files: Add files to the collection's folder, and then run the pipeline again. In the run dialog, select Sync Source Collection so the new files are listed, and then select them on Select files. All files processes every file again, including indexed ones. See Execute the Pipeline.
Each node saves its own settings when you select Save, so the pipeline keeps its configuration without a separate save step.