Configure the Chunker
After you create an unstructured source collection, the canvas shows a Chunker placeholder attached to it. The Chunker reads each file in the collection, extracts its text, images, and tables, and splits the content into chunks. A chunk is a short passage of text that later steps embed and that search returns as a match. The Chunker settings therefore decide what your users can find. In a pipeline that uses the default Mew3 processing engine, the Chunker is the first processing step.
Configure the Chunker
Every setting has a default, so you can save after the first two choices and adjust the rest later. Configure the Chunker:
In C3 AI Studio, select Data > Data Fusion and find your pipeline's source collection on the canvas.
Select the Chunker placeholder, labeled Add chunker. To change a Chunker you already saved, select its node. The Configure Chunker panel opens.
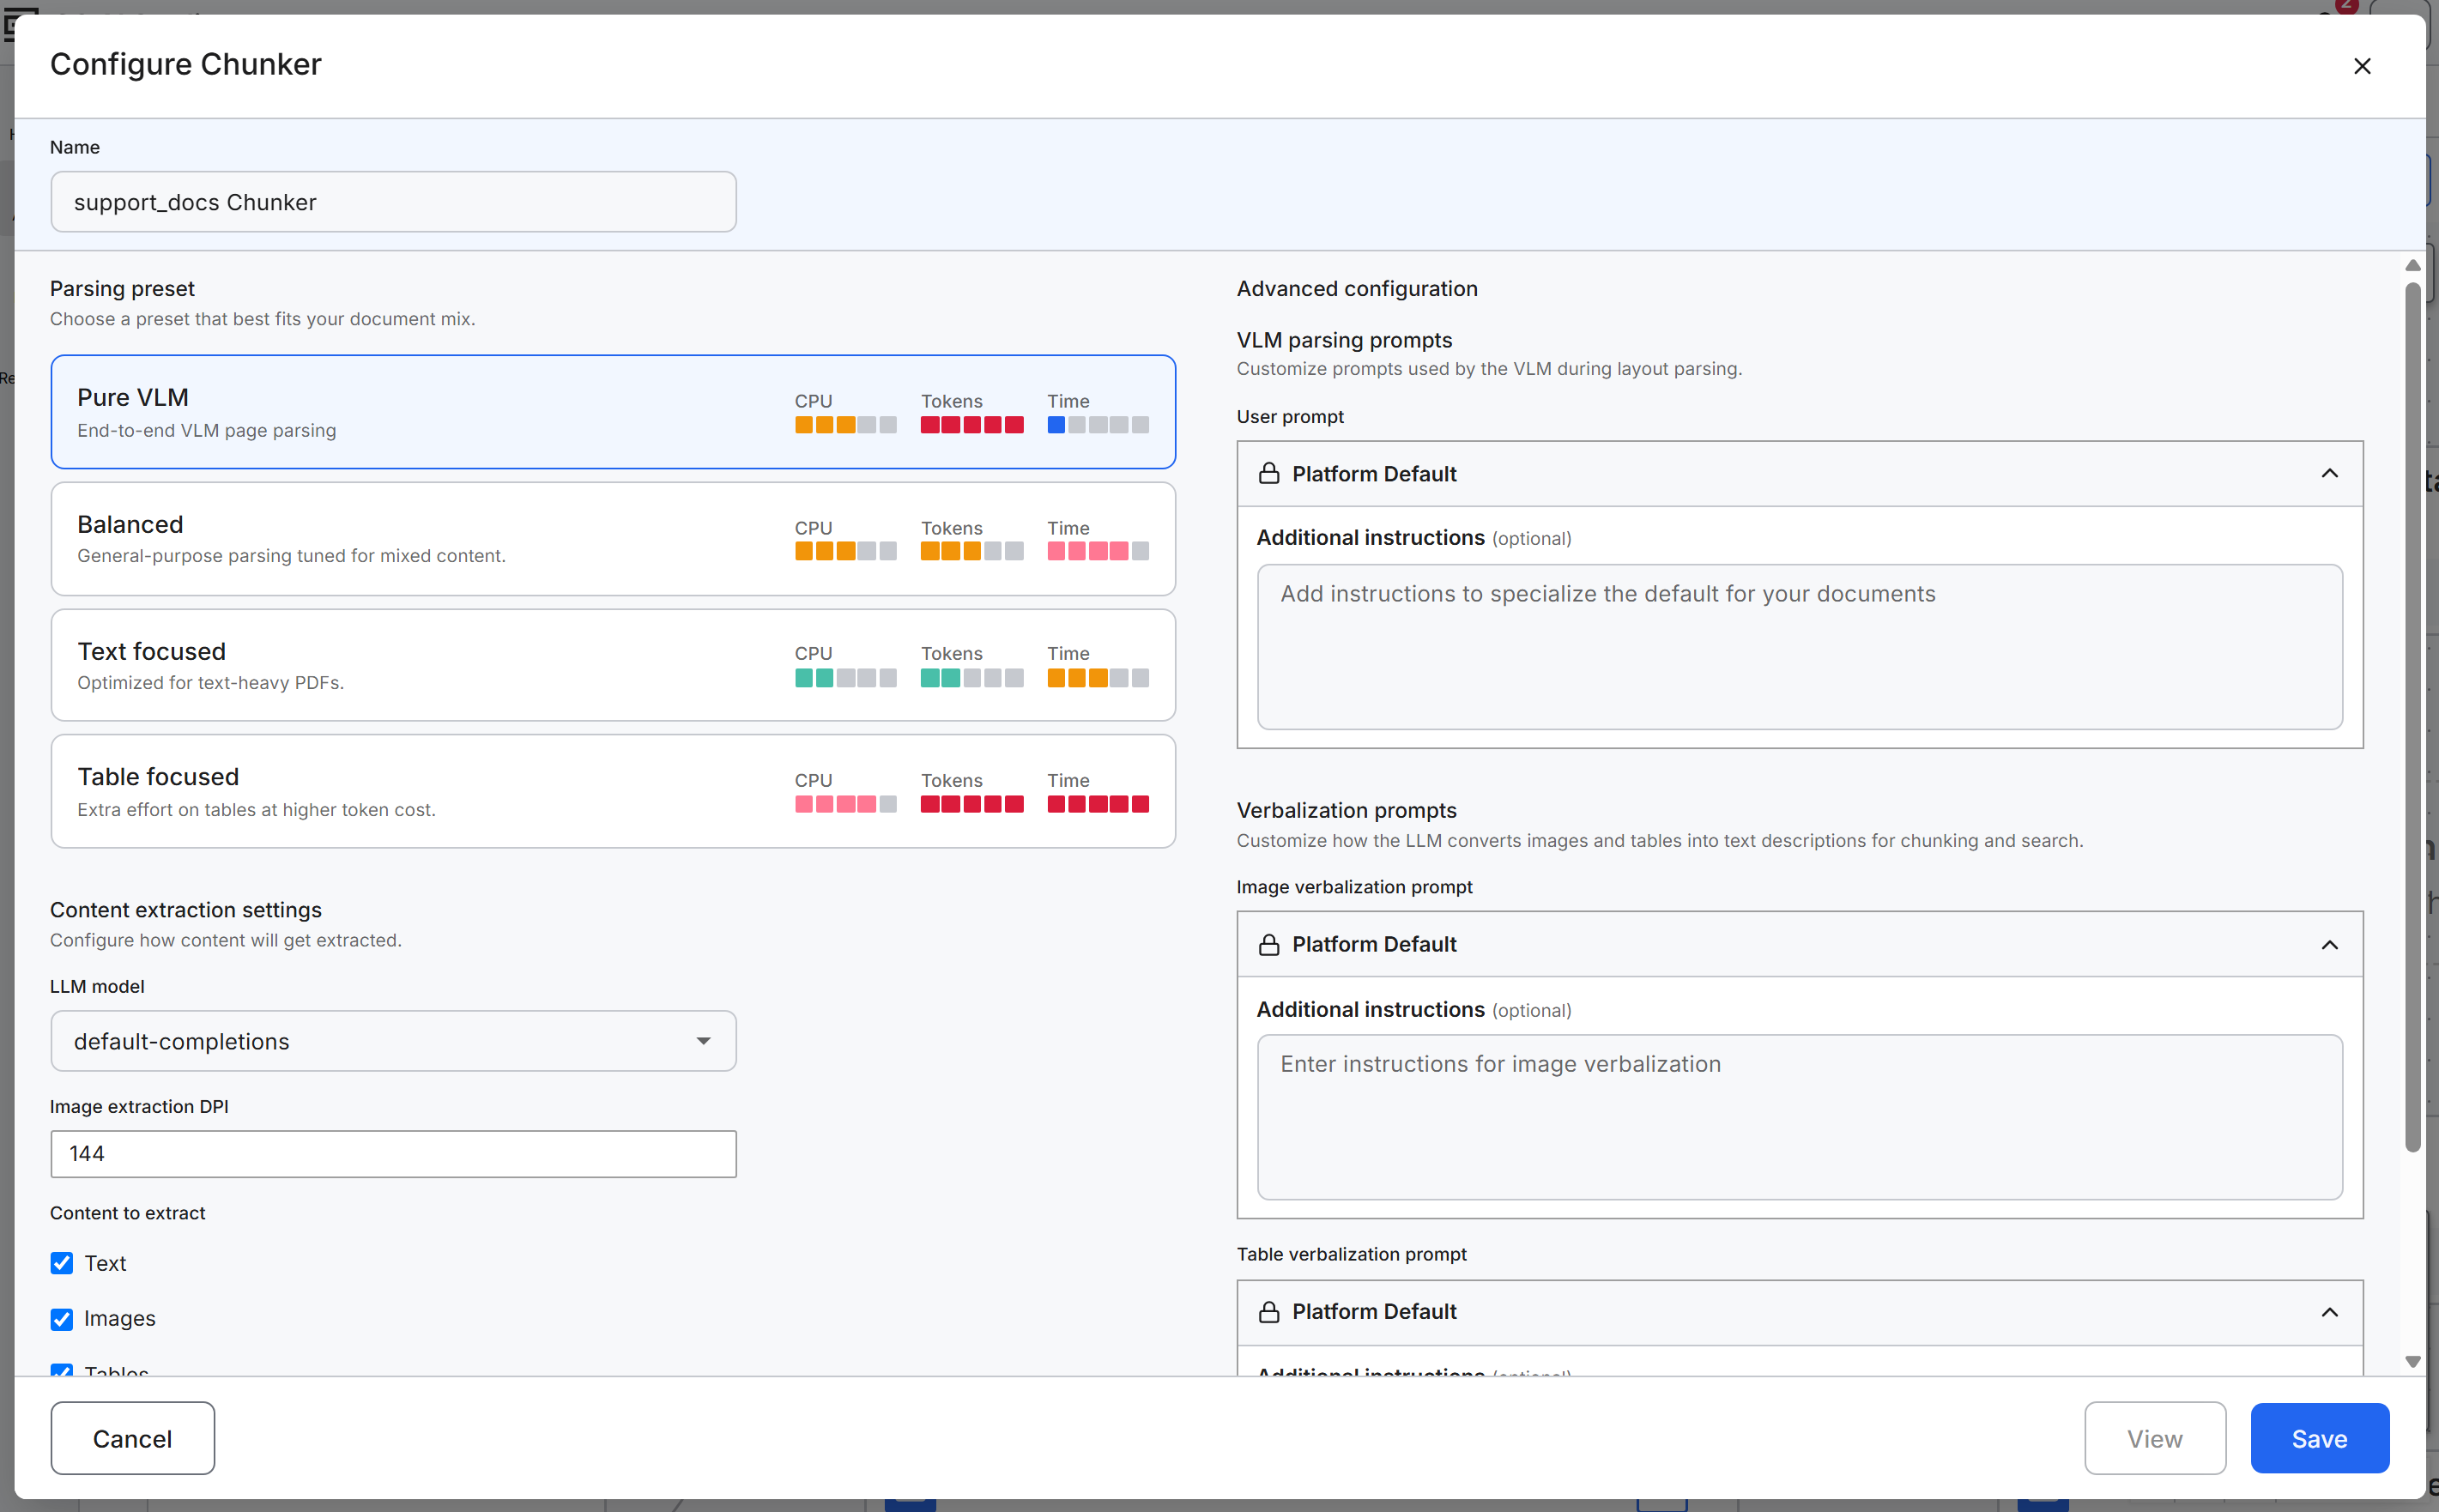
Keep or change the Name. The name is prefilled with
<collection name> Chunker, and the canvas node shows this name.Under Parsing preset, select the preset that fits your documents. The default preset is Pure VLM.
- Pure VLM: Parses each page end to end with a vision language model (VLM).
- Balanced: Choose it for documents that mix text, images, and tables.
- Text focused: Choose it for documents that are mostly text.
- Table focused: Choose it when tables carry the information you need.
For what each preset does, see Choose a parsing preset.
In LLM model, select the large language model (LLM) that the Chunker uses to read content and describe images and tables. The default is
default-completions. The list shows the LLM clients configured in your environment.Optionally, adjust the content extraction, chunking, and prompt settings. Each section of this page explains when to change them.
Select Save.
The canvas adds three placeholders after the Chunker: Entity Extractor, Metadata Tagger, and Embedder. The Embedder is the next step to configure. The Metadata Tagger and Entity Extractor are optional.
Choose a parsing preset
A parsing preset sets how the Chunker parses each page. Choose the preset that matches the content you need to find:
| Preset | Choose it when |
|---|---|
| Pure VLM (default) | You want a vision language model (VLM) to parse each page end to end |
| Balanced | Your documents mix text, images, and tables |
| Text focused | Your documents are mostly text, such as reports or articles |
| Table focused | Tables carry the information you need, such as financial reports. This preset spends extra effort on tables, at a higher token cost |
A token is a word or part of a word that a language model reads as one unit.
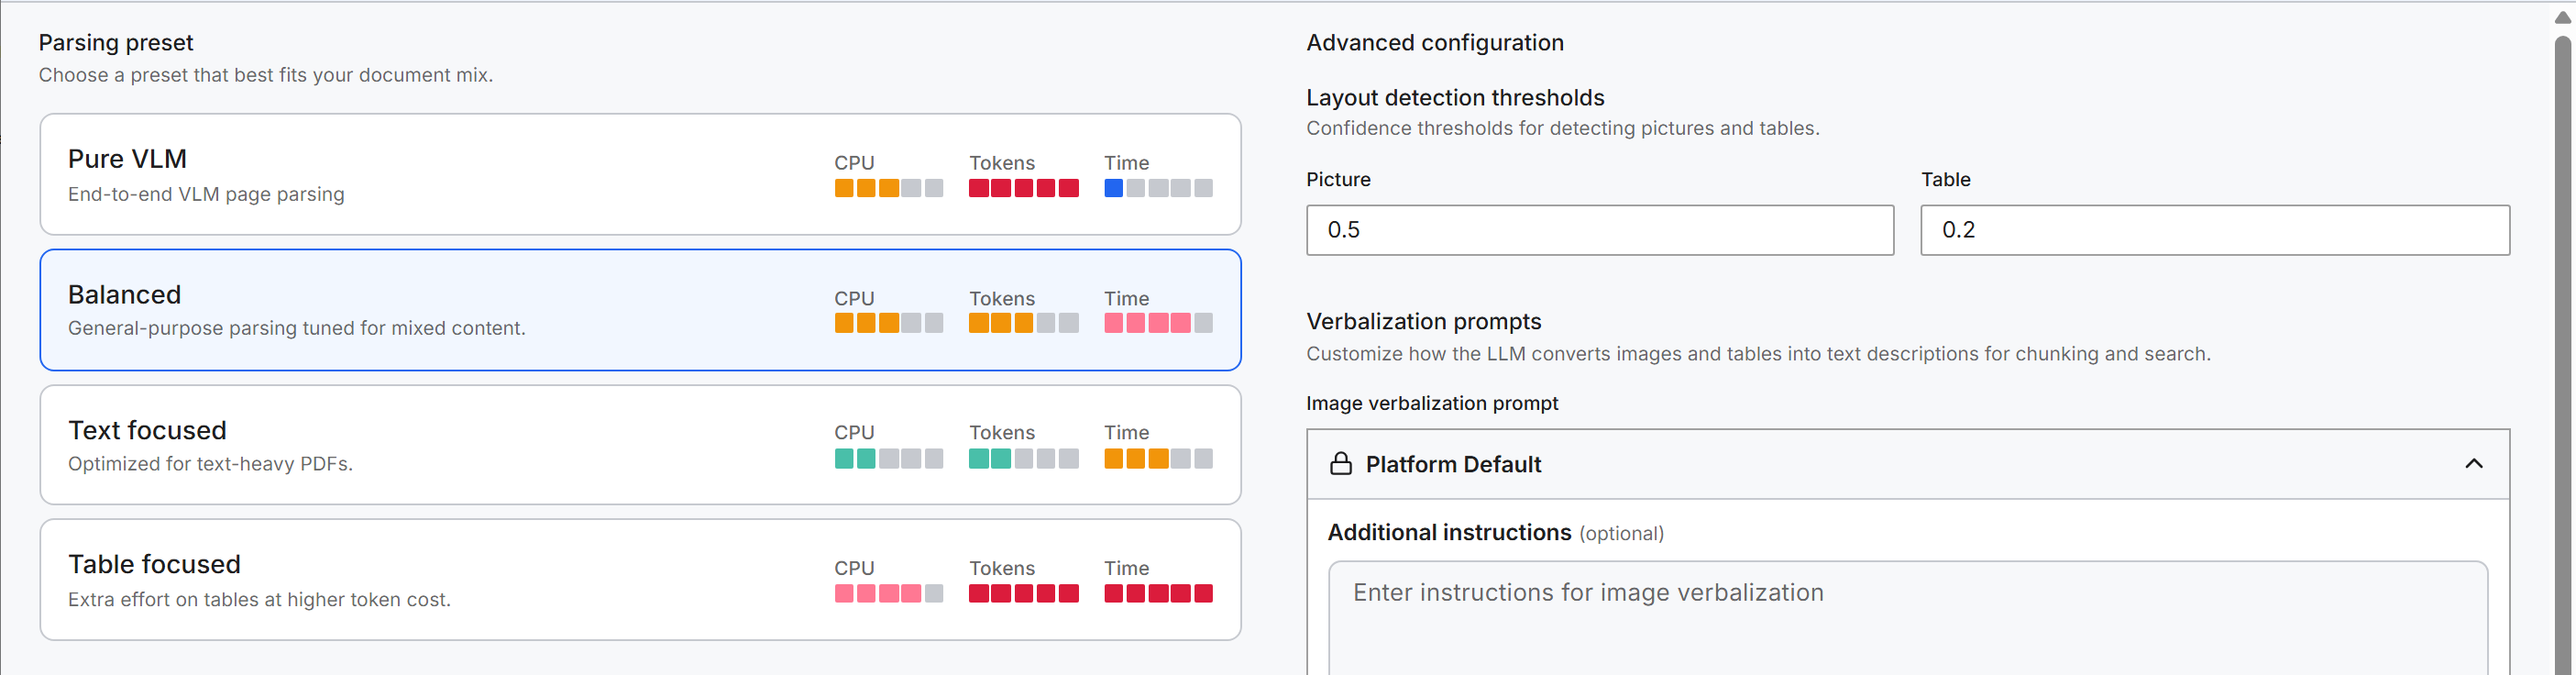
The preset also decides which advanced settings the panel shows. Pure VLM shows VLM parsing prompts. The other three presets show Layout detection thresholds.
A preset doesn't change the values in the panel's fields, so values you enter stay when you switch to another preset.
Choose an LLM model
The Chunker uses an LLM for content extraction, including the text descriptions of images and tables. In LLM model, the default is default-completions, and the list shows every LLM client configured in your environment. Select another client to run this pipeline's extraction on a different model.
To see or add LLM clients, open Model Hub > Clients in C3 AI Studio. The page heading is Model Clients.
Adjust content extraction
The Content extraction settings section decides what the Chunker extracts from each document:
- Image extraction DPI: The resolution, in dots per inch (DPI), at which the Chunker reads images. The default is
144, and the field accepts 1 to 600. Increase the DPI to capture finer detail in images. A higher value increases processing time and storage. - Content to extract: Text, Images, and Tables are all selected by default. Clear a checkbox to skip that content type, for example Images when your images carry no information you need. At least one must stay selected.
Adjust chunk size and overlap
The Chunking section sets how the Chunker splits the parsed content:
- Chunk size: The largest size of a single chunk, in tokens. The default is
1000. - Chunk overlap: How many tokens neighboring chunks share. The default is
0. Increase the overlap to keep context that spans the boundary between two chunks.
Tune layout detection thresholds
With the Balanced, Text focused, or Table focused preset, the Chunker detects which regions of a page are pictures and which are tables. The Chunker gives each region a confidence score and treats the region as a picture or a table when the score is higher than the threshold. Under Advanced configuration > Layout detection thresholds:
- Picture: The default is
0.5. - Table: The default is
0.2.
A higher threshold is more precise but can miss regions. Raise a threshold when the Chunker marks too many regions as pictures or tables. Lower the threshold when the Chunker misses pictures or tables.
Customize the prompts
The Chunker sends prompts, which are instructions, to the LLM. Each prompt has a locked Platform Default and an Additional instructions (optional) box. Select Platform Default to read the built-in prompt. Text that you enter in Additional instructions (optional) is added to the platform default when the pipeline runs. Leave the box empty to use the platform default as it is.
The panel shows these prompts:
- VLM parsing prompts > User prompt: Shown with the Pure VLM preset. Add instructions that specialize page parsing for your documents.
- Verbalization prompts > Image verbalization prompt and Table verbalization prompt: A verbalization is the text description of an image or a table that the LLM writes. Search matches against the verbalization. Add instructions for your document set, for example
Describe charts in terms of axes, units, and trends.for images.
Check the parsing results
After the pipeline processes at least one file, you can see how the Chunker parsed it. View stays unavailable until then. Check the results:
- Select the Chunker node. The Configure Chunker panel opens.
- Select View. The Chunker Result dialog opens with the list of processed files.
- Select a file. For a PDF, the dialog shows each page with a bounding box around every region the Chunker found, and the fields extracted from that region. Use Sync Scroll and Toggle Fields to move through the results.
View shows the results of the last run. View doesn't parse the file again with changes you haven't saved. To see the effect of new settings, save the Chunker and run the pipeline again.