Configure Metadata Tagging
After you save the Chunker in an Unstructured Data Integration (UDI) pipeline, you can add the optional Metadata Tagger. The Metadata Tagger uses a large language model (LLM) to tag each document with values from categories you define, such as a document type or a department. The tags become part of each document's metadata.
The Metadata Tagger works per document. The tagger reads text sampled from the start and the end of each document and applies the tags to the whole document.
Decide whether to add a Metadata Tagger
The Metadata Tagger makes one LLM call for each document, so add it when the tags are worth that cost. Add a Metadata Tagger when:
- You want each document labeled with properties such as document type, department, region, or classification.
- Your documents carry those properties in their text, not in their file names or folder paths.
Leave the Metadata Tagger out when file names, folder paths, or existing fields already carry the properties you need. Also skip the tagger when you need only search over the document text.
Before you begin
Make sure you have:
- A UDI pipeline with a saved Chunker: saving the Chunker adds the Metadata Tagger placeholder to the canvas. For the Chunker, see Configure the Chunker.
- An LLM model client: the Metadata Tagger lists the same clients as the Chunker, from Model Hub > Clients.
Open the Metadata Tagger
Open the configuration and name the node:
- In C3 AI Studio, select Data > Data Fusion and find your pipeline's source collection on the canvas.
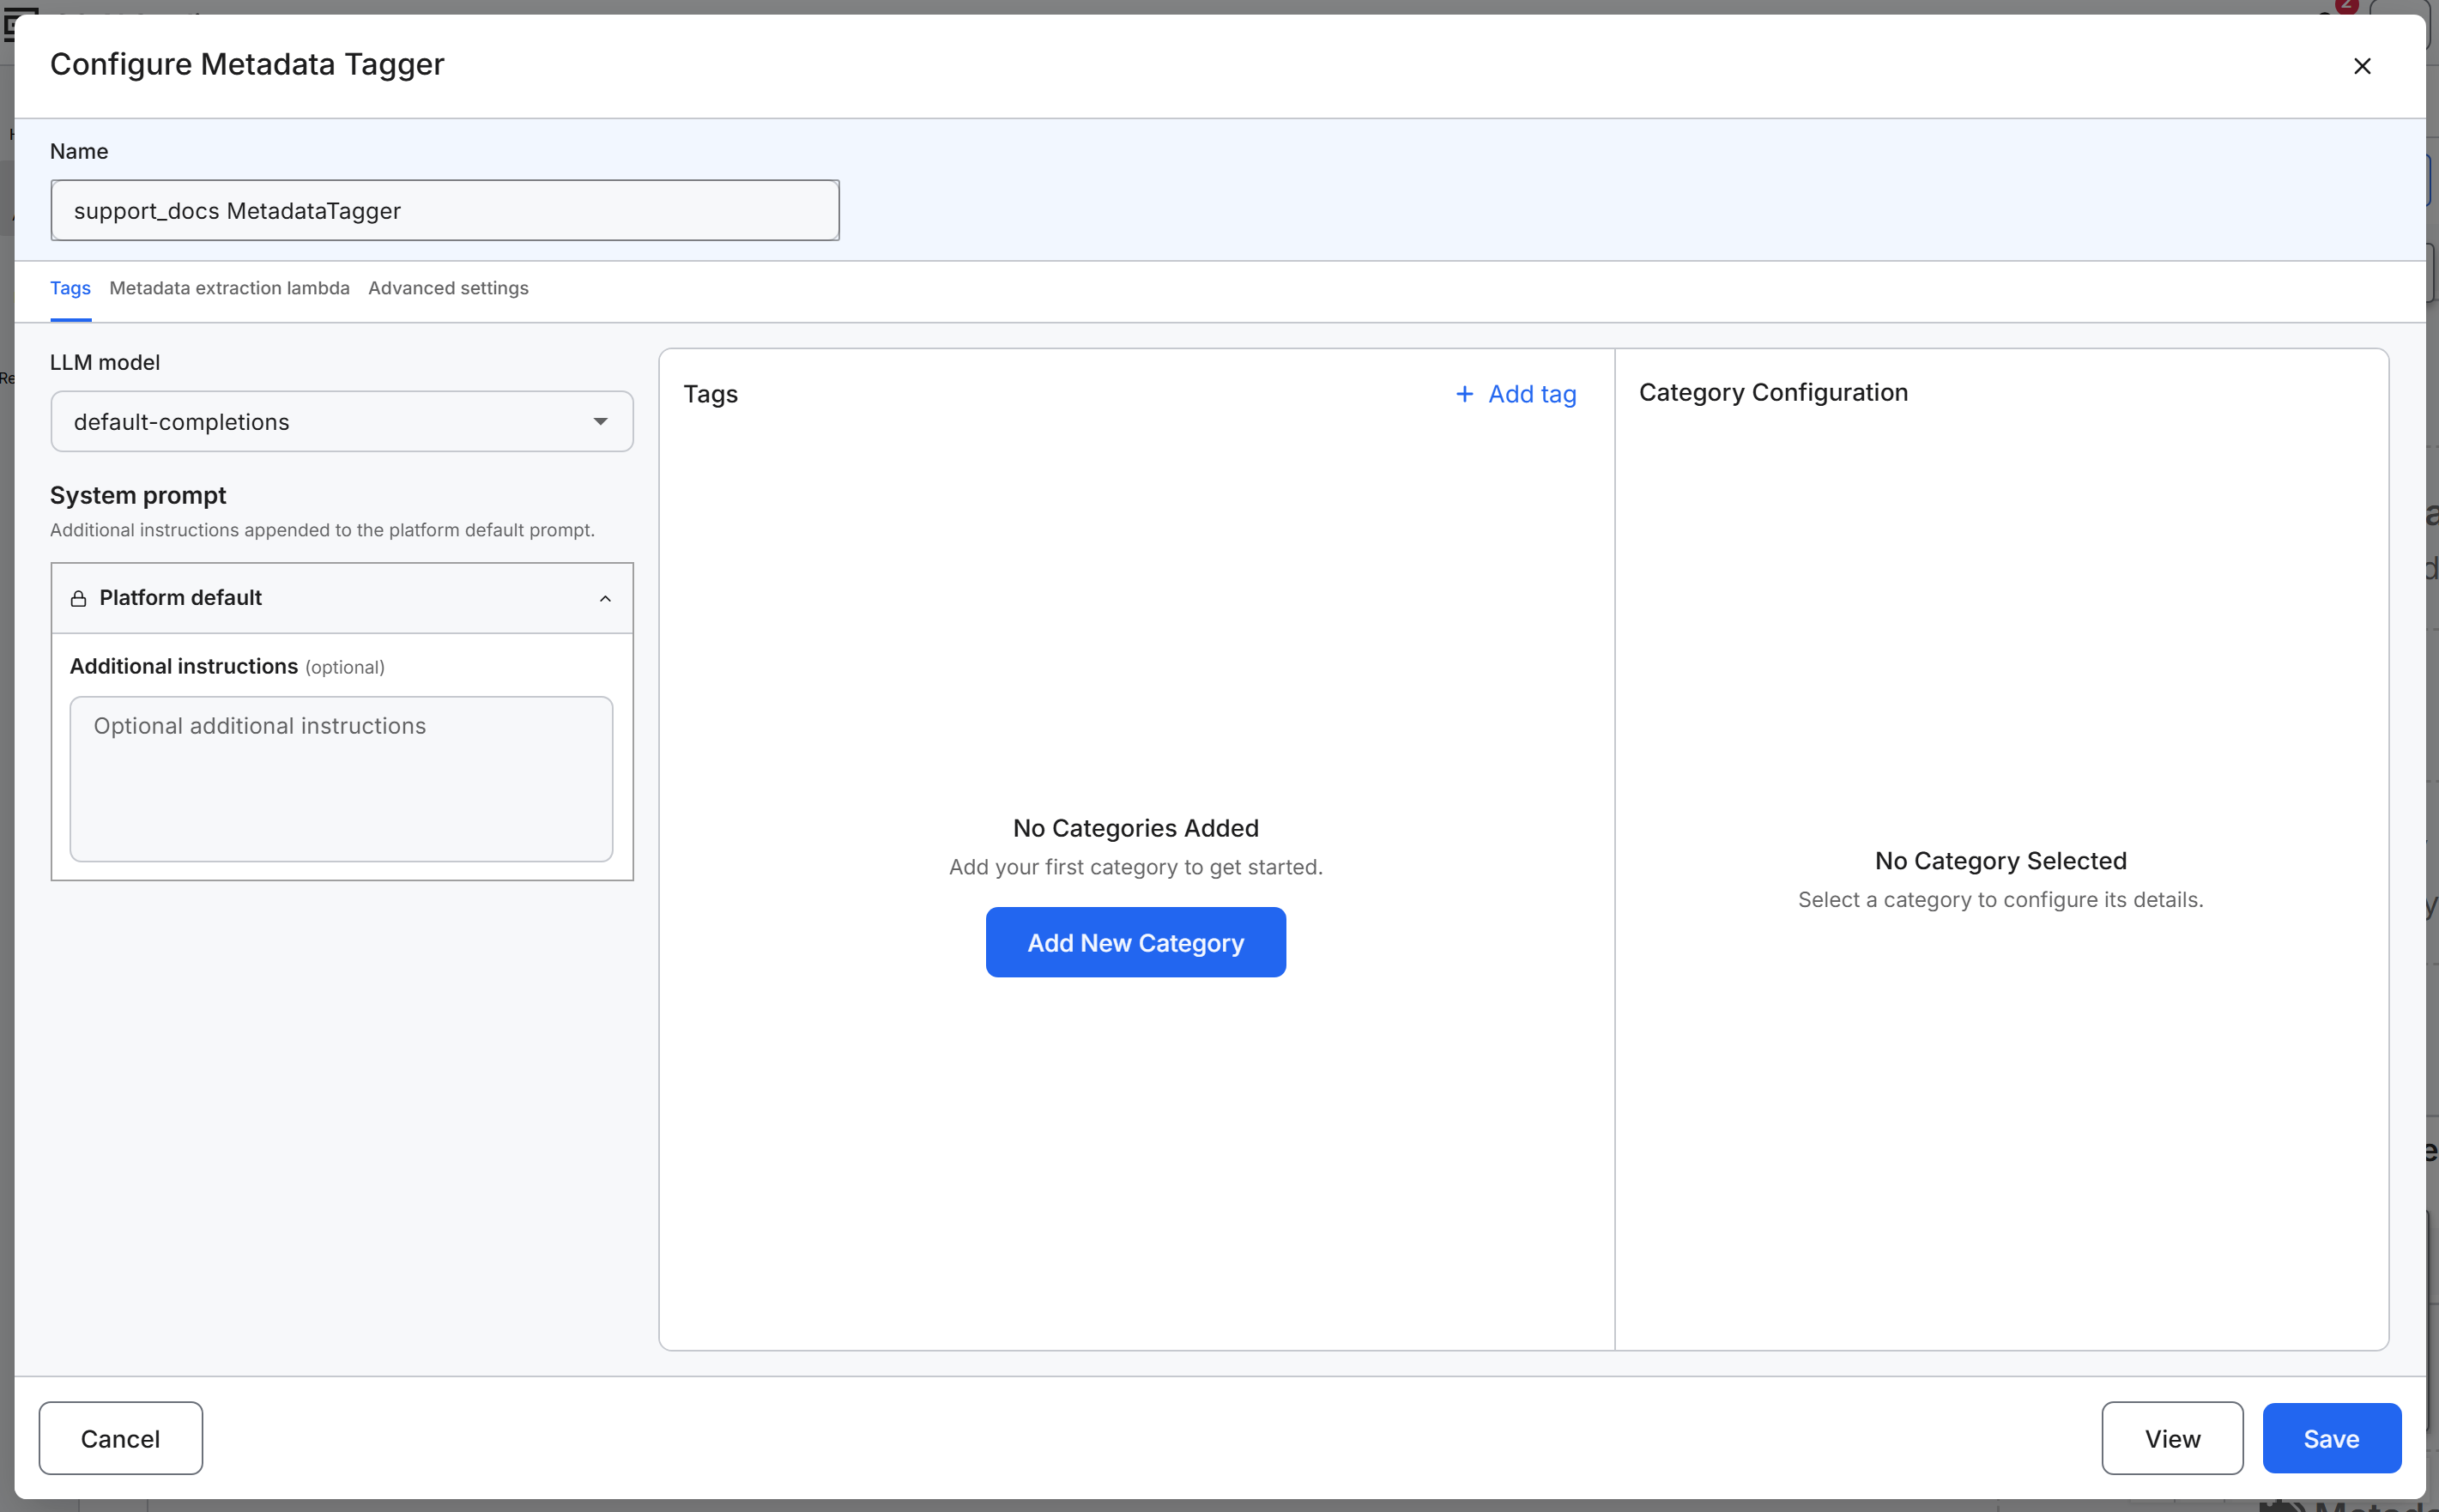
- Select the Metadata Tagger placeholder. The Configure Metadata Tagger dialog opens with three tabs: Tags, Metadata extraction lambda, and Advanced settings.
- In Name, keep the default
<collection name> MetadataTaggeror enter another name. The canvas node shows this name.
Choose tags only or a custom Lambda
The Metadata Tagger always uses the settings on the Tags tab. You can also add a Lambda, a custom function that replaces the default extraction step:
- Use the Tags tab alone when an LLM with your categories and instructions can assign the tags. This option is the default.
- Add a Metadata Extraction Lambda when you need your own logic, such as pattern matching, lookups, or your own handling of the LLM response. The Lambda still receives the model and instructions you set on the Tags tab.
Set the model and the system prompt
On the Tags tab, choose the model that assigns the tags and add instructions for your documents:
- In LLM model, select the model client that assigns the tags. The default is
default-completions, and the list shows the LLM clients configured in your environment. - Optional: Expand Platform default to read the built-in tagging prompt.
- Optional: In Additional instructions (optional), describe your documents, your terminology, or the kind of tag values you want. When the pipeline runs, the platform adds your text to the platform default prompt.
Add tag categories
A category is a named group of tag values, such as DocumentType or Department. A tag value is what the LLM assigns to a document from that category. For each category, the LLM assigns up to three values per document by default.
Each category is Open or Closed. The default category type is Open:
- Choose Open when you cannot list the possible values ahead of time and want the LLM to propose them, such as topics.
- Choose Closed when the values are known and must stay consistent, such as departments or product lines. The LLM picks only from the values you list, and a Closed category holds up to 200 values.
Add a category to the tagger:
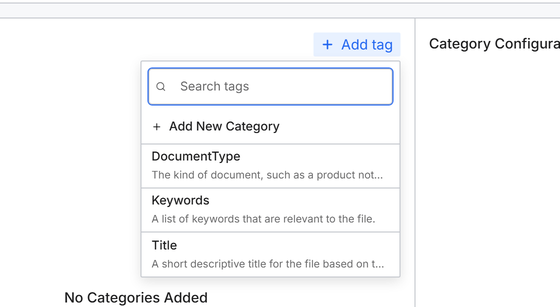
- In the Tags section, select Add tag. A list opens with Search tags, Add New Category, and the categories that already exist in the application. Every application includes Title and Keywords.
- To reuse a category, select it in the list. The category appears in the Tags table. Skip the remaining steps.
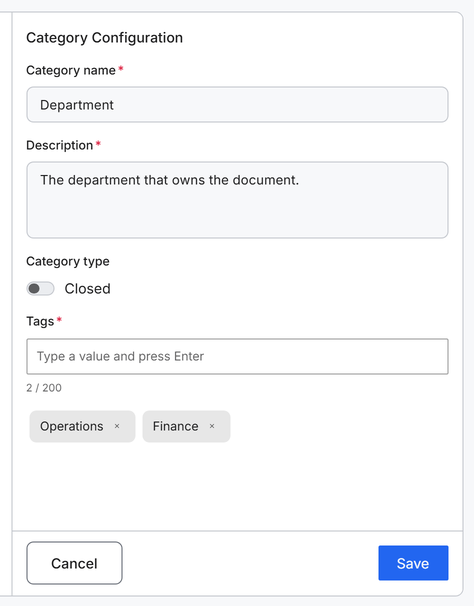
- To create a category, select Add New Category. The Category Configuration pane opens.
- Enter a Category name, such as
DocumentType. - Enter a Description that tells the LLM what the category means and what kind of values to assign.
- Under Category type, leave the toggle on for an Open category, or turn it off for a Closed category. The label next to the toggle shows Open or Closed.
- In Tags, type each value and press Enter. Tags needs at least one value for either category type. For an Open category, the values are examples that guide the LLM, and it can assign other values. For a Closed category, the LLM can assign only the values you enter.
- Select Save in the Category Configuration pane. The category appears in the Tags table with its Name, Description, and Category Type.
The Add tag list shows the categories you can reuse and the option to create one:
This example configures a Closed category with two tag values:
To edit or remove a category, select its row in the Tags table. The Category Configuration pane opens with the category's settings and a Delete button.
Write a metadata extraction Lambda (optional)
Skip this section unless you chose a custom Lambda. To add a Lambda:
Select the Metadata extraction lambda tab.
Turn on the Metadata Extraction Lambda toggle. The tab shows the Signature, the Parameters, the Returns format, and a Code Editor.
In Code Editor, enter a function with this signature:
JavaScriptfunction(completionClient, text, extractionPrompt, responseSchema, promptExamples, numTags, args)
The platform passes these values to your function:
| Parameter | Value |
|---|---|
completionClient | The model client selected in LLM model on the Tags tab. |
text | Text sampled from the whole document, as set on the Advanced settings tab. |
extractionPrompt | The platform's metadata extraction prompt. |
responseSchema | A JSON schema string that the response must match. |
promptExamples | Examples for each category. |
numTags | The maximum number of tag values for each category. |
args | Additional arguments, including your Additional instructions (optional) text as additional_instructions. |
The function returns a JSON object that maps each category to its values, such as {"DocumentType": ["Manual"]}.
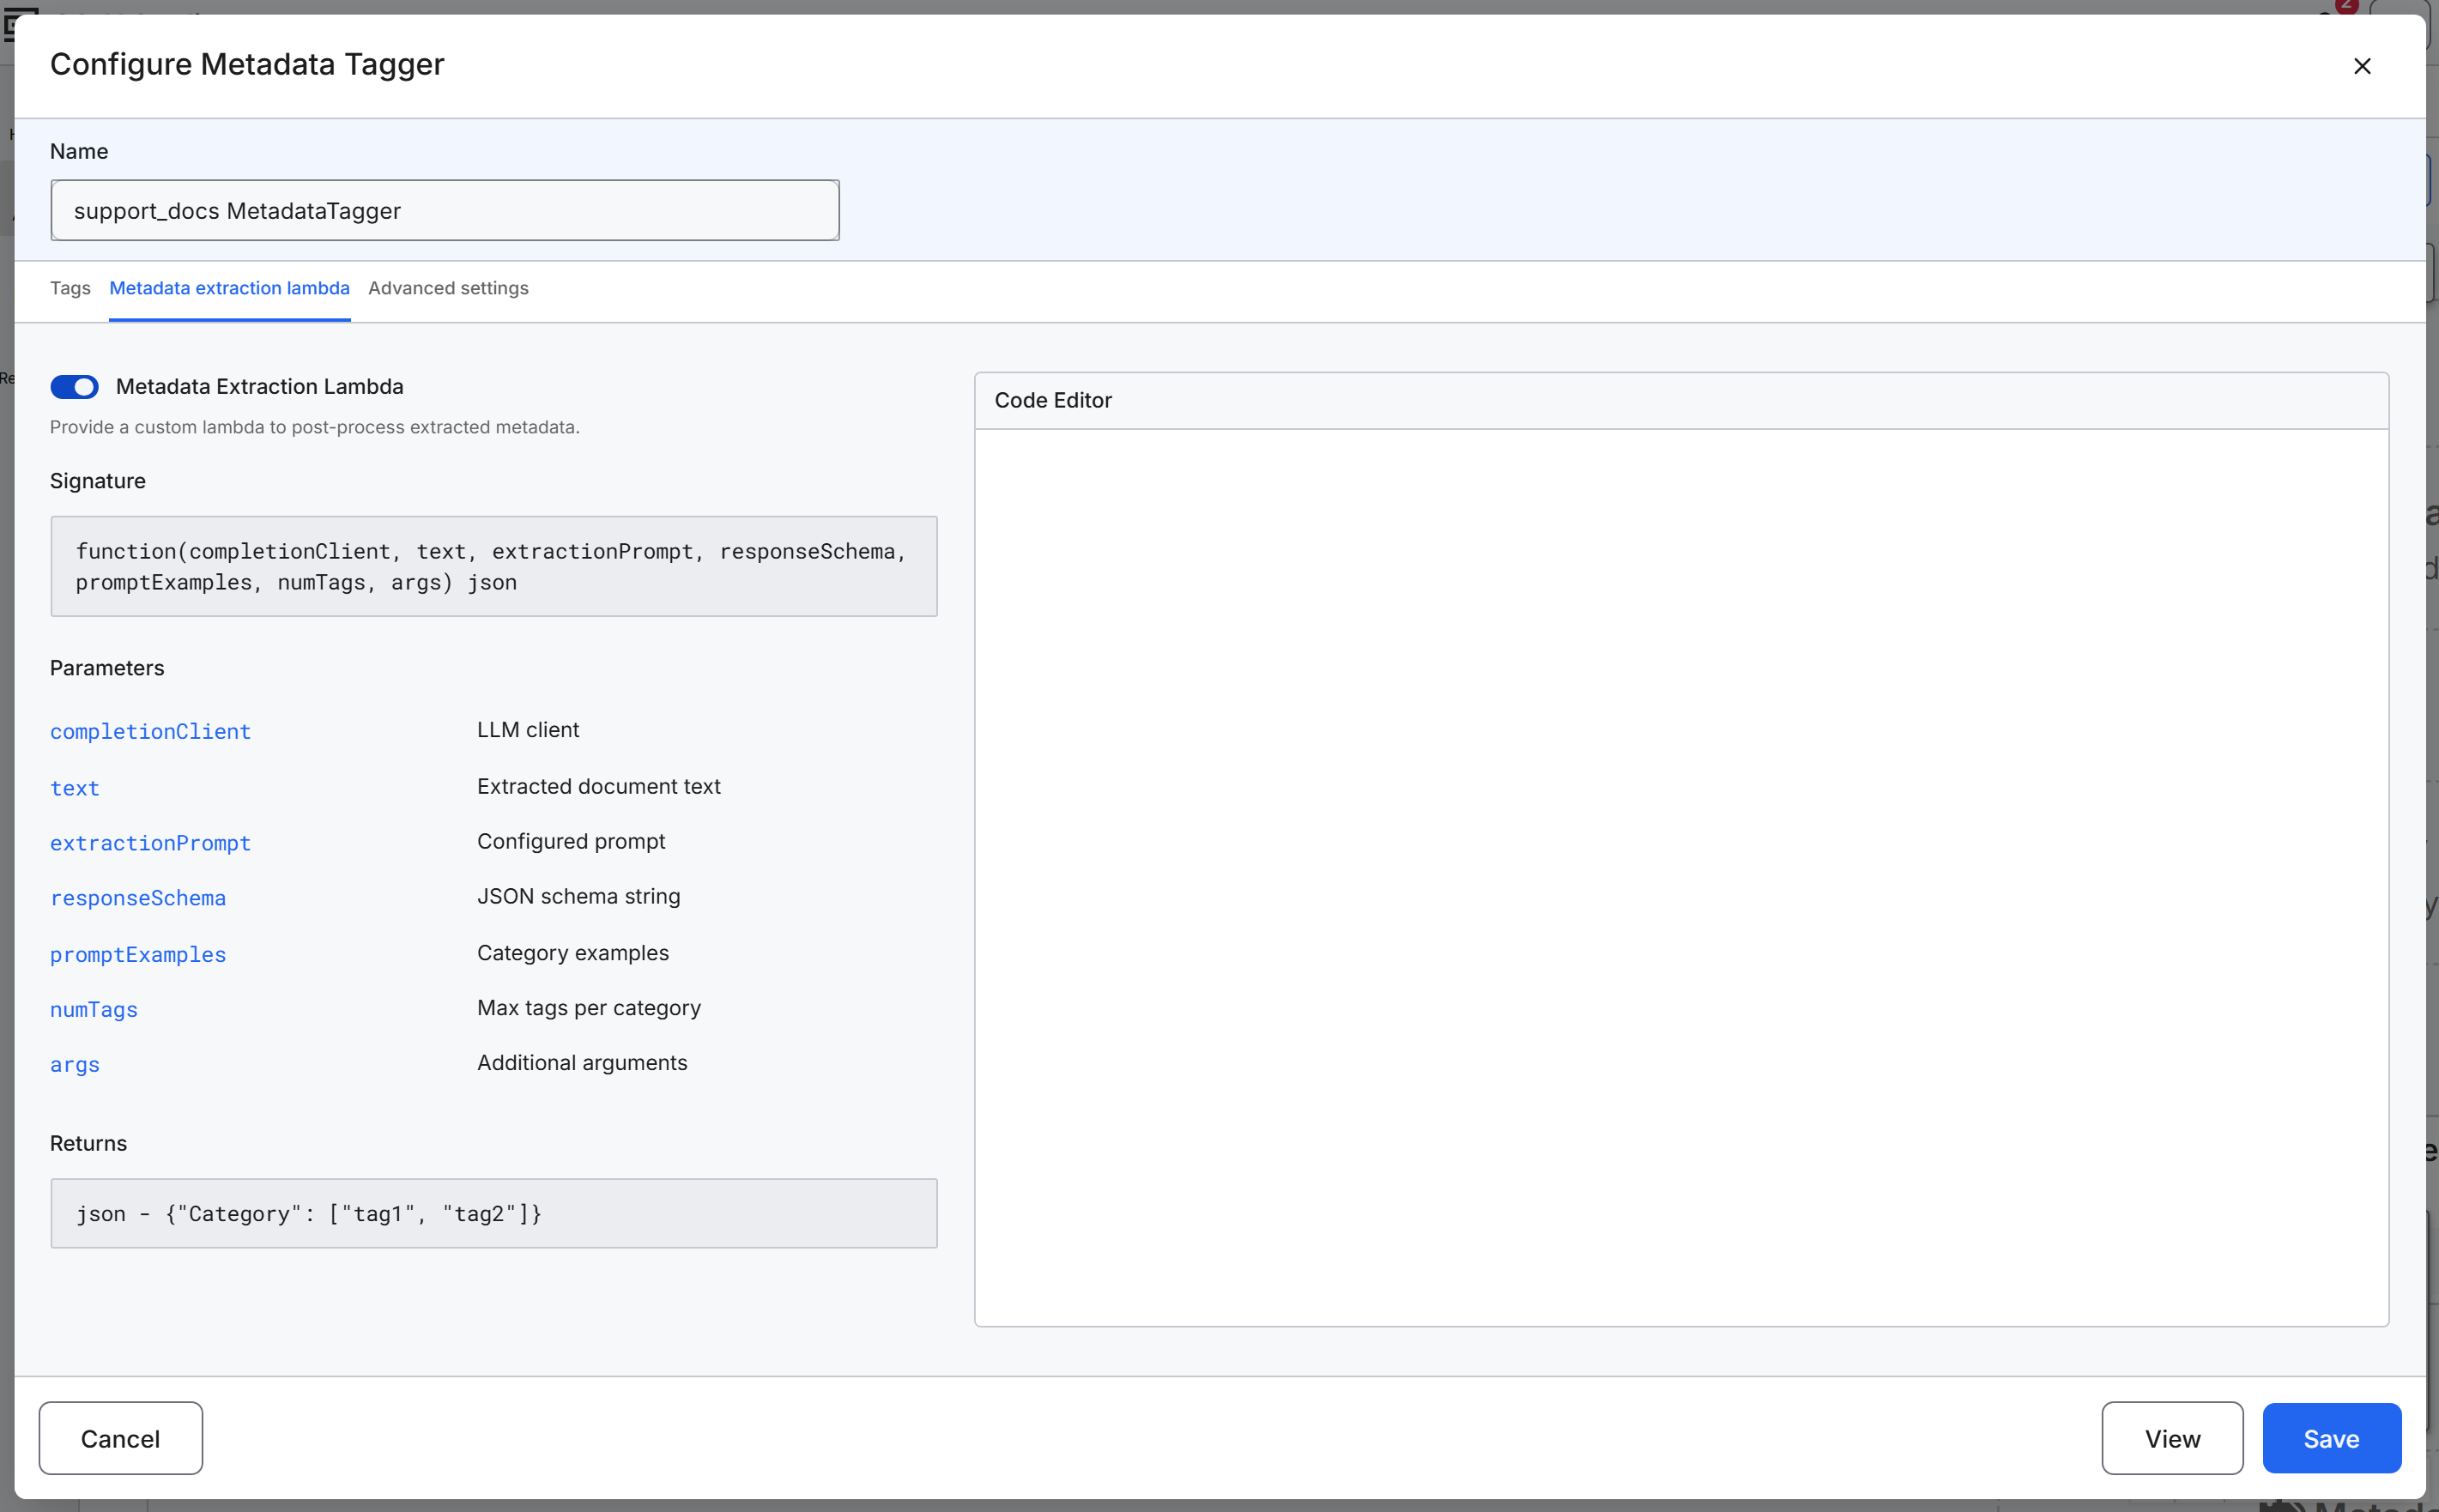
To stop using the Lambda, turn off the toggle or clear the code, then select Save.
Adjust how much text the tagger reads
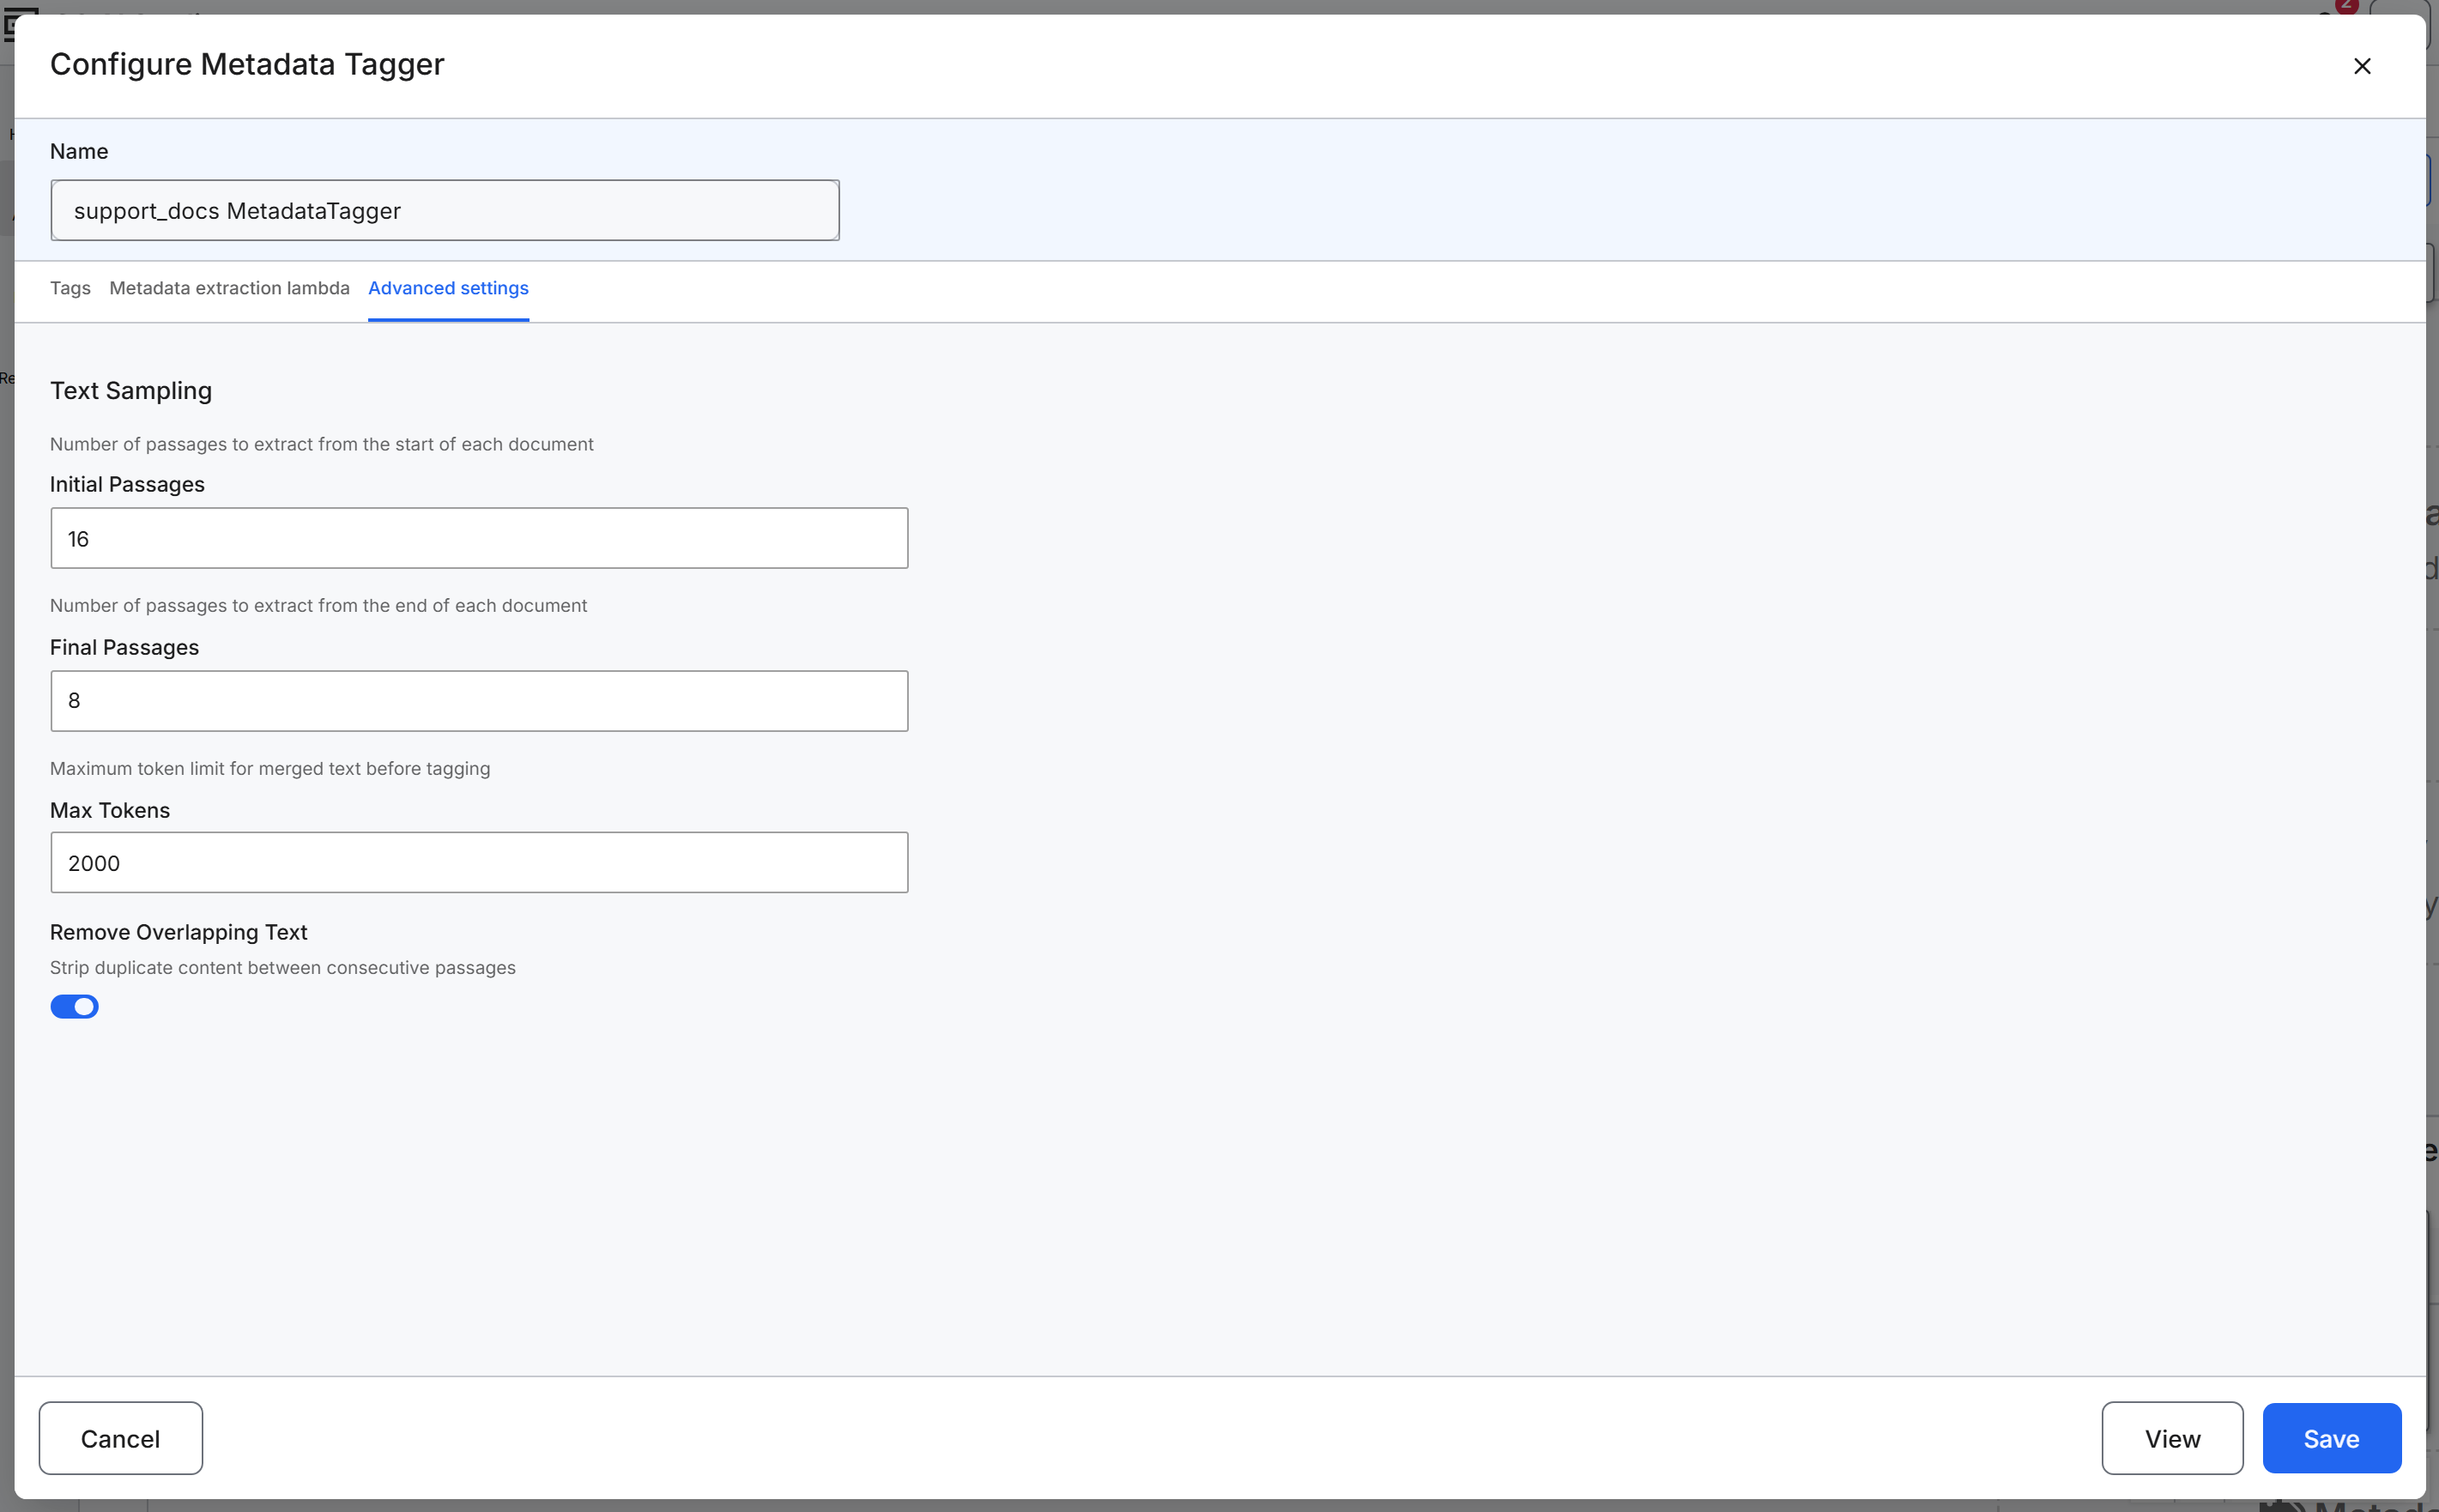
The Advanced settings tab controls how much of each document the tagger sends to the LLM. A passage here is one chunk of the document. A token is a word or part of a word that the LLM reads as one unit. Raise the passage counts when the properties you tag appear deep inside long documents, and lower Max Tokens to reduce token cost. The Text Sampling section has these fields:
- Initial Passages: The number of passages taken from the start of each document. The default is
16. - Final Passages: The number of passages taken from the end of each document. The default is
8. - Max Tokens: The maximum number of tokens in the merged text before tagging. The default is
2000. - Remove Overlapping Text: Removes duplicate content between consecutive passages. The setting is on by default.
Save and check the tags
Save the Metadata Tagger, run the pipeline, then review the tags it extracted:
- Select Save. Tagging runs after chunking and before embedding.
- Optional: To include the tags in the embeddings, open the Embedder and turn on Document Tags under Include Metadata in Embeddings. For details, see Configure the Embedder.
- Run the pipeline on your files. For details, see Execute the Pipeline.
- After the run, open the Metadata Tagger and select View. The Metadata Tagger Result dialog lists the processed files.
- Select a file. The dialog shows a preview of the document and, under Tags extracted, each category Name with its Values.
View shows the tags from the last run. View does not test unsaved settings. A file processed before you added the Metadata Tagger shows "No tags extracted for this file." until the pipeline processes it again.