Create an Unstructured Source Collection
Every Unstructured Data Integration (UDI) pipeline starts from the documents it reads. Before you configure any processing, you tell the pipeline where those documents are. Two objects on the Data Fusion canvas record the location:
- Source system: the storage connection, such as an Amazon S3 bucket or the built-in
Canonicalsource system. On the canvas, the source system appears as a node labeled File Source System. - Source collection: a folder inside the source system. The pipeline processes every file in that folder.
Each UDI pipeline reads from one source collection.
Choose Canonical or an external source system
UDI reads documents from file storage. You can use the built-in Canonical source system or connect an external one.
Use the built-in Canonical source system when you want to:
- Try a UDI pipeline without setting up external storage or credentials.
- Upload a small set of documents directly from your computer.
Canonical stores files in the application's own storage and is already on the canvas, so you need no connection step. Go to Create the source collection.
Use an external file source system, such as Amazon S3, Azure Blob Storage, Google Cloud Storage, Google Drive, or OneDrive and SharePoint, when you want to:
- Index documents that already live in cloud storage or a document library.
- Process large document libraries that keep their own access controls.
- Keep ownership of the documents outside the application.
Add an external file source system
To read documents from external storage, connect it with the Configure Connector wizard. After you select a file connector, Setup Progress lists four steps: Connector, Destination, Authentication, and Review. Before you start, gather the storage location and the credentials for the authentication method you plan to use.
On the Data Fusion canvas, select Add Data Source. The Configure Connector wizard opens on the Connector step.
Select File systems, and then select your connector: S3, Azure Blob, Google Cloud Storage, Google Drive, or OneDrive/SharePoint.
On the Destination step, enter the connection details. For Amazon S3, the step asks for:
- Name: A unique name made of letters, numbers, and underscores that doesn't begin with a number, for example
support_docs_s3. - Description (optional): Fewer than 500 characters.
- Bucket Information: Select Use Existing Bucket to pick a bucket the platform already knows. Or select Add Bucket to enter a bucket and folder path, such as
my-bucket/. End the path with/, and don't include a prefix such ass3://. - Region: The bucket's AWS Region.
To fill the fields from a configuration you already have, paste it into the Auto-Map Fields panel. The wizard maps the configuration's keys to the fields on the Destination and Authentication steps.
- Name: A unique name made of letters, numbers, and underscores that doesn't begin with a number, for example
On the Authentication step, select an Authentication Method, and then fill in the fields that the method shows. The methods depend on the connector:
- S3: Access Key or IAM Role. Choose IAM Role when the platform can sign in with an AWS Identity and Access Management (IAM) role, so you store no secret. Choose Access Key when you have only an access key and secret.
- Azure Blob: SAS Token or Service Principal. Choose Service Principal, an application registered in Microsoft Entra ID, when you can register one: the credential belongs to the application, not to a person. Choose SAS Token when only a shared access signature (SAS) token is available, and enter a new token before it expires.
- Google Cloud Storage: Private Key, the key of a Google service account.
- Google Drive and OneDrive/SharePoint: One method each, so the step shows the credential fields directly. Google Drive signs in with a Google Cloud service account, and OneDrive/SharePoint with a Microsoft Entra ID app registration.
For each method's fields and where to find the values, see Authenticate File Sources.
On the Review step, select Save & Test to check that the platform can reach the storage with your credentials. If the test fails, an AI Error Analysis message suggests what to fix.
When the wizard reports "Connection test successful", select Save & Close.
The new source system appears on the canvas as a File Source System node.
Create the source collection
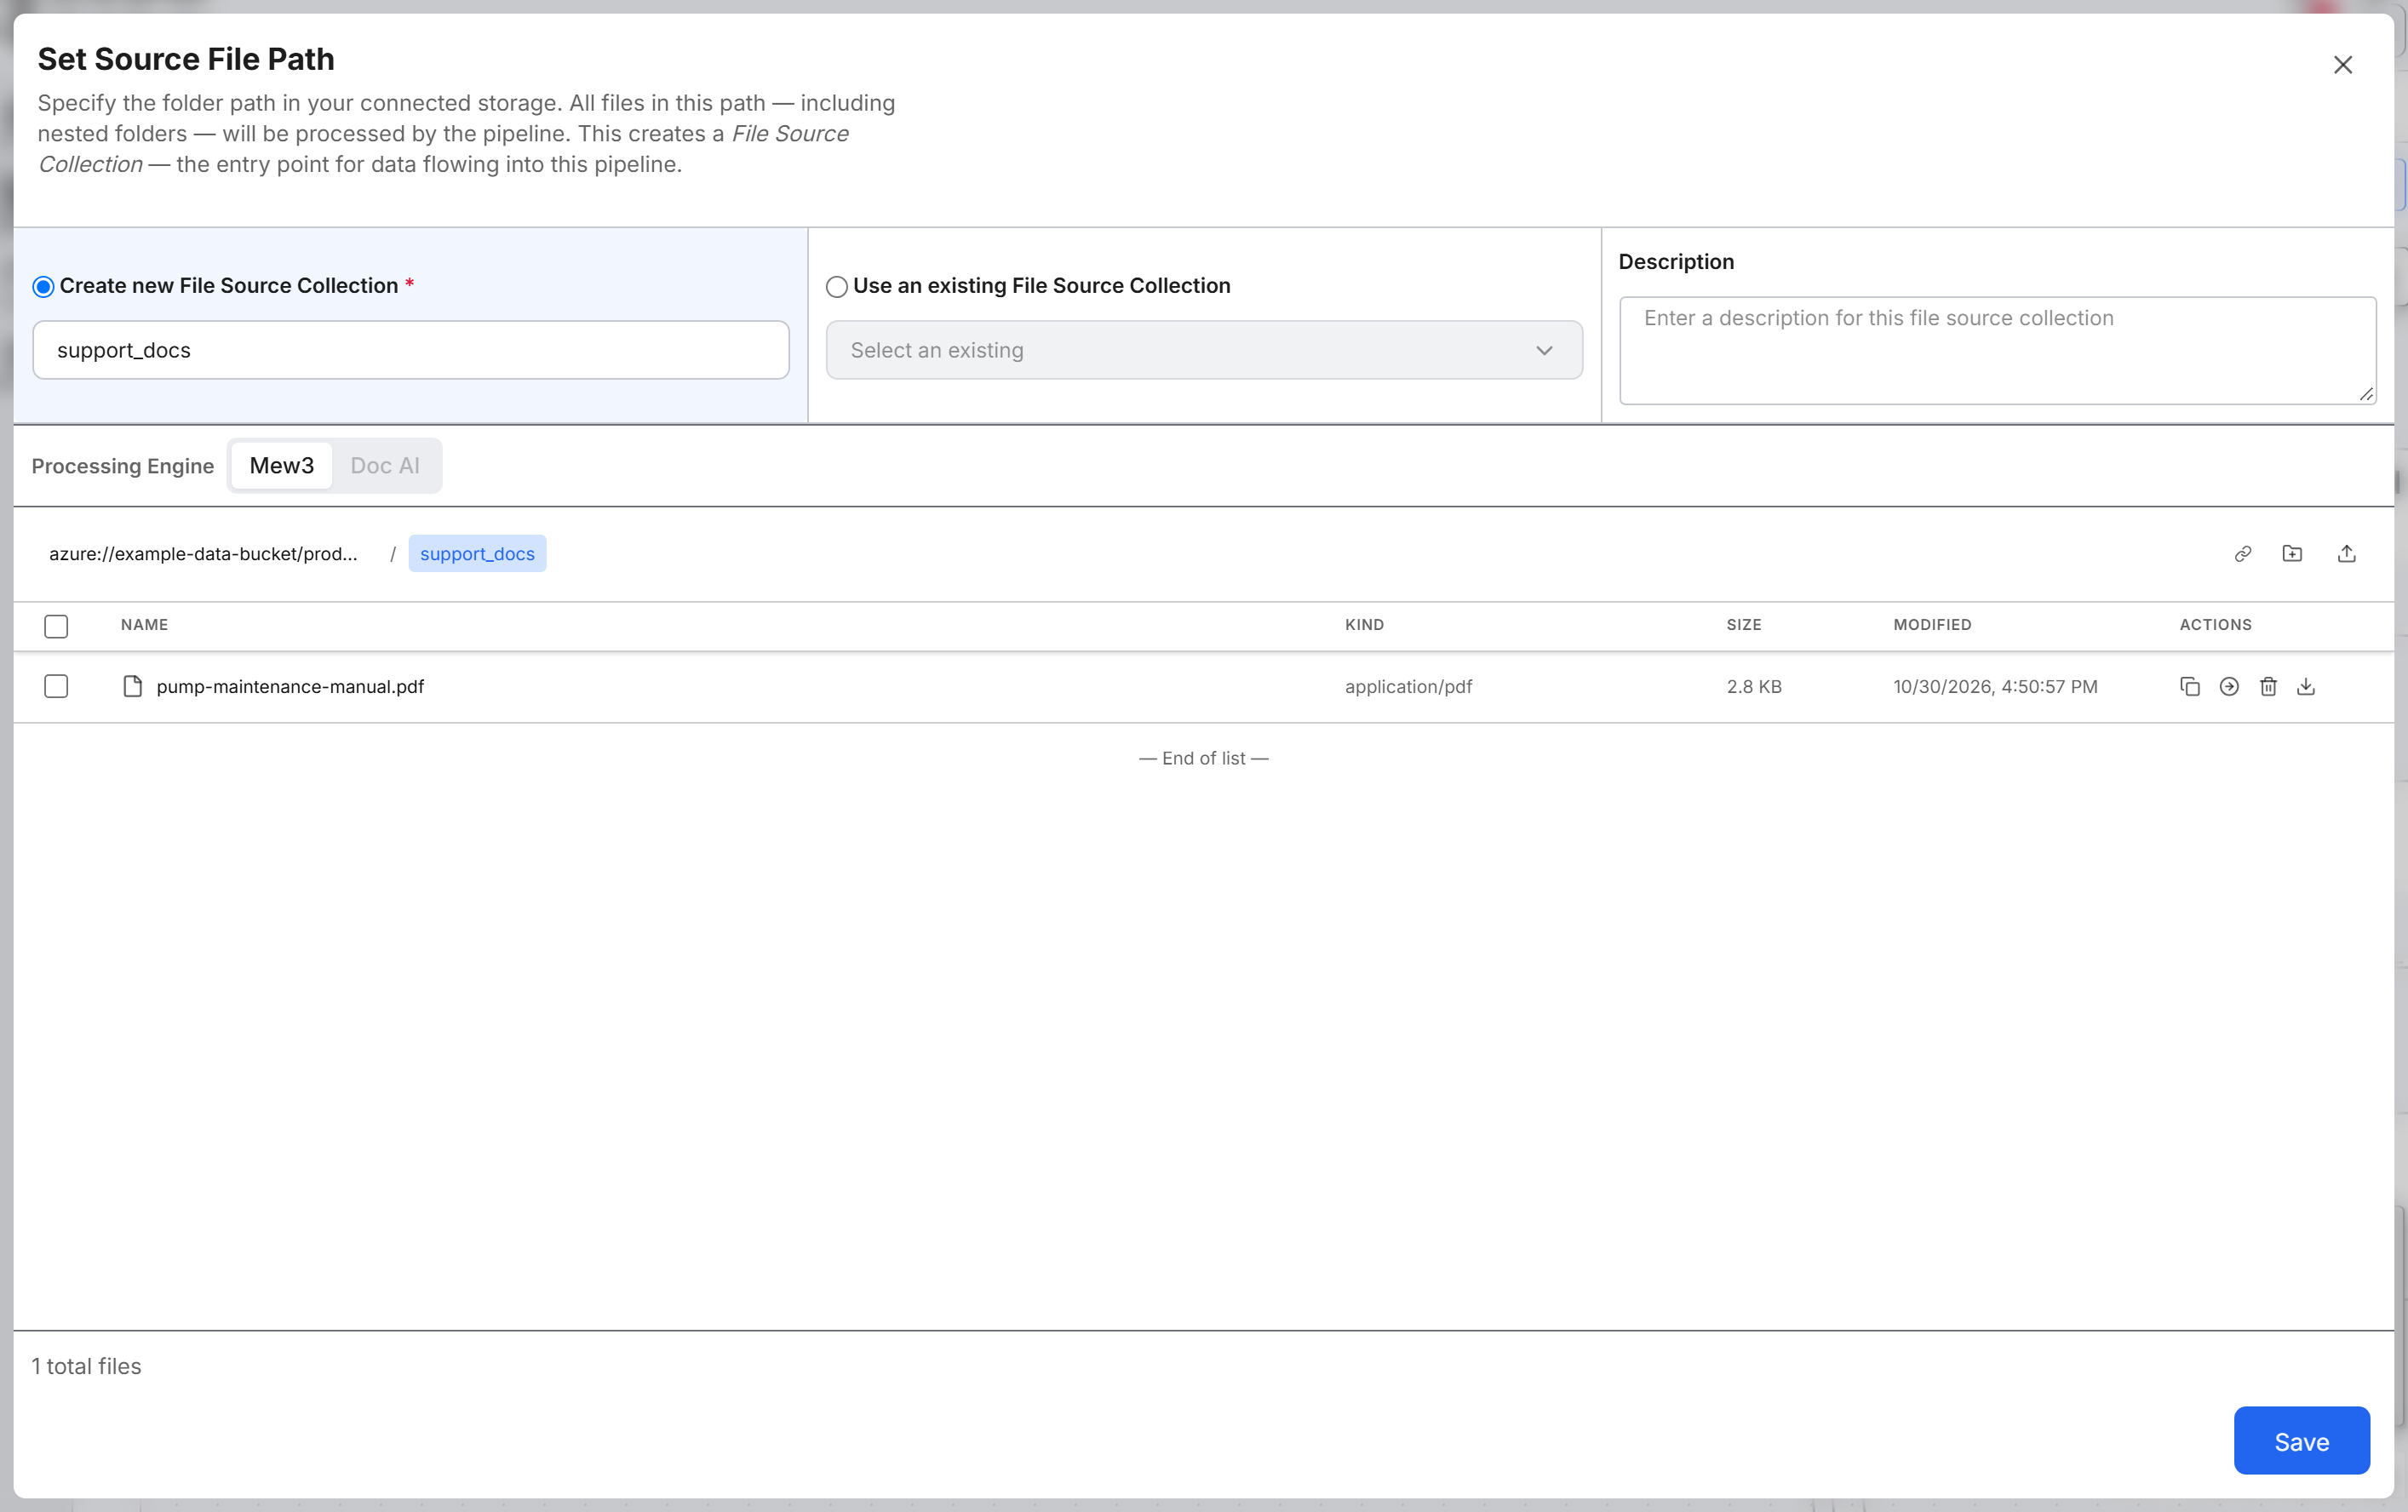
A source collection tells the pipeline which folder to read. You create the source collection from the source system node, in the Set Source File Path dialog:
Open the source system node's menu (the three-dot button) and select Add Source Collection. The Choose type of source collection dialog opens. If the source system has a Files / Set file path node, you can select that node instead. The canvas shows the Files / Set file path node only for a source system that has no source collections yet.
Select Unstructured source collection. The Set Source File Path dialog opens. Choose Structured source collection instead for tabular data, such as CSV files.
Create a new collection or reuse one:
- To create a collection, keep Create new File Source Collection selected and enter a name in the box under it, for example
support_docs. - To reuse a collection that already points at the folder you want, select Use an existing File Source Collection. Then pick the collection in Select an existing.
- To create a collection, keep Create new File Source Collection selected and enter a name in the box under it, for example
Optionally, enter a Description that tells other users what the collection holds.
If you are creating a new collection, check Processing Engine. Mew3 is selected by default. Doc AI can be selected only when the Doc AI service is deployed in your environment. Doc AI also needs a source file system that supports presigned URLs. A presigned URL is a temporary link that gives access to one file without other credentials. You can't change the engine after you create the collection.
Open the folder that holds your documents. The collection processes every file under the folder you open, including nested folders. To make a new folder, select Create directory, enter a Directory name, and select Create.
For
Canonical, always create or open a folder first. If you set theCanonicalroot as the path, the collection includes every file already stored inCanonical.To add documents from your computer, select Upload files. In the Upload files dialog, select files or drag them into the dialog, and then select Start Upload. Check that your files are listed.
Select Save. If the Upload complete panel covers Save, select Clear on that panel first.
The canvas adds two nodes: the source collection, labeled GenaiSourceCollection, and a Chunker placeholder labeled Add chunker. A placeholder is a node for a pipeline step that you have not configured yet. Configure the Chunker next.
The collection always covers the whole folder, so you don't select individual files. The checkbox on each row selects files for actions such as Copy, Move, Download, and Delete.
Add files to an existing collection
To add documents later, upload them into the collection's folder:
- Select the source collection node. The Set Source File Path dialog opens with the collection's name.
- Select Upload files, add your files, and select Start Upload.
- Select Save.
The pipeline picks up the new files the next time you sync the collection and run the pipeline. For the steps, see Execute the Pipeline.