File System Configuration Example — Amazon S3
Data Fusion is in Beta. Please contact your C3 AI representative to enable this feature.
File system data sources allow you to connect cloud storage with file-based data into the C3 Agentic AI Platform. Use file system sources when you have documents that you want to use as training for predictions. Some file system sources include the following:
- Amazon S3
- Azure Blob
- Google Cloud Storage
This topic explains how to configure Amazon S3 (Amazon Simple Storage Service) with Data Fusion. However, the steps are similar for connecting any file system. Use these steps to guide you while connecting any file system source to Data Fusion.
Prerequisites
Before starting, ensure you have the following:
- A C3 environment running on Version 8.8 or above
- A running C3 application
- Amazon S3 credentials
- CSV formatted files
Data Fusion does not currently support unstructured files for data integration.
Configure S3 by Amazon as a data source
Open your application in C3 AI Studio and navigate to the Data Fusion tab. In the Data Sources panel, select Add data source.
In the Add data source workflow, select your file system source. In this case, select S3 by Amazon.
Upon selecting Next, you reach the Configure Data Connector window. Enter the following information into this window:
- Name — The C3 identifier for the connection
- Description — Any information you'd like to include about the source
The Configuration section prompts you to enter the following information for a successful connection to S3:
- Bucket — The bucket where your data lives; you can find more about buckets in Amazon's documentation on Buckets.
- Bucket Region — Where your bucket is accessible; you can find more about buckets in Amazon's documentation on Regions and Zones
- Access Key — The public key associated with your S3 account
- Secret Key — The private key associated to the access key
When you enter a new Bucket, you must select the address as New Url: {your Url} in the dropdown menu.
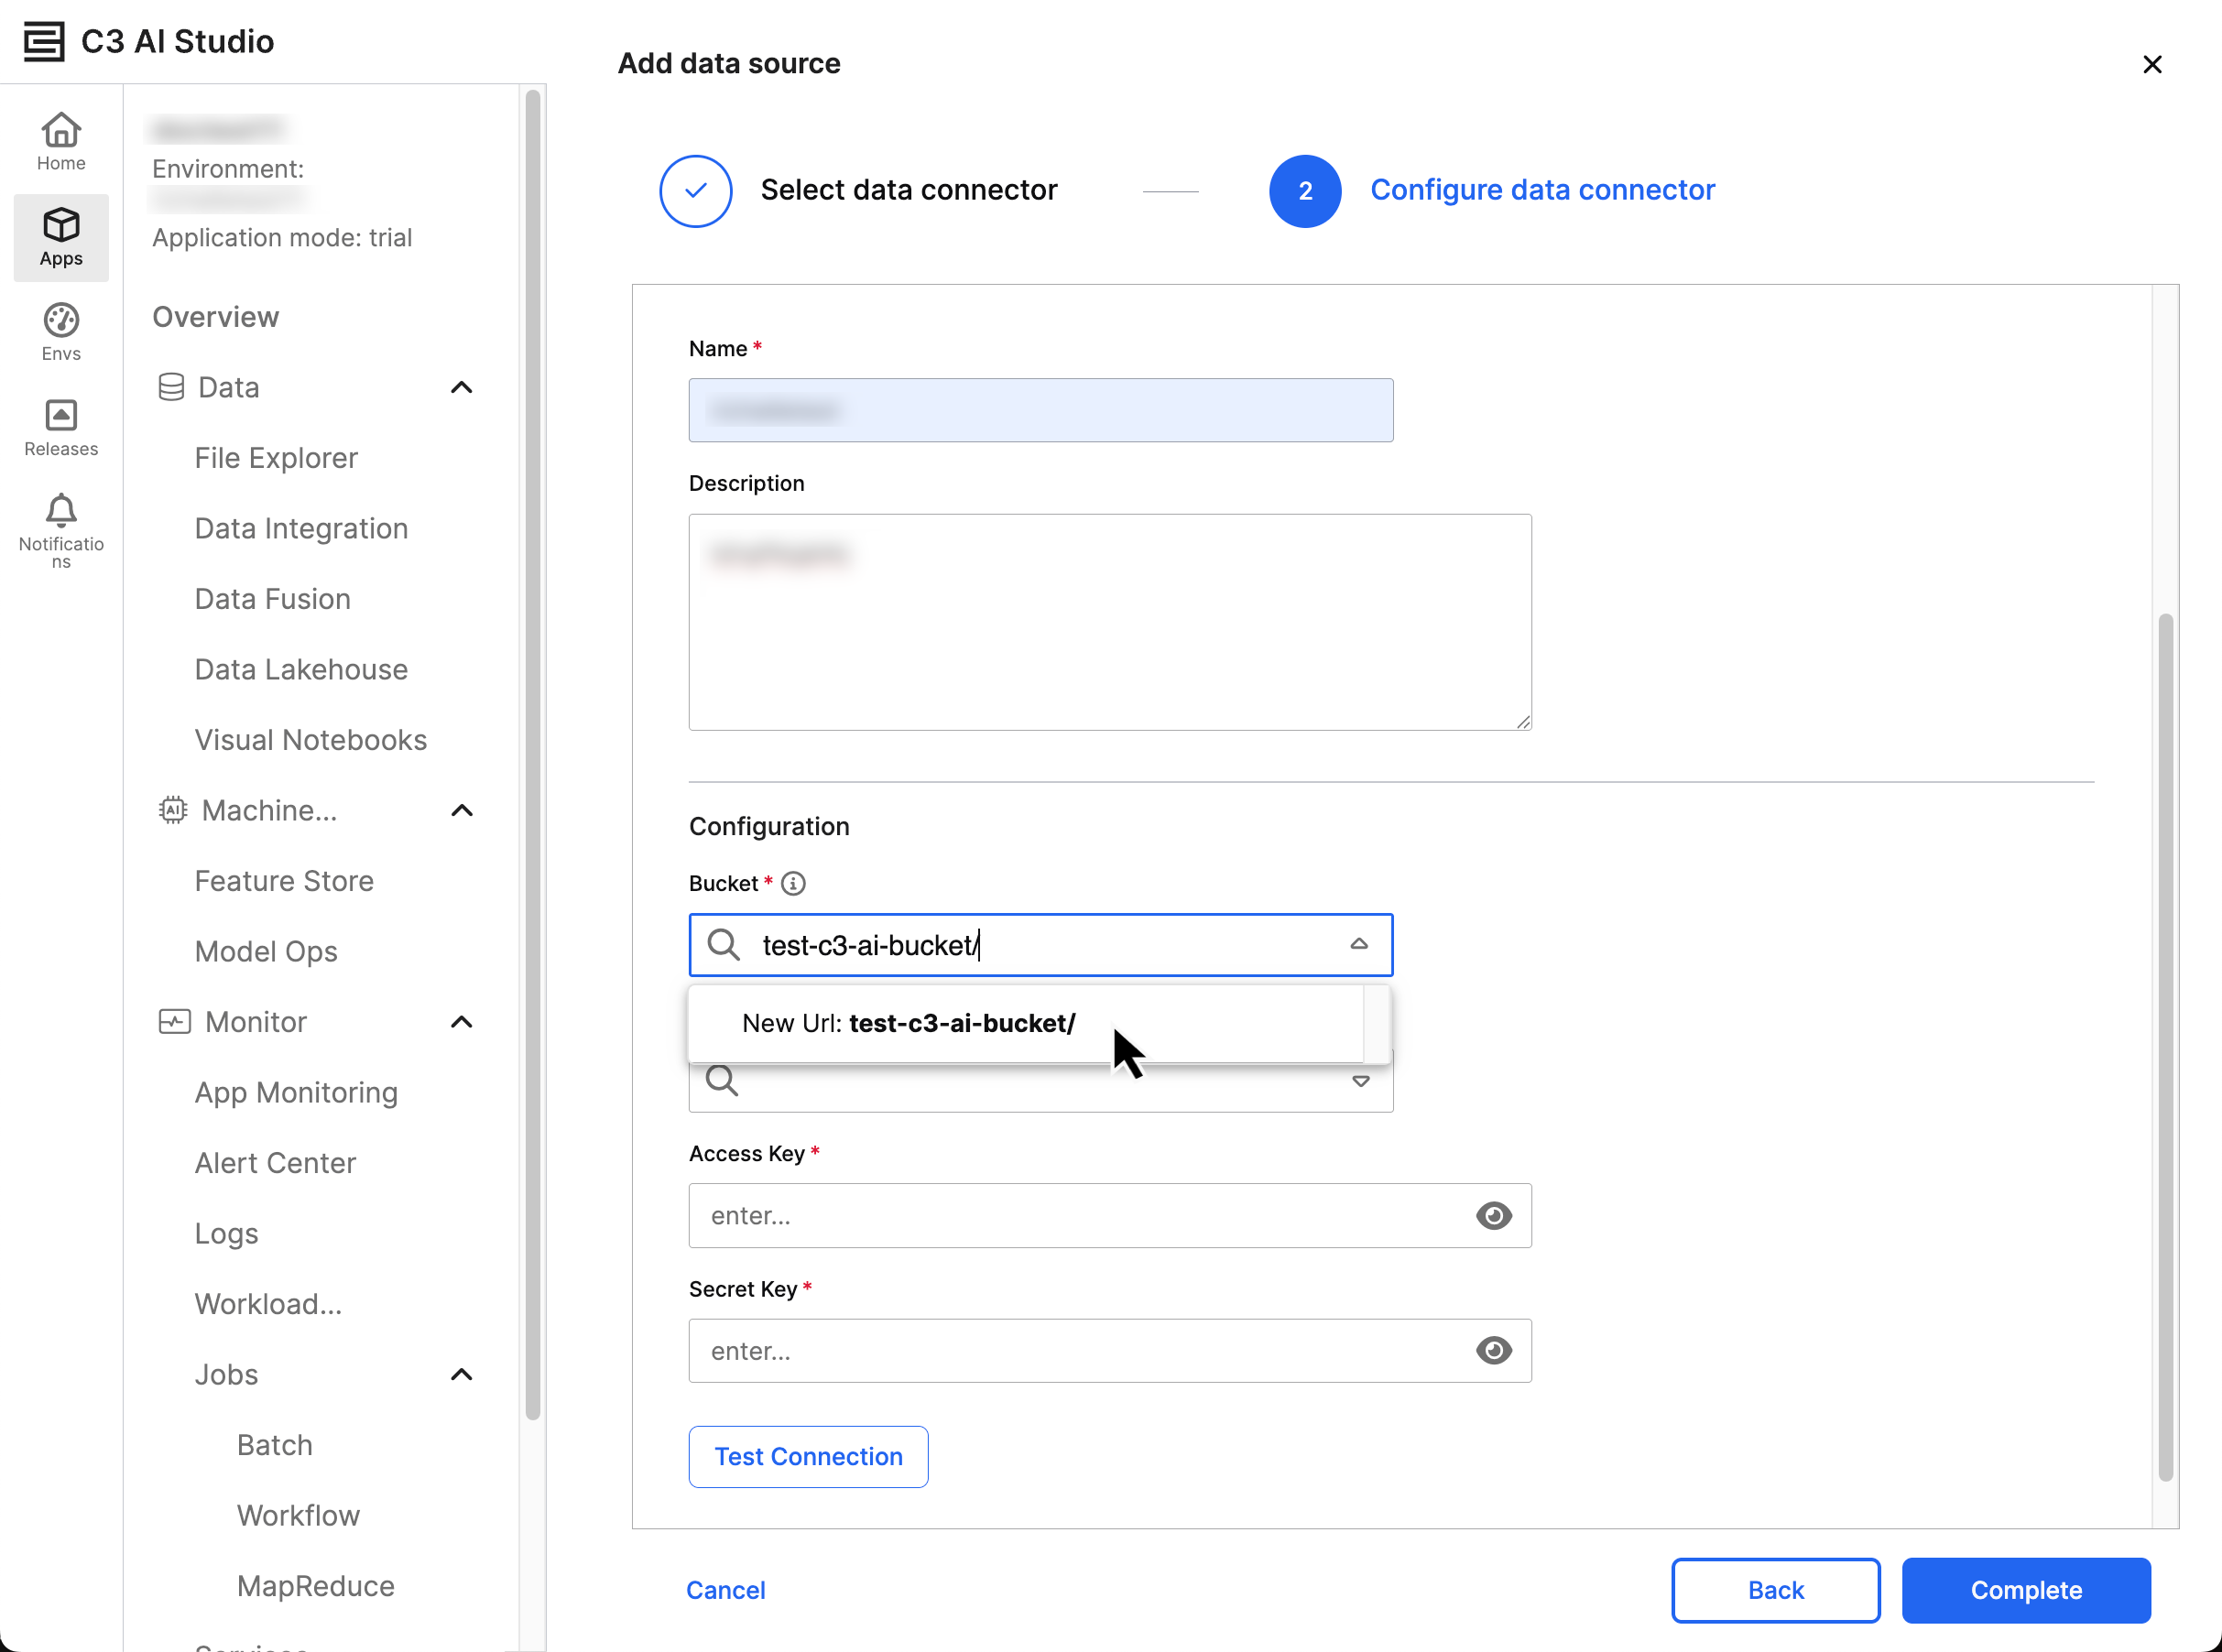
You must enter the Access Key and Secret Key for authentication; your credentials must have read and write permissions for C3 to access your Bucket.
After entering the connection information, select Test Connection to validate the credentials. If the test is successful, select Complete to map schema or set up data ingestion. You should now see the S3 connector and bucket in the Data Sources TreeView.
Review the S3 data source
In the Data Sources tab of the Data Fusion tool, identify the S3 data source you want to manage. View the data source's properties in the name of your data connector:
- Bucket or Paths — Displays the current path to the S3 bucket
- Type — Indicates the type of connection, such as bucket
- Versioning — Confirms whether versioning is enabled or disabled
- Location — Displays the bucket's AWS region
- Connection Status — Verifies that the connection is Active with a green checkmark
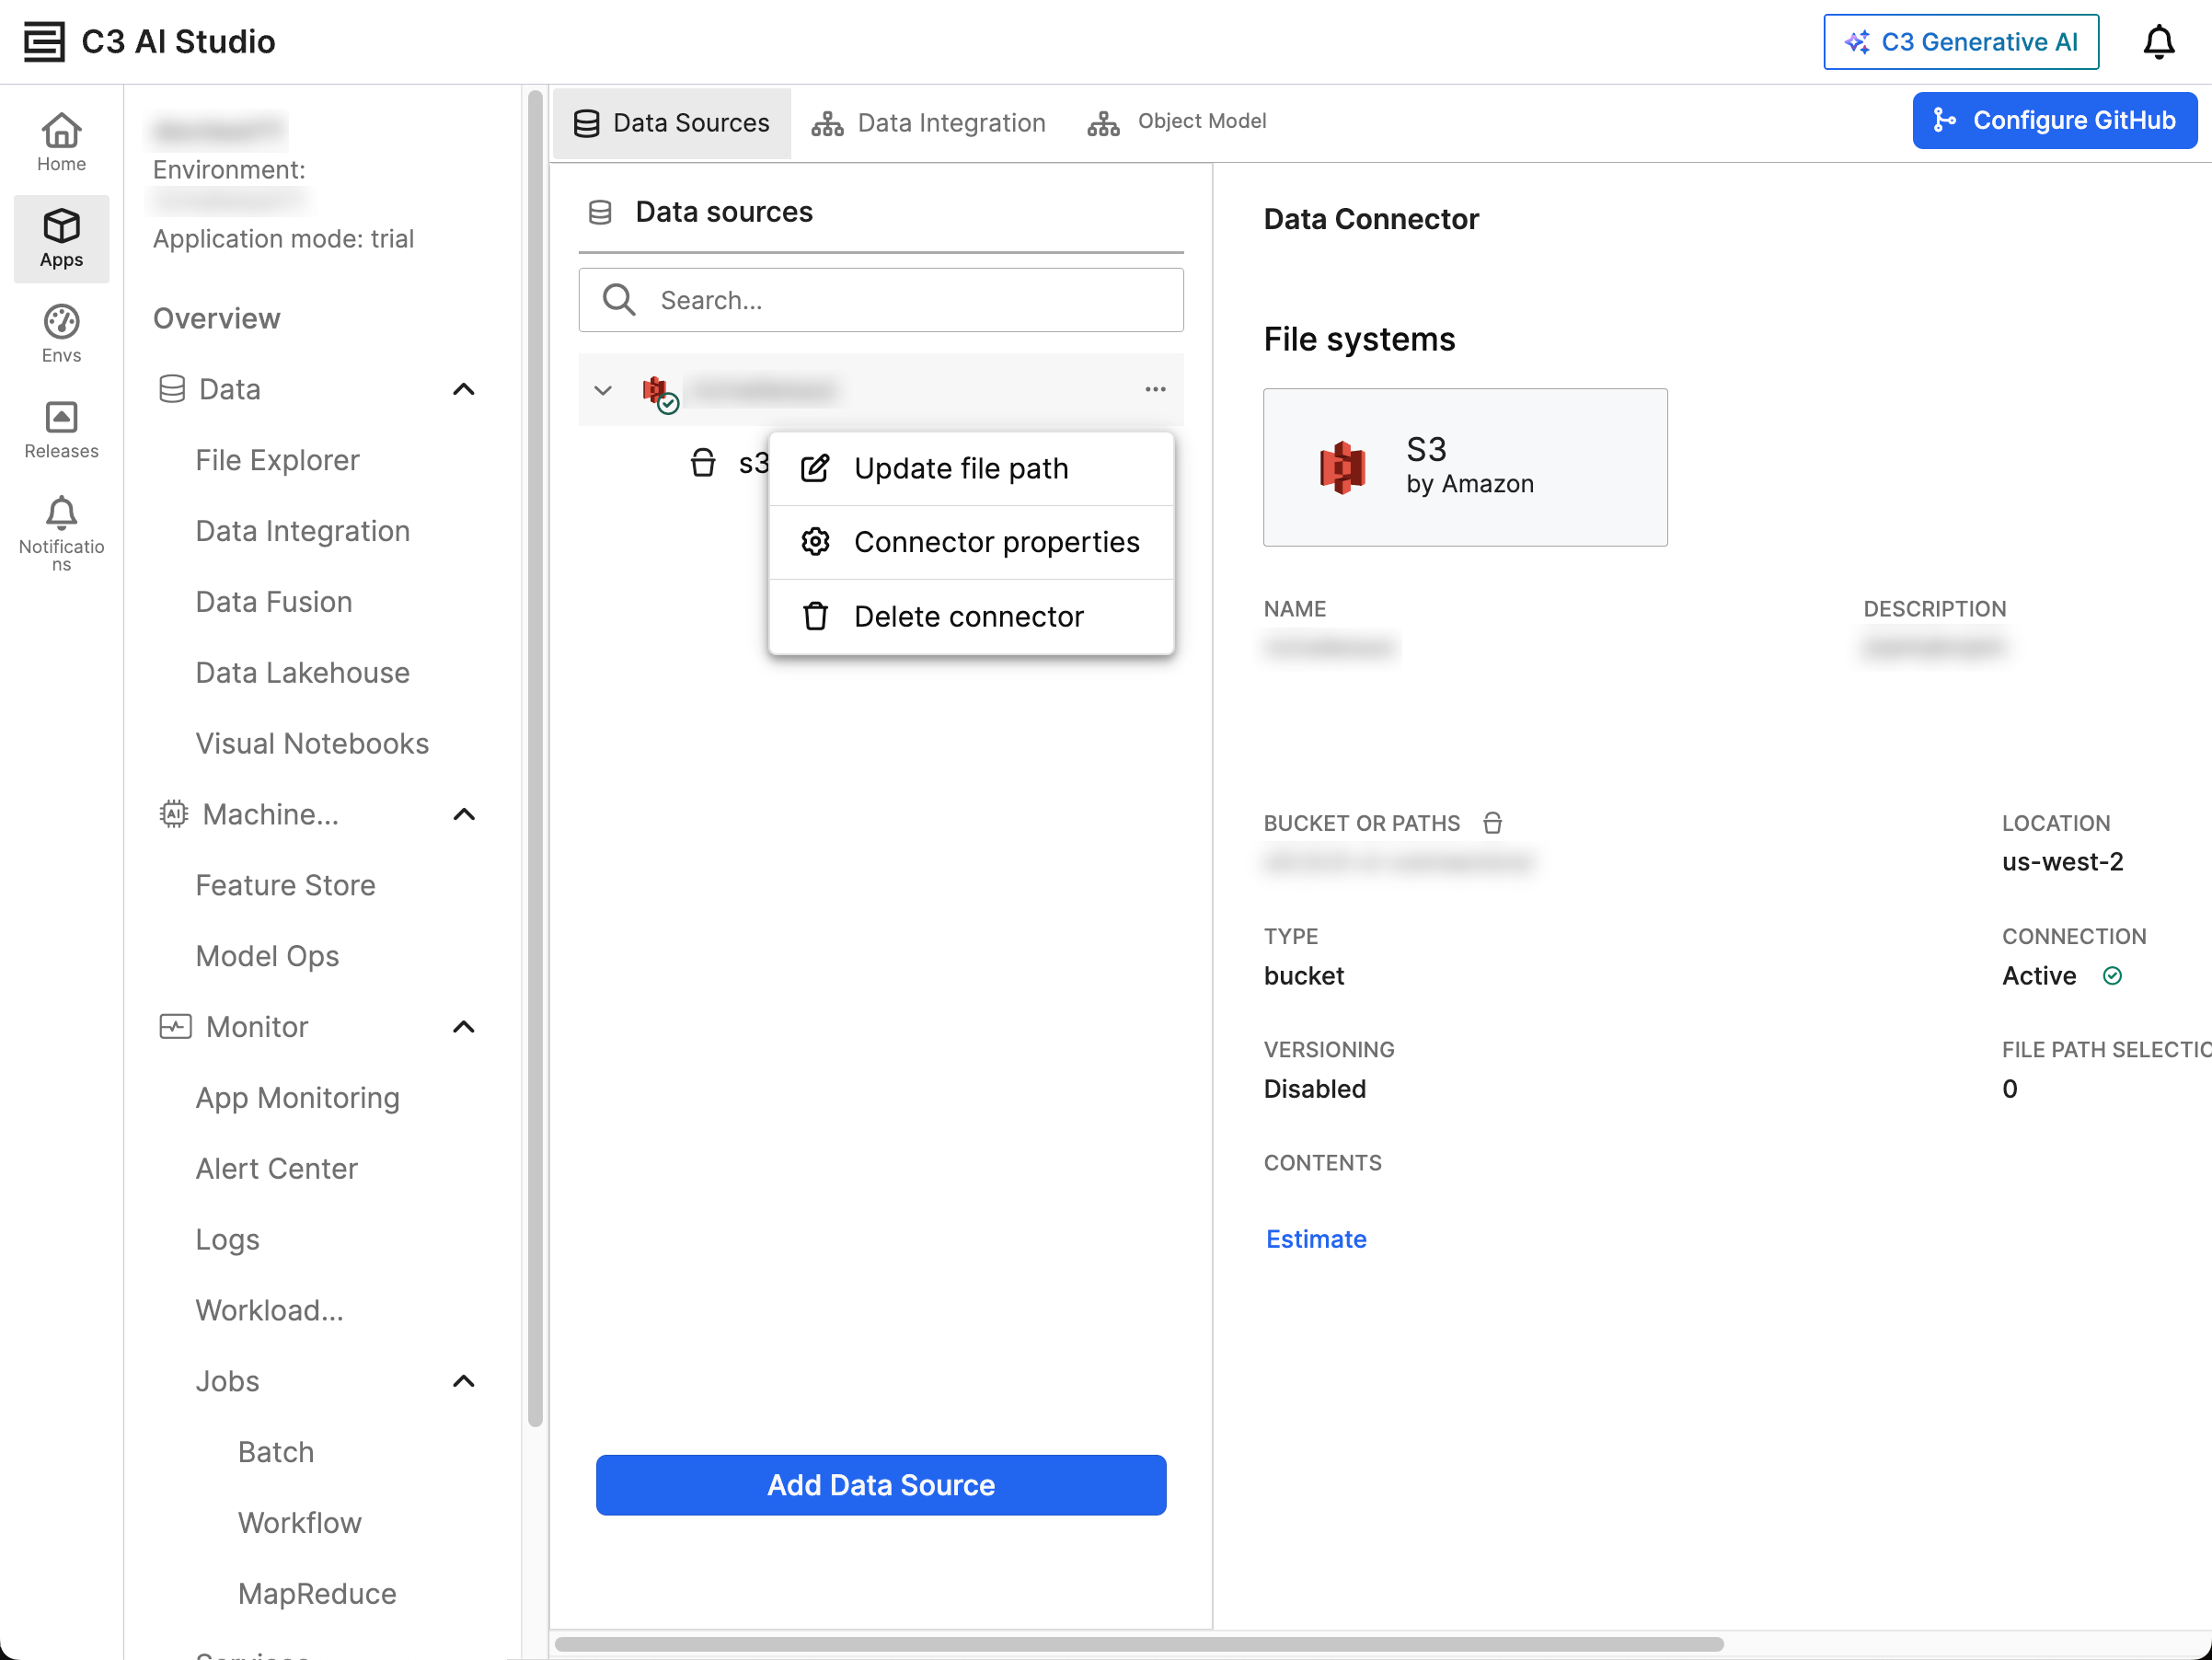
The ellipsis menu (...) beside the data source displays the following management options:
- Update file path
- Connector properties
- Delete connector
Select the dropdown menu beside your S3 connector to reveal the connected buckets.
Configure schema and file settings in Update file path
Schemas allow you to select the relevant fields and assign them aliases on the C3 Agentic AI Platform. If you set an alias, this alias becomes the official field name for your C3 AI Type. Aliases allow you to standardize names across your application and allow for structured querying in the Generative AI application. Configure your schema to ensure that your data can be analyzed and processed.
Select Update file path from the ellipsis menu of your S3 connector to open the Add data source workflow. Navigate to the folder structure of the connected data source and select the folder for integration.
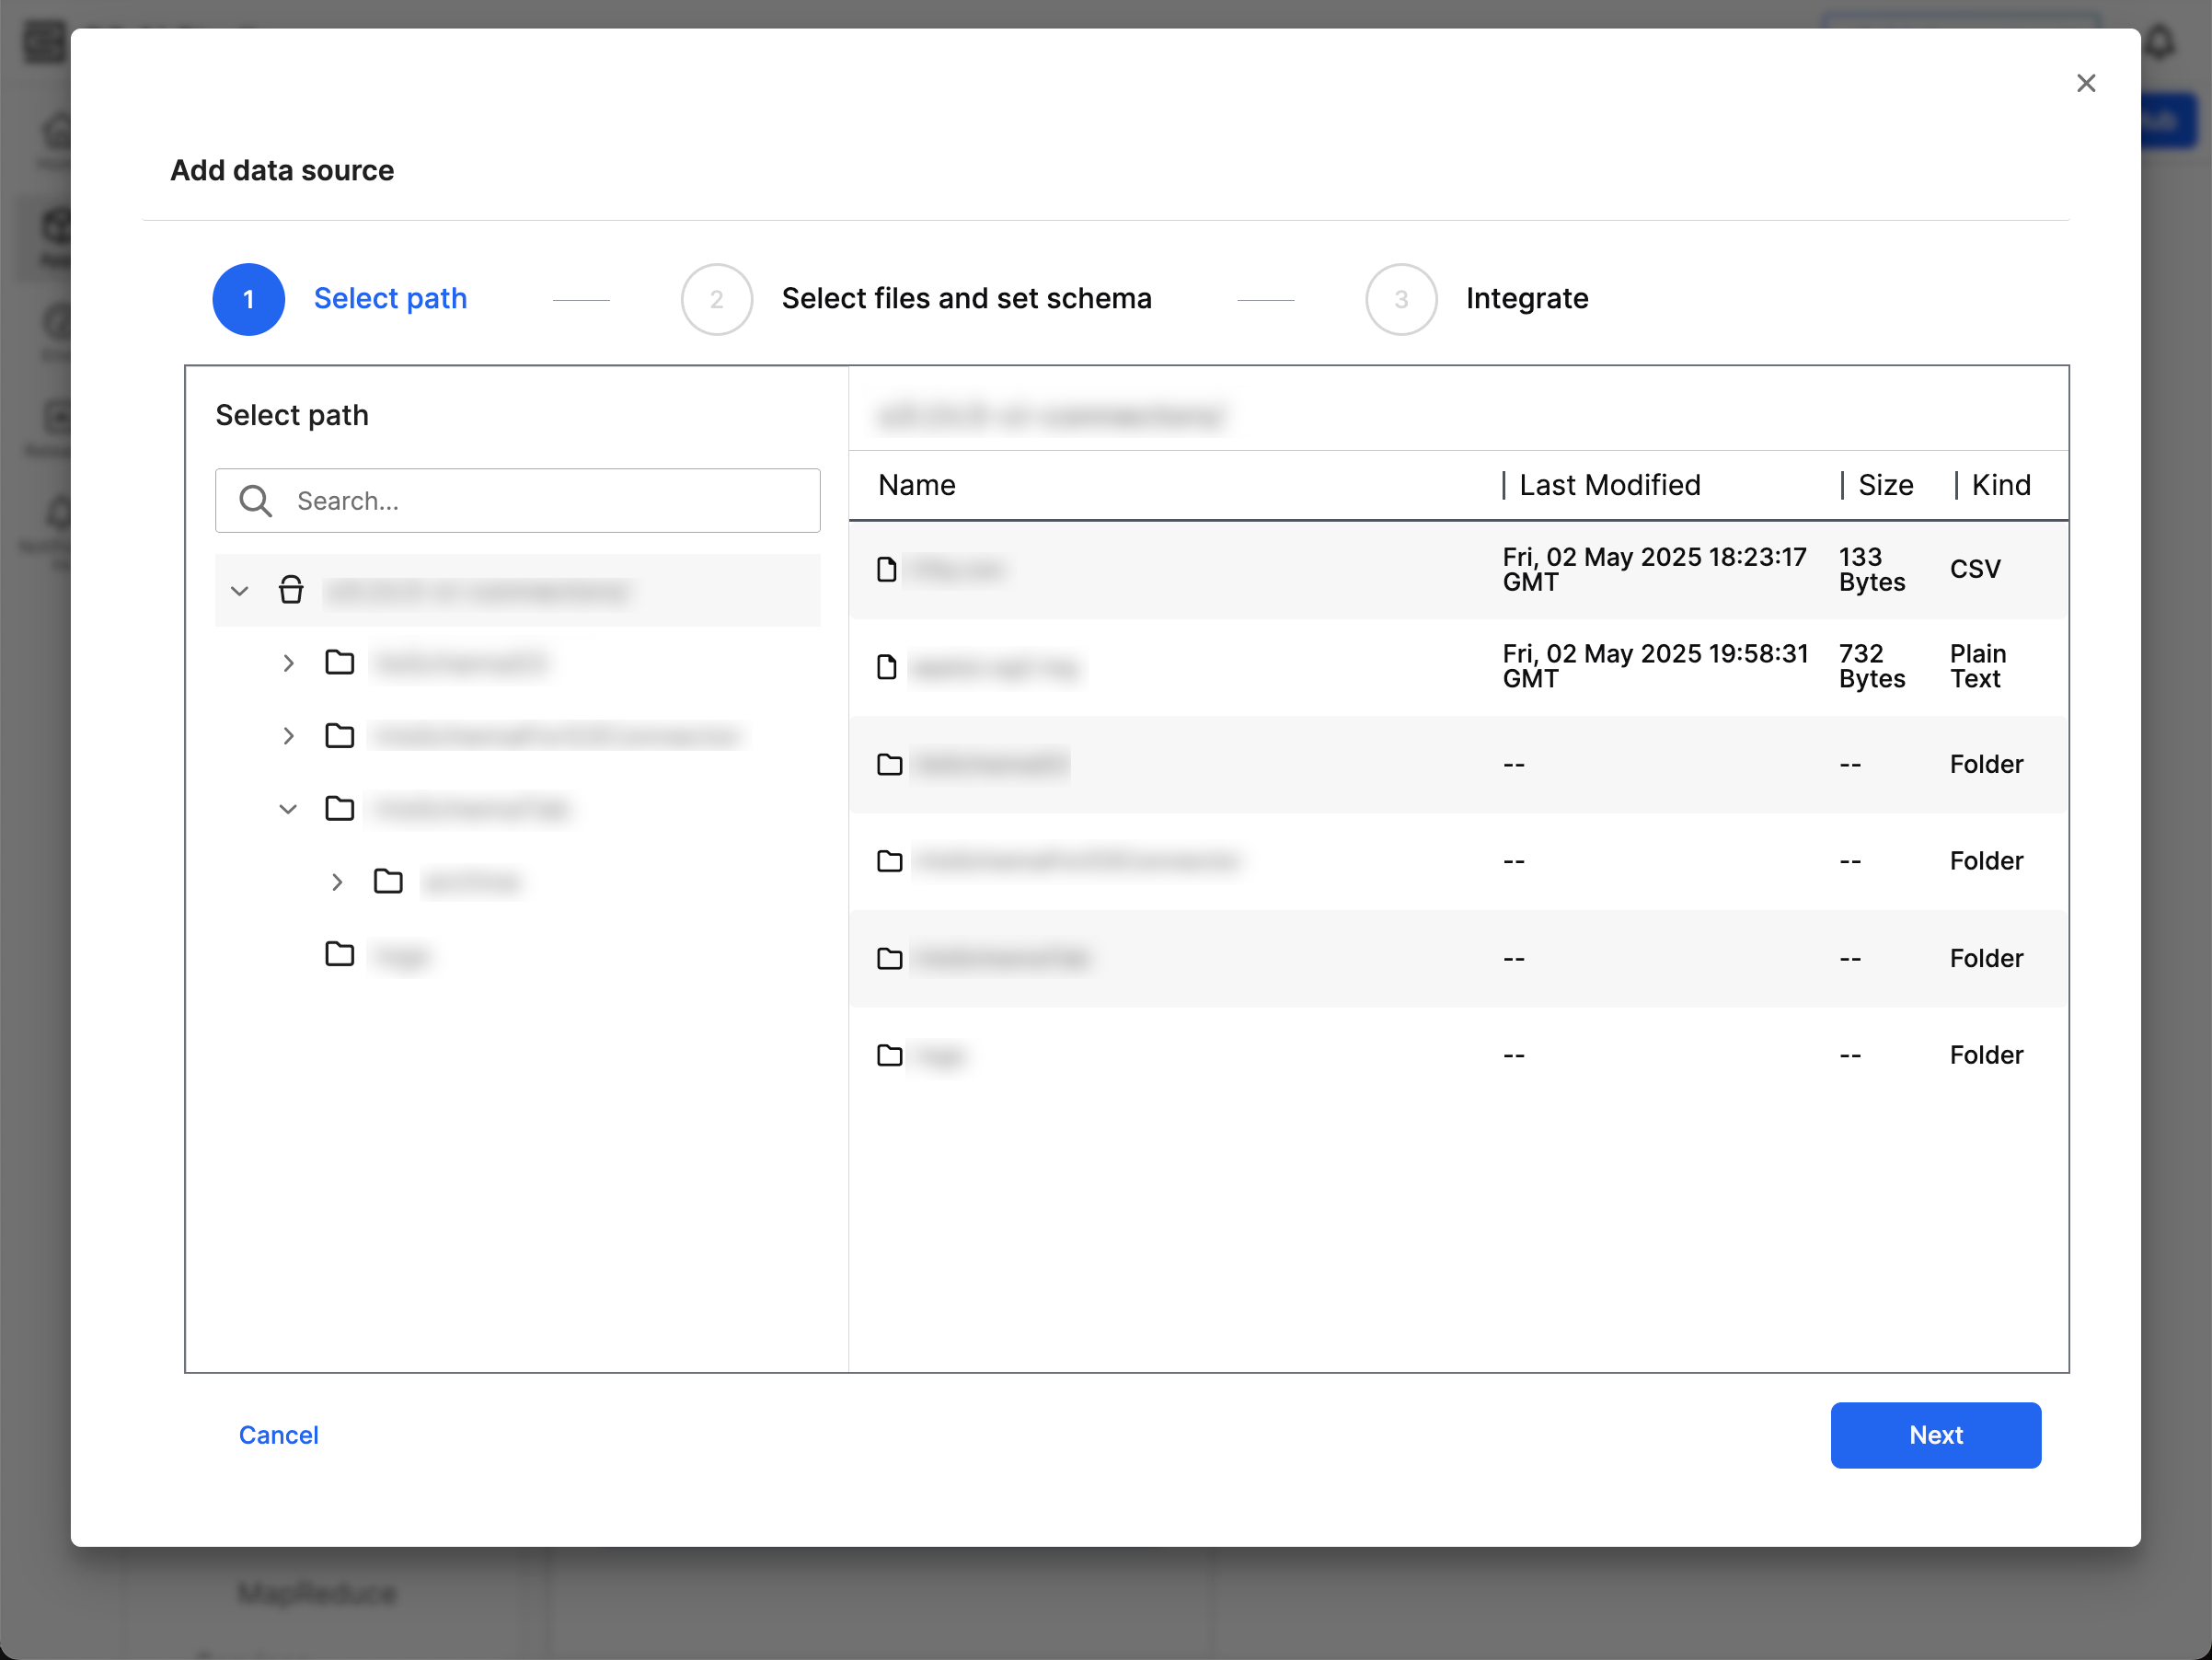
Verify the file details and select Next to configure the schema.
In Select files and set schema, review the following tabs:
- Schema
- Files
- Applied Schema
- File settings
Review and update the following tabs as needed:
- Schema — You must check the box of every field you need in the schema. Upon checking a field, you can modify the Column alias and Description for your target Type.
- Files — This tab tells you the status of your files and surfaces relevant warnings in the Warnings column.
- Applied Schema — Use this tab to compare your schema to the first 20 entries in your file. When you update columns in the Schema, Applied Schema updates to show what values belong to those columns. By using this tab, you can ensure the accuracy of the columns and values.
- File settings — Select the delimiters, quote type, and escape character for all your files.
After you confirm the data for all four tabs, select Next.
Map file data to canonical model for integration
Before completing your data source connection, connect the data to a target canonical in your application.
Canonicals serve as an interface between your data sources and C3 Types. With canonicals, you can more easily set fields and data types expected for a particular pipeline. Canonicals maintain consistency and stability in the data integration process. When you use canonicals, you allow data ingestion to continue without requiring upstream modifications. By mapping data to a canonical, you ensure that any changes to application data models don't disrupt the data integration pipeline.
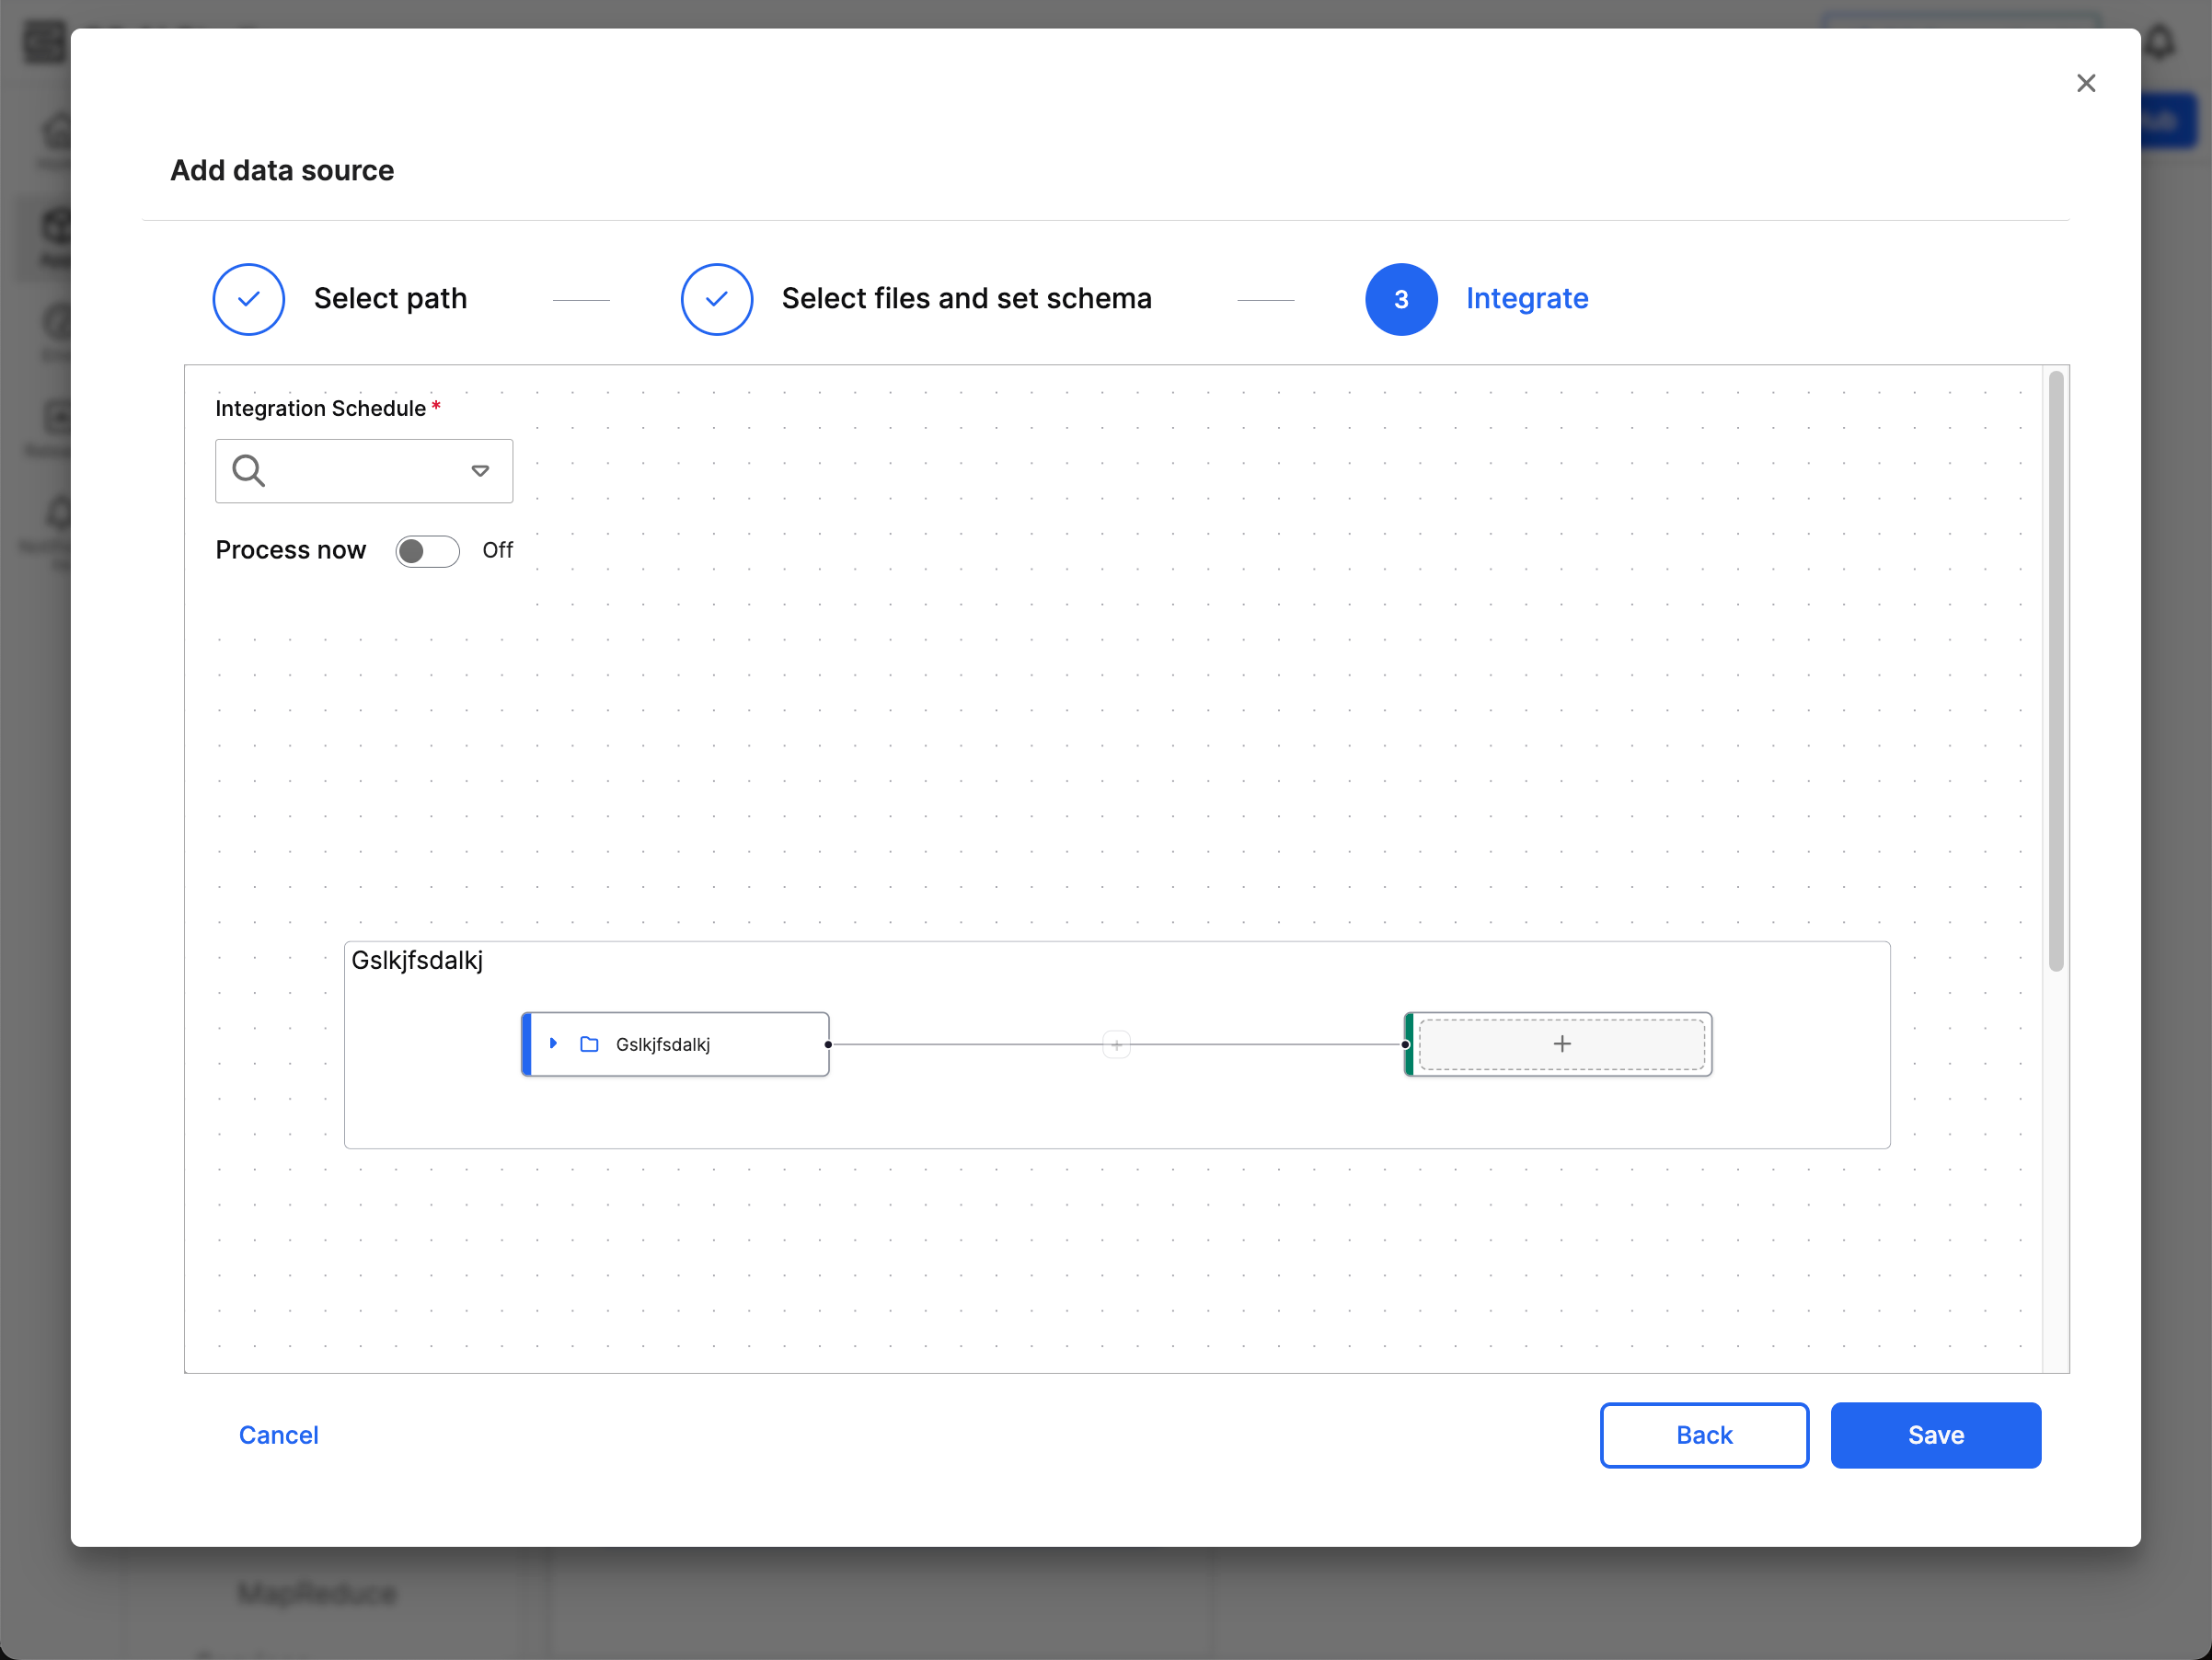
The source node (in blue) represents the file source from the previous step. The target node (in green) represents the canonical that you want to feed data into. Before you add a canonical, the target node has a plus icon (+). These nodes are linked to indicate the data flow from the file source to the canonical model.
Select the target node to view all the available data model canonicals. You can use the Search Panel to find a canonical. The selected canonical turns green and expands to show its fields.
For more information on how to map your source node to the appropriate canonical using Data Fusion, refer to Modify Data Mappings in Data Integration. This topic explains how to use Projections, Transformers, and Filters to map from source to target.
The Integration Schedule field allows you to determine how frequently C3 AI processes and ingests data from S3. Your file source must be accessible and stable during the configured interval. You may need to lower the frequency based on your data volume; Large file sizes or complex schemas may require longer processing times.
Scheduling is only possible during source-to-canonical mapping configuration. Ensure the schedule is correct during this step because you cannot change it after the saving the connection configuration.
Toggle Process now to indicate whether you'd like to process the data from your source immediately after saving.
After completing the mappings and transformations, select Save to finalize your data source.