Data Broker Configuration Example — Kafka
Data Fusion is in Beta. Please contact your C3 AI representative to enable this feature.
Streaming services and message brokers offer data in realtime as information becomes available. Kafka is a widely-used service for messaging, activity tracking, metrics, logging, stream processing, event sourcing, and countless other use cases.
It enables real-time data ingestion, which is critical for applications requiring continuous updates. Predicting maintenance, monitoring operations, or analyzing changes in real time all benefit from data streaming sources. Here are some topics Kafka streams can offer for your C3 AI application:
- Ingest streaming data: Process event data or telemetry from IoT devices or applications.
- Support AI models: Enable real-time decision-making or insights from machine learning models.
- Enhance operational intelligence: Provide up-to-date data for dashboards or monitoring systems.
Before you begin
Because streaming data often represents a realtime series, you should consider integrating this data into objects using an appropriate key value store. For more information, refer to Key Value Store Alternatives.
If you intend to store this data in a key-value store, ensure that the Canonical maps to a Entity that uses a key-value store. Entities using a key value store include Key-Value as a Tag in the Object Model tab. You can toggle a Tag in Diagram Settings.
For more information on the Object Model tab, see Manipulate ERD Views with Data Model.
Generate API keys for your stream
Before connecting your Kafka stream to C3 Agentic AI Platform, you must secure an API key to your Kafka stream. A Kafka Administrator can create this key for you. As an example, Confluent, a vendor that provides a Kafka managed service, lists the steps to generate keys in Manage API Keys in Confluent Cloud.
If creating an API key for another user, select Service account to ensure this user has the correct access to your Kafka service. Request the Partition ID from your Kafka admin if you cannot access stream data.
Select a Kafka streaming source
In C3 AI Studio, start your environment and select your application. Navigate to the Data Fusion tab. In the Data Sources tab, select Add Data Source.
Select Kafka from the Cloud Message Brokers/Streaming section; the process is similar for all data sources in this category. After selecting Next, you'll see the Configure data connector page. The page prompts you to provide details for C3 AI to connect to Kafka, including:
- Name: Your name for the connector on C3 Agentic AI Platform
- Description: An optional field for describing what information you’re pulling from the connector
- Topic Name: The topic name where your Kafka data lives; you can only select streams from this topic
- Broker endpoint: The URL of your Kafka broker
- API key and API secret: The credentials for your Kafka instance
After entering these details, you can select Test the connection to validate the credentials and configuration. Save the connection.
Once the Kafka streaming source establishes a connection, navigate to Data Sources to confirm that Kafka is ready to access.
Select Kafka streams for connection
From Data Sources, locate your Kafka source and select the ellipsis menu (...) to connect specific streams. Select a stream to open the menu for integrating stream data. When selecting a data stream, you need to select a specific partition. Navigate to this partition by selecting View Available Partitions.

If you do not see any streams or partitions, you likely do not have access to view the data. Contact your Kafka Administrator to learn the name of your partition; you can use the search bar to find this particular partition.
Preview stream contents offers a subset of data from the selected stream. Review the following information in the table view:
- Partition ID: The ID you selected
- Data: The content of the record in JSON format; select an entry to view the full JSON object
- Approximate timestamp: An approximate date-time of the information's creation or ingestion
- Sequence # (if applicable): A unique identifier for the record
After confirming the stream, select Next to review the schema.
Generate the schema for the streaming source
Before generating the schema for a streaming source, review the schema to define the structure of the data. This step involves specifying key details about the schema.
In the Edit stream schema step, specify the Schema Name and Description. Data Fusion shows auto-filled data for the following fields:
- Column name
- Column alias
- Data type
- Description
Because the source information always has the same fields, you can only modify the Column alias, Data type, and Description fields.
C3 Agentic AI Platform infers the data type based on a subset of the data in your stream and partition. Review the data type for each field to ensure a seamless integration.
Select Next to integrate the schema to the target.
Connect a Kafka schema to a canonical
In the Integrate step, map your schema to a canonical in your app. Canonicals serve as an intermediary standard model that help maintain consistency and stability in the data integration process. The canonical model acts as a buffer, allowing you to update the target model without reconfiguring the entire data integration process. By mapping data to a canonical model, you ensure that any changes to application data models don’t disrupt the data integration pipeline.
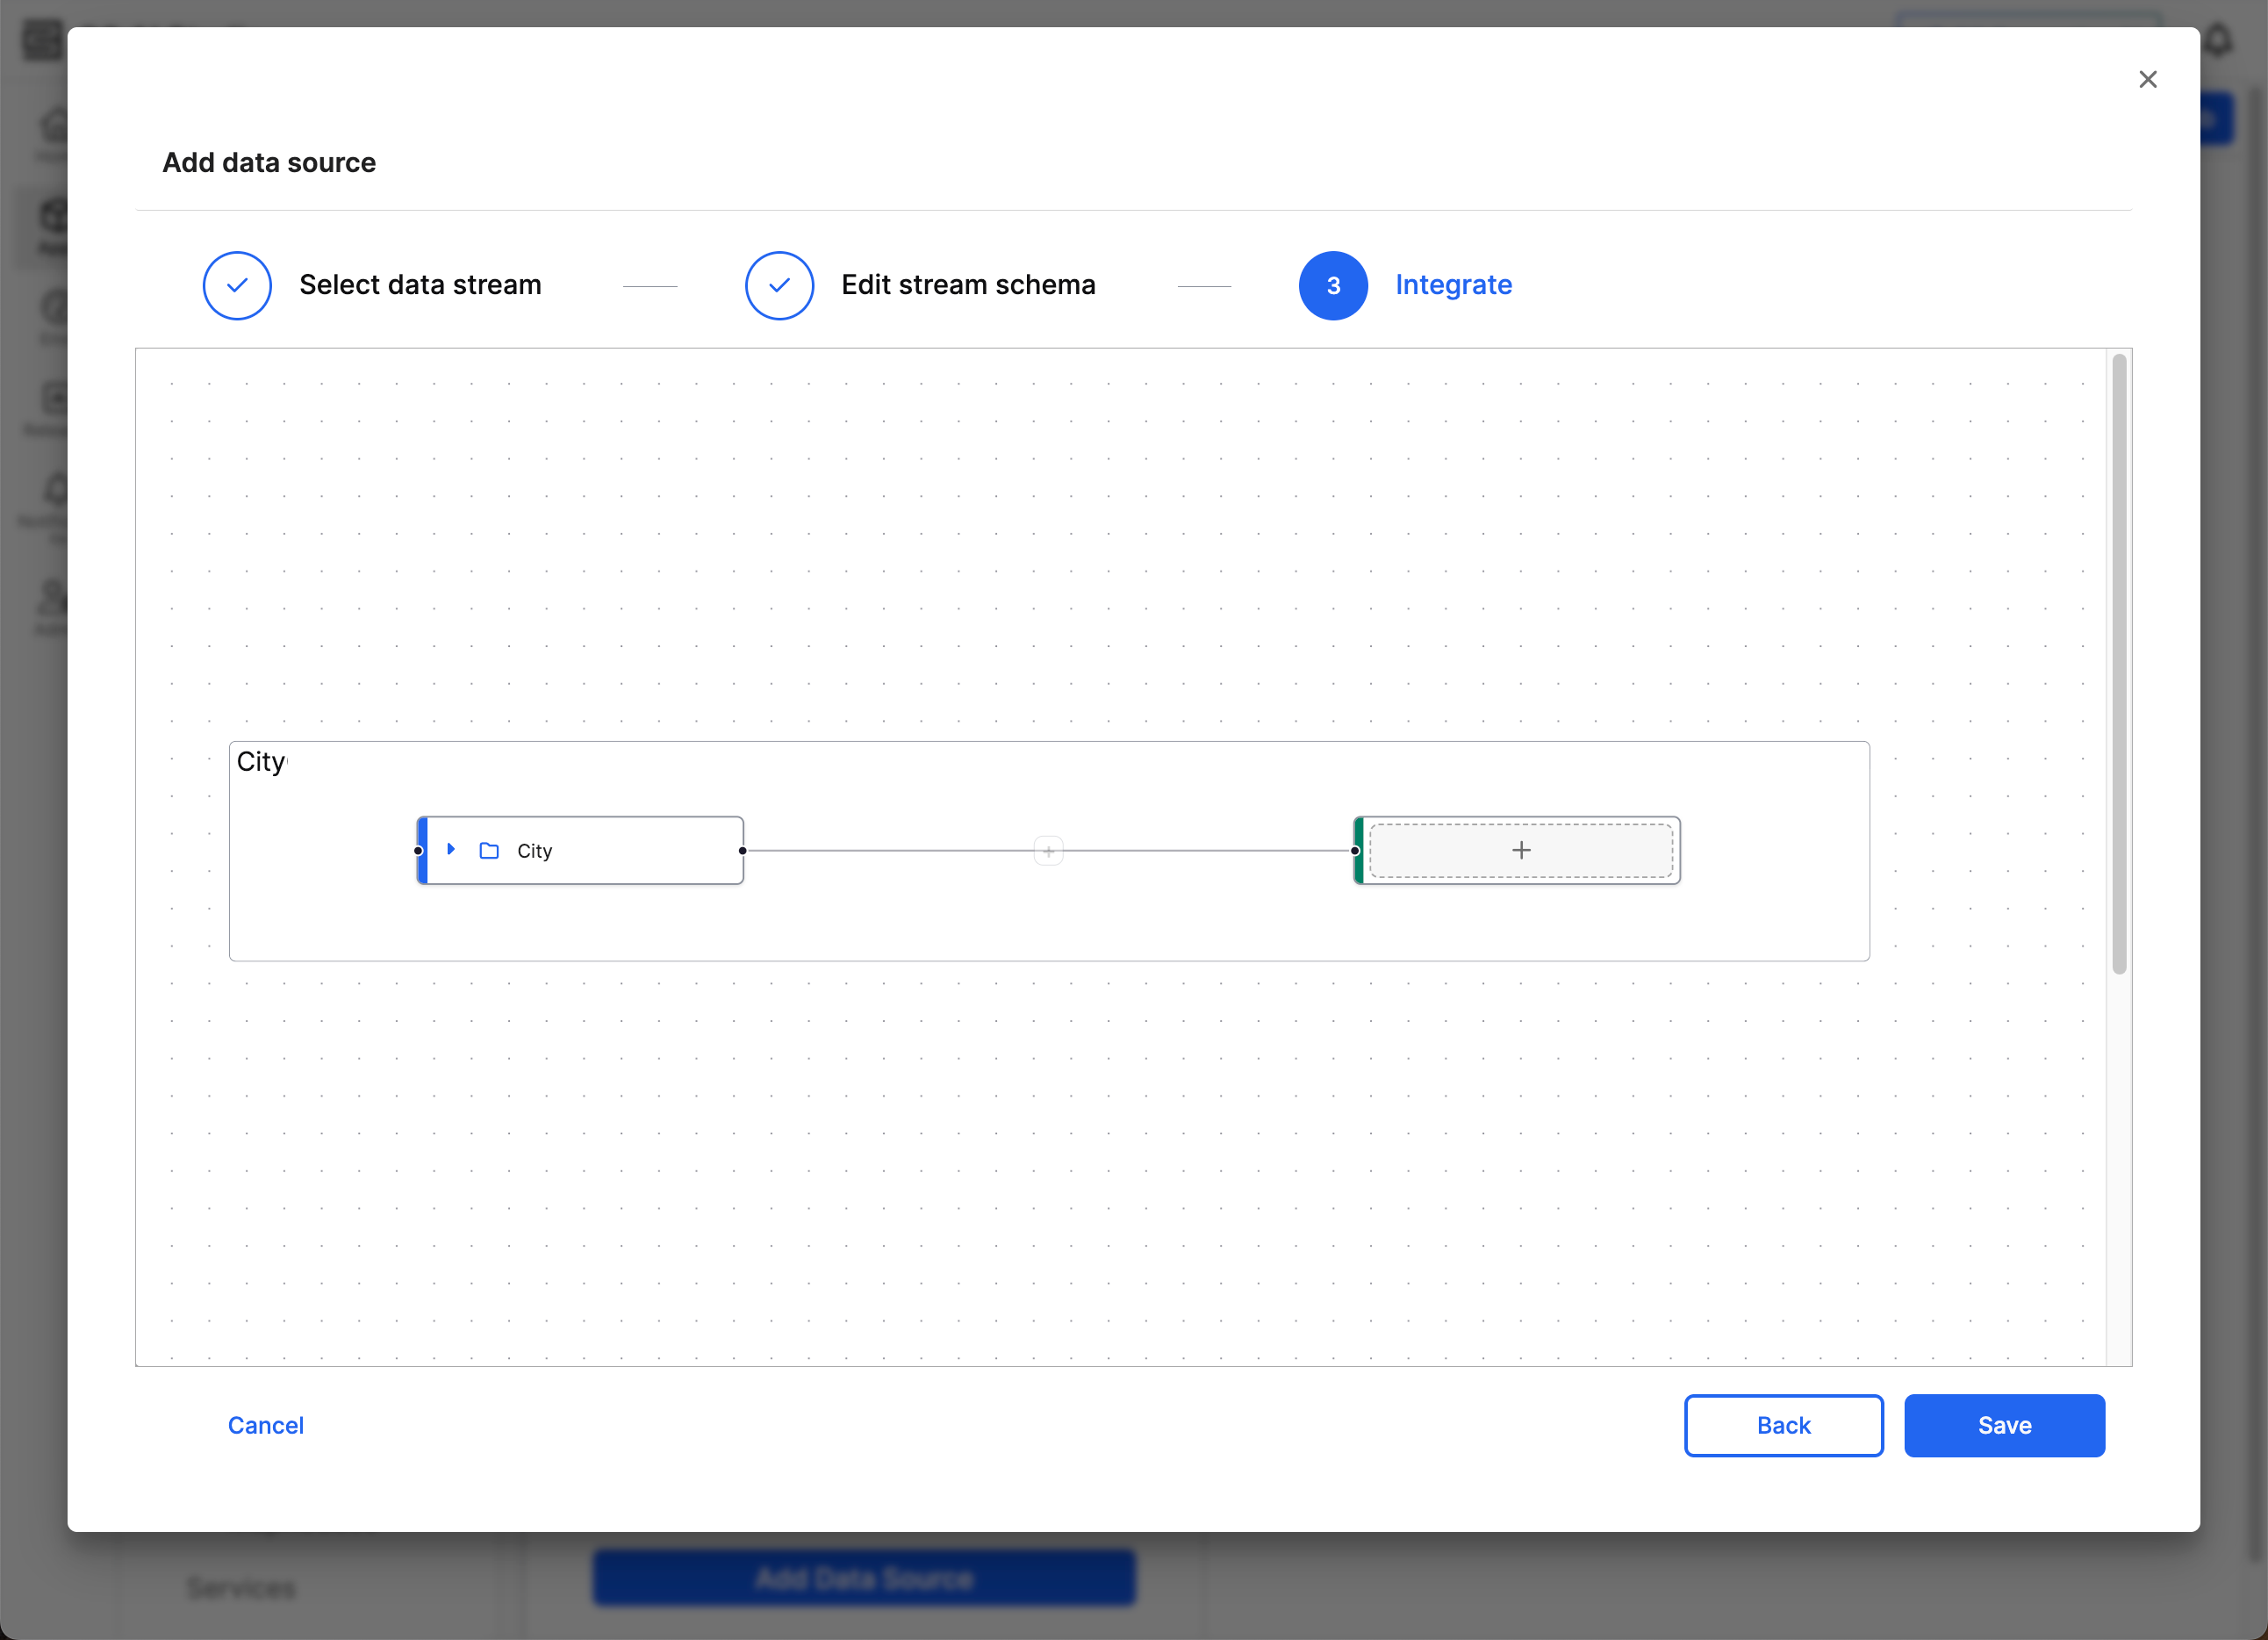
On the left side, the Source node represents the schema from the selected file source. The name of your schema populates the Source node.
The Target node on the right, which features a plus sign (+) at the start, represents the C3 AI data structure where the data will reside.
Select the plus sign to open a dropdown menu that lists the possible canonicals. Once you find the appropriate canonical, Select Target to set this canonical as the Target.
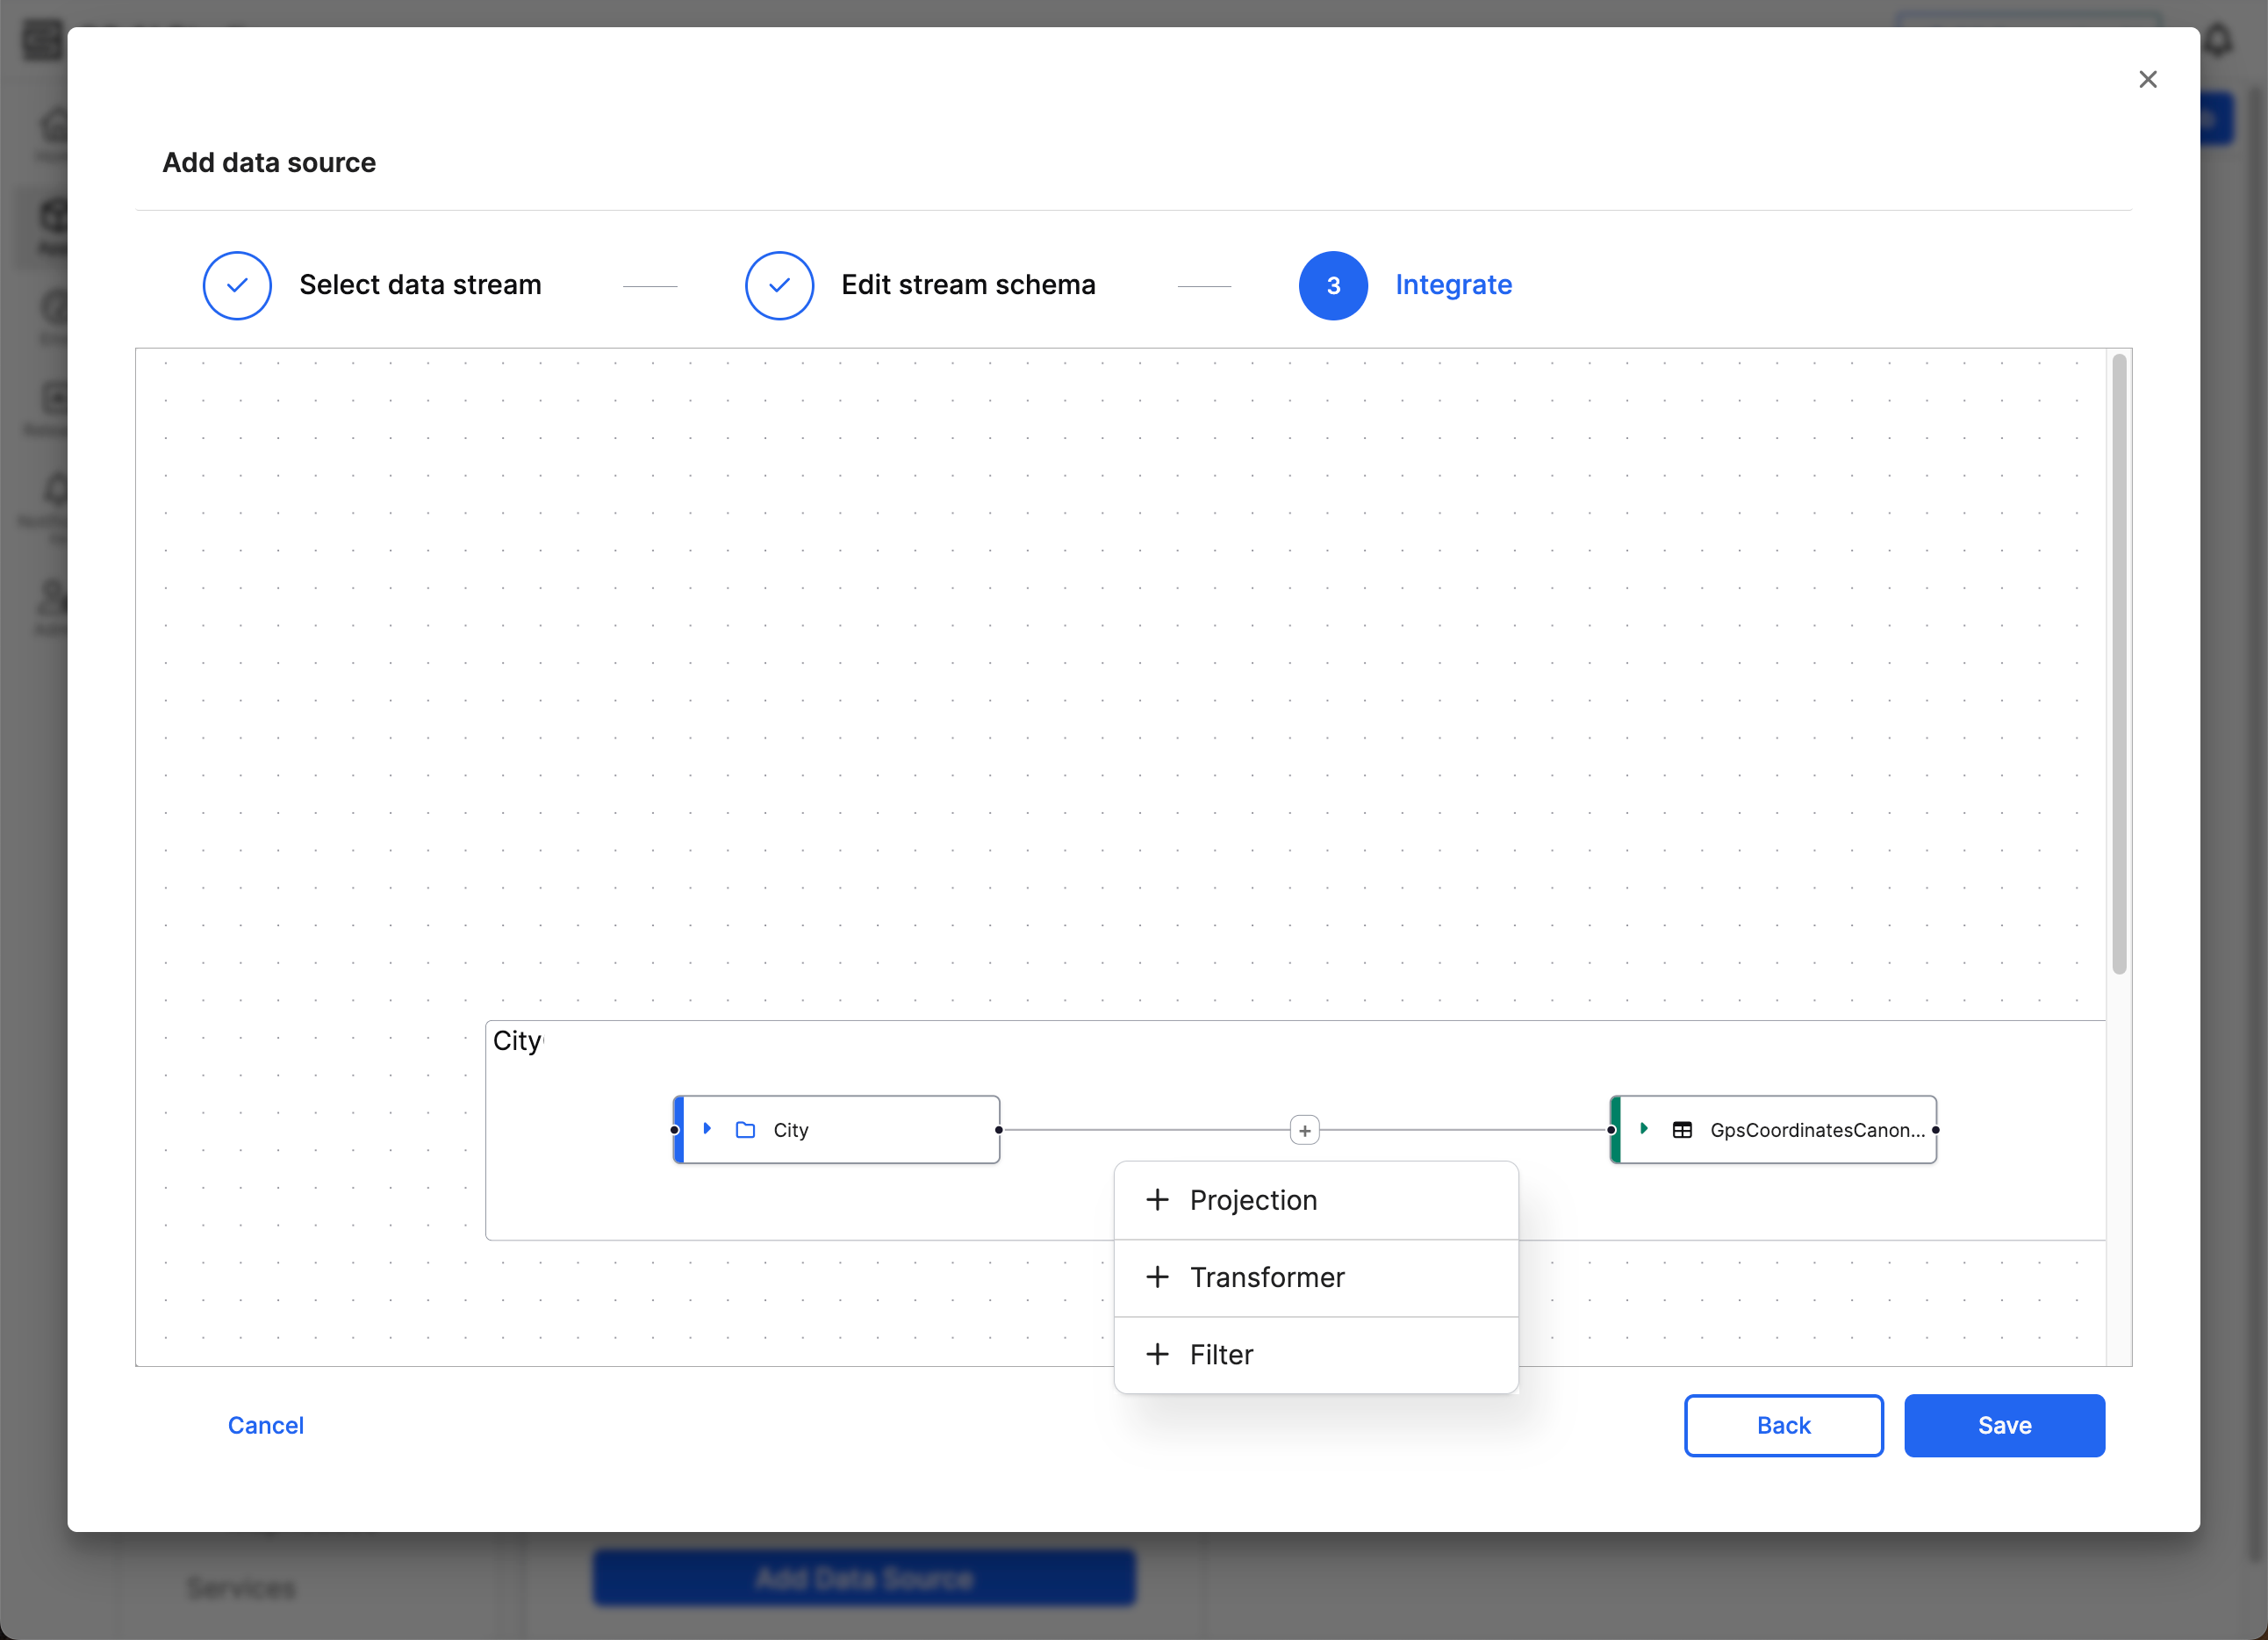
After selecting the target canonical, a plus sign appears on the line connecting source to target. Select this plus sign to specify how the source fields map to the target fields. A dropdown appears, offering three different methods to connect source to target.
- Projection: Small changes to source data fields
- Transformer: Larger or more complex changes to source data fields
- Filter: Filter before projecting or transforming the source data
Projection and Transformer both offer tools to modify the data before it enters the target canonical. Before projecting or transforming, you can Filter the data for more targeted changes.
Once you set the connection to Projection or Transformer, you cannot modify the connection to use the other option. Instead, you must delete the connection and create a new connection with the same Source.
After completing the mappings and transformations, select Save changes and continue with the integration workflow.
Apply projections on the source
Select Projection to configure low-code transformations. You can use pre-built ExpressionEngine functions for tasks such as the following:
- Type conversion: Convert from one data type to another.
- Data derivation: Connect or split data.
- Conditional logic: Change functionality based on the source data.
- Data augmentation: Create new attributes or compute values dynamically.
To help build your field mappings, Data Fusion offers a Function Library dropdown menu. This menu lists function names and information on how to use them. You can also combine multiple functions together for complex transformations. If these functions don’t fit your exact needs, you can enter JavaScript into this field. However, if you need more than a line of JavaScript, use Transformer instead.
Transform the source
To run more complex transformations on the source data, select Transformer. This option offers a code block to write Lambda functions in either JavaScript or Python. You can also use ExpressionEngine functions in this space.
Filter source data
Before choosing between Projection and Transformer, use Filter to apply changes to a subset of source data. Filter source data when you must modify segments of your source data independently.
For example, if your source data includes information from two different wind turbines and one turbine measures changes in metric units while the other turbine measures in Imperial units, you can filter by turbine ID to transform the different sets of data.
You can create filters that map to the same or different targets. You cannot have multiple filters in the same data connection.
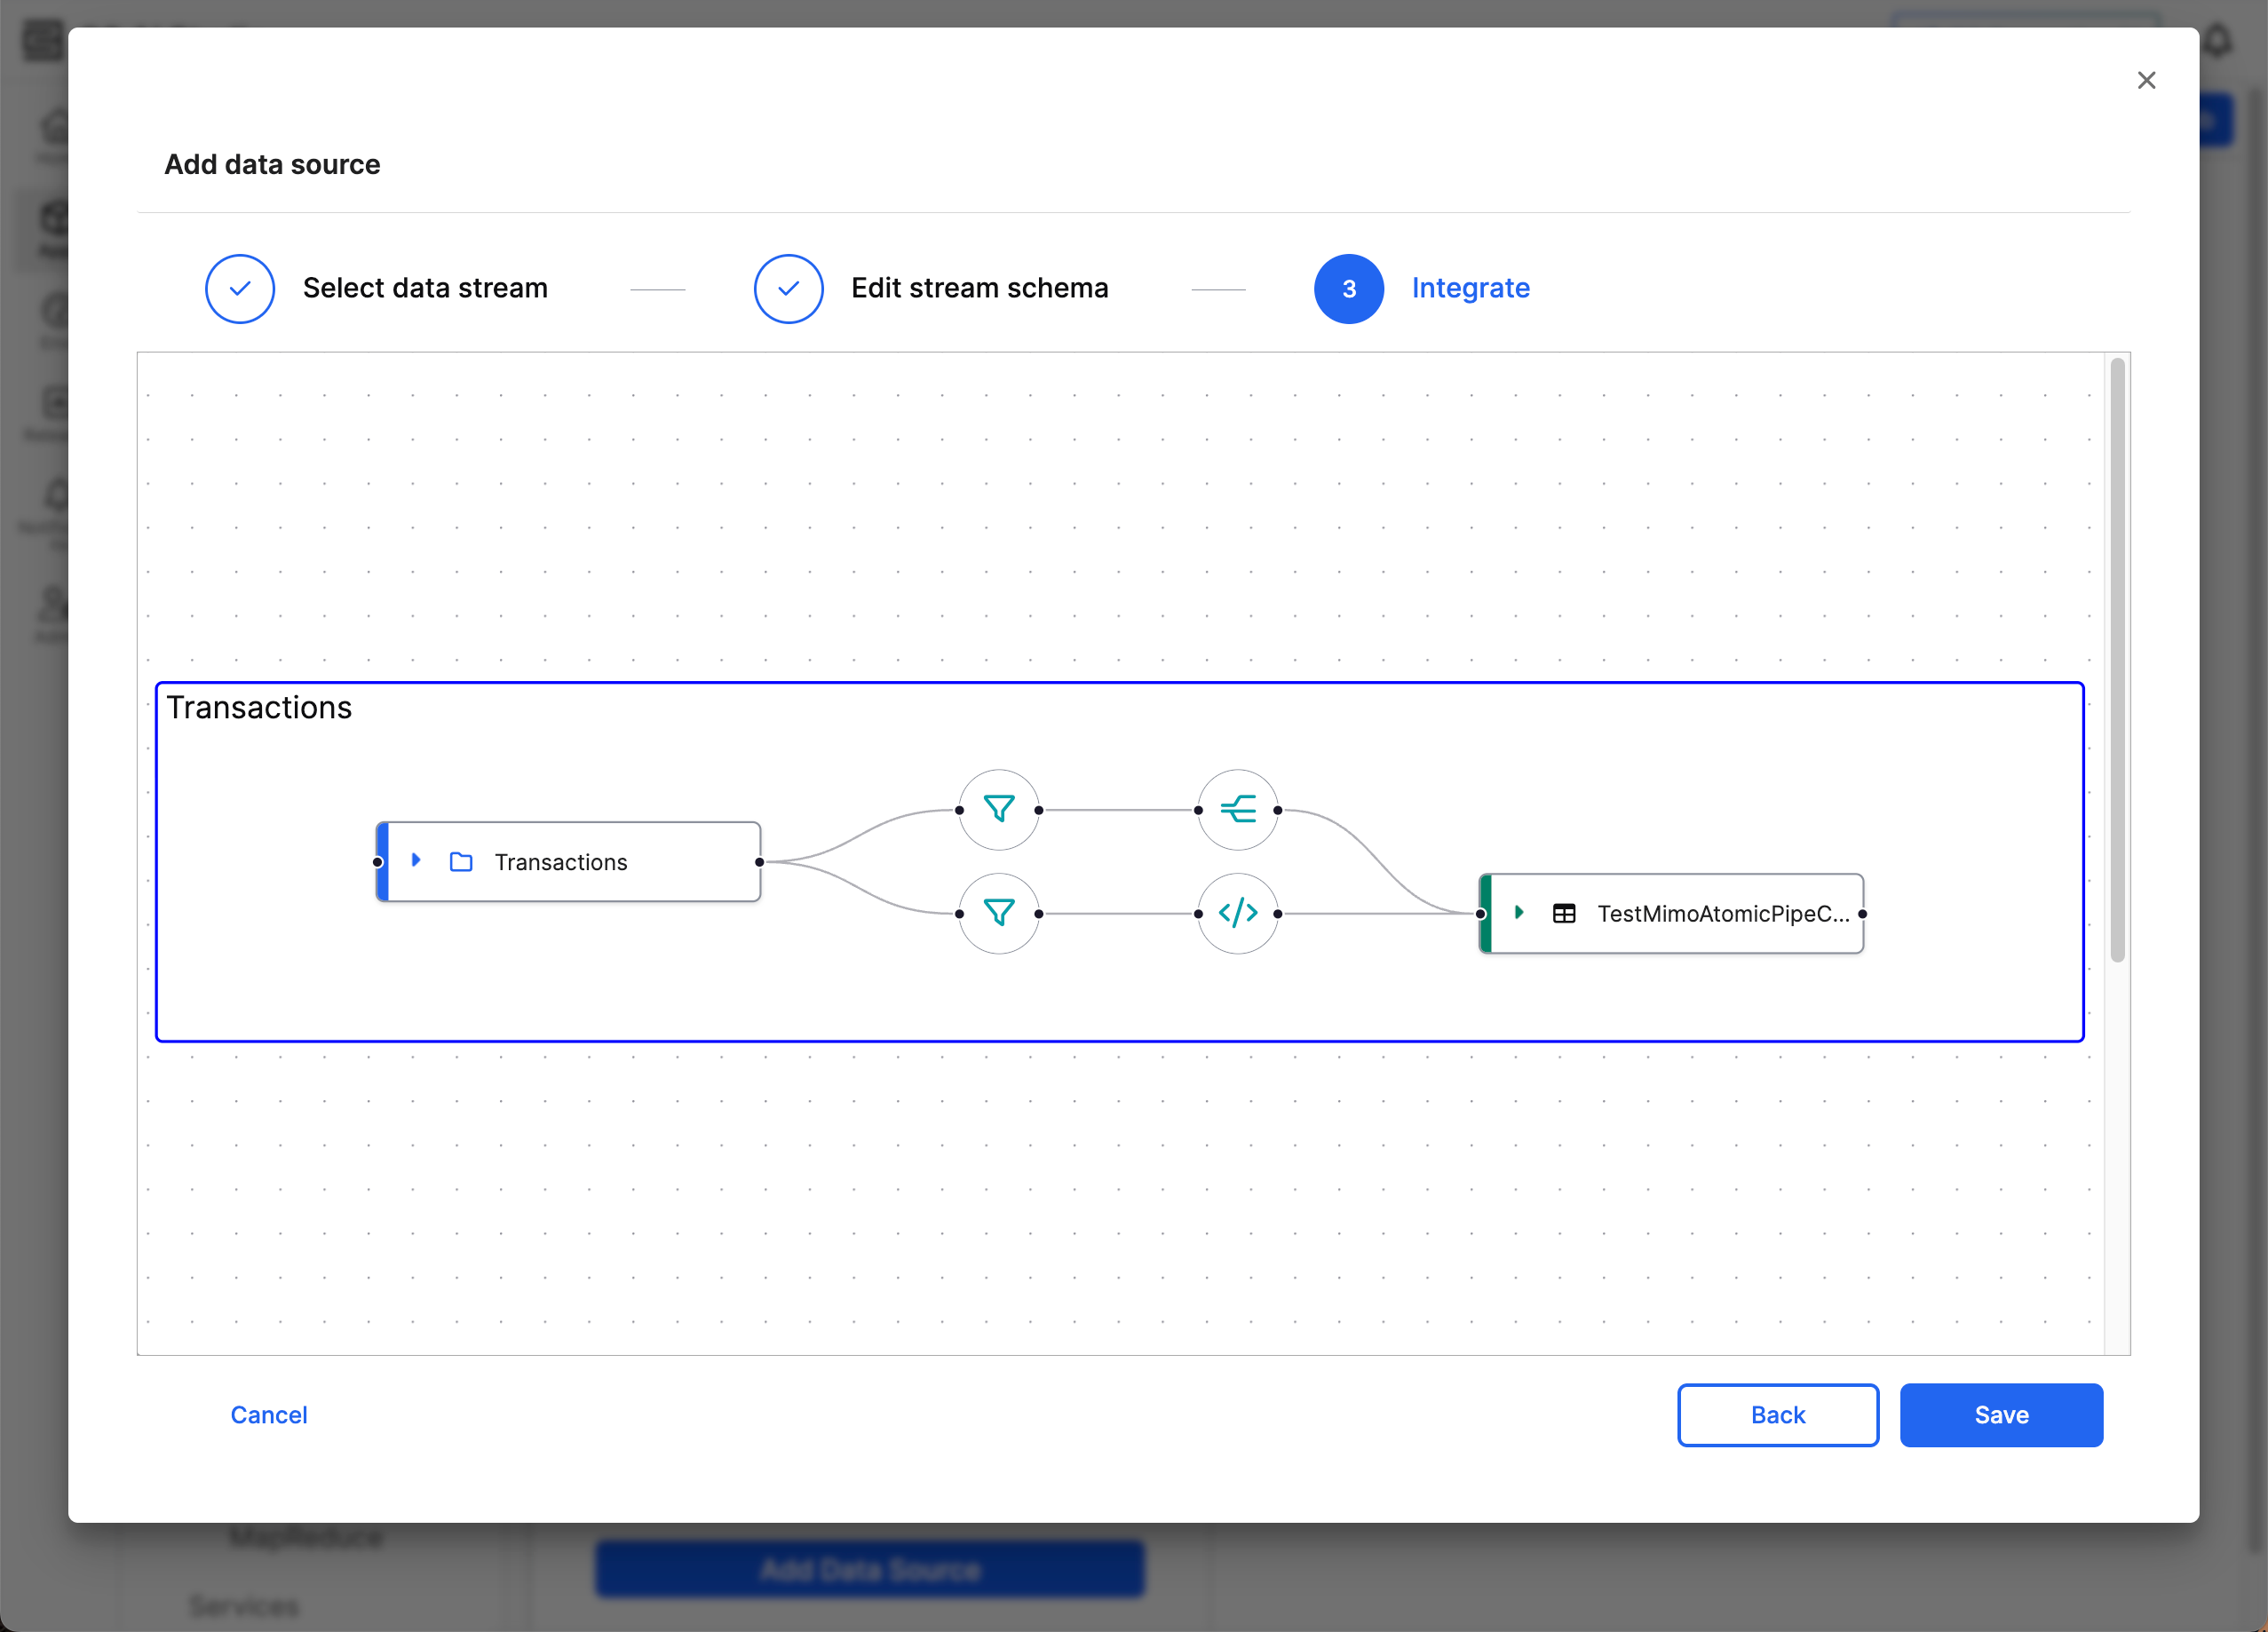
To create a new connection for filtering and applying changes to the data, right-click the source and select + New Target. When the new target appears, add the target canonical. If the target canonical is the same as another connection, the new target disappears and the second connection redirects to the pre-existing target.
Filters follow the same syntax conventions as the condition key in data transforms. The following example is a valid filter:
(Facility == "FacilityA" OR Facility == "Facility B") AND (Inventory > 10 AND Inventory < 20)This condition includes the entry in the target canonical if the value of Facility is either FacilityA or FacilityB and has an Inventory value between 11 and 19.