Configure Metadata Tagging
The Metadata Tagger node is optional. It uses an LLM to attach structured metadata tags to each document chunk. Tags appear alongside chunks in the vector store and improve retrieval precision. The platform implements this node as Genai.MetadataTaggingSettings.
The platform organizes metadata into two layers:
- Categories are the named groups, such as
Department,DocumentType, orRegion. - Tags are the individual values that the LLM assigns from each category to each chunk.
Decide whether you need metadata tagging
Add the Metadata Tagger when:
- Downstream search must filter by attributes such as document type, department, region, classification, or date.
- Your corpus has implicit metadata in the document body that isn't already in the file name or path.
- You want structured faceted search. For example, Show me only Engineering documents from 2025.
Skip the Metadata Tagger when:
- File names, folder paths, or existing structured fields already carry the metadata you need.
- You're doing a quick semantic-search proof of concept and don't need facets yet.
- Adding LLM calls per chunk is too expensive for your use case.
Open the Metadata Tagger configuration
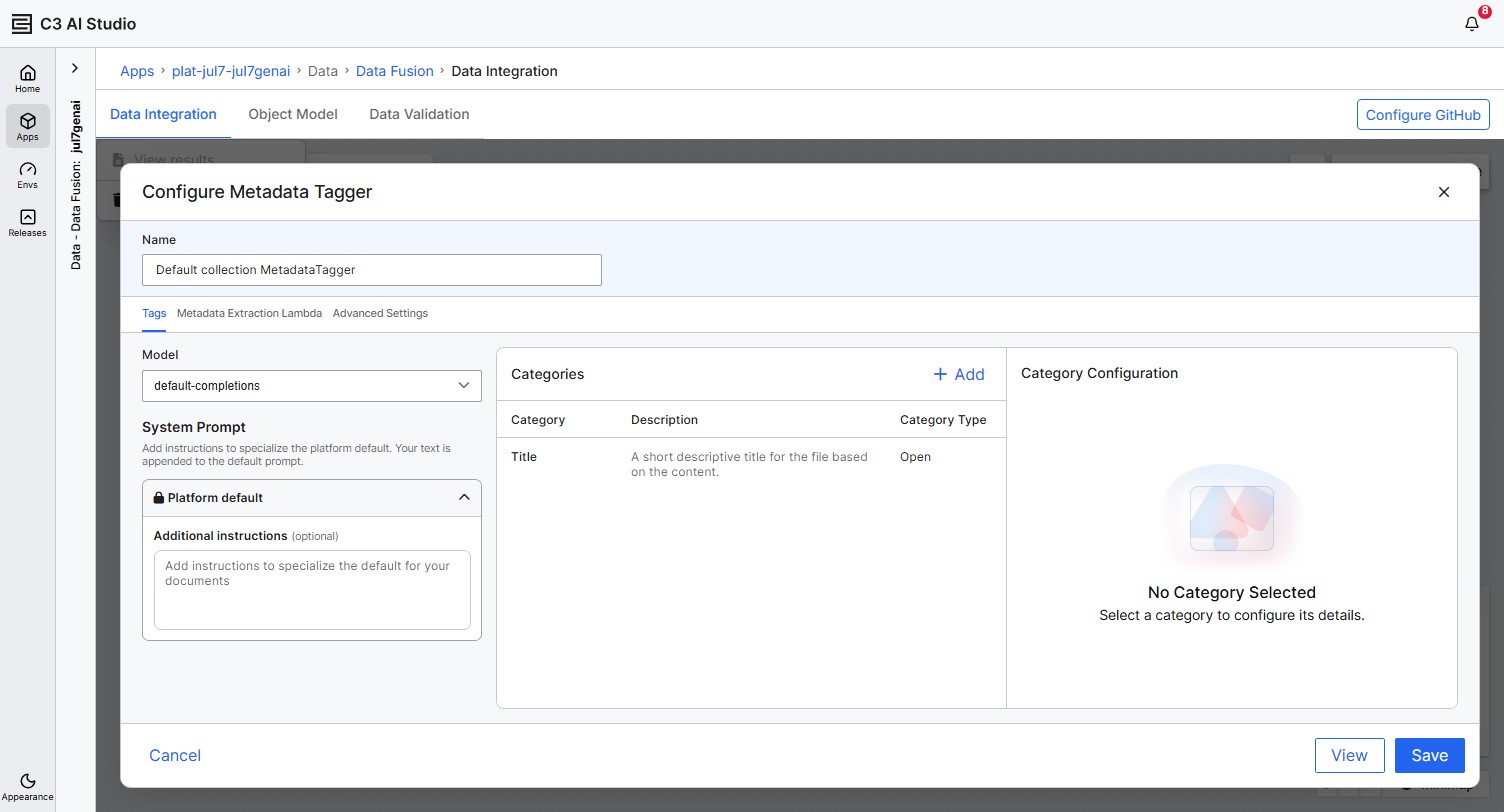
On the canvas, select the Metadata Tagger node attached to your Chunker. The Configure Metadata Tagger panel opens. The panel has three tabs: Tags, Metadata Extraction Lambda, and Advanced Settings.
Name the Metadata Tagger
At the top of the panel, the Name field is prepopulated with <source-collection-name> MetadataTagger (one word). Keep the default or enter a different name. The canvas node title shows this name.
Choose between Tags mode and Lambda mode
The Metadata Tagger has two execution modes.
- Tags mode (default): You define categories through the UI. For each category, the platform asks the LLM to assign one or more tags per chunk.
- Lambda mode (advanced): You write a JavaScript function that overrides the default extraction logic and returns tags programmatically.
Use Tags mode when:
- Your categories are stable and known in advance.
- You don't need custom extraction logic beyond what an LLM with a system prompt can do.
- Non-developers will maintain the category set.
Use Lambda mode when:
- You need deterministic logic such as regex matching, lookups against an external API, or hybrid LLM-plus-rules extraction.
- You want to call multiple LLMs or chain prompts.
- You want to control exactly how the platform parses and validates the LLM response.
Configure categories
On the Tags tab, configure the LLM model, the system prompt, and the categories the LLM assigns to each chunk.
Select an LLM Model
Pick a client from the Model dropdown. The list mirrors the LLM Model dropdown in the Chunker. The default is default-completions.
Configure the System Prompt
The System Prompt section has a locked Platform default panel at the top and an Additional instructions (optional) textarea below. Your text is appended to the platform default at execute time.
- Select the Platform default panel to view the built-in prompt the platform uses for tag extraction.
- Enter application-specific context in Additional instructions (optional) to specialize the default. For example, tell the LLM about your document domain, your organization's terminology, or the kinds of tags you value.
- Leave the Additional instructions textarea empty to use the platform default as-is.
Add categories
Select + Add in the Categories section header. A popover opens with:
- A Search input that filters the list of existing categories.
- + Add New Category — creates a new category and opens its Category Configuration pane on the right.
- A scrollable list of existing categories in the application. The platform seeds two categories, Title and Keywords. Select a row in the list to attach that category to this Metadata Tagger.
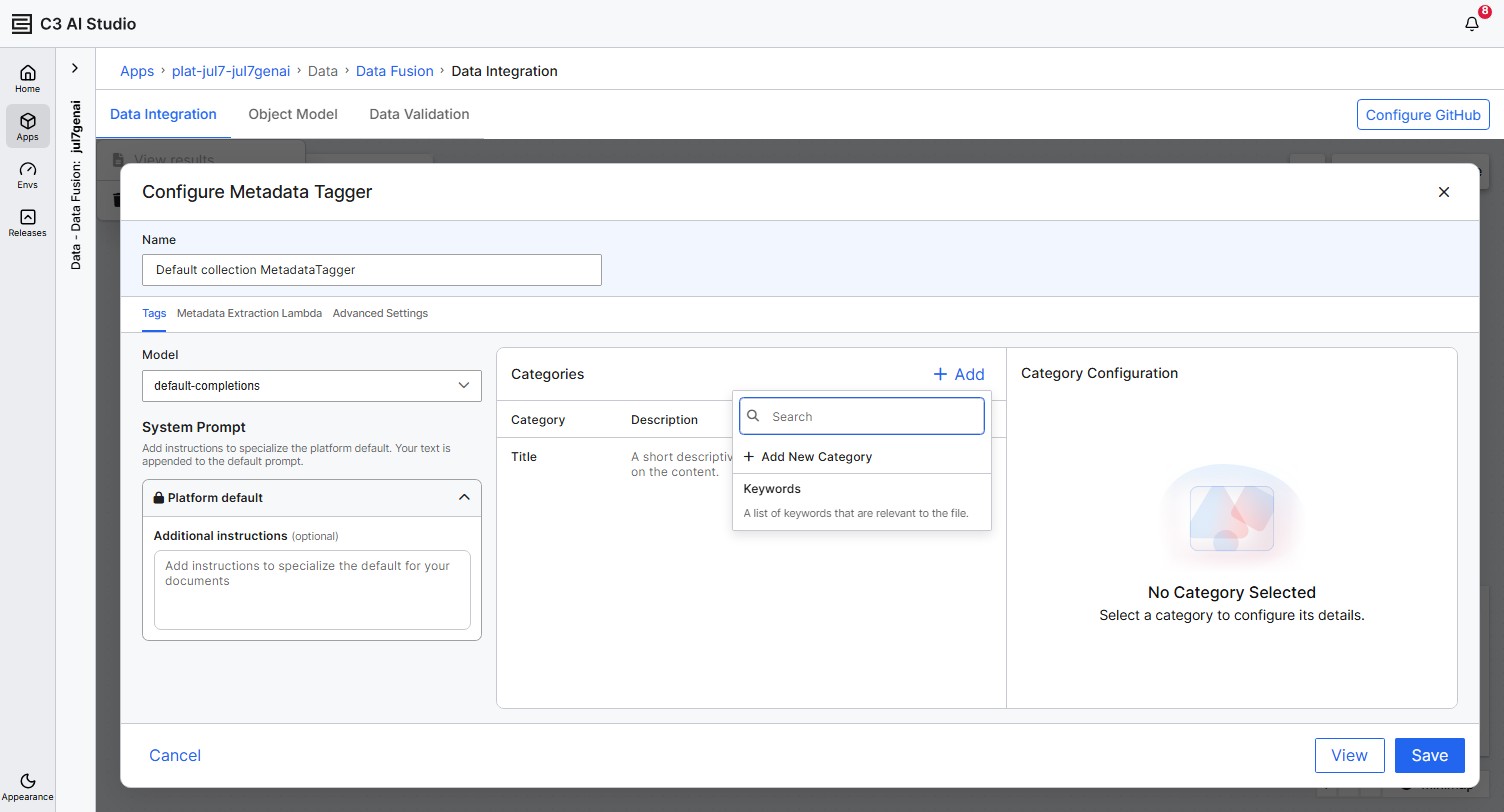
For a new category, the Category Configuration pane opens on the right. Enter:
- Category Name: The category key. For example,
Department,DocumentType, orRegion. - Description: Describes the category to the LLM and the kind of tags to assign.
- Category Type: Open or Closed. See the next section.
- Tags (Closed only): The predefined set of values the LLM must pick from. Type or paste a comma-separated list.
Categories you attach to this Metadata Tagger appear in the middle-panel Categories table, with columns Category, Description, and Category Type. Select a row in the table to reopen its Category Configuration pane and edit or delete the category.
Select a category type
Each category has an Open or Closed category type.
Use the Open category type when:
- The set of possible tags is unbounded or unknown ahead of time.
- You want the LLM to invent labels. For example, topic tags on news articles.
- A long-tail tag distribution is acceptable.
Use the Closed category type when:
- The set of valid tags is bounded and known. For example, departments in your organization, ISO country codes, or product line names.
- You need consistent labels for facets, dashboards, or downstream rules.
- You want to constrain the LLM from drifting into similar-but-not-identical labels.
A single Closed category accepts up to 200 tags. If you need more than 200 tags, split the category into two or switch the category type to Open.
Configure the Metadata Extraction Lambda (advanced)
On the Metadata Extraction Lambda tab, switch on the Metadata Extraction Lambda toggle to show a code editor.
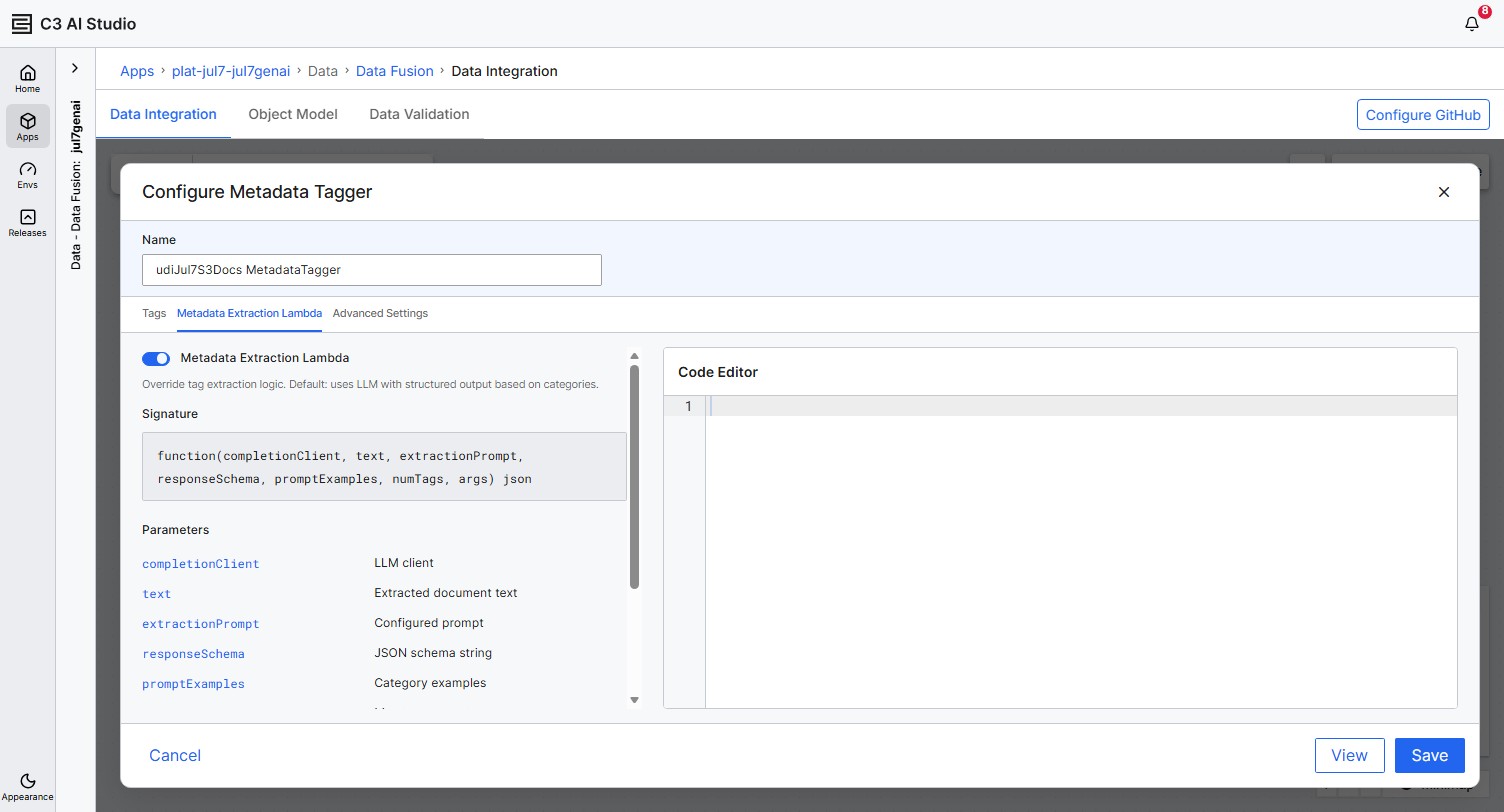
The Lambda must conform to this signature:
function(completionClient, text, extractionPrompt, responseSchema, promptExamples, numTags, args)| Parameter | Description |
|---|---|
completionClient | LLM client to use for the call. |
text | Extracted document text for the current chunk. |
extractionPrompt | The prompt configured in the Tags tab, or from args. |
responseSchema | JSON schema string the response must conform to. |
promptExamples | Category examples to anchor the LLM's output. |
numTags | Maximum number of tags per category. |
args | Additional arguments passed through from the pipeline. |
The Lambda must return JSON of the form {"Category": ["tag1", "tag2"]}.
When you configure Lambda mode, the platform uses your Lambda instead of the Tags-tab Model and System Prompt. To switch back to Tags mode, clear the Lambda code and save.
Configure Advanced Settings
Select the Advanced Settings tab to tune how much document text the Metadata Tagger considers before extraction. Adjust these values when documents are very long or when you need to bound LLM token spend.
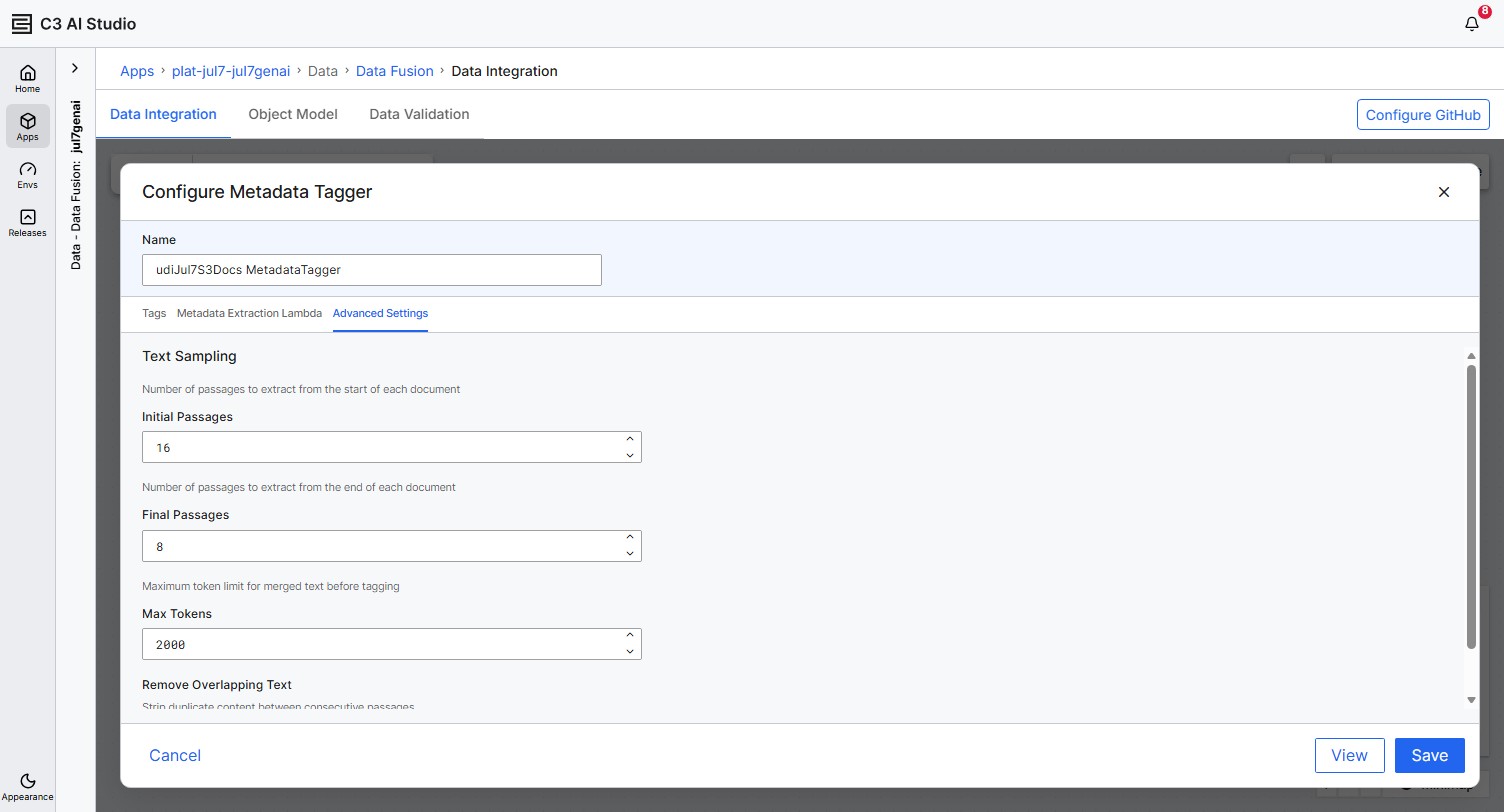
- Initial Passages (default
16): The number of passages the tagger extracts from the start of each document. - Final Passages (default
8): The number of passages the tagger extracts from the end of each document. - Max Tokens (default
2000): The maximum token limit for the merged text before tagging. - Remove Overlapping Text: Strips duplicate content between consecutive passages. Turn this off if your documents benefit from preserving repeated context across passage boundaries.
Save the configuration
Select View to test the tagger against a sample chunk without saving. Select Save when the result looks correct.