Configure the Chunker
The Chunker is the first processing node in every Unstructured Data Integration (UDI) pipeline. It parses each document into text, images, and tables, then splits the parsed content into chunks that downstream nodes can embed and index.
Open the Chunker configuration
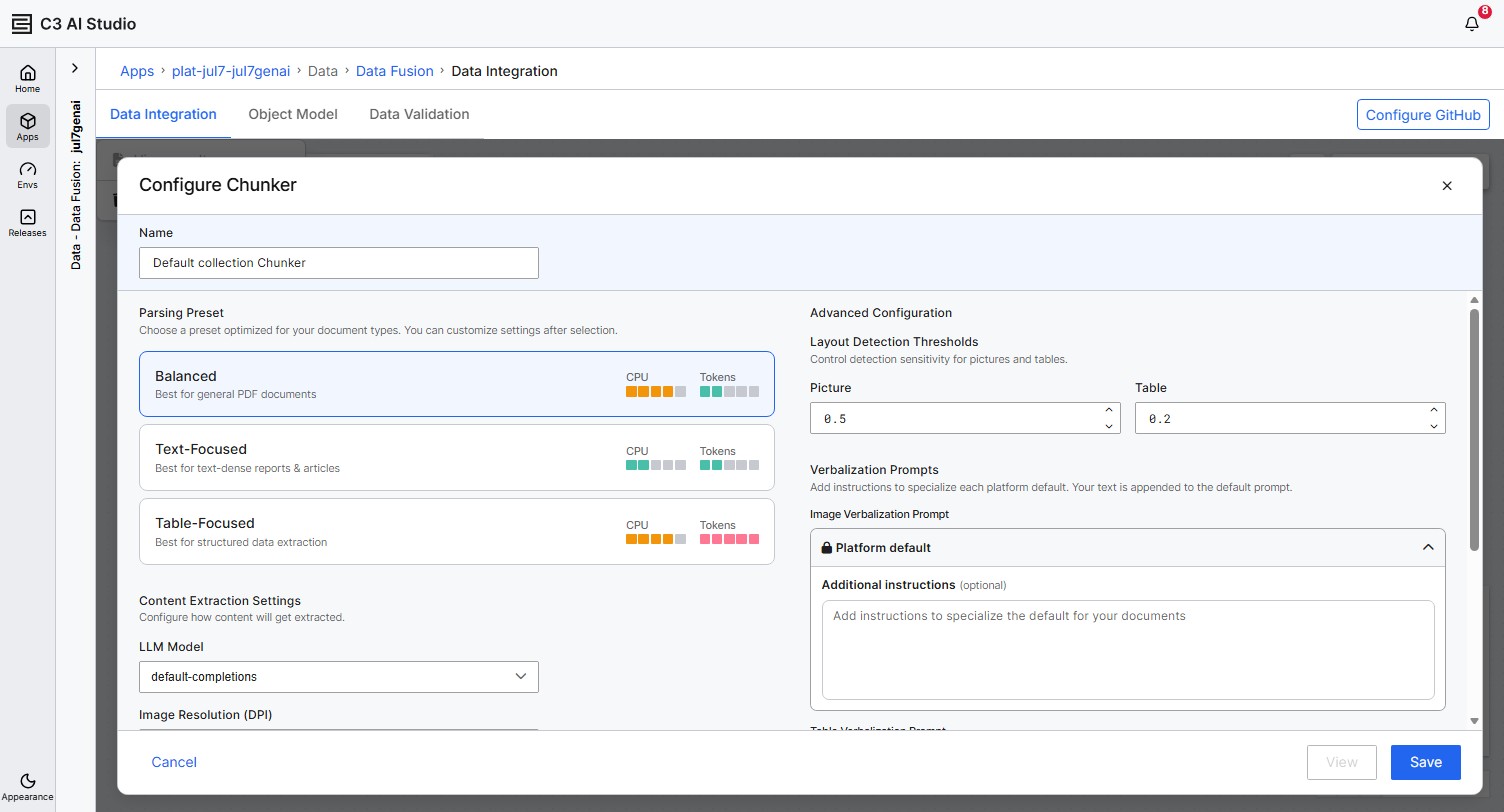
On the canvas, select the Chunker node attached to your source collection. The Configure Chunker panel opens.
Name the Chunker
At the top of the panel, the Name field is prepopulated with <source-collection-name> Chunker. Keep the default or enter a different name. The canvas node title shows this name.
Select a parsing preset
The Chunker offers three presets that trade off cost, latency, and accuracy.
Use the Balanced preset (default) when:
- You're indexing a mixed corpus of documents, such as PDFs with both text and tables, Word files, and presentations.
- You don't have a strong opinion about cost versus accuracy yet.
- You're building a Quickstart or a first pass and plan to tune later.
Use the Text-Focused preset when:
- Your documents are mostly prose, such as narrative reports, knowledge-base articles, or transcripts.
- Tables, if present, are simple enough that capturing rows as lines is acceptable.
- You want lower CPU and token cost.
Use the Table-Focused preset when:
- Your documents are table-heavy, such as financial reports, lab results, or structured records.
- Losing table structure during parsing would lose information you need to retrieve.
- You accept higher CPU and token cost for higher accuracy on tables.
Select the card for the preset you want. Each preset card shows two meters — CPU and Tokens — that let you compare relative processing cost and LLM token spend across presets. Balanced uses moderate CPU with low token spend; Text-Focused uses low CPU and low tokens; Table-Focused uses moderate CPU and high tokens.
After you pick a preset, customize any Content Extraction, Chunking, or Advanced Configuration field as needed. Your field changes take precedence over the preset defaults.
Select an LLM Model
The Chunker invokes an LLM client for content extraction. The default is default-completions. The dropdown lists every LLM client configured in your environment.
The available models depend on the LLM clients registered in Model Hub > Model Clients for this application. If the right client to use isn't clear, confirm with your platform administrator.
Configure content extraction
The Content Extraction section controls what the Chunker pulls from each document.
- Image Resolution: Default
144DPI. Increase the value to capture finer image detail. Decrease the value to reduce token cost. - Text Parsing, Image Parsing, and Table Parsing: All checkboxes are selected by default. Clear a checkbox to skip that content type during parsing.
Configure chunking settings
After the Chunker parses content, it splits the result into chunks of a fixed size.
- Chunk Size: Default
1000tokens. The maximum size of a single chunk before splitting. - Chunk Overlap: Default
0. The number of tokens that overlap between adjacent chunks. Increase the value to preserve context across chunk boundaries.
Tune layout detection (optional)
The Advanced Configuration > Layout Detection section controls how the Chunker decides whether a region of a document is a picture or a table.
- Picture Threshold: Default
0.5. The confidence score above which the Chunker treats a region as a picture. - Table Threshold: Default
0.2. The confidence score above which the Chunker treats a region as a table.
Lower thresholds catch more regions but produce more false positives. Raise the thresholds when the Chunker over-identifies pictures or tables.
Customize verbalization (optional)
When Image Parsing or Table Parsing is selected, the Chunker uses the LLM to generate a textual description of each image or table — a verbalization — that is embedded alongside the surrounding text.
The Verbalization Prompts section in the right column has two panels: Image Verbalization Prompt and Table Verbalization Prompt. Each panel shows a locked Platform default at the top and an Additional instructions (optional) textarea below.
- Select the Platform default panel to view the built-in prompt the platform uses for verbalization.
- Enter text in Additional instructions (optional) to specialize the default for your document set. Your text is appended to the platform default at execute time. For example, add
Describe charts in terms of axes, units, and trends.under the Image panel, orSummarize the table by listing column headers and the most relevant rows.under the Table panel. - Leave the Additional instructions textarea empty to use the platform default as-is.
Preview parsing (PDF only)
Select View to preview the parsing result for a sample PDF without saving the configuration. The View results mode applies only to PDFs. Other file types parse with the default configuration during pipeline execution.
The View button is disabled until the pipeline has processed at least one file. Selecting View discards any unsaved changes in the modal and opens the preview using the last-saved configuration. Save your Chunker configuration before selecting View if you want the preview to reflect your changes.
Save the configuration
Select Save. The canvas adds three downstream placeholders at the same time: the Entity Extractor, the Metadata Tagger, and the Embedder.