Configure Entity Extraction
The Entity Extractor node is optional. It uses an LLM to extract structured entities, such as contracts, people, products, or facilities, from each document chunk. The platform stores extracted records at SourcePassage.metadata.structure.
Decide whether you need entity extraction
Add the Entity Extractor when:
- Your documents contain repeating structured information that you want to query as records. For example, contracts, work orders, addresses, or line items.
- You want to load the extracted records into your application's data model.
- You must populate downstream entity Types from unstructured documents.
Skip the Entity Extractor when:
- Pure semantic search over chunks is sufficient for your use case.
- The information you care about is already structured elsewhere, such as in a database or an API.
- Adding LLM calls per chunk is too expensive for your use case.
Open the Entity Extractor configuration
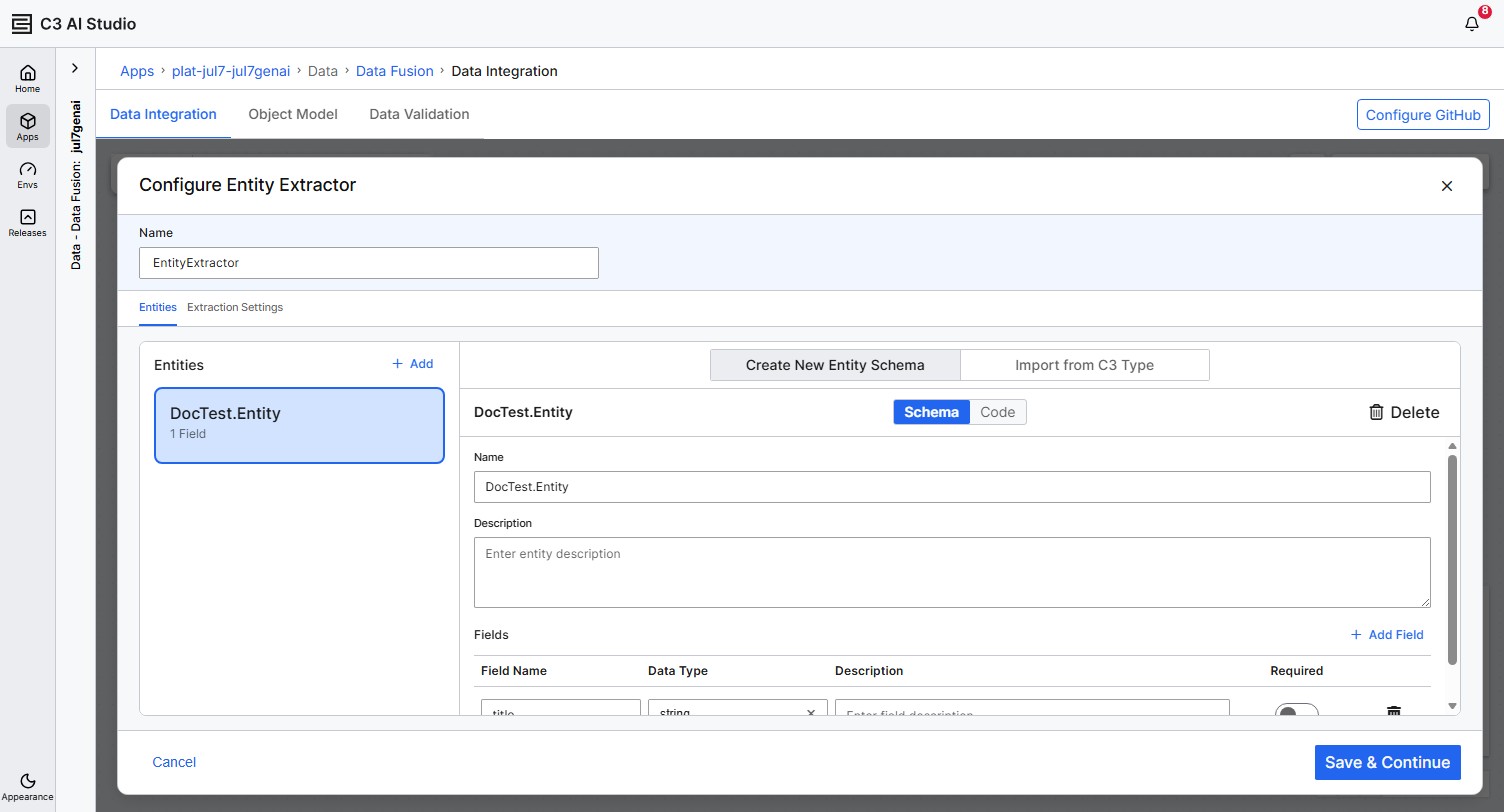
On the canvas, select the Entity Extractor node. The Configure Entity Extractor panel opens with two top-level tabs: Entities and Extraction Settings.
Name the Entity Extractor
At the top of the panel, the Name field is prepopulated with <source-collection-name> EntityExtractor (one word). Keep the default or enter a different name. The canvas node title shows this name. The downstream Load node is auto-created with the matching name <source-collection-name> Load when you save the Entity Extractor.
Add an entity schema
On the Entities tab, select + Add to create a new entity in the left-hand list. The right-hand pane shows the entity's detail with a segmented control at the top: Create New Entity Schema (default) and Import from C3 Type.
Use Create New Entity Schema when:
- You want to define a one-off schema specific to this pipeline.
- The shape of the entity doesn't map cleanly to an existing Type.
- You're prototyping and don't want to commit to a permanent Type yet.
Use Import from C3 Type when:
- An entity Type already exists in your application's data model that matches the structure you want.
- You plan to load extracted records back into that same Type using the Load Destination.
- You want field names, descriptions, and types to stay in sync with the canonical model.
Once you save an entity, you cannot flip it between Create and Import — the segmented control locks to whichever mode you saved with. Newly added entities in the current session stay switchable until you save.
Import from an existing C3 Type
Select Import from C3 Type on the right pane. A search combobox appears. Type to filter the list of importable Types, then select the Type you want. The platform imports the Type's name, description, and fields.
In Import mode:
- Every field row is read-only.
- The Code view is read-only.
- You cannot add or remove fields on the imported entity.
- To pick a different Type, select Clear next to the Type name and search again.
Delete an imported entity from the modal to switch back to Create mode with a fresh entity.
Delete an entity
Each entity in the left-hand list has a Delete button on the entity header. Selecting Delete removes the entity from the modal immediately. There's no in-modal confirmation for this action. If you delete the wrong entity, cancel the modal without saving to discard all changes.
The canvas-level delete for an entity node attached to Load has a stricter type-to-confirm dialog and cascades to the Load node and Entity Extractor. See Configure the Load Destination.
Define entity fields
For each entity, enter a Name and a Description. The description guides the LLM on what to extract.
Select Add Field to add columns. Each field has:
- Field Name: The identifier the LLM uses in its structured output.
- Data Type: A UI hint about the expected value type. The persisted schema stores only the field's description and required flag; the LLM infers types from the description at extraction time.
- Description: Tells the LLM what to extract for this field.
- Required: If selected, the LLM must return a value, or the platform treats the chunk as a non-match.
Edit in Schema view or Code view
Each entity's detail panel exposes two views.
- Schema view (default): A form-based editor with field rows. Use it when you're iterating on field names and descriptions.
- Code view: A JSON editor that shows the same schema in raw form. Use it when you're copying a schema between pipelines, version-controlling it, or making bulk edits.
The two views stay in sync. Edits in one appear in the other.
Configure the extraction prompt
Select the Extraction Settings tab. The section has a locked Platform default panel at the top and an Additional instructions (optional) textarea below. Your text is appended to the platform default at execute time.
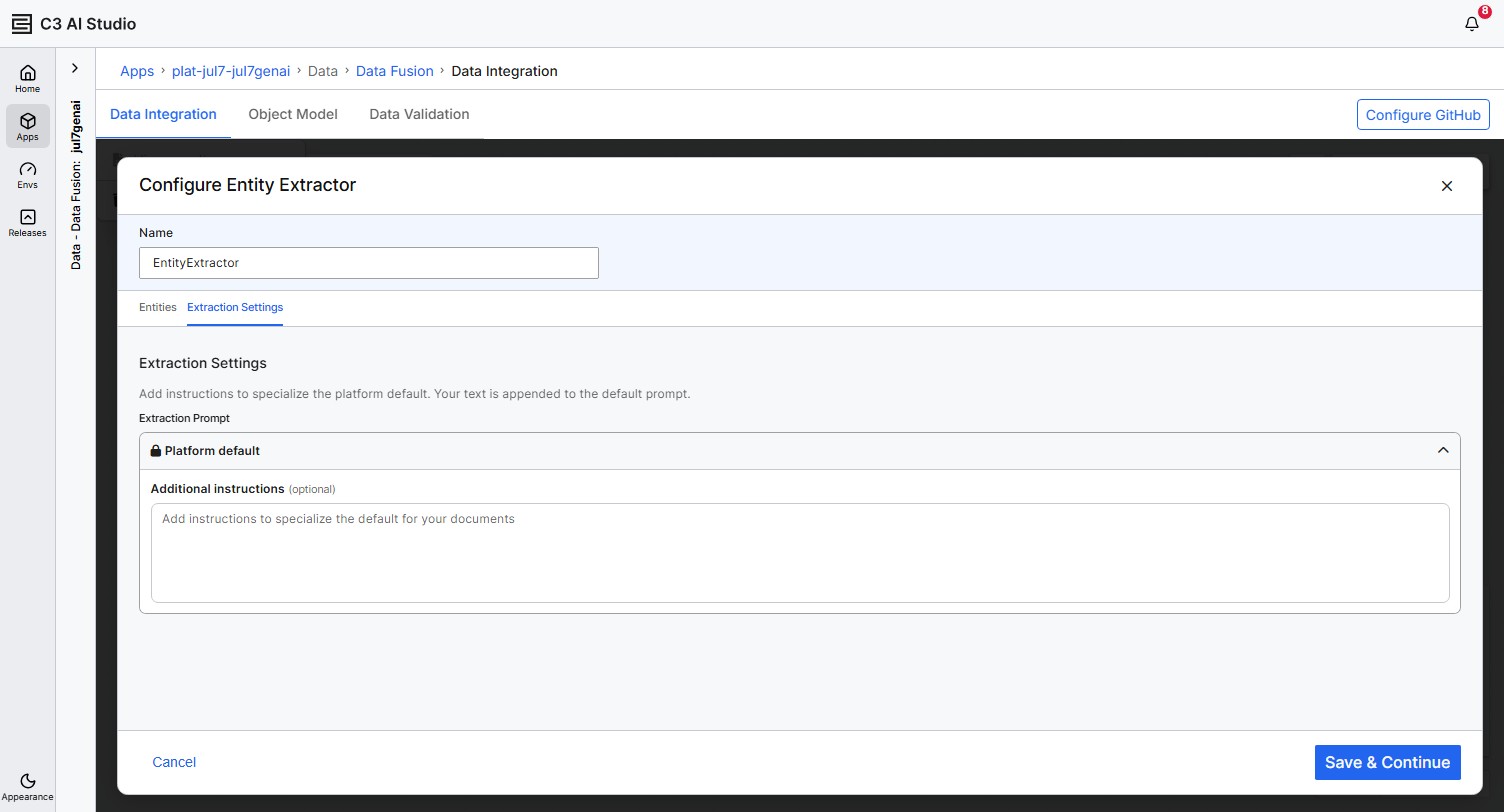
- Select the Platform default panel to view the built-in extraction prompt the platform ships with.
- Enter text in Additional instructions (optional) to specialize the default for your document set. For example:
- A description of the documents to process
- Instructions on what makes a high-quality extraction
- Examples of expected output, also known as few-shot prompting
- Guidance on how to handle ambiguous cases
- Leave the Additional instructions textarea empty to use the platform default as-is.
Save the configuration
Select Save & Continue. The platform validates the configuration in two passes:
- Entity names — invalid names show an inline error under the offending name. The modal jumps to the first invalid entity and stays on the Entities tab.
- Fields — if any Create-mode entity has no fields, or any field is missing its Field Name or Data Type, a dismissible red banner appears at the top of the modal and the pane jumps to the first invalid entity.
When both passes pass, the configured Entity Extractor stays wired into the pipeline and the platform auto-creates a downstream Load node with an entity child for each schema in this Extractor. Extracted entities flow to the vector entity, and to the Load Destination, on the next pipeline run. See Configure the Load Destination.