Manipulate ERD Views with Object Model
After you integrate sources and map them to entity Types, use the Object Model tab of Data Fusion to review your data model. The Diagram view shows the data model as an entity relationship diagram (ERD). Each entity Type appears as a box, called a node, and lines between nodes show how the Types relate.
In the Diagram view, you can read each entity's fields and keys, act on an entity from its menu, and filter the diagram by package. A package is a named collection of related Types. You can also change what each node shows, save named views, arrange nodes automatically, and download the diagram. Administrators can hide packages from the diagram for every user.
The Object Model has two other views of the same Types. To browse Types as cards or a table, see Explore Types in the Object Model. To inspect one Type, see Inspect a Type in the Object Model.
Open the Diagram view
The Diagram view opens from the Object Model, which has a view switch for its Grid view, List view, and Diagram view. To open the Diagram view:
- In C3 AI Studio, open your application, select Data > Data Fusion, and then select the Object Model tab.
- In the view switch, select Diagram view.
The diagram opens with two toolboxes. The entity toolbox holds Add new entity, Toggle multi-select mode, Search nodes..., and Filter. Toggle multi-select mode lets you select several nodes at once, for example to group them. The view toolbox holds the views list, Save view, Reset view, Auto layout, Settings, Download, and the view switch. The Legend panel explains the colors and icons.
Read the diagram
Each node shows one entity Type. The diagram follows standard ERD conventions, with these additions:
- Border color: By default, a node's border color shows the package the entity belongs to. To change the color scheme, use Settings.
- Mixins: The Types an entity mixes in, which give it shared fields and behavior, appear under the entity name.
- Required fields: A data type with a leading exclamation point (
!), such as!string, marks a required field. This notation follows C3 AI Type syntax. - Keys: Key icons mark primary keys, foreign keys, and fields that hold several foreign keys.
- Sections: Each node lists its stored fields first, then Calc Fields, then Methods.
The Legend panel shows the color scheme in use and an Icons list with these entries:
- Primary Key, Foreign Key, and Foreign Keys: The key icons.
- Indexed: Marks an indexed field.
- Read Calc (
C): A calculated field computed each time you read it. - Stored Calc (
SC): A calculated field whose value is saved. - Static Method (
static): Marks a static method. Member methods have no marker.
To hide or show the Legend panel, select Legend.
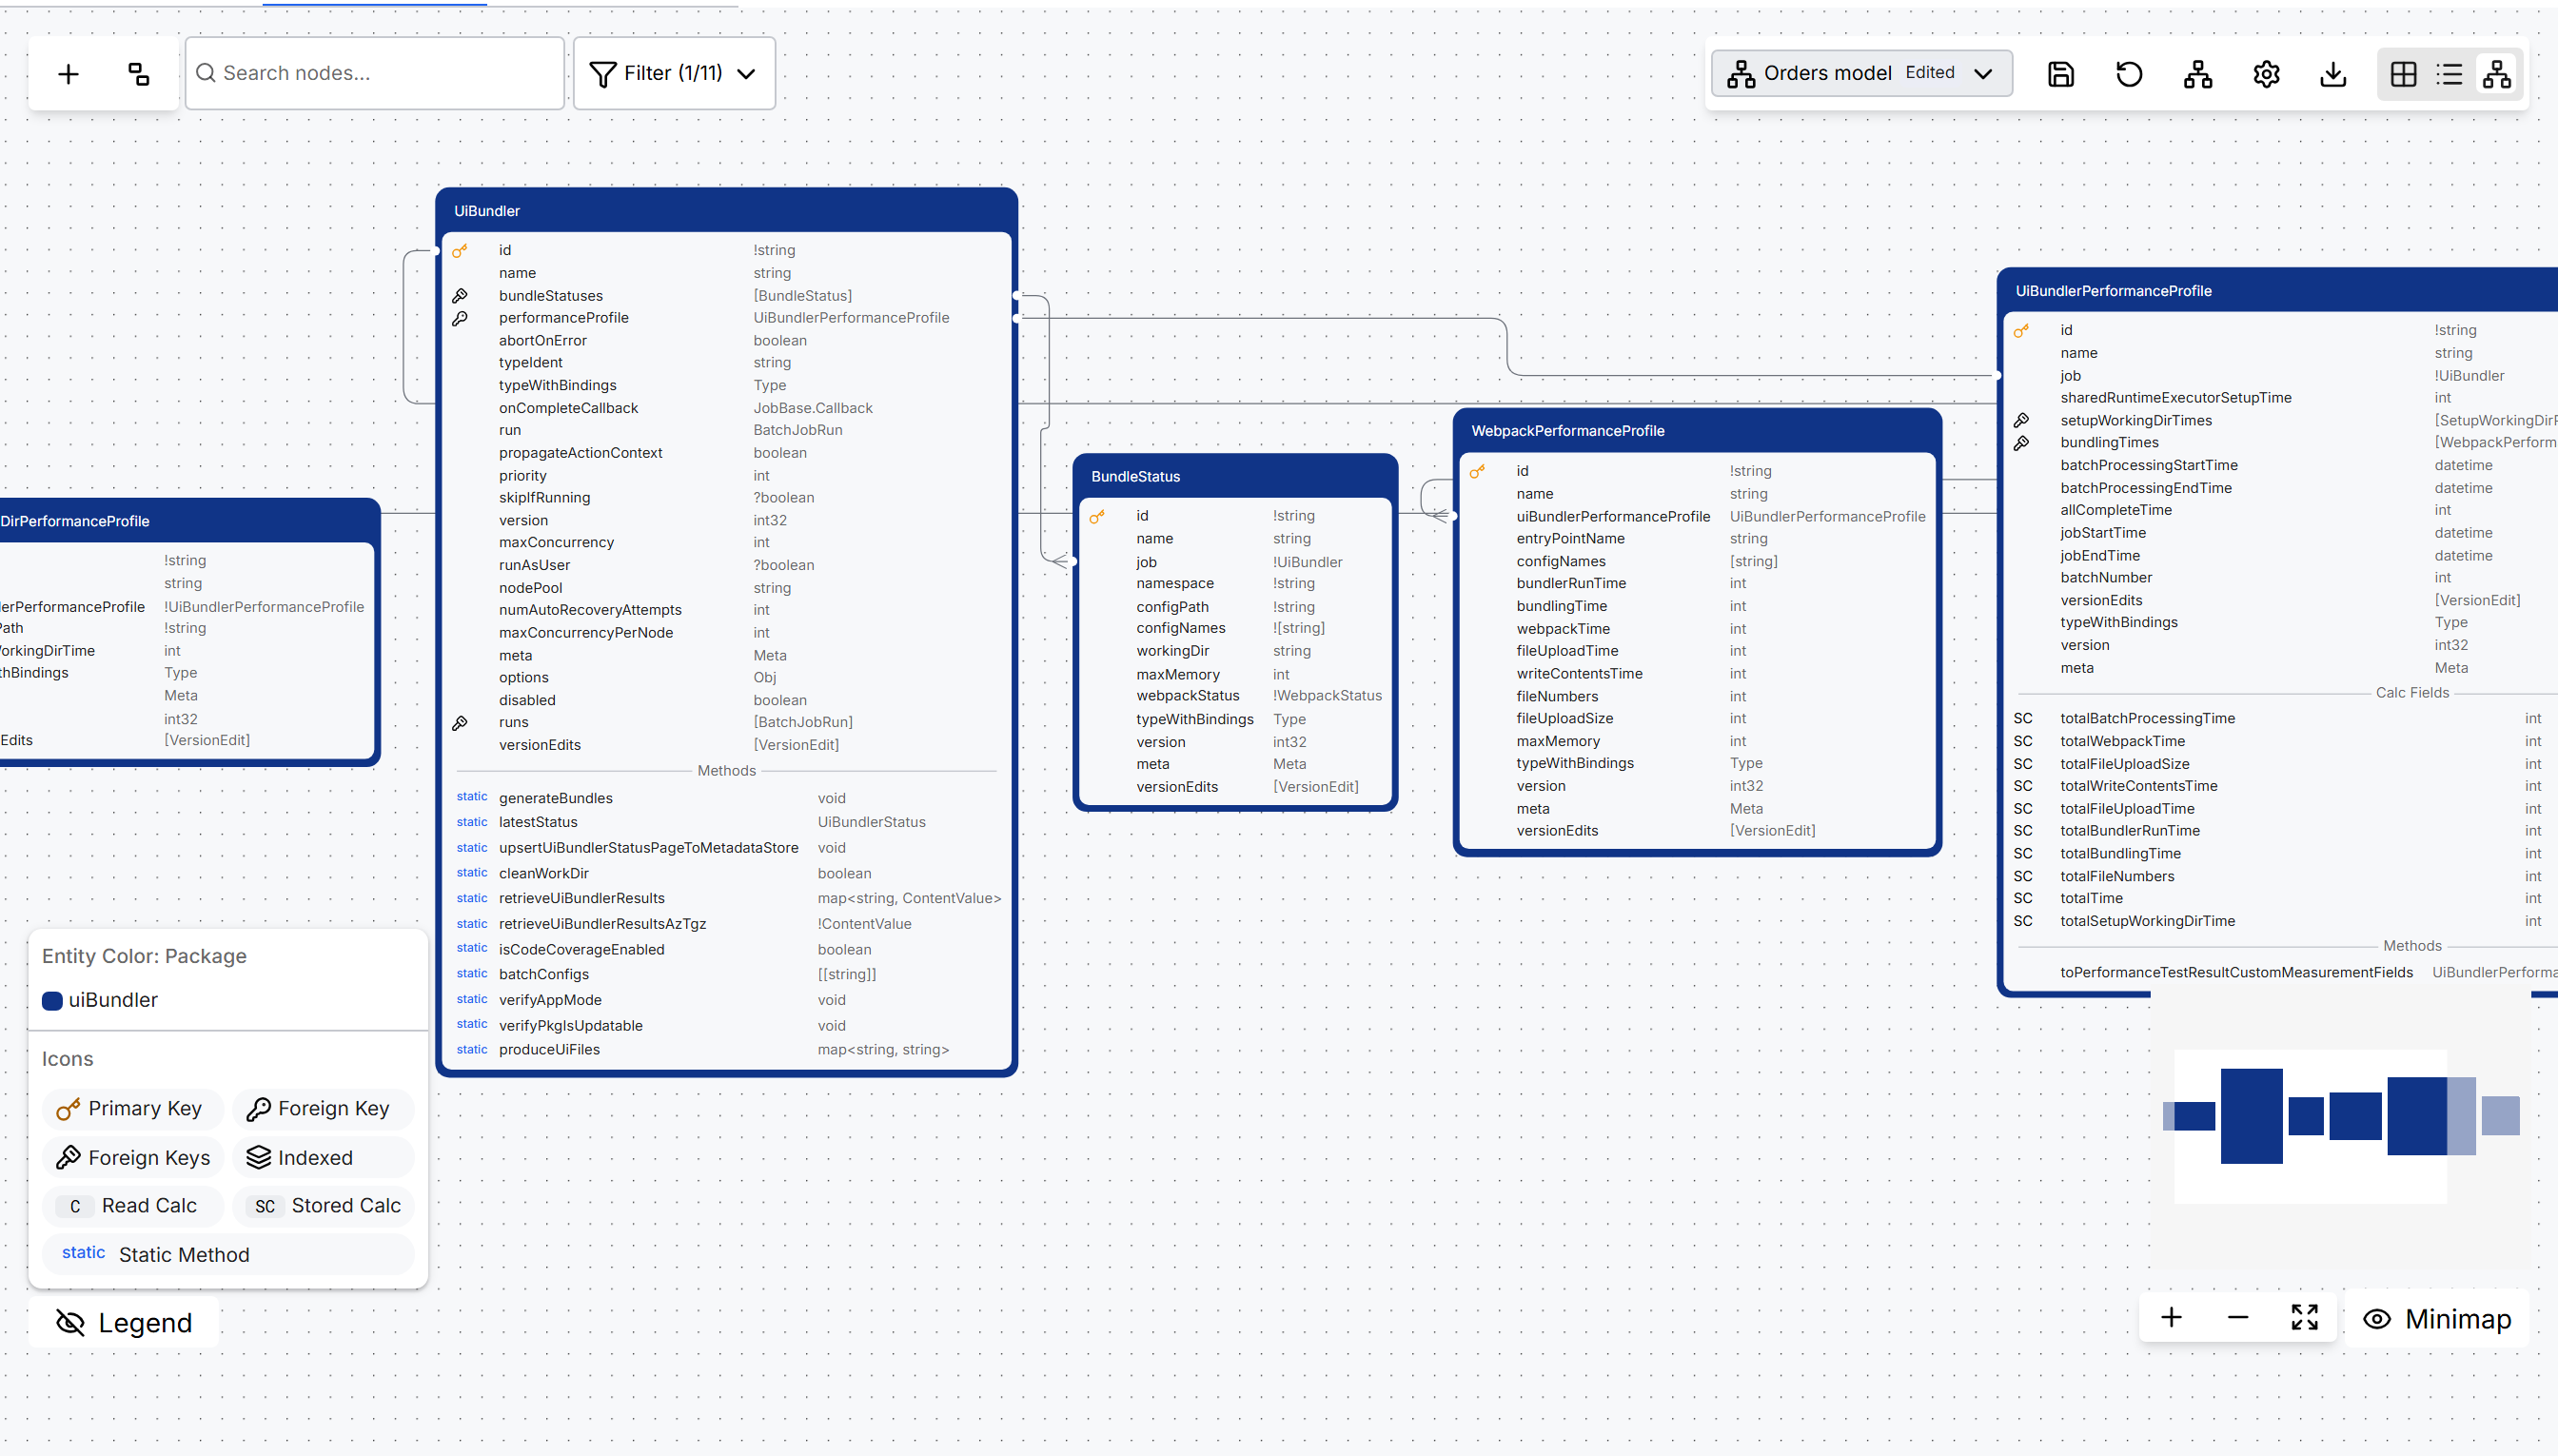
Select a node to open the Type Detail panel for that Type. The same panel opens from a card in the Grid view or a row in the List view. For the panel's tabs and buttons, see Inspect a Type in the Object Model.
Act on an entity from its menu
Each node has a context menu with actions for that entity. To open the context menu, right-click the node, or hover over the node and select Actions. Your application's root package is the package your application is built from. Dependency packages are the packages your application depends on. The menu shows these items:
- Preview Data: Opens the preview drawer on its Preview Data tab, which lists saved records of the entity.
- Preview Schema: Opens the preview drawer on its Schema tab, which lists each field's Column Name, Column Alias, Data Type, and Description.
- Modify Code, Remix Code, or View Code: Opens the entity's source in the code editor. The menu shows one of the three, depending on the application mode and the entity's package.
- Delete: Deletes the entity Type from your application's root package.
- Remove from Group: Shows when the entity belongs to a group. For groups, see Manage ERD Node Groups.
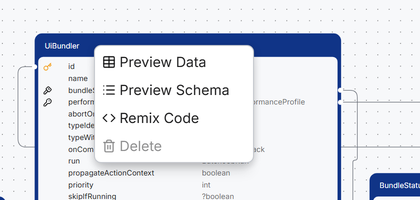
Delete is unavailable for entities outside the root package, for entities marked final (a Type that cannot be remixed), and in production or test mode. The disabled item shows the tooltip "Cannot delete types outside the root package or final types".
Selecting Delete removes the entity Type at once. No confirmation dialog appears.
The code item the menu shows follows these rules:
- Modify Code: The application is not in production or test mode, and the entity is in the root package.
- Remix Code: The application is not in production or test mode, and the entity is in a dependency package and is not marked
final. To remix an entity is to save your edited copy of it in your root package. - View Code: All other cases. The code editor opens read-only.
To add, edit, or remix entities, see Add and Update Entities in the Object Model.
Find and filter entities
By default, the diagram shows every package of your application, including its dependency packages. An administrator can hide a dependency package for all users; see "Hide packages for all users" in this topic.
To find an entity, type its name in Search nodes.... The list shows each matching entity with its package. Select an entity to center it in the diagram and open its Type Detail panel. Search covers the packages selected in Filter.
To choose which packages the diagram shows, select Filter. The Filter list has these controls:
- Select All: Selects or clears every package at once. Select All is selected by default.
- Package checkboxes: One per package. Selecting or clearing a checkbox updates the diagram at once, with no separate apply step.
- Reset: Selects every package again.
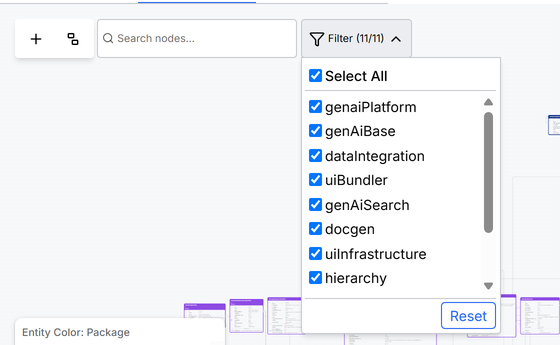
Hiding packages you do not need makes a large diagram easier to read.
Change what entities show
Use Settings to choose how nodes are colored, which tags they show, and which sections they list. Select Settings in the view toolbox. The settings panel has these groups:
- Entity Color: Sets the border color scheme.
- Package: Each package gets its own border color. Package is the default.
- Integrated/Populated: Separates entities that receive data through a data integration pipeline from entities that the application populates. The Legend labels the two kinds Integrated and Populated.
- No Color: All nodes use a neutral border.
- Tags: Turns each tag set on or off.
- External Data Source Tag: Tags entities hosted by an external data source as
External. - Remix Tag: A setting for entities that remix an entity from a dependency package.
- Entity Tag: Tags entities backed by a non-relational store with the store type:
Key-Value,File Key-Value,Vector, orCassandra.
- External Data Source Tag: Tags entities hosted by an external data source as
- Details: Turns each section of a node on or off.
- Fields: Stored fields.
- Indexed: A setting for indexed fields.
- Calc Fields: Calculated fields, marked
C(read calc) orSC(stored calc). - Methods: Static and member methods.
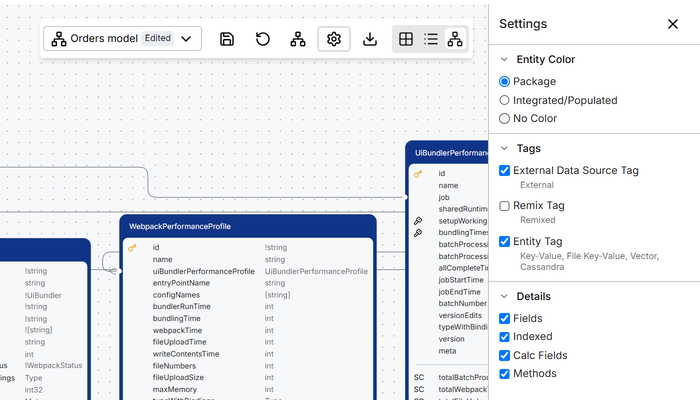
Switch, save, and reset views
A view is a saved set of diagram settings, node positions, groups, and package filter selections. Use the views list in the view toolbox to switch views. The views list shows Detailed and Minimalist under Views, plus any views your team saved:
- Detailed: Shows each node's fields, calc fields, and methods.
- Minimalist: Hides the fields, calc fields, and methods, so you can focus on how entities relate.
When you move nodes or change settings, filters, or groups, the views list shows an Edited badge. Your changes stay in your browser until you save them:
- To keep the changes in the selected view, select Save view, and then select Save in the Save View dialog.
- To discard the changes, select Reset view, and then select Reset. Resetting restores the view as last saved, and it cannot be undone.
Both buttons are unavailable until the view has unsaved changes.
To save the current diagram as a new named view:
- In the views list, under Actions, select Create new view.
- In the Create a new view dialog, enter a Name. Optionally, enter a Description of up to 250 characters.
- To open this view by default, select Make default view.
- Select Submit.
An application can hold up to 25 saved views. To delete a saved view, select Manage views under Actions. The Saved views dialog lists each view with its Name, Description, Created by, Last updated by, Last updated, and Default columns. Select Delete view on a row, and then select Delete in the Delete View dialog. A deleted view cannot be restored.
Saved views belong to the application. Everyone who opens the Diagram view of the application sees the same saved views, including their layout and settings.
Arrange entities automatically
Auto layout repositions every node to reduce overlap. On a large diagram, Auto layout can stop responding for several minutes. To keep Auto layout fast, first clear the packages you do not need in Filter. To arrange the diagram automatically:
- In the view toolbox, select Auto layout.
- In the Auto Layout dialog, select Apply Layout. The dialog warns that current positions will be lost.
- To keep the new arrangement, select Save view, and then select Save.
Download the diagram
Download the diagram as an image to share your data model outside C3 AI Studio. To download the diagram:
- Optional: In Filter, clear the packages you do not want in the image.
- In the view toolbox, select Download.
- In Format, select SVG or PDF. The default is SVG.
- In Export Area, select Current View to capture what the canvas shows, or Full Diagram to capture every node. The default is Current View.
- Select Download.
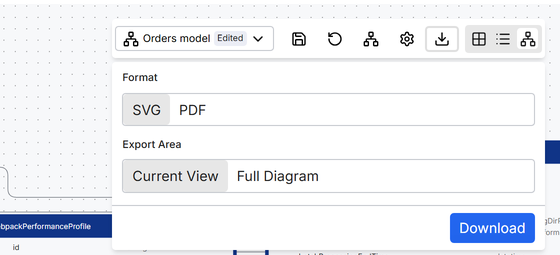
Wait for the download to finish. An SVG file downloads directly. For a PDF, your browser's print dialog opens; select Save as PDF to save the file.
Hide packages for all users
Administrators, meaning users who can change the application's configuration, can hide a dependency package from the Diagram view for every user of the application. The setting is the exclude field of EntityRelationshipDiagramPackageConfig, set per package. The root package always shows. The C3 Agentic AI Platform ships with some of its own packages excluded.
To check or change whether a package is hidden:
Open the C3 AI Console of your application.
Read the current configuration of a package:
JavaScriptEntityRelationshipDiagramPackageConfig.make({ name: 'selfServiceDI' }).getConfig()Replace
selfServiceDIwith the name of the package. If the output showsexcludeset totrue, the package is hidden from the Diagram view.Update the configuration to show or hide the package:
JavaScriptEntityRelationshipDiagramPackageConfig.make({ name: 'selfServiceDI' }).setConfigValue('exclude', false, ConfigOverride.APP)Set
exclude: falseto show the package in the diagram. Setexclude: trueto hide the package.Reload the Object Model in your browser to load the updated package list.