Connect with File Source System
You can load CSV files from an Amazon S3 bucket into an entity Type, the data model in your application that stores the records. You build the pipeline in Data Fusion. On the Data Fusion canvas, each step of the pipeline appears as a node, and you configure each node in a dialog.
You build the pipeline in this order:
- Add an S3 connector, which appears on the canvas as a File Source System node.
- Create a source collection, which sets the folder in the bucket that the pipeline reads.
- Define the source schema: the columns and data types of the incoming files.
- Choose a transform, create the target entity Type that stores the records, and map the source fields to it.
- Run the pipeline, check the status of each file, and view the loaded records.
The screenshots on this page use a sample CSV file of orders, loaded into an entity Type named Order. Use your own bucket, collection, and Type names.
To change or remove the connector later, see Edit or remove the connector. To fix common errors, see Troubleshoot S3 connections.
The S3 connector is one of the connectors under File systems, with Azure Blob, Google Cloud Storage, Google Drive, and OneDrive/SharePoint. Those connectors follow the same steps; only their Destination and Authentication fields differ.
This flow loads structured files, such as CSV. Unstructured files use the Unstructured source collection option in a separate workflow.
Prerequisites
You need:
- A running application that you can open in Data Fusion. C3 AI Studio shows Data Fusion for running applications on version 8.8 or later. For the roles you need, see Data Integration Roles and Permissions.
- An Amazon S3 bucket that holds your CSV files, and the AWS region of that bucket, for example
us-west-2. - Credentials for the bucket: an AWS access key ID and secret access key, or an IAM role that Data Fusion can assume. If you leave the role ARN blank, the connector uses the AWS identity of the environment that runs your application. Before you choose that option, read Authenticate File Sources.
The credentials must allow listing and reading the objects in the bucket. To create folders or upload files from Data Fusion, the credentials also need write access to the bucket.
Add the S3 connector (File Source System node)
The S3 connector stores the bucket location and the credentials that Data Fusion uses to read your files. A wizard guides you through four steps: Connector, Destination, Authentication, and Review.
Select the S3 connector
Open Data Fusion and choose S3 as the data source:
- In C3 AI Studio, open your application, then select Data > Data Fusion.
- On the Data Integration tab, select Add Data Source.
- In the Configure Connector dialog, select the File systems category, or search for
s3. - Select the S3 tile.
The Destination step opens.
Enter the bucket and region (Destination)
On the Destination step, name the connector and point it at your bucket:
- In Name, enter a name for the connector. The name must be unique among the data sources in your application, alphanumeric, and must not begin with a number.
- (Optional) In Description, enter fewer than 500 characters of context.
- Under Bucket Information, choose how to set the Bucket:
- Add Bucket: enter the bucket and path where your files are, for example
my-bucket/ormy-bucket/sales/. Do not include thes3://prefix; Data Fusion adds it. The value must end with/. - Use Existing Bucket: select a bucket already set up for your application. User Buckets lists buckets already added to the application; Platform Buckets lists the application's own storage locations.
- Add Bucket: enter the bucket and path where your files are, for example
- If you used Add Bucket, select the AWS Region of the bucket, for example US West (Oregon) | us-west-2.
- Select Continue.
With Add Bucket, you set the Region and complete the Authentication step. With Use Existing Bucket, the Region field disappears when you select a bucket, and the wizard skips the Authentication step. To set a region and credentials for an existing user bucket, turn on Override credentials for selected mount. A bucket under Platform Buckets has no override option, so you cannot change its credentials.
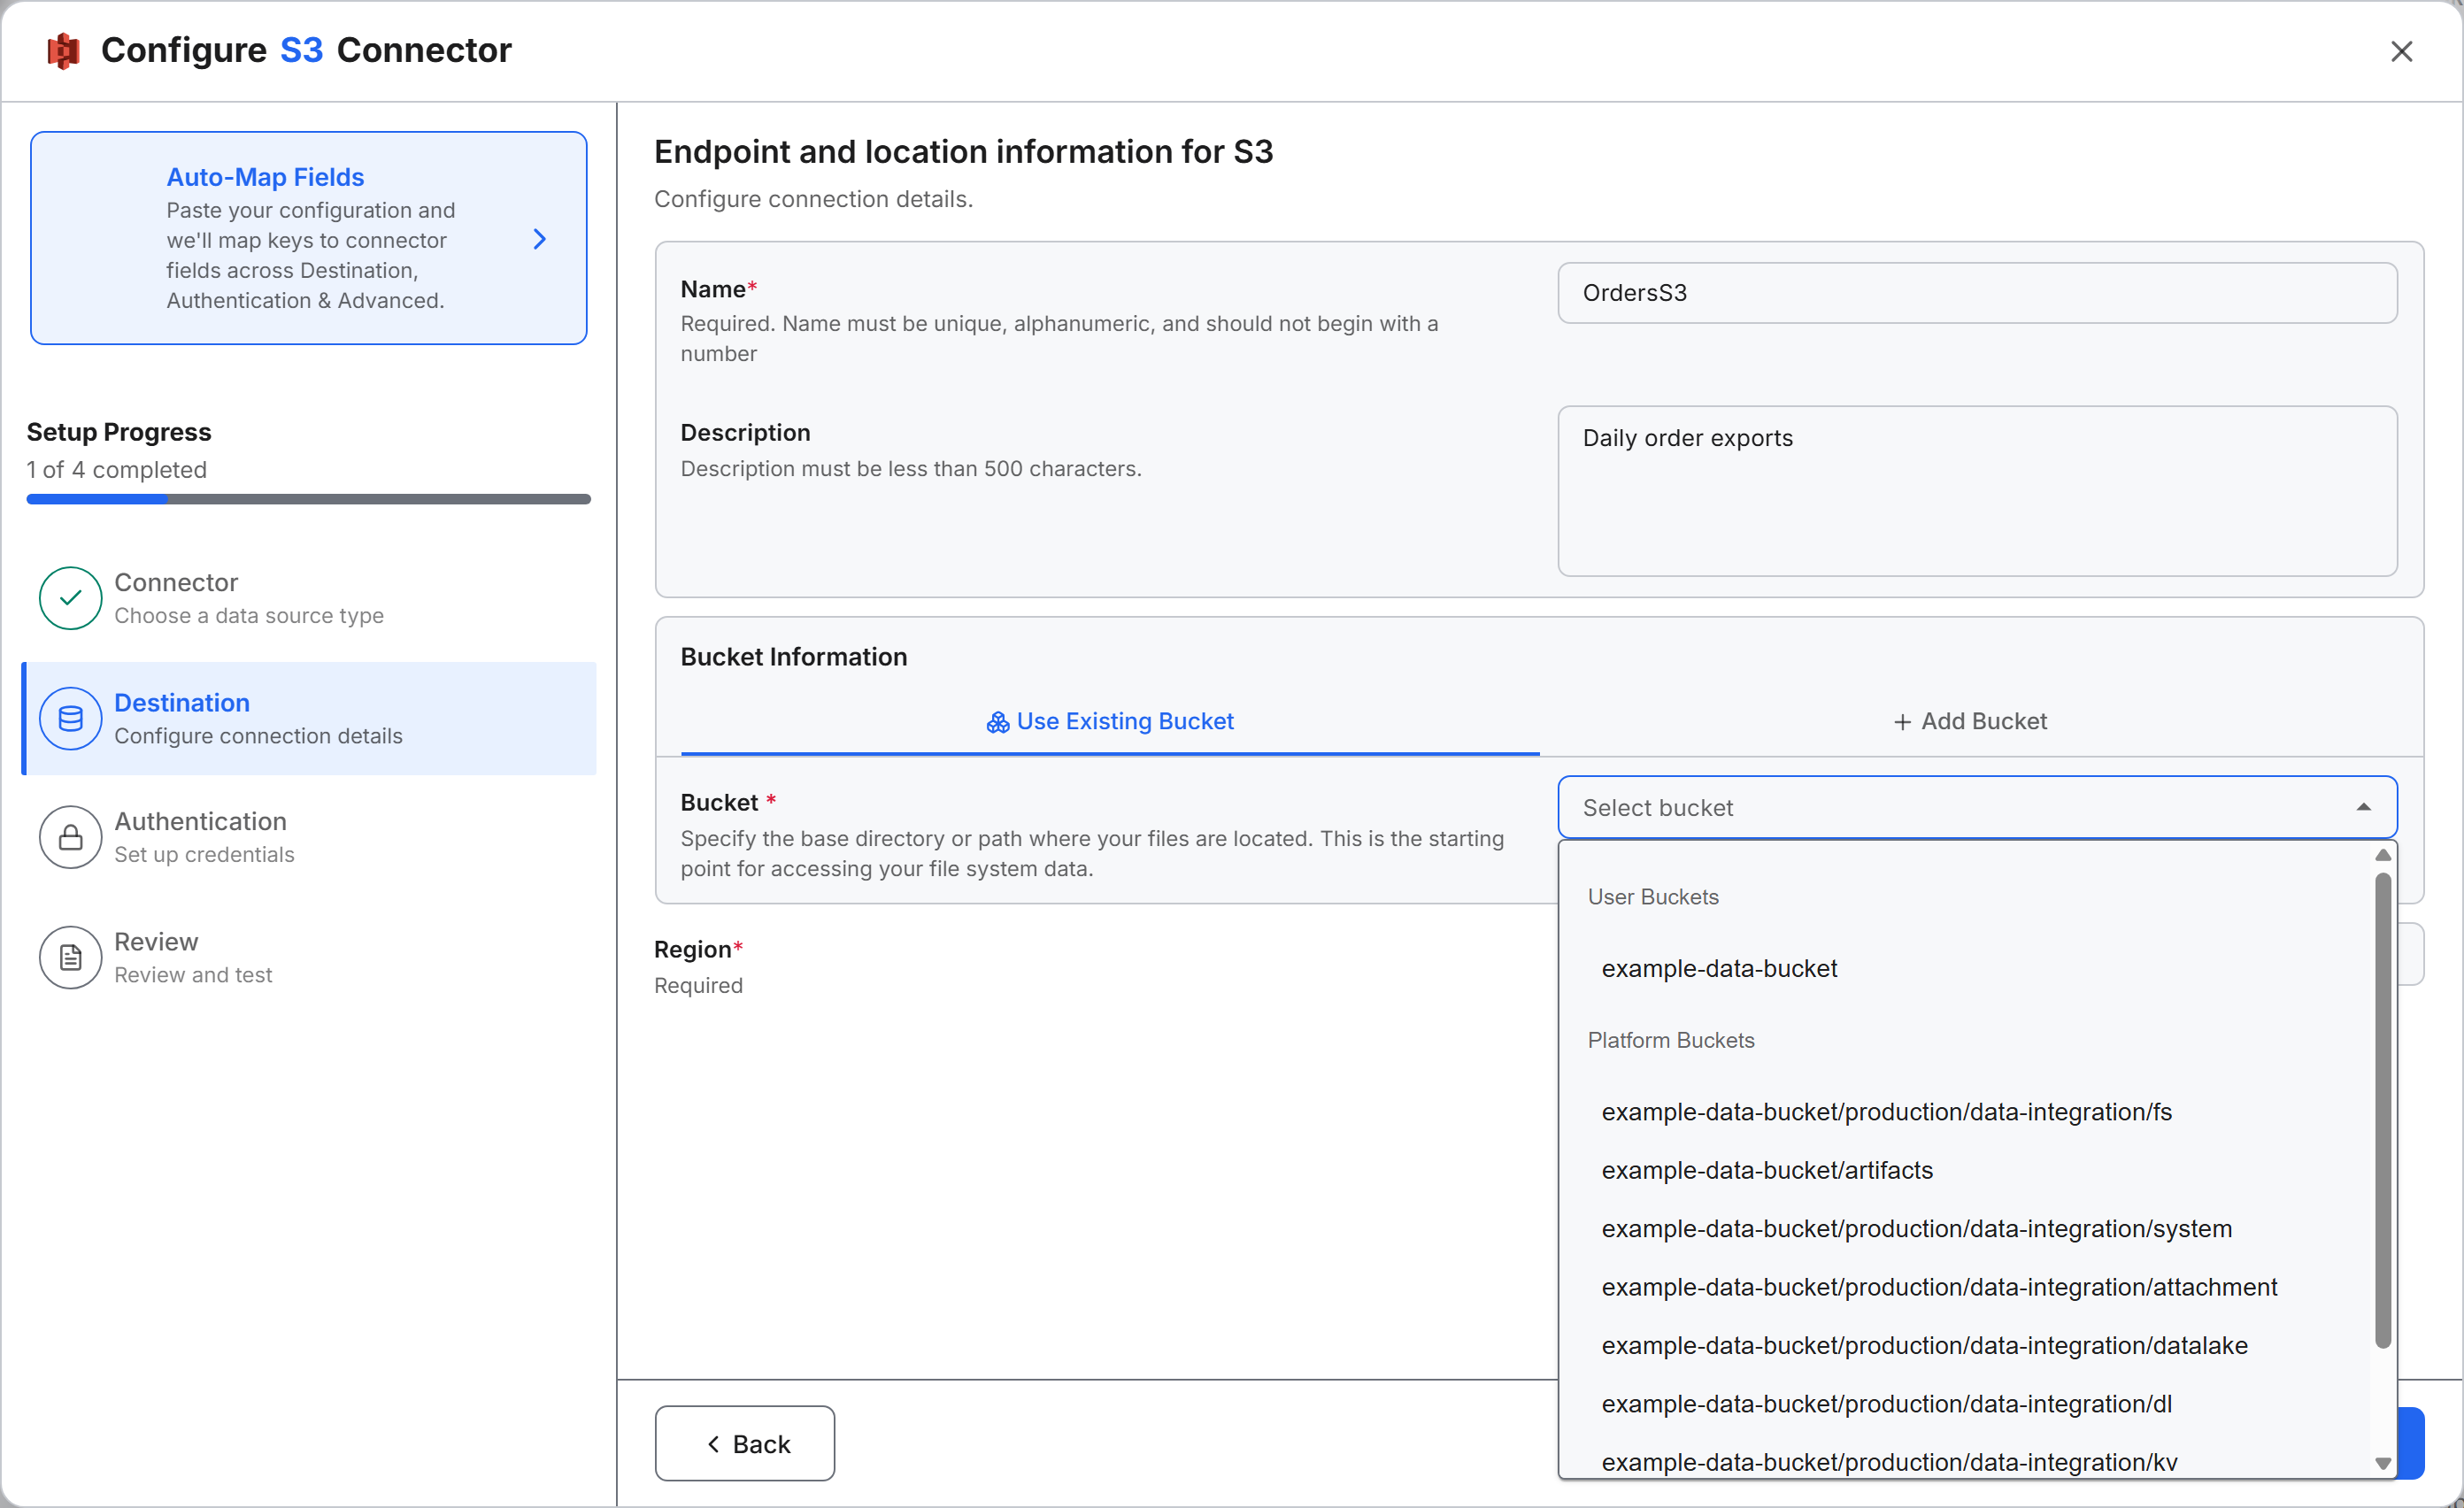
Fill the fields from an existing configuration (optional)
If you have the connector settings as JSON or as a JDBC URL, Auto-Map Fields can fill the form for you. The Auto-Map Fields card appears from the Destination step onward. Select the card to open a panel with two parts:
- 1. Provide Input: choose JSON or JDBC URL, then paste the text (Paste) or upload a file (Upload), and select Extract & Suggest Mapping. The panel reads only the key names and never sends secret values.
- 2. Map Extracted Keys to Connector Fields: review the suggested mapping, grouped under Destination, Authentication, and Advanced. Keys that match no connector field, such as
bucket,name, anddescription, appear under Unmapped Fields. Enter those values in the form.
If the form already has values, choose Merge new values (keep existing) or Override existing values. Select Fill fields to apply the mapping. The wizard then opens the Review & Test step and marks each step that still needs values, for example Destination when Name is empty. Open each marked step and complete its fields. To close the panel without applying the mapping, select Back; the form keeps its values.
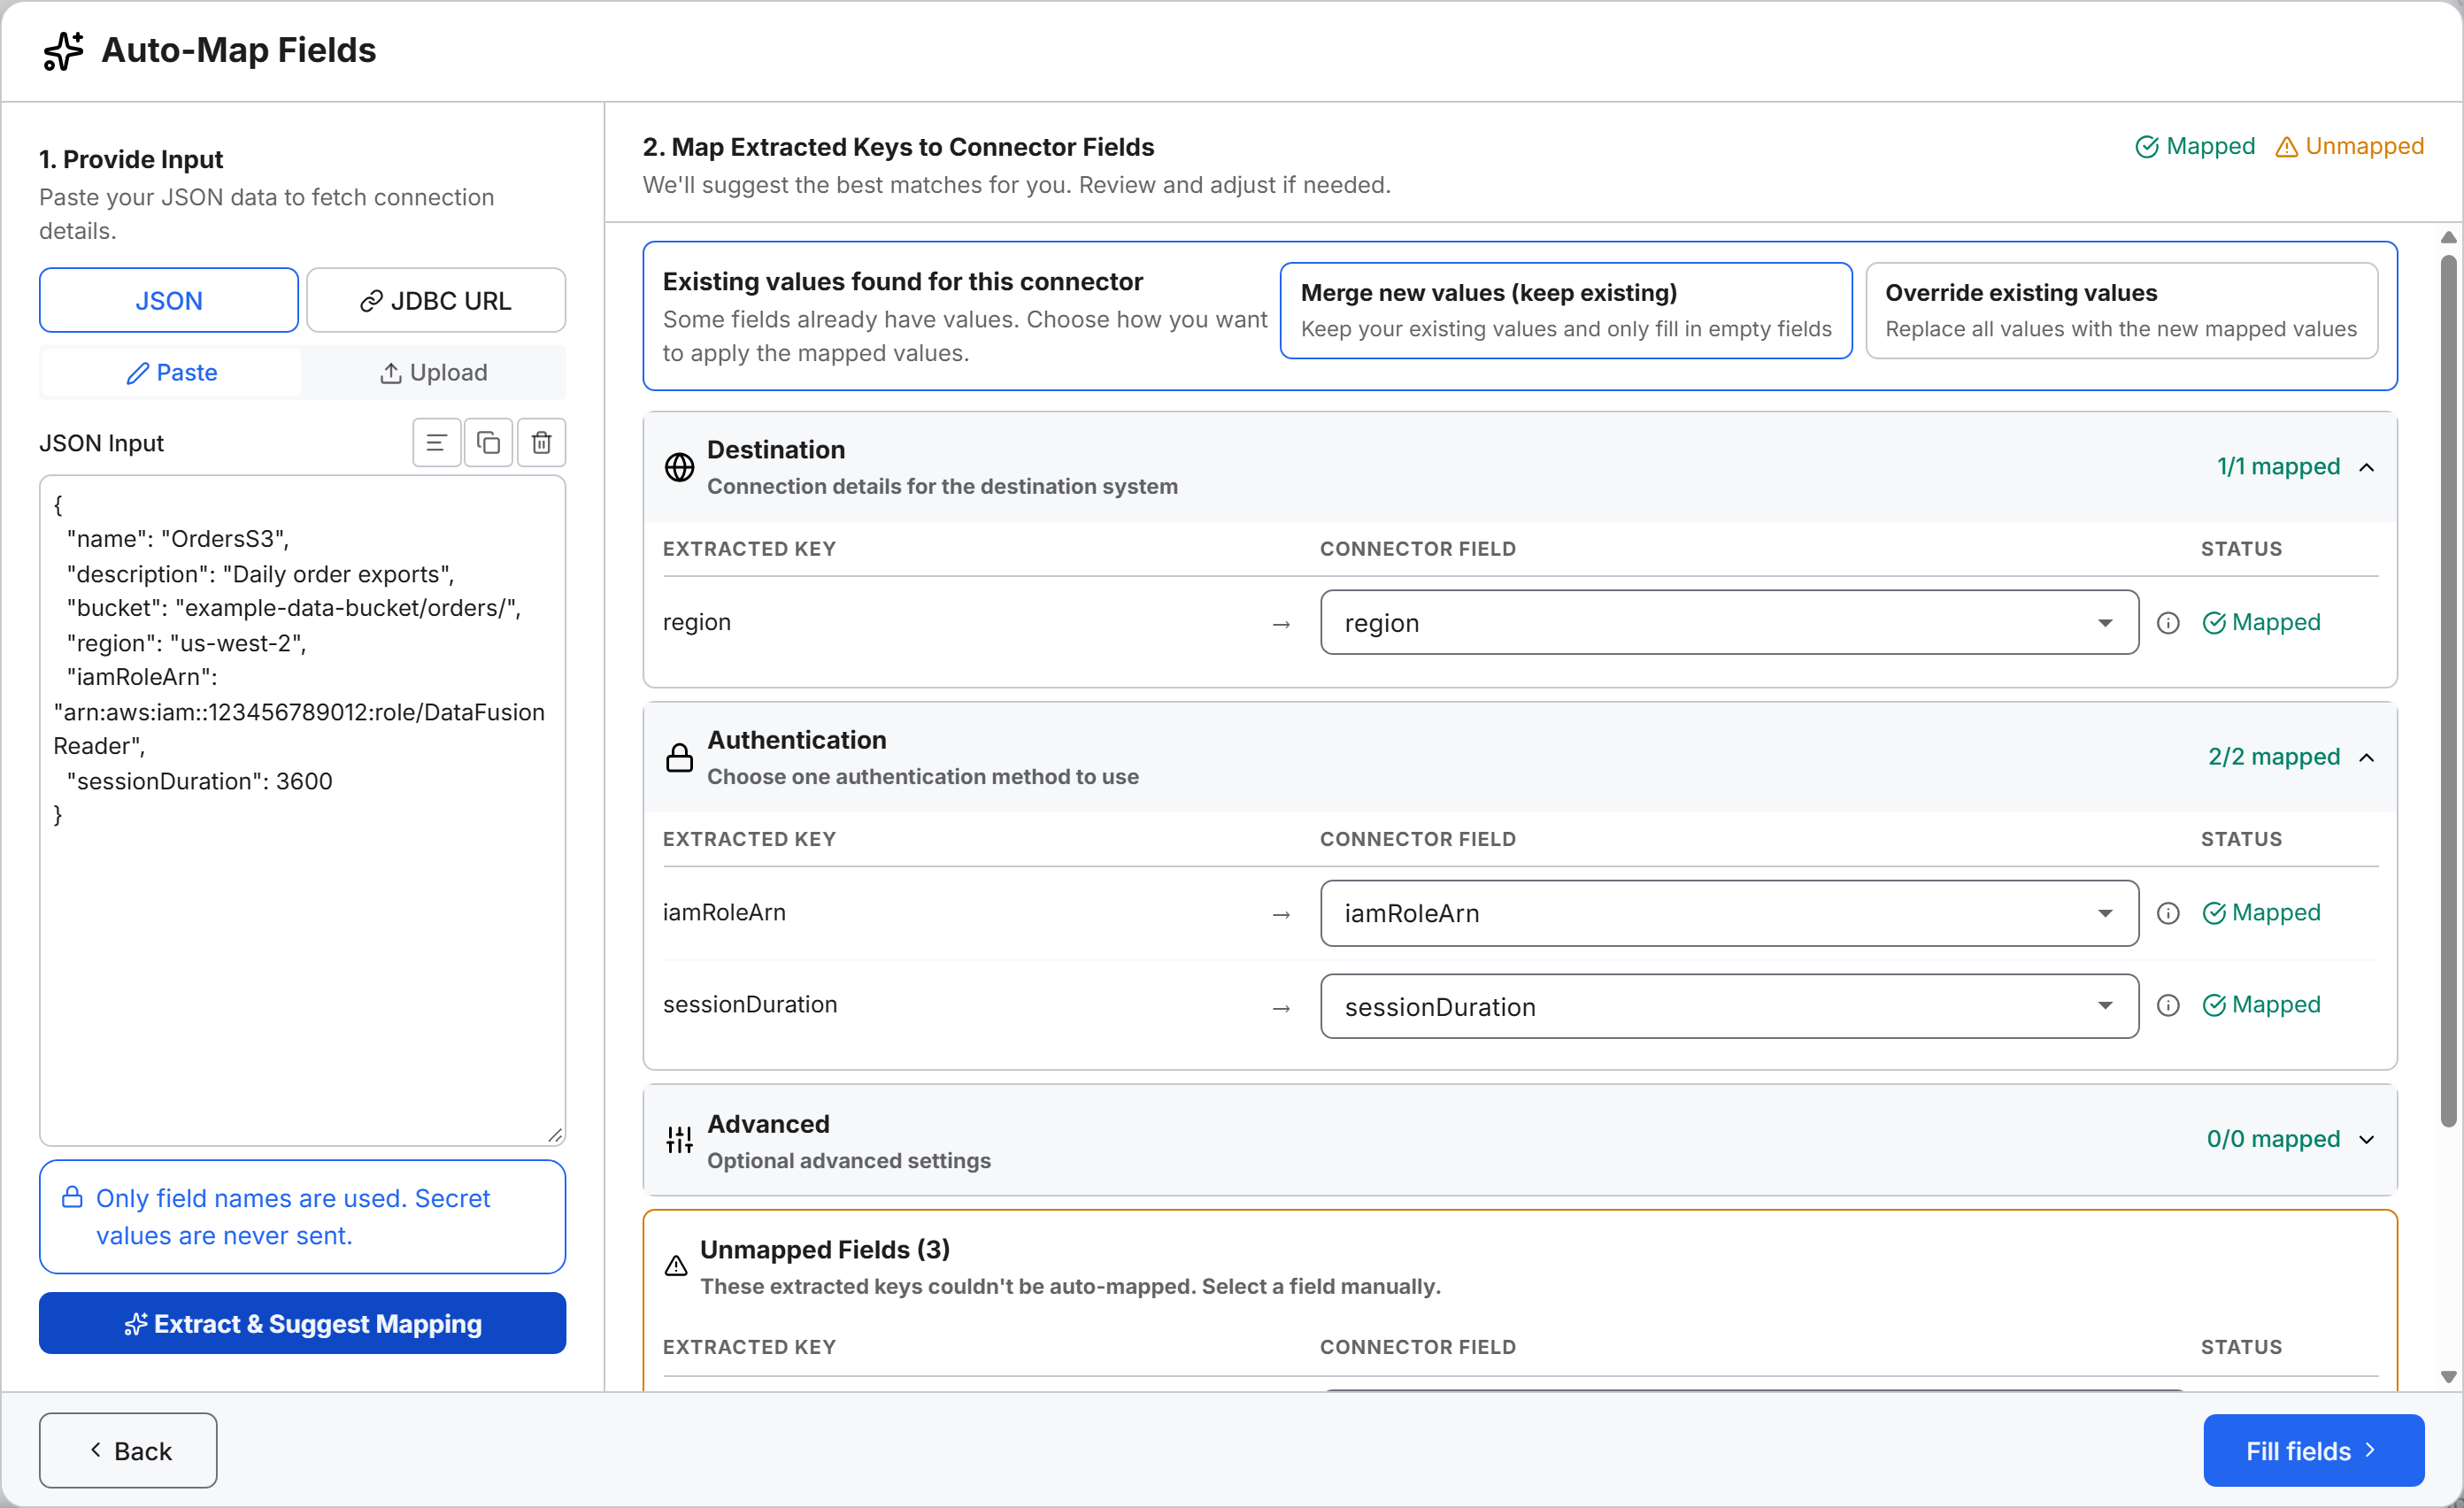
Enter access keys or an IAM role (Authentication)
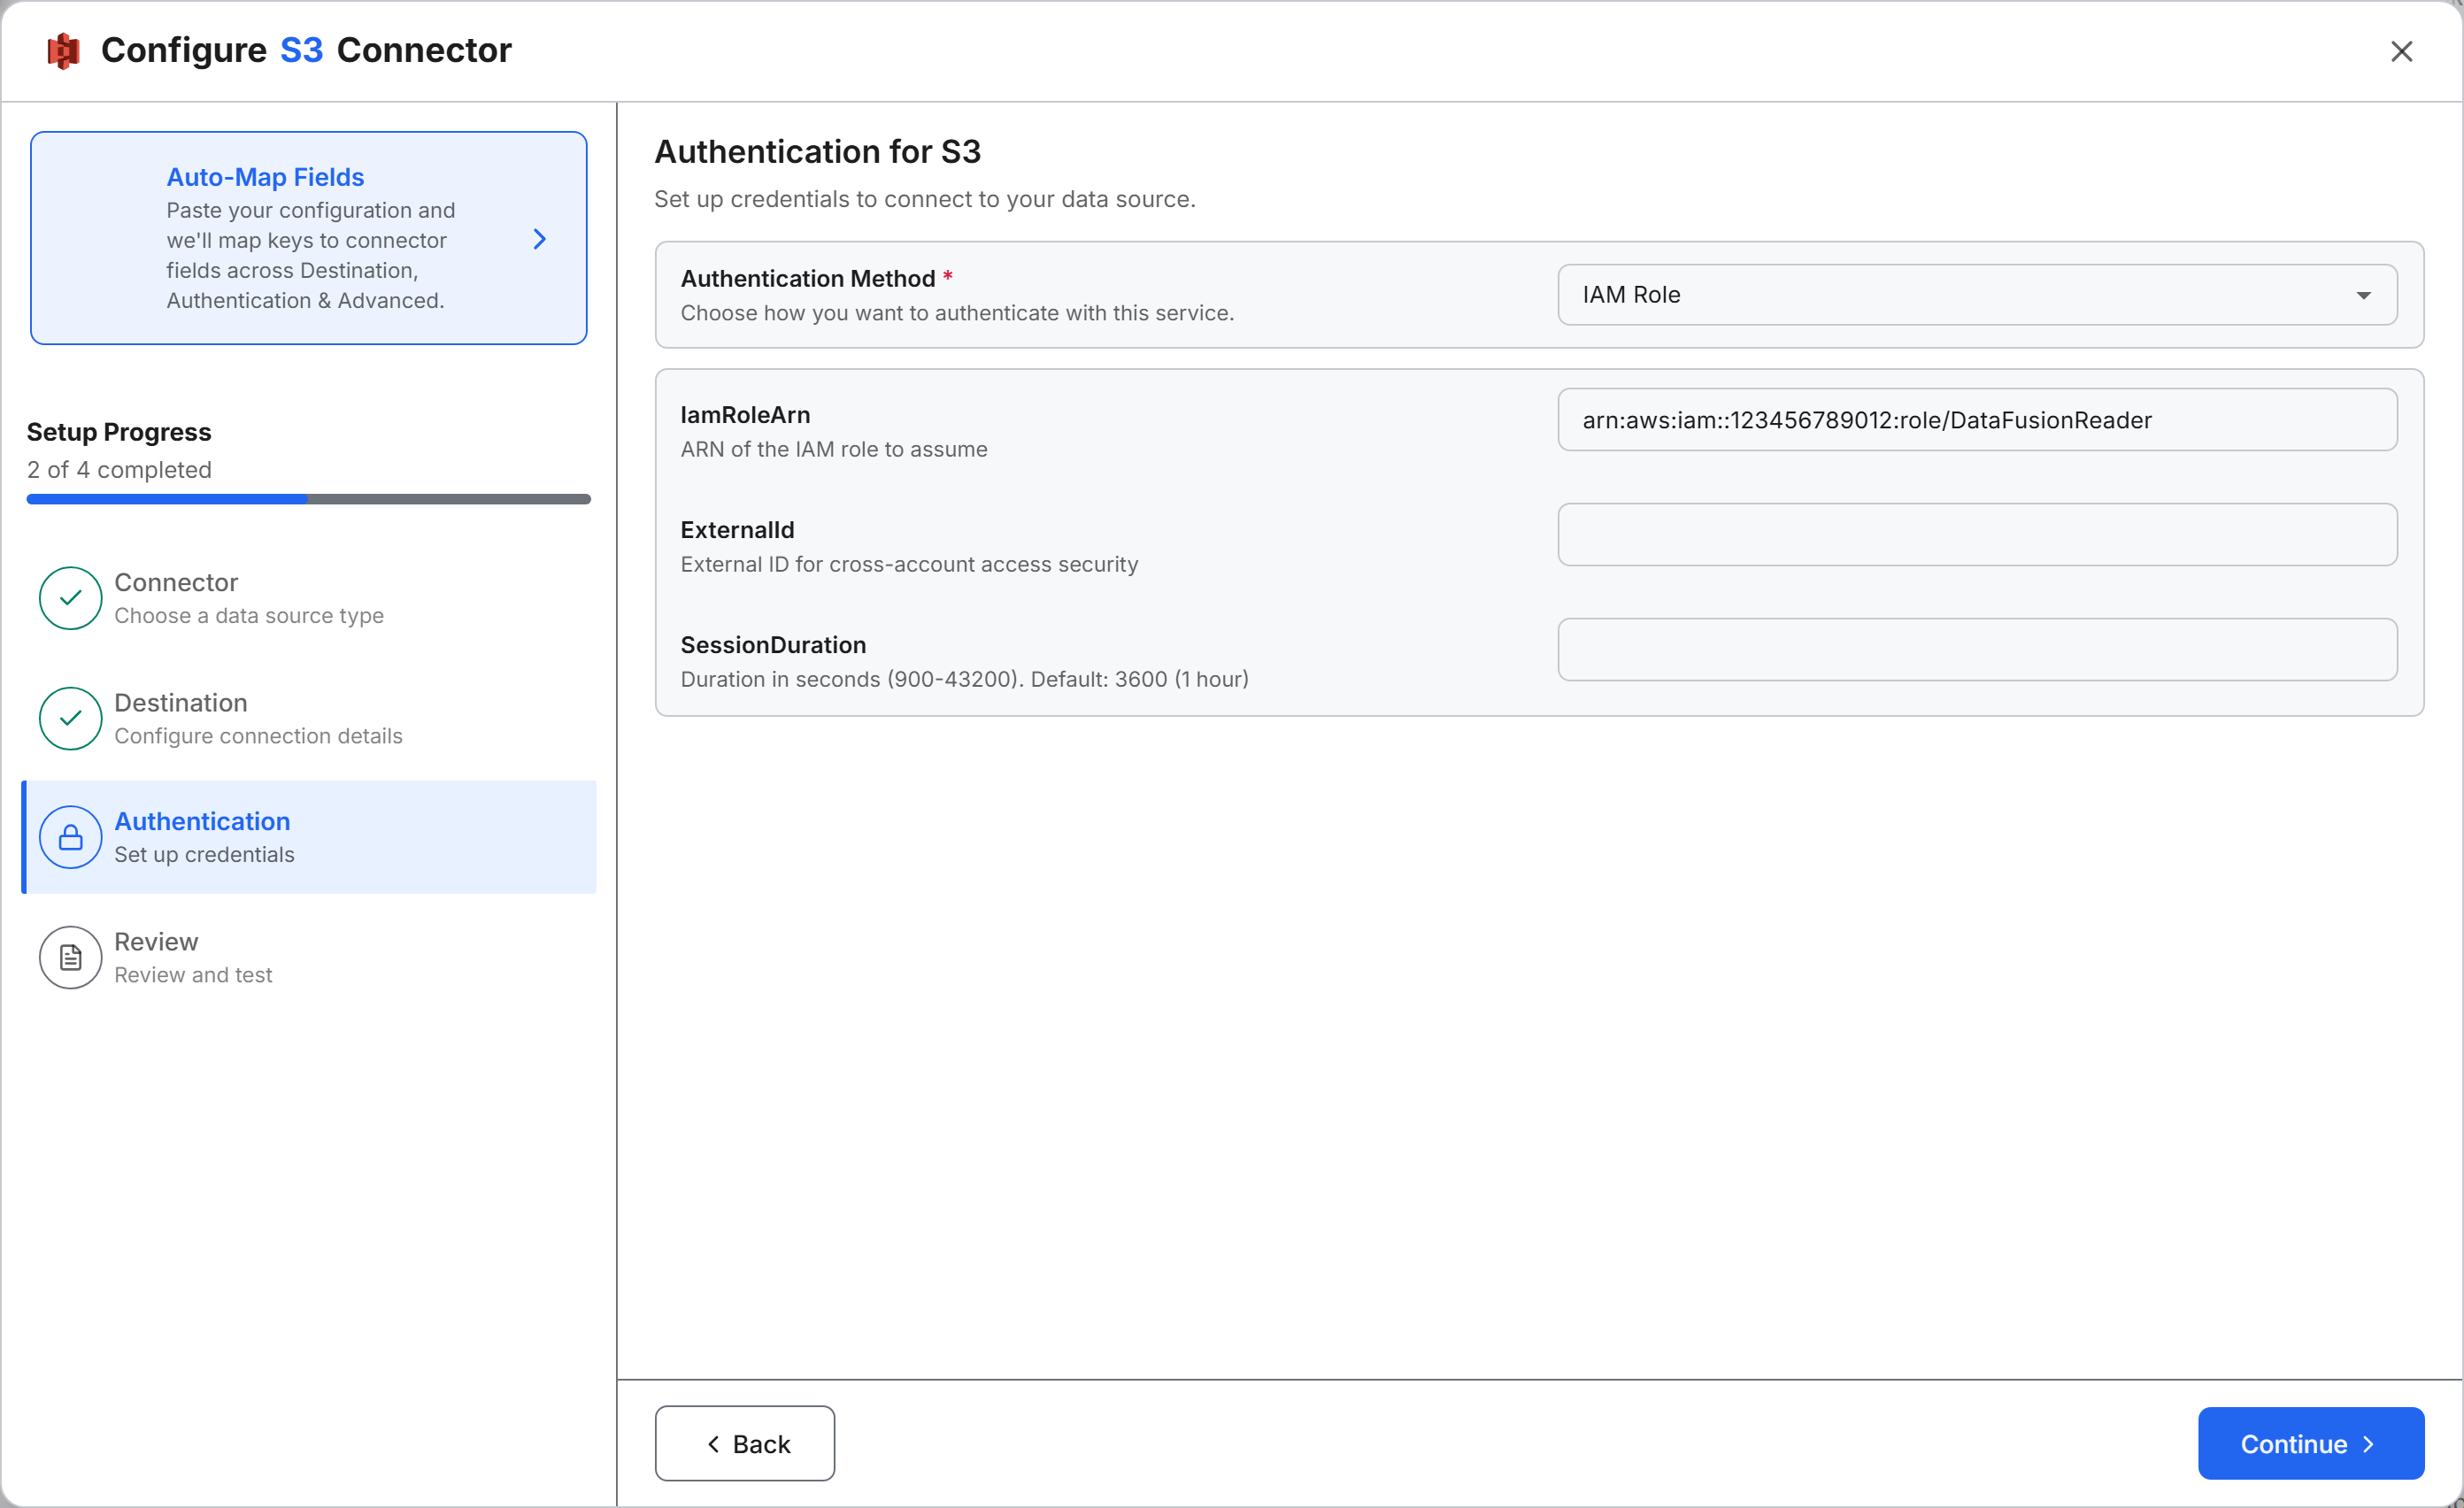
On the Authentication step, select an Authentication Method and enter its fields:
- Access Key: sign in with an AWS access key.
- SecretKey: your AWS secret access key.
- AccessKey: your AWS access key ID.
- IAM Role: assume an AWS IAM role.
- IamRoleArn: the ARN of the IAM role to assume.
- ExternalId and SessionDuration: the wizard shows these fields, but the connection does not apply their values. Leave them blank.
Select Continue.
Save and test the connection (Review)
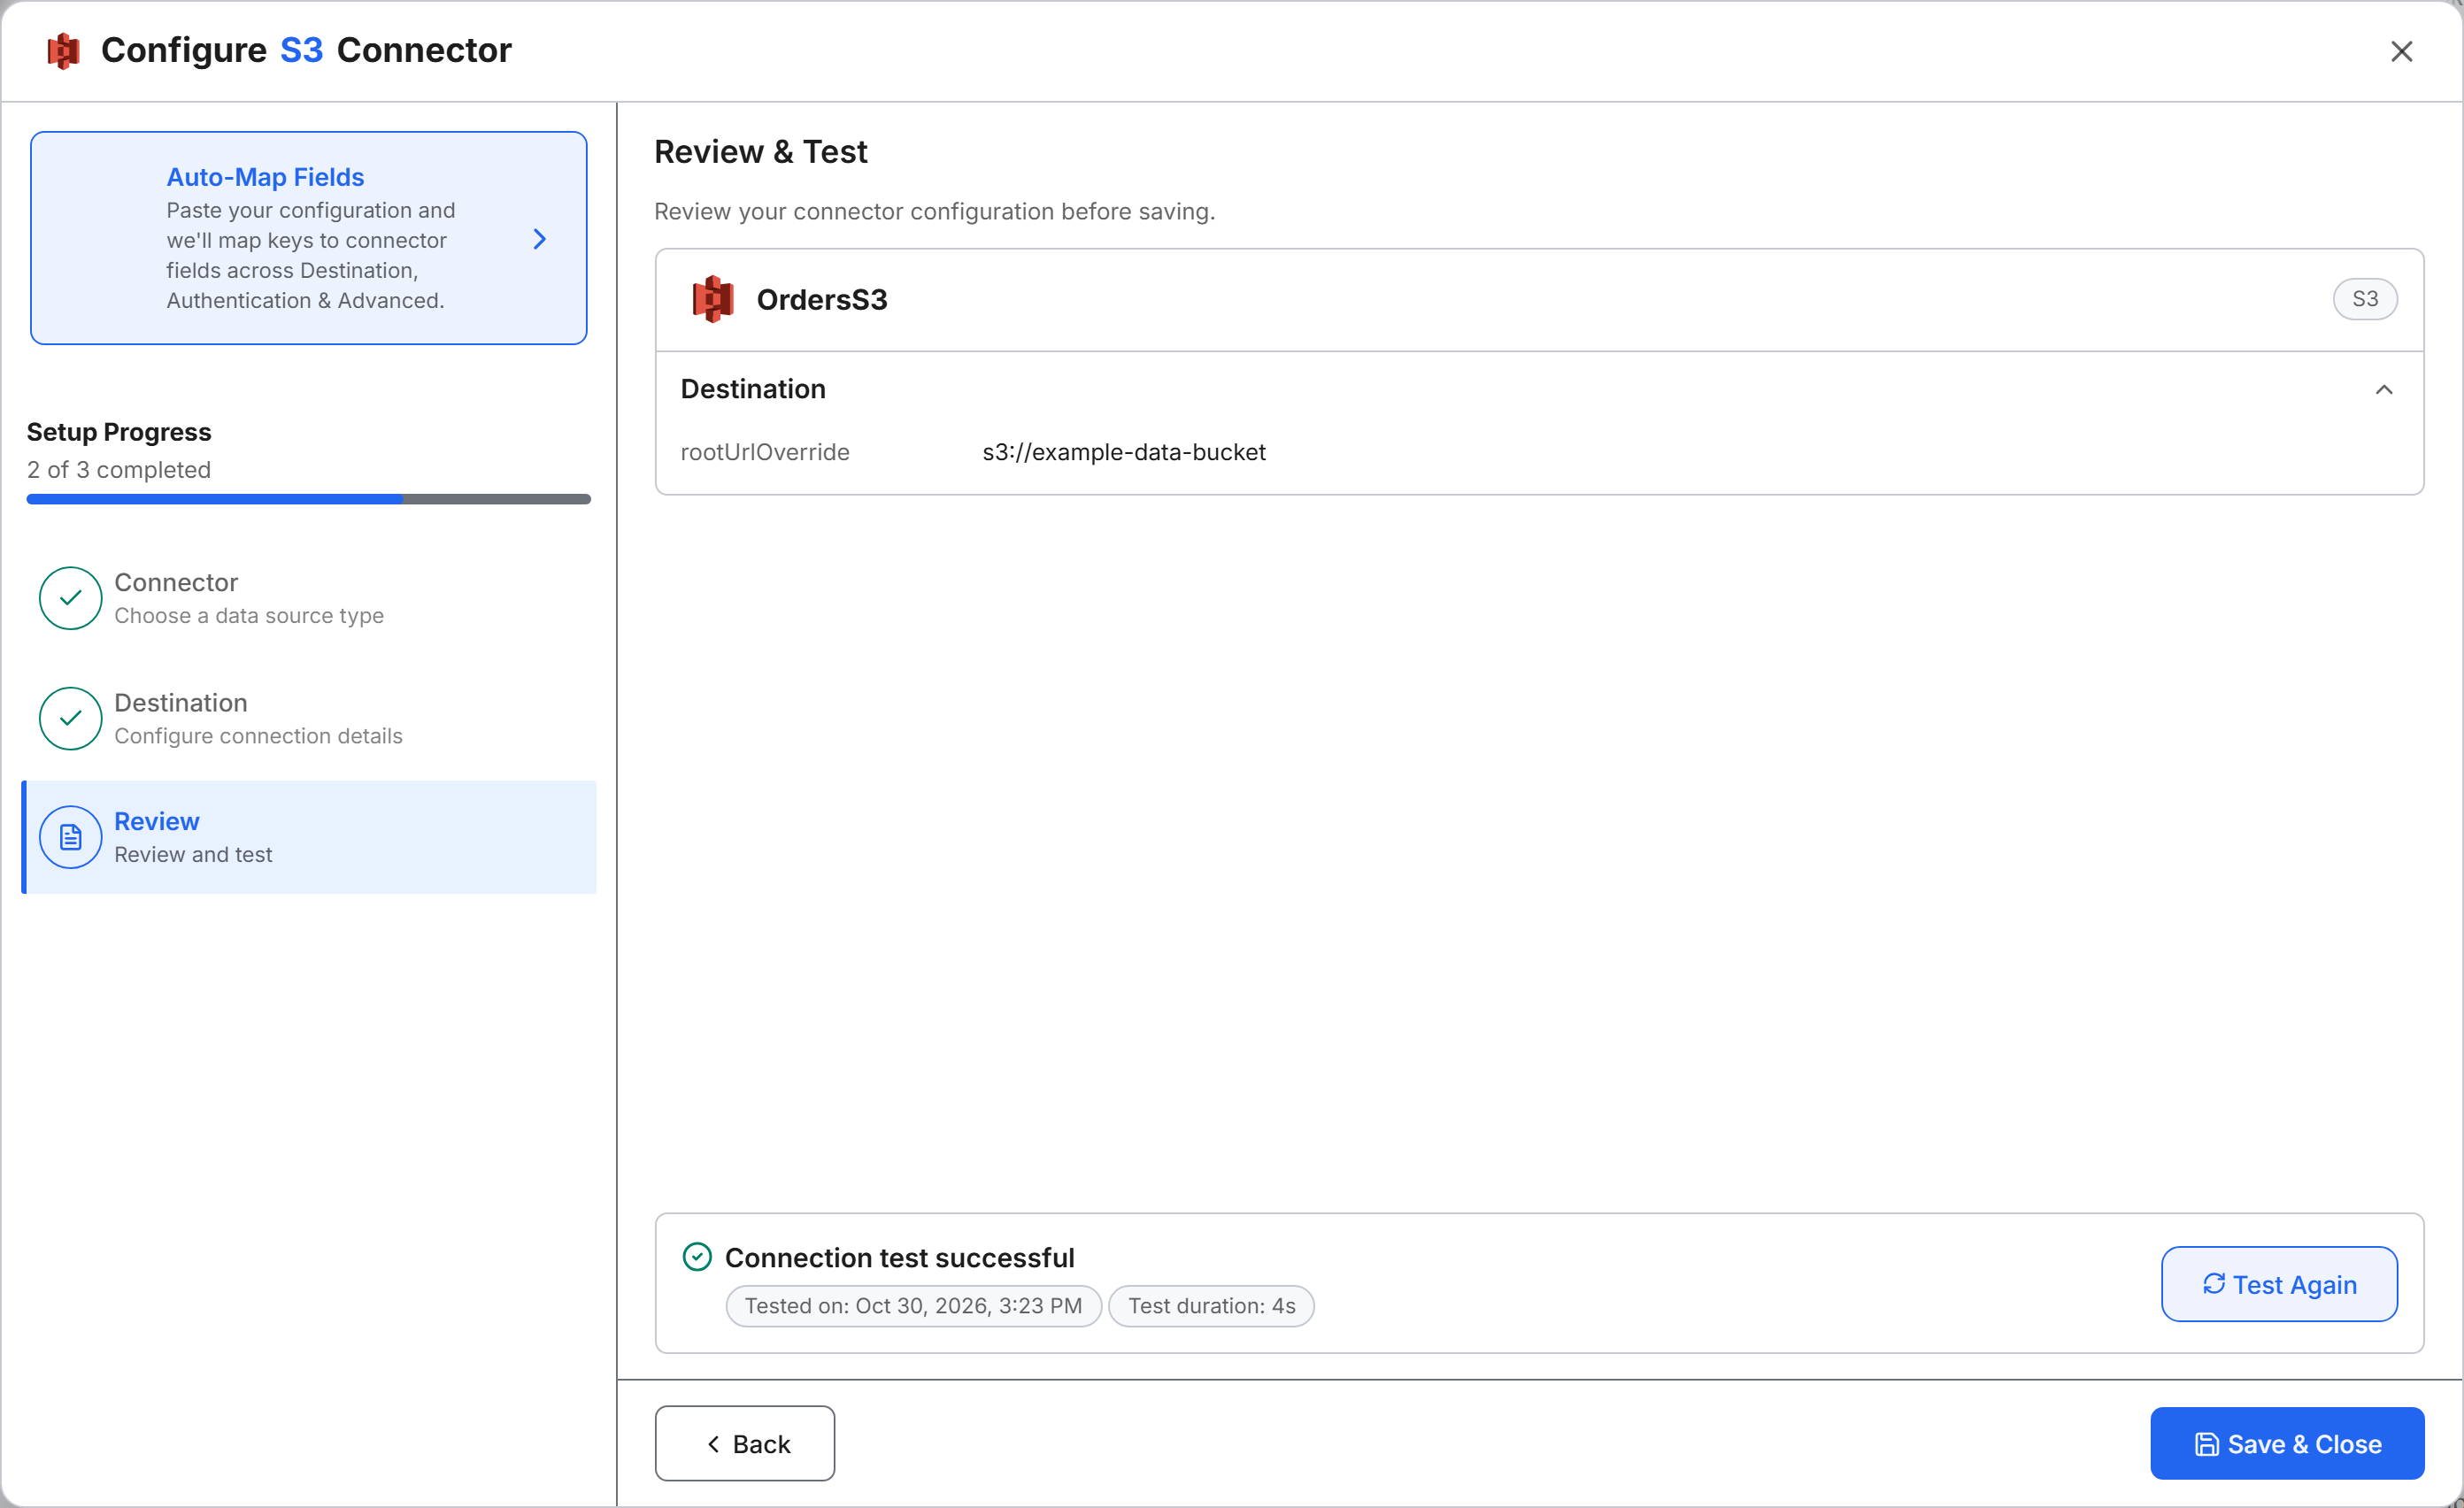
The Review & Test step lists the Destination values and the selected authentication method. Save the connector and test it:
- Check the bucket, shown as
rootUrlOverride. With Add Bucket, also check theregionand the authentication method. - Select Save & Test. Data Fusion saves the connector and its credentials, then tests the connection. The connector stays saved even if the test fails.
- Wait for the result:
- On success, the panel shows "Connection test successful", with the test time and duration.
- On failure, an AI Error Analysis summary describes the likely cause. To fix the error, see "Save & Test fails and AI Error Analysis names the region or the keys" in Troubleshoot S3 connections.
- Select Save & Close.
The message "Successfully added data source" appears with your connector name. The S3 connector appears on the canvas as a File Source System node (FileSourceSystem), with an unconfigured Files node attached to it.
Create the source collection (File Source Collection node)
A source collection (FileSourceCollection) sets the folder that the pipeline reads. The pipeline processes every file under that folder, including files in nested folders.
Open the Set Source File Path dialog
Start the collection from the node attached to your connector:
- On the canvas, select the Files node (subtitle Set file path) attached to the File Source System node.
- In Choose type of source collection, select Structured source collection.
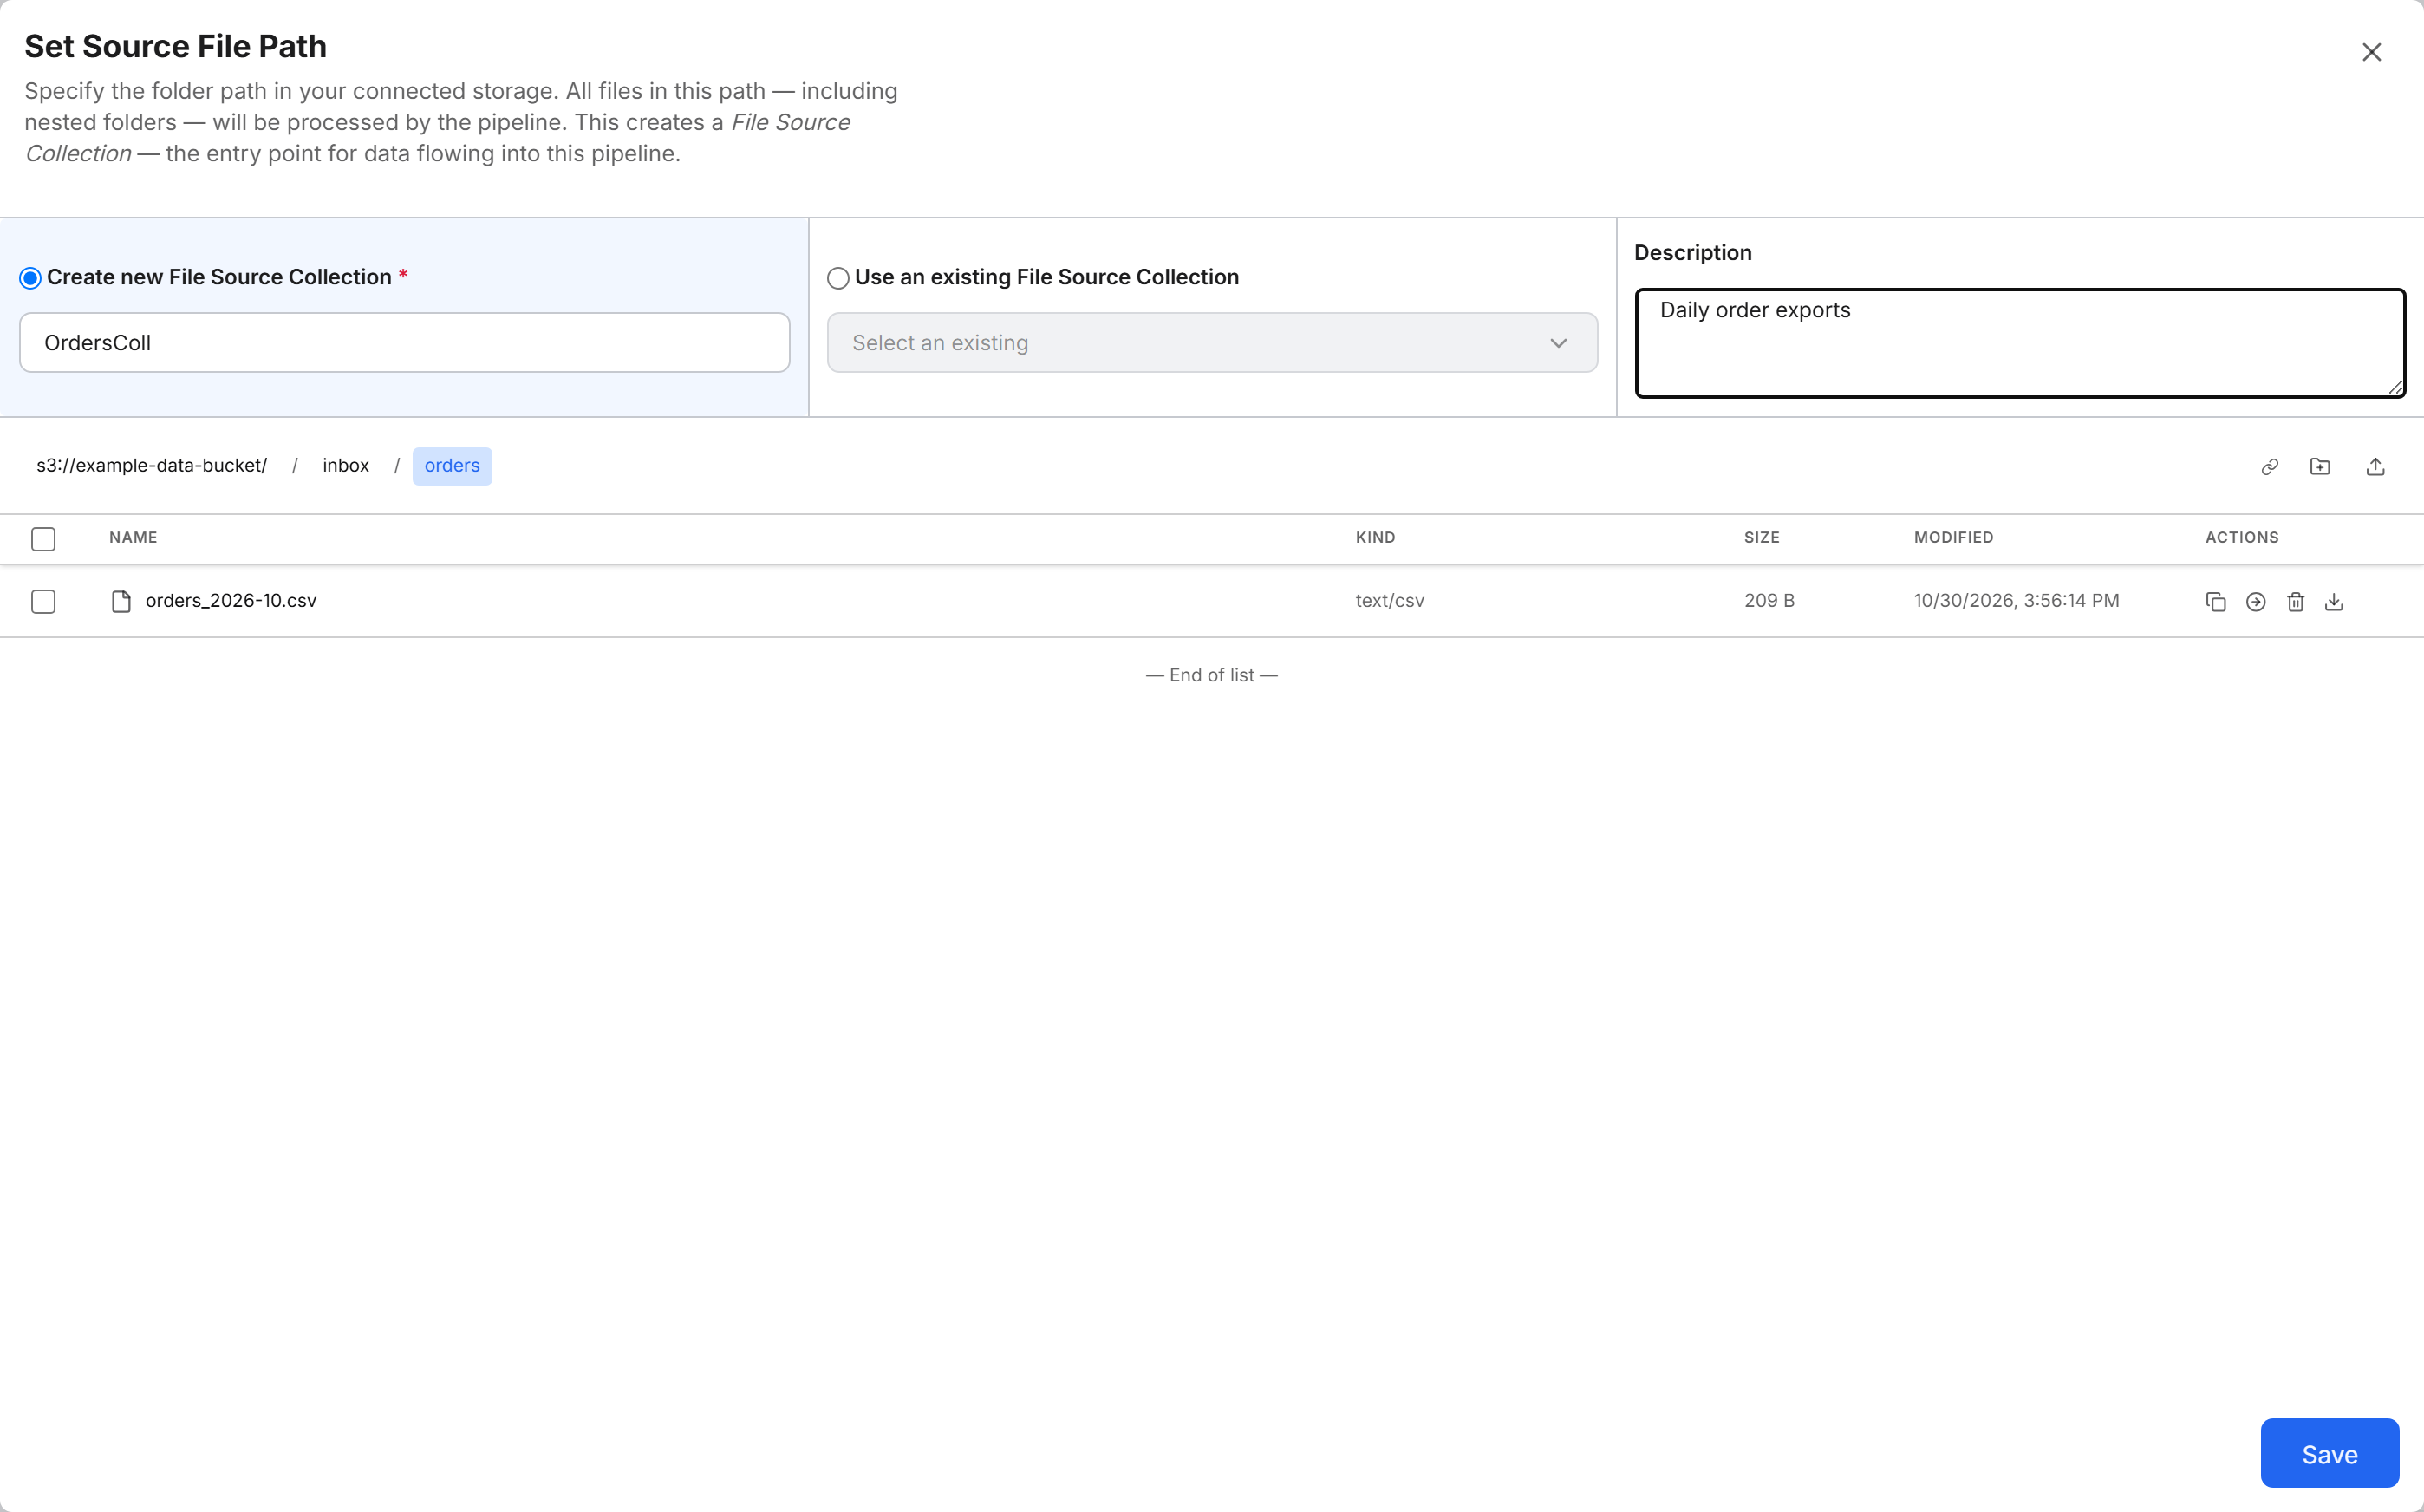
The Set Source File Path dialog opens with a file browser for your bucket.
Name the collection and choose the folder
Name the collection, then browse to the folder that holds your files:
- Select Create new File Source Collection and enter a name, or select Use an existing File Source Collection and choose one from the list.
- (Optional) In Description, enter context for the collection.
- In the file browser, open the folder that holds your CSV files. The browser starts in the
inboxfolder of the bucket. Select a folder name to open it, and select a segment of the path at the top of the browser to go back up. - Select Save.
The collection covers the folder that is open when you select Save. The message "Successfully created the source collection" appears with your collection name. The File Source Collection node appears on the canvas, connected to the File Source System node.
The file browser also lets you manage files in the bucket:
- The toolbar has buttons to copy the current path, create a folder (Create directory), and upload files (Upload files). In the Upload files dialog, select or drop the files, then select Start Upload.
- Each file row has actions to copy, move, delete, or download the file. Selecting files in the browser does not change which files the pipeline processes.
The file browser works on the bucket itself. Creating folders, uploading files, and deleting files change the contents of your S3 bucket.
Define the source schema (Source node)
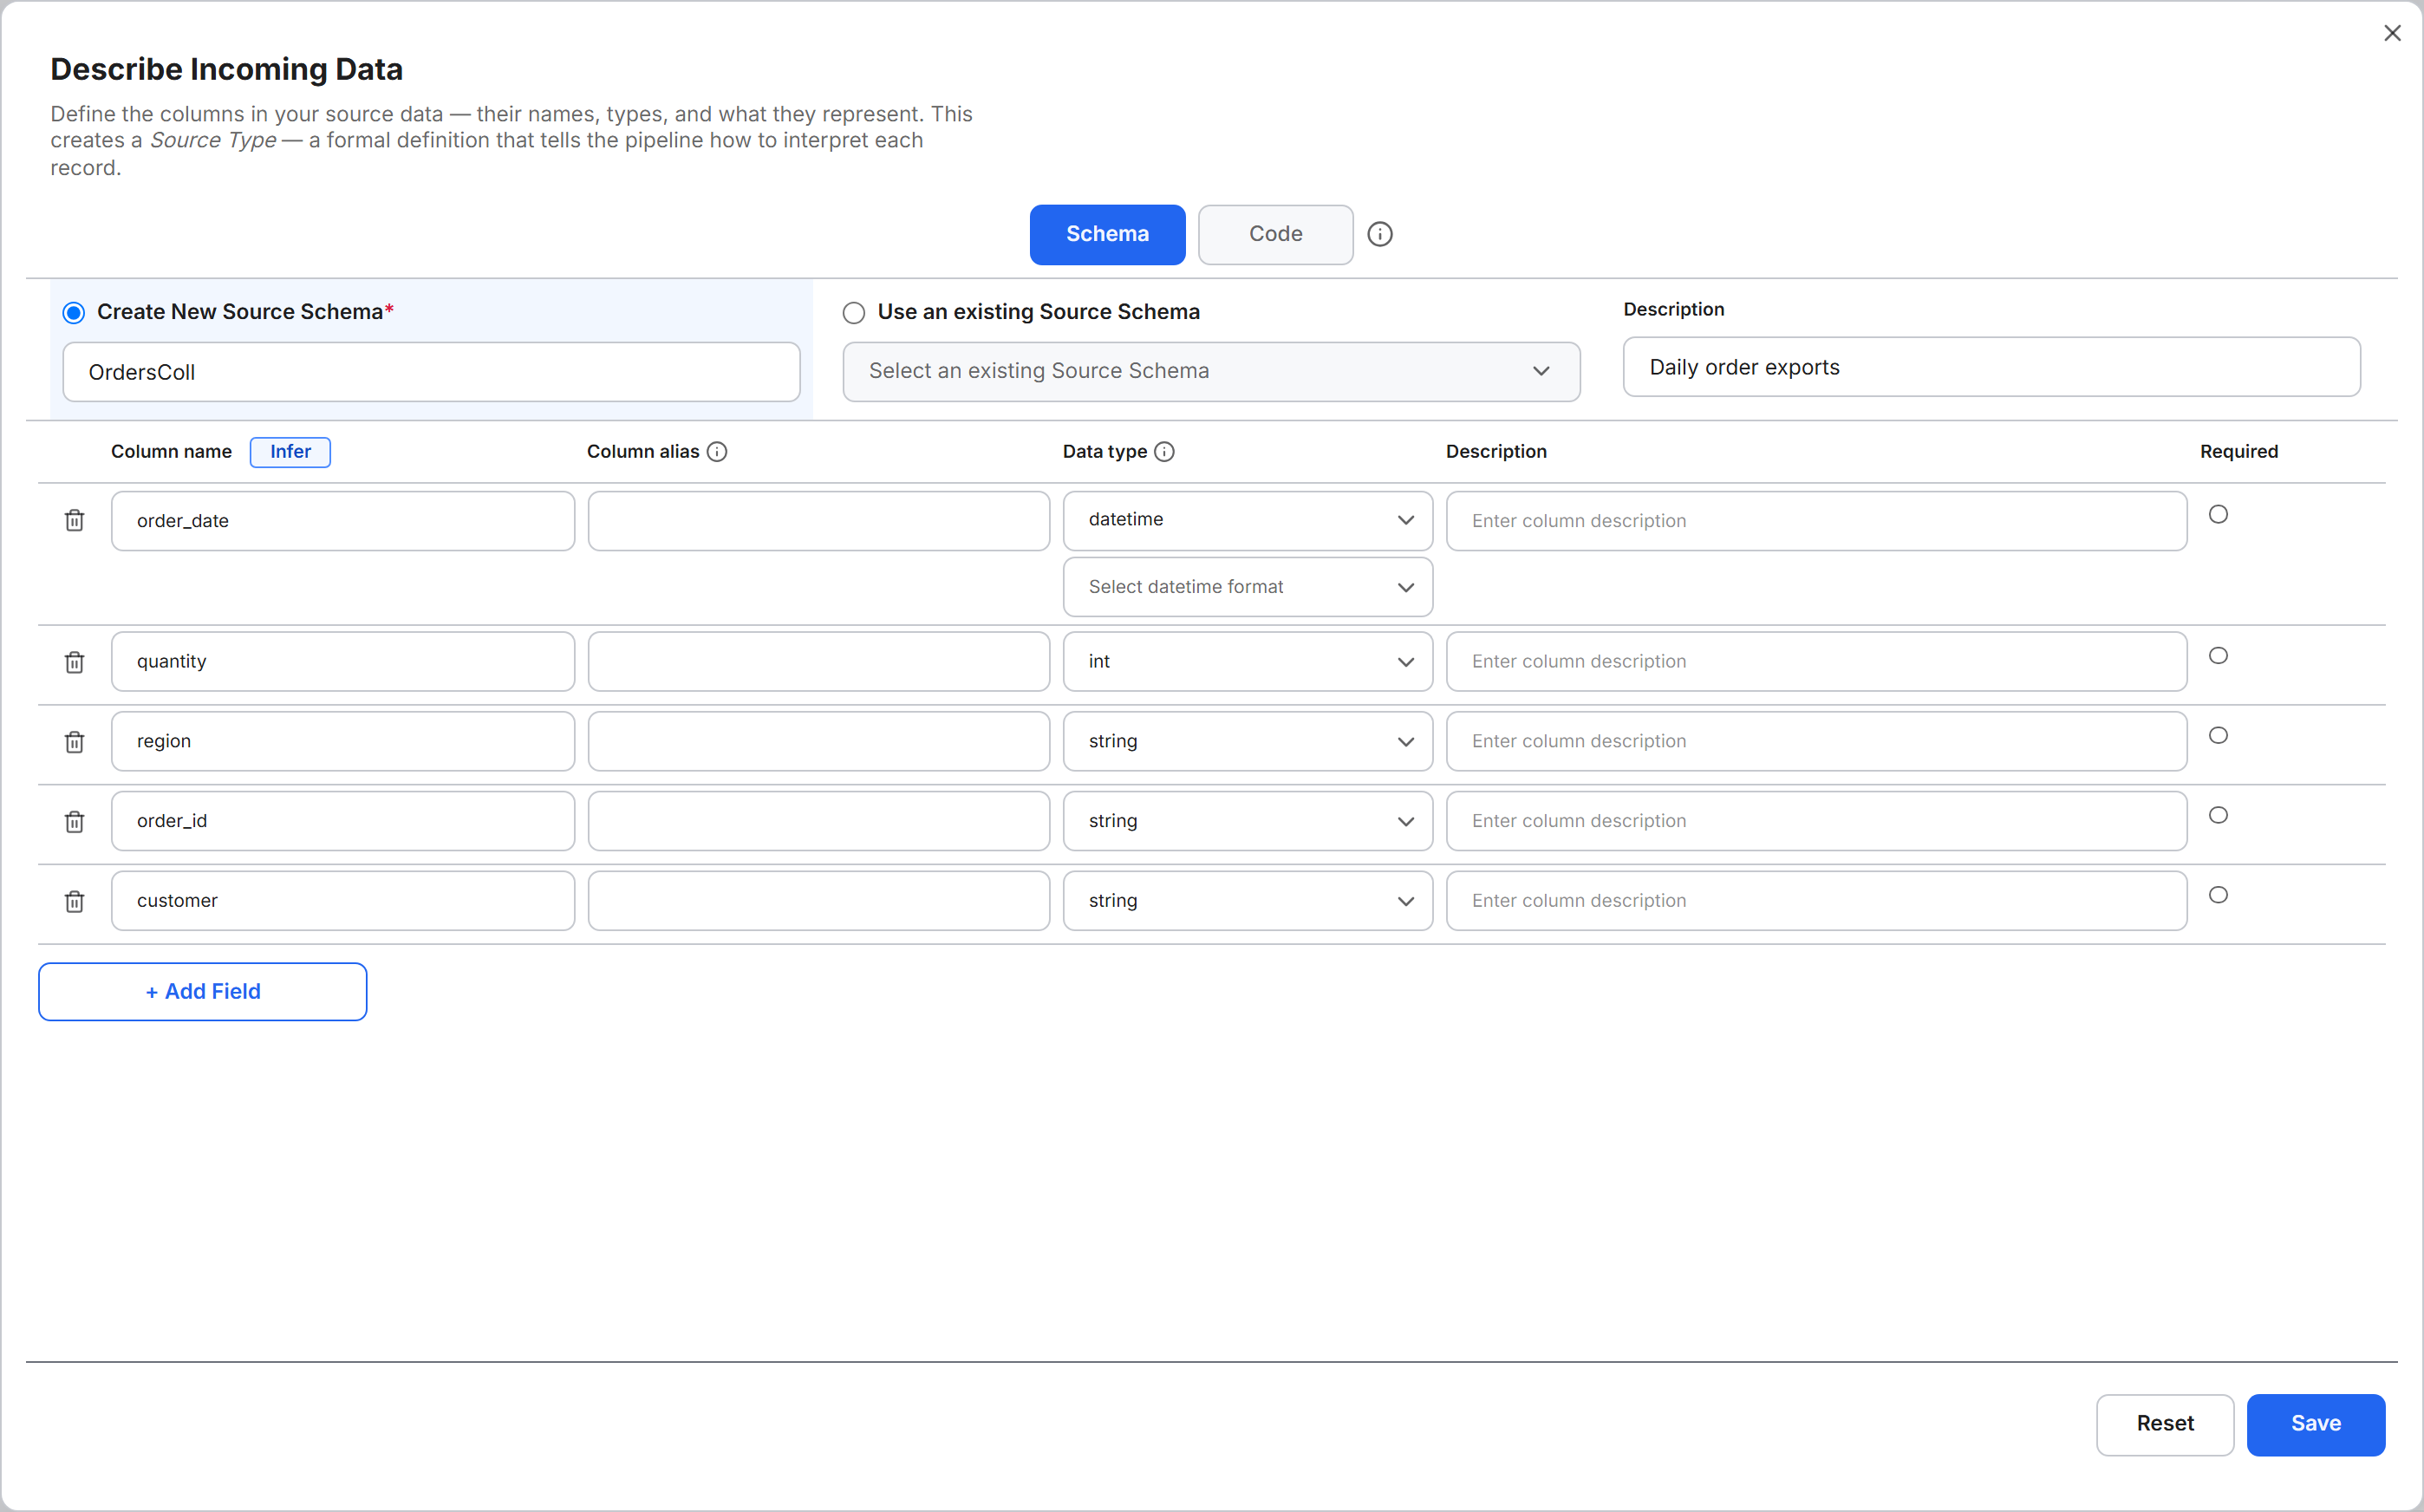
The source schema describes one record in your files: its column names and data types. Saving the source schema creates the Source Type, which the transform uses to map each column to a field in the target entity Type.
- On the canvas, select the Source node (subtitle Describe data) attached to the File Source Collection node.
- In the Describe Incoming Data dialog, choose a schema:
- Create New Source Schema: keep the suggested name, which is the collection name, or enter another.
- Use an existing Source Schema: select a schema from the list.
- Review the columns. The dialog fills in the columns from a sample of your files; select Infer to detect them again. Each row has a Column name, a Column alias, a Data type, a Description, and a Required setting. Column alias is the column's name as it appears in your files, when it differs from Column name, for example a header with spaces. Data Fusion fills in Column alias when it infers the schema. Leave Column alias blank when the names match.
- Check the Data type of each column and change any that do not match your data. For correct datetime and boolean detection, use ISO 8601 format for datetime values and
TrueorFalsefor boolean values. Adatetimecolumn also shows a Select datetime format list. Leave the list empty for ISO 8601 values. - (Optional) Select + Add Field to add a column, or select the trash icon on a row to remove one.
- (Optional) Select the Code tab to view or edit the schema as code (its C3 Type definition). Your changes carry over when you switch between the Schema and Code tabs.
- Select Save.
The message "Successfully created the type" appears, and the node becomes a Source Type node.
Map fields to a target entity Type (Transform node)
A transform maps each source field to a field of the target entity Type. A transform can also clean, rename, or convert values. In this step you choose the transform type, create the target entity Type, and map the fields.
Choose Projection or Transformer
Open the transform from the canvas:
- On the canvas, select the Transform node (subtitle Map fields) attached to the Source Type node.
- In Choose a Transform Type, select a type:
- Projection: map fields in a grid, one expression per target field. Use Projection to map, rename, or convert fields without writing code.
- Transformer: write the transform as code. Use Transformer for multi-step logic, custom functions, or output that differs from the input.
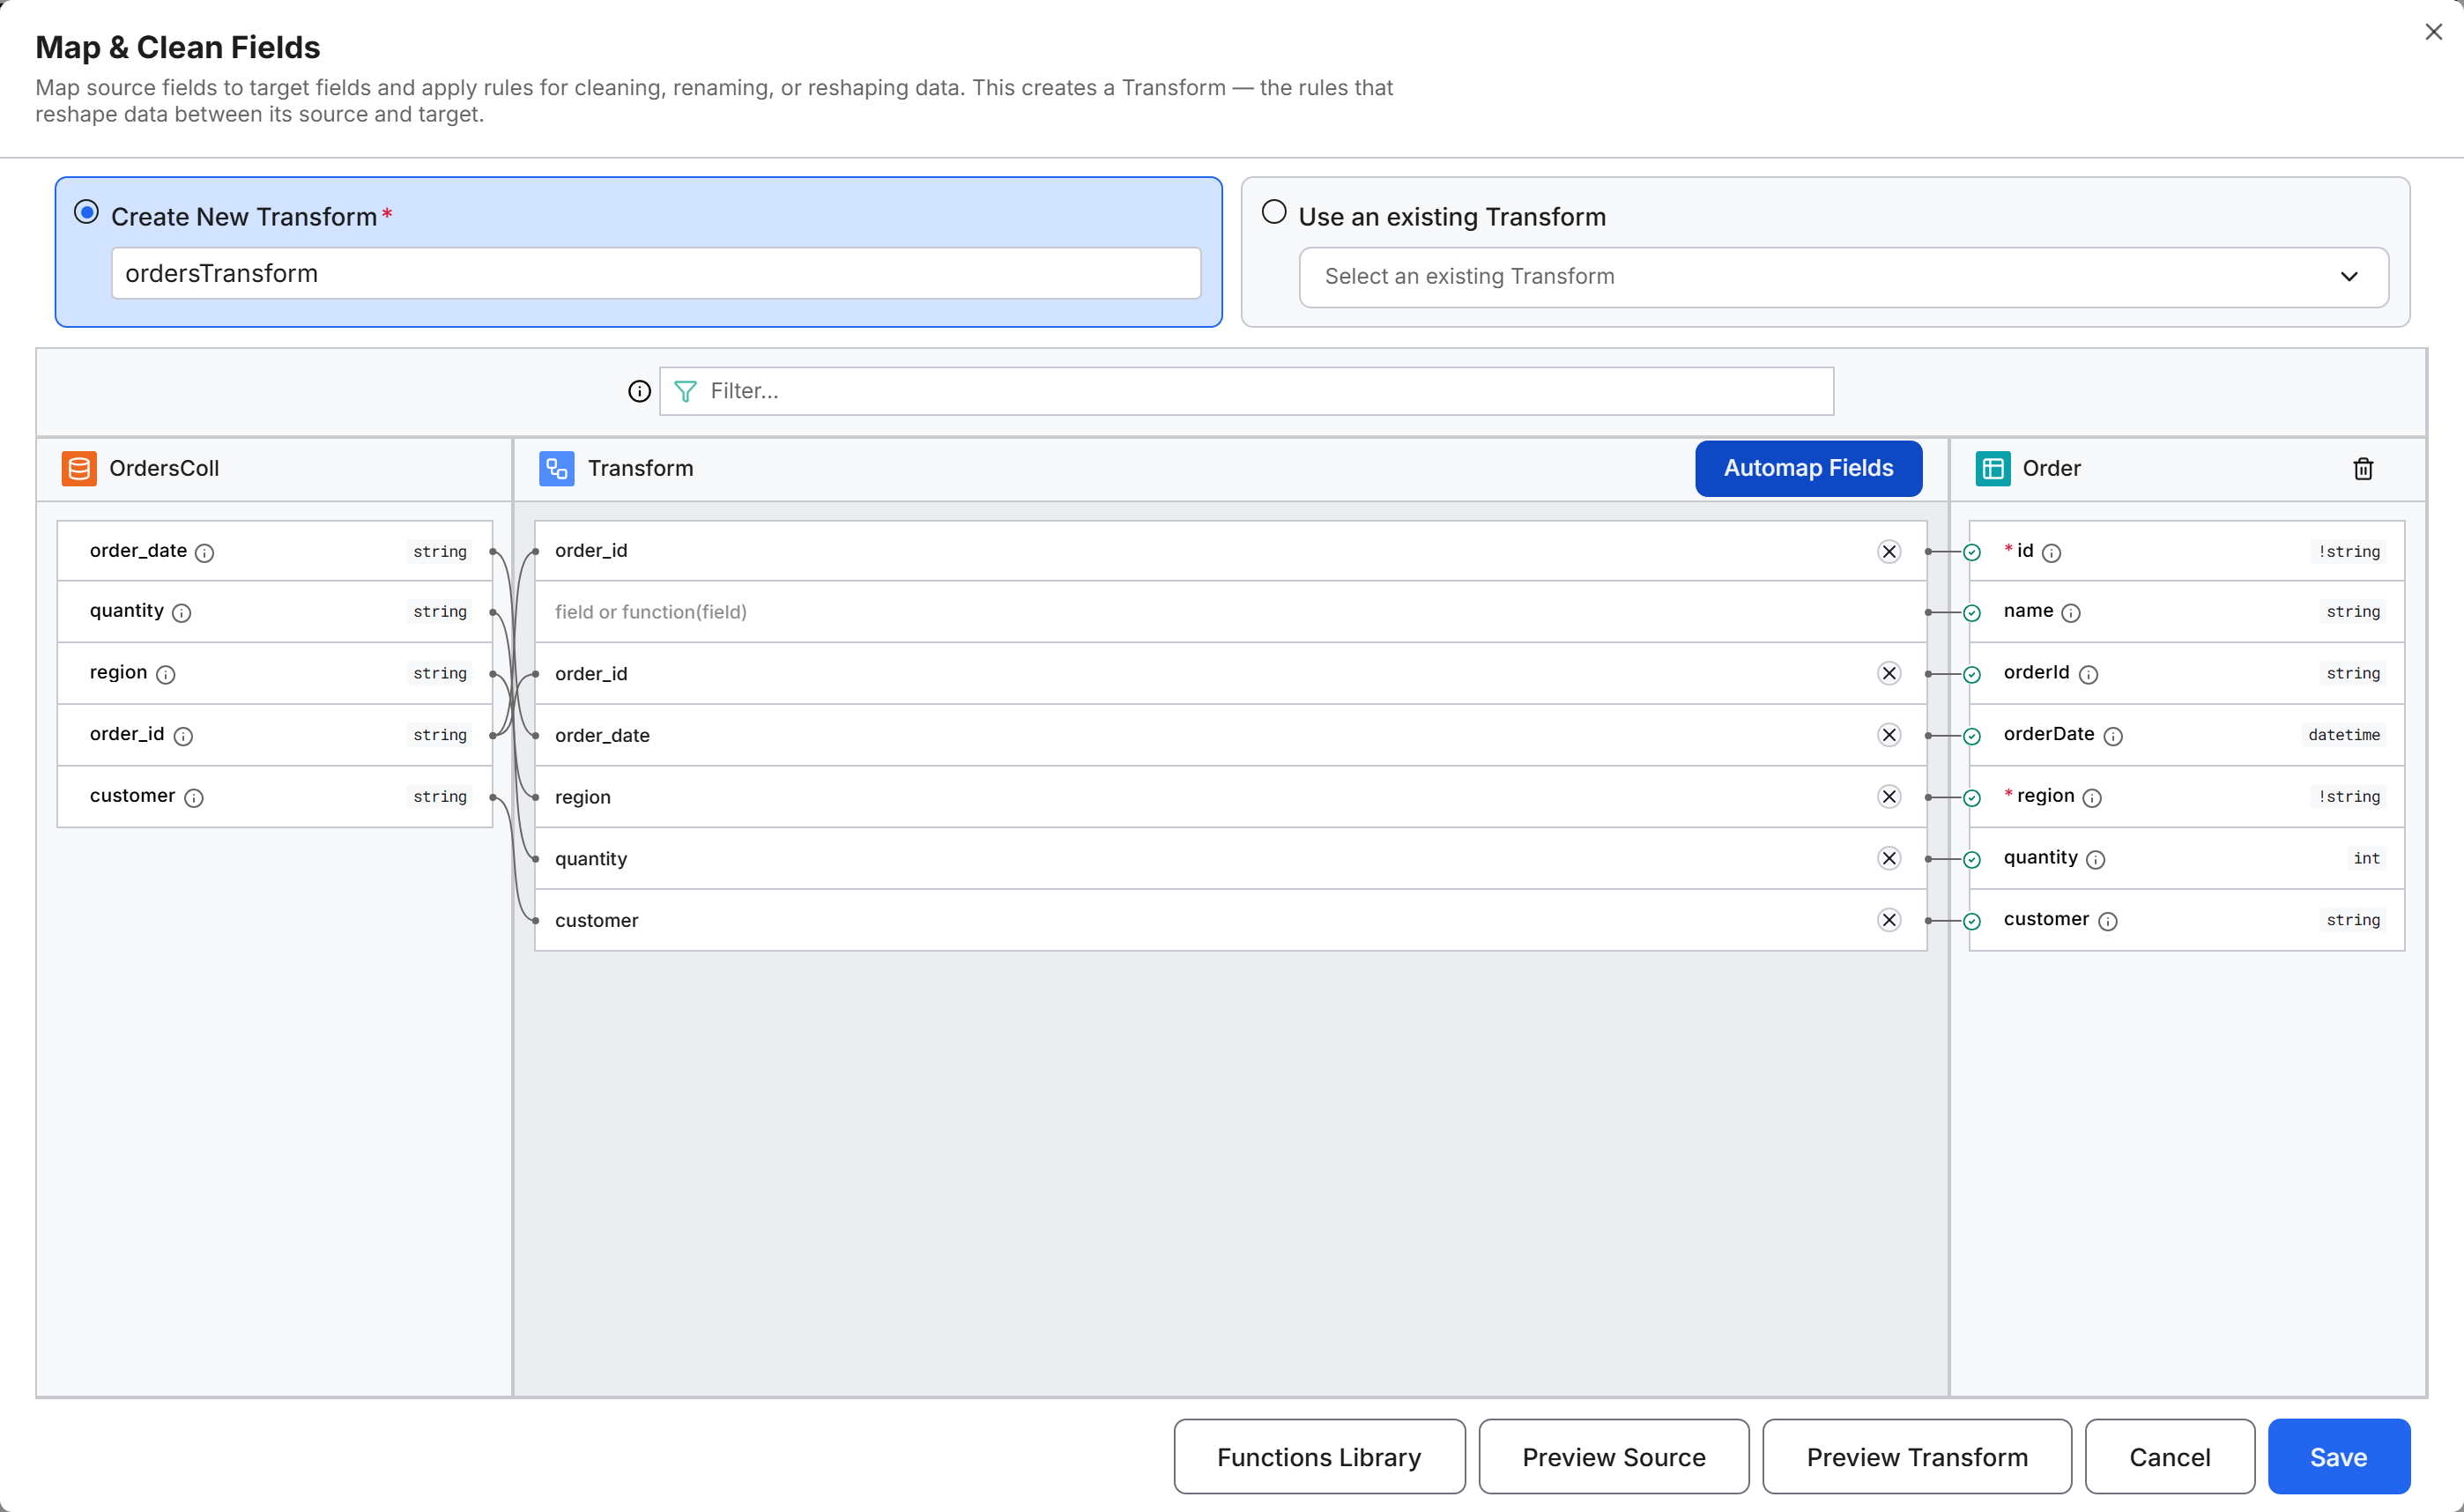
The remaining steps use Projection. When you select Projection, the Map & Clean Fields dialog opens. The dialog shows three panes: the source fields with their data types, the Transform expressions, and the target pane with the target fields.
Create the target entity Type (Entity Type node)
The target entity Type stores the records that the pipeline loads. Create new target also offers Canonical, a shared model for data that arrives from several sources. This page writes straight to an entity Type. To combine sources first, see Combine Multiple Sources with a Canonical via UI.
Select an existing entity Type, or create it from the Map & Clean Fields dialog:
- In Map & Clean Fields, select Create New Transform and enter a name, or select Use an existing Transform.
- In the target pane, under Select target for transform, select an existing entity Type, or select Create new target and then Entity.
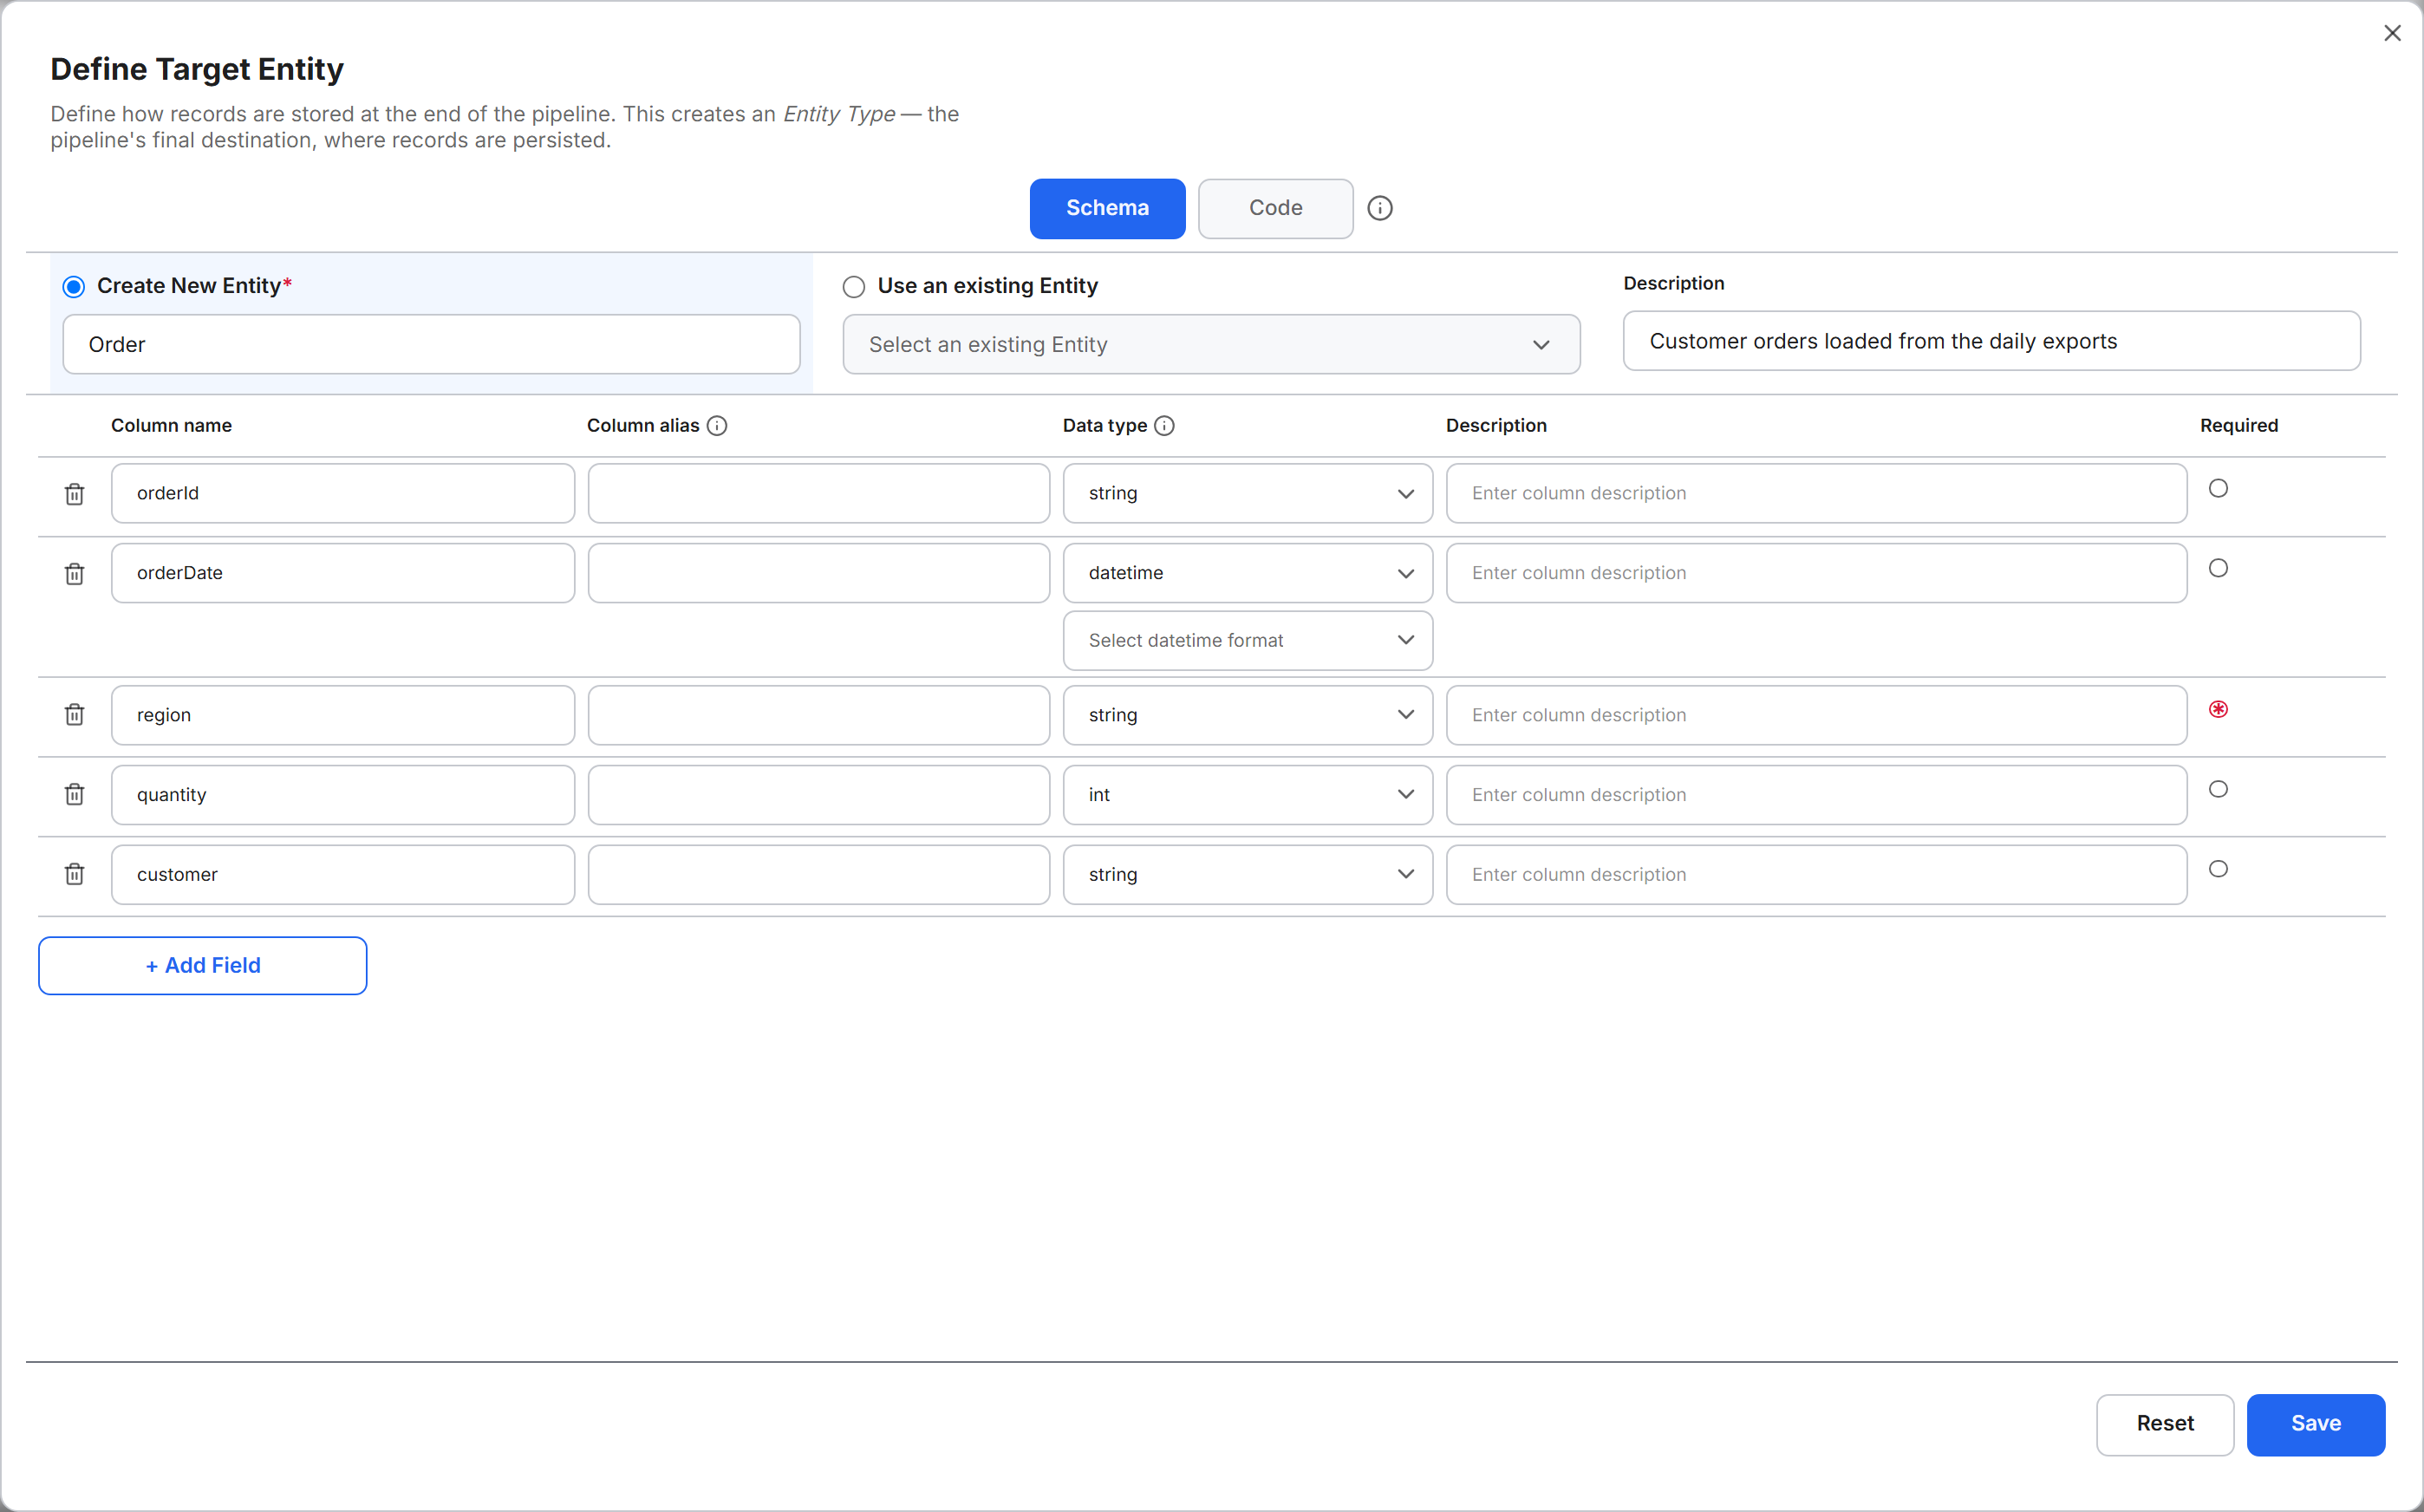
- In the Define Target Entity dialog, select Create New Entity and enter a name, or select Use an existing Entity.
- (Optional) Enter a Description.
- Add a row for each field to store, with a Column name, Column alias, Data type, Description, and Required setting. Column alias is optional: an alternative name for the field, used when records are exported. Leave Column alias blank in most cases. Select + Add Field to add a row, or the trash icon to remove one.
- (Optional) Select the Code tab to view or edit the entity Type as code (its C3 Type definition).
- Select Save. To discard unsaved changes instead, select Reset.
The message "Successfully created the type" appears. The new entity Type becomes the target in Map & Clean Fields, and an Entity Type node appears on the canvas.
Map and clean the fields
Map each target field to a source field or an expression. Every required target field needs an expression; the type of a required field starts with !, for example !string.
- For each target field, enter an expression in its row of the Transform pane. Enter a source field name to copy the value, or wrap it in a function to change it. Select the Clear transform button on a row to clear its expression.
- (Optional) Select Automap Fields. Data Fusion uses generative AI to suggest an expression for each target field, based on the source and target definitions. Review each suggestion before you save.
- (Optional) Use these tools:
- Filter: narrow the field list in a wide schema.
- Functions Library: open the Expression Function Library panel, a searchable list of the functions you can use in expressions.
- Preview Source: view a sample of the incoming records.
- Preview Transform: view the result of the current expressions. To preview the result for one file, choose it in File.
- Check that every required target field has an expression. Preview Transform and Save do not check for missing expressions; a required field with no expression fails only when the pipeline loads the records.
- Select Save.
For transforms written as code, see the examples in Combine Multiple Sources with a Canonical via UI and Integrate Data Programmatically.
Run the pipeline (File Source Collection node)
You run the pipeline from the File Source Collection node. First set how Data Fusion processes the collection, then start a run.
Set the integration schedule
Each source collection runs either on demand or on a schedule. These steps run the pipeline on demand:
- On the File Source Collection node, select the Open menu button (the three-dot icon). The menu lists Sync source files, Edit properties, View run status, Unlink, and Delete.
- Select Edit properties. The Edit Properties dialog opens, titled with the collection name.
- On the Integration Schedule tab, check that Manual is selected, so that the pipeline runs only when you start a run. To process new files on a recurring schedule instead, choose On Schedule.
- If you changed the setting, select Save. Otherwise, select Cancel.
The other tabs, such as CSV Configuration and Error Handling, keep their default values for this pipeline.
Start a run
Start the run from the same node:
- On the File Source Collection node, select the Execute pipeline button (the play icon). The Configure Runtime Parameters dialog opens, titled with the location of the collection folder.
- On the Basic tab, select All files to process every file in the collection, or Select files to choose files from the grid.
- If the grid shows no files, select Sync Source Collection to list the files in the folder.
- (Optional) To process every file again, including files that already show
Processed, turn on Reset Run State. Then choose what happens to the records that earlier runs loaded:- Keep existing processed data: the default. The run keeps the records already loaded.
- Clear existing processed data: deletes all records in the target entity Types you leave checked under Affected targets, including records that came from other sources. All connected targets are checked by default.
- Select Execute.
Reset Run State clears the source queue and the run status of every collection in the application, not only this collection. Clear existing processed data is available in every environment, including production.
A banner reads "Pipeline execution started", with a View run status link.
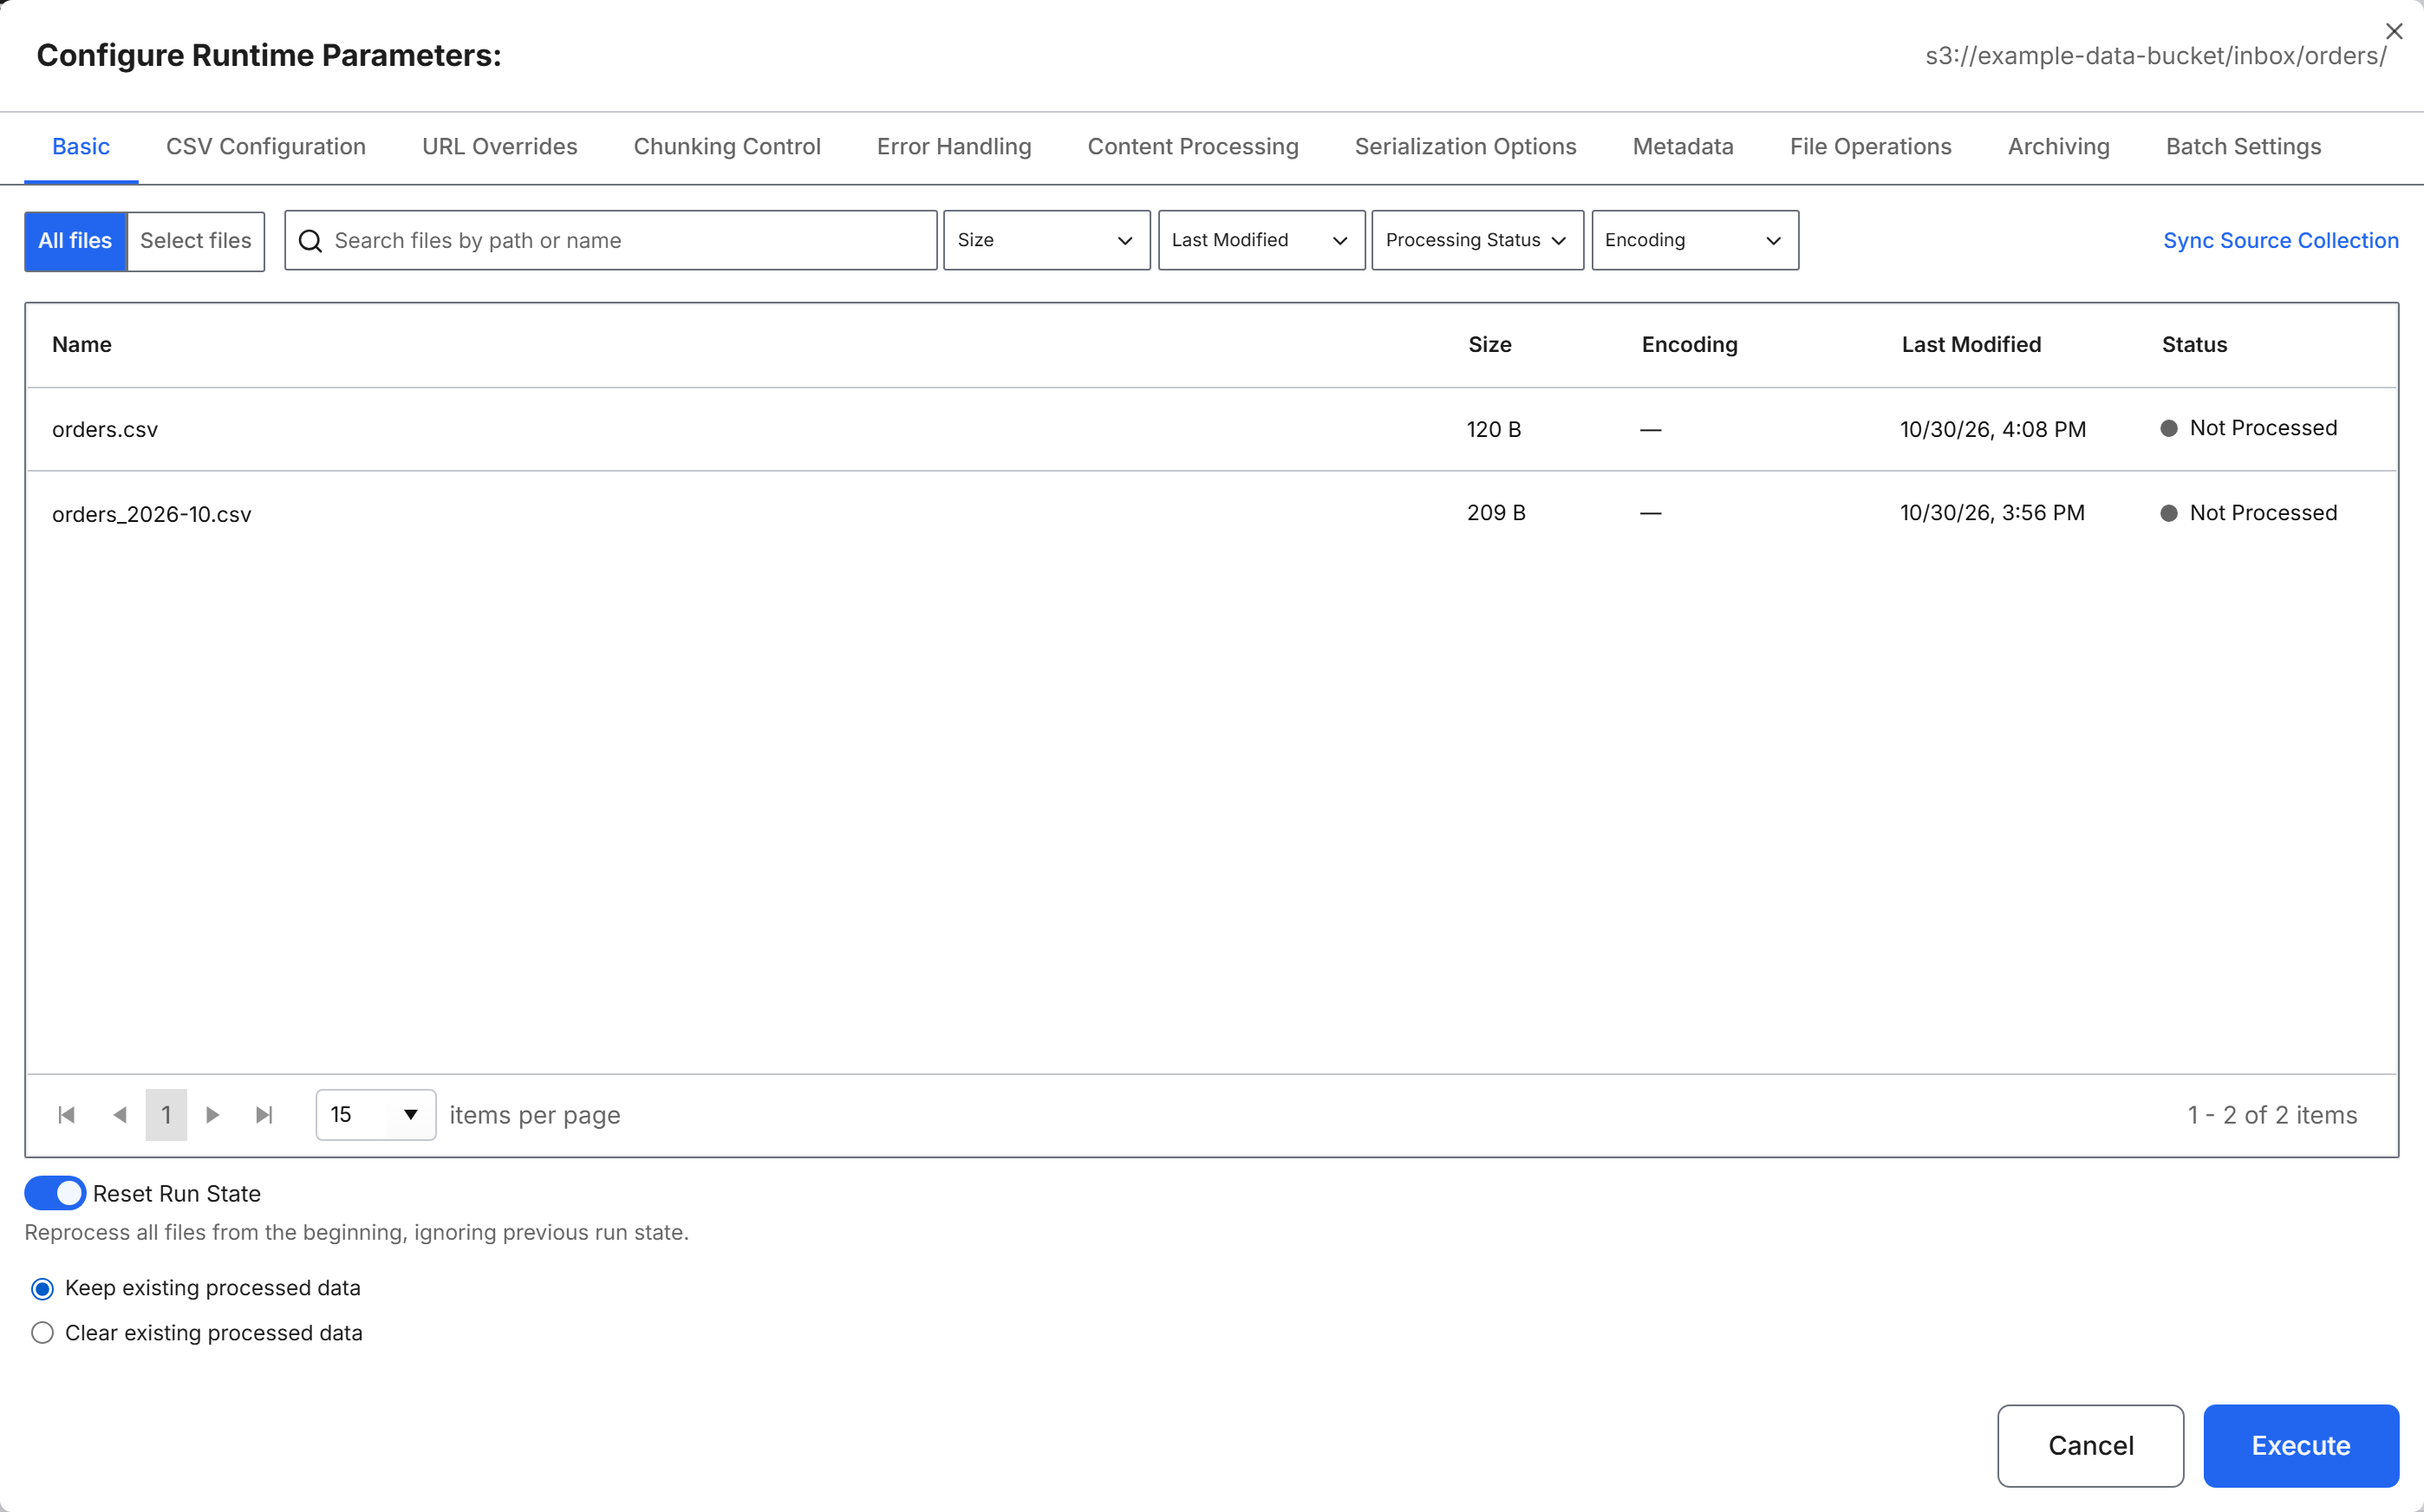
The other tabs of Configure Runtime Parameters, such as CSV Configuration, Chunking Control, and Error Handling, hold the collection settings described in Configure a Source Collection.
Check the run and view the loaded data
Check that each file loaded, then view the records in the target entity Type:
- On the File Source Collection node, select Execute pipeline again to reopen Configure Runtime Parameters. The Status column shows each file's state:
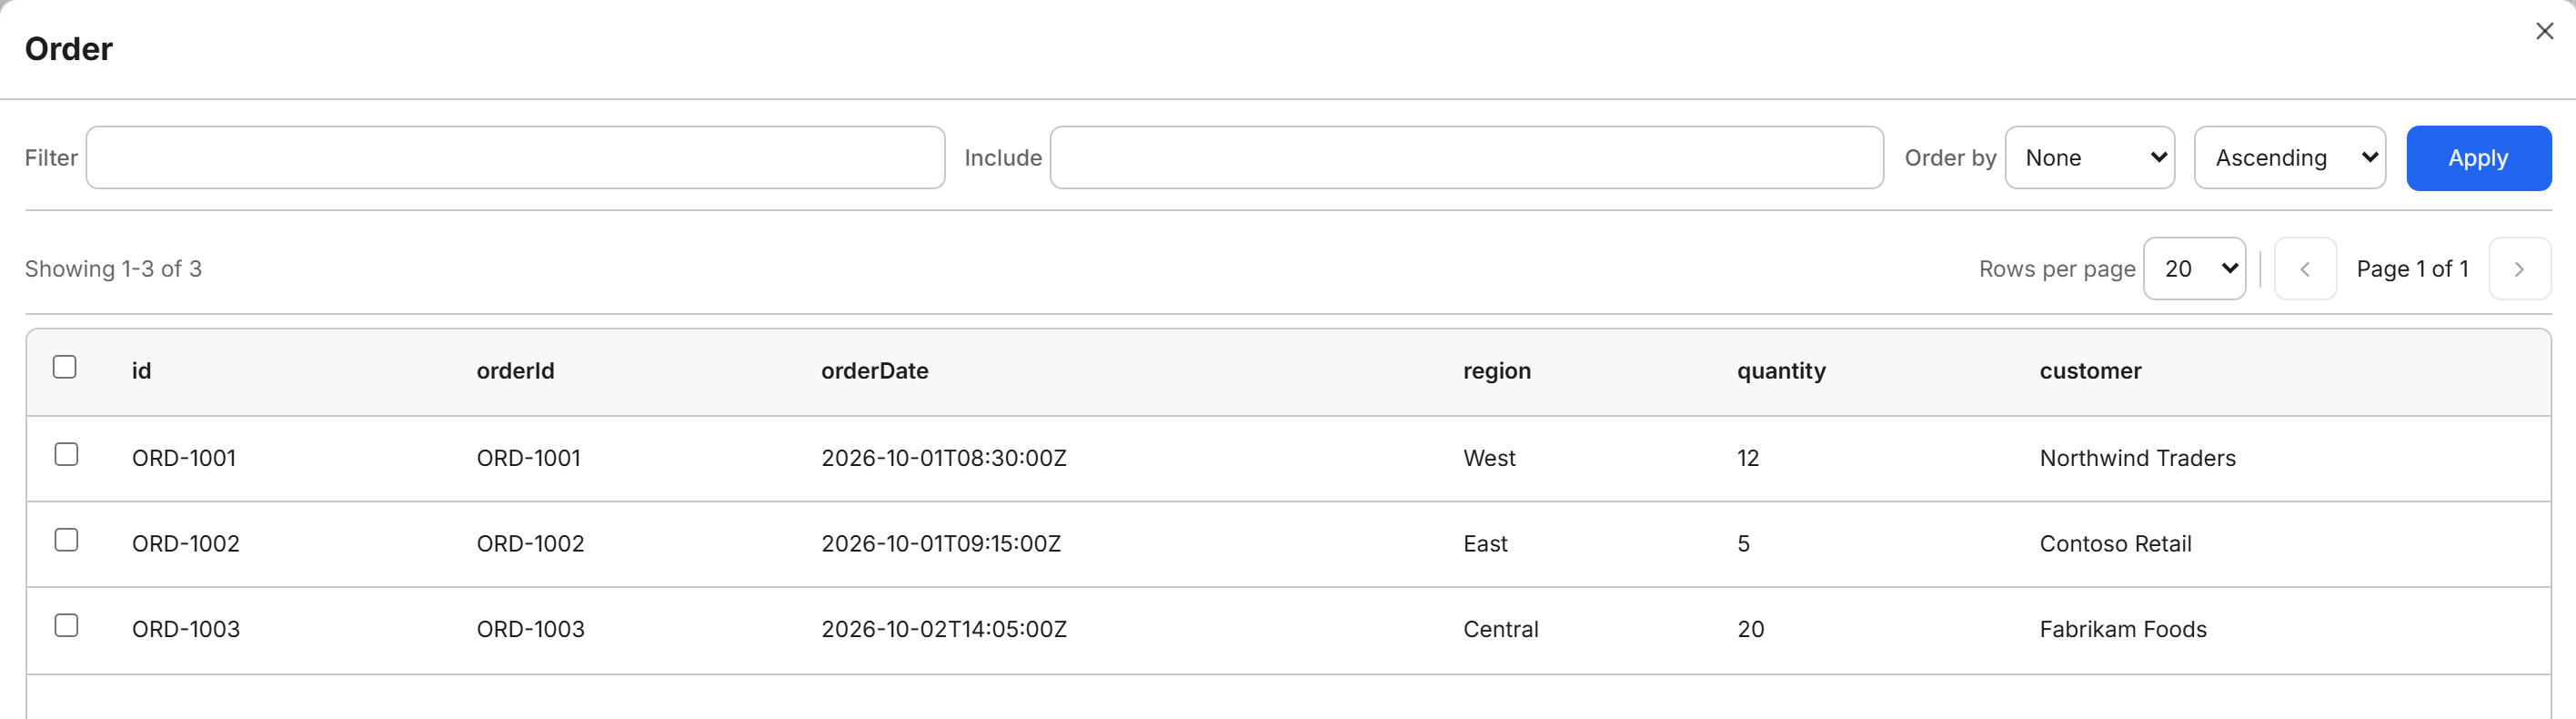
Processed,Processing,Failed, orNot Processed. The grid reads the status when the dialog opens, so reopen it to see later states. Select Cancel to close the dialog. - On the Entity Type node, select the Open menu button, then select View Data.
- In the dialog titled with the entity name, review the records. Use Filter, Include, and Order by, then select Apply, to narrow or sort the list.
To review the run itself, select View run status from the File Source Collection node's menu. You can also find the target entity Type on the Object Model tab of Data Fusion.
Edit or remove the connector
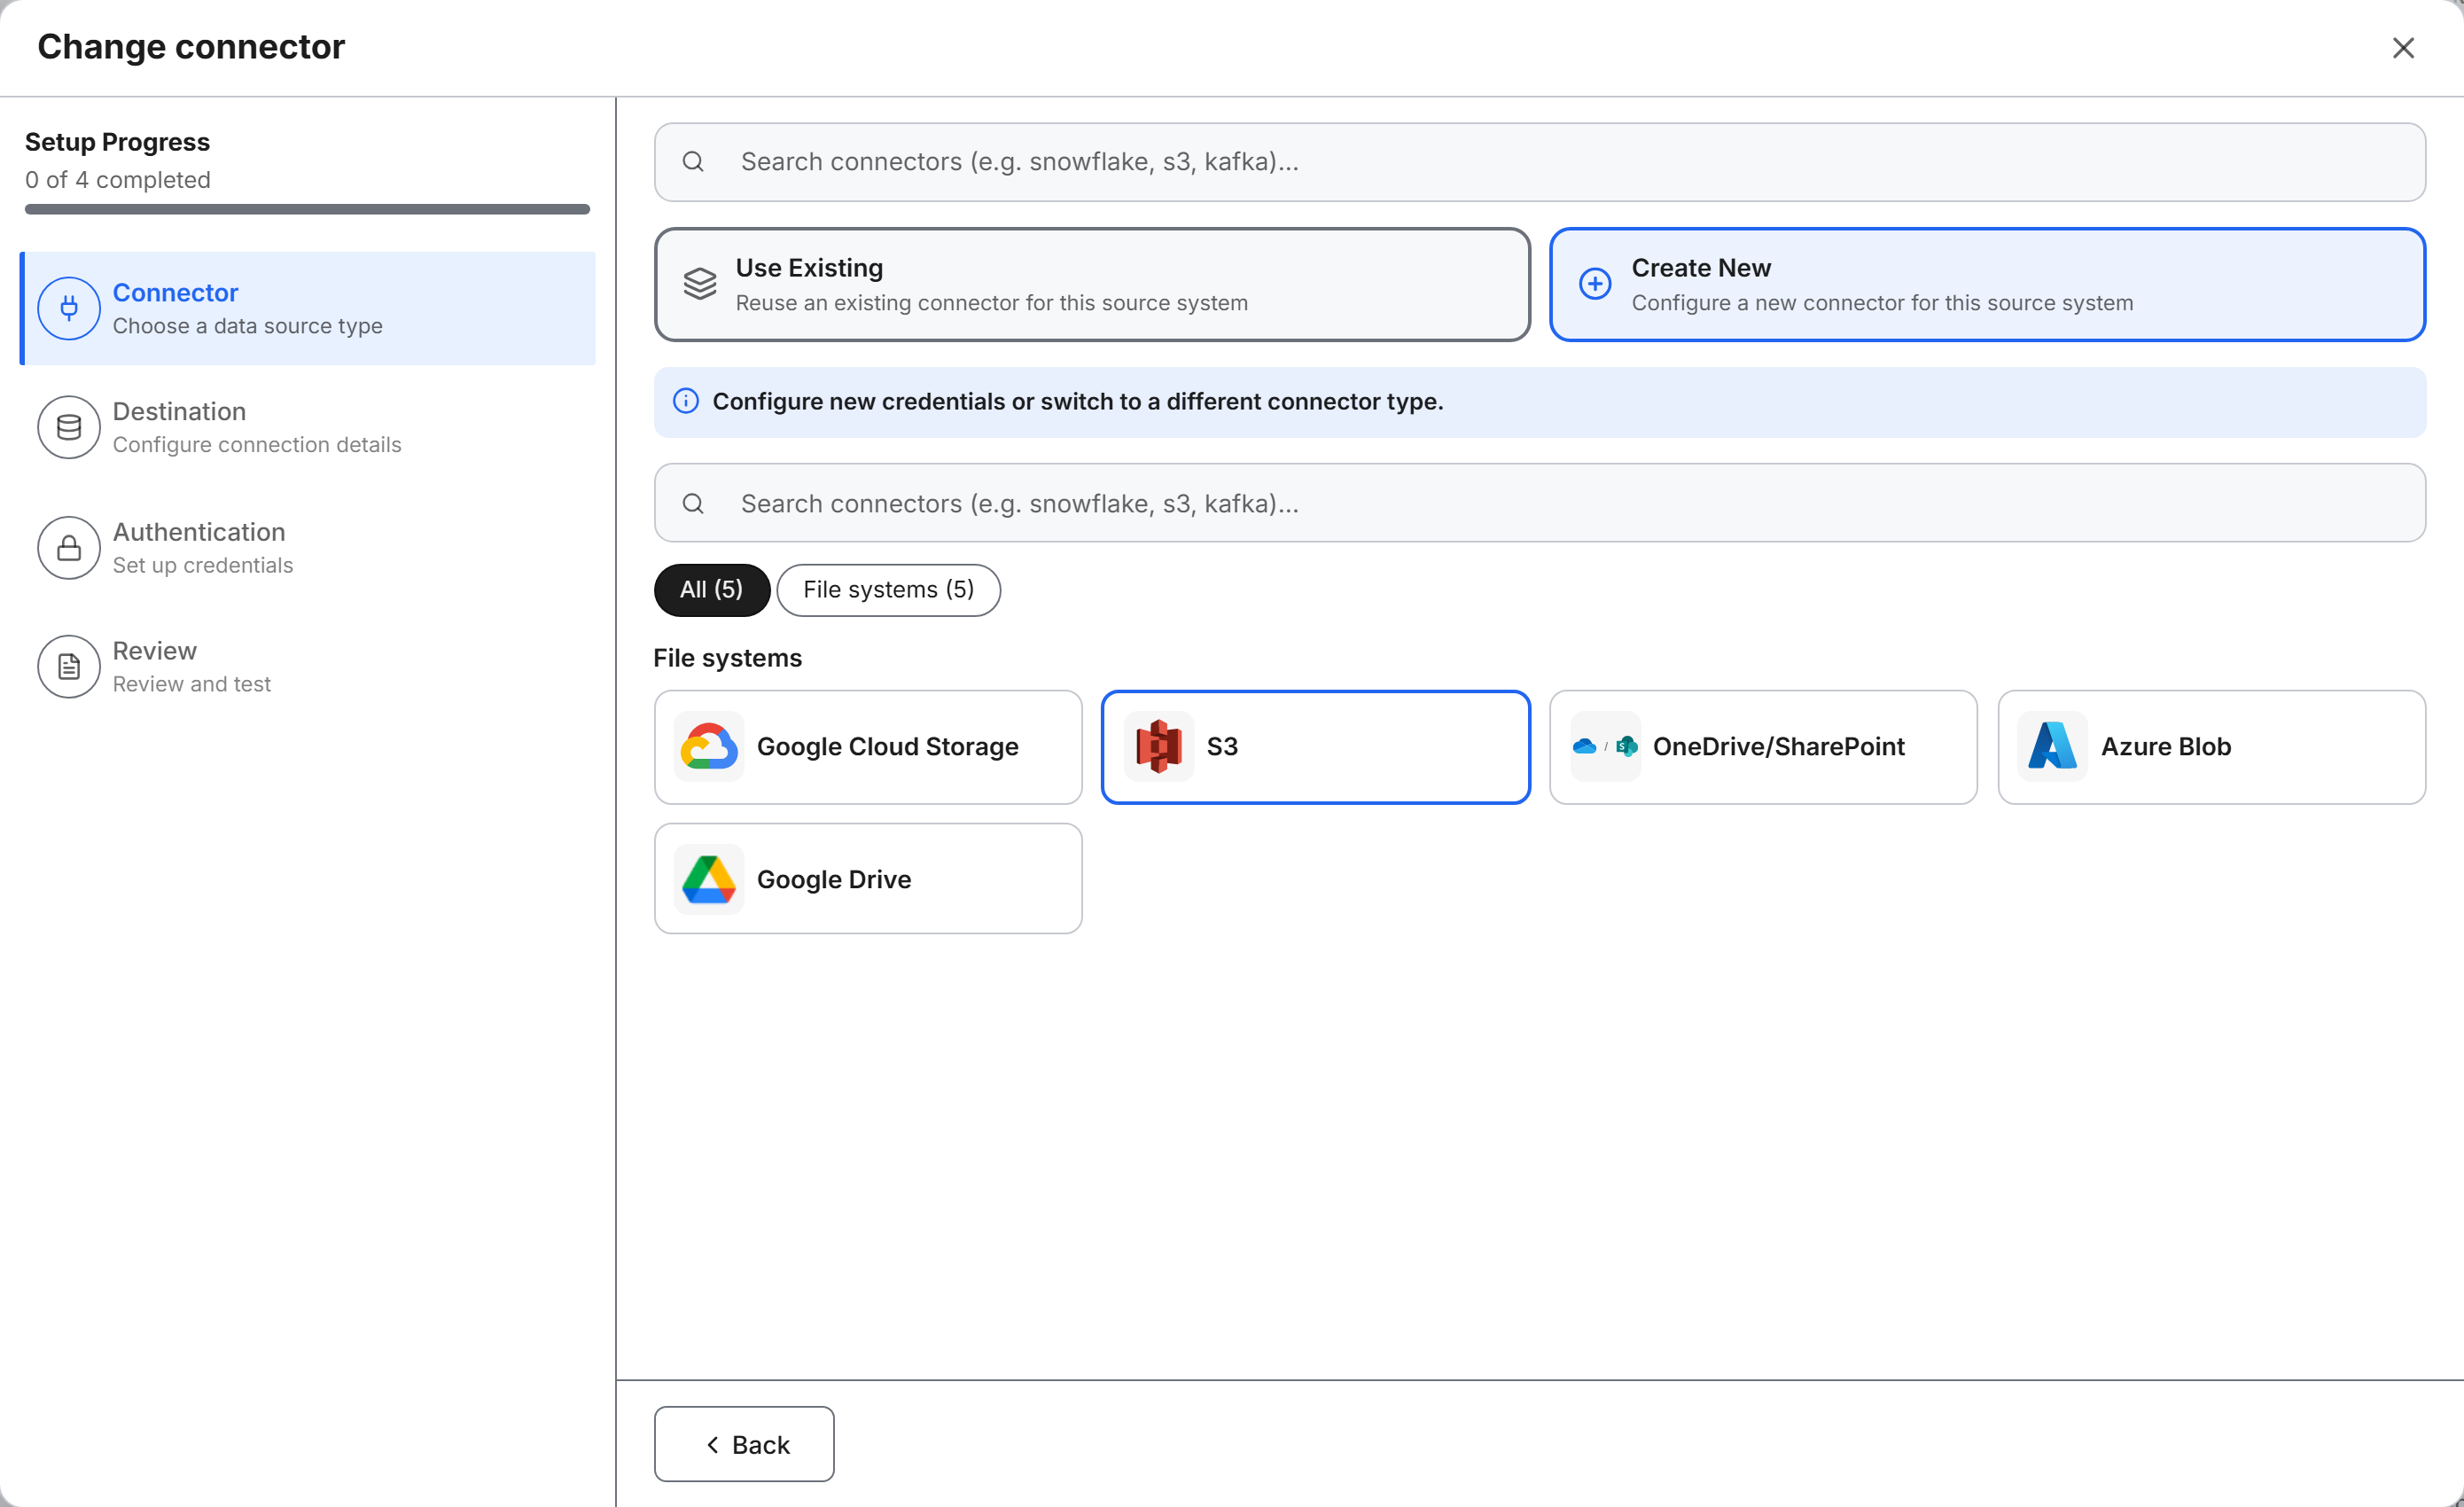
Select the File Source System node to reopen the connector wizard. On the Connector step, Selected Connector shows the current connector. Select Change Connector to switch to another connector of the same family. Use Existing picks a connector already set up, and Create New configures new credentials or a different connector type. For a file connector, the choices are the File systems connectors. You cannot switch a file connector to a SQL or streaming connector.
The File Source System node's Open menu button lists Add Source Collection, Unlink, and Delete:
- Unlink: opens Unlink?, where you select the collections to disconnect from the connector, then select Unlink.
- Delete: opens a dialog that warns that deleting the source system removes the node and all of its connections, and that the deletion cannot be undone. Type the connector name to enable Delete.
On a connector with no collections, the menu omits Add Source Collection and Unlink is unavailable.
Troubleshoot S3 connections
Use these entries when Save & Test fails or the file browser cannot work with the bucket.
Save & Test fails and AI Error Analysis names the region or the keys
The bucket region, the access key, or the secret key does not match the bucket in AWS. The AI Error Analysis summary names the value that failed. Save & Test has already saved the connector, so correct it in the connector wizard:
- Close the wizard.
- On the canvas, select the connector's File Source System node. The connector wizard opens, titled Edit and the connector name.
- To correct the region, open the Destination step and select the correct Region.
- To correct the keys, open the Authentication step, select Edit credential next to each key, and enter the key again.
- On the Review & Test step, select Save & Test, then select Save Changes.
The Bucket field shows "Must end with a /."
The Add Bucket value has no trailing slash, or it starts with a prefix such as s3://. Enter only the bucket and path, ending with /, for example my-bucket/ or my-bucket/sales/.
Upload files or Create directory fails
The credentials can read the bucket but cannot write to it. Ask your AWS administrator to grant write access to the bucket, including s3:GetBucketAcl, then try again. Reading and processing files need only list and read access.
The run dialog shows "No files found"
The collection has no source schema yet, so Sync Source Collection registers no files. Define the source schema on the Source node (Describe data), then open Configure Runtime Parameters again and select Sync Source Collection. The files appear with the status Not Processed.
Preview Transform fails with "can't infer value type for expression"
The message reads "Failed during doing transform:Internal error: can't infer value type for expression : " followed by the expression. The expression names a field that the source schema does not have. Correct the field name in the Transform pane; select Preview Source to see the source field names.
Preview Transform fails with "Invalid value ... for Int Type"
The message names the value, the target type, and the field, for example "Invalid value '2026-10-01T08:30:00Z' for Int Type. Error when evaluating field 'quantity'". The source value does not convert to the target field's data type. Map a source field of the matching type, convert the value with a function from the Functions Library, or change the target field's data type.
The run fails with "Required field ... not set"
The message reads "Required field" followed by the entity and field name, for example "Required field Order.region not set." The transform step completes. The load into the target entity Type then fails for every record that has no value for a required field. Open the Transform node, enter an expression for the required field, select Save, and run the pipeline again. A target id with no expression is not an error: the pipeline generates an id.