Connect with Streaming Source System
You have event data on an Apache Kafka topic and want to store it in an entity Type in your application as the events arrive. An entity Type is the data model in your application that stores records. You build the pipeline in Data Fusion, the visual pipeline editor in C3 AI Studio. You connect to the Kafka cluster, choose a topic, and describe the message fields. Then you map the fields to a target entity Type, start continuous processing, and check that records arrive.
Typical uses for a Kafka pipeline include:
- Device and application telemetry: Store events from devices and services as they are produced.
- Near real-time decisions: Give models and AI workflows the latest events.
- Operational monitoring: Keep dashboards and alerts current.
The same steps apply to the other streaming connectors in Data Fusion, Amazon Kinesis and Azure Event Hubs. Only their connection fields differ; Authenticate Streaming Sources lists the fields for each connector.
How the Kafka pipeline fits together
On the Data Fusion canvas, each part of the pipeline appears as a box called a node. A Kafka pipeline has five nodes:
- Cloud Message Source System: The Kafka connector. A source system stores the connection to one Kafka cluster: the bootstrap endpoint, the API key, and the API secret. The source system's Type is CloudMessageSourceSystem.
- Cloud Message Source Collection: Reads one Kafka topic through the source system. One source system can feed several source collections. The source collection's Type is CloudMessageSourceCollection.
- Source: The source schema, which lists the fields of each message and their data types. The source schema you define here is the Source Type.
- Transform: Maps the source fields to the fields of the target entity Type, and can clean or reshape values.
- Entity Type: The target entity Type, which stores the records that the pipeline produces.
Each node has a menu button, the three-dot button on the node, labeled Open menu.
Prerequisites
Make sure that:
- You have a running application in C3 AI Studio, and you can open Data Fusion in it.
- The Kafka topic you want to read exists on the cluster.
- You have the cluster's bootstrap endpoint, an API key for the cluster, and the API secret paired with that key. The Kafka connector in Data Fusion offers one authentication method: an API key and secret over SASL_SSL (Simple Authentication and Security Layer over Transport Layer Security).
- The API key can list topics, read records from the topic, and read the consumer group that the platform uses. The group is the source collection's
cloudConsumervalue, or$Defaultwhen it has none. - Your C3 AI environment can reach the bootstrap endpoint over the network.
- The messages on the topic are JSON or CSV. Data Fusion reads
application/jsonandtext/csvmessage content.
Add the Kafka connector
Create the connector in a four-step wizard: Connector, Destination, Authentication, and Review. Data Fusion saves the connector together with its first source collection, so the wizard continues straight into topic selection.
Select the Kafka connector
Open the connector wizard from the Data Fusion canvas:
- In C3 AI Studio, open your application, then select Data > Data Fusion.
- On the Data Integration tab, select Add Data Source.
- In the Configure Connector panel, under Cloud Message Brokers / Streaming, select Kafka.
The Destination step opens.
Enter the bootstrap endpoint
The Destination step, titled "Endpoint and location information for Kafka", identifies the connector and the cluster:
- In Name, enter a unique name for the connector. The name must be alphanumeric and must not begin with a number.
- (Optional) In Description, enter context for the connector, in fewer than 500 characters.
- In Endpoint, enter the bootstrap server address that your Kafka provider lists for SASL-secured clients. Use the
host:portform, for examplebroker.example.com:9092, and separate several brokers with commas. Leave out quotation marks and URL schemes such ashttps://. - Select Continue.
To fill the fields from a configuration you already have, select Auto-Map Fields in the side panel of the wizard. Paste or upload a JSON document, select Extract & Suggest Mapping, and review which keys Data Fusion suggests for Endpoint, ApiKey, and ApiSecret. Then select Fill fields. The suggestion uses only the key names; Data Fusion never sends the secret values.
Enter the API key and secret
The Authentication step, titled "Authentication for Kafka", holds the cluster credentials:
- In ApiKey, enter the API key from your Kafka provider.
- In ApiSecret, enter the API secret for that key.
- Select Continue.
To check a value you entered, select Show password on its field.
Review the connector and open topic selection
The Review step, titled "Review & Test", summarizes the Destination values. The Authentication section does not display the API key or secret. To finish the connector:
- Check that the endpoint matches your bootstrap server address.
- Select Next.
Data Fusion connects to the cluster with these details and opens the Select Message Stream dialog with the list of topics on the cluster. The topic list is the connection check for a Kafka connector: if the list loads, the endpoint and credentials work. If the topic list does not load, see "The topic list does not load after Review" in "Troubleshoot Kafka connections".
Select a Kafka topic (Source Collection)
The source collection decides which topic feeds the pipeline. You configure the source collection in the Select Message Stream dialog, which opens when you select Next on the connector's Review step. To add a source collection to a connector that already exists, see "Add another source collection".
Name the source collection
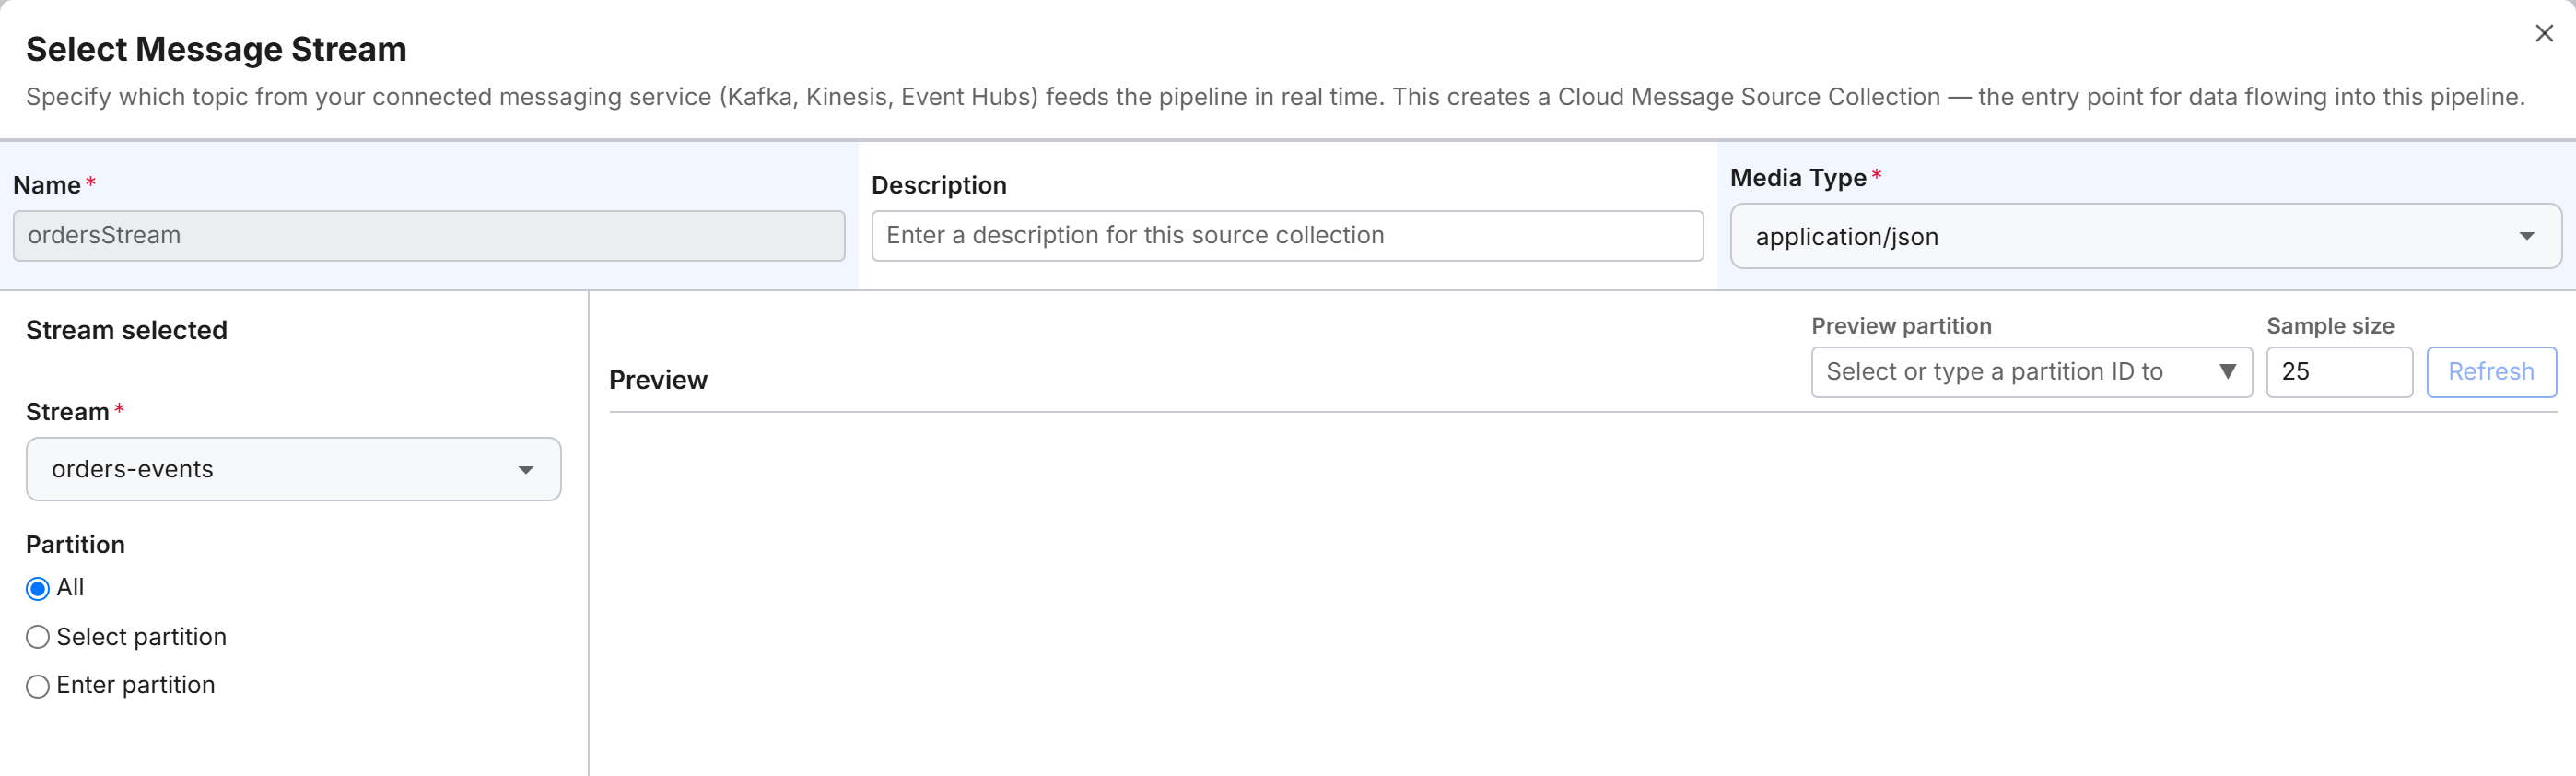
Enter the collection details at the top of the dialog:
- In Name, enter a name for the source collection. Use letters, numbers, and underscores, and start with a letter or underscore.
- (Optional) In Description, add context for the collection.
- In Media Type, select the format of the message content:
application/jsonortext/csv. To use Infer when you define the source schema, selectapplication/json.
Select the topic and partitions
Choose the topic, then decide which of its partitions the collection reads:
In Stream, select the topic from the list of topics on the cluster.
Under Partition, choose one option:
- All: Read every partition in the topic. All is the default.
- Select partition: Pick one partition from the partitions that Data Fusion finds on the topic.
- Enter partition: Type a partition ID.
Infer, which fills in the source schema from the messages, needs one partition to read. With All, Infer fails with a message about a missing partition setting. To use Infer, choose Select partition or Enter partition.
Preview messages
Preview reads a sample of messages from one partition, so you can check that the topic holds the data you expect. This step is optional:
- In Preview partition, select or type a partition ID. If you chose Select partition or Enter partition, Data Fusion fills in the same ID. Data Fusion then reads a sample from that partition.
- (Optional) In Sample size, change the number of messages to read. The default is 25 and the maximum is 1,000.
- To read a new sample, select Refresh. Refresh is available after you set a preview partition.
When the partition has no messages to show, the preview displays "No messages to preview."
Save the source collection
Save & Close saves the connector and the source collection. Save & Close needs a Name, a Media Type, and a Stream. To change the connector details first, select Back to return to the wizard.
- Select Save & Close.
Data Fusion shows two confirmations: "Successfully added data source: <connector name>" and "Successfully added stream: <collection name>". The canvas shows the Kafka Cloud Message Source System node connected to the new Cloud Message Source Collection node. A Source node for the schema follows the collection node.
Define the source schema
The source schema lists the fields of each message and their data types, so the Transform can map them to the target entity Type. The schema describes the message value only, not the Kafka message key or headers. To define the schema:
- On the canvas, select the Source node connected to the collection. Until you define the schema, the node shows "Describe data".
- In the Describe Incoming Data dialog, choose Create New Source Schema and enter a name, or choose Use an existing Source Schema and select one.
- Check the columns. When the dialog opens, it runs Infer, which reads messages from the collection's partition and fills in column names and data types. Infer is available when the collection's Media Type is
application/jsonand the collection reads one partition. Adjust the result, or add columns with + Add Field. Each column has a Column name, a Column alias, a Data type, a Description, and a Required setting. Column alias is the field's name as it appears in the message, when it differs from Column name, for example a key with spaces. Data Fusion fills in Column alias when it infers the schema. Leave Column alias blank when the names match. - If the collection's Media Type is
text/csv, Infer is not available. Select + Add Field for each column of the message, then enter its Column name and select its Data type. - (Optional) Select the Code tab to view or edit the schema definition as text. The Schema and Code views update each other when you switch tabs.
- Select Save.
For correct inference, use ISO 8601 format for datetime values and True/False for boolean values.
Map fields in the Transform
The Transform gives each field of the target entity Type a value: a source field, or an expression that cleans, renames, or reshapes source values.
Choose Projection or Transformer
Start from the Transform node, which shows "Map fields" until you configure it:
- On the canvas, select the Transform node connected to the source schema.
- In Choose a Transform Type, select Projection. A projection maps fields with expressions and needs no code. Choose Transformer instead when you need custom code. The remaining steps use Projection.
- In the Map & Clean Fields dialog, choose Create New Transform and enter a name, or choose Use an existing Transform and select one.
Select the target entity
The Target column of Map & Clean Fields starts with the choice of target entity Type:
- Under Select target for transform, select an existing entity Type, or select Create new target.
- If you selected Create new target, select Entity in Choose Target Type. The Define Target Entity dialog opens. Complete the dialog as described in "Define the target entity", then return to Map & Clean Fields.
When you return to Map & Clean Fields, the Target column lists the fields of the target entity Type.
Define the target entity
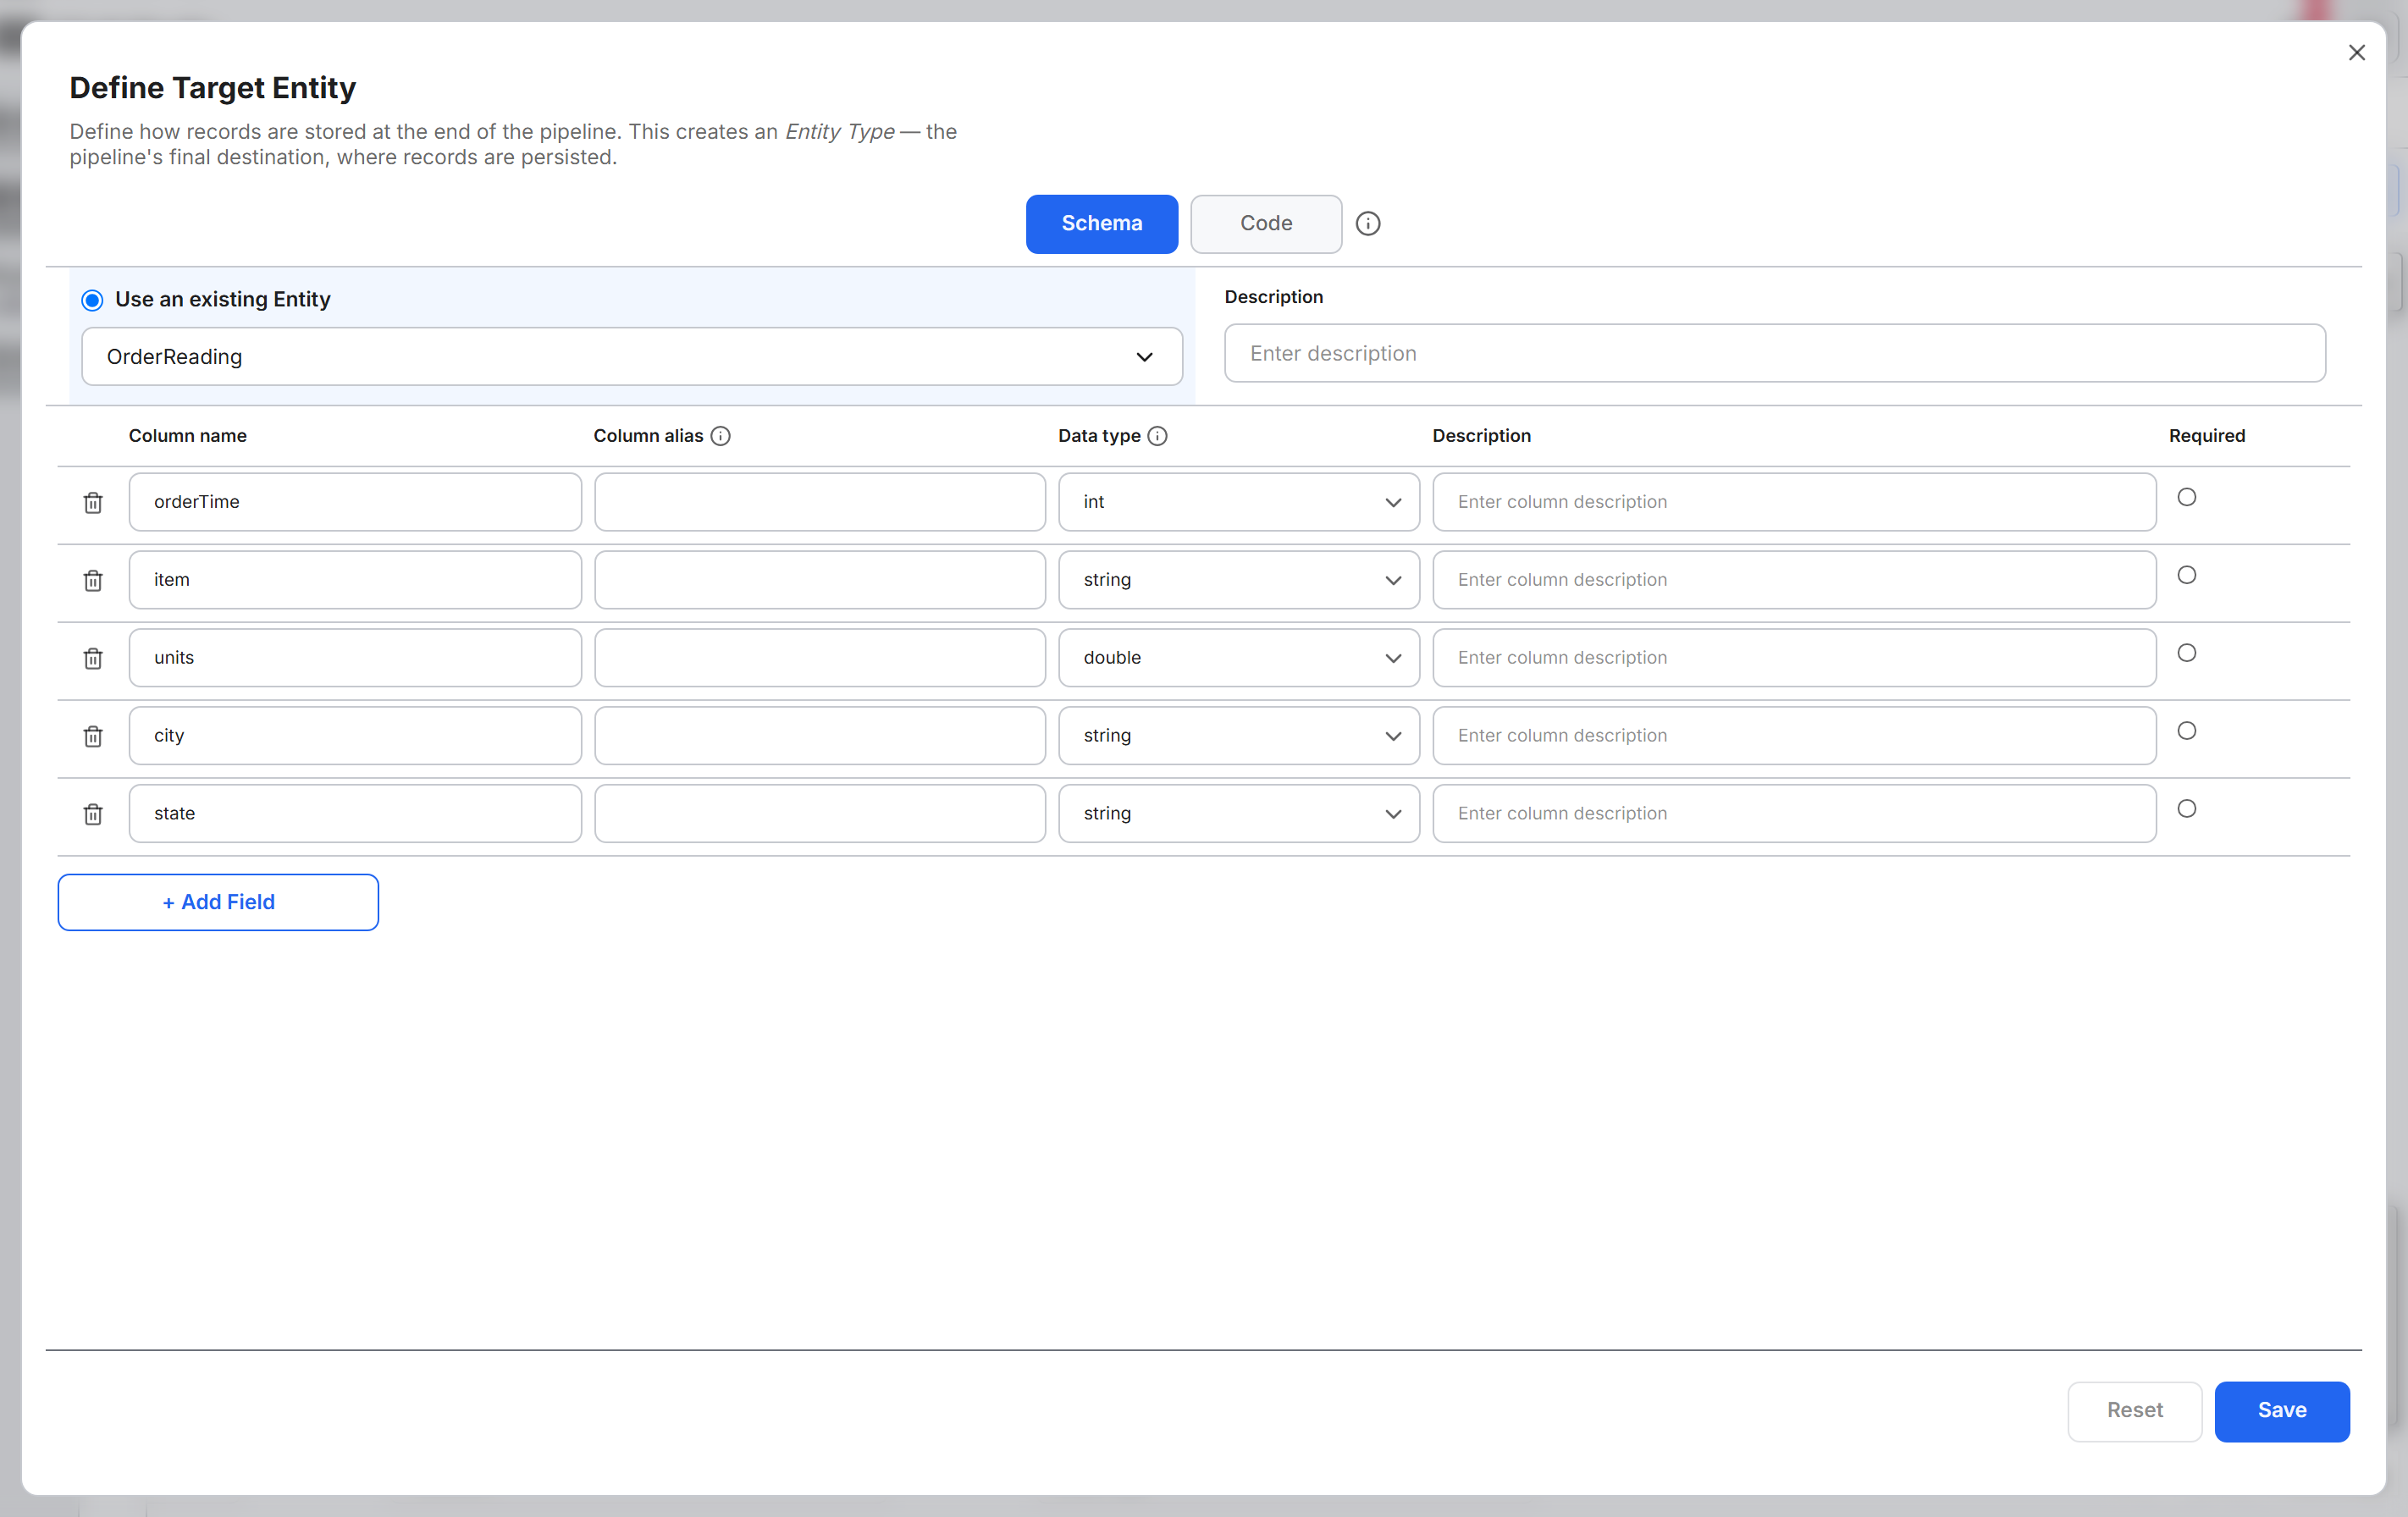
The target entity Type stores the records that the pipeline produces, and it appears on the canvas as the Entity Type node. You open the Define Target Entity dialog from the Transform (Create new target, then Entity), or by selecting the Entity Type node. In the dialog:
- Choose Create New Entity and enter a name, or choose Use an existing Entity and select one.
- (Optional) Add a Description.
- Define the columns: Column name, Column alias, Data type, Description, and Required. Column alias is optional: an alternative name for the field, used when records are exported. Leave Column alias blank in most cases. Select + Add Field to add a column, or the delete button on a row to remove it.
- (Optional) Select the Code tab to view or edit the entity definition as text. The Schema and Code views update each other when you switch tabs.
- Select Save. To discard unsaved changes instead, select Reset.
Streaming data often arrives as a high volume of time-stamped records. For these workloads, use a target entity Type that is backed by key-value storage, a store built for high volumes of time-stamped records. The Define Target Entity dialog has no storage setting, so select an existing key-value entity Type with Use an existing Entity.
Map the fields
The Map & Clean Fields dialog shows three columns:
- Source: The fields of the source schema, with their data types.
- Transform: One expression for each target field. Enter a source field name to copy its value, or wrap the name in a function to clean or convert the value. Use dot notation for a nested field; for example,
address.cityreadscityfrom theaddressobject. - Target: The fields of the target entity Type.
To map the fields:
- Select Automap Fields to match source fields to target fields by name. Check each expression that Automap Fields fills in.
- Edit any expression in the Transform column. To clear a row, select Clear transform on that row.
- To narrow a long field list, type in the Filter box.
- (Optional) Check your work with the actions at the bottom of the dialog:
- Functions Library: Opens the Expression Function Library panel, a searchable list of the functions you can use in expressions.
- Preview Source: Shows a sample of the incoming messages. Preview Source is available after you select a target.
- Preview Transform: Shows the records that the current expressions produce.
- Select Save.
Run the streaming pipeline
A streaming pipeline runs continuously: after you start it, the source collection processes messages as they arrive on the topic. To start and stop the pipeline:
- On the Kafka Cloud Message Source Collection node, select Execute pipeline, the play button on the node. Processing starts at once, without a confirmation dialog, and the button changes to Pause on arrival.
- To stop processing, select Pause on arrival. The message "Pipeline paused successfully" appears. Messages already being processed finish, and the collection then reads no new messages. Records already stored stay in the target entity Type.
The first start reads every message that the topic still retains, from the earliest offset of each partition, and then continues with new messages. On a topic with a long retention period, expect a large first load.
Verify the pipeline
Check that records reach the target entity Type:
- On the Entity Type node, select Open menu, then select View Data. The table lists the records stored in the target entity Type.
- To follow processing, select Open menu on the Cloud Message Source Collection node, then select View run status.
For processing state and counts for each source collection, see Monitor Your Data Pipeline. On the monitoring page's Source Collections grid, a paused collection shows the state Inactive and the process mode Manual.
Change the connector or add a topic
After the pipeline runs, you can update the connector's description or read another topic through the same connector.
Update the connector description
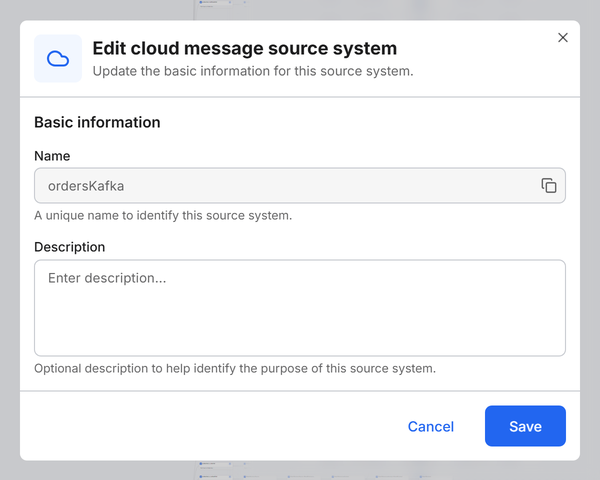
Select the Kafka Cloud Message Source System node on the canvas to open the Edit cloud message source system dialog. You can change the Description there. The Name is read-only; select the copy button next to it to copy the name.
Add another source collection
To read another topic through the same connector, start from the source system node:
- On the Kafka Cloud Message Source System node, select Open menu, then select Add Source Collection.
- In the Add Source Collection dialog, select Create New. To link a source collection that already exists, select Use Existing instead.
- The connector wizard opens on the Connector step. Select Kafka, enter the Endpoint, ApiKey, and ApiSecret again, then select Next on the Review step. The credentials you enter here apply to the new source collection.
- In Select Message Stream, name the collection, choose the topic and partitions, and select Save & Close, as described in "Select a Kafka topic (Source Collection)".
Troubleshoot Kafka connections
These entries cover the connection to the cluster and the message preview.
The topic list does not load after Review
After you select Next on the Review step, Stream shows no topics, and an AI Error Analysis summary describes the likely cause. Data Fusion could not reach the cluster or sign in to it. For example, the endpoint is wrapped in quotation marks or starts with a URL scheme. To fix the connection:
- Select Back to return to the connector wizard.
- On the Destination step, enter the endpoint in the
host:portform, without quotation marks or a scheme. - On the Authentication step, check the ApiKey and ApiSecret, and confirm with your Kafka provider that the key is active and can list topics.
- Select Next again.
The preview shows "No messages to preview."
The preview reads only the partition set in Preview partition. Check that:
- The partition ID is correct, and the partition holds messages.
- The API key can read records from the topic.