C3 AI MCP Quickstart
This tutorial takes you from a fresh IDE to a working loop where your coding assistant writes a new method, generates tests, runs them, and fixes failures automatically. You connect to both MCP servers that C3 AI provides along the way.
By the end, you have:
- C3 Central MCP Server connected so your assistant can answer C3 questions, generate Types, and apply coding standards.
- Your application's MCP server with
runTestandgetC3TypeInformationenabled so the assistant can run tests and inspect Types on your live application. - A short feedback loop where the assistant writes code, writes tests, runs them, and iterates.
Before you start
Confirm the following before you begin:
- IDE: VS Code 1.102 or later with GitHub Copilot, Cursor 1.2.1 or later, or Claude Code.
- Node.js: installed and available on your PATH.
- C3 Agentic AI Platform 8.10 or later: required so the Studio MCP pages appear in your application.
- App Admin role: required on your application to generate tokens, enable tools, and publish prompts.
- An application that depends on the
mcpServerpackage: the package is included by default in 8.10 and later.
For best results, use a model with strong tool-calling capabilities, such as Claude Sonnet 4.5, GPT-5.2, Gemini 3, or a model with similar or better tool-calling performance. Weaker models may fail to invoke MCP tools correctly or stall during the write-test-fix loop.
Step 1 - Connect to the C3 Central MCP Server
The Central MCP Server is hosted at https://mcp.c3.ai and shared across all C3 AI developers. It provides tools, prompts, and skills that help your assistant work with C3 Types, Transforms, and platform conventions.
Go to https://mcp.c3.ai.
Authenticate with your C3 AI Developer Portal credentials.
On the configuration page, select Install for VS Code, Install for Cursor, or Install for Claude Code based on your IDE.
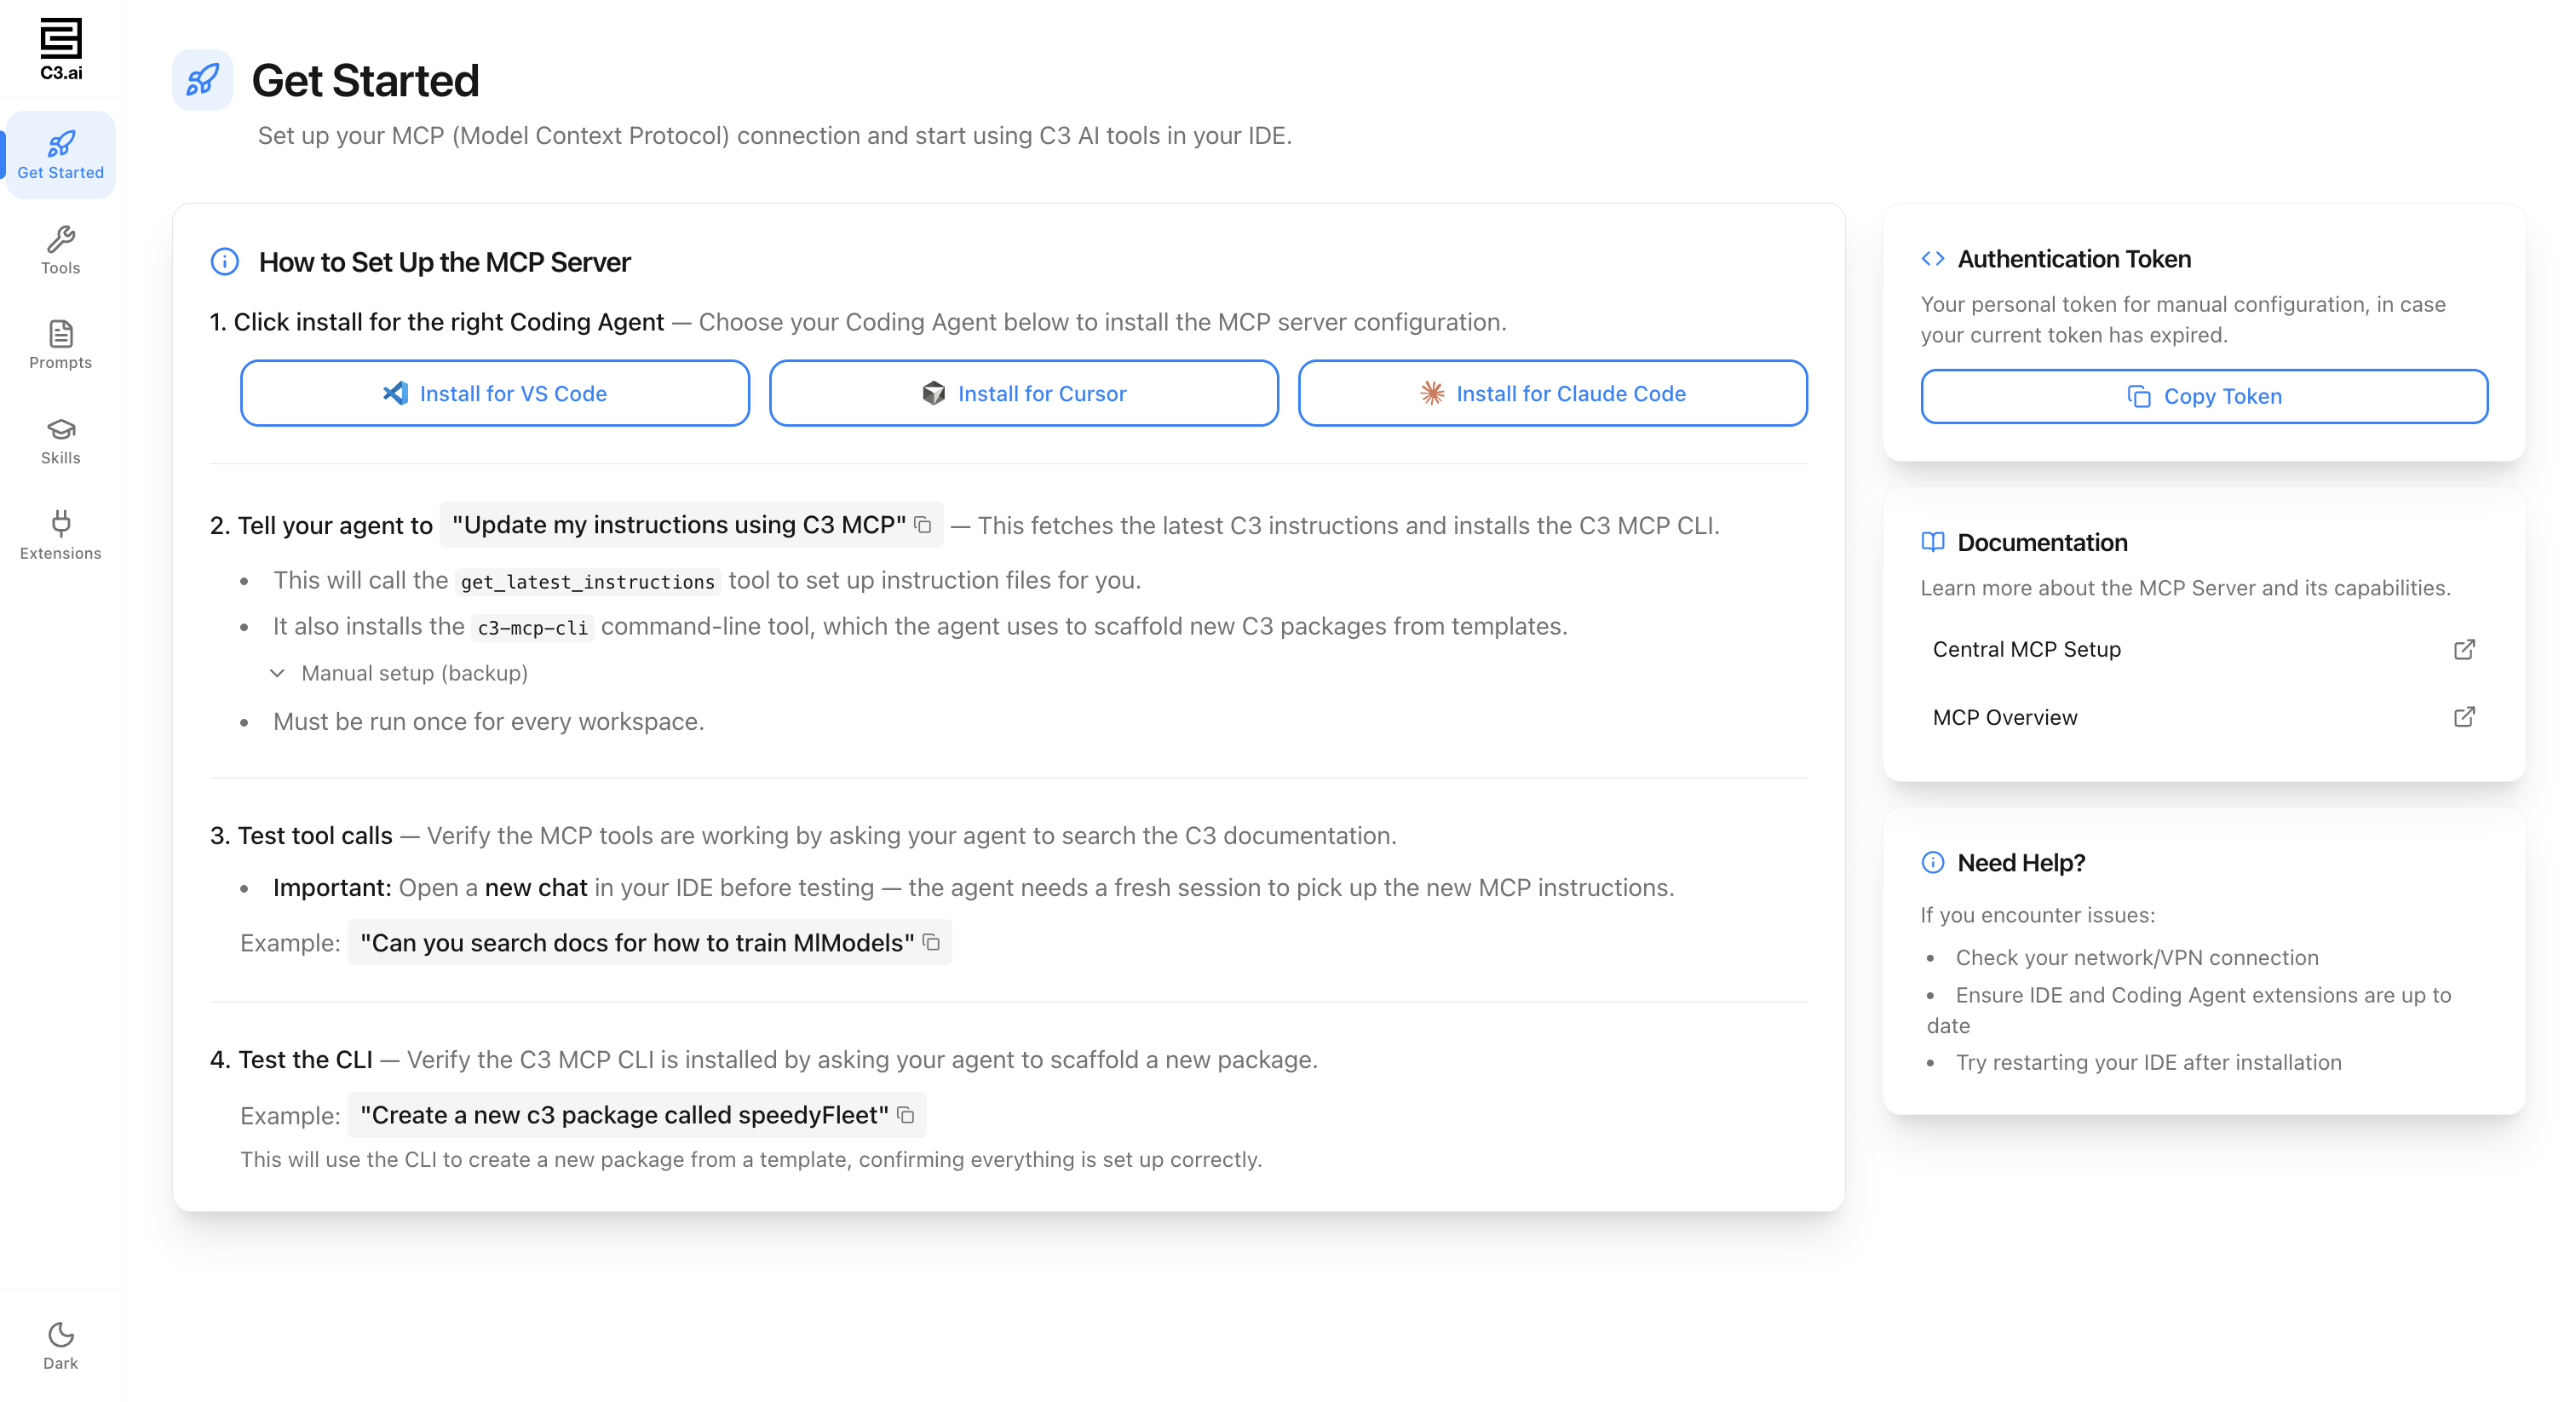
For VS Code or Cursor, the editor launches and shows an install prompt. Select Install. For Claude Code, copy the displayed command and run it in your terminal:
Command Lineclaude mcp add \ --transport http \ C3AI-MCP-Server \ https://mcp.c3.ai/mcp/server \ --header "Authorization: C3Bearer <your-token>"Verify the connection:
- VS Code: open the Command Palette and search for MCP: Open User Configuration. Confirm
C3AI-MCPappears. - Cursor: open the Command Palette and search for View: Open MCP Settings. Confirm tool and prompt counts appear.
- Claude Code: run
claude mcp listand confirmC3AI-MCP-Serveris listed.
- VS Code: open the Command Palette and search for MCP: Open User Configuration. Confirm
For the full setup reference and troubleshooting, see Connect to the C3 Central MCP Server.
Step 2 - Install the C3 instruction files
Instruction files give your assistant persistent context about C3 conventions, Type patterns, and file structure. Without them, generated code does not match C3 standards.
Open a chat with your assistant.
Enter:
Update my instructions using C3 MCP.The assistant calls
get_latest_instructionsand installs thec3-mcp-clicommand-line tool.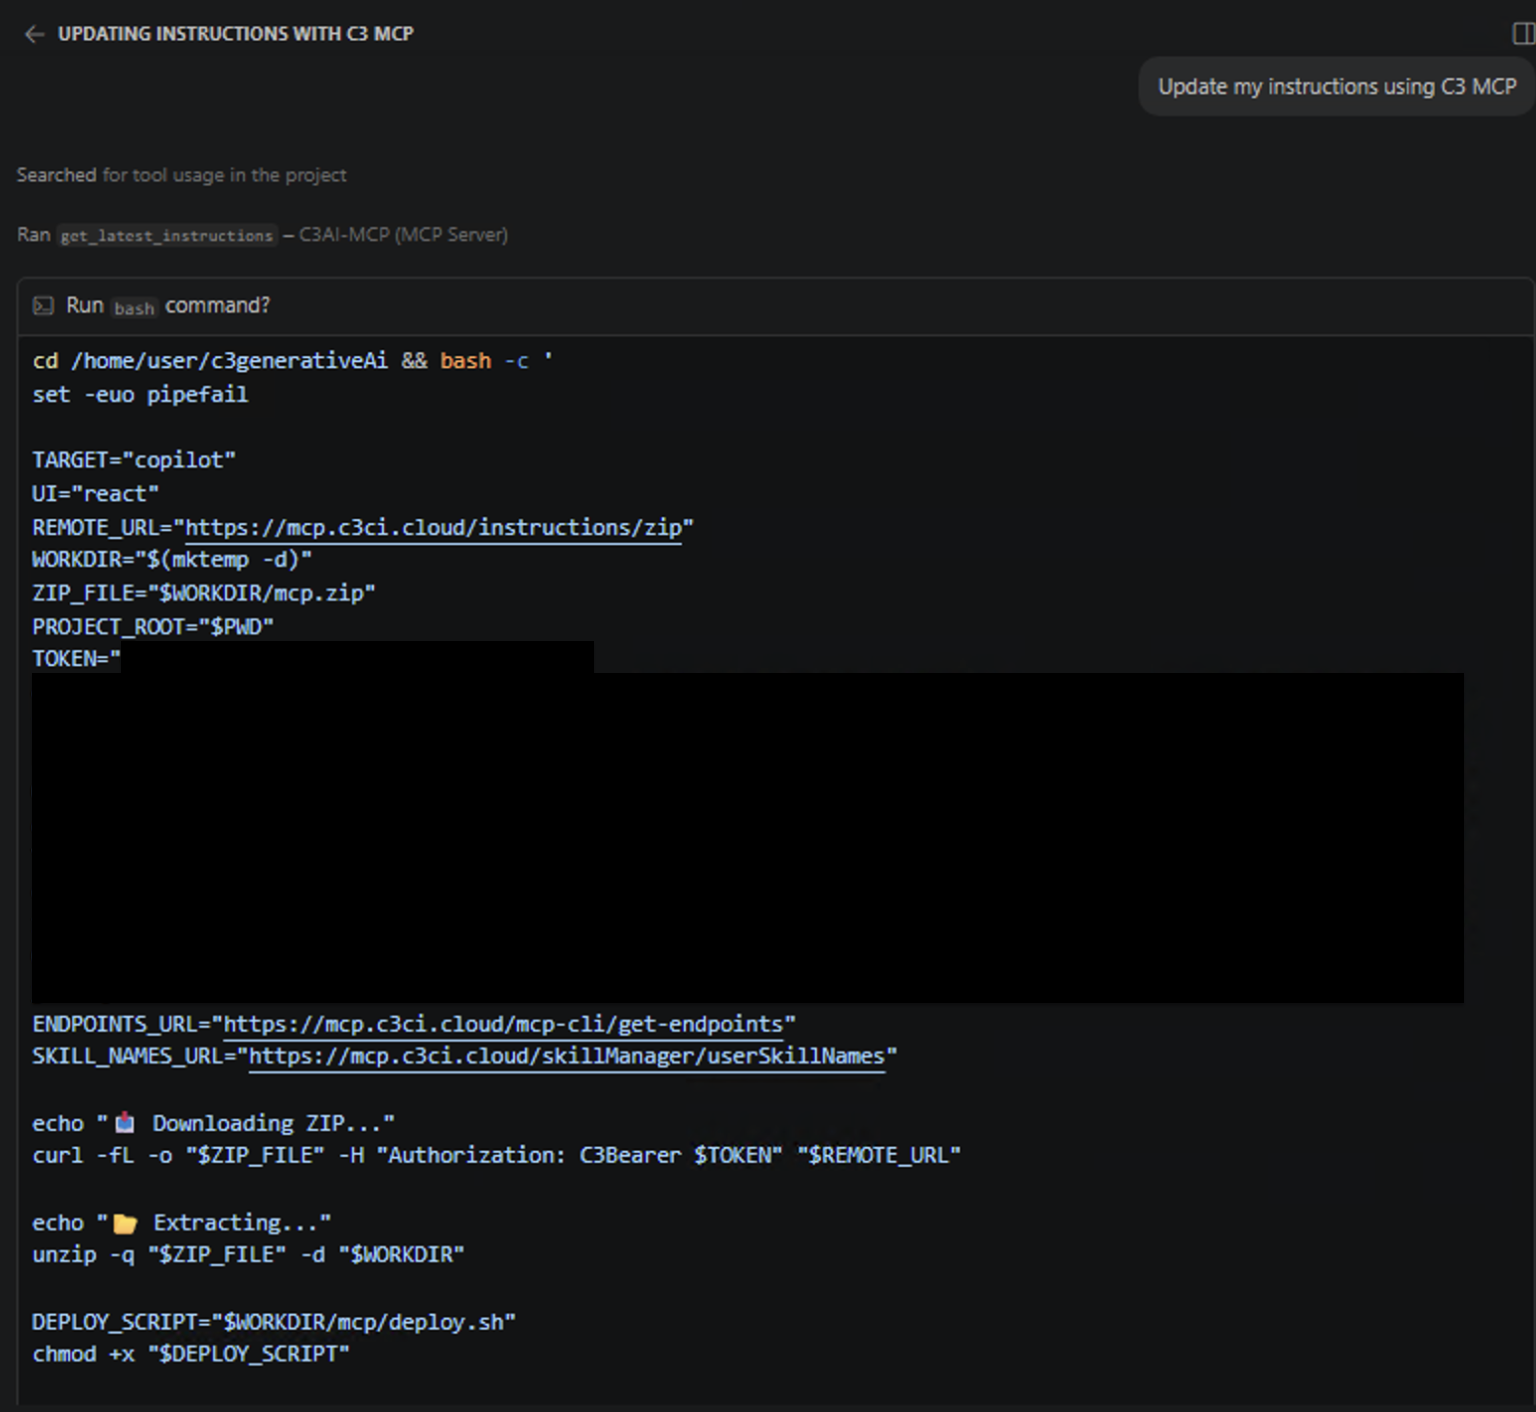
Wait for the setup script to finish. The script installs both C3 instruction files and skills (reusable workflows such as vault encryption, type generation, and test automation) into the folder that matches your IDE:
- VS Code:
.github/instructions/,.github/skills/folders. - Cursor:
.cursor/rules/,.cursor/skillsfolders.
- VS Code:
If the command does not run on its own, copy it from the chat and paste it into your terminal. On Windows, use Bash.
With Central MCP connected and instruction files installed, your assistant can already generate C3 Types, create Python and JavaScript implementations, search C3 documentation, and use guided prompts for common tasks like writing tests and designing data models.
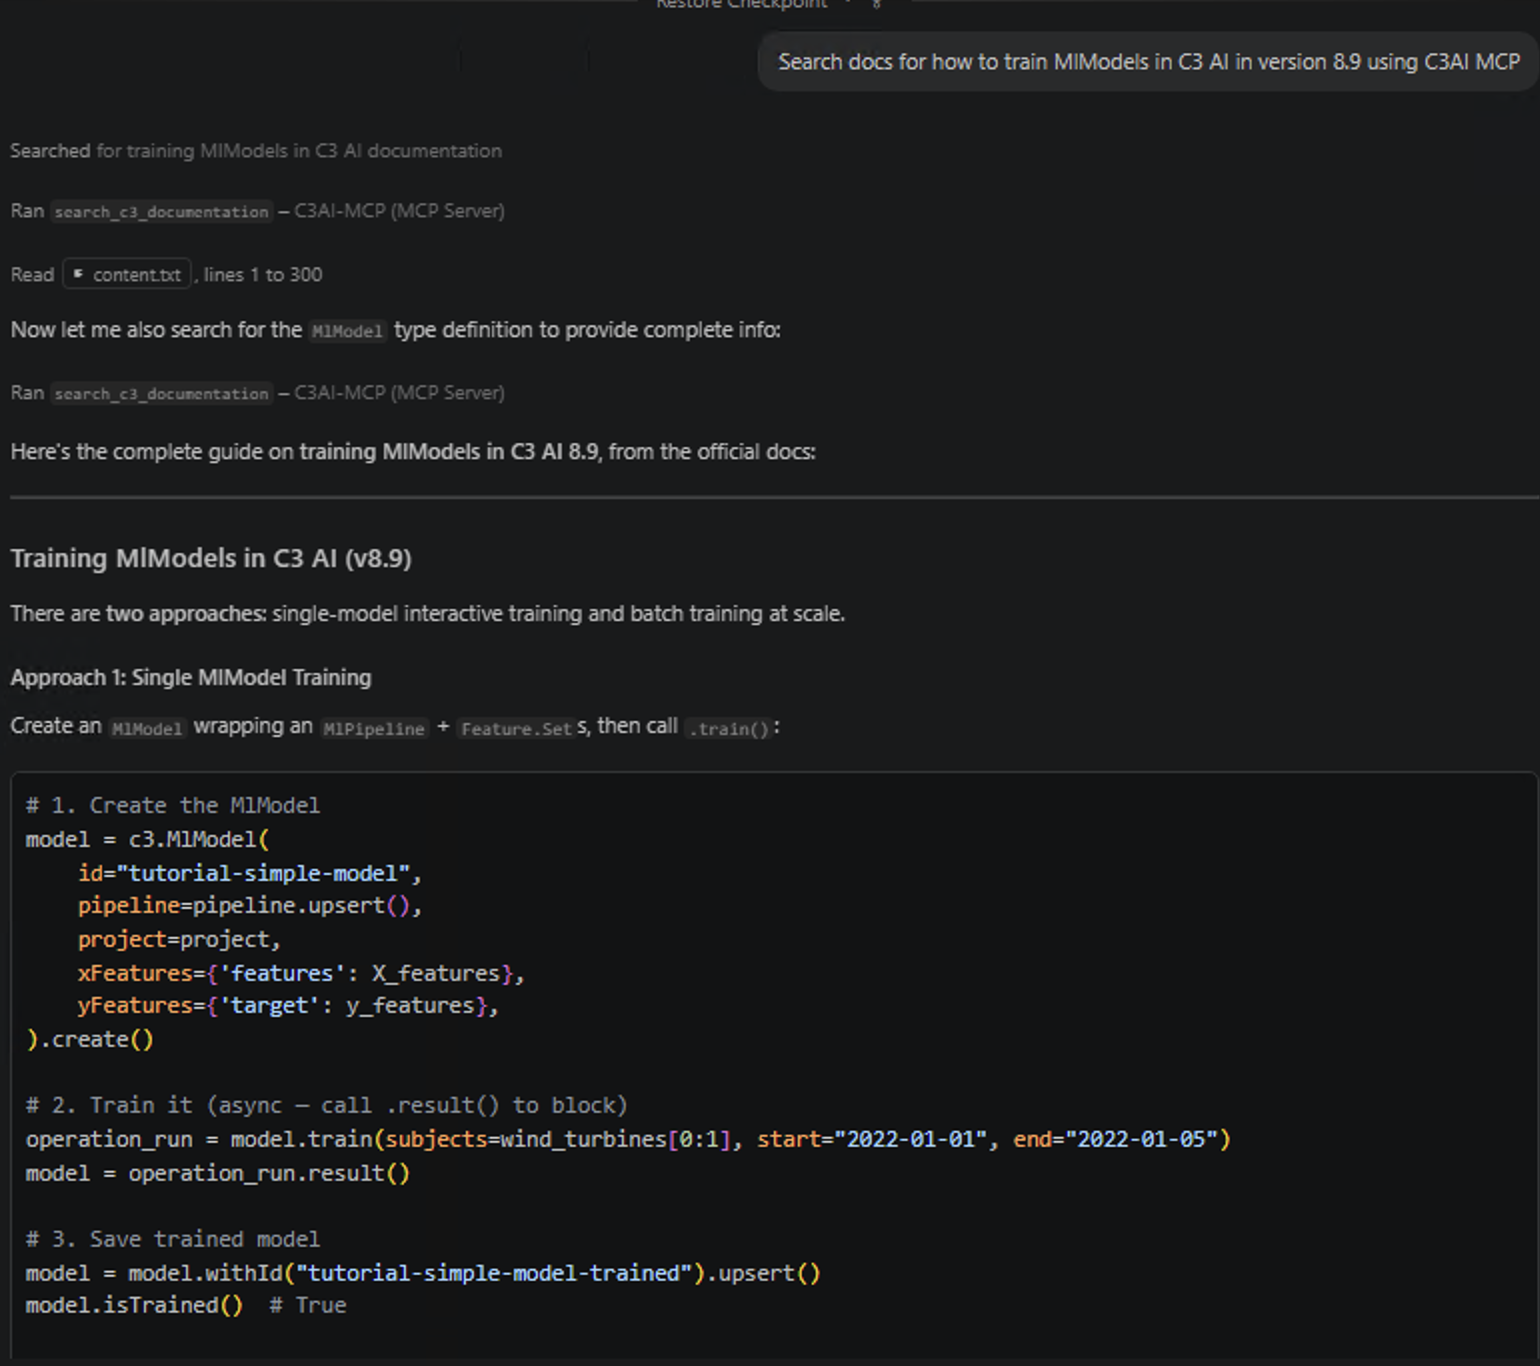
To verify the connection works, try a documentation search. Enter a prompt like:
Search docs for how to train MlModels in C3 AI in version 8.9 using C3 AI MCPYour assistant calls search_c3_documentation and returns relevant results from the C3 documentation:
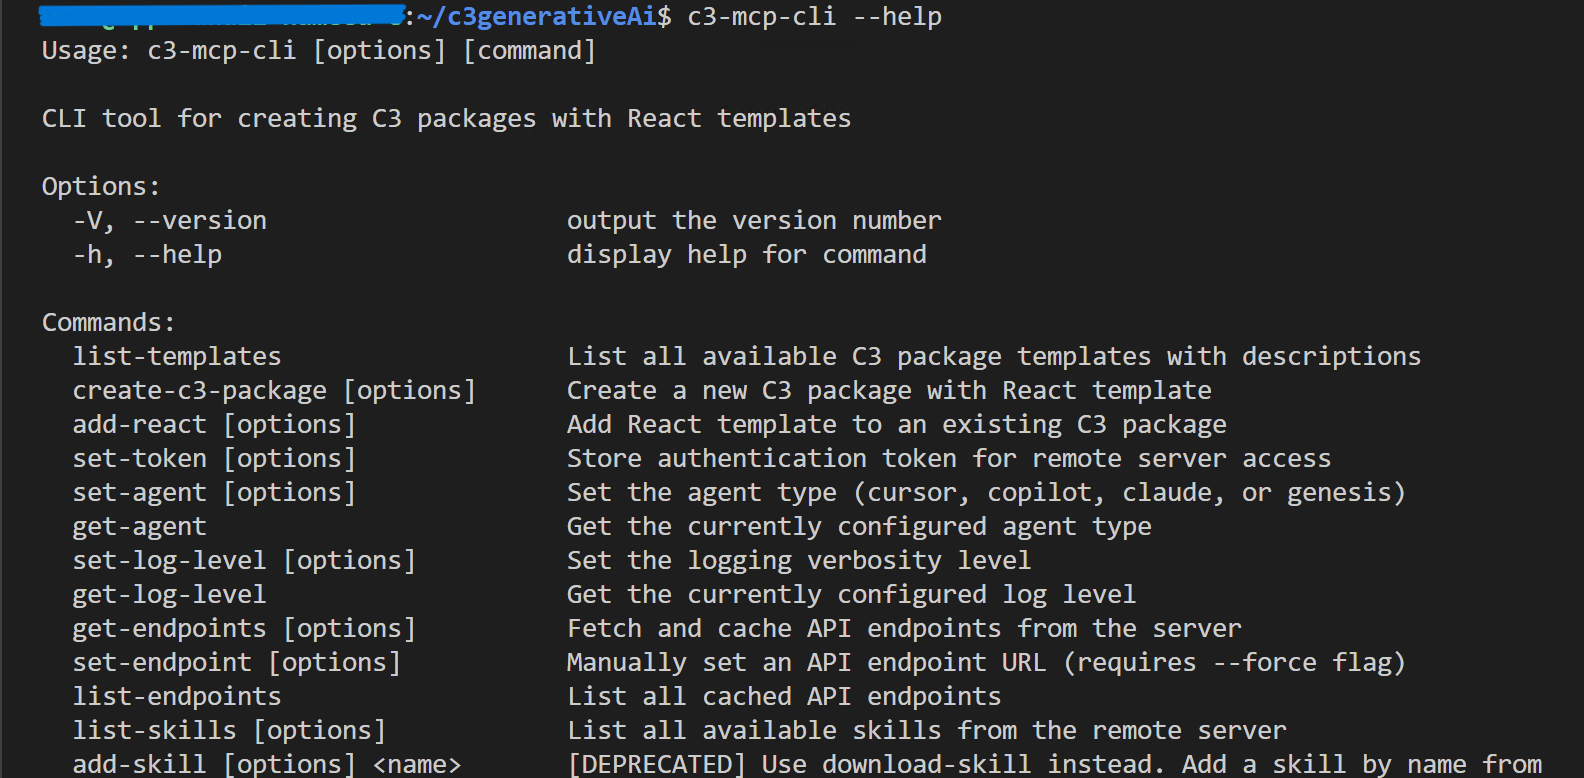
You can also confirm the CLI tool installed correctly by running the following in your terminal:
c3-mcp-cli --helpThis lists all available commands in the C3 MCP CLI:
For the full list of tools, prompts, skills, and extensions available through Central MCP, see Configure and Use C3 Central MCP Server.
Step 3 - Generate an App MCP token
Central MCP gives your assistant general C3 knowledge, but it cannot see your application's data, run code in your environment, or execute your tests. That is what App MCP does. Your application runs its own MCP server that exposes business-specific tools and prompts. When your assistant connects to both servers, it can combine C3 platform guidance from Central MCP with live actions on your application from App MCP.
To connect your IDE to your application's MCP server, generate an authentication token from Studio.
In Studio, open your application and select MCP > Access from the left sidebar.
On the My Tokens tab, select Generate Token.
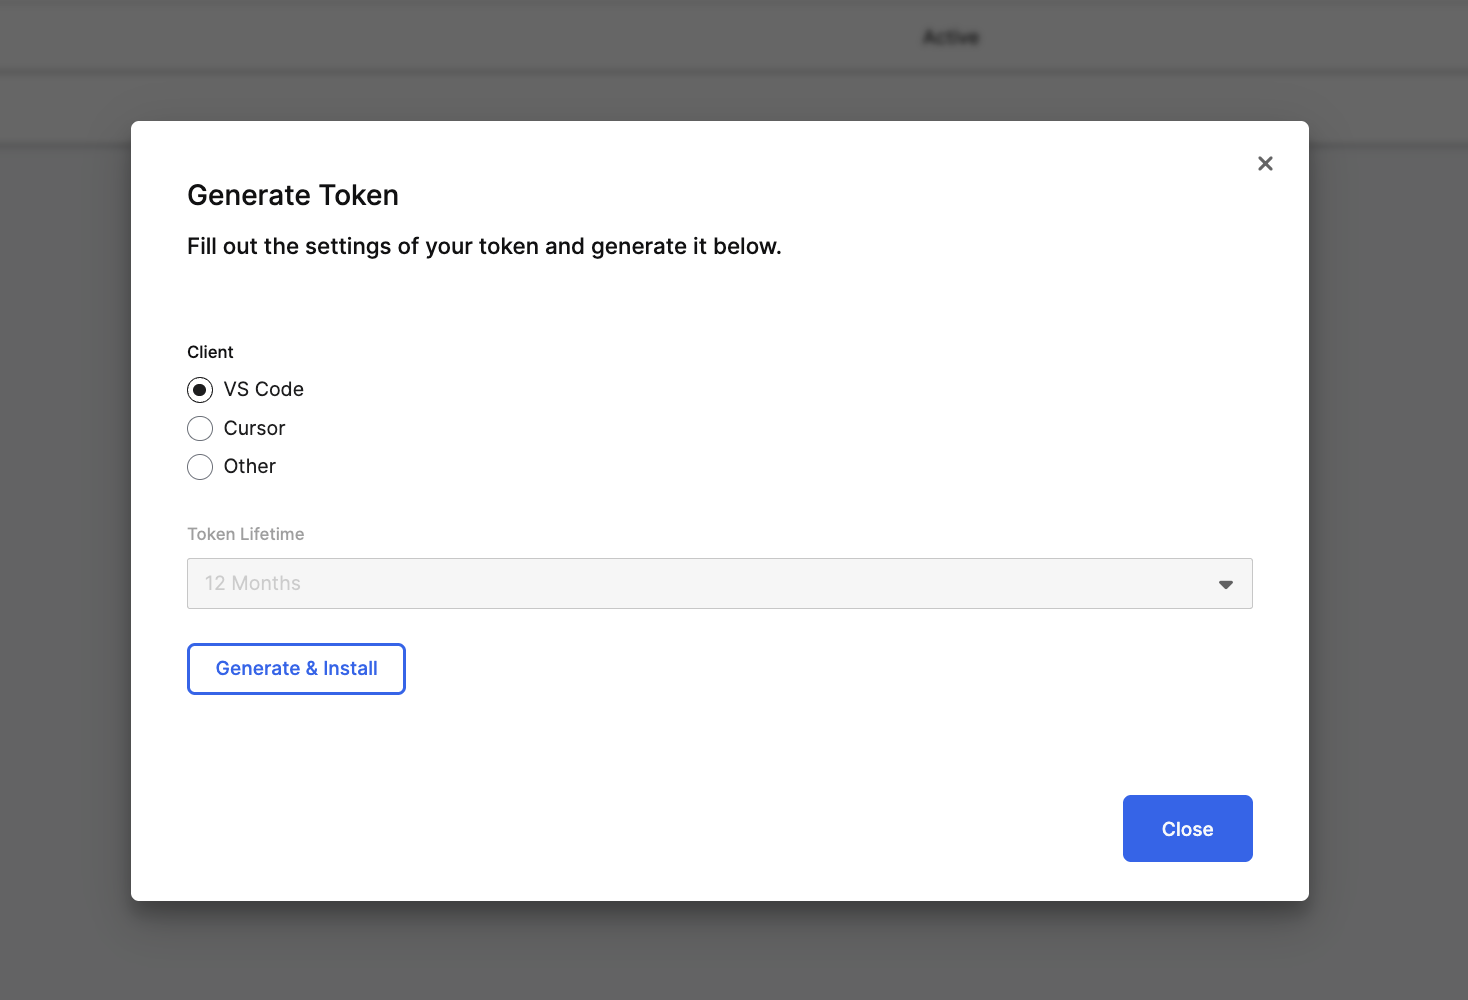
Choose your IDE client:
- VS Code or Cursor: select Generate & Install. The browser opens a deep link that registers the server in your IDE.
- Other (including Claude Code): select Generate Token, then copy the server URL and token into your IDE's MCP configuration file.
Token lifetime is fixed at 12 months.
Verify the connection. In VS Code, open
mcp.jsonin your project root and confirm an entry like:JSON{ "servers": { "YourServerName": { "url": "https://<cluster>/<env>/<app>/mcp/server", "headers": { "Authorization": "C3Bearer <token>" } } } }
The header format is C3Bearer <token>, not Bearer <token>. An incorrect prefix returns a 401 authentication error.
If Generate Token is disabled, the MCP server is turned off. Open MCP > Tools and enable the server from the page header toggle.
For token management, revocation, and administrator controls, see MCP Access.
Step 4 - Enable App MCP tools
Your application ships with a set of default tools from the genaiPlatform package. Some tools are enabled out of the box and appear automatically when you connect. Others are seeded but disabled by default. You can see which tools are available and toggle them on or off from the MCP > Tools page in Studio.
For the write-test-fix loop in the next steps, you need runTest and getC3TypeInformation enabled.
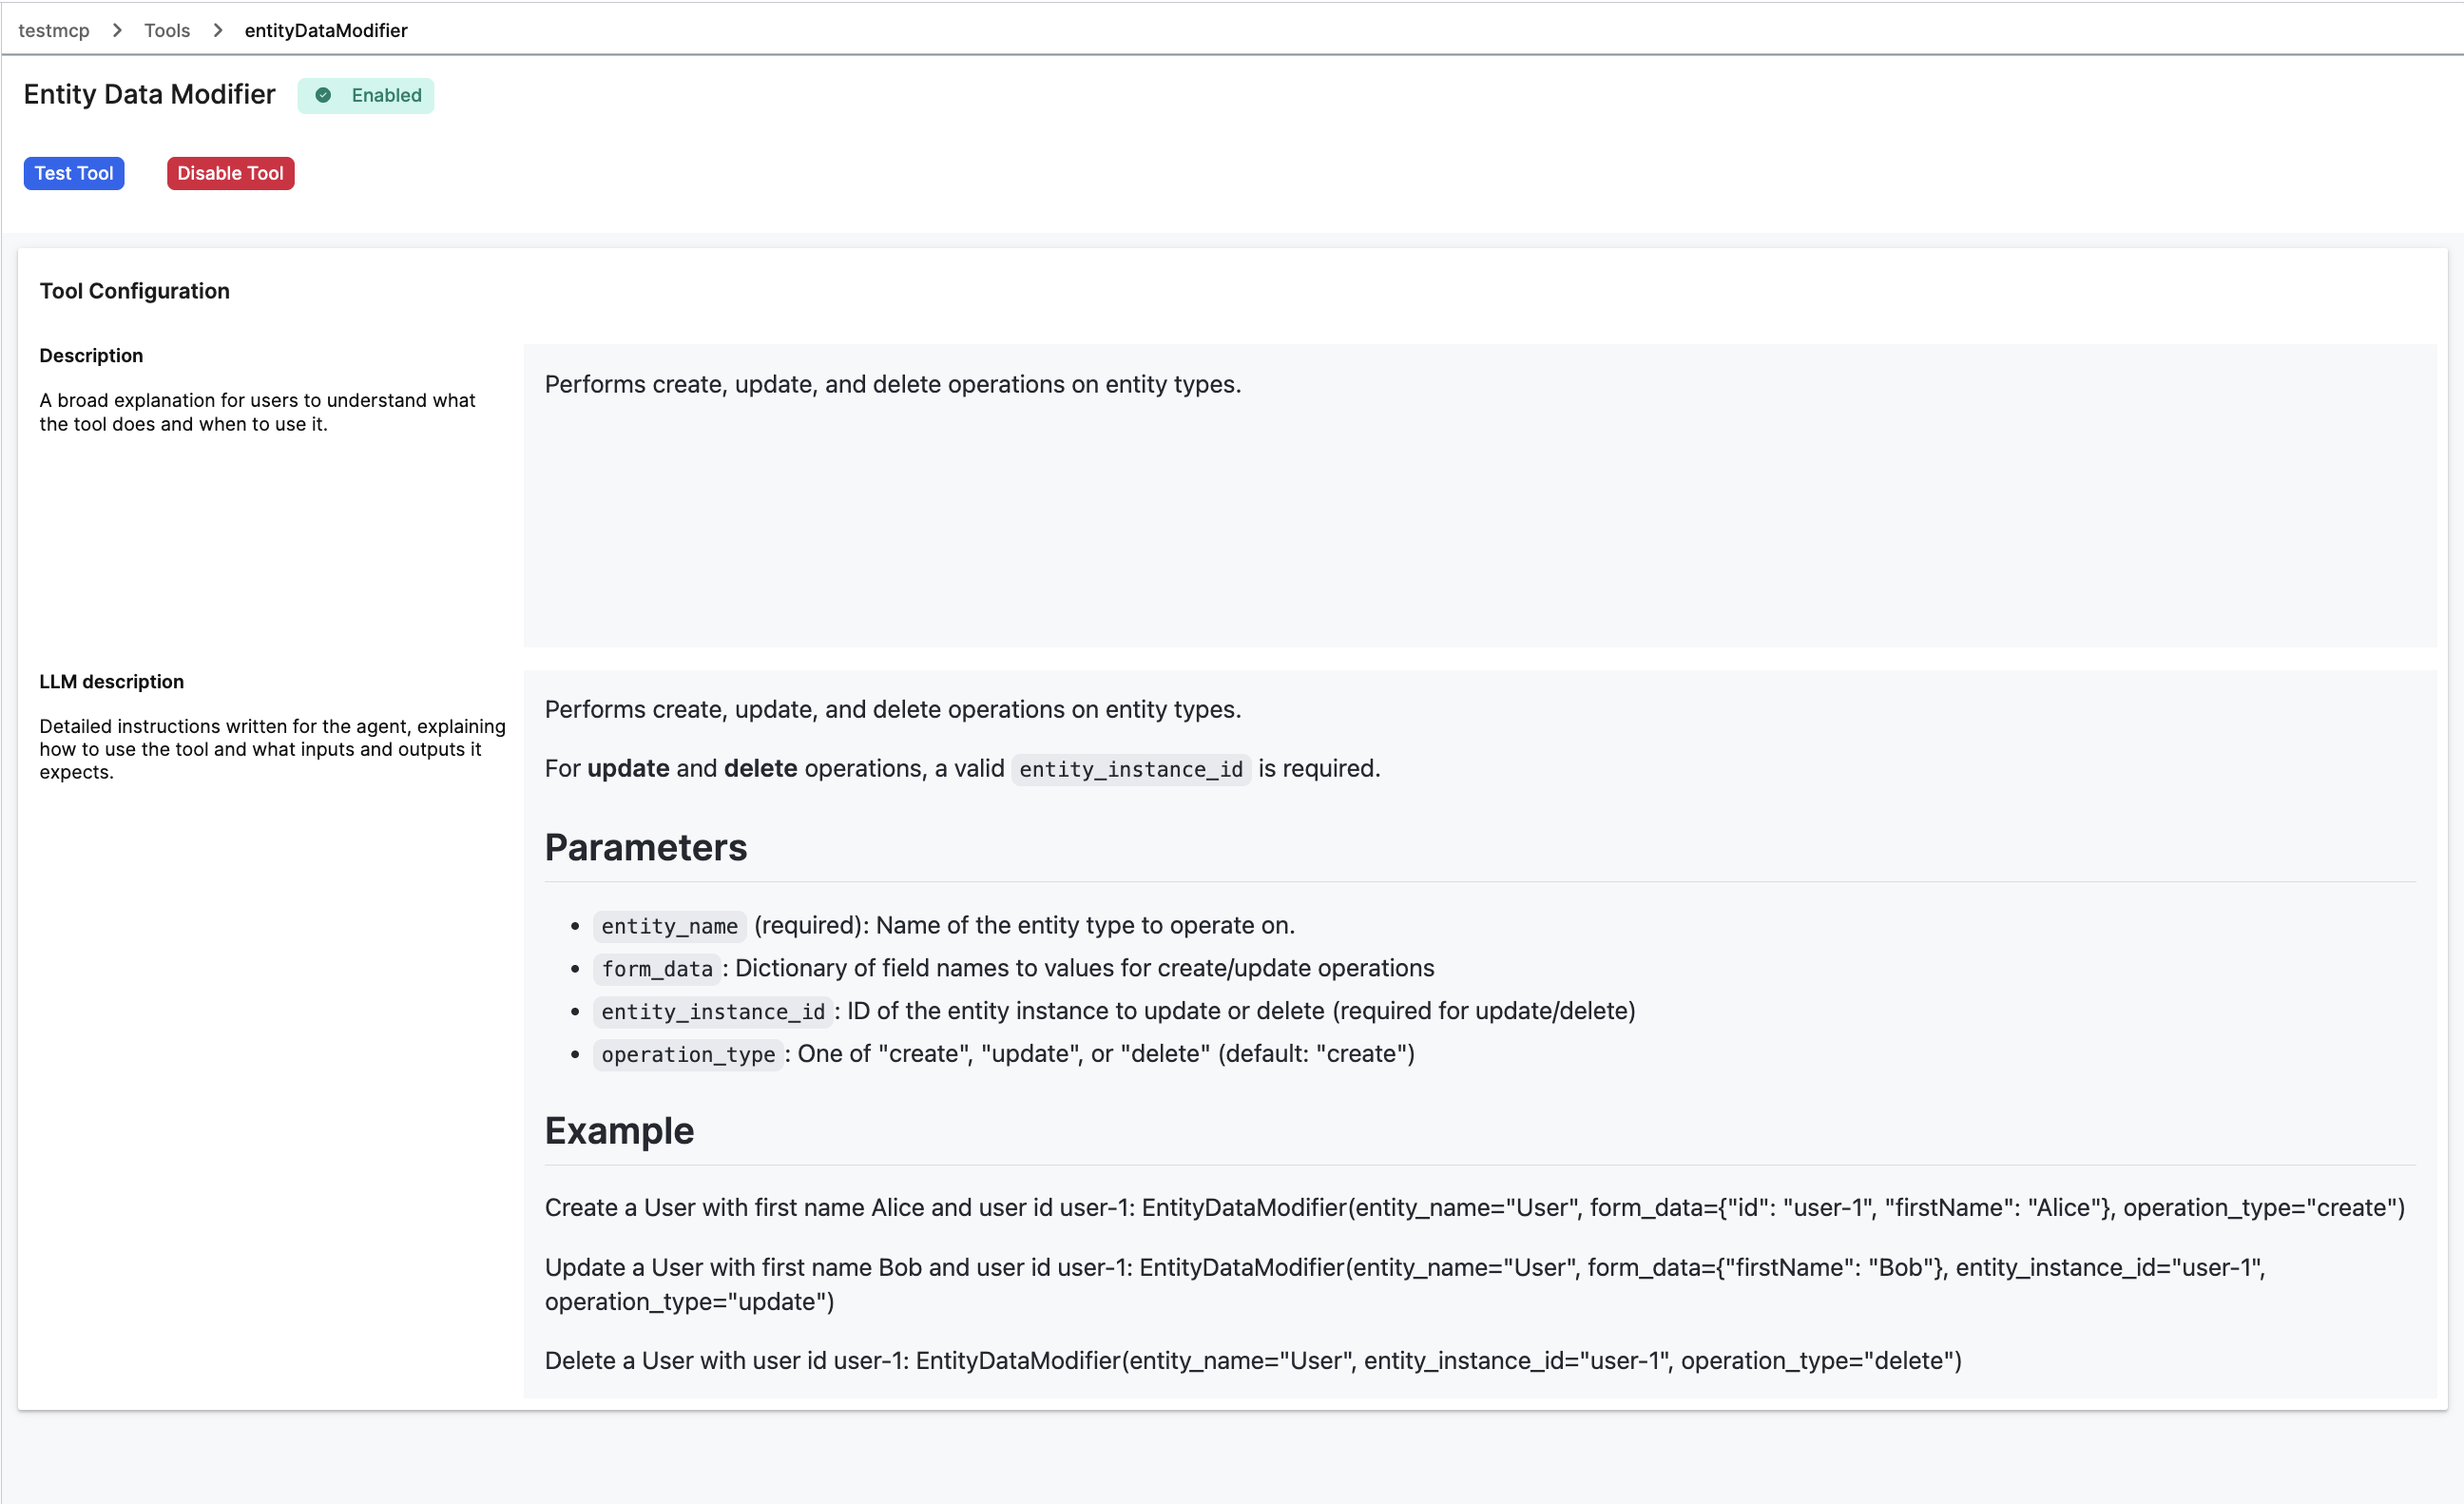
In Studio, select MCP > Tools.

Find runTest (Test Runner) in the grid and toggle Enabled for MCP to on. This tool calls
c3.TestRunneron your application and returns structured YAML results.Find getC3TypeInformation (C3 Type Info Retriever) and toggle Enabled for MCP to on. This tool reads live Type metadata from your running application, including fields, methods, return types, and documentation.
Confirm both tools show Enabled on their detail pages.
Only the App Admin role can toggle Enabled for MCP. If the toggle is disabled for you, ask your admin.
For the full list of default tools, see the Default tools section in App MCP Overview. To create custom tools beyond the defaults, see Manage MCP Tools.
Step 5 - Run the write-test-fix loop
Your assistant now has Central MCP for C3 platform knowledge and App MCP for live application actions. This step brings both together. You describe a feature in plain language, and the assistant writes the implementation, generates tests, runs them on your application, and iterates until they pass.
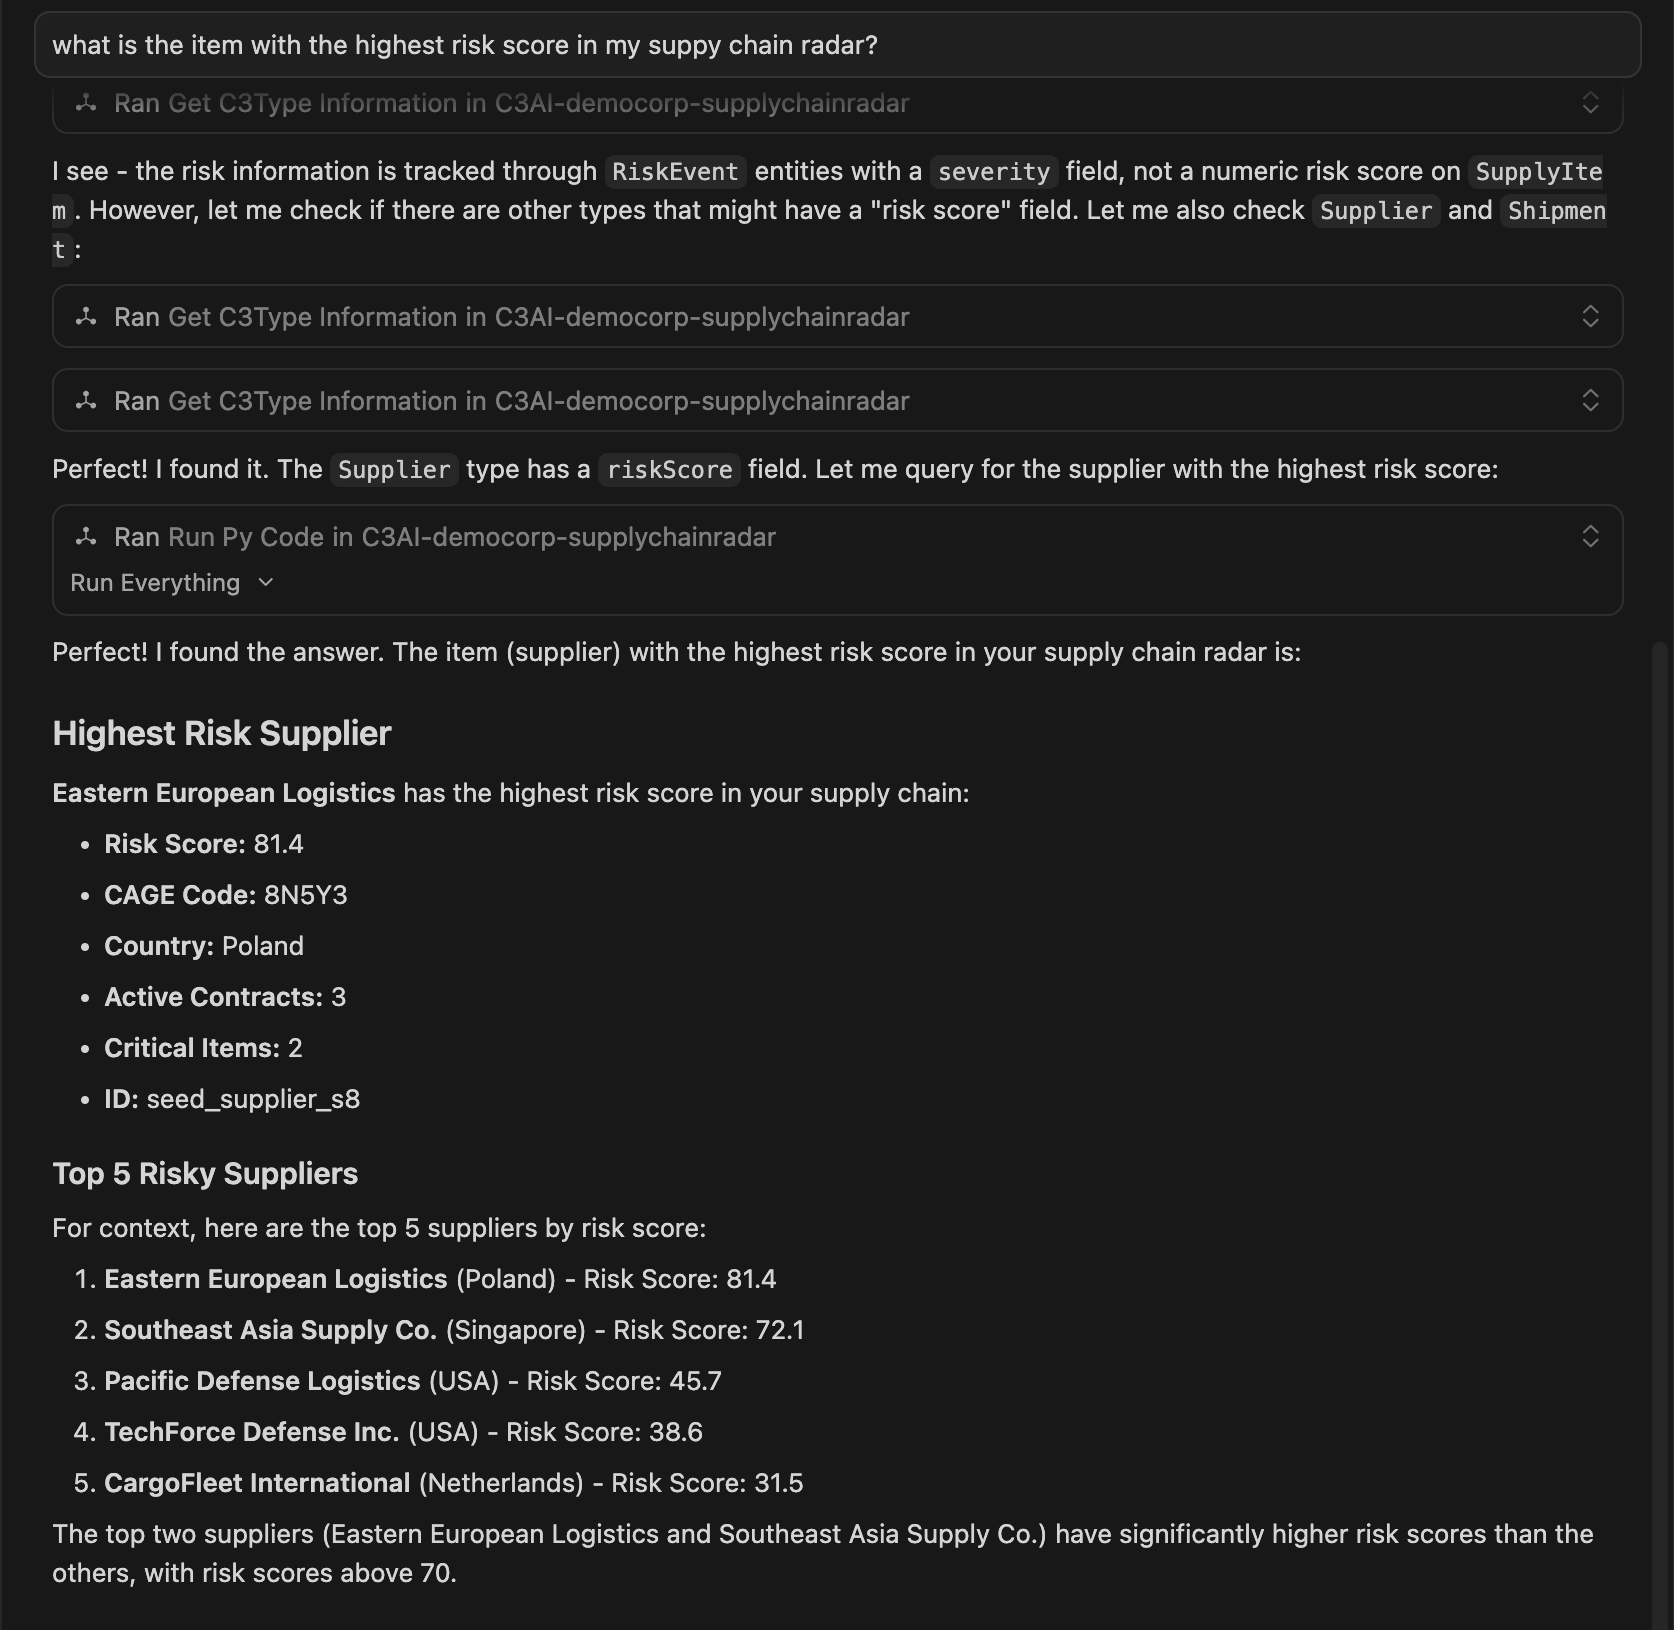
Start with a quick data-query prompt to confirm the connection works. Enable
entityDataRetrieverfrom MCP > Tools, then enter a prompt like the following in your assistant's chat. Replace the Type name and property with ones from your application:TextFind the [YourType] with the highest [YourProperty] in my application.The following screenshot shows App MCP tools being used to find the item with the highest risk score in an example application:
Once that returns a result, try the full write-test-fix loop. Replace the Type name and method description with something relevant to your application:
TextAdd a new method on [YourType] in my application that [describe what it should do]. Write js tests for this method and run the tests on my application. If any test fails, find the problem and iterate until they all pass.Your assistant picks the right tools from both MCP servers based on the task. A typical session includes:
- Reading Type metadata from your application (App MCP) to understand the existing schema.
- Using C3 documentation and code-generation tools (Central MCP) to draft the implementation following platform conventions.
- Reading skills and prompts for writing tests (Central MCP) to generate test cases.
- Editing files in your project directly.
- Running tests on your live application (App MCP) and reading the results.
- Fixing failures in the implementation or tests and re-running until the tests pass.
The exact tools and order vary depending on the prompt, the model, and your application.
Accept or reject each file change as the assistant proposes it.
The loop continues until all tests pass. The assistant summarizes the final state.
If the loop stalls, paste the failing test output back into chat with one line of context. Short feedback beats long rewrites.
Step 6 - Verify the run in MCP Monitor
Every tool call the assistant made against your App MCP server is recorded. Use Monitor to confirm the loop worked and to inspect arguments.
In Studio, open MCP > Monitor and select the Tools tab.
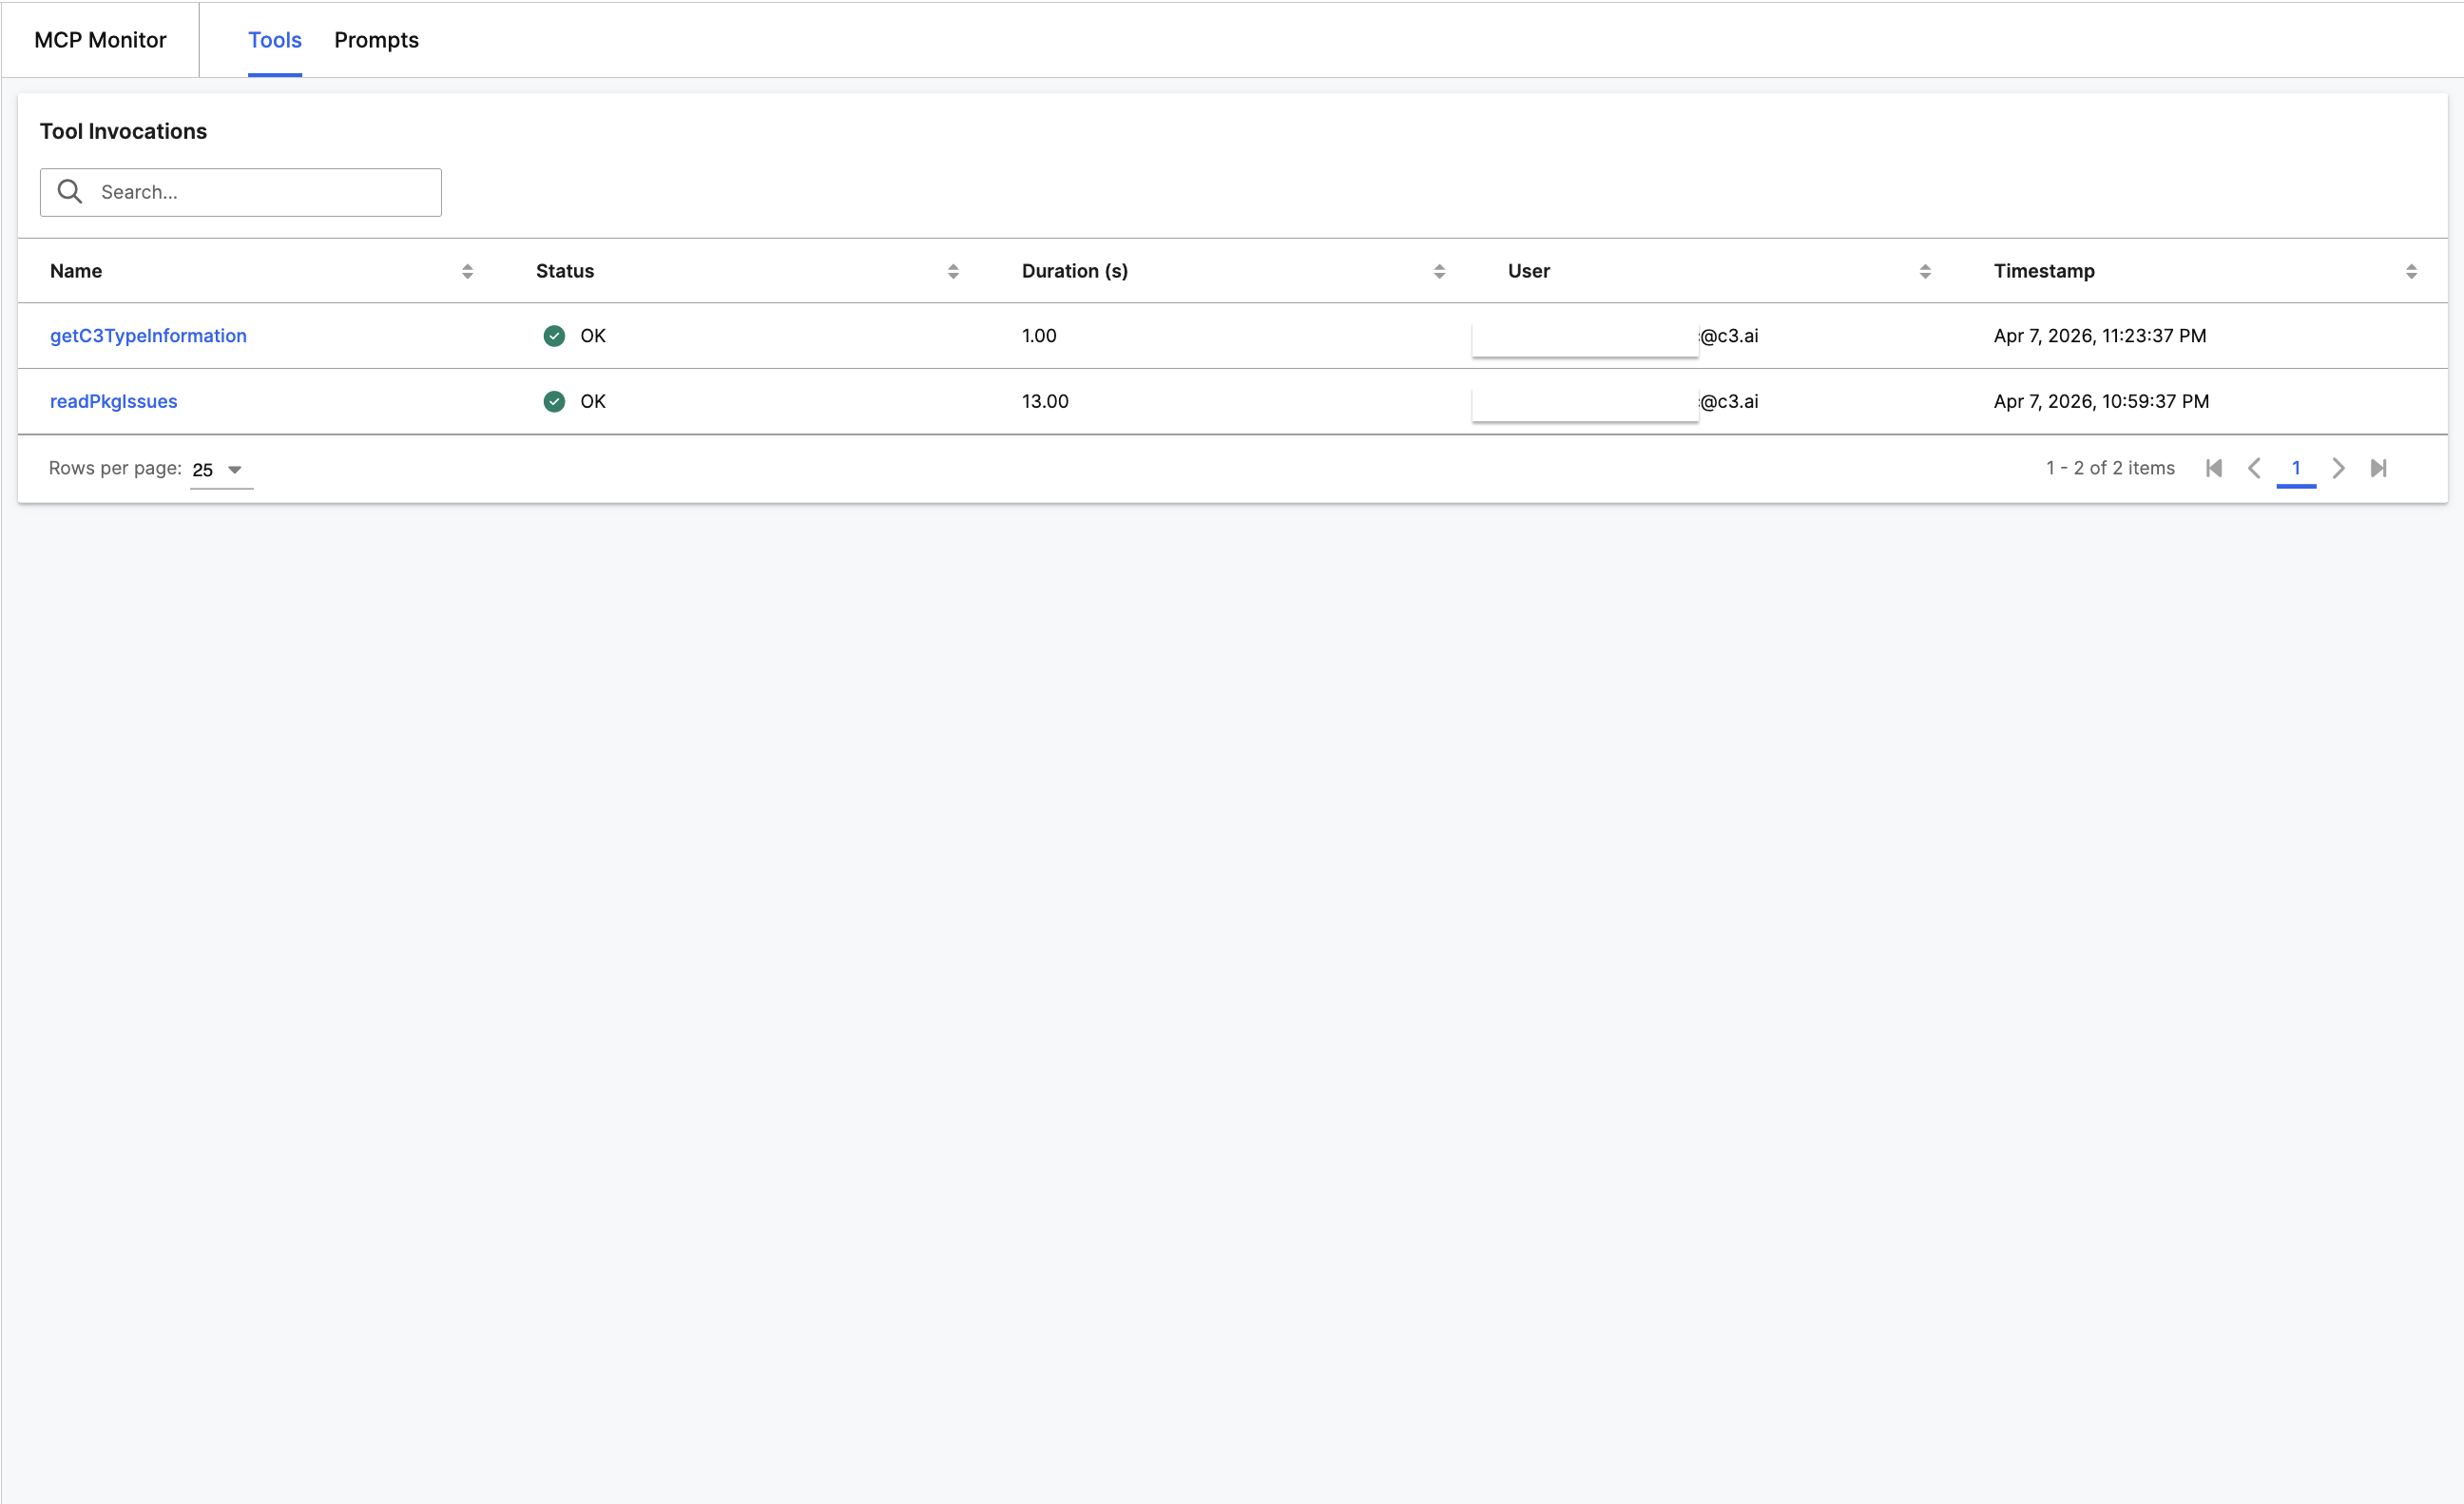
Find the rows for
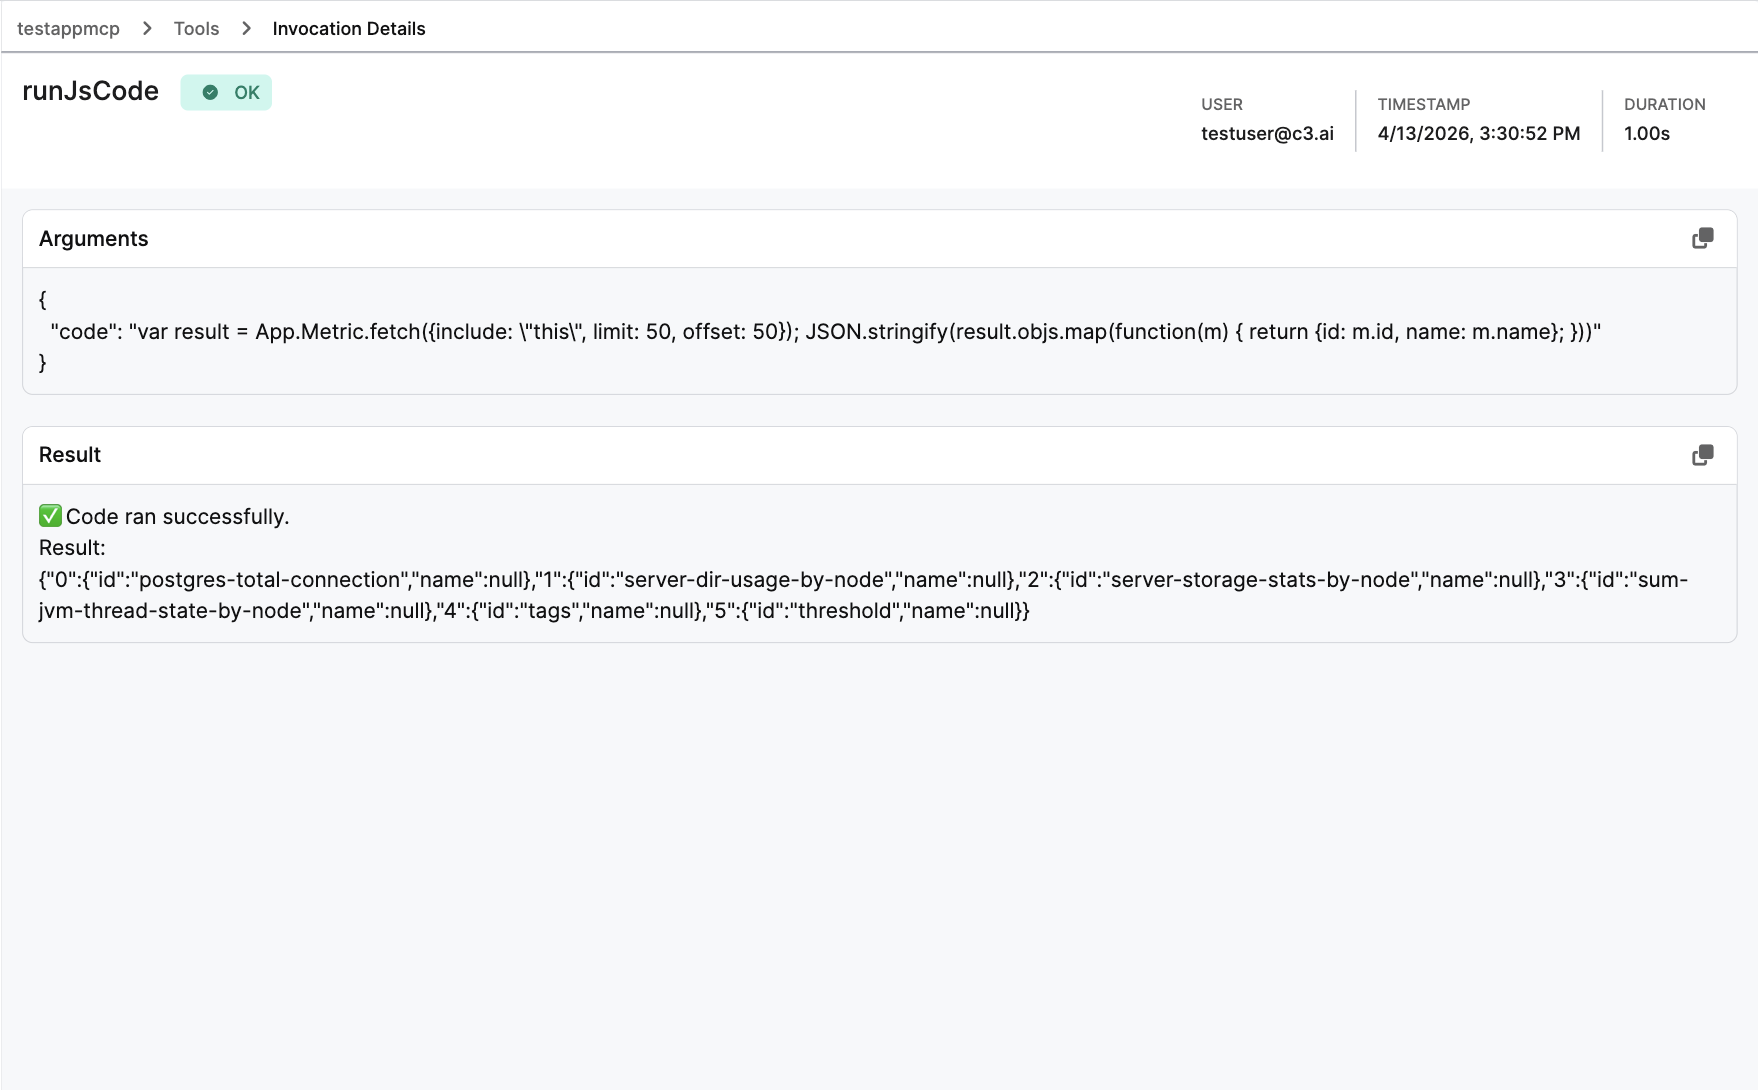
runTestandgetC3TypeInformation. The status column shows OK or Error.Select the row to open the invocation detail page. Review:
- Arguments: the exact payload the assistant sent.
- Result: the value the tool returned.
- Duration: how long the call took.
- Error: full stack trace if the call failed.
Admin users see calls from all users. Non-admin users see only their own calls.
For the full monitoring reference, see MCP Monitor.
What you now have
After finishing the tutorial, your environment is set up for the full agentic workflow:
- Central MCP provides C3 platform knowledge, code generation, and reusable prompts.
- App MCP runs tools on your live application: executing code, running tests, inspecting Types, and validating packages.
- Your assistant can edit files, call tools from both servers, and iterate automatically.
- Every App MCP tool call is recorded in Monitor for auditing and debugging.
From here, you can enable more default tools (such as entityDataRetriever and readPkgIssues), create custom tools for your business logic, publish reusable prompts, and install extensions to broaden what your assistant can do.
Next steps
Now that you have the end-to-end loop working, explore each area in more detail:
Expand your tool set
- Enable additional default tools such as
entityDataRetriever,readPkgIssues, andupsertSeedDatafrom the MCP > Tools page. See App MCP Overview for the full default tools list. - Create custom Python Tools or C3 Action Tools in the Tool Gallery. See Manage MCP Tools.
Add reusable prompts
- Publish prompt templates your team can invoke with
/in the IDE. See Manage MCP Prompts.
Install extensions and skills
- Install third-party extensions (GitHub, Atlassian, Figma, Playwright) alongside Central MCP to give your assistant access to external services.
- Discover and install skills that provide specialized C3 workflows such as vault encryption, type generation, and test automation.
- See Configure and Use C3 Central MCP Server for extensions, skills, and instruction file setup.
Manage access
- Review token hygiene, revoke stale tokens, and manage user access from the Users tab. See MCP Access.