C3 Code 8.12 Release Notes
C3 Code 8.12 makes connecting a data source part of the chat. Ask the agent to connect a source, and a card in the chat opens the Data Connector Wizard, where you enter the sign-in details. Agentic Workflows let the agent build and publish a business process as a series of steps that you run, schedule, and review. You sign in to a Model Context Protocol (MCP) server with your own account, and you choose which servers each workspace uses. You can also store an application in a GitLab repository, on gitlab.com or on your own GitLab server. C3 Code offers to send preview and package errors to the agent as they appear. The running preview, the code editor, and every configuration tool now open as tabs that you arrange beside the chat panel. Each chat gains a reasoning effort setting, models that route each request for you, and a meter that shows how full the model's context window is. Selection Mode points the agent at an element in your running application.
About this release
C3 Code 8.12 delivers nine new features and a set of improvements:
- Data Connector Wizard: Ask the agent to connect a data source, then enter the sign-in details in a wizard that opens as a workspace tab.
- Agentic Workflows: Describe a business process to the agent, and the agent builds and publishes a workflow that you run and schedule.
- MCP server sign-in: Sign in to an MCP server with your own account. Turn each server on or off for a workspace from the chat.
- GitLab repositories: Connect GitLab with a personal access token, link a GitLab repository to an application, and import an application from GitLab.
- Automatic error fixing: Send preview and package errors to the agent from a prompt in the chat panel, or have C3 Code send every error.
- Tabbed workspace layout: Open the preview, the code editor, and each configuration tool as a tab, and arrange tabs side by side. Dock the chat panel on the left or the right, or give it the full width.
- Model routing and reasoning effort: Choose a model by the service that hosts it, or let an Auto entry route each request. Set how much the model reasons before it answers.
- Context usage and compaction: See how full a chat's context window is, and compact the conversation to free up room.
- Selection Mode: Select an element in your running application and ask the agent to change exactly that element.
- Improvements: Chat panes, prompt steering, and the to-do list, workspace configurations, Git connection and branches, deployment progress and hibernation pauses, token figures and budget warnings, the template detail page, and administrator quotas.
New feature: Data Connector Wizard
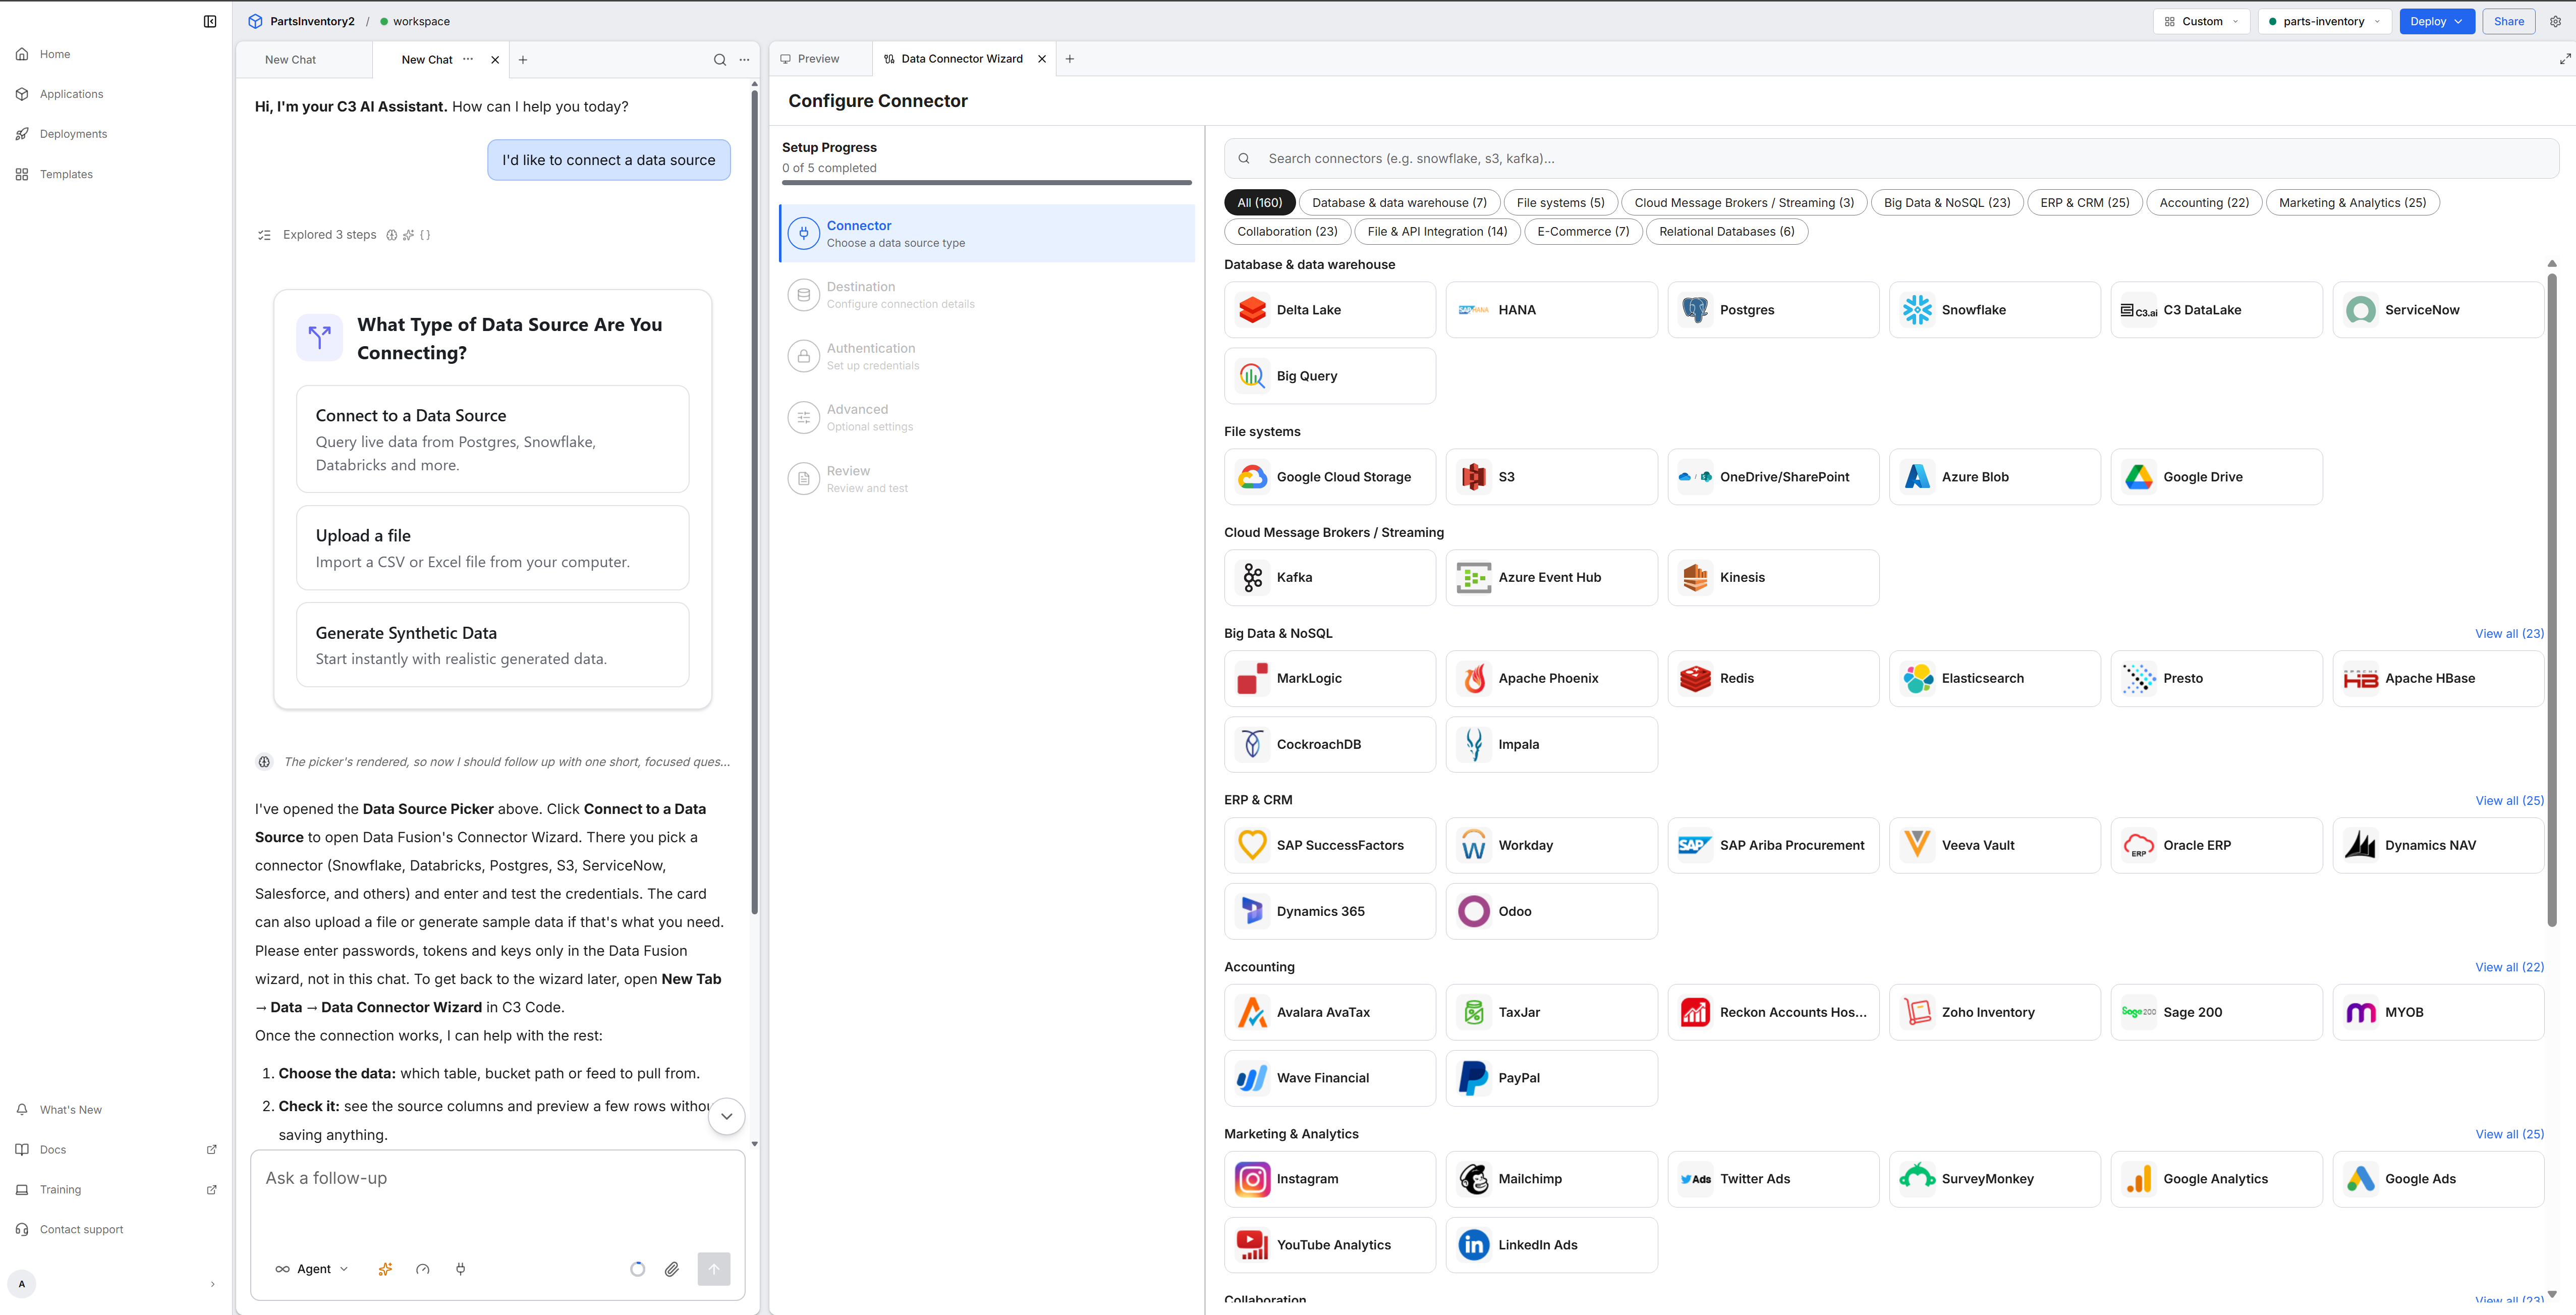
Connecting an outside system now starts in the chat. Ask the agent to connect a data source, and the agent shows a card that opens the Data Connector Wizard. The wizard opens Data Fusion at the form for adding a source, where you enter and test the sign-in details yourself. The card collects no sign-in details, so your credentials never pass through the chat.
Key capabilities:
- Data source card: The What Type of Data Source Are You Connecting? card offers three choices. Connect to a Data Source opens the wizard for a live system such as Postgres, Snowflake, or Databricks. Upload a file opens File Explorer for a CSV or Excel file. Generate Synthetic Data asks the agent for realistic generated records.
- Wizard tab: The wizard opens as a tab in your workspace. You can also open it from the Data category on the New Tab page.
- Finish screen: When the connection succeeds, Data Source Connected names your source. View in Data Fusion shows the new source, Create Another connects a second source, and Close Tab closes the wizard.
- The agent takes over: Tell the agent which table, file, or folder to use. The agent adds the source, maps the rows onto your records, runs the load, and can schedule it.
New feature: Agentic Workflows
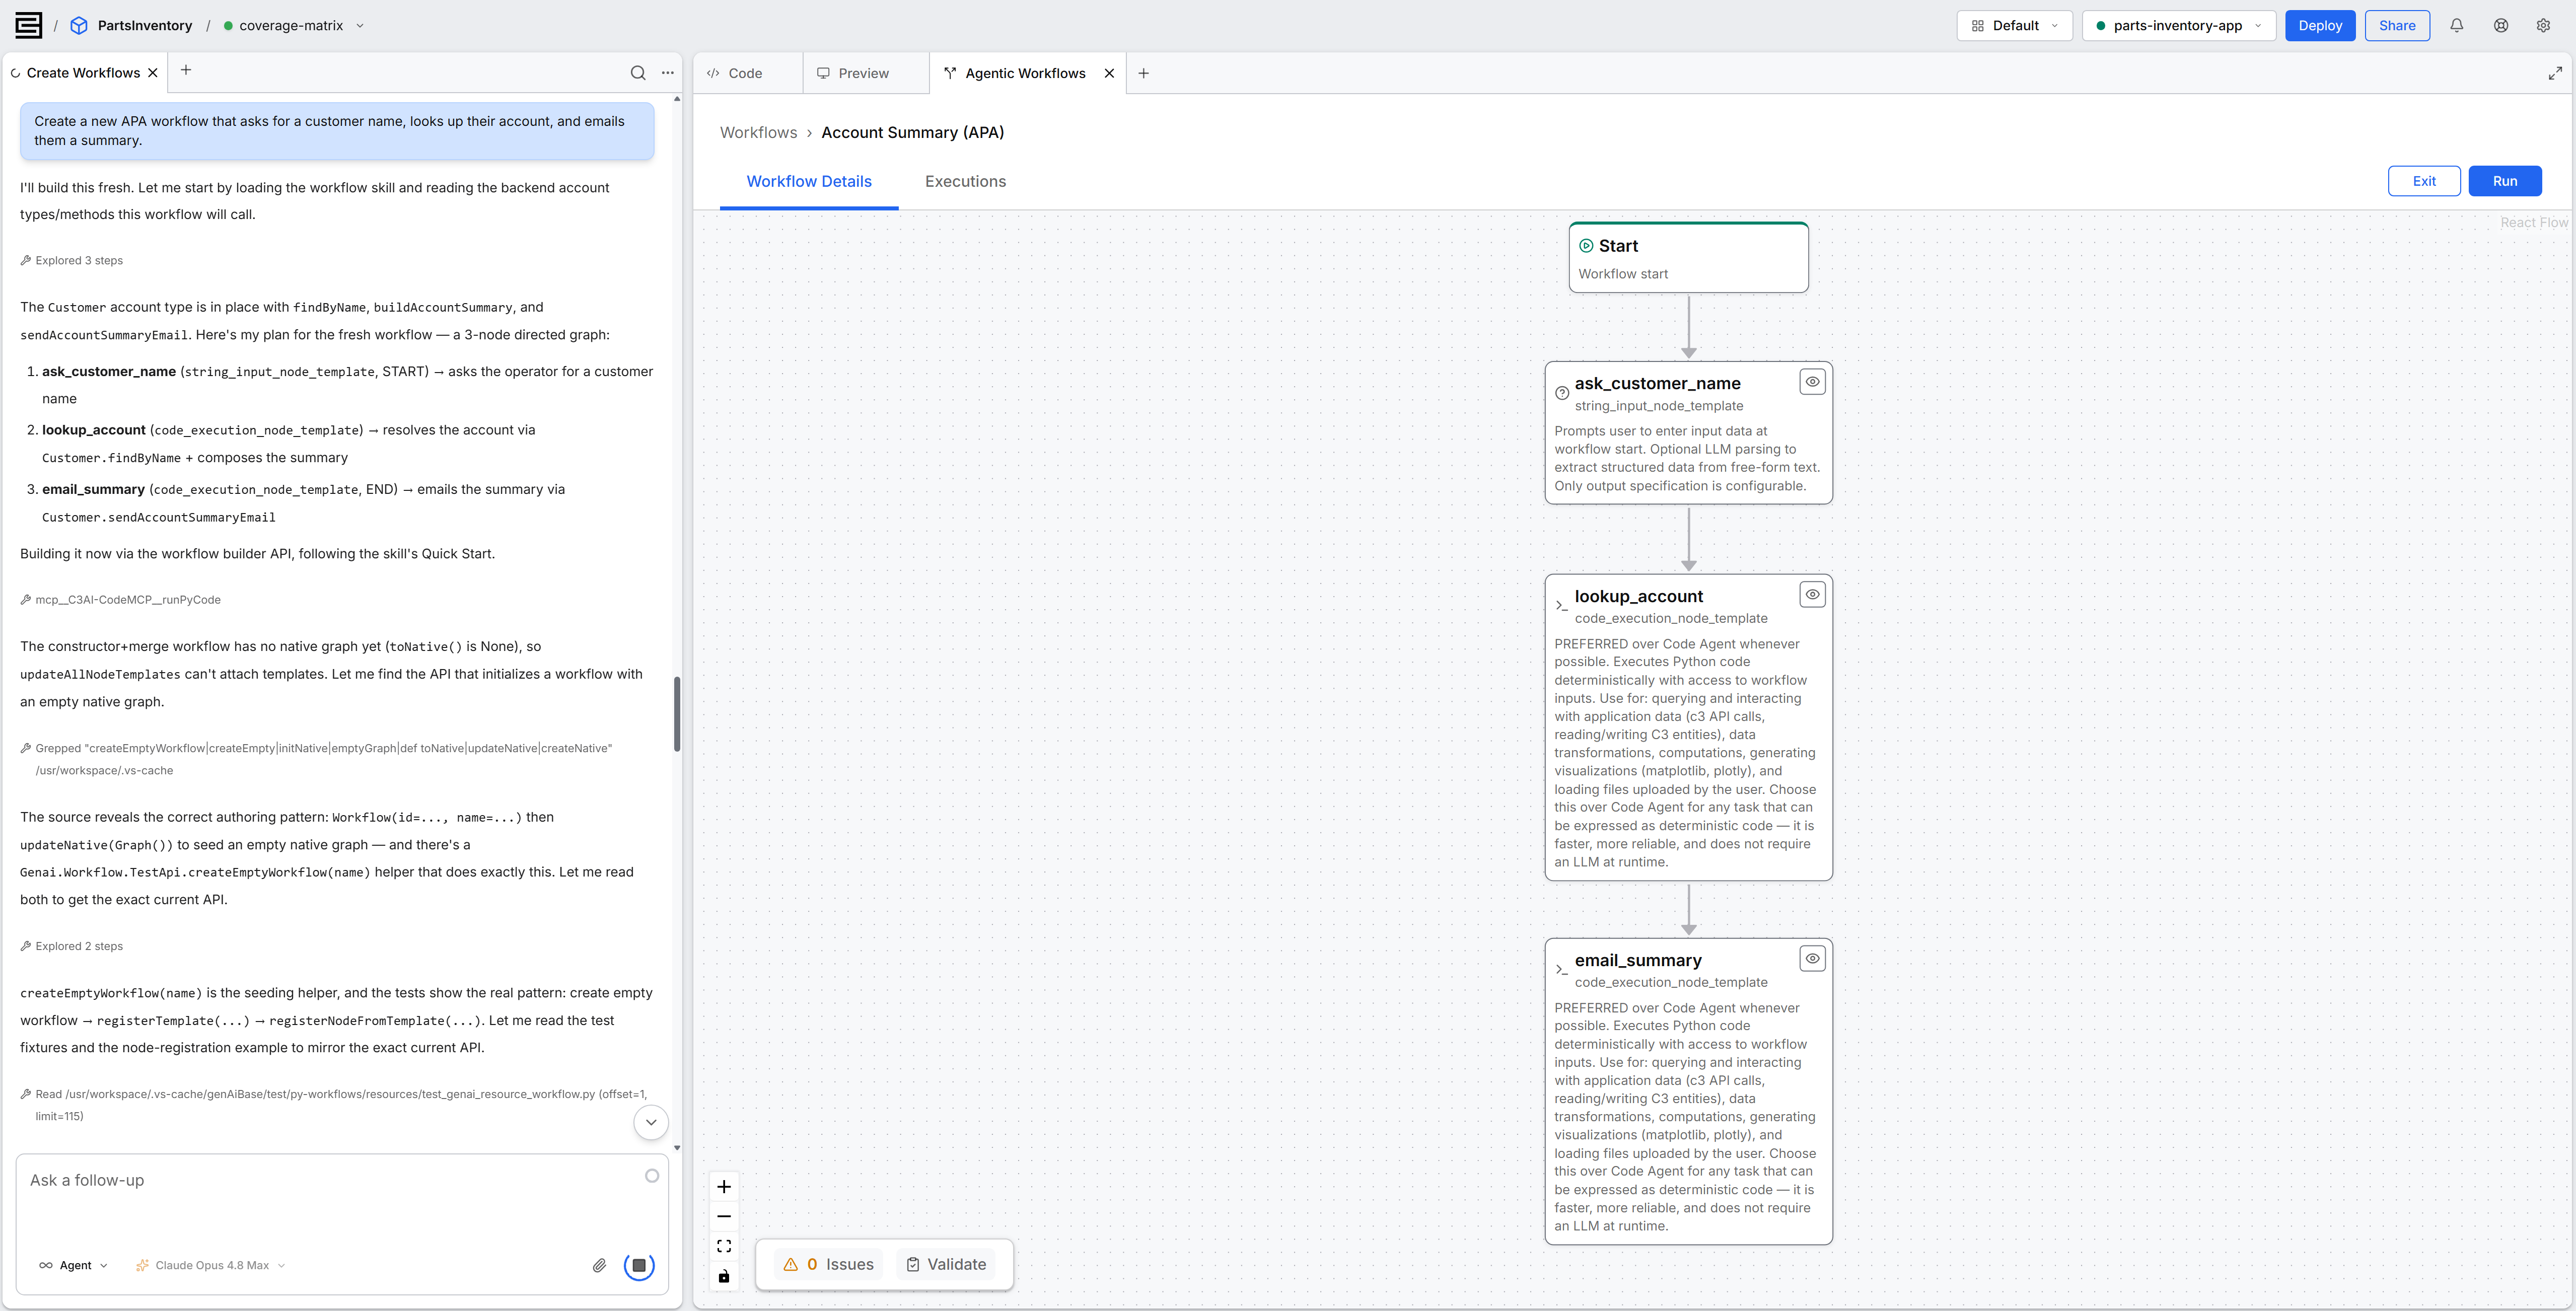
A workflow runs a business process as a series of steps. Examples include a report you generate every week, or a request that needs the same checks before approval. Each step is a node, and the connections between the nodes set the order the steps run in. Describe the process to the C3 Code agent, and the agent builds, checks, and publishes the workflow. The Agentic Workflows tool lists the workflows in your application, so you can open, run, and schedule each one and review its runs.
Key capabilities:
- Build by description: Describe the workflow in the chat panel, and the agent asks about its name and structure before it builds. Name every node and connection up front, and the agent builds immediately. To change a workflow later, describe the change in the same conversation.
- Workflow canvas: Read the workflow's graph, validate the workflow, and edit a node's variables and parameters while the workflow is unpublished. Schedule a published workflow from its Start node.
- Manage and run: Find, sort, publish, clone, rename, and delete workflows from the Agentic Workflows list. Run a workflow and review the output of each run, and start several runs of one workflow at the same time.
- Document generation: A workflow can produce a formatted document, such as a report or a summary. Review and edit the document in the built-in editor, then export the document or ask the agent for a downloadable file.
- Workflow roles: WorkflowViewer opens workflows and reviews their runs. WorkflowEditor builds, changes, publishes, runs, schedules, clones, and deletes workflows. WorkflowOwner manages every user's workflows and their runs. An application administrator has full workflow access.
The Agentic Workflows tool needs the genAiUi dependency, which is the package that provides the workflow pages. Ask the agent to add the dependency, or add it yourself in the Code tab.
See Author a Workflow with the Agent, Manage Your Workflows, Workflows Canvas, and Generate Documents in a Workflow.
New feature: MCP server sign-in
An MCP server connects the agent to an outside system, such as your team's issue tracker or a documentation service. You now sign in to many MCP servers with your own account, through OAuth, so you never copy a token into C3 Code. An MCP menu in the chat shows each server's status and turns a server on or off for one workspace.
Key capabilities:
- Sign in with your account: The Authorization field on the Add MCP Server form starts on OAuth. Select Save, sign in to the service in the window that opens, and approve access for C3 Code.
- Token options: Select Bearer for most tokens, and C3 Code adds the
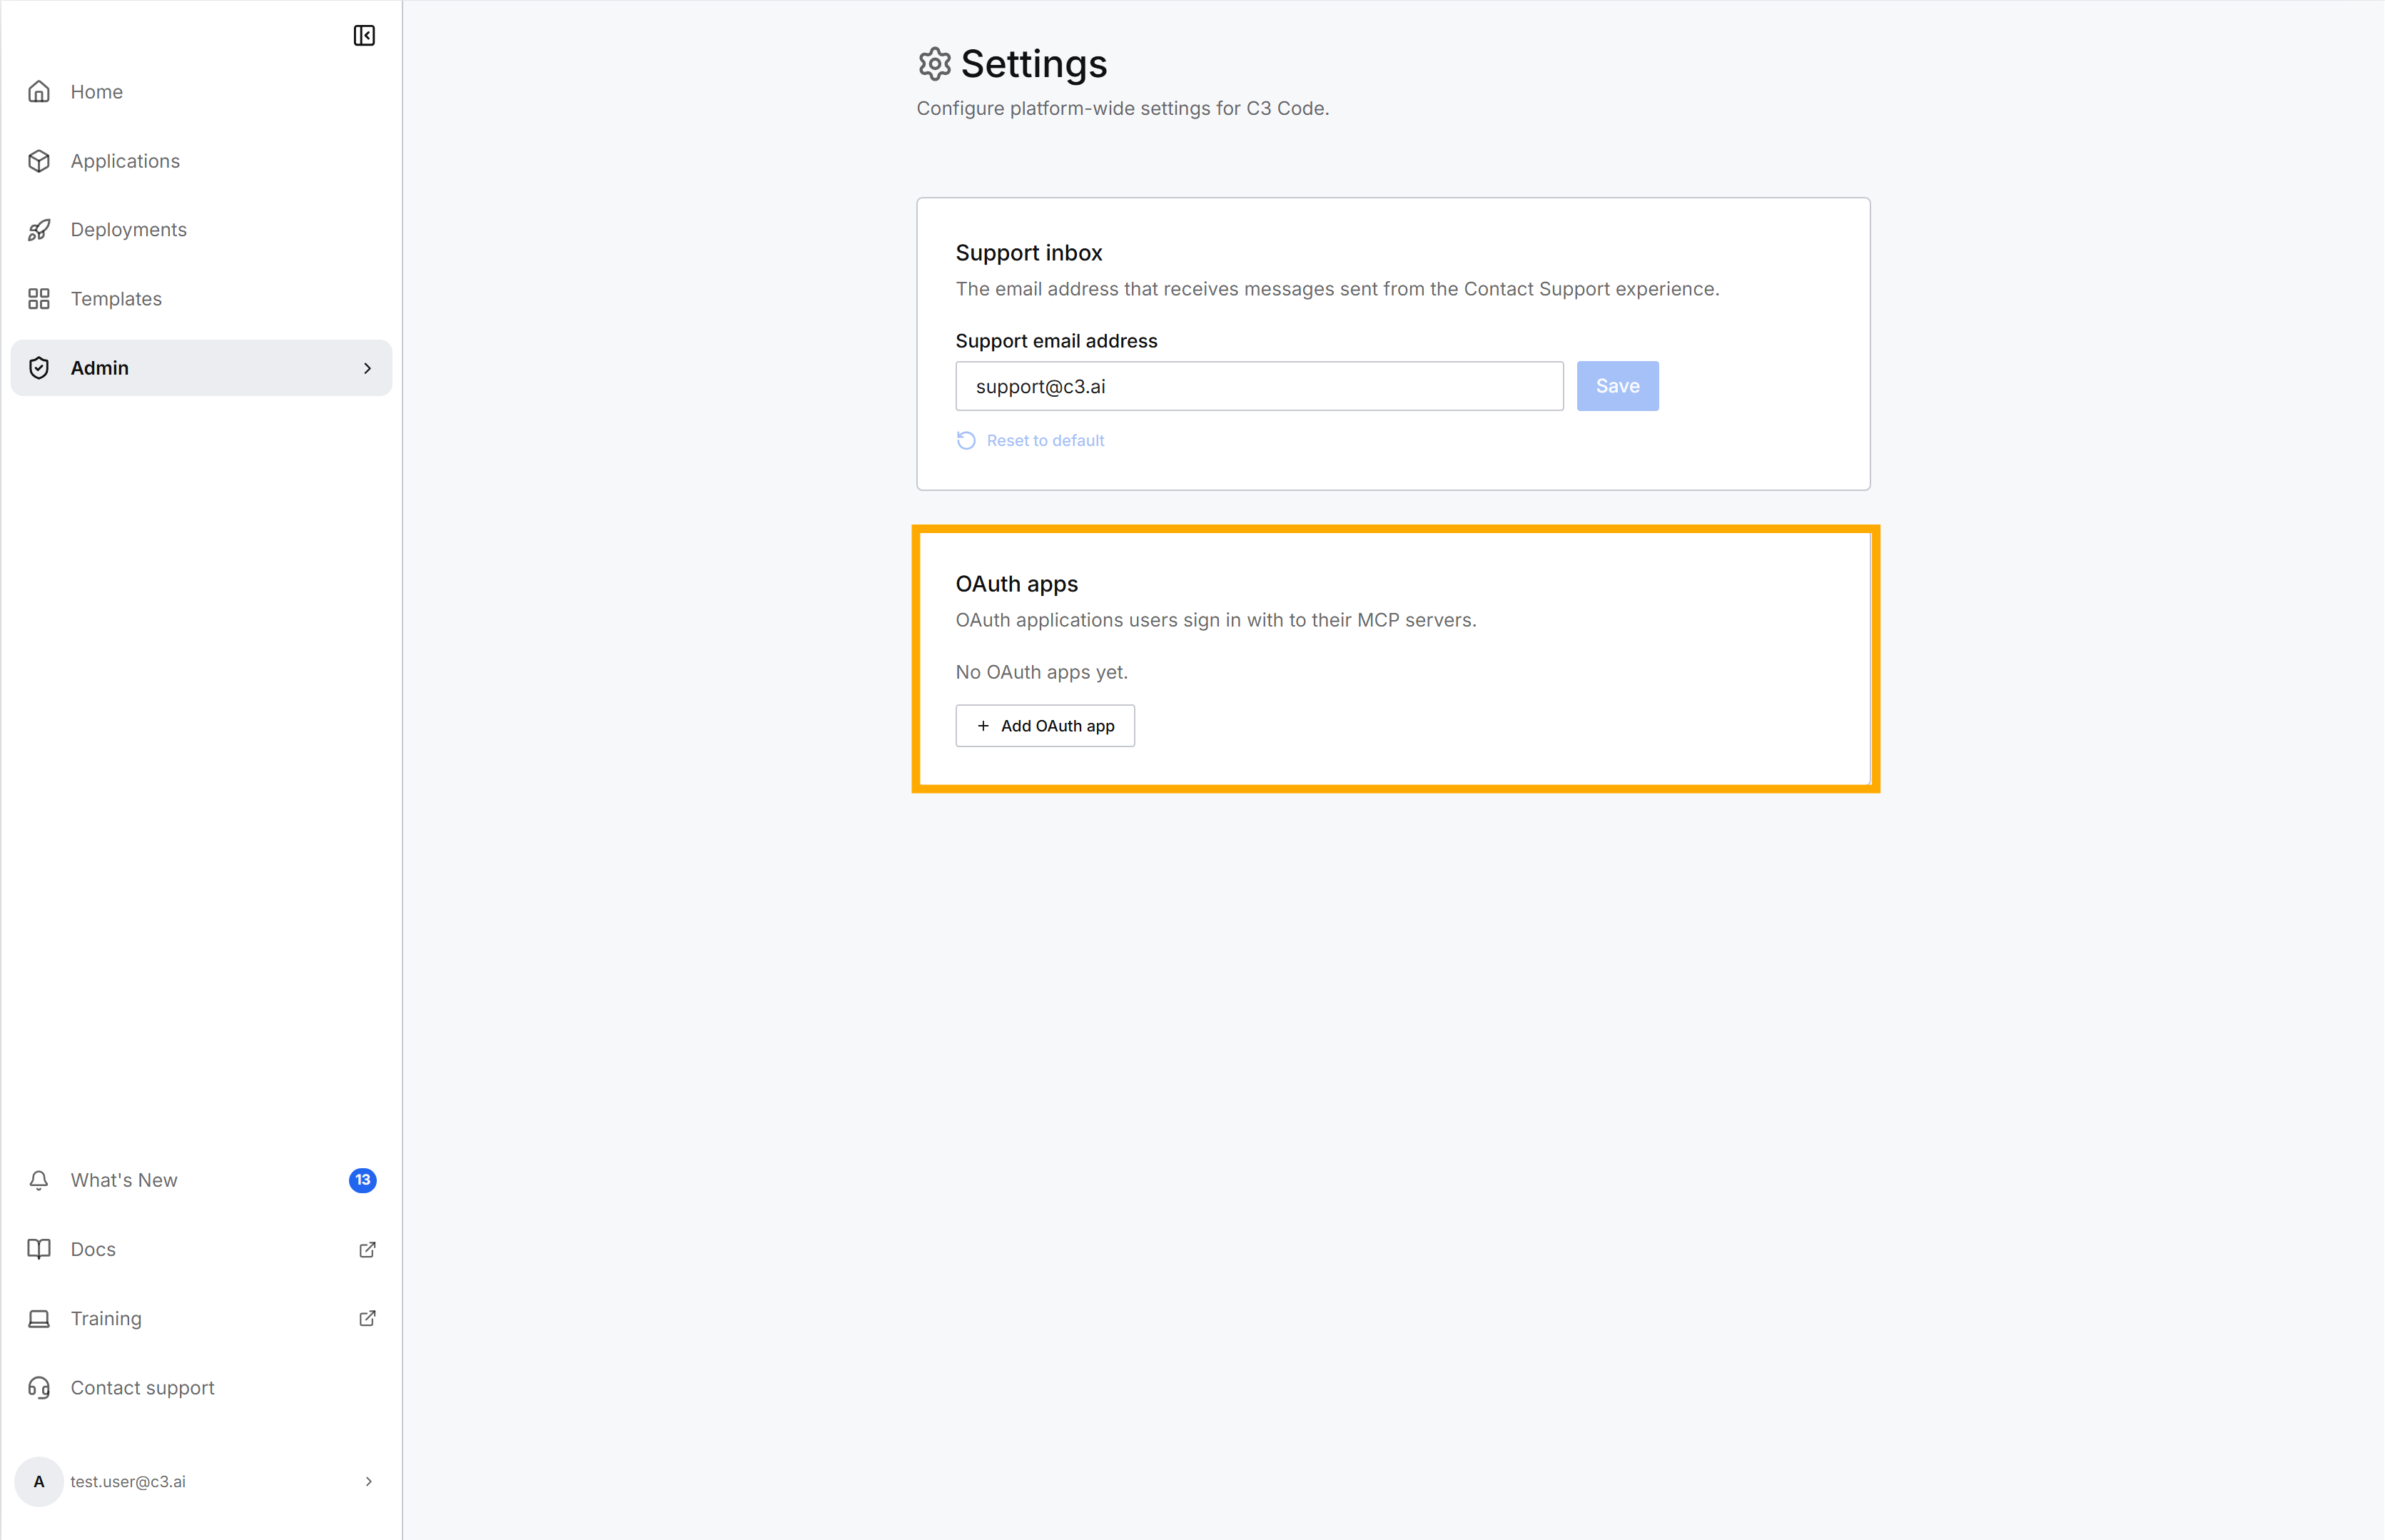
Bearerprefix. Select Custom for a token the server owner says to send in a different format, or None for a server that needs no sign-in. - Apps an administrator added: Some services accept sign-ins only from apps their owner approved in advance. For those servers, select Use an app an administrator added and pick the app. An administrator adds these apps in the OAuth apps card on the Settings page of the Admin section.
- MCP menu in the chat: Select MCP, next to the model selector, to see each server's status and tools. Turn off a server's switch to leave it out of the current workspace. The change covers every chat in that workspace and affects only you.
- Reconnect: C3 Code renews a sign-in when the agent uses the server shortly before the sign-in expires. When a renewal fails, a warning icon appears on MCP, and Reconnect signs you in again.
- No restart: Running workspaces pick up a server you add in Settings, and the agent can use the server from your next message.
See Connect MCPs and Work in Multiple Chats.
New feature: GitLab repositories
C3 Code now stores an application in GitLab as well as GitHub. You connect your GitLab account with a personal access token, on gitlab.com or on a self-managed instance, which is a GitLab server that your company runs. You then commit, push, pull, and switch branches in a GitLab repository the same way you do in a GitHub one.
Key capabilities:
- Connect GitLab: In Settings, the GitLab card under Git Providers takes a personal access token with the
apiscope. For a self-managed instance, enter its API address in Self-managed GitLab API URL (optional). C3 Code checks the token with GitLab before it saves the connection. - Link a GitLab repository: When you connect both GitHub and GitLab, choose the provider at the top of the popover in the workspace header. Create Repository creates a private project in your personal namespace, and Select Existing Repository lists the projects where you hold the Developer role or higher.
- Import from GitLab: In the Import from Git repository dialog, select GitLab, then type the Package name and, when the package is in a folder, the Application Path. C3 Code checks that the package's
.c3pkg.jsonfile exists in the branch. - One instance per connection: C3 Code sends your GitLab token only to the instance you connected. To use a repository on another instance, connect GitLab again with a token for that instance.
Continuous deployment builds from GitHub repositories only. An application linked to a GitLab repository deploys from a workspace.
See Connect GitLab and Start from a Git Repository.
New feature: Automatic error fixing
C3 Code watches the running preview and your package for errors while the agent changes your application. When an error appears, a prompt in the chat panel offers to send the error to the agent. The error then reaches the agent without you copying the message into chat.
Key capabilities:
- Fix prompt: Select Fix it to send the error to the agent, which finds the cause, applies a fix, and rebuilds the preview. Select Dismiss to handle the error yourself.
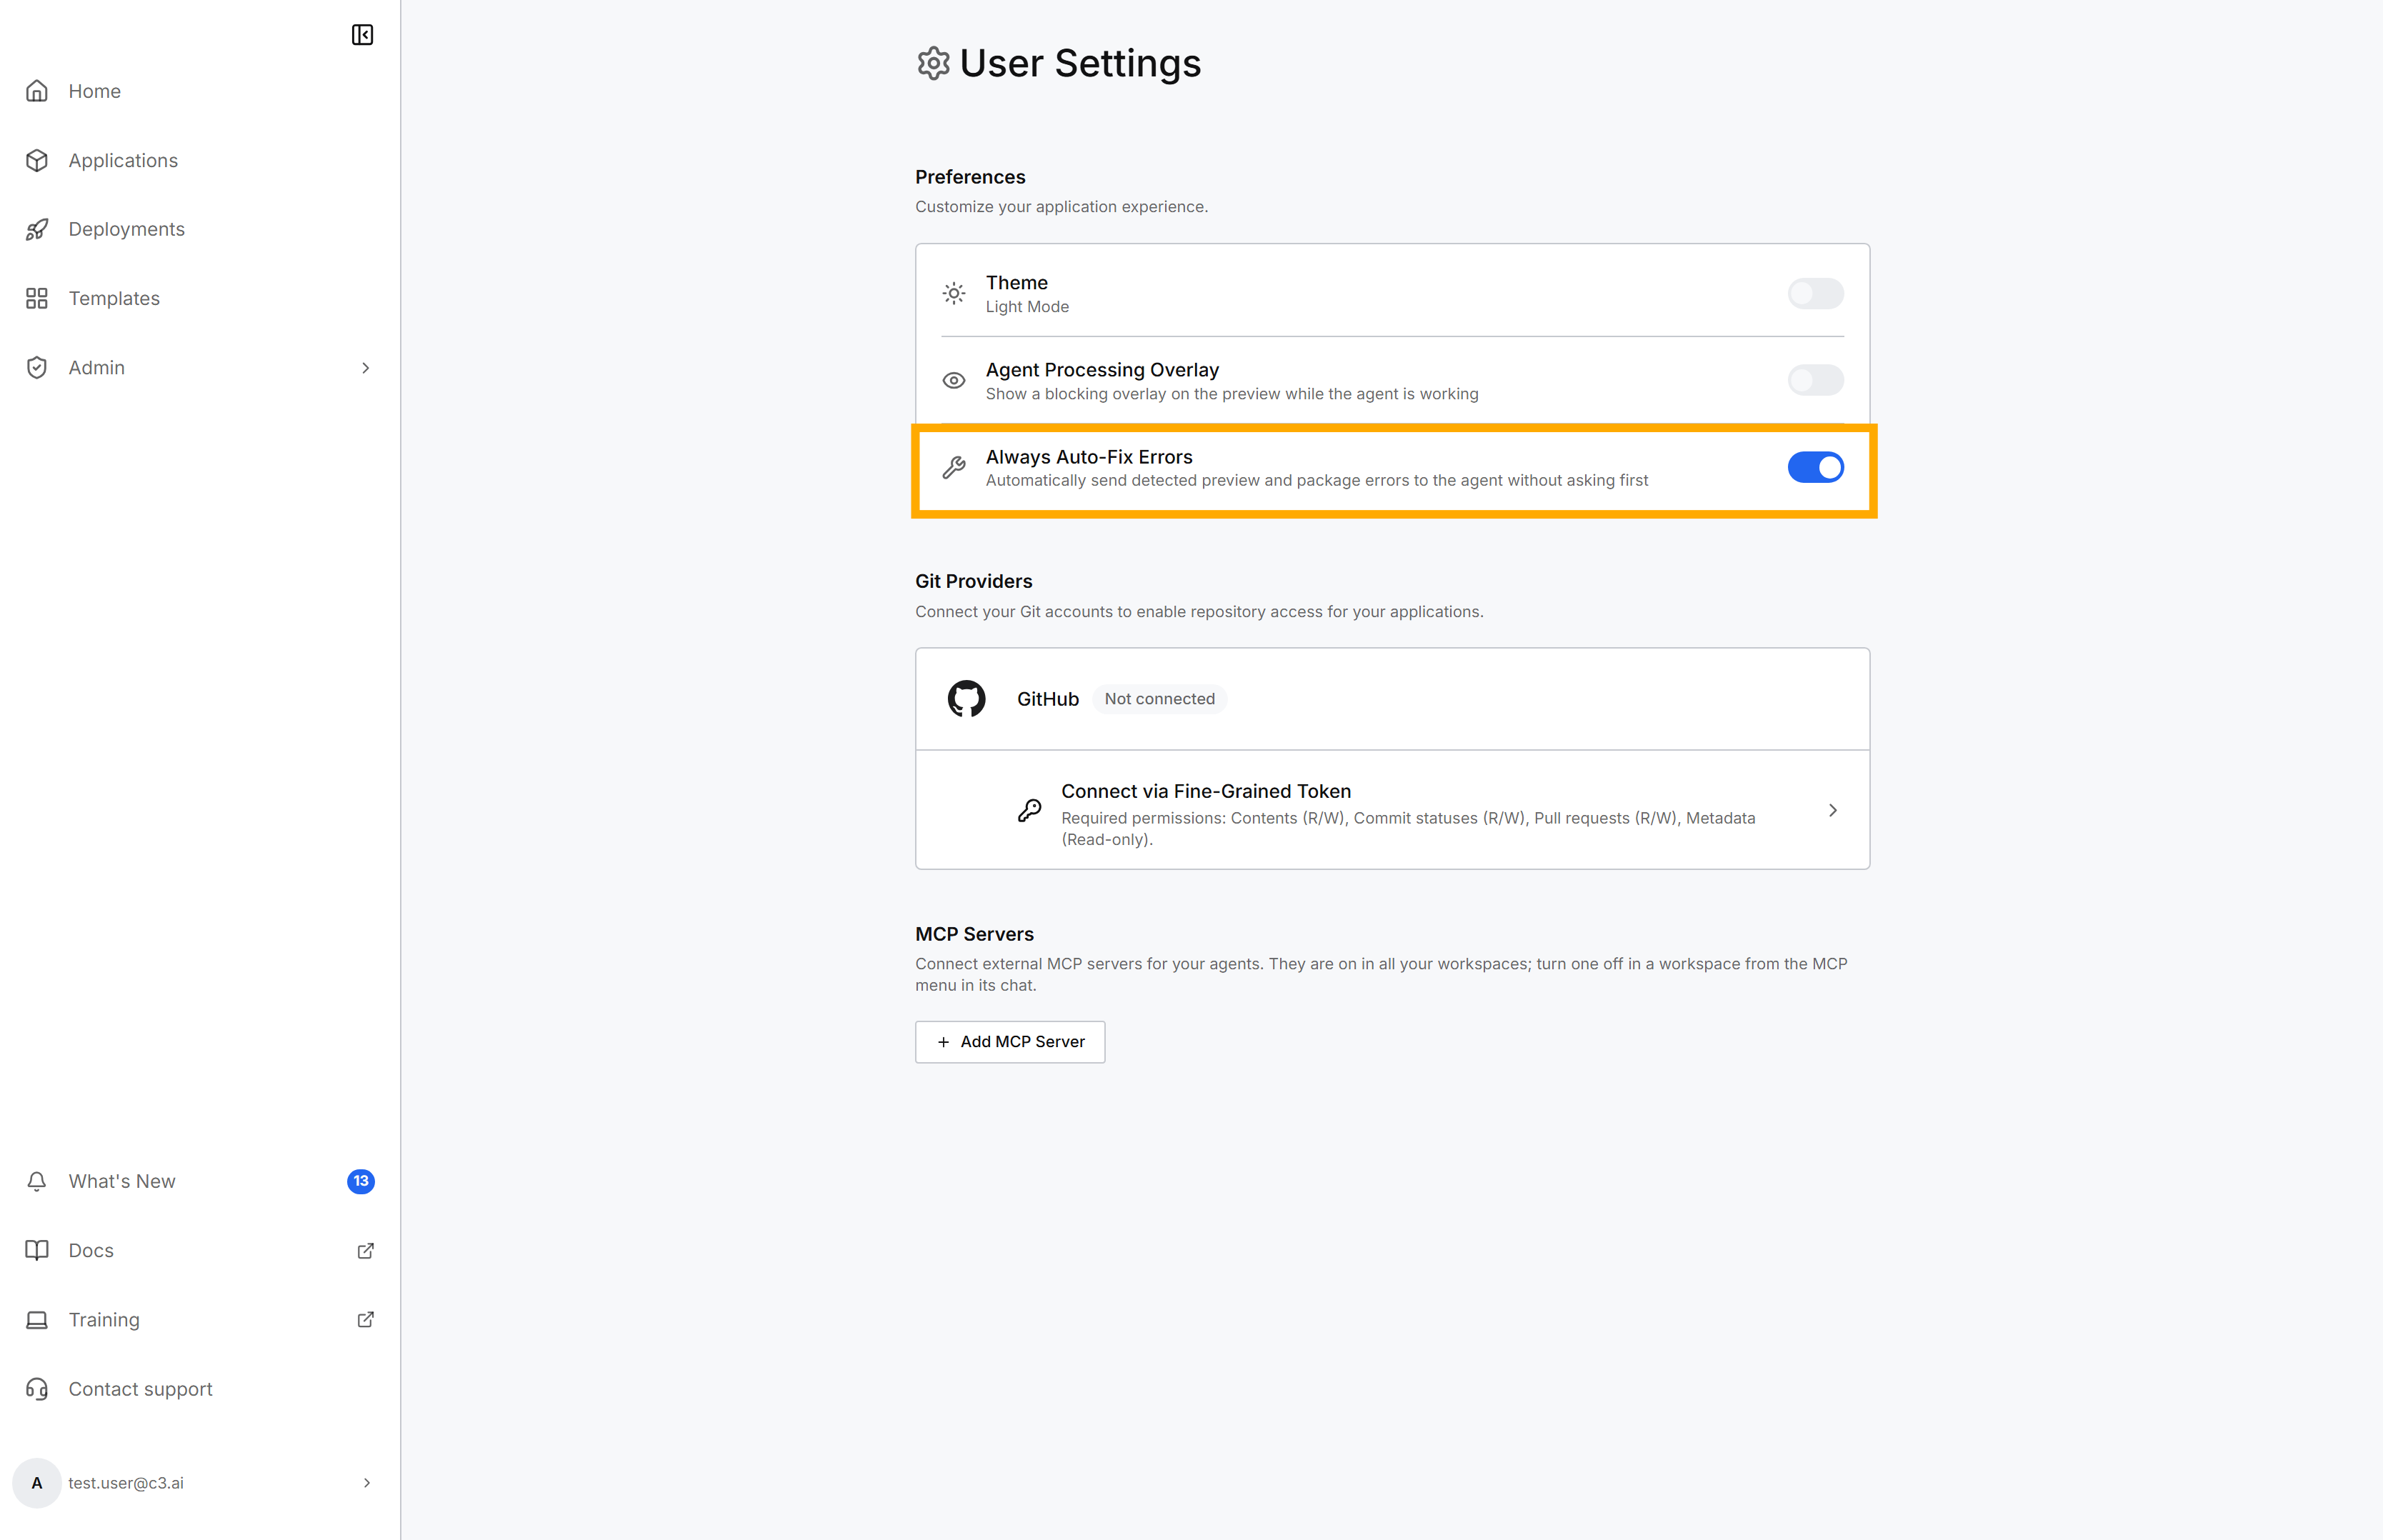
- Automatic fixing: Turn on Always Auto-Fix Errors in the Preferences section of the User Settings page, or select Always fix automatically on any prompt. C3 Code then sends every detected error straight to the agent. The setting stays off until you turn it on.
- Preview and package errors: C3 Code detects two kinds of error. Preview errors are runtime errors in the running application. Package errors are the build and validation problems that block a deployment.
- One prompt for each error: C3 Code offers a fix for errors, not warnings, and sends each distinct error once per session.
New feature: Tabbed workspace layout
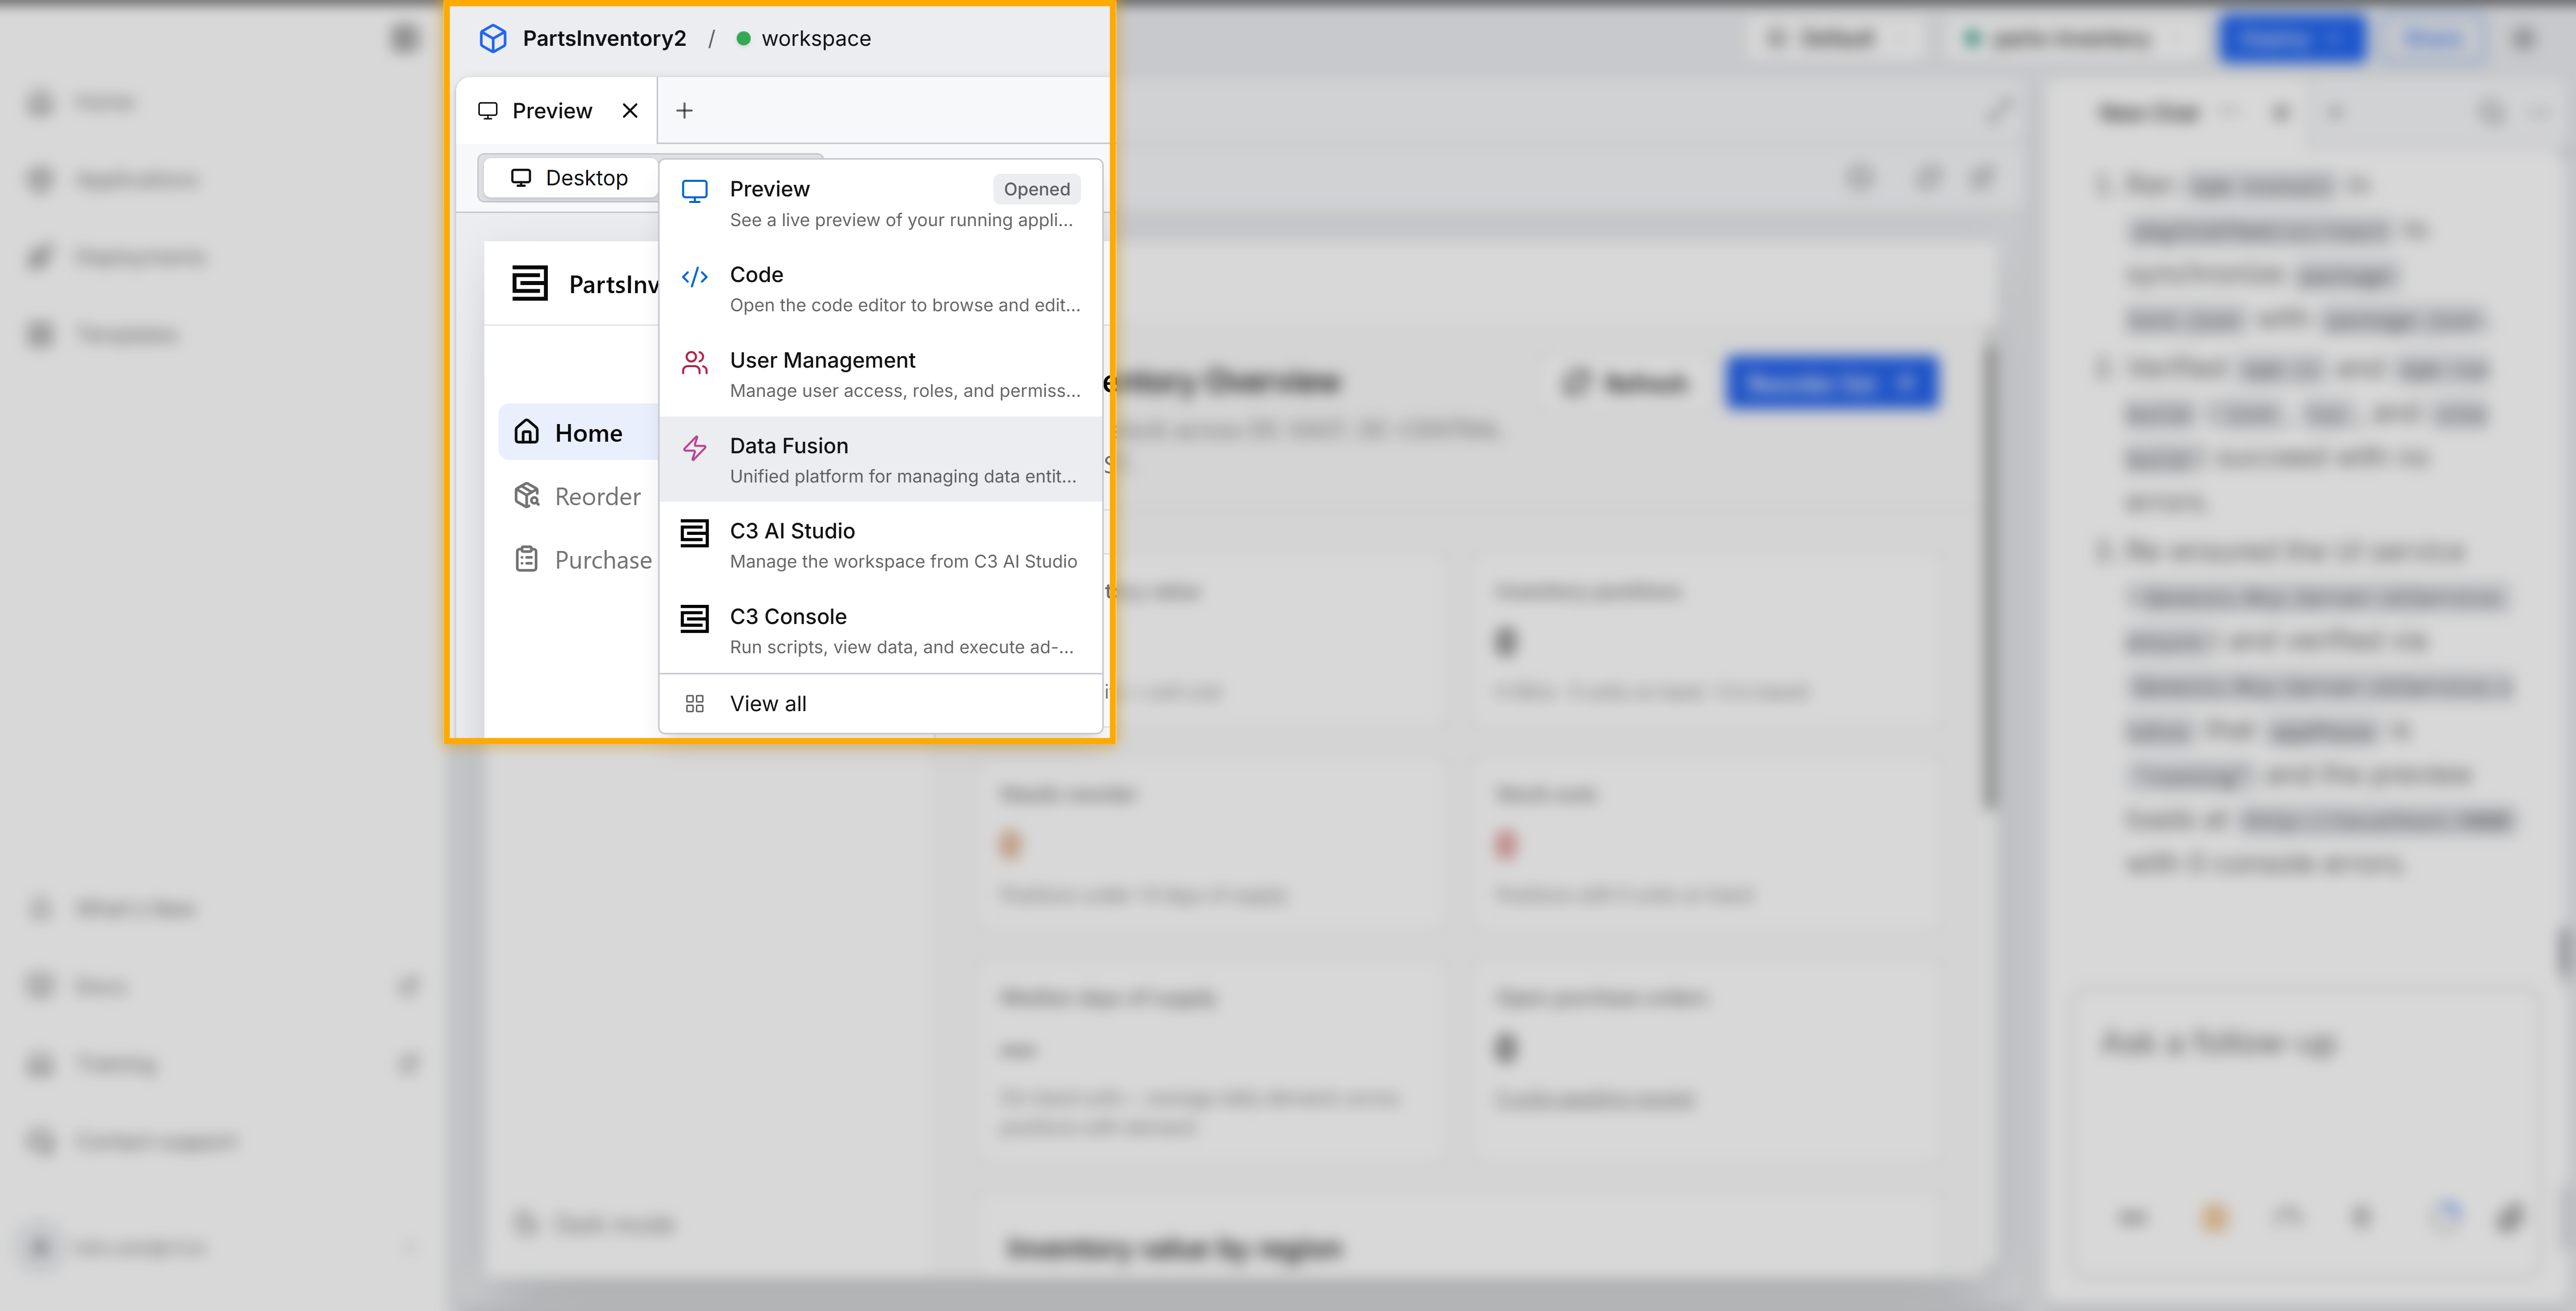
Each tool in a workspace now opens as a tab beside the chat panel. The preview, the code editor, and C3 AI Studio tools such as Data Fusion share one tab strip. The tab strip is the row of tab names above your tools. Several tools therefore stay open while you work. A new workspace opens on the New Tab page, which lists every tool and opens your running application with Open Preview.
Key capabilities:
- New tab menu: Select + (New tab) at the end of a tab strip to open a common tool, such as Preview or Code. Select View all to open the New Tab page with every tool.
- New Tab page: Search for a tool, or browse the tools in nine categories. The Application Preview card reports whether your application is running, and Open Preview opens the application.
- Side-by-side tabs: Drag tabs to arrange them side by side. C3 Code saves the arrangement for the workspace as the Custom view. Select Default in the View menu to return the workspace to a single New Tab page.
- Keyboard shortcuts: Press Ctrl+T (Cmd+T on a Mac) to open a tab, and Ctrl+W (Cmd+W) to close the current tab. Press Ctrl+Tab or Ctrl+Shift+Tab to move between tabs. The keys act on the chat tabs or the tool tabs, depending on where your focus is.
- Chat panel position: Select Chat actions (...) at the top of the chat panel, then choose a Position. Left and Right dock the chat next to the workspace, and Full width hides the workspace and gives the chat the full width, so you can focus on the conversation.
See Overview and Use Configuration Tools.
New feature: Model routing and reasoning effort
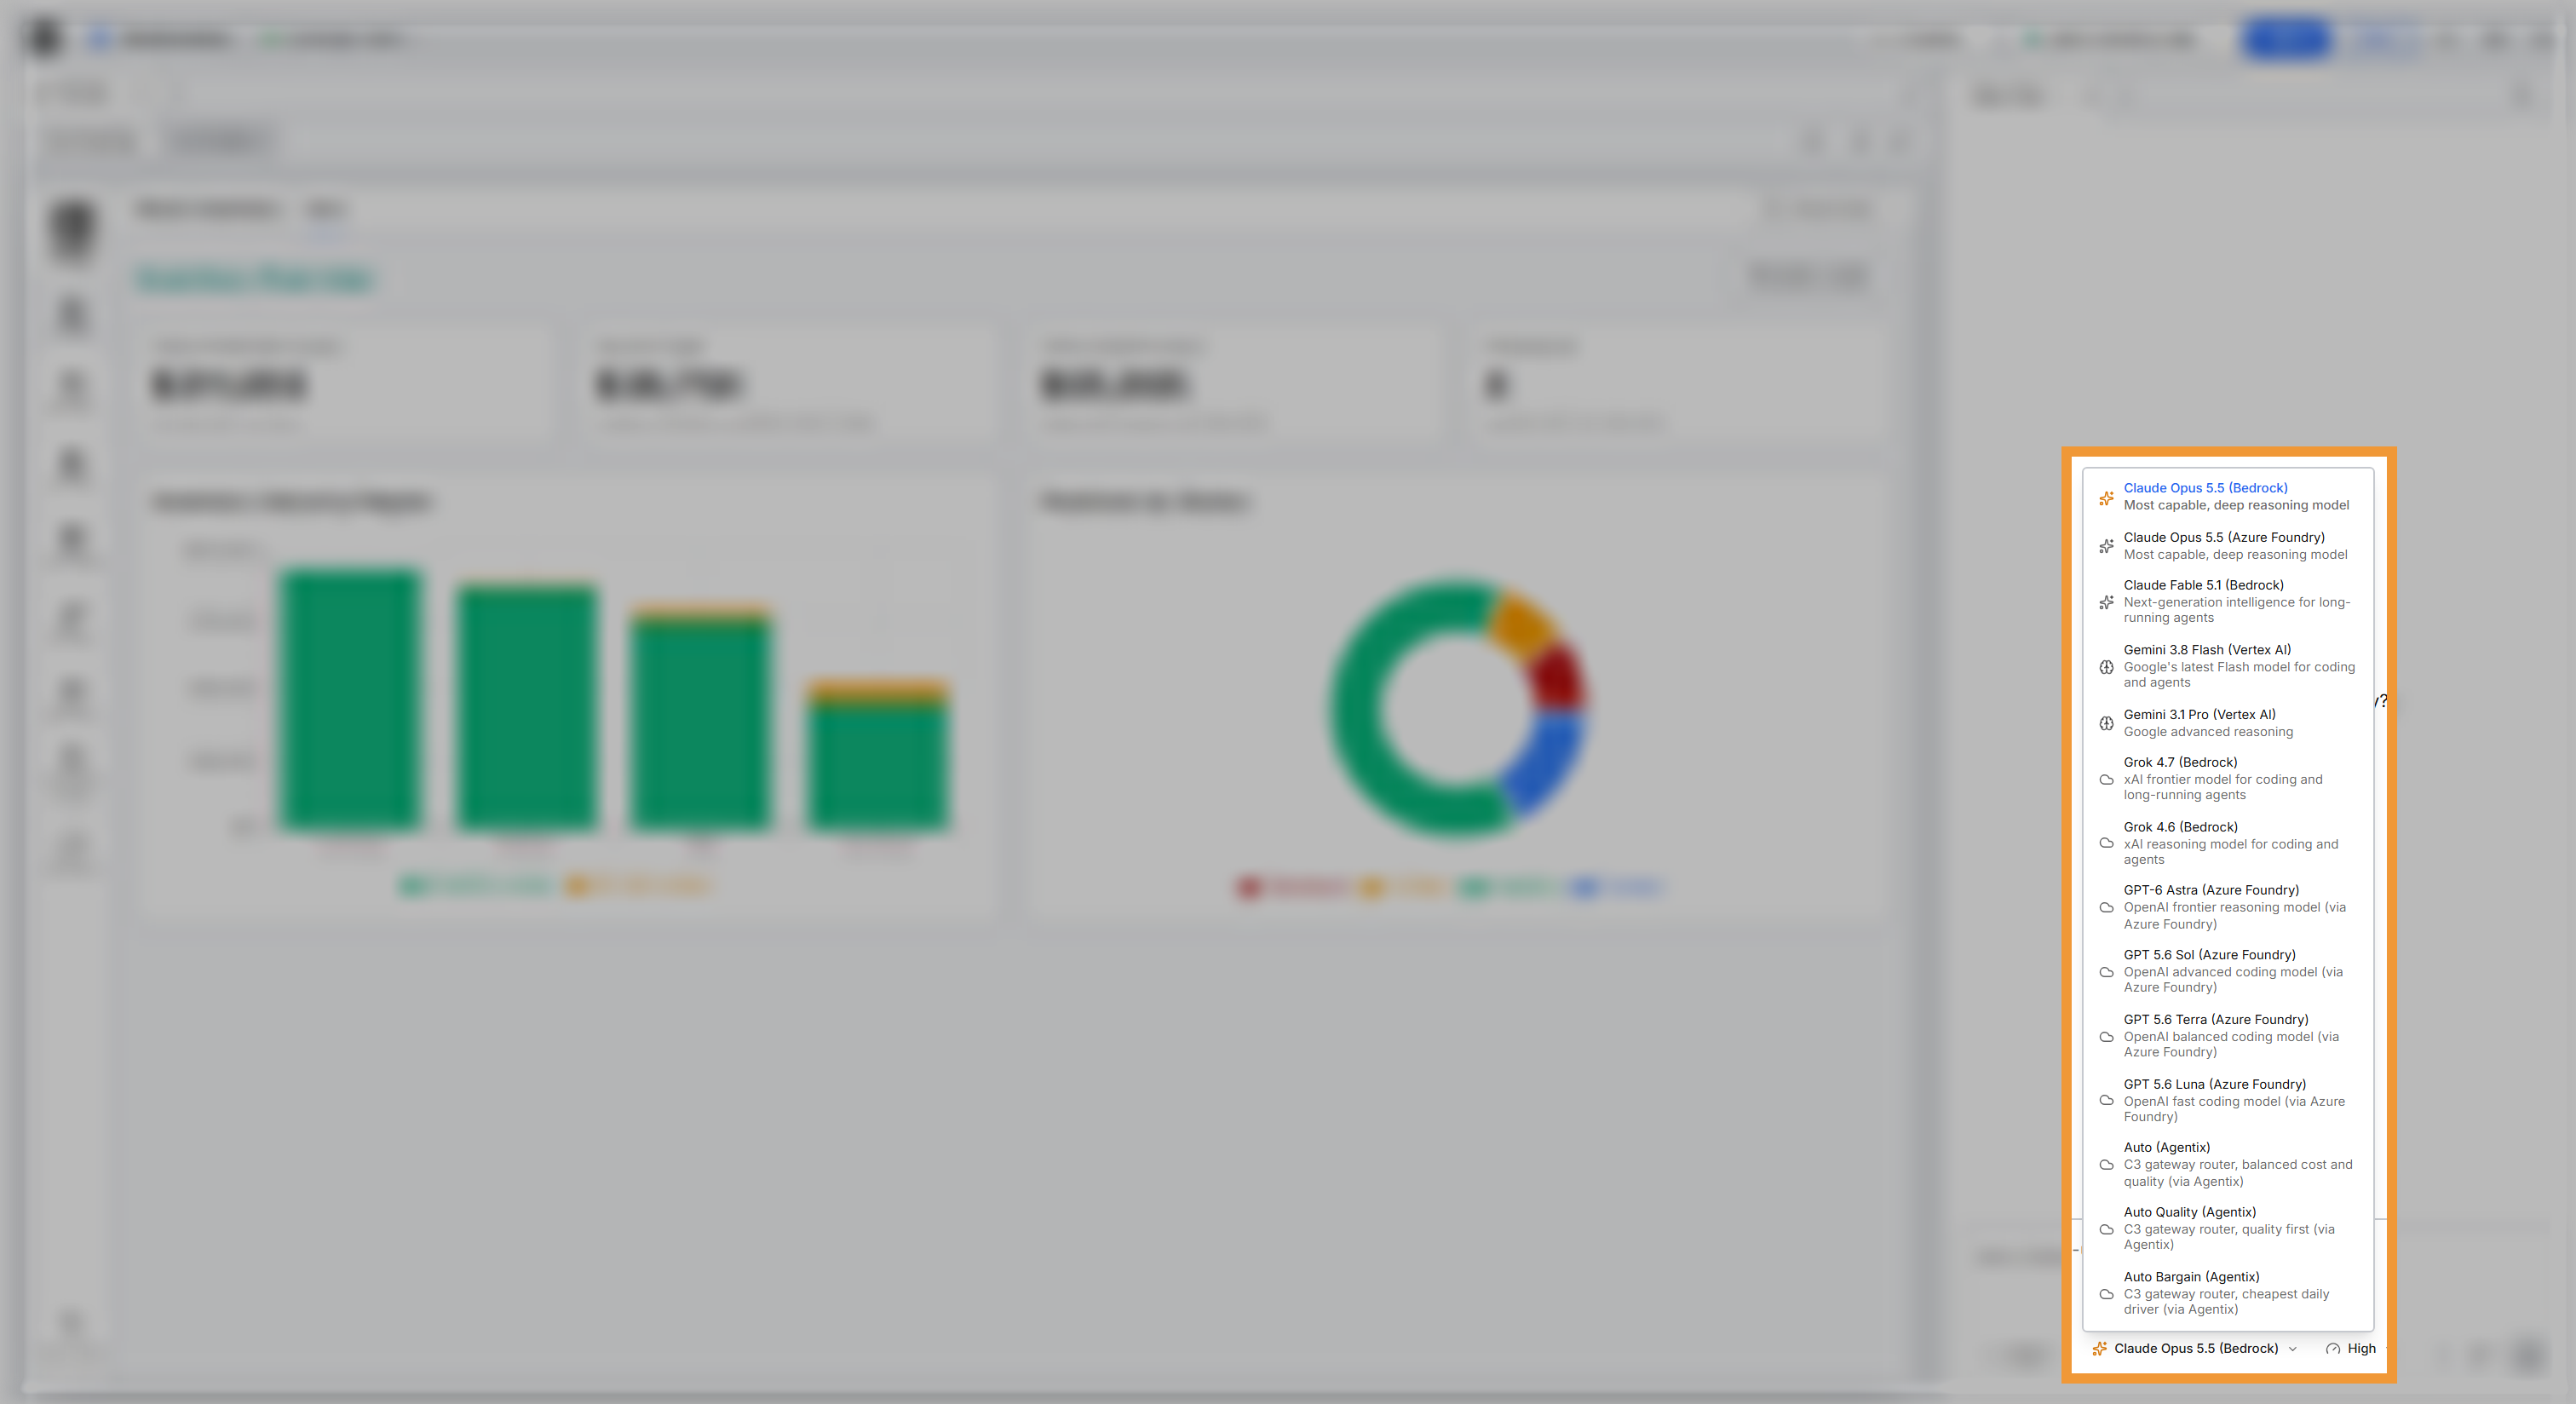
Each chat holds three settings for the agent: the mode, the model, and the reasoning effort. The model selector names the service that hosts each model and offers entries that choose a model for you. The reasoning effort selector sets how much the model reasons before it answers, so you match the effort to the difficulty of the request.
Key capabilities:
- Hosted model names: Each model name ends with the service that hosts it. Examples include Claude Opus 5.5 (Bedrock), Gemini 3.1 Pro (Vertex AI), and GPT 5.6 Sol (Azure Foundry).
- Automatic routing: The Auto, Auto Quality, and Auto Bargain entries, hosted by Agentix, route each request to a model. Auto balances cost and quality, Auto Quality puts quality first, and Auto Bargain picks the cheapest option.
- Reasoning effort: Set the effort from Low to Max for models with adjustable reasoning. Higher effort suits harder problems and can spend more of your LLM budget.
- Settings that stay with each prompt: Each queued prompt keeps the model and reasoning effort you selected when you sent it. A reopened chat keeps its mode, and its reasoning effort returns to the model's default.
- Custom endpoint models: Depending on your environment, the selector also lists a self-hosted or third-party model reached through a custom endpoint. That model behaves like any other model in the selector.
New feature: Context usage and compaction
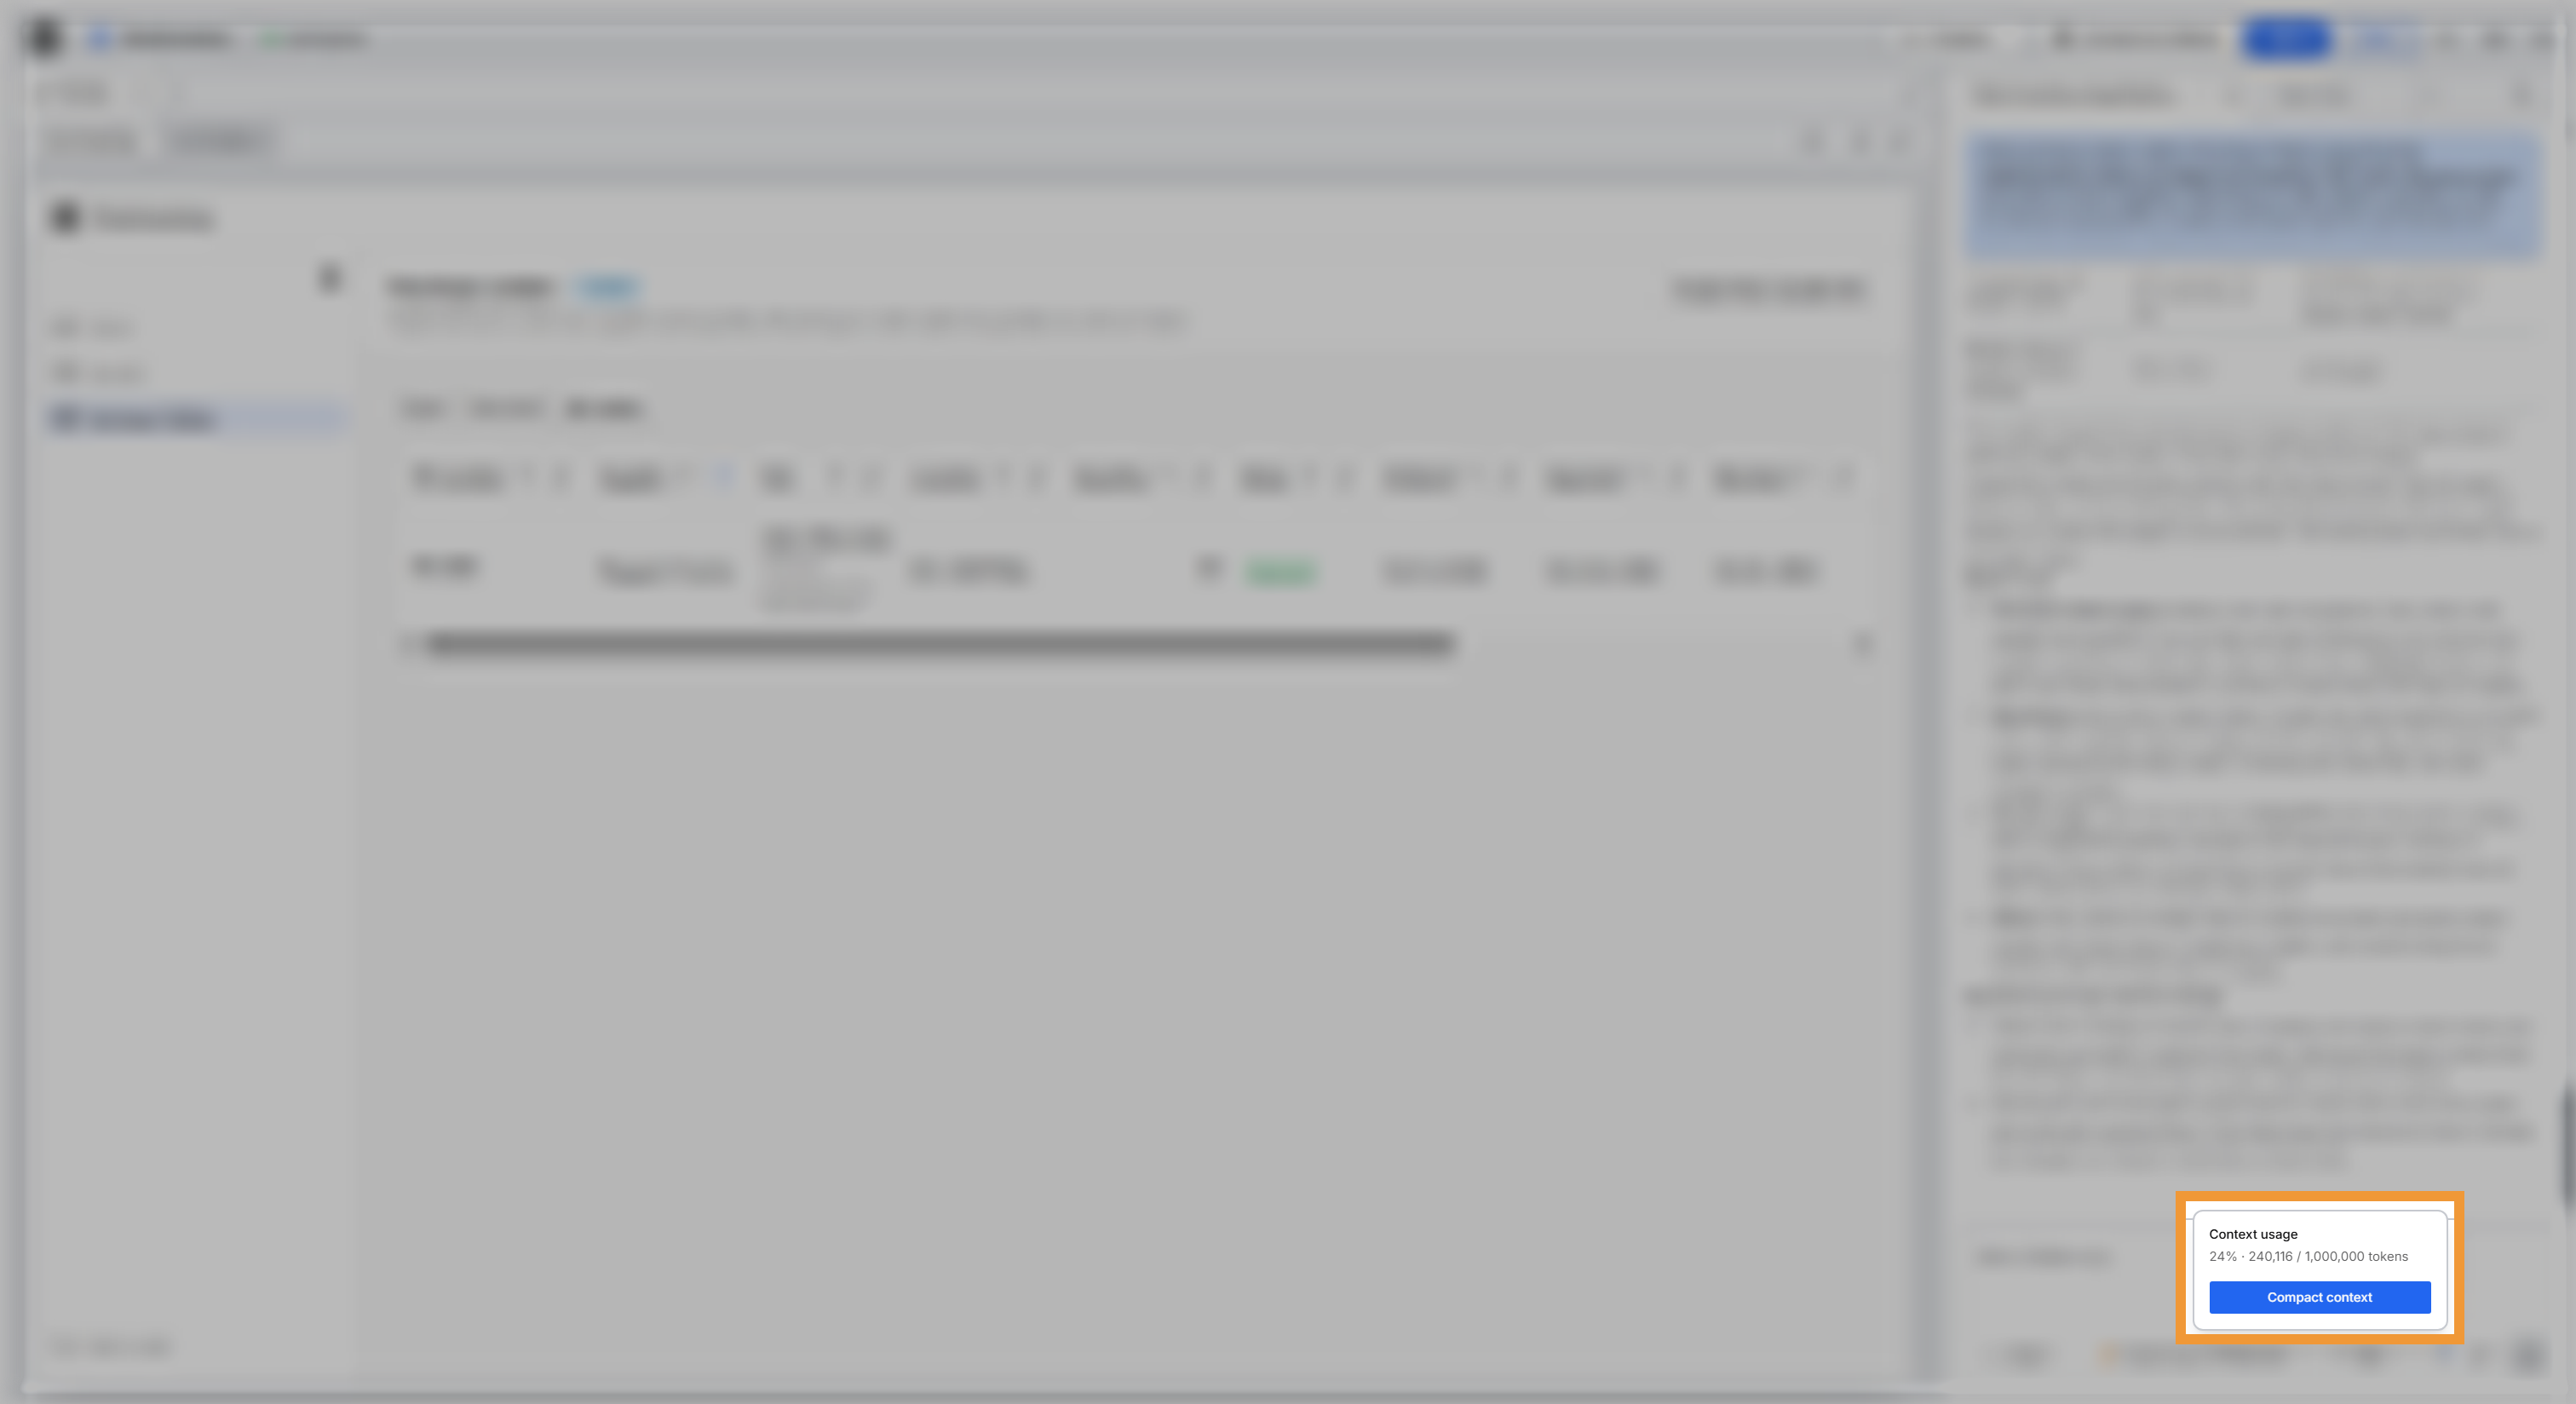
Every model works within a context window, which is the amount of the conversation the model can hold and re-read on each turn. A long chat fills that window and leaves less room for new work. The context usage meter in the chat panel shows how full the window is, and compacting the conversation frees up room in the same chat.
Key capabilities:
- Context usage panel: Select the meter to see the percentage used and the tokens the conversation occupies, out of the model's context window. These tokens measure the conversation in the window and are separate from your LLM budget.
- Compact context: Select Compact context to condense the earlier messages, so the chat keeps the context it needs while occupying less of the window. Compacting changes only the chat you compact, and every other chat keeps its full conversation.
New feature: Selection Mode
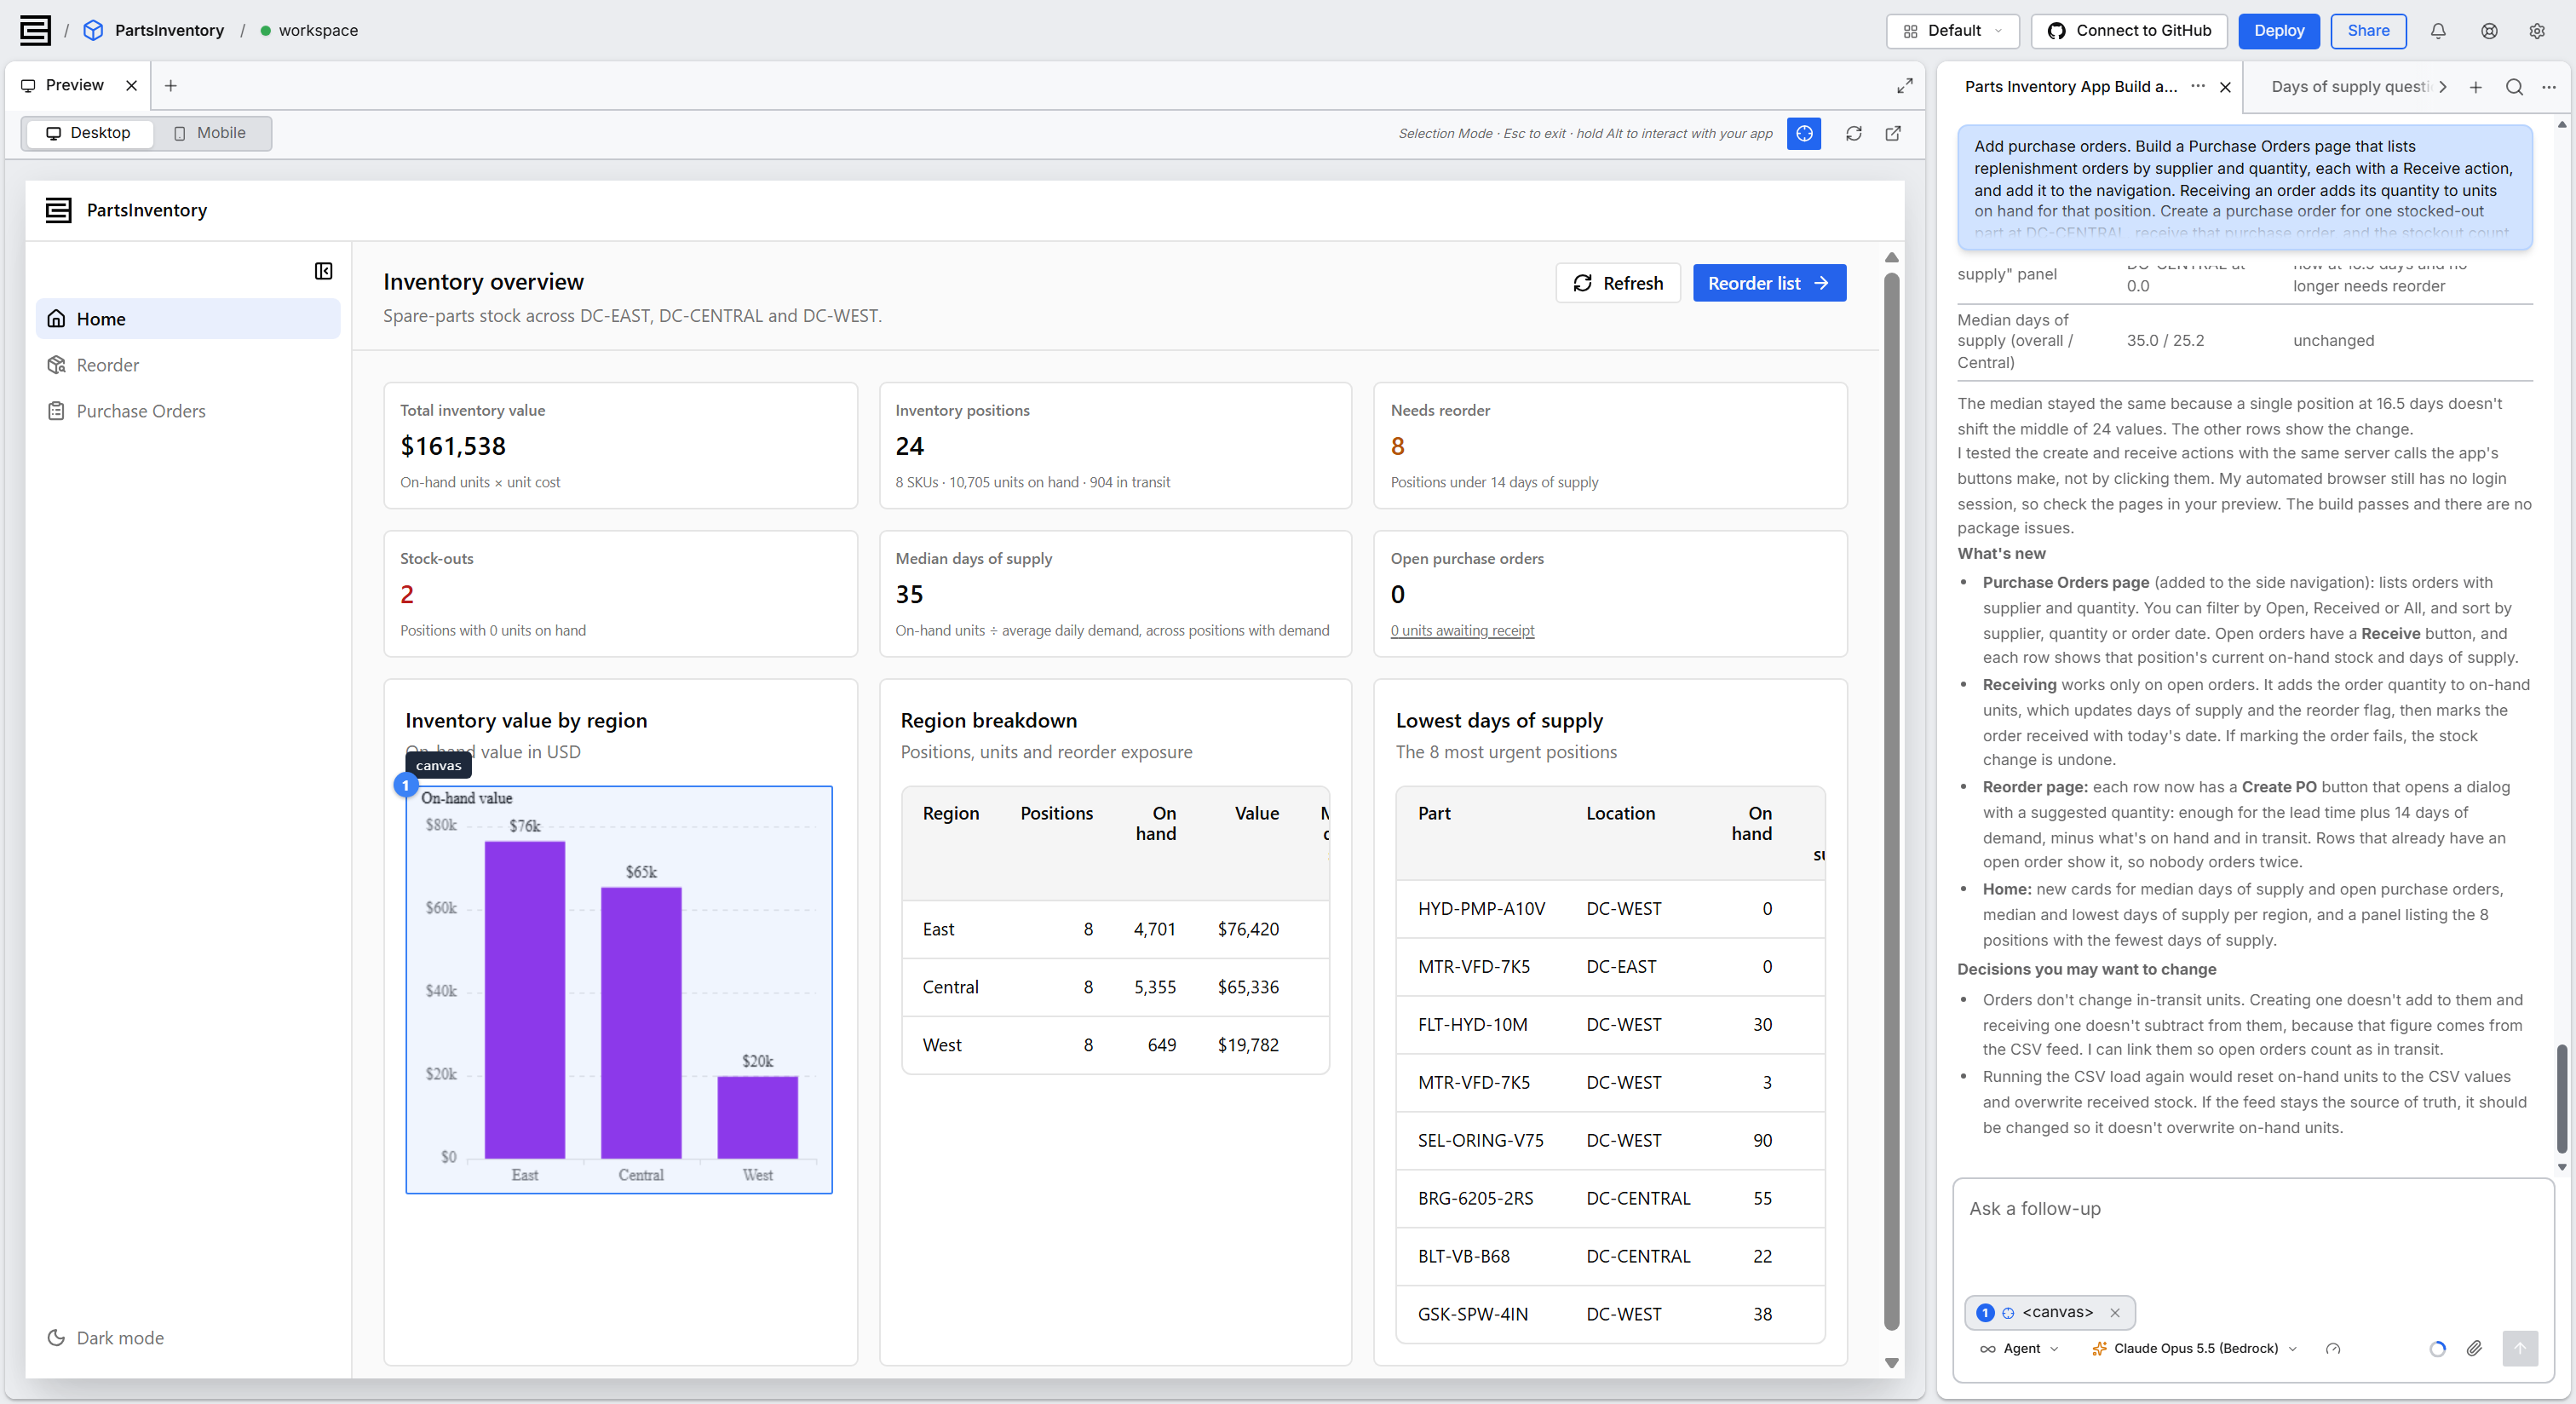
Selection Mode lets you point at an element in your running application and ask the agent to change exactly that element. The agent maps your selection to the source file, so you never need to name a file or describe the element in words.
Key capabilities:
- Select in the preview: Turn on Selection Mode in the Preview toolbar, next to Refresh. Selection Mode highlights the nearest meaningful element under the pointer, such as a heading, a table, or a card.
- Several elements in one request: Each selected element gets a numbered badge in the preview and a matching pill above the chat input. Refer to the elements as "this" or "these", or by their numbers.
- Interact while selecting: Hold Alt (Option on a Mac) to use the application while the mode stays on, and press Escape to exit.
- Element details for the agent: Each selection carries the element's tag and text, its resolved styles, its attributes, and its place in the page. The agent uses those details to find the matching component in your code.
See Change an Element with Selection Mode.
Improvements
Version 8.12 also improves chat sessions, workspace configurations, Git connections, deployments, usage reporting, templates, Contact support, and administration.
Chat sessions
Chats give you more control over queued prompts, over work the agent plans and splits up, and over how chats share the chat panel:
- Edit queued prompts: Select Edit prompt on a queued prompt to change its text and model before it runs. The prompt keeps its place in the queue.
- Send now: Select Send now, into the running turn on a queued prompt to give it to the agent before the current request finishes. The agent reads the prompt as soon as its current tool finishes. When the prompt can't join the running turn, it runs after the current request instead.
- To-Do List: For a request with three or more steps, the agent writes its plan to a To-Do List in the chat panel before it starts, and checks off each item as it works. Collapse the list or resize it to keep the conversation in view.
- Read-only chats: A chat belongs to the person who started it. A collaborator who opens someone else's chat can read along but can't send messages, and starts a new chat to work with the agent.
- Subagents: For a larger request, the agent can hand parts of the work to subagents. A subagent is a helper agent that works in parallel inside the same chat. A Subagents list shows each subagent as Running, Done, Error, or Stopped. Open a subagent's output in a tab of its own, or select Stop to end it.
- Chat tab menu: Each chat tab's ... menu renames the chat and downloads the chat as a JSON file with Download chat session. The same menu closes several tabs with Close others, Close to the left, and Close to the right.
- Split panes: Select Split right or Split down in a chat tab's ... menu to give the chat a pane of its own. Each pane has its own tab strip and chat input, and Move left and Move right reorder its tabs.
- Zoom: Select a Zoom size in the Chat actions menu, from Small to Extra large, to resize the conversation and the chat input. The size applies to every chat.
See Work in Multiple Chats and Share with Collaborators.
Workspace configurations
Workspace resources and features are now set in one place for the whole application, and each workspace can differ from those defaults:
- Workspace Default Configurations: In the application Settings tab, under Advanced Settings, the section that set workspace resources now also holds three groups of feature switches: Workspace & Sidecars, VS Code Workbench Flags, and C3 Extension Flags. Changes apply to new workspaces and to workspaces you restart.
- Settings for one workspace: The Workspace Configurations section in a workspace's settings holds the same resources and switches. A value you set there takes precedence over the application default and shows Overridden. Select Reset to default to return the value to the default.
- Restart prompt: After you save, Restart Workspace to Apply Changes? offers Restart Workspace to apply the change now, or Later to apply it the next time the workspace starts.
See Application Settings.
Git and repositories
Connecting a repository, importing from one, and creating a branch take fewer guesses:
- Connect to GitHub button: A workspace with no linked repository shows Connect to GitHub in its header, in place of the Git status control. An application Admin links the repository from that button or from the Repository section of the application Settings tab.
- Repository name messages: When GitHub declines a new repository name, the message gives the reason. The name already exists on your account, GitHub reserves the name, or the name is too long.
- Package selection on import: When you import from a GitHub repository, C3 Code scans the branch for
.c3pkg.jsonfiles. Each package it finds appears in a searchable Package list. C3 Code fills in the Application name from the package you pick. - Create Branch in the control: Create Branch in the Git status control opens a name field in place, instead of asking for the name in the chat. The new branch starts from the current branch, and the workspace switches to it.
See Review Code and Manage Branches.
Deployments
The Deploy Application popover shows more about each deployment and how far a deployment has progressed. Each deployment's page also gives you more control over when the deployment runs:
- Deployment card: The Staging and Production tabs each show a card for that deployment, with its status, its version, and who deployed it and when. Launch Application opens the running application, and Manage Deployment opens the deployment's page in a new tab.
- Deploy and redeploy labels: The button reads Deploy to Staging for a first deployment and Redeploy to Staging when staging already has a deployment. Production uses the same labels.
- Six-step progress: The popover tracks six steps, from Packaging application to Starting services, with Step N of 6 and an estimate of the time remaining.
- View progress banner: When you close the popover during a deployment, a banner at the top of the workspace shows the current step. Select View progress to reopen the popover.
- Stopped deployments: A stopped deployment opens with a notice on its Overview tab, and Resume takes the place of Launch App. The Overview tab also shows the deployment's details, its hibernation schedule, and its recent activity.
- Pause hibernation: Keep a deployment running for 1 day, 3 days, or 7 days from the Hibernation card, for example before a demonstration. After the pause ends, the nightly hibernation schedule applies again.
See Deploy to Staging and Production and Manage Your Deployments.
Usage and quotas
The My Usage and Cost page shows more of what counts against each quota and where your tokens go, and the chat warns you before you reach your LLM Budget:
- Quota details: Select the count on the Applications, Workspaces, or Deployments tile. A list opens with your current quota and every item that counts against it, each with a link.
- Environments created outside C3 Code: Your quotas also count the single-node environments (SNEs) and multi-node environments (MNEs) you created outside C3 Code. One example is an environment created in C3 AI Studio. When you have any, the tiles read Workspaces + SNEs and Deployments + MNEs.
- Budget warning: A banner appears in the chat panel when your spend this month reaches 75% of your LLM Budget, and again at 90%. The banner links to the My Usage and Cost page, where you request an increase.
- Token figures: The Tokens card splits the old Cached Tokens figure into Cache Read Tokens, Cache Write Tokens, and Reasoning Tokens, next to Total Tokens, Input Tokens, and Output Tokens.
See My Usage and Cost.
Templates
Each template now has a page of its own. Select a template card to open the template's detail page, which shows the template's description, the documentation that ships with it, and a Version details panel with the Version and the Last published date. Select Use Template to start a new application with that template already selected. See Start from an Application Module.
Contact support
Contact support opens from the navigation on every page. The workspace header has no separate Contact support button. See Contact Support.
Administration
The Admin section adds quota controls, a place to manage OAuth apps, and a GitHub check on the Health page:
- Quotas: The Quotas section lists each user's quotas for applications, workspaces, deployments, and LLM spend, next to that user's usage. Edit one user's quotas from that user's row, or select Edit defaults to change the quotas new users start with.
- OAuth apps: The OAuth apps card on the Settings page lists the apps users sign in with to MCP servers and to GitHub. An app with the ID
GitHubturns on Connect via OAuth for GitHub. - GitHub OAuth App check: The Health page checks the callback URL of the GitHub OAuth app and whether GitHub accepts the app. Rejected (misconfigured) names the setting that GitHub refused.
- Request emails: C3 Code emails every C3 Code administrator when a user submits a request. The email names the requester, the resource, the amount, and the justification, and links to the Requests section.
See Set User Quotas, Manage User Roles and Quotas, and Check C3 Code Health.