C3 Code Release Notes
C3 Code
C3 Code is the agentic application builder in the C3 Agentic AI Platform. Describe a business problem in natural language, and its agentic coding assistants autonomously design, build, test, and deploy a production-grade Enterprise AI application. You do not need to write code. C3 Code transforms work that took a team of engineers weeks to months into work that takes one person hours to days.
What C3 Code builds is production-grade. The application integrates with the systems that hold your enterprise data and applies machine learning to that data. It ships with full security, access control, and governance from the C3 Agentic AI Platform. Agents generate the data model, the business logic, the pages, the agents inside the application, and the access controls together, so the parts fit each other.
Two things separate C3 Code from a general-purpose coding assistant. A general-purpose tool starts from a blank canvas on every project. C3 Code starts from the C3 AI Type System, from more than 40 application modules C3 AI already runs in production, and from proven domain algorithms. An application therefore arrives already shaped by how that domain works. C3 Code then carries that application to a governed deployment in one action, because deployment, security, and access control come from the platform underneath.
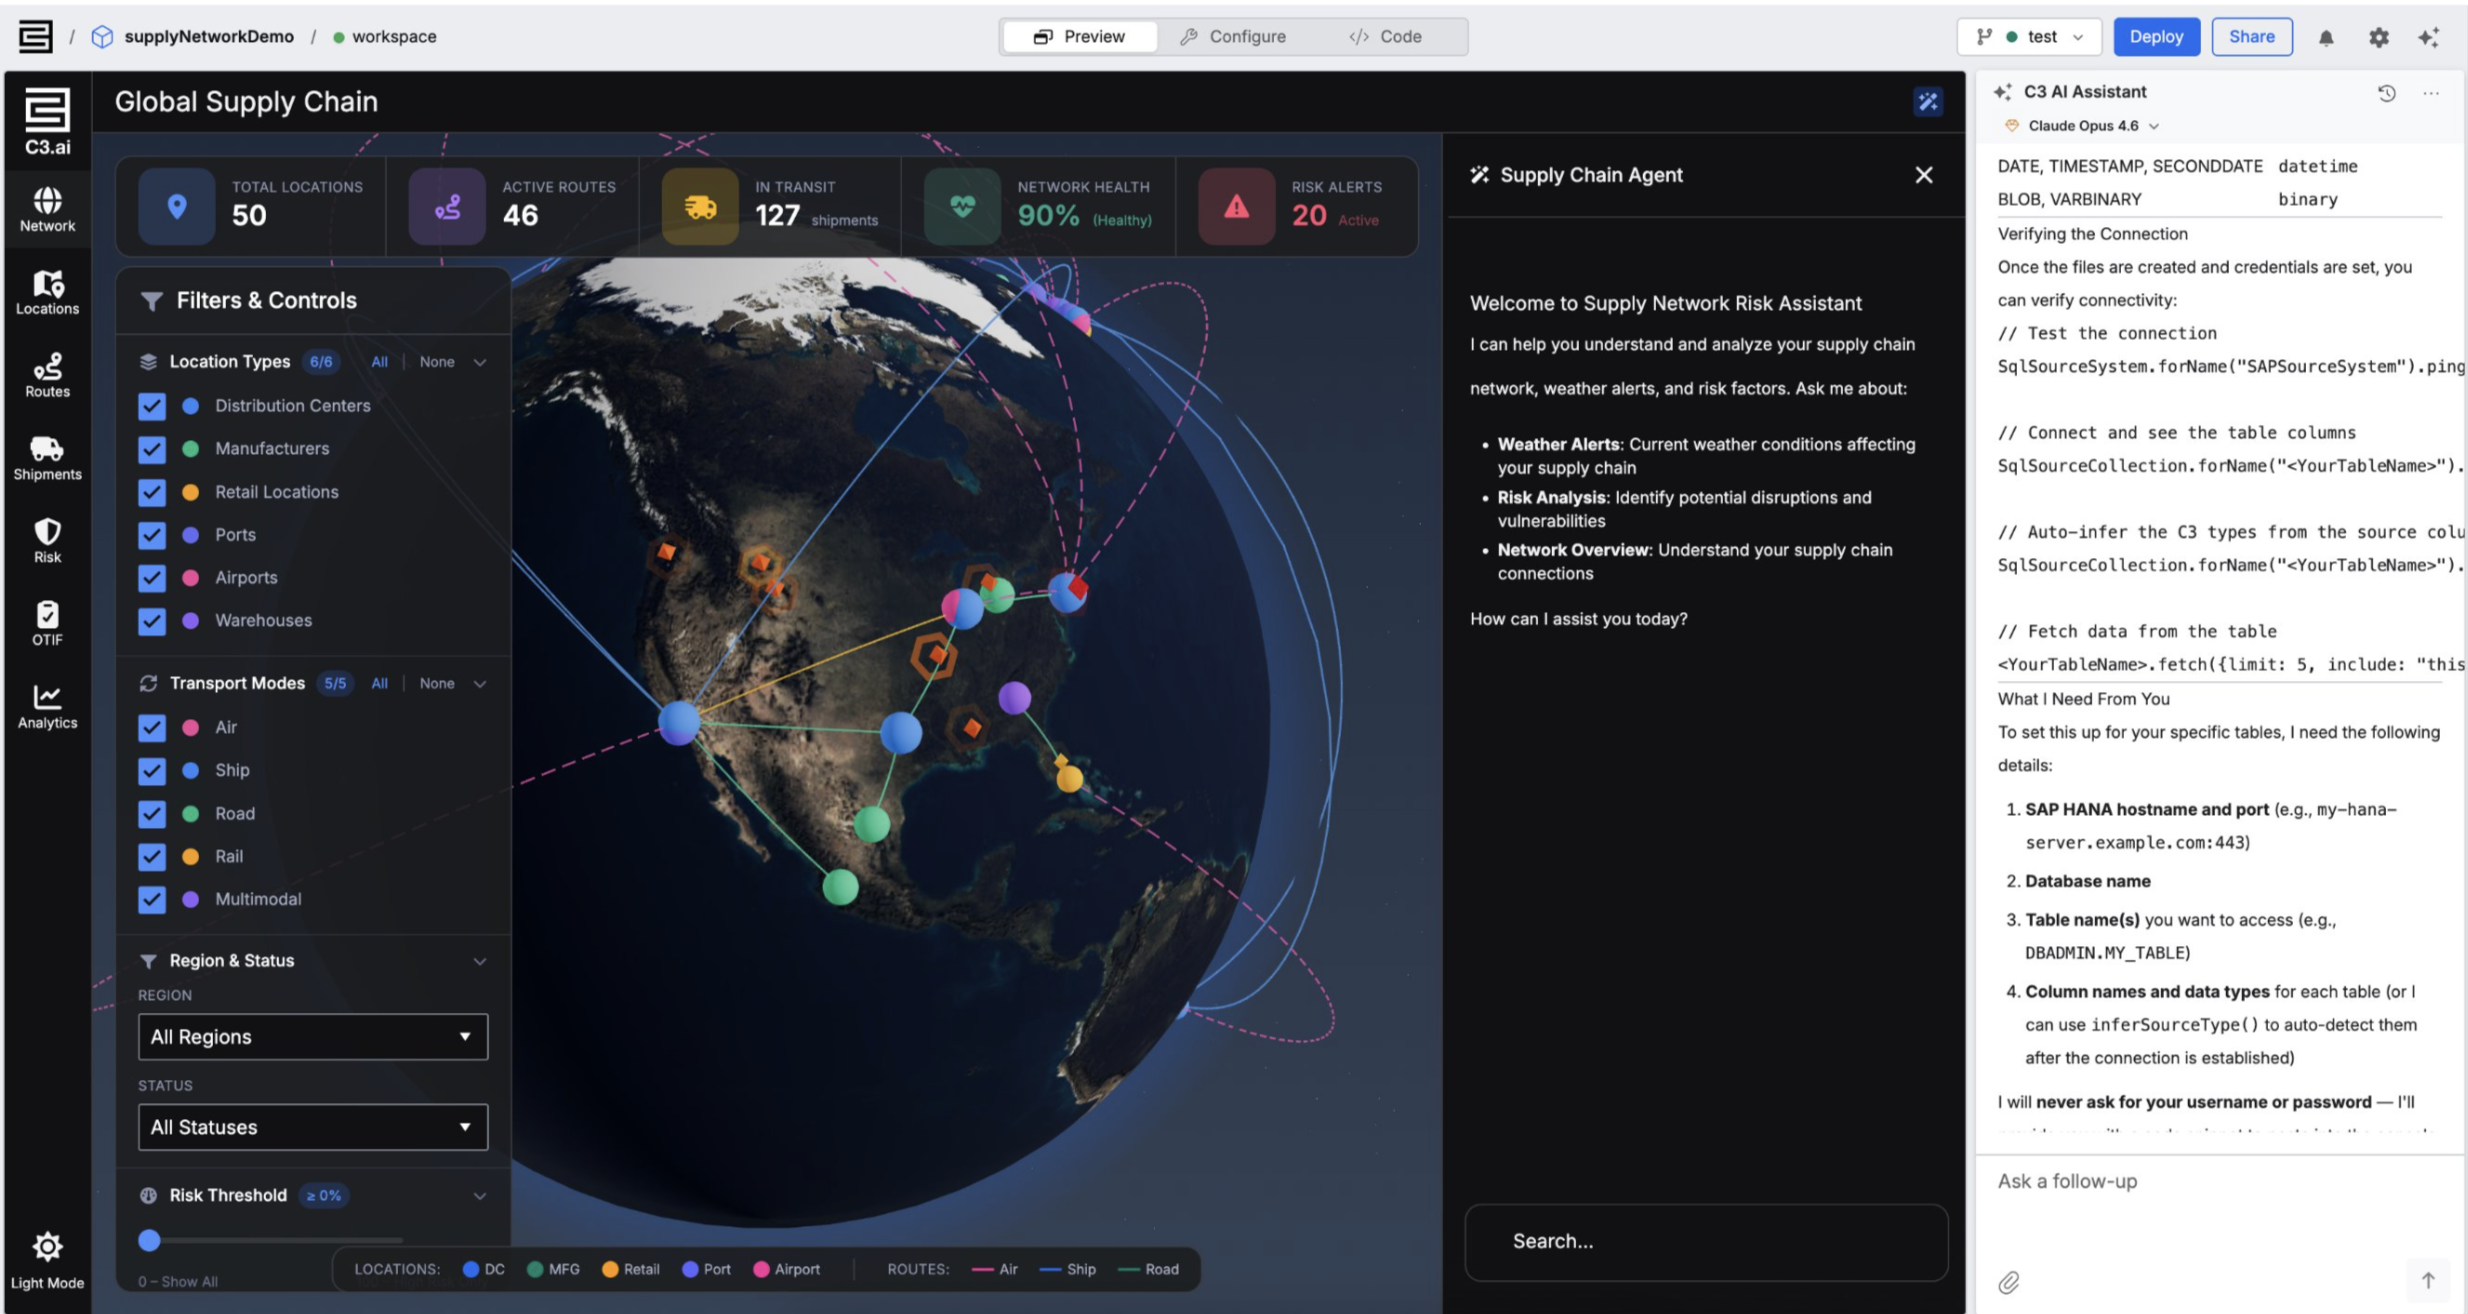
See Overview for what you can build, Set Up C3 Code to confirm your access, and Build, Share, and Deploy Your First Application to take one application from a prompt to production. For answers to common questions, see C3 Code Frequently Asked Questions.
Release highlights
C3 Code launches with capabilities across the following areas:
- Natural language application development: build enterprise applications from plain-language prompts, or from an application module in one action. Agents generate data models, application logic, AI pipelines, and user interfaces.
- Application modules: start from enterprise software C3 AI has already built for a domain, then change that software through prompting, visual configuration, or direct edits. Application modules appear in the Templates gallery.
- Applications and workspaces: organize development around shared applications with several isolated workspaces, so teams build features in parallel, experiment safely, and work on one codebase.
- Model choice: pick the model each chat runs on, and move routine work to a lighter model to stretch your LLM budget. Administrators see usage by model across every user.
- Source control and version history: track every change with Git-backed workspaces, integrated Git operations, GitHub integration, and agent-assisted conflict resolution.
- Deployment and continuous deployment: validate, deploy, and continuously deliver applications with one-action deployments, package validation, and scheduled pipelines.
- Model Context Protocol (MCP) integration: register external MCP servers so the agent can use their tools and prompts, and publish the application itself as an MCP server.
- Sharing and collaboration: share applications with role-based access, collaborate through workspaces, and distribute live previews for review and feedback.
- My Usage and Cost: track your token and compute cost and your usage against each quota, and request more resources when you reach a limit.
- Contact support: reach the C3 Code team from inside the product, from the navigation or from a workspace or deployment.
- Administration and analytics: govern development from a central administration area covering token usage and cost, quotas and resource requests, preprovisioning, the support inbox, and analytics for product adoption, conversation quality, and user activity.
Natural language application development
You describe a use case in plain language, and C3 Code builds a running application from that description. C3 Code generates the data model, the machine learning and generative AI features, and the front end together, so the parts fit each other.
The home page is where a new application starts, from a prompt or from an application module.
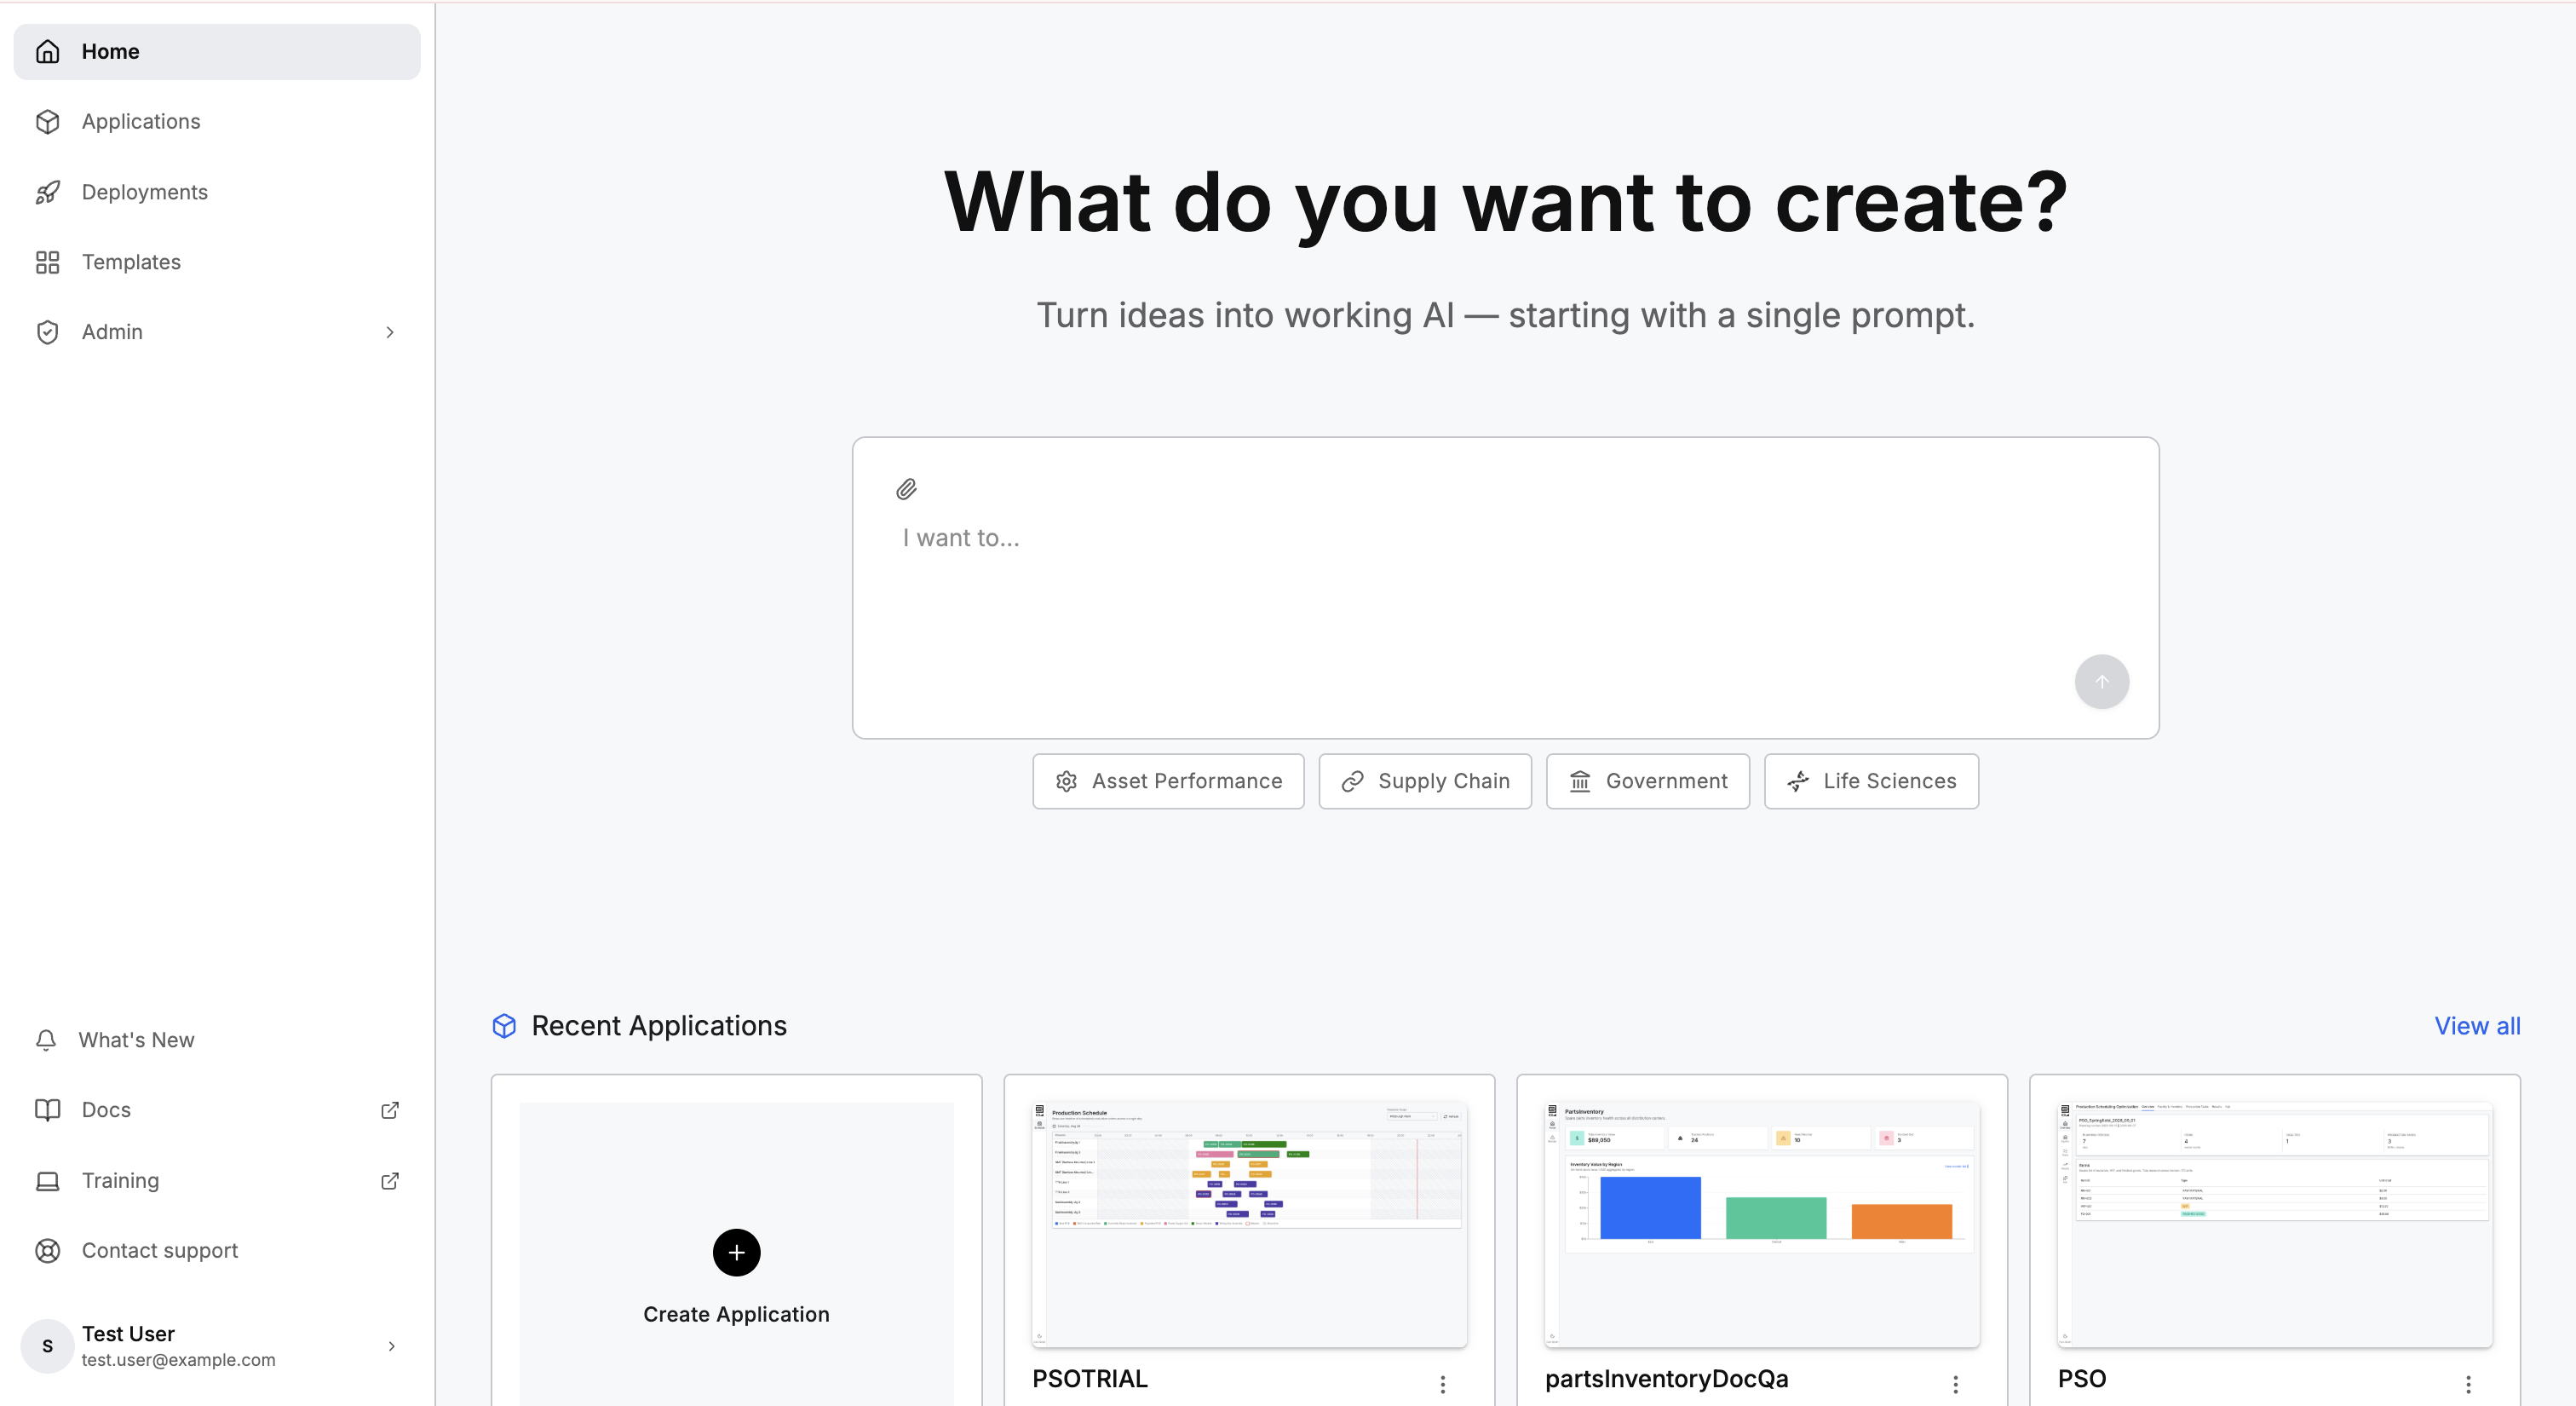
Key capabilities:
- Prompt-driven design: every prompt invokes an agent that carries out your design. The agent grounds its work in reusable domain Types, which are the kinds of record your application holds, so data models, business logic, AI pipelines, and pages fit together as one application.
- Typed file attachments: attach spreadsheets and data files (XLSX, CSV) to shape data models, images (PNG, JPG, JPEG) as design references, and documents (PDF, DOCX, TXT, MD) for requirements. Attachments accept up to 20 MB per file, 10 files, and 100 MB per message.
- Multiple chat sessions: run more than one chat in a workspace, each with its own agent, mode, and model. A long change runs in one chat while you ask a question in another, and closing a tab keeps the conversation so any chat can be reopened.
See Start from Scratch, Work in Multiple Chats, and Evolve Your Application.
Application modules
An application module is enterprise software C3 AI has already built for a domain, ready for you to configure to your own business. Starting from a module reaches a running application faster than starting from a description, and every module stays fully editable through prompts, visual configuration, or direct code edits.
Modules appear in the Templates gallery, where each card names a module and describes the work that module does.
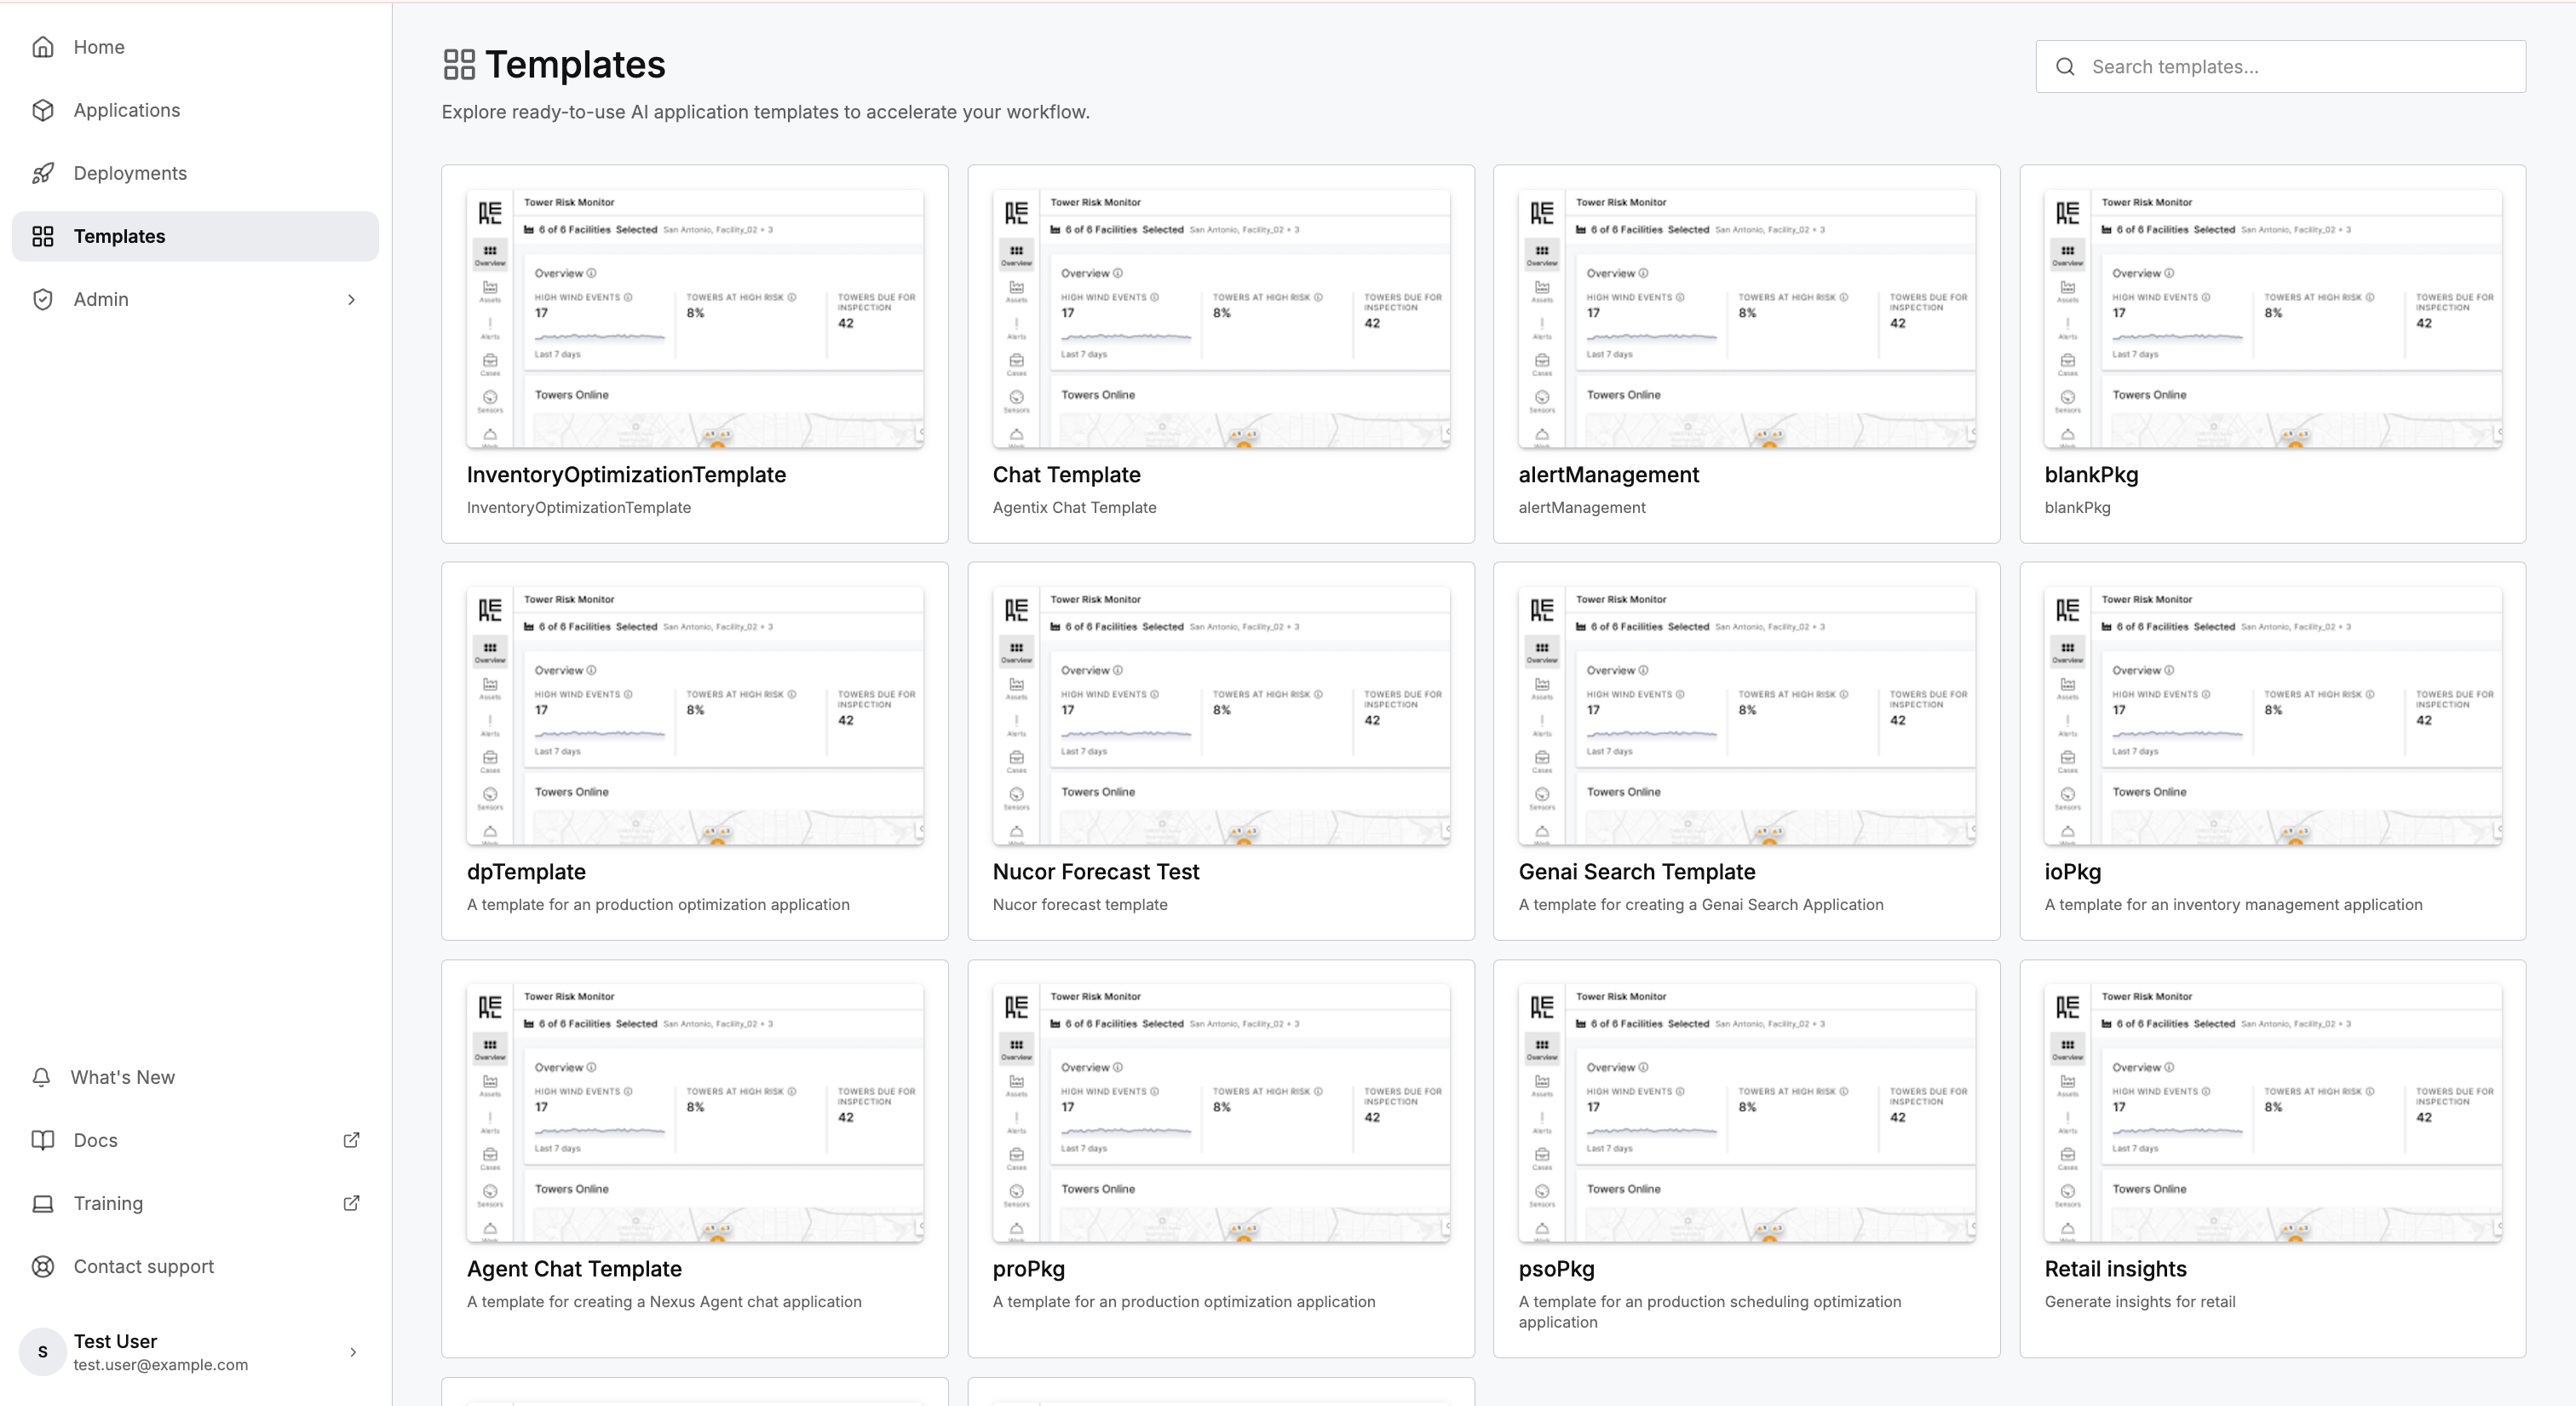
Key capabilities:
- Module gallery: browse a searchable catalog of application modules built on proven enterprise software, and launch an application from any module.
- Agent-assisted customization: extend a module through prompts, visual configuration, or direct code edits. Agents keep the module's architecture intact while adding functionality and adapting workflows to your business.
- Growing library: C3 Code adds modules and enhancements with each release.
For starting from an application module, see Start from an Application Module.
Applications and workspaces
An application is the product you build: a name, a set of collaborators, and a deployable codebase. Each application has one or more workspaces. A workspace is an isolated cloud environment with an environment of its own and a Git branch of the shared repository. Workspaces let each collaborator work independently while contributing to one codebase. You create an application from a description, from an application module, or from an existing Git repository, and manage the application from the application detail page.
Key capabilities:
- Applications page: search your applications and start a new one with Create Application, a two-step flow that picks a source (Blank, Template, or Git) and a name, then creates the application and the first workspace, and opens that workspace.
- Role-gated application detail page: one hub with Workspaces and Deployments tabs for every user, and Collaborators and Settings tabs for application administrators.
Choose How to Start Your Application covers comparing the three ways to start, and Start from a Git Repository covers bringing in code your team already wrote.
Workspaces tab
The Workspaces tab is where you add a workspace, name it, choose a starting branch, and give the agent a first prompt.
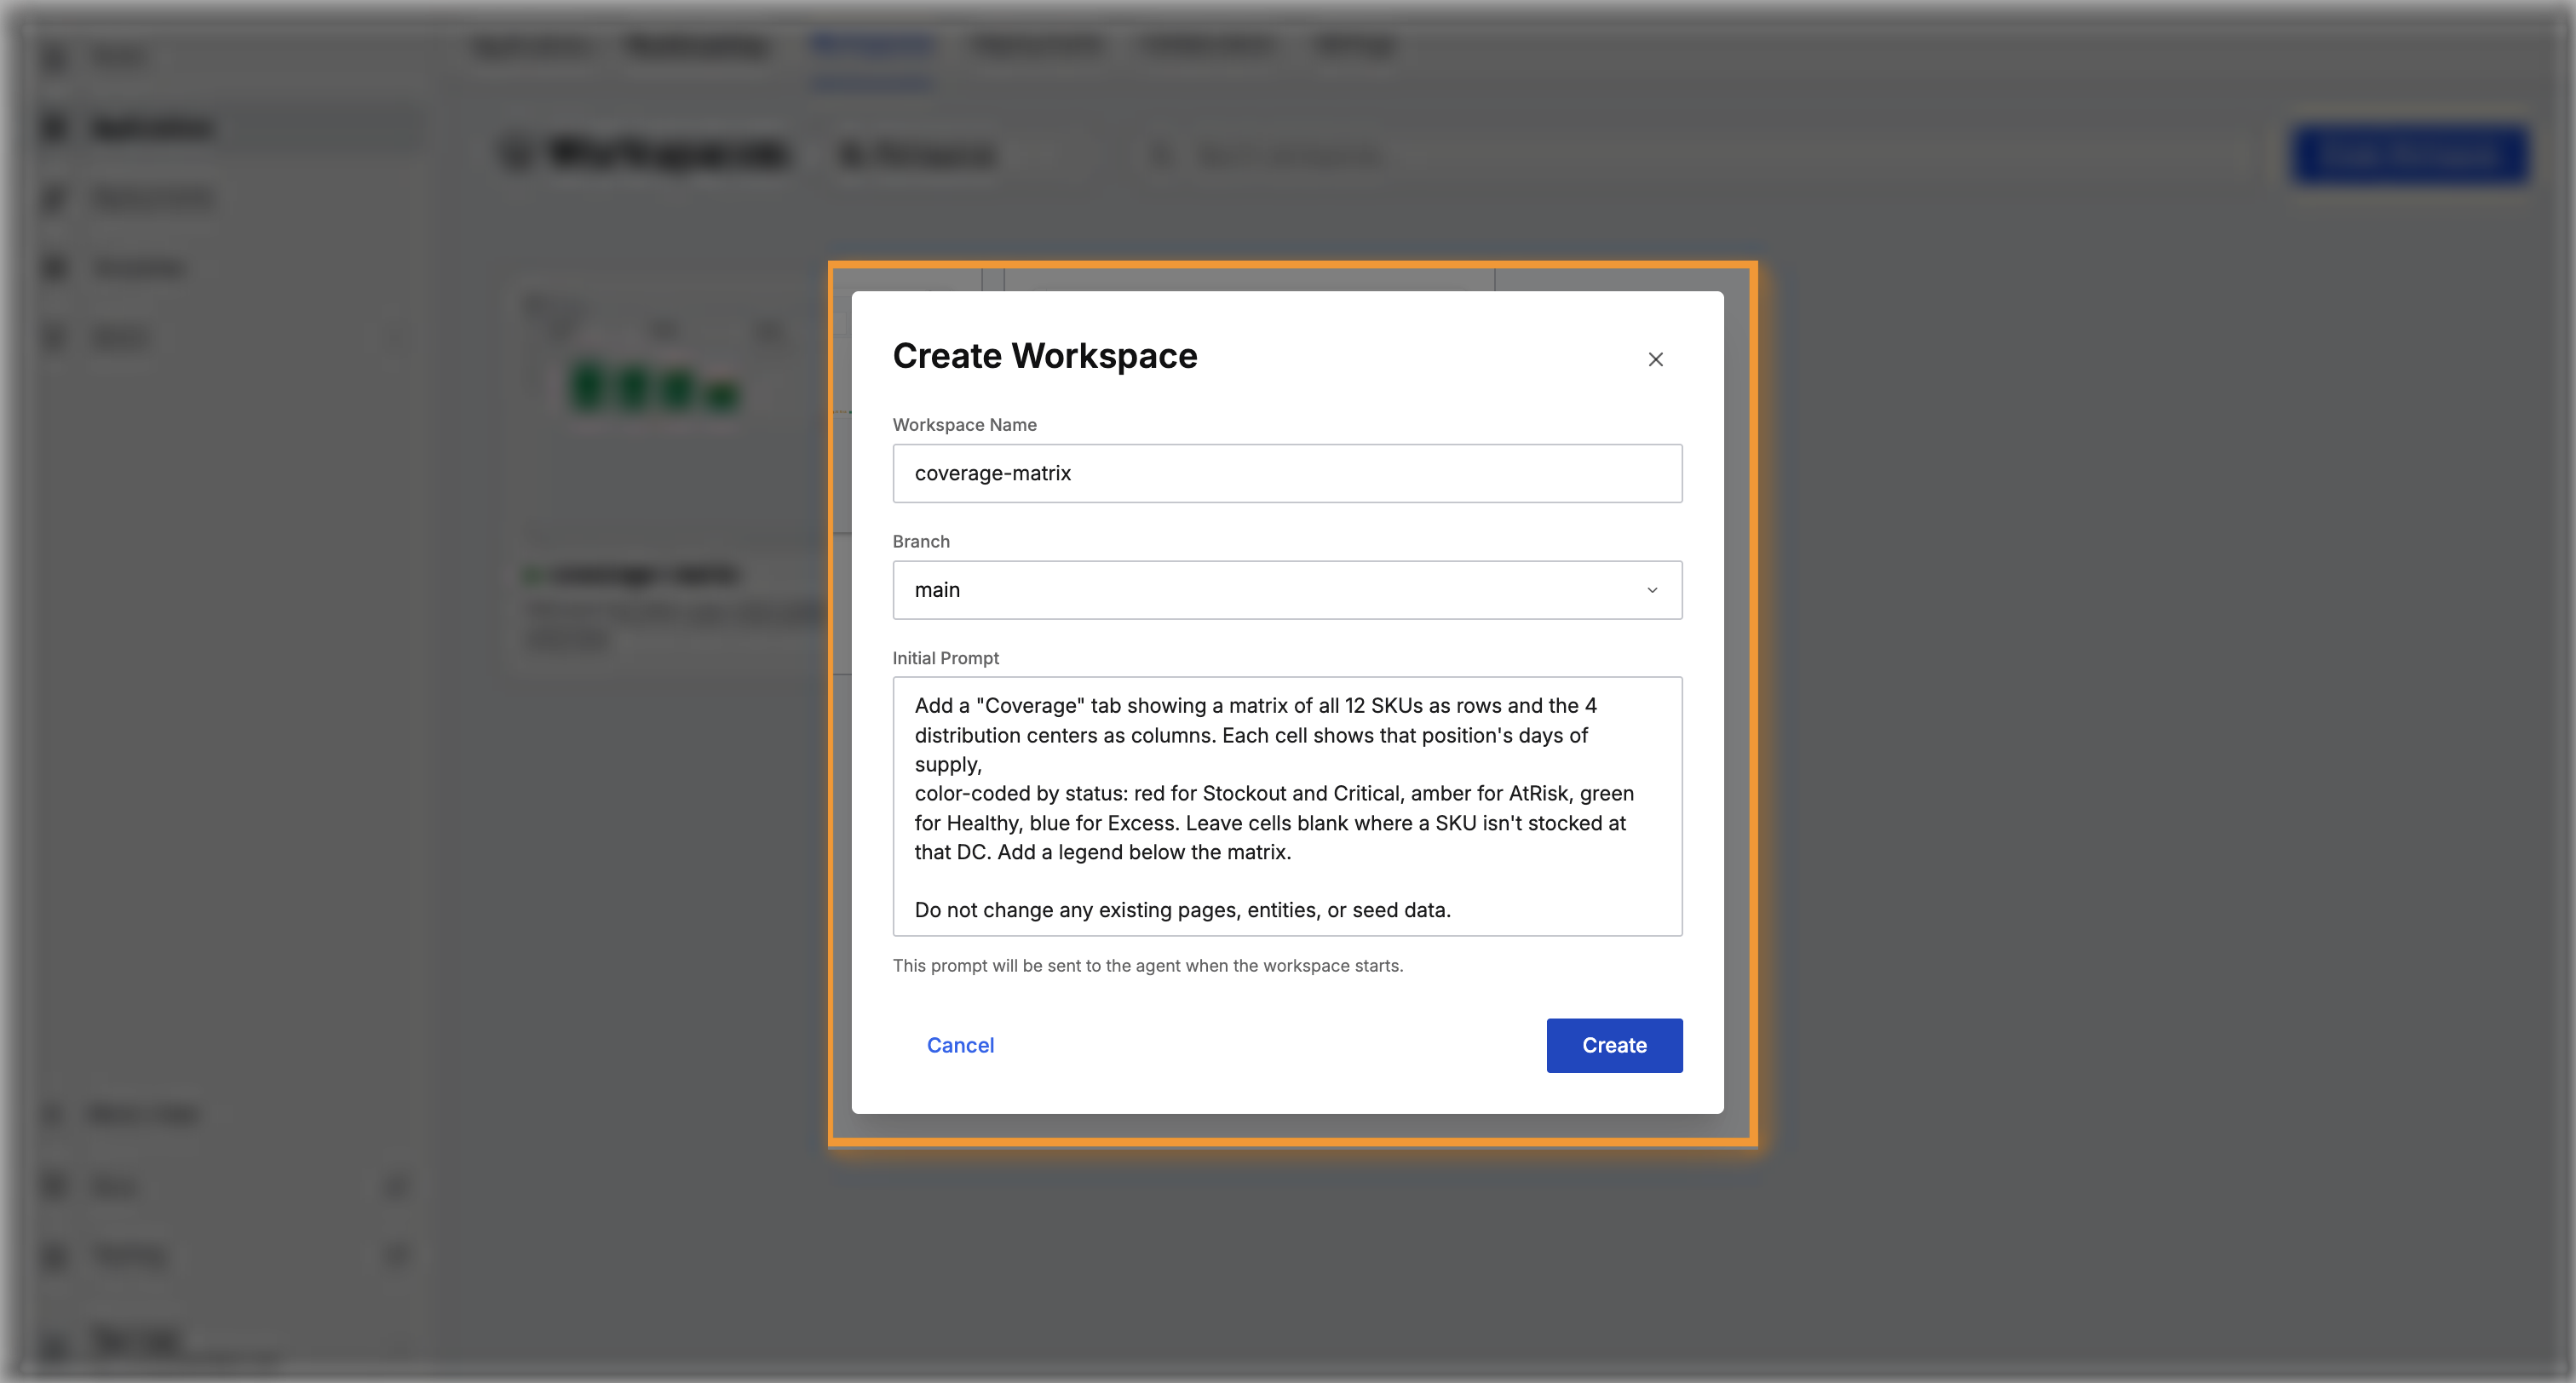
- Several workspaces per application: develop features in parallel, try a large change, or give each collaborator an environment of their own. My workspaces and All workspaces filters, and a Create Workspace modal, manage the set.
- Workspace status: a color-coded indicator reports each workspace as Ready, Starting, Restarting, Resuming, Upgrading, Configuring, Stopping, Terminating, Stopped, or Error.
- Workspace lifecycle actions: start, stop, rename, and delete a workspace from the card menu, with a confirmation before a delete removes the workspace and any unmerged code.
For working in more than one workspace, see Use Multiple Workspaces for One App.
Application settings
The Settings tab holds the application name, the repository link, the pipelines, and the resources behind each new workspace.
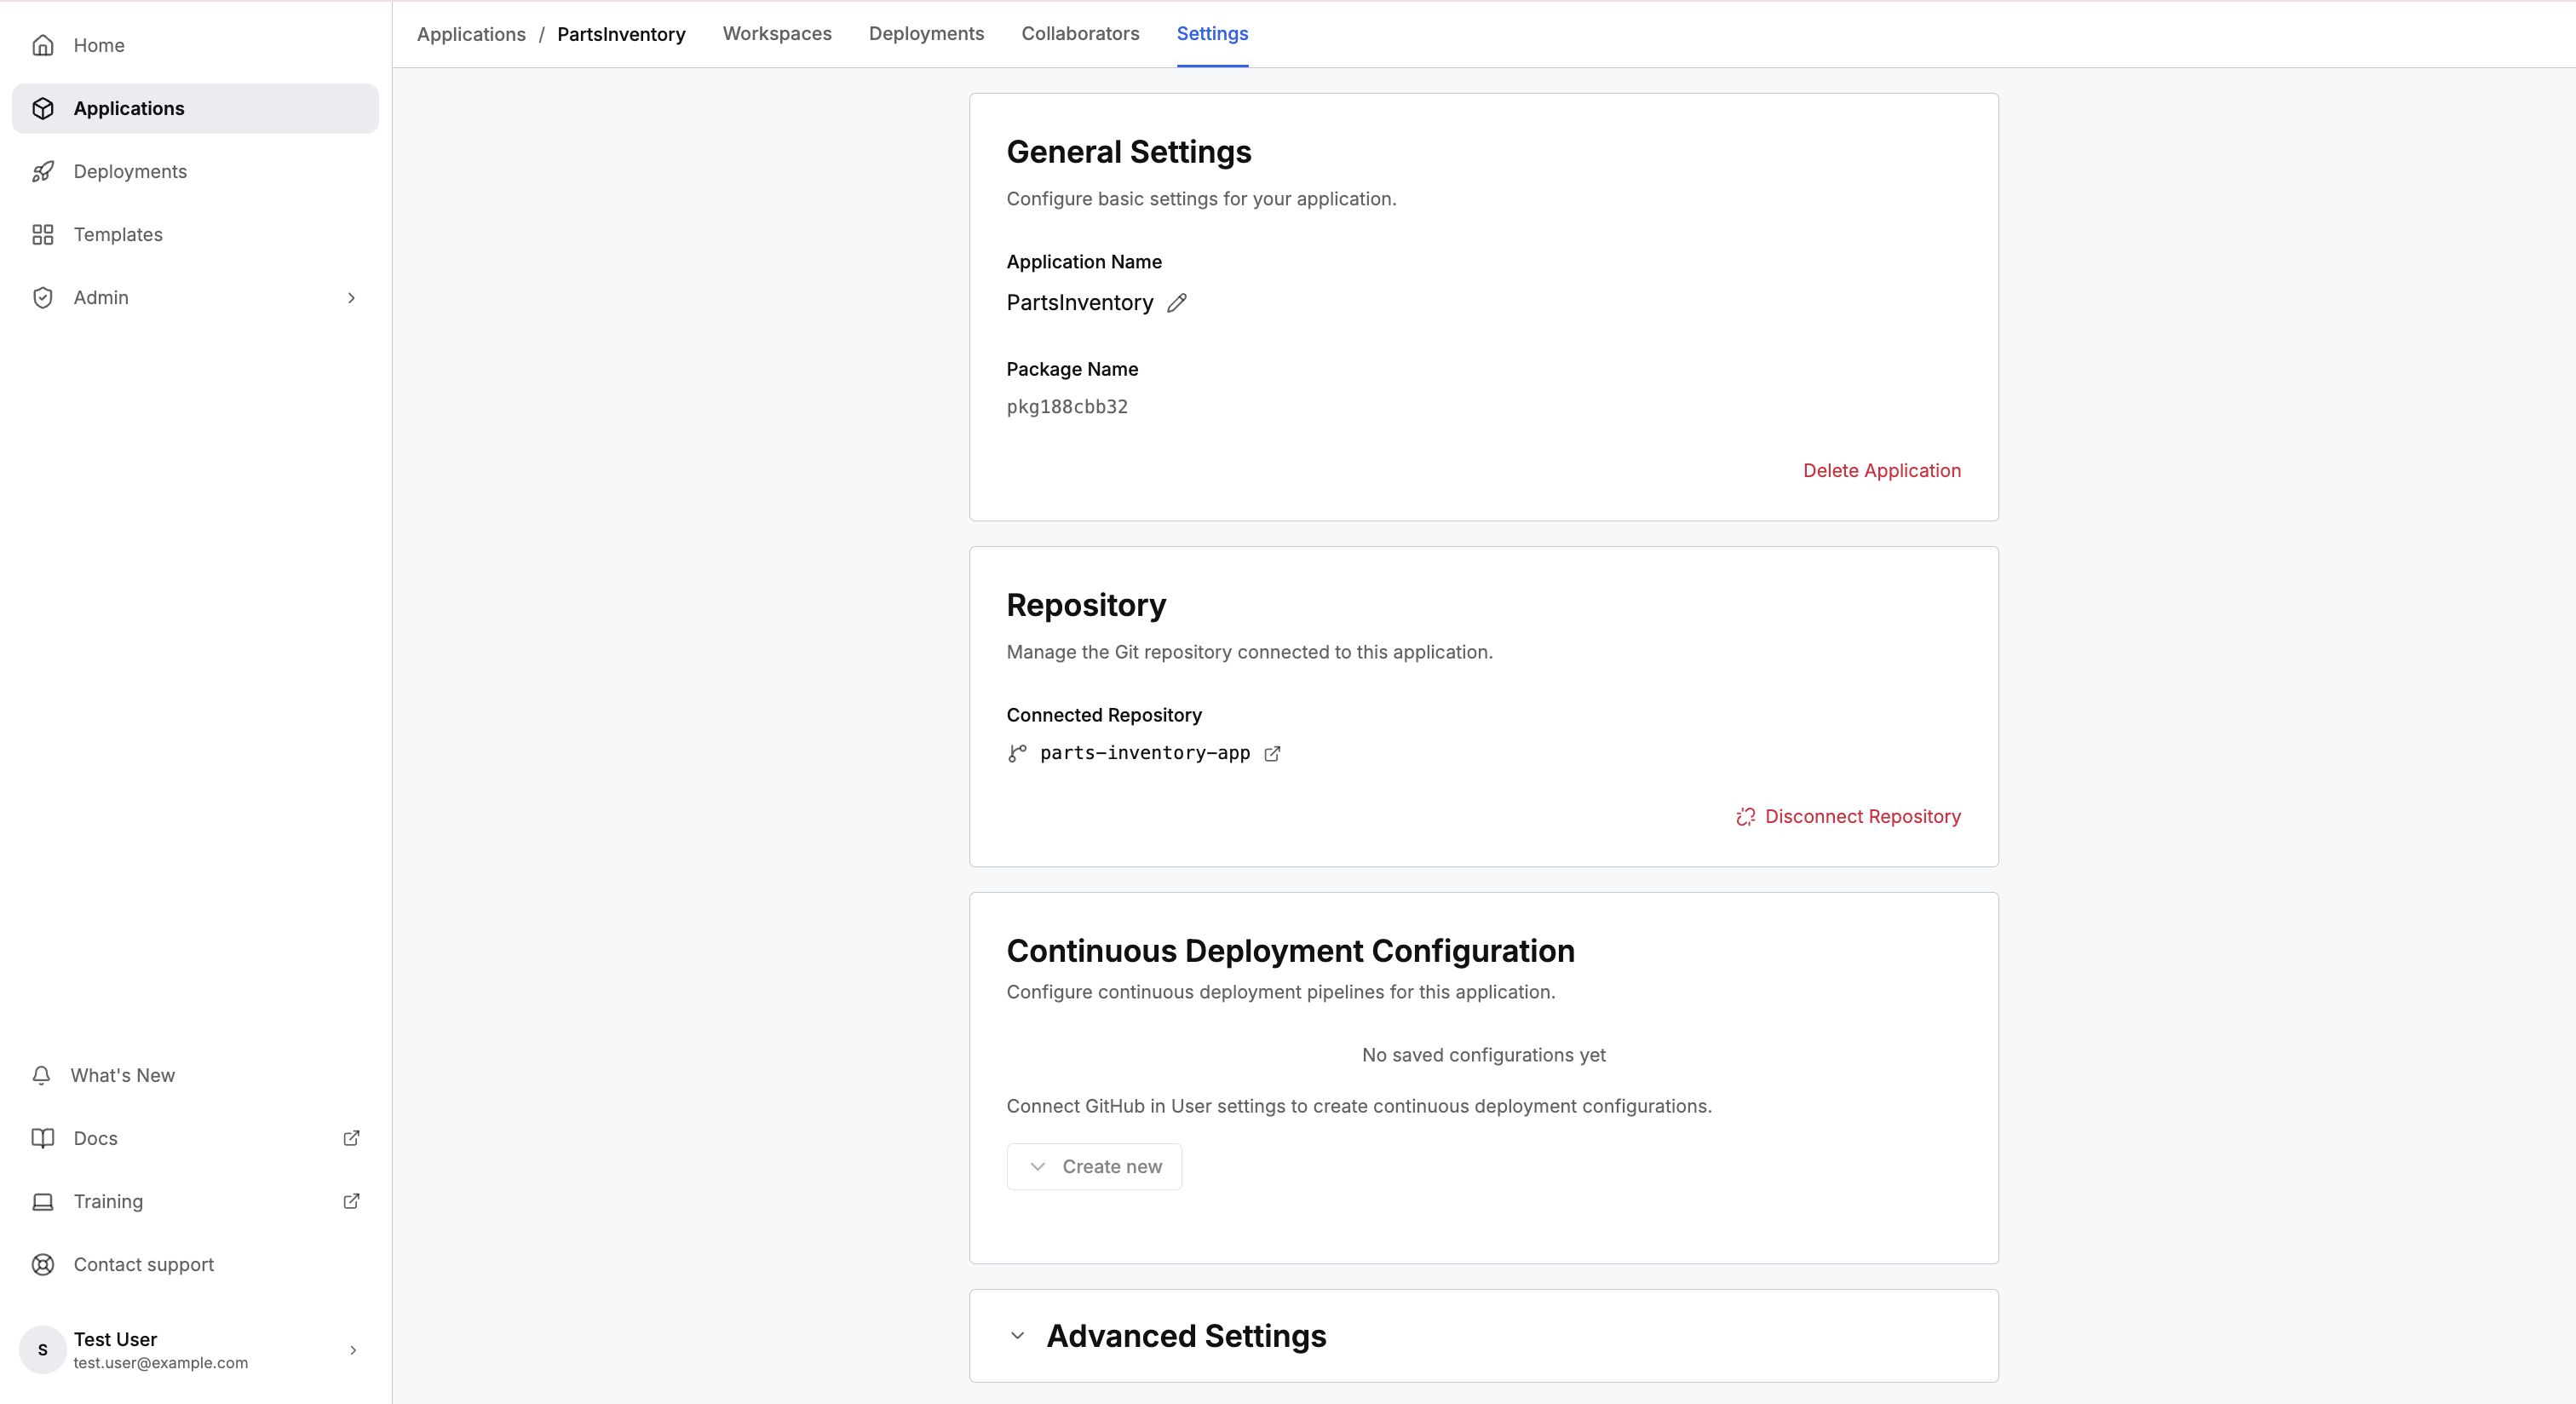
- General settings: rename the application, or delete the application along with every workspace and deployment, from a confirmation dialog.
- Repository: connect the application to a Git repository, with a prompt to enable a Git provider first when no provider is connected.
- Continuous deployment configuration: register scheduled pipelines that rebuild deployments from a branch.
- Advanced settings: set processing power and memory for each part of a workspace, and a Workspace Initialization Lambda that runs after a workspace is created.
Application Settings covers the settings behind every new workspace, Preprovisioning Pools covers the pool of resources kept ready, and Manage Your Deployments covers deployment hibernation.
Model choice
C3 Code is model-agnostic and works across every major frontier-model family, including Claude, Codex/GPT, Gemini, Grok, Mistral, and Llama. The model belongs to the chat rather than to the workspace, so you choose which model does each piece of work.
Key capabilities:
- Per-chat model selection: each chat carries its own mode and model selectors in the chat panel footer. Changing them in one chat leaves every other chat unchanged. A heavy build and a quick question can therefore run on different models at once.
- Cost by model: your LLM budget tracks the estimated cost of your token usage, weighted by model, so a lighter model spends less of your budget than a heavier one for the same work.
- Usage by model: filter your own consumption by model on My Usage and Cost, and administrators filter across every user, application, and workspace from the Usage section.
See Work in Multiple Chats, My Usage and Cost, and Manage User Roles and Quotas.
Source control and version history
Every workspace is backed by a Git repository. The agent writes generated code into the workspace as it works, and you commit changes from the Git status control. That commit history is what lets you check out an earlier version of your application. Connect a GitHub account to keep work outside C3 Code and collaborate through branches, commits, and pull requests.
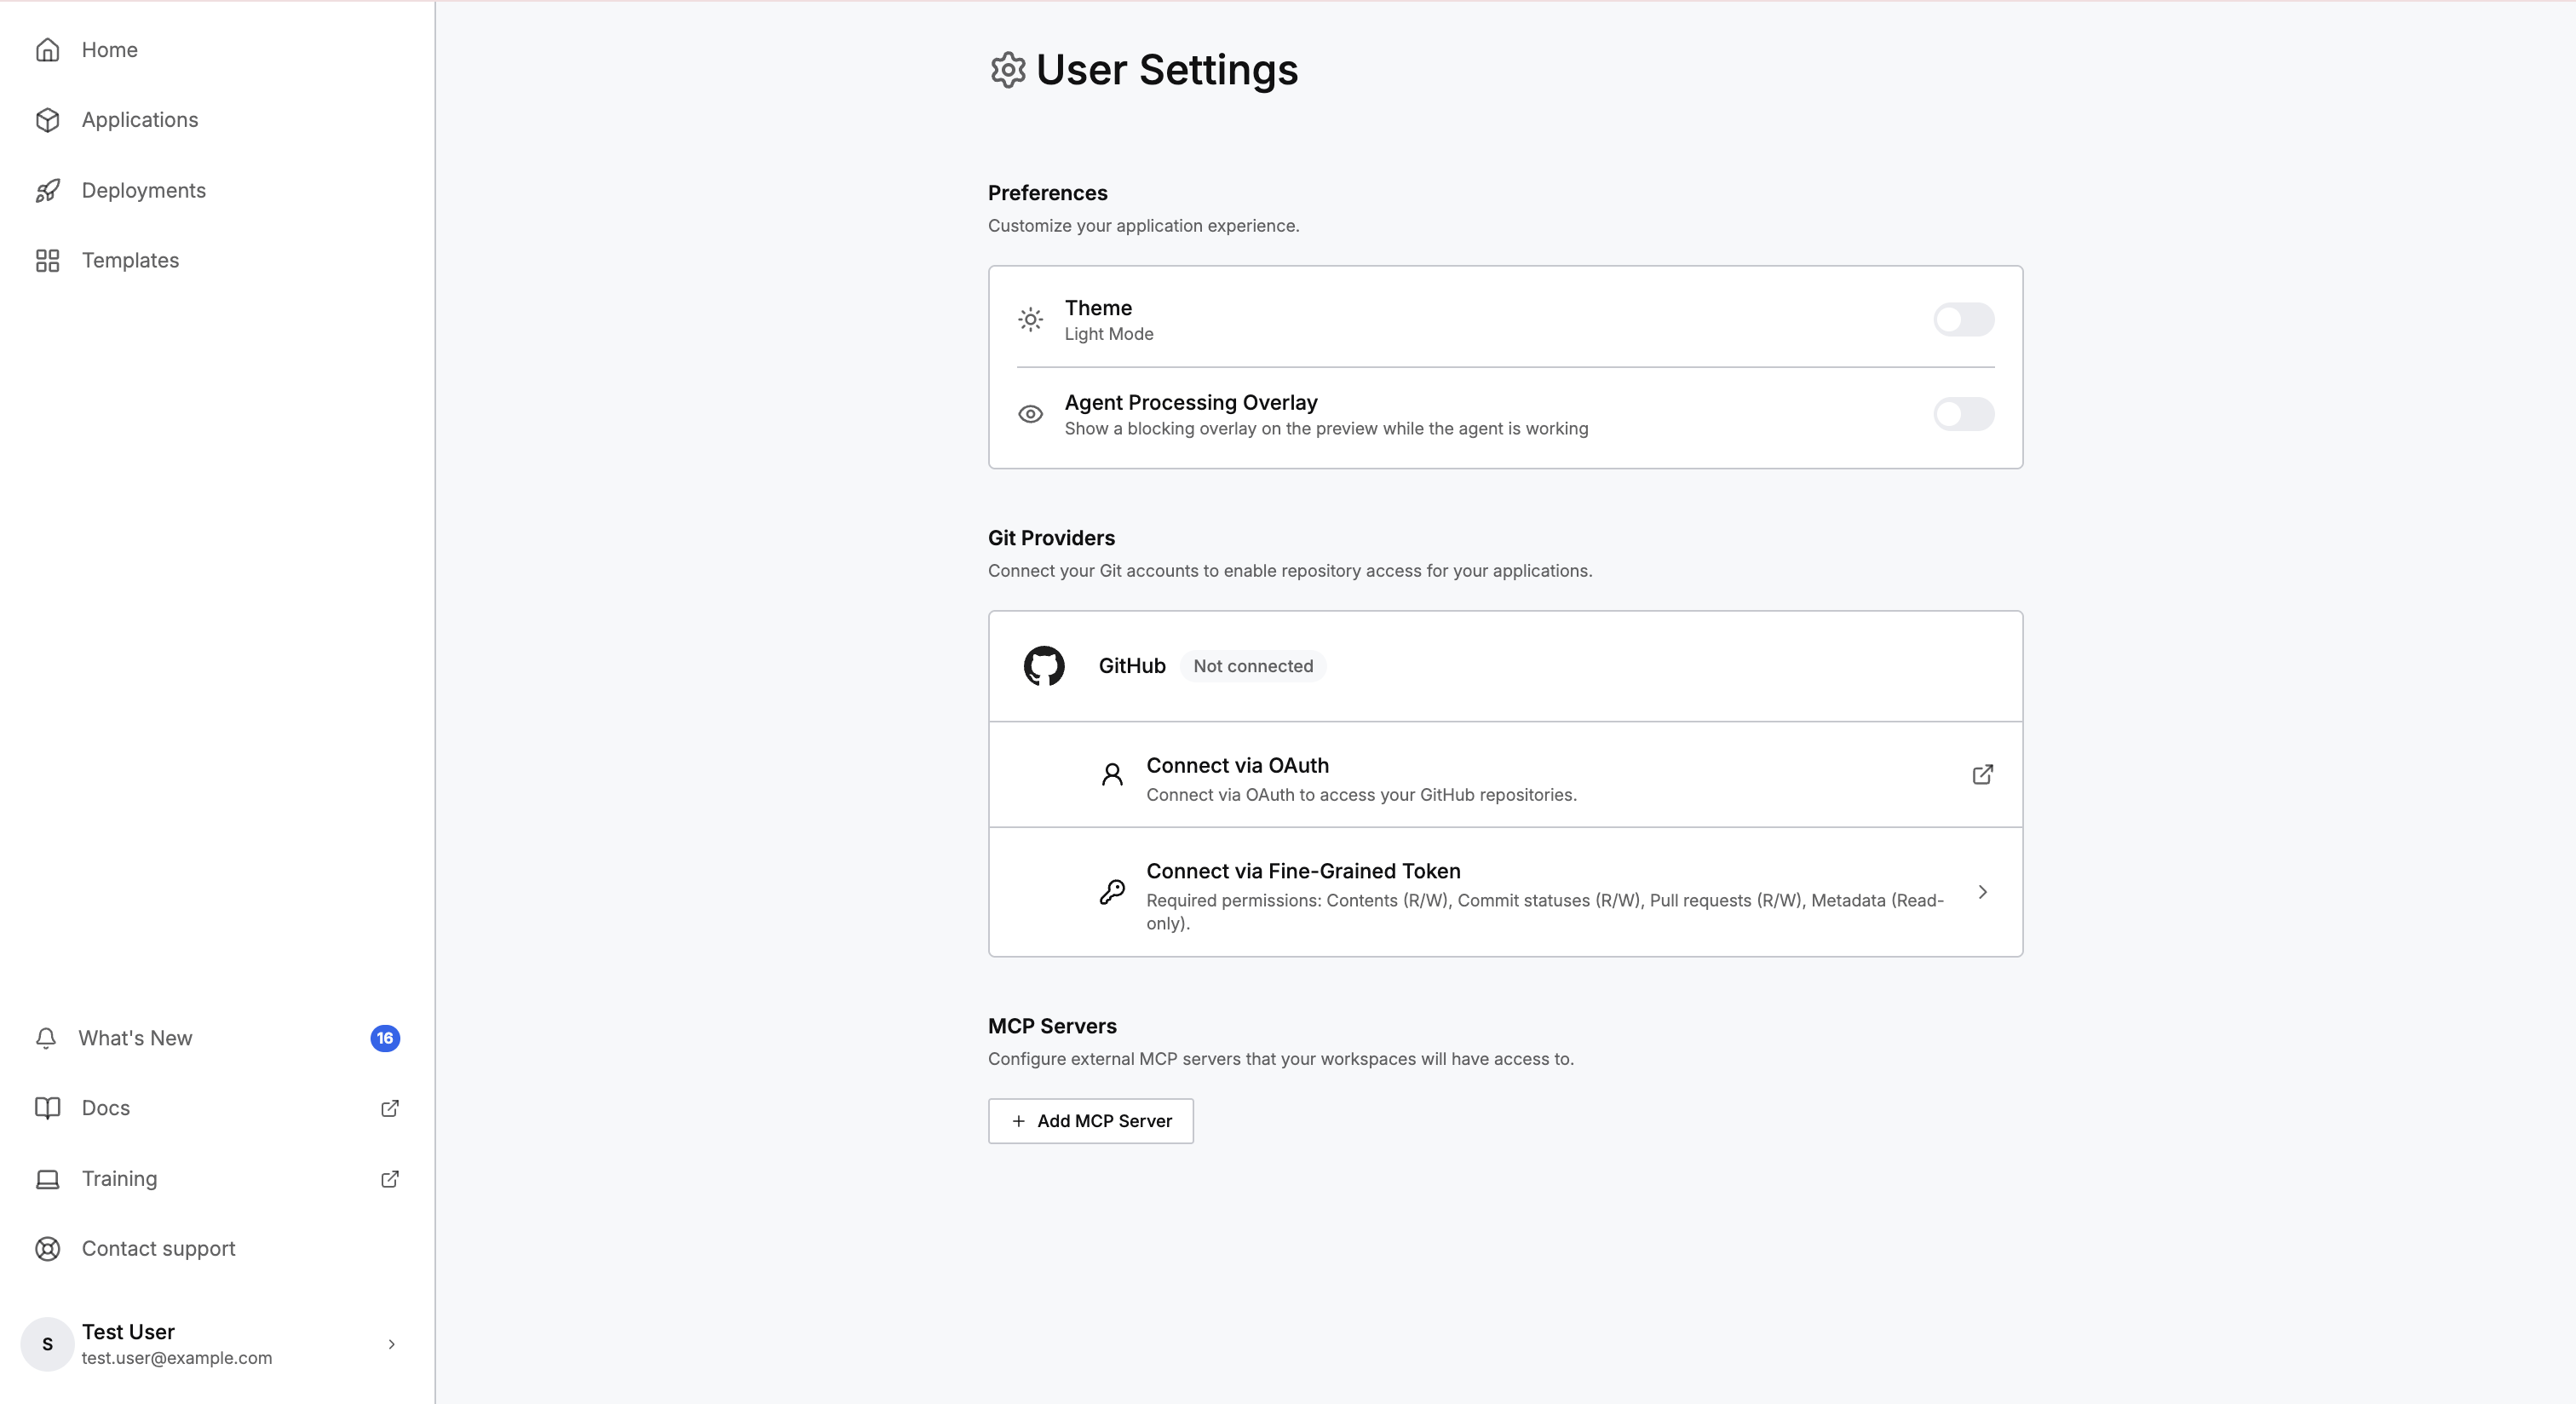
Both connections, GitHub and MCP servers, are on the User Settings page.
Key capabilities:
- Git-backed workspaces: every workspace has a Git repository from the moment you create the workspace. You commit generated code from the Git status control or by asking the agent, and C3 Code commits for you when you switch branches with uncommitted changes.
- GitHub integration: connect from User Settings through OAuth or a fine-grained personal access token, with the required token permissions listed in the setup steps. Connections are per user, so each collaborator connects an account of their own. Connecting through OAuth also adds the GitHub MCP server to the agent.
- Repository connection: link a repository to an application by creating a repository or selecting an existing one, or create an application by cloning an existing GitHub repository.
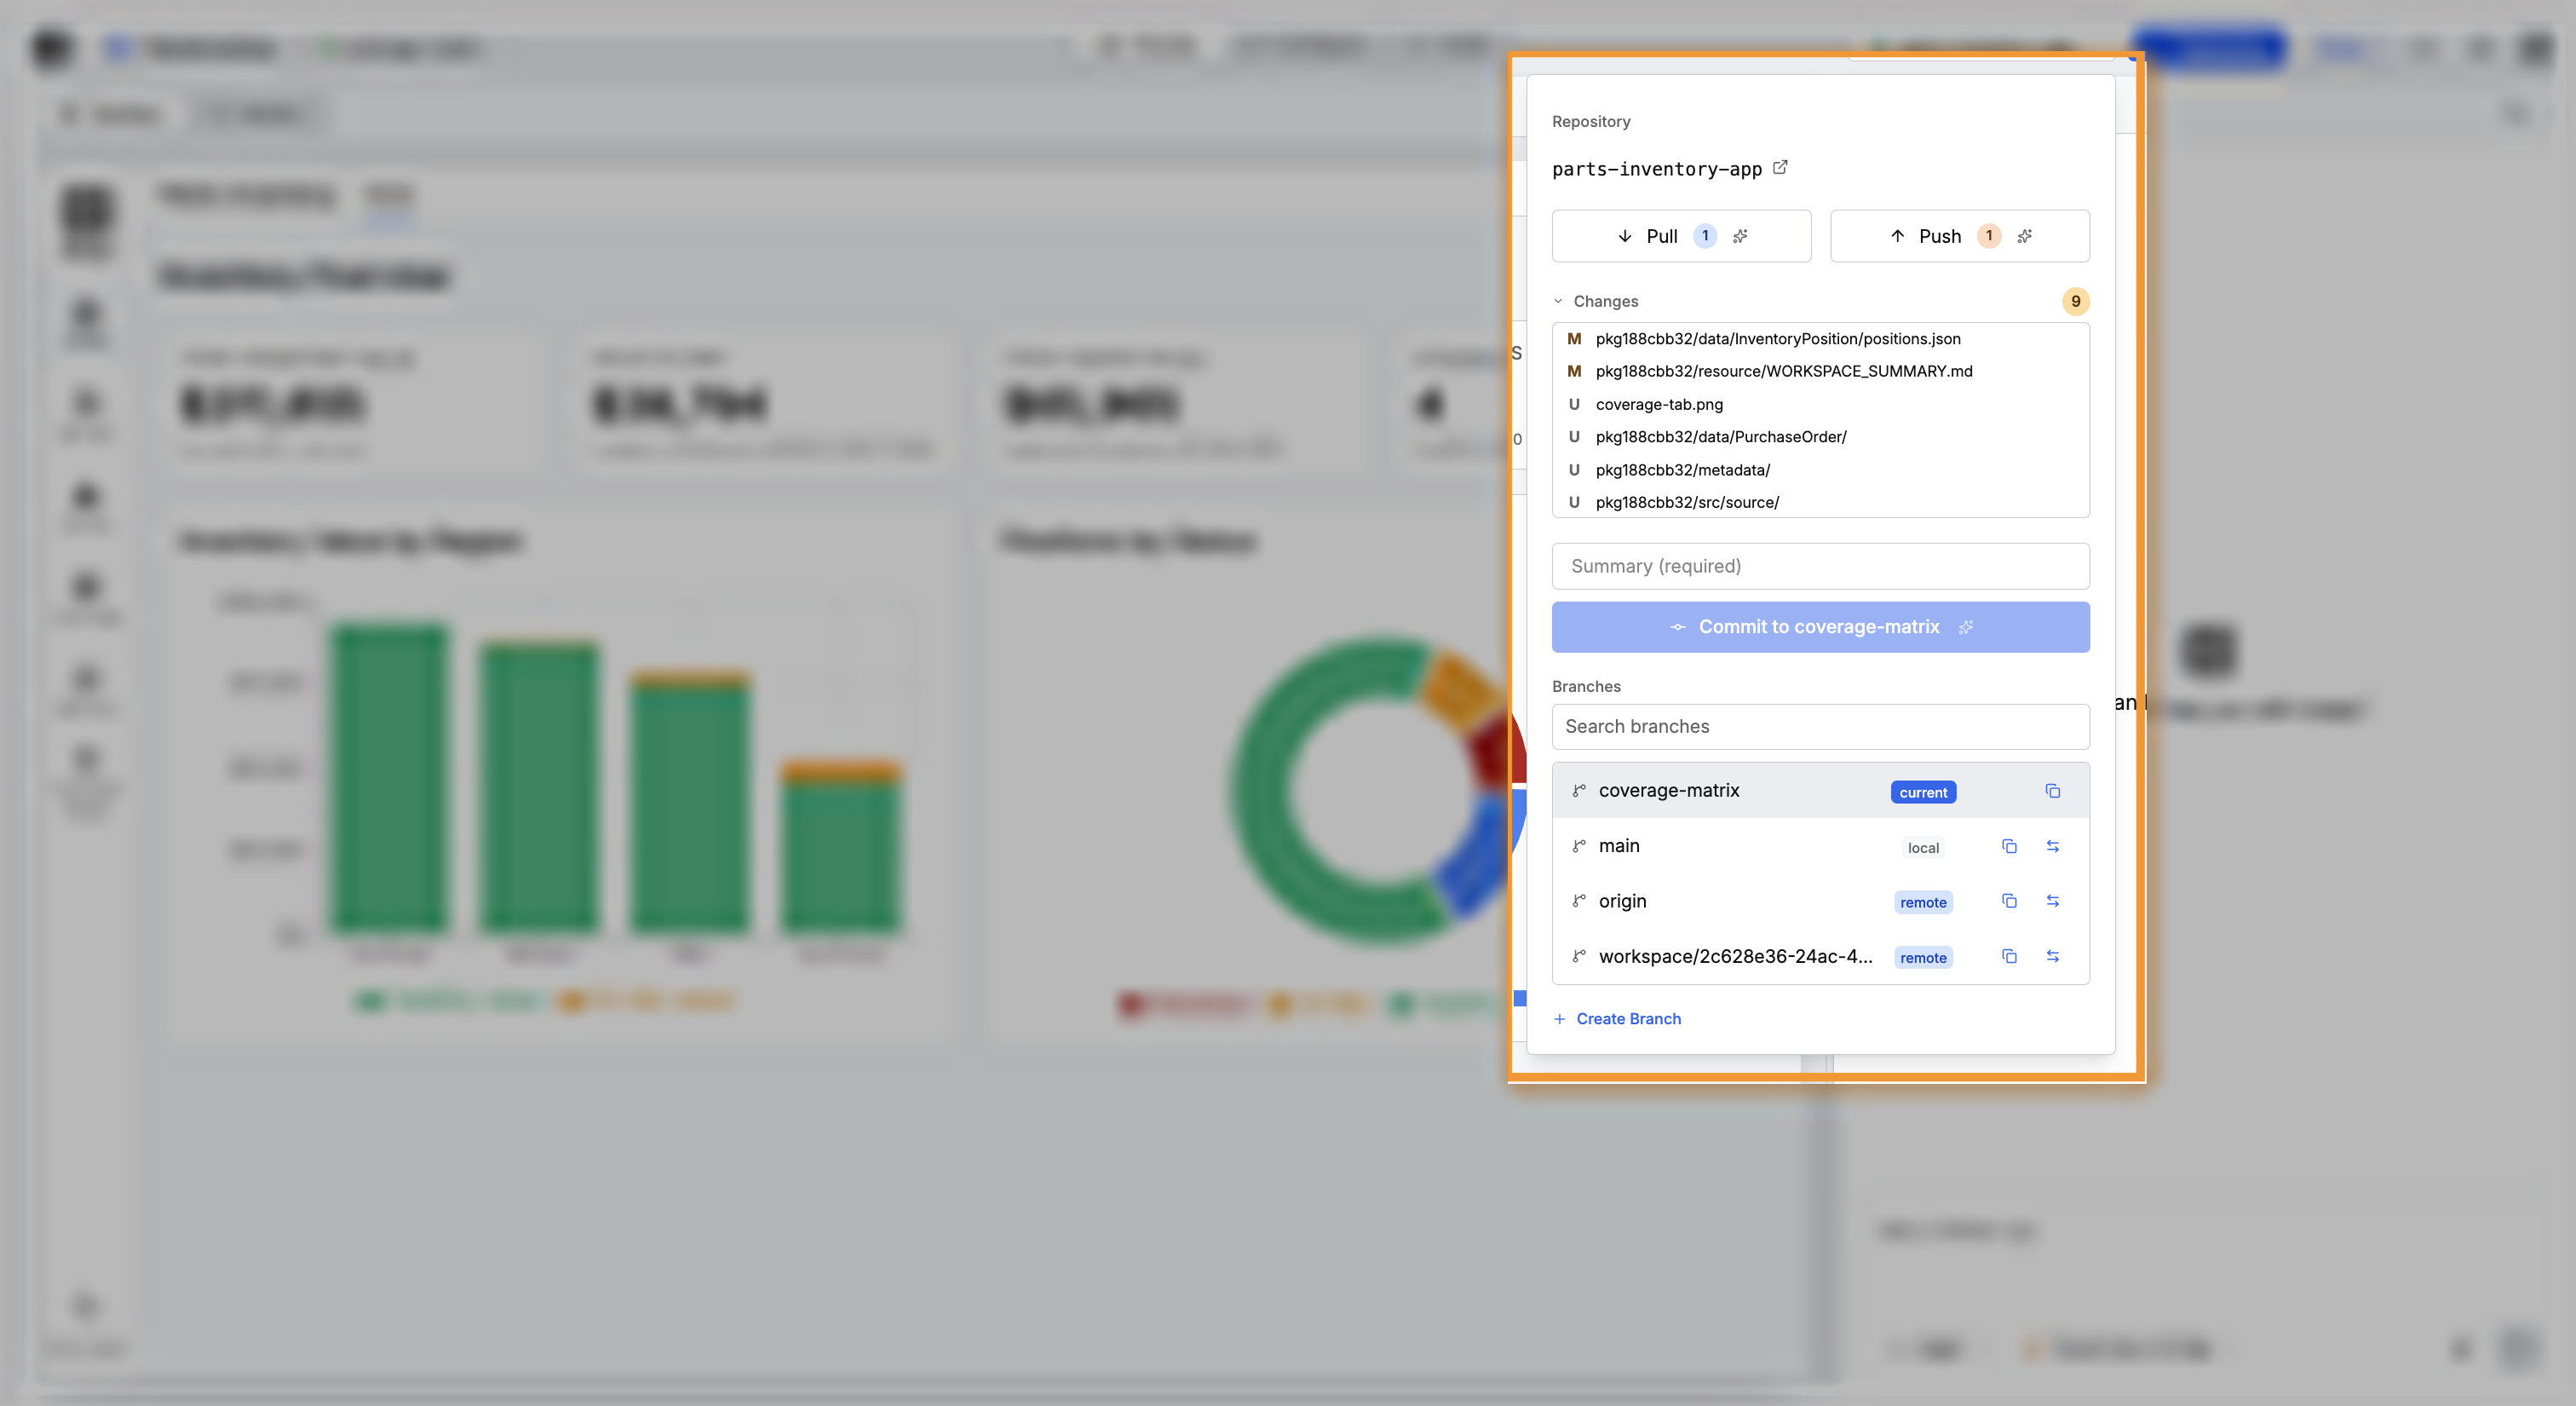
- Git status control: see the current branch and the count of uncommitted changes, then pull, push, stage and commit with a summary and description, browse and search branches, and create a branch, all from one control.
- Conflict resolution: when a merge conflict happens, select Resolve Conflicts and the agent finds, resolves, and stages the conflicting files. You can also ask the agent to handle conflicts from the chat panel.
The Git status control lists every branch and marks the branch the workspace is on.
Review Code and Manage Branches covers saving, branching, and reviewing your code, and Connect GitHub covers connecting your account and linking a repository.
Deployment and continuous deployment
You deploy a workspace to staging or production in one action from the workspace header. C3 Code validates the package first, tracks the lifecycle of every deployment, and can rebuild deployments from a Git branch on a schedule. Every deployment inherits the security model of the C3 Agentic AI Platform. Role-based access control and audit trails are part of the architecture rather than work you add afterward.
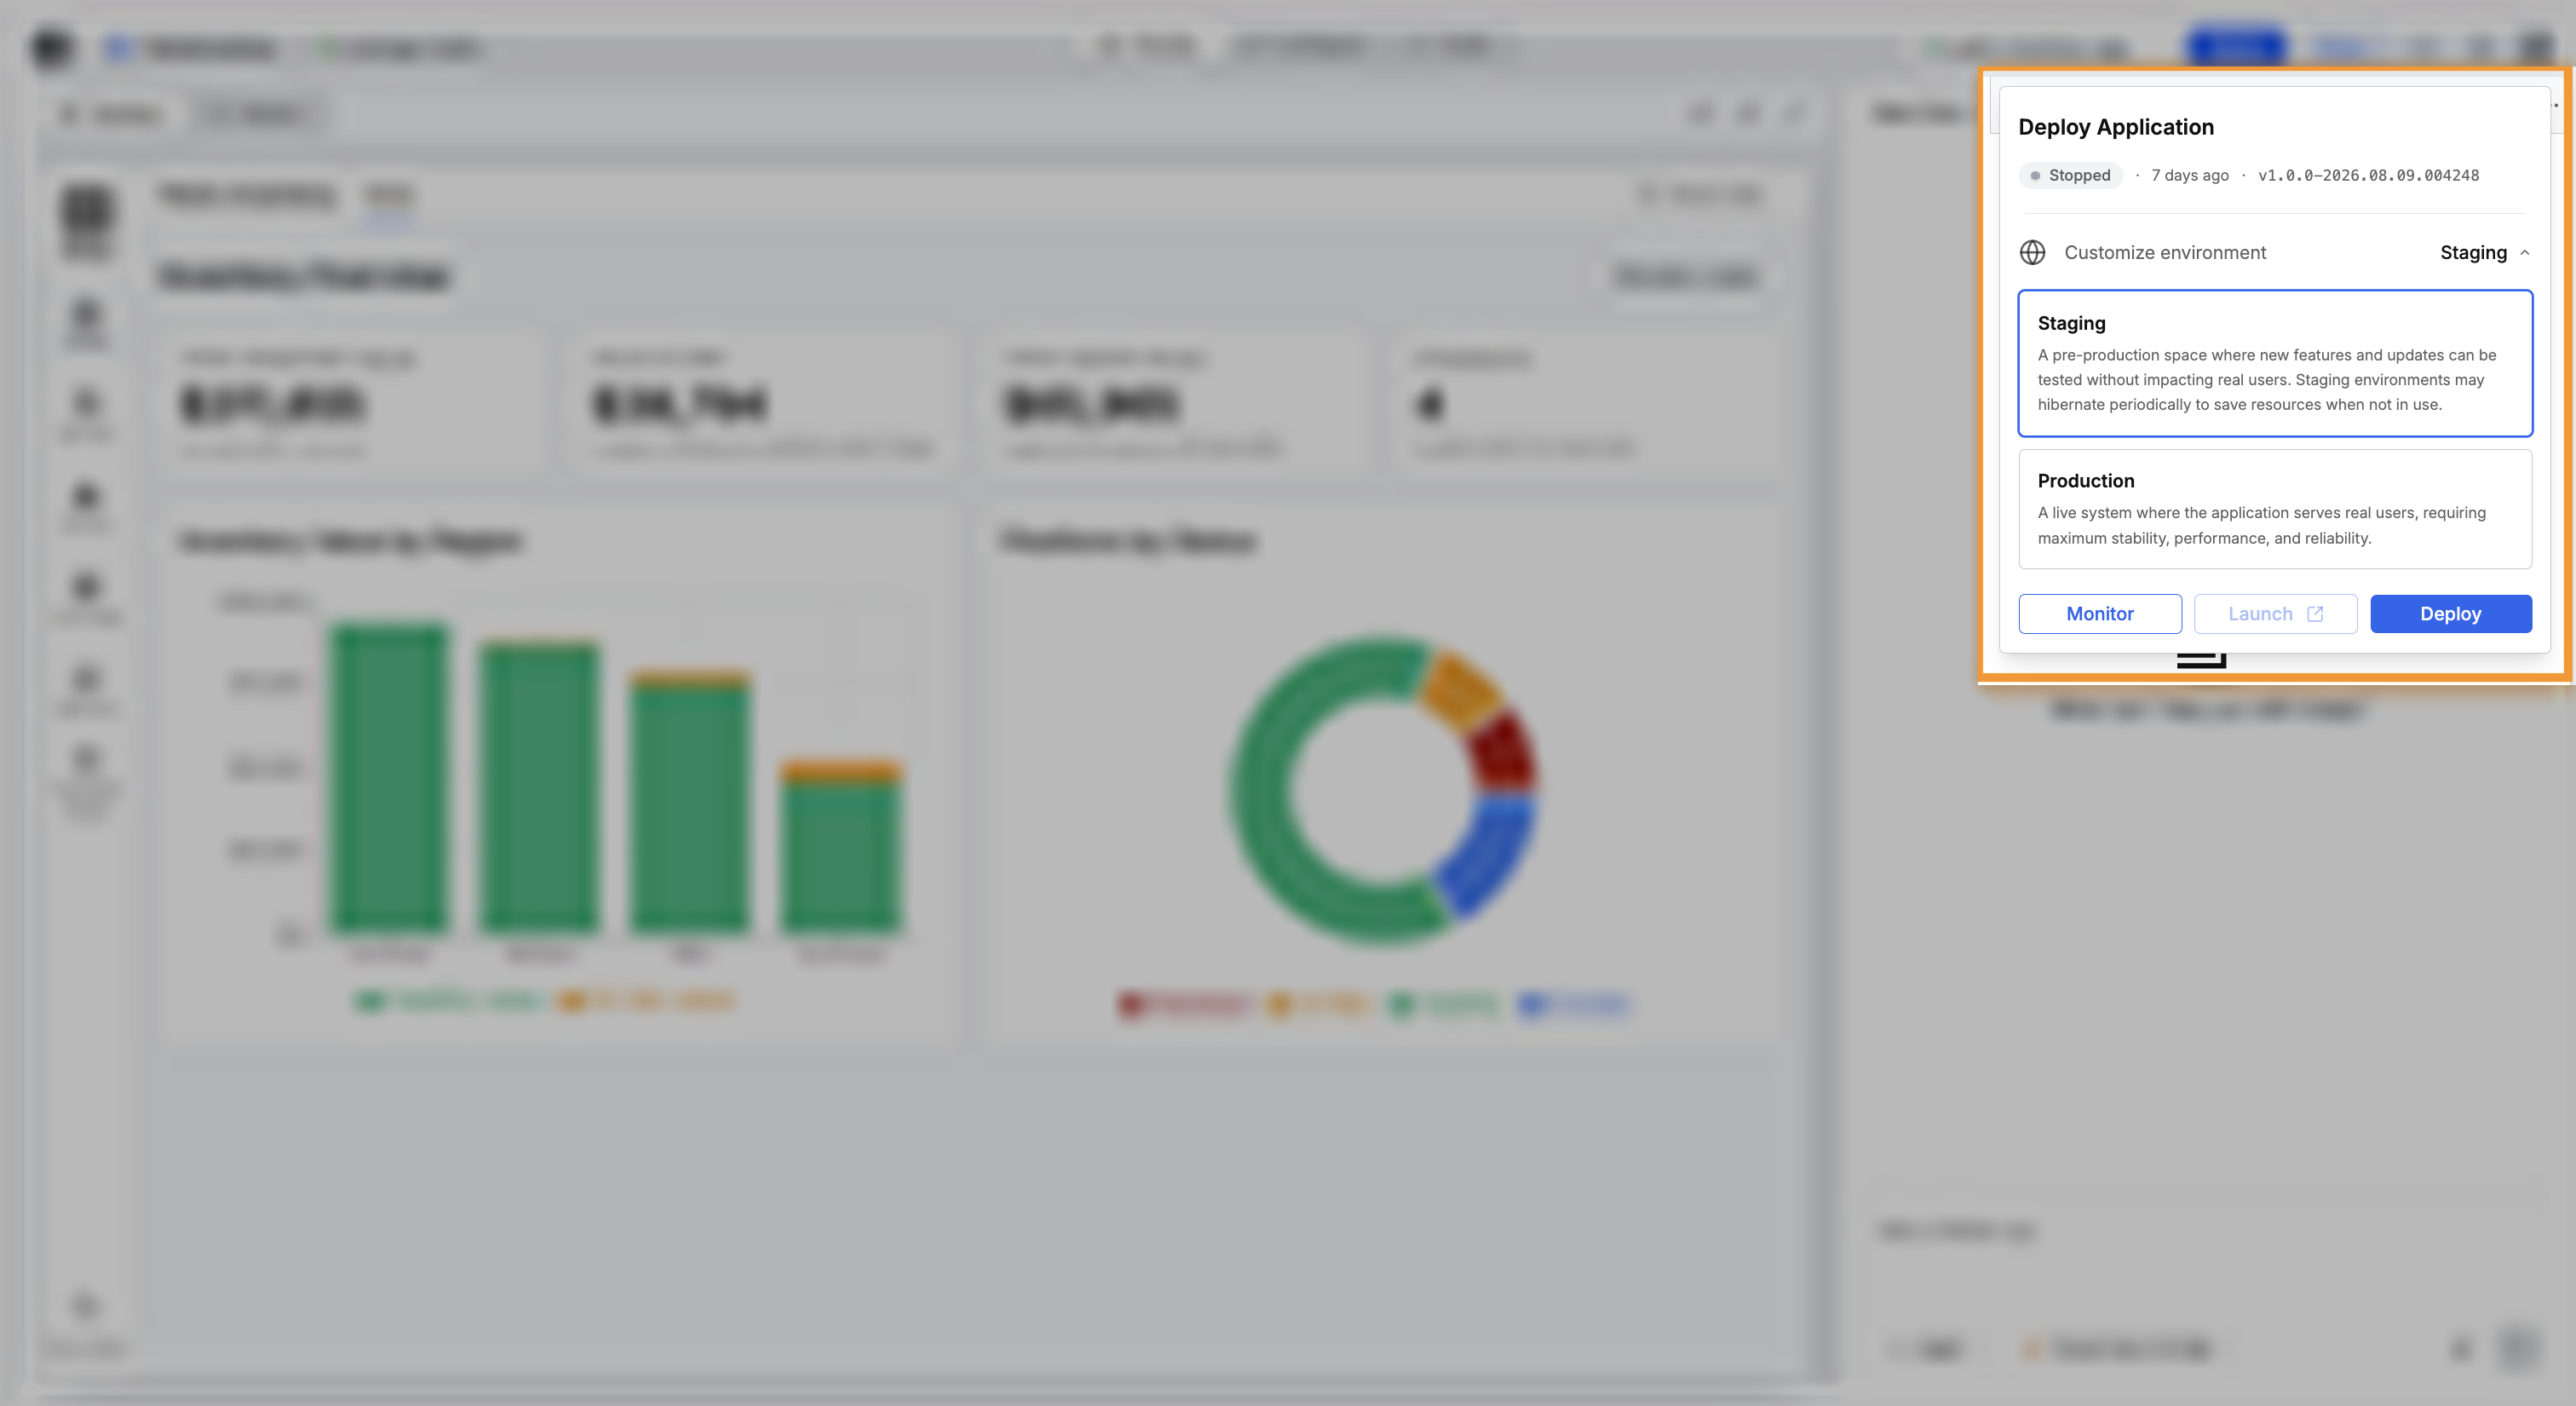
Deploying starts from the Deploy Application popover, which is where you choose between the two deployments.
Deploy and validate
Deploying takes one action, and C3 Code checks the application before sending anything:
- One-action deployment: select a deployment in the Deploy Application popover and confirm. Production is excluded from hibernation by default, and staging hibernates on a schedule.
- Package validation: C3 Code validates the package before deploying. The Package Issues Detected modal groups errors and warnings by file, offers Fix with C3 AI Assistant, and lets you deploy when only warnings remain.
For the deploy procedure itself, see Deploy to Staging and Production.
Deployment lifecycle and monitoring
The Deployments page lists every deployment you can reach, with the environment, version, and status of each.
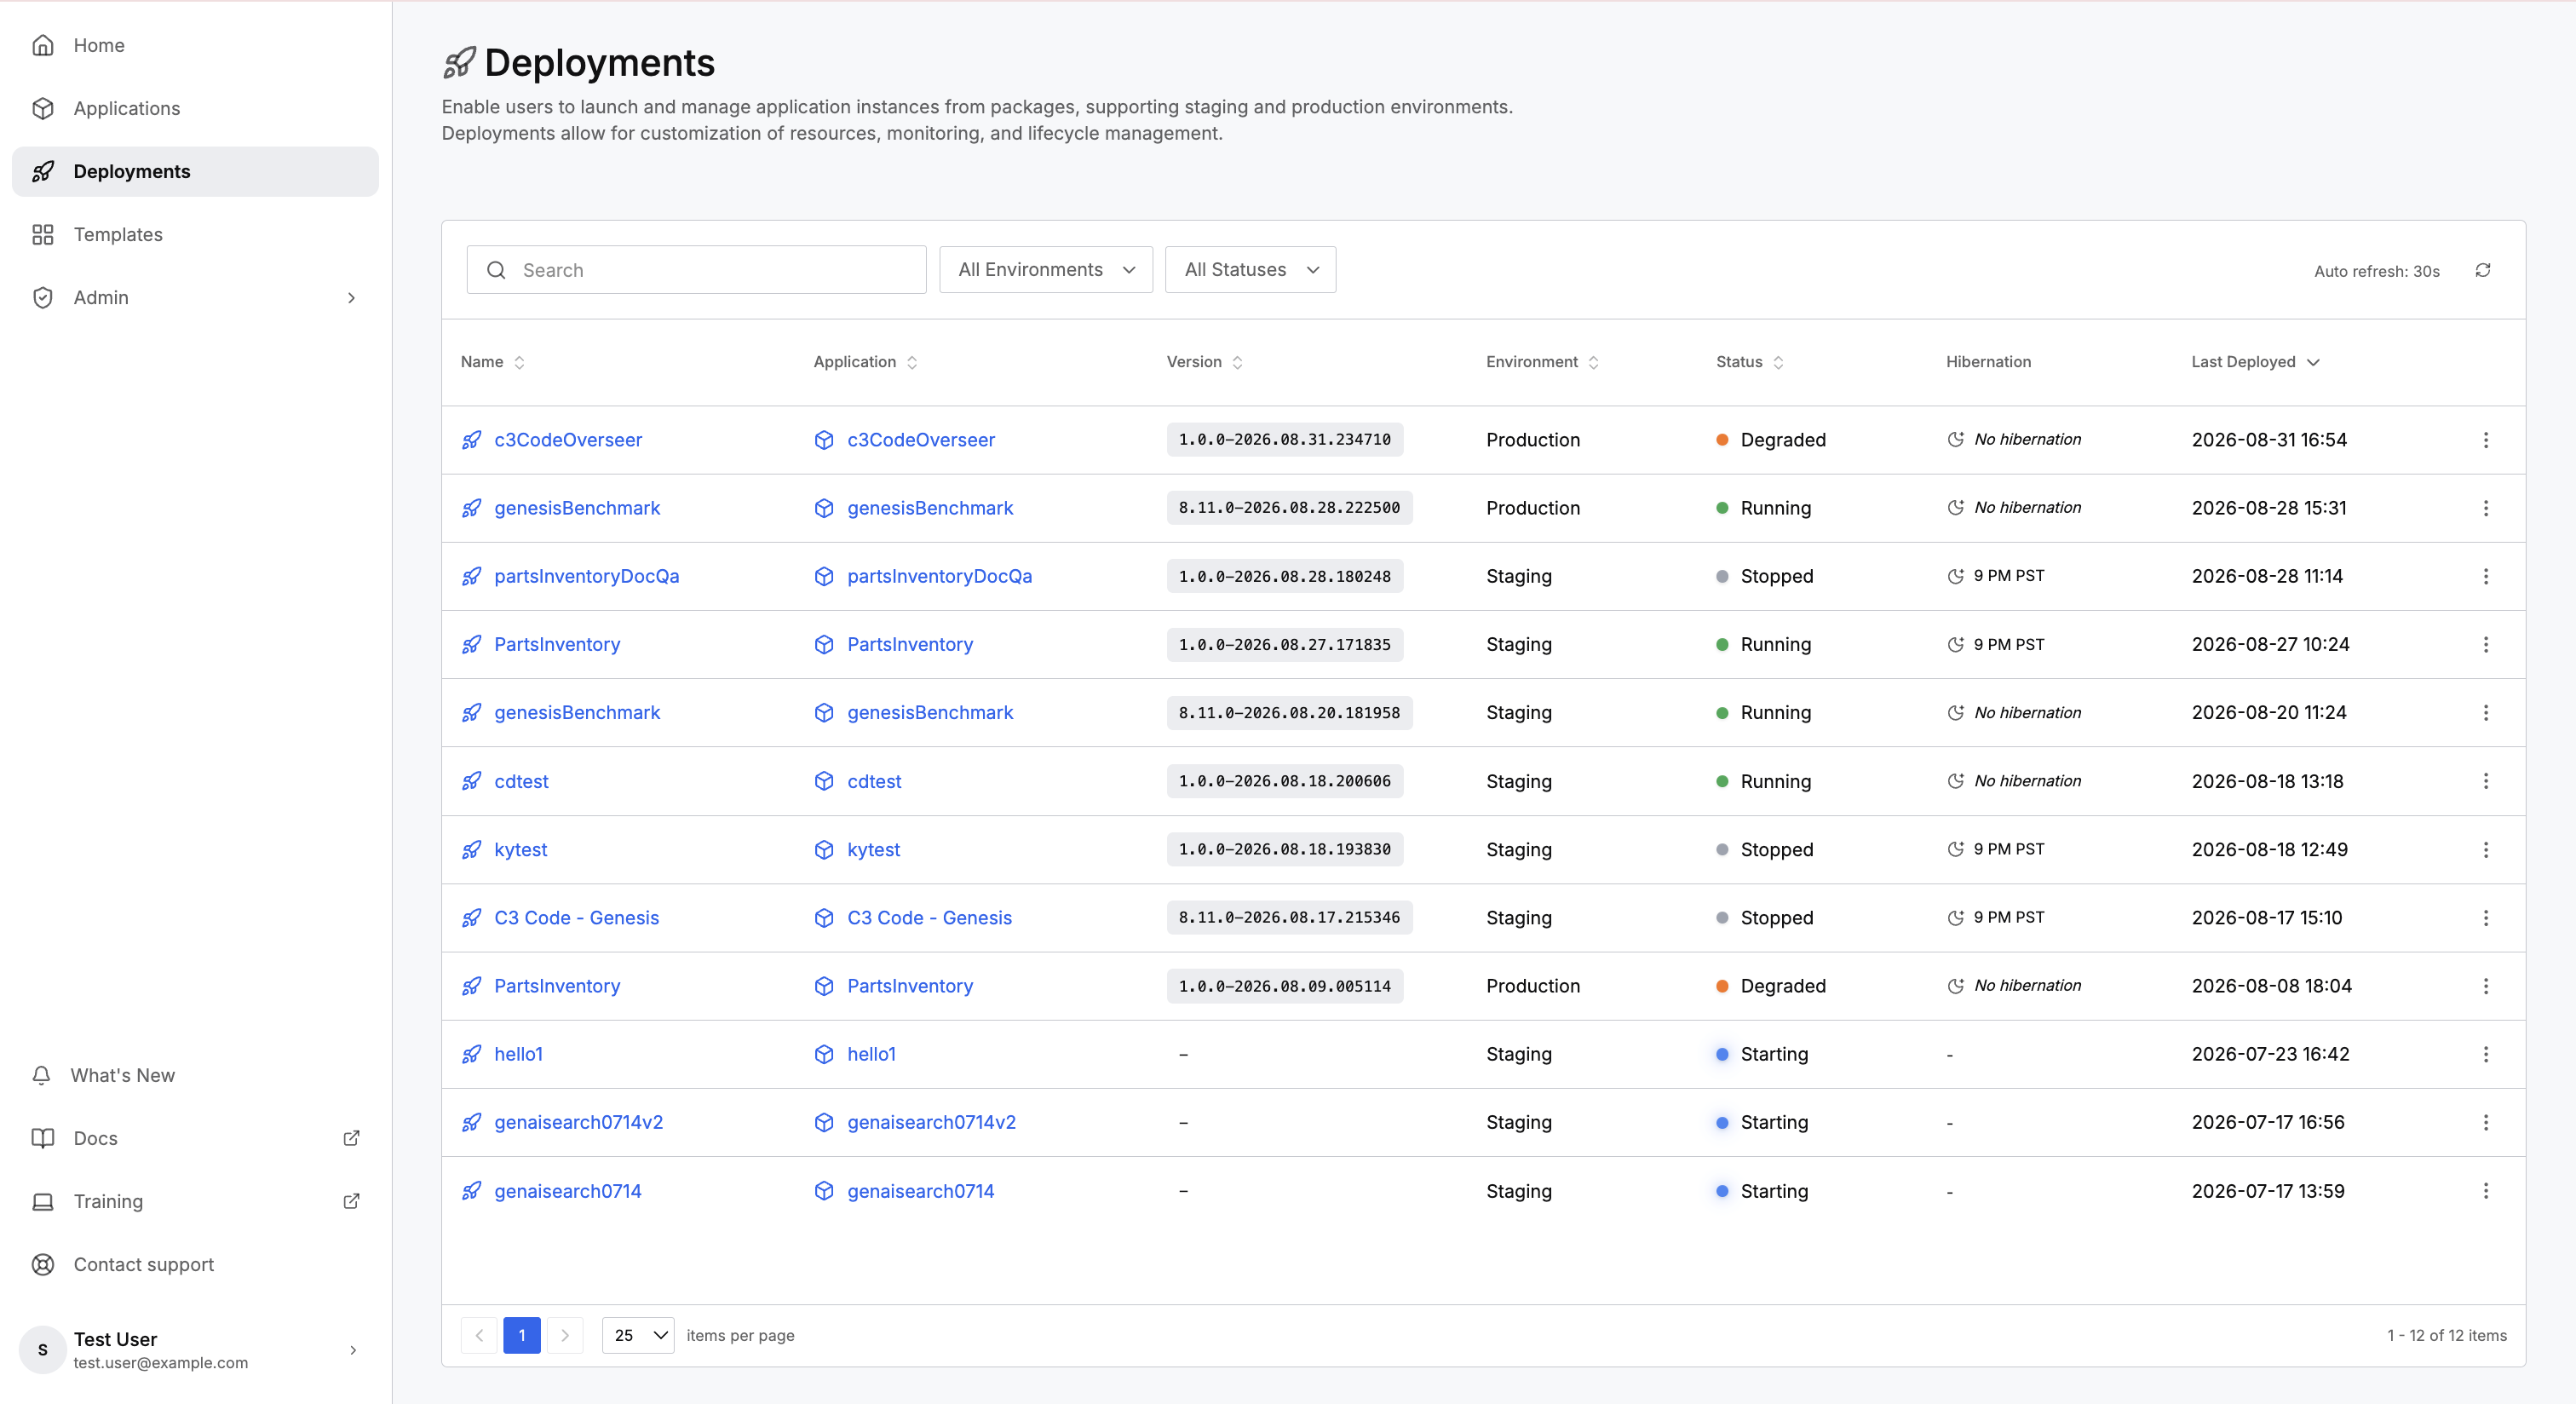
- Lifecycle actions: stop, resume, rename, launch, and delete a deployment, and open its settings, with a color-coded status covering Starting, Running, Hibernating, Stopped, Degraded, Error, and Failed to Start.
- Monitoring: track deployments on a global Deployments page or on a per-application tab, with environment and status filters and an automatic refresh.
- Deployment detail and diagnostics: open a deployment to see the details, an Activity section counting errors and warnings, and a full log viewer, with recovery guidance for Error and Failed to Start.
Manage Your Deployments covers stopping, resuming, and diagnosing a deployment, and Deploy Your Application covers choosing between staging and production.
Continuous deployment
A build pipeline maps a branch to one or more deployments and rebuilds those deployments on a schedule.
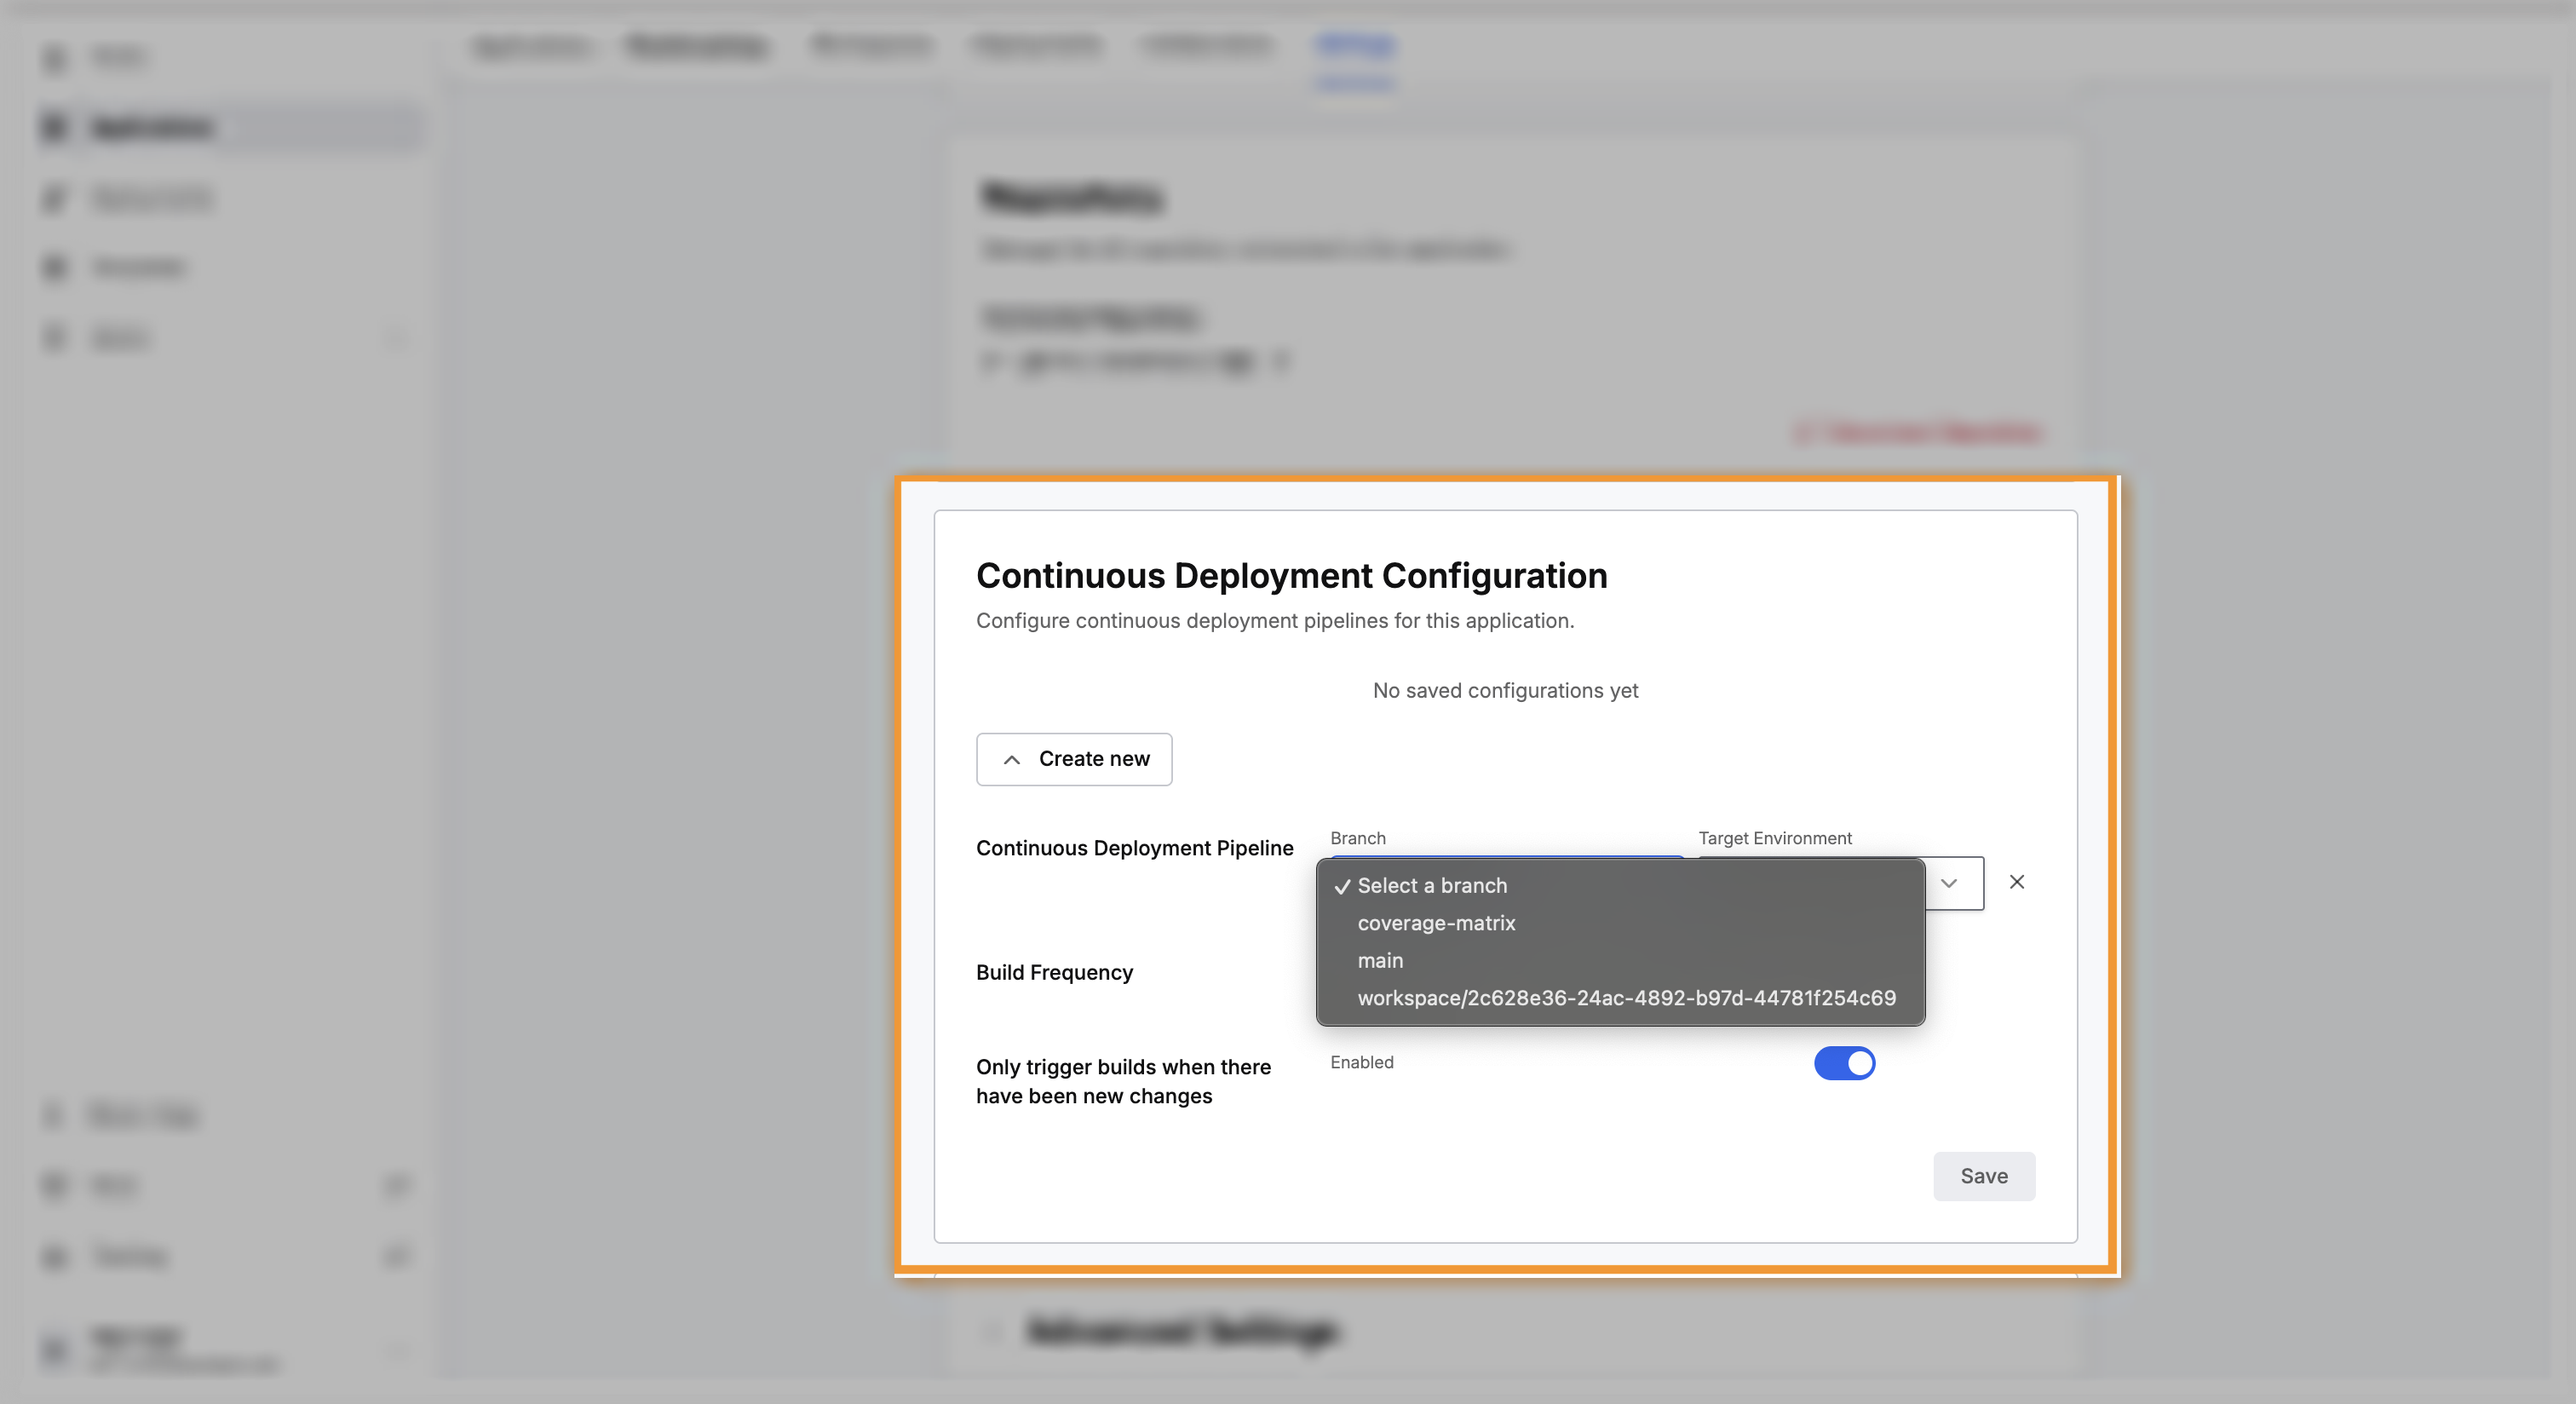
- Scheduled pipelines: register one or more pipelines. A build frequency preset or a custom interval controls how often C3 Code checks, and a toggle limits builds to when the branch has new changes.
- Manual-deploy awareness: while a pipeline targets a deployment, manual deployment to that deployment is disabled and a tooltip explains why. The other deployment stays available.
For rebuilding a deployment from a branch on a schedule, see Continuous Deployment.
Model Context Protocol integration
C3 Code connects the agent to outside systems through the Model Context Protocol. Register an MCP server to give the agent more tools, prompts, and data, and manage those connections from dedicated tabs in Configure.
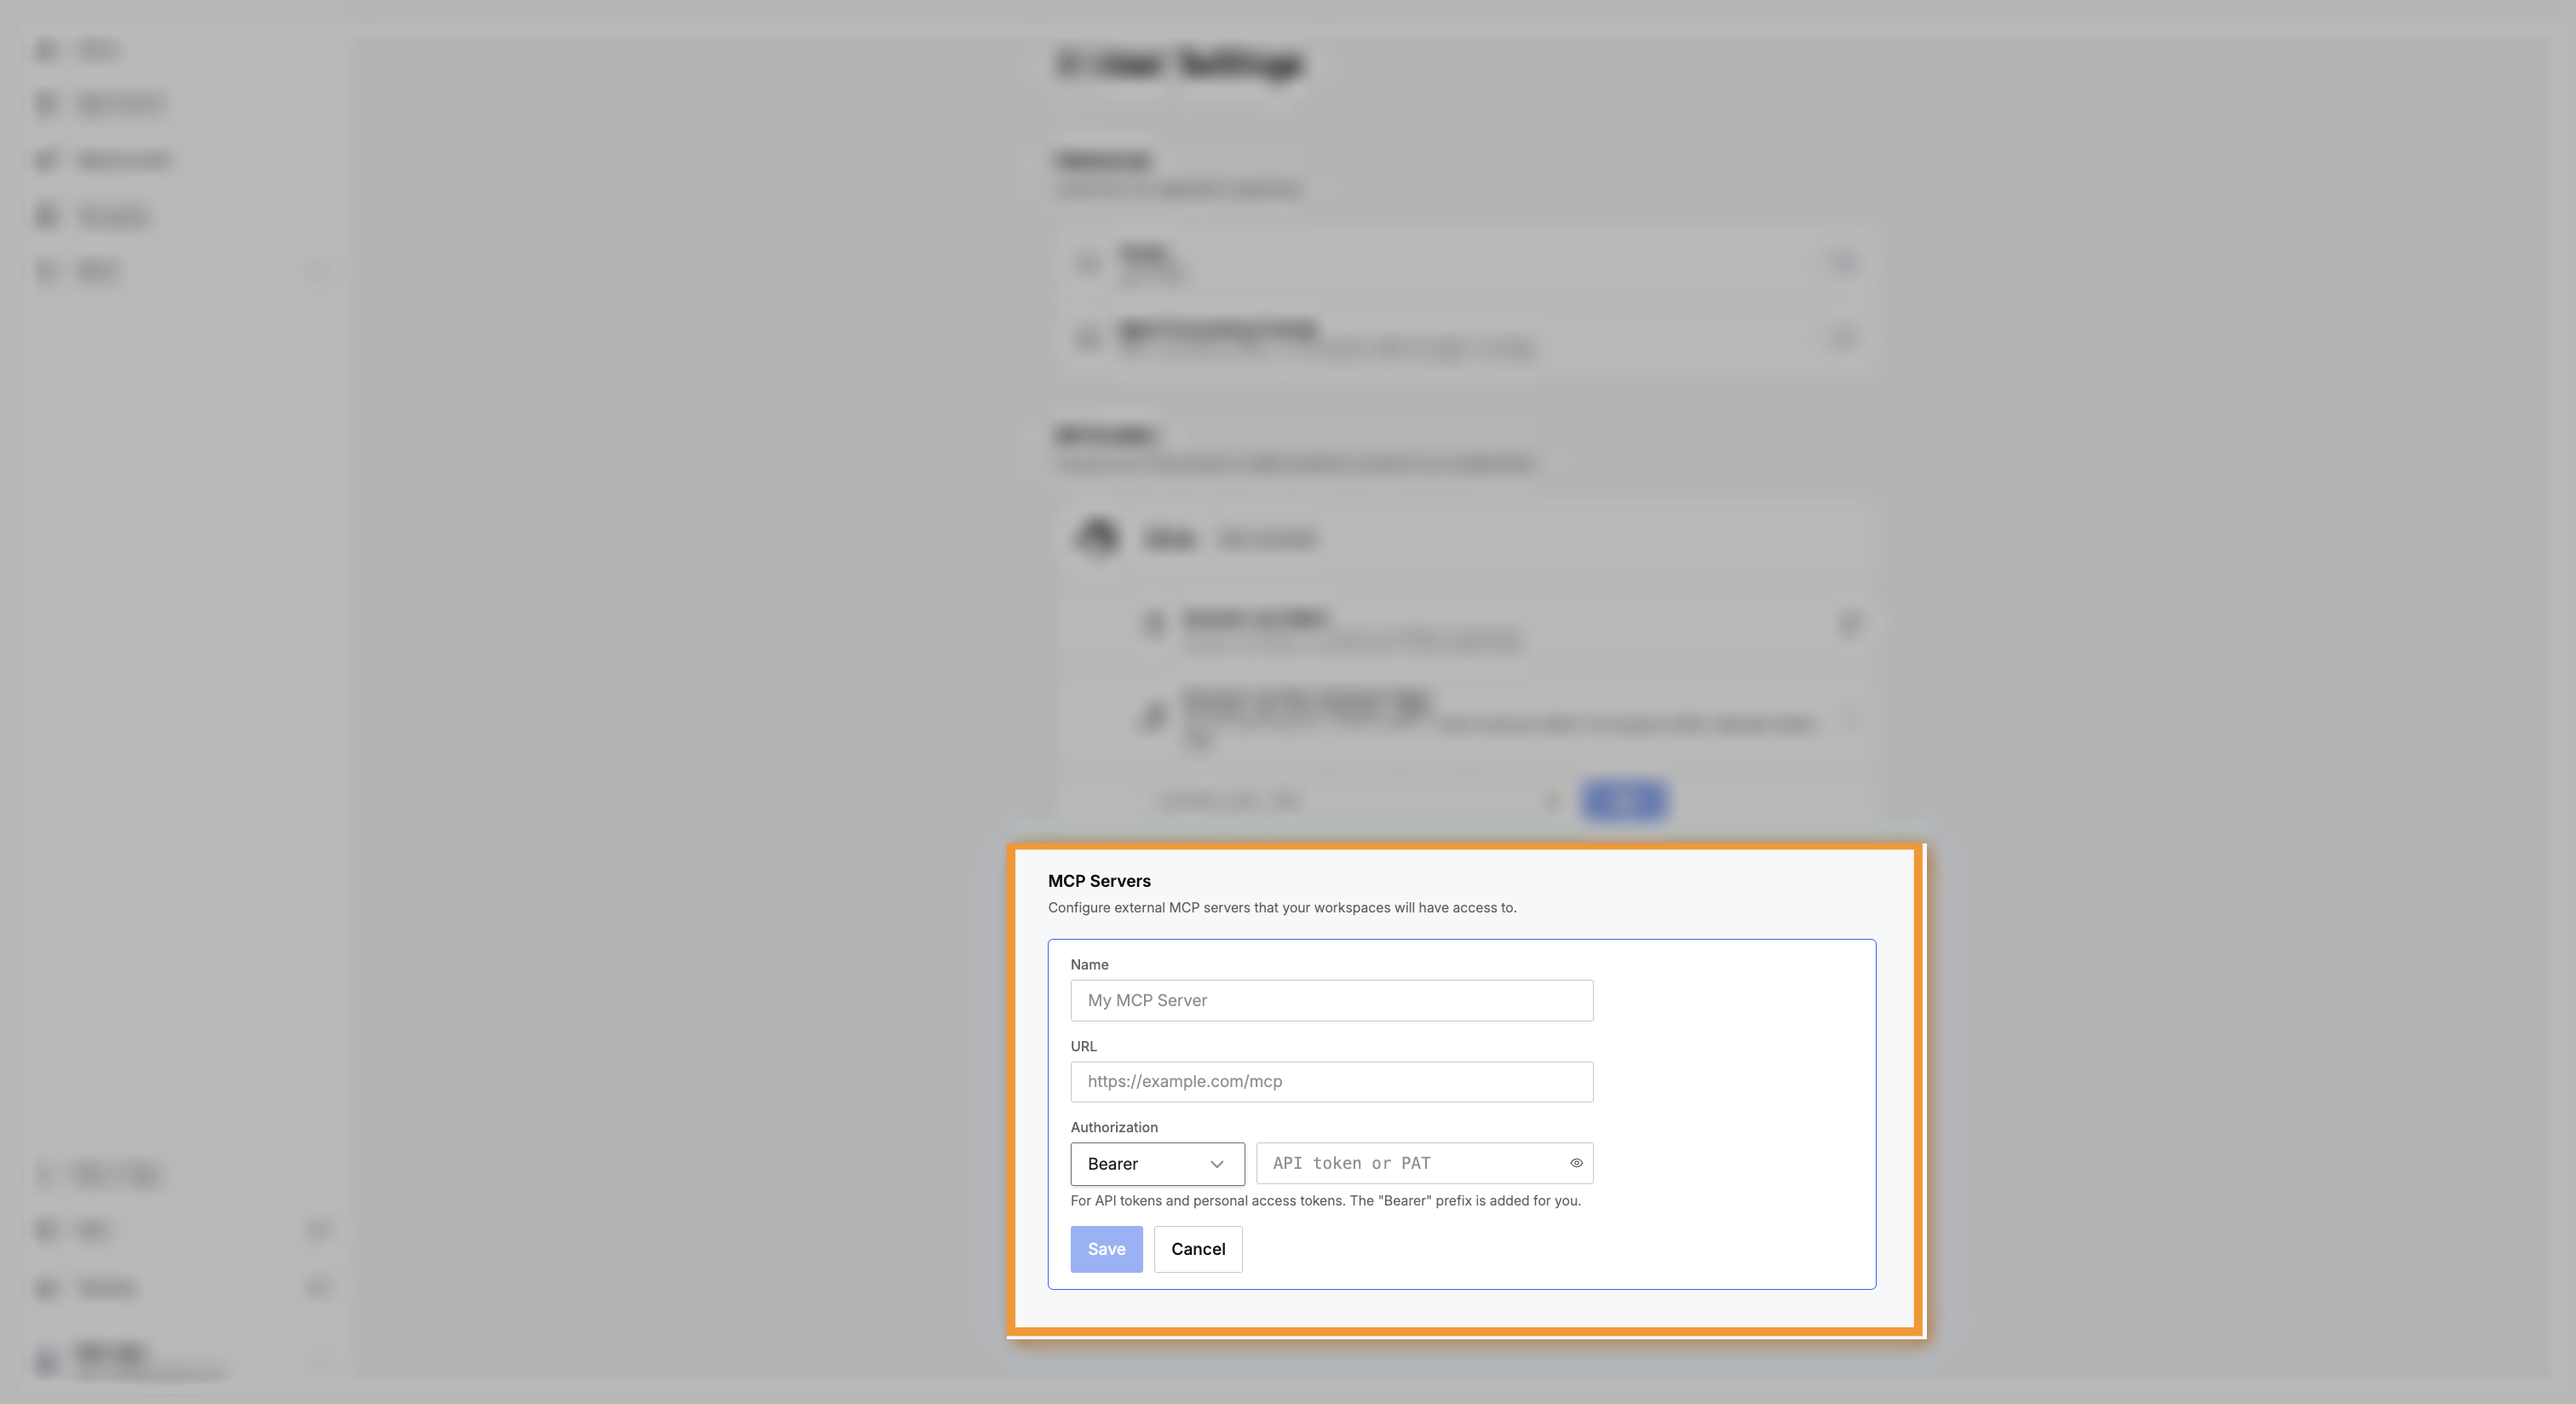
Registering a server uses one form, with a name, an address, and an optional token.
Key capabilities:
- Add MCP servers: register a server from User Settings with a name, URL, and optional authorization header. The name must be unique, and every workspace you own gains that server's tools, with a running workspace picking the server up after a restart.
- Dedicated management tabs: Configure publishes your application as an MCP server through five tabs. Use MCP Tools to publish tools, MCP Prompts to curate a prompt library, MCP Monitor to watch incoming calls, MCP Servers to run more than one named server, and MCP Access to manage token access for outside assistants.
Connect MCPs covers adding a server and checking the tools it gives the agent, and Use Configuration Tools covers what each tool in Configure does.
Sharing and collaboration
C3 Code shares work at two levels. Application-level sharing controls who can open an application and create workspaces inside that application. Workspace-level sharing controls who can reach a single workspace and the live preview of that workspace. Two people cannot edit one workspace at the same time. Each person works in a workspace of their own and collaborates through Git branches, commits, and pull requests.
Roles
A collaborator's permissions depend on the level at which that collaborator is added, and the same role name carries a different meaning at each level.
| Level | Role | Can do | Cannot do |
|---|---|---|---|
| Application | Admin | Manage workspaces, add and remove collaborators, change roles, delete the application | Nothing further |
| Application | User | Reach workspaces and build within the application | Manage collaborators, change roles, or delete the application |
| Workspace | Admin | Full control over the workspace, the settings, and the collaborators | Nothing further |
| Workspace | User | Preview the workspace | Edit code, run the agent, or contribute to the workspace |
Manage collaborators
You add collaborators from the Collaborators tab, where each role is described as you choose it.
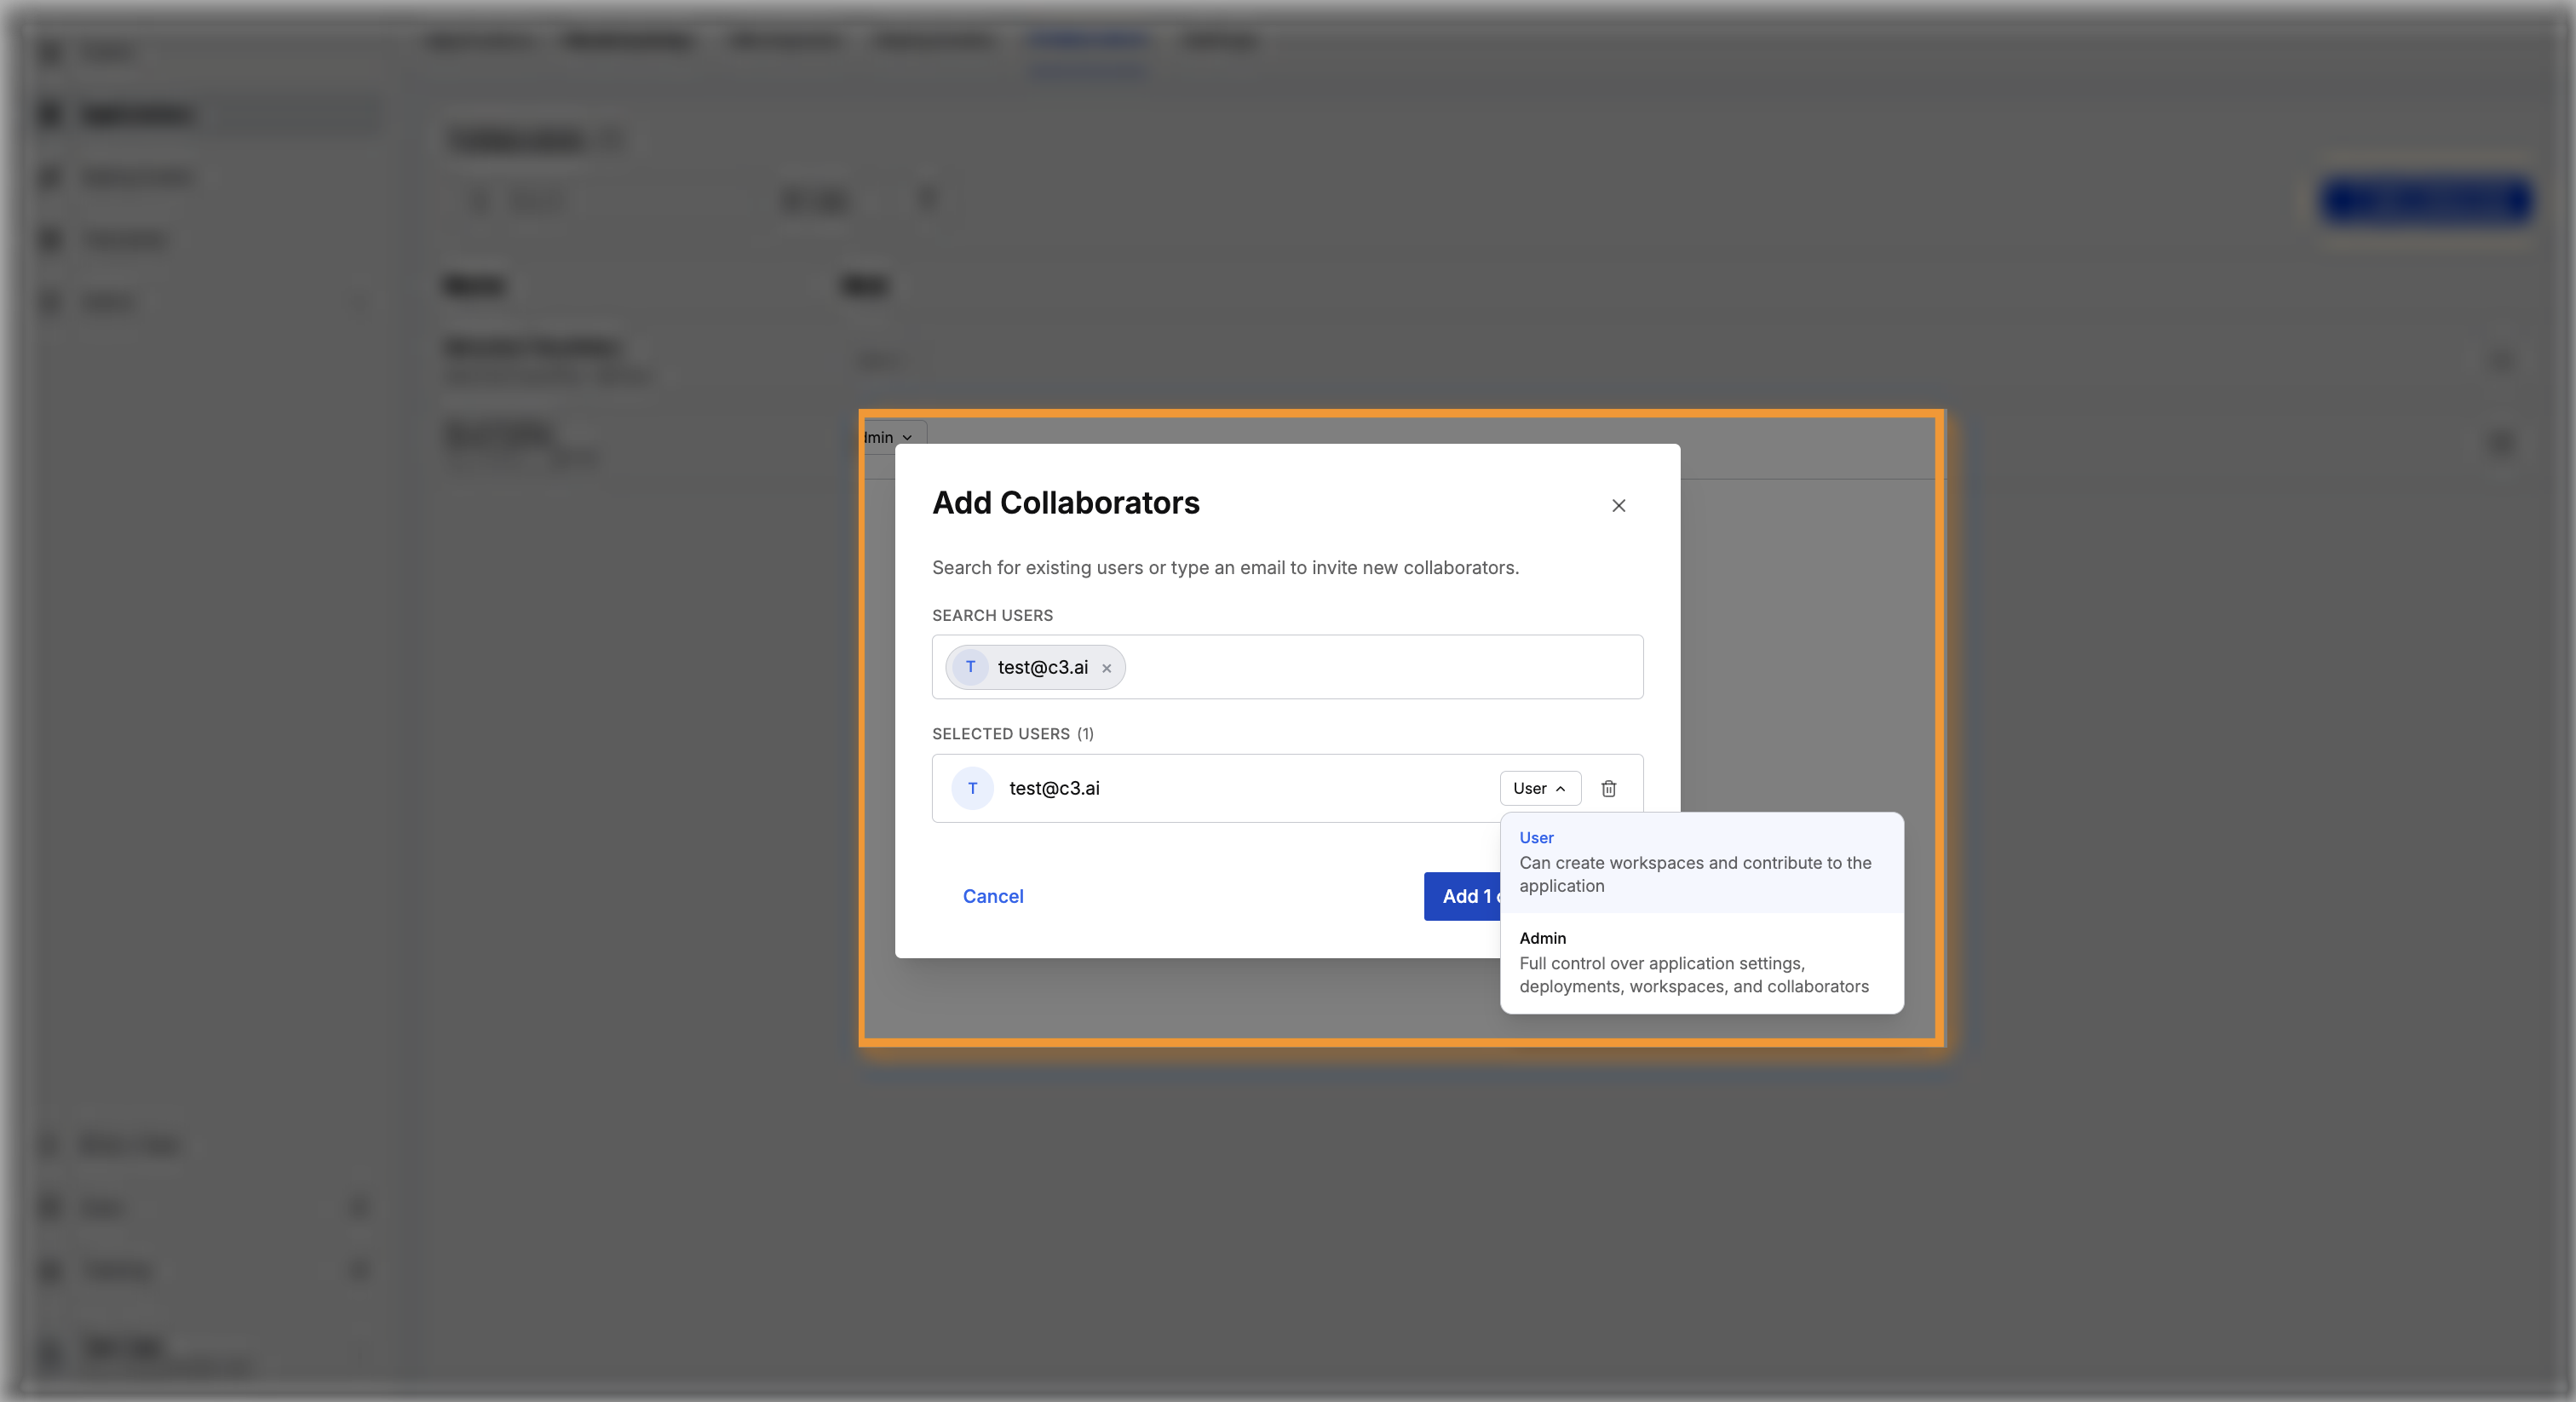
- Application collaborators: add a collaborator, change a role, or remove a collaborator from the Collaborators tab on the application detail page. Adding a collaborator grants the
C3.Code.Userplatform role needed to create and use workspaces, and C3 Code sends an email. Removing a collaborator revokes application and workspace access, and does not remove the platform role automatically. - Workspace collaborators: add a collaborator from Workspace settings > Collaborators, or from the Share Preview modal, and remove a collaborator from either place. The Share Preview modal adds people as workspace Users by default. To give a collaborator edit access, add that person at the application level instead.
Share a live preview
The Share Preview modal holds the preview address and the list of people who can reach the preview.
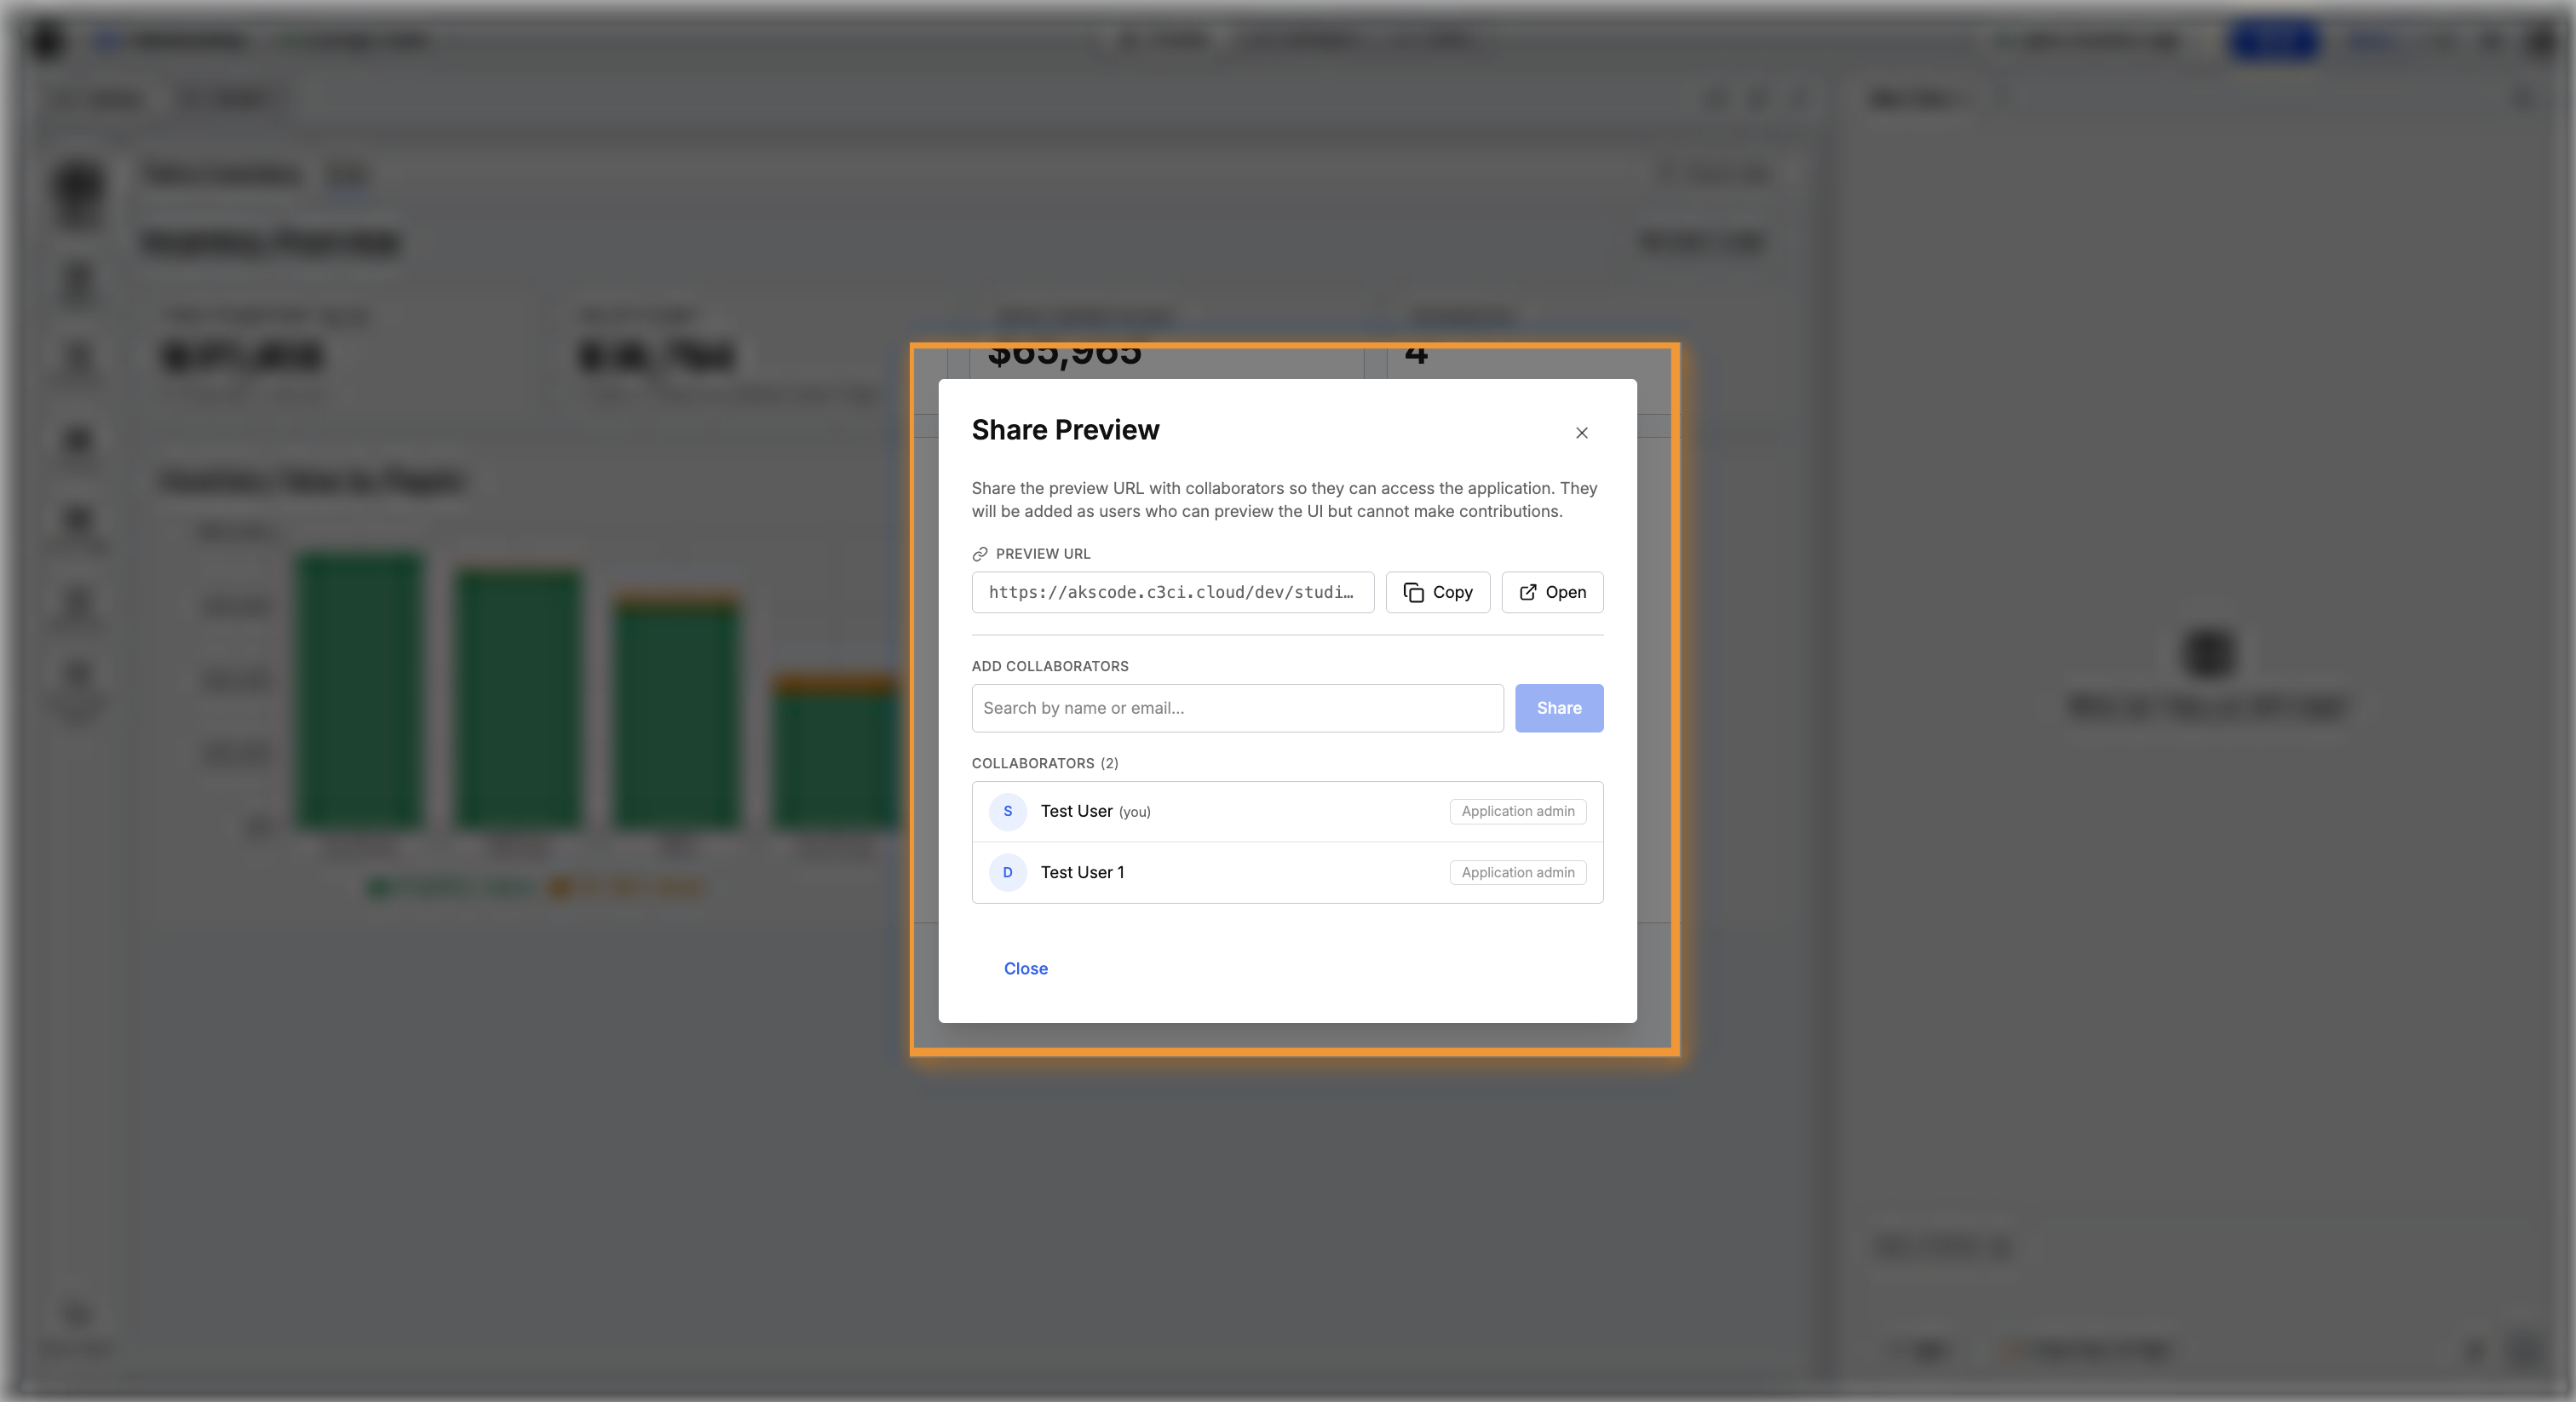
- Preview links: from the workspace header, select Share to open the Share Preview modal, then copy or open the workspace Preview URL. Recipients see the live application in a full-screen view, and are added as workspace Users who can preview but not contribute. The link always reflects the current running state of the workspace, requires access to your C3 AI environment, and is not public.
For adding people and sharing a preview link, see Share with Collaborators.
Access and workspace quotas
A quota caps how much each person can create:
- Workspace quotas: each user with the
C3.Code.Userrole has a workspace quota that caps how many workspaces that user can create across all applications. A user who reaches the quota deletes a workspace, or asks an administrator to raise the limit.
My Usage and Cost covers seeing what you have used against each quota, and Request Access and Resources covers requesting more quota from an administrator.
My Usage and Cost
As you build, your work adds to your token and compute cost, and a quota caps how much you can create. The My Usage and Cost page brings both together: your month-to-date cost and your remaining quota, with a breakdown of where the cost comes from. Open it from your profile menu.
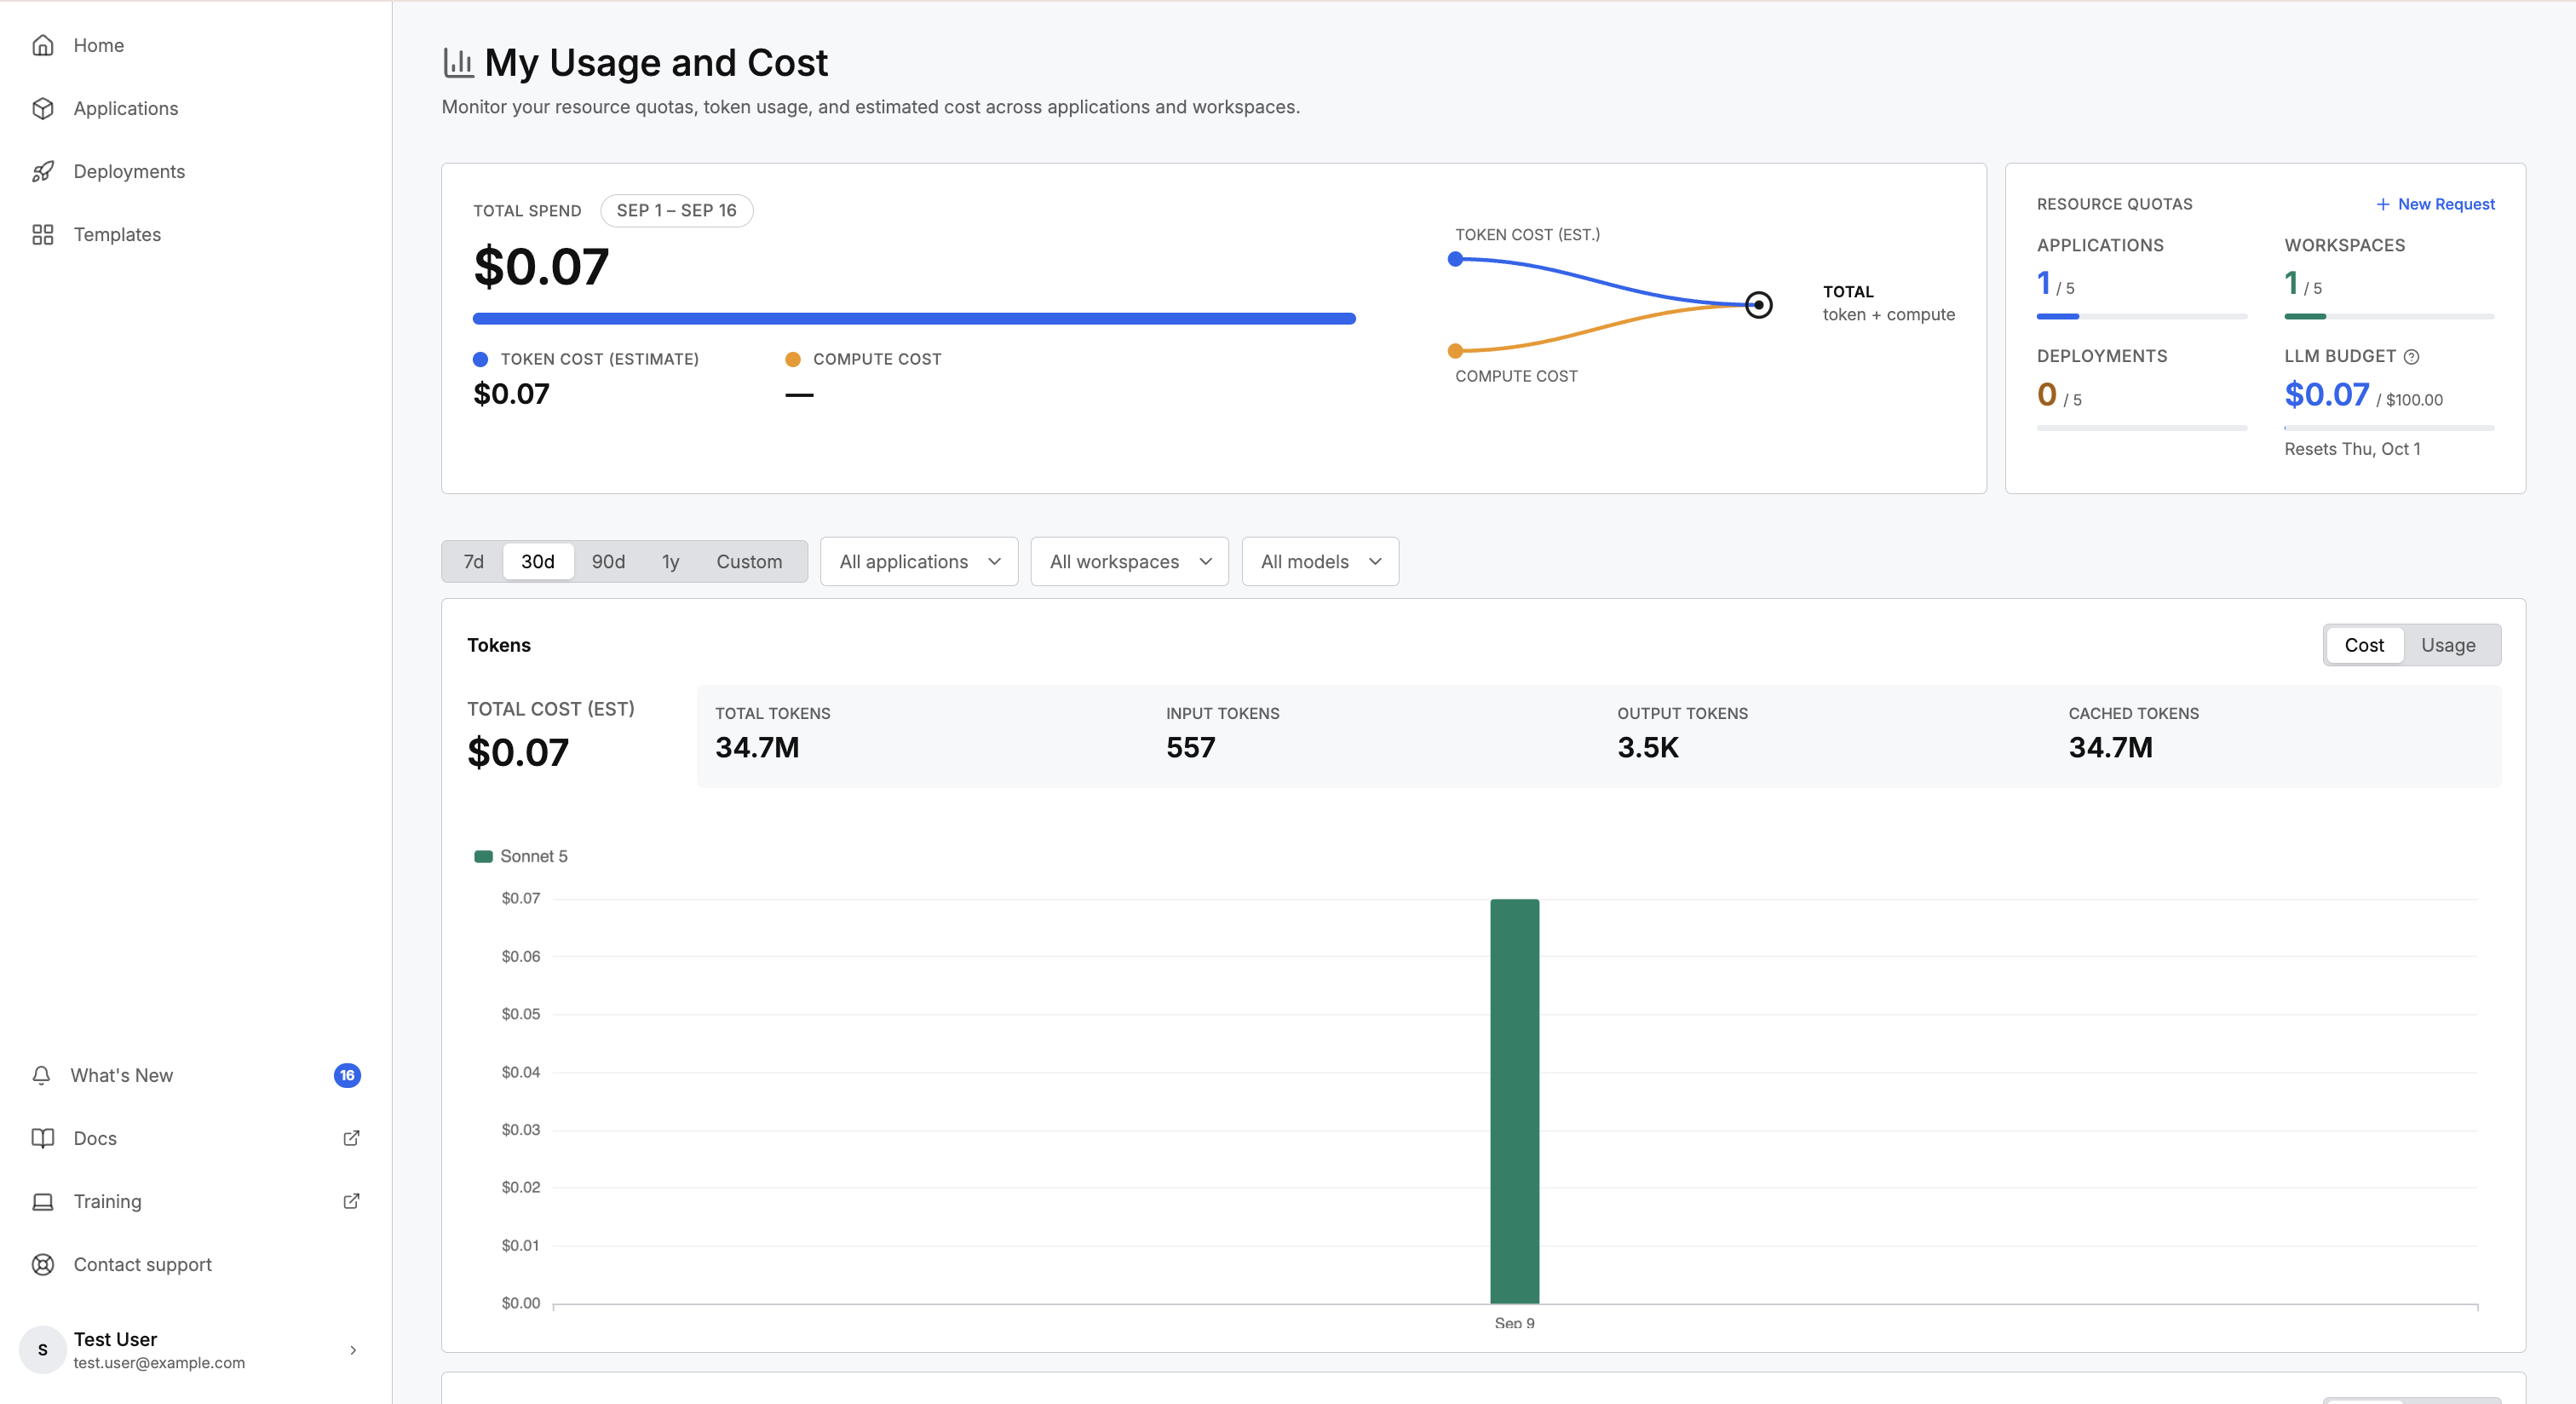
Key capabilities:
- See your total spend: one total combines token cost and compute cost for the current month, so you know what your work costs before you reach a limit.
- Track four quotas: read your usage against your applications, workspaces, deployments, and a monthly LLM budget, and see the date the budget resets.
- Break down the cost: filter by time range, application, workspace, and model to see token cost and usage, compute runtime and cost, and a per-workspace total.
- Request more when you reach a limit: select New Request, choose the resource, and write a justification. An administrator reviews the request, and the My Requests page tracks it until a decision arrives.
For what each number means and how to submit a request, see My Usage and Cost.
Contact support
When you need help while building or running an application, Contact support reaches the C3 Code team from inside the product. Open it from the navigation on any page, or from the Settings menu on a workspace or deployment. Then write a subject and a message, attach any files that help, and send.
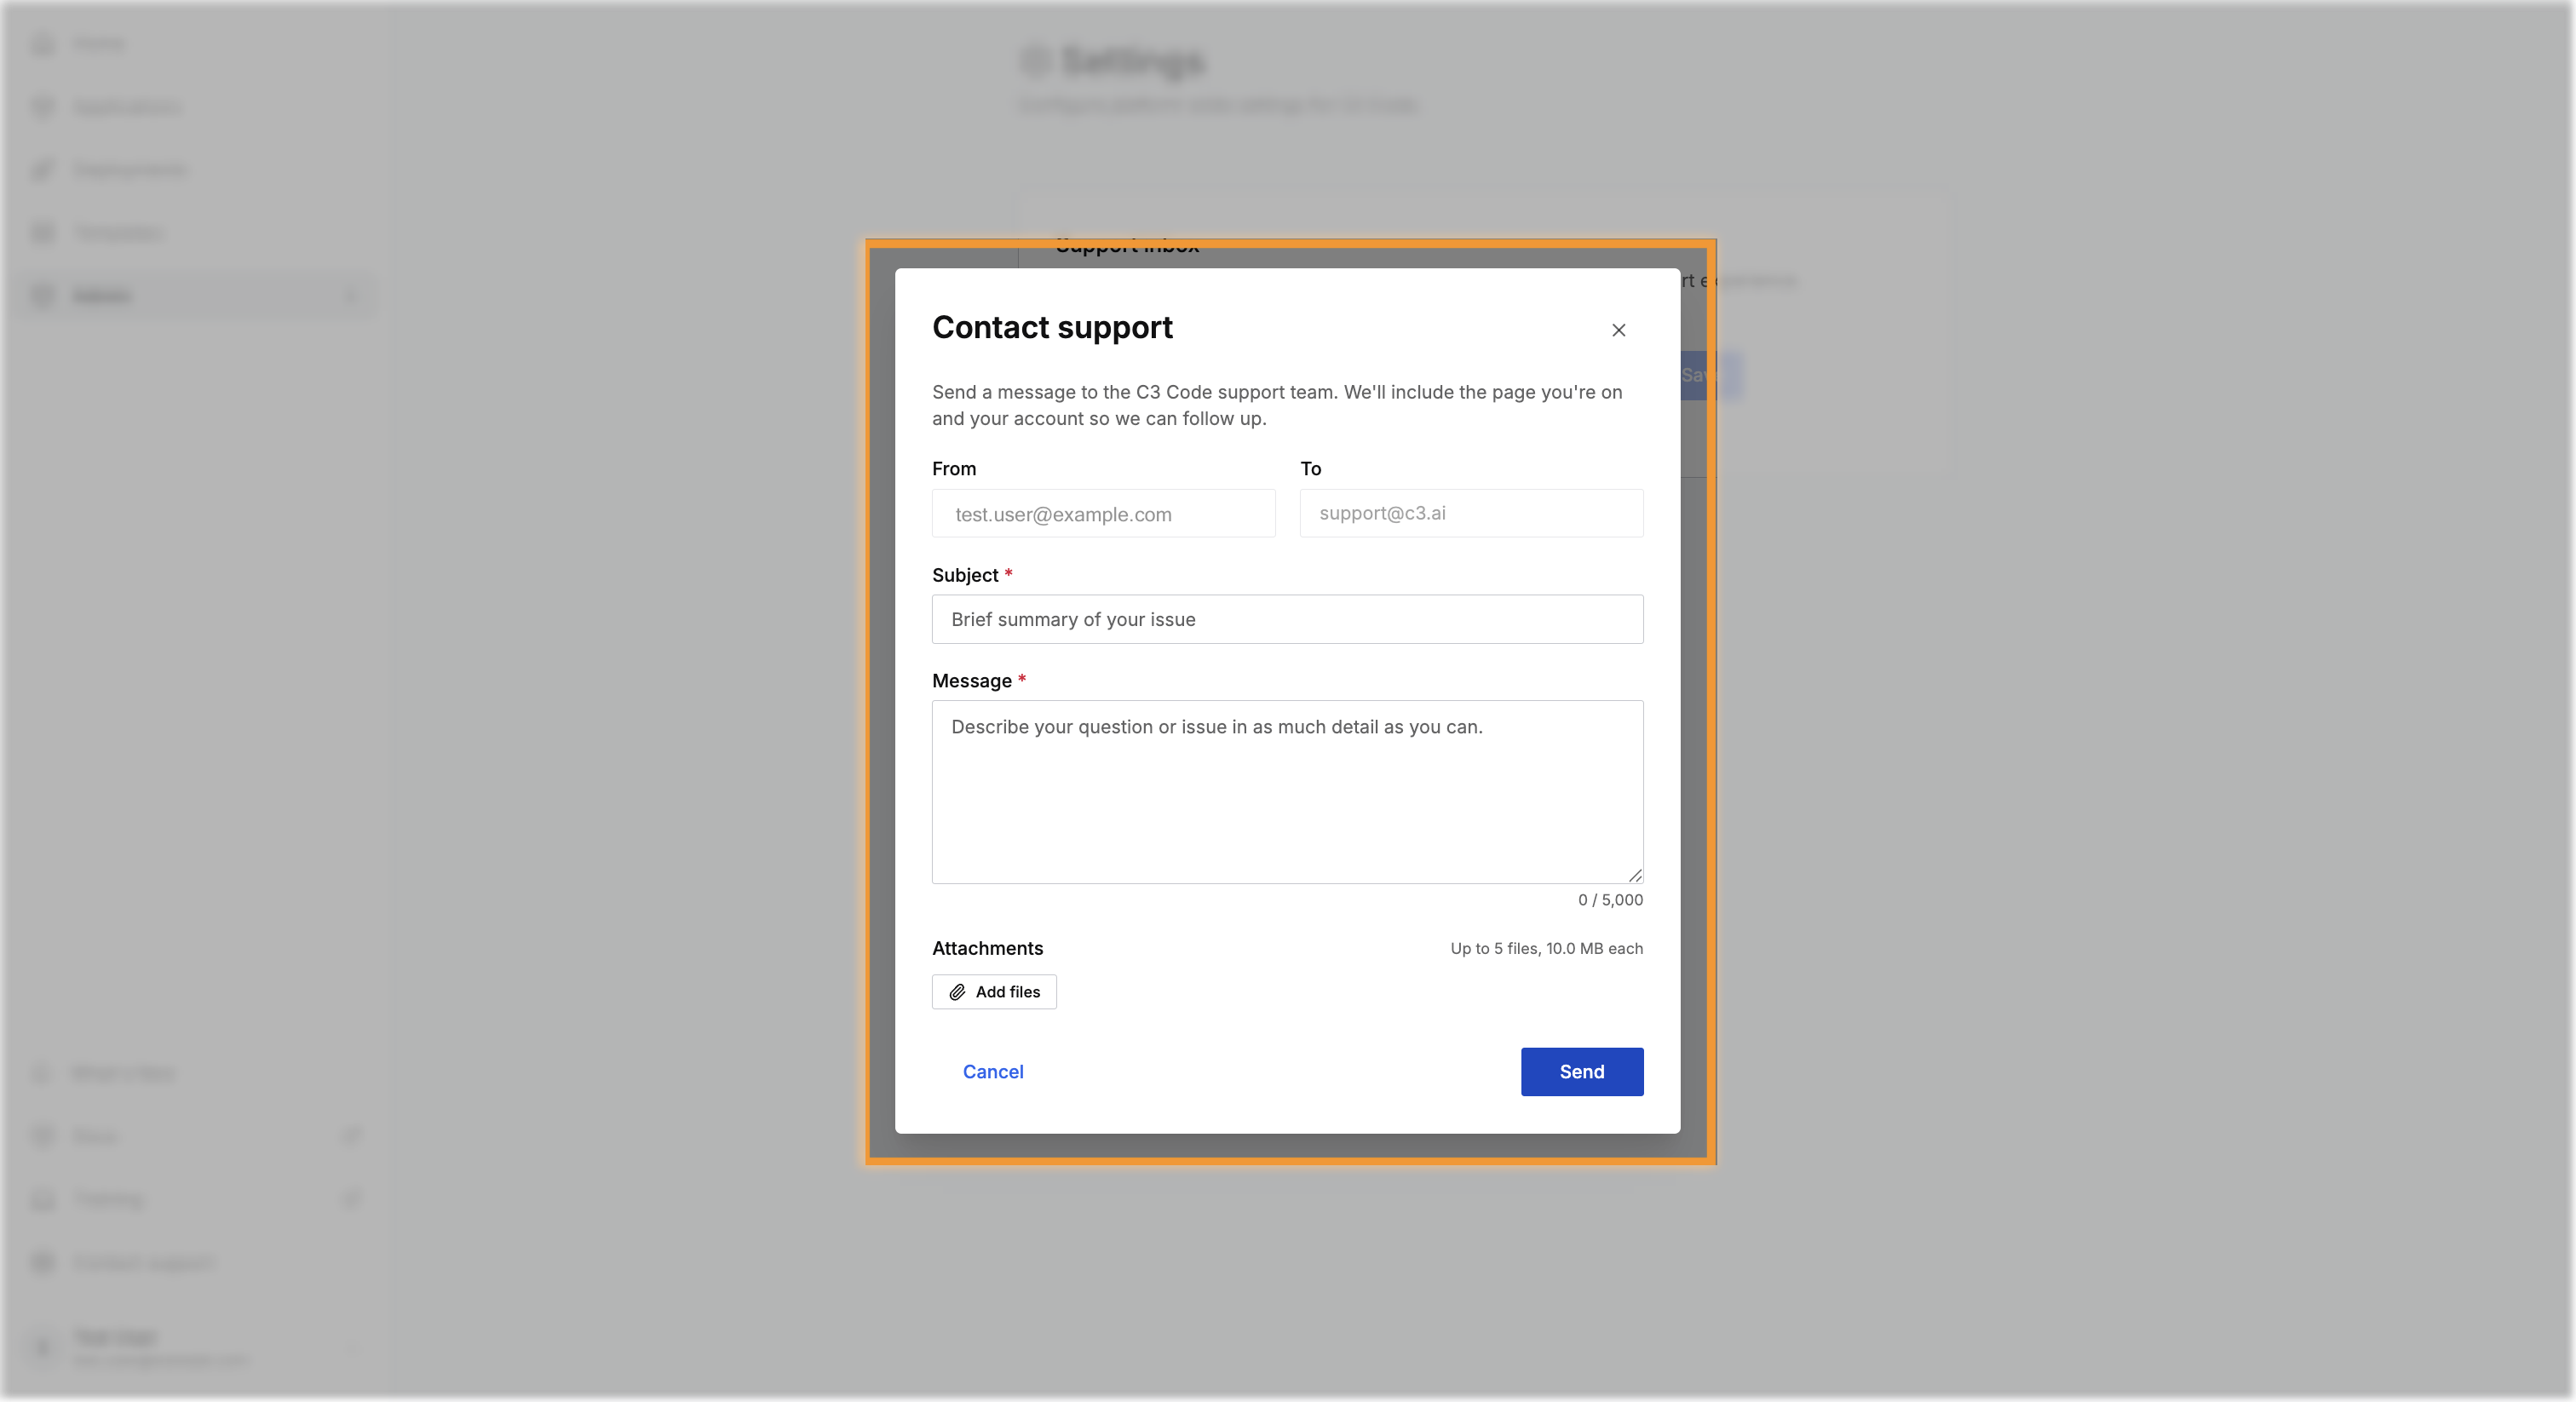
Key capabilities:
- Reach support in context: C3 Code attaches the page you are on and your account details, so the support team can follow up without asking for them.
- Send a full request: enter a subject and a message up to 5,000 characters, and attach up to five files. C3 Code fills in and locks the From and To addresses, so every request reaches the configured support inbox.
- Track the reply by email: after you send, C3 AI Support replies by email with a support ticket number and a link to the conversation.
For sending a support request and what happens after, see Contact Support.
Administration and analytics
Administrators see how C3 Code is used across your organization, and manage the limits that govern individual usage. From one administration area, you read token usage and cost, decide the resource requests users file, keep new applications starting quickly, set where support messages go, and read an analytics suite covering adoption, conversation quality, and user activity.
The Admin navigation group links the five administration areas.
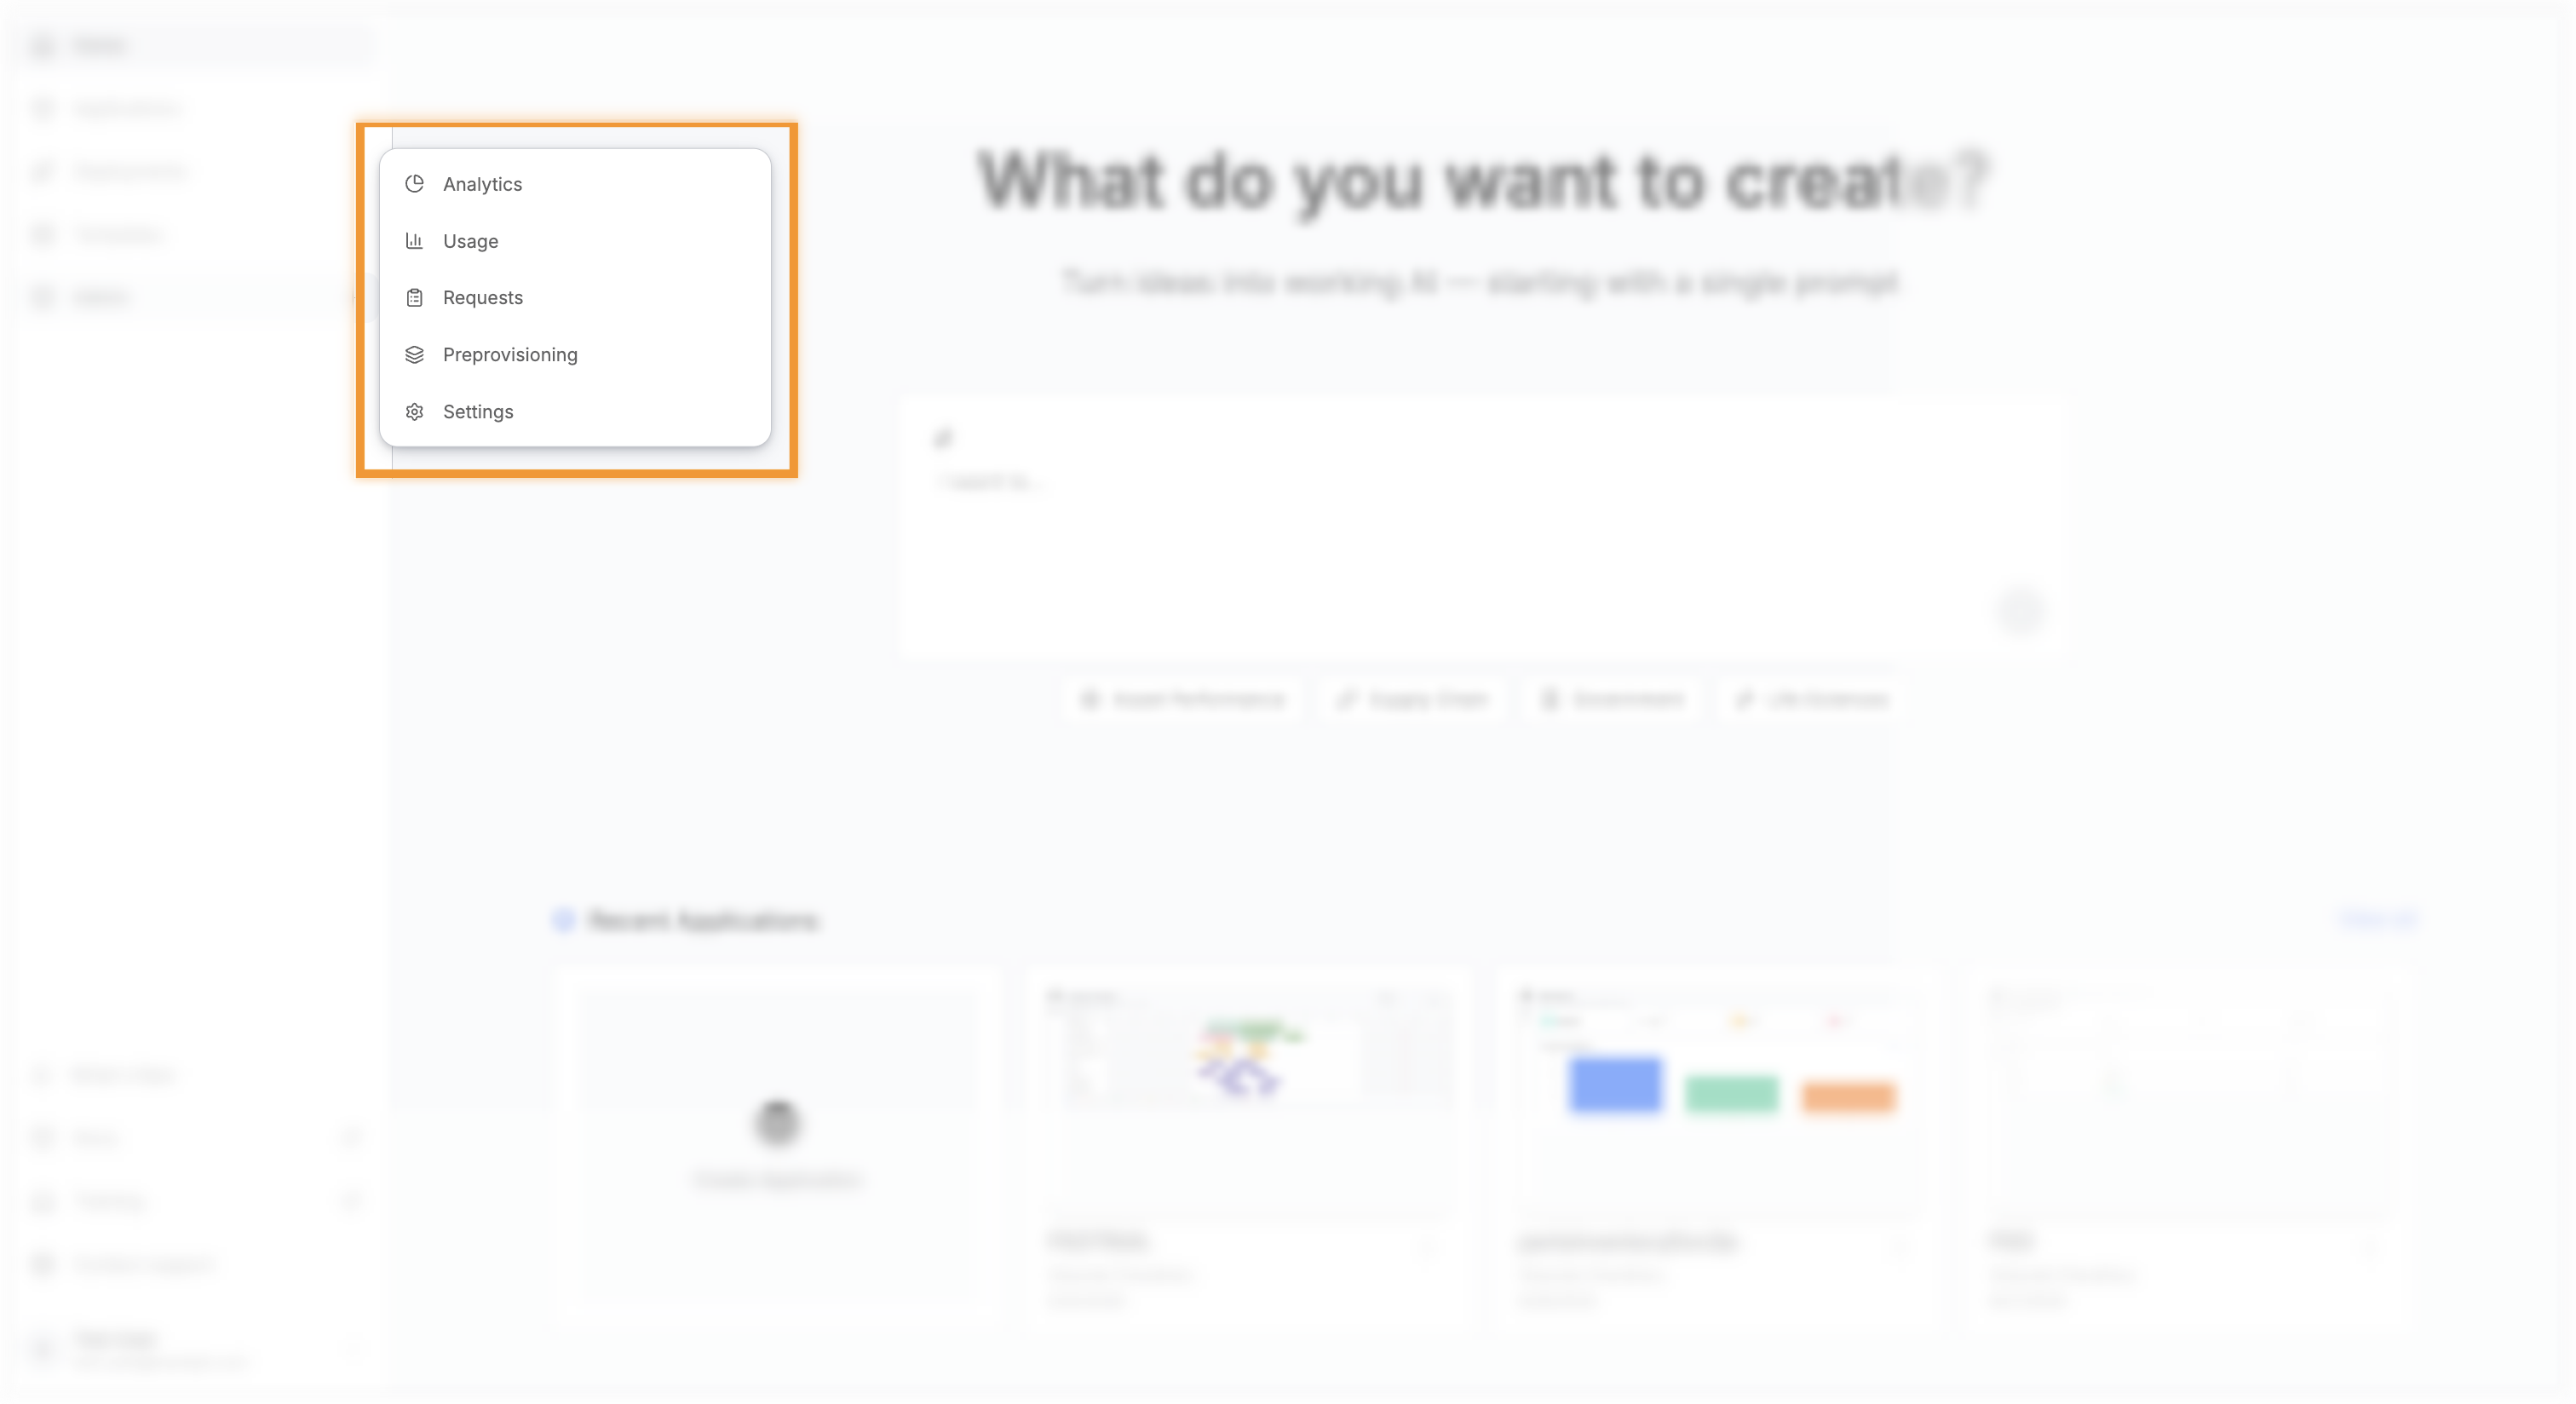
Key capabilities:
- Administration access: the Admin navigation group links the Analytics, Usage, Requests, Preprovisioning, and Settings pages, and any one of four administrator roles opens the area.
- Usage and cost: read token usage across every user, application, and workspace with an estimated cost, and filter by user, application, workspace, and model to see where usage concentrates.
- Resource requests: review the quota requests users submit and approve or reject each one, with an approved amount that adds to the user's existing quota.
- Preprovisioning pools: keep applications and workspaces built ahead of demand so a new one is handed over in seconds, and size each pool to how often people claim from it.
- Support inbox: set the address that receives the messages users send from Contact support.
- Product analytics: track adoption and engagement through headline metrics, active-user trends, feature adoption, an onboarding funnel, errors and friction, performance, template effectiveness, and tool usage.
- Conversation analytics: review conversation volume and outcomes, sentiment, agent performance, a per-conversation drill-down with failure modes and evidence, and session complexity, supported by a sentiment evaluation pipeline.
- User activities: move from a per-user activity list into one user, and then into that user's activity within one application.
- Quotas and usage tracking: default quotas cap applications, workspaces, deployments, and a monthly token allowance that counts the text going to the agent and the text coming back. Users track their own consumption and request higher limits from My Usage and Cost, and administrators act on those requests.
See Administer C3 Code, Manage User Roles and Quotas, Review Usage and Cost, Preprovisioning Pools, Set the Support Inbox, Product Analytics, and Conversation Analytics.